biodex ATOMLAB 100 Operation manual

ATOMLAB 100
DOSE CALIBRATOR
OPERATION AND SERVICE MANUAL
VERSION 2.1
086-250
086-258
FN: 08-008 1/08
BIODEX
Biodex Medical Systems, Inc.
20 Ra say Road, Shirley, New York, 11967-4704, Tel: 800-224-6339 (Int’l 631-924-9000), Fax: 631-924-9241, E ail: [email protected] , www.biodex.co

This manual covers installation and operation of the following products:
#086-250 Atomlab 100 ose Calibrator (115V)
#086-258 Atomlab 100 ose Calibrator (250V)
Prior to making activity measurements after a preset Dial Value has been
changed on ANY isotope selection key, all Atomlab model Dose Calibrators must
be power cycled; i.e., the Dose Calibrator power switch must be turned OFF and
then back ON. Failure to power cycle after changing any preset key may cause a
measurement ERROR on any or all isotope keys.
ATOMLAB 100 DOSE CALIBRATOR

Atomlab Dose Calibrator
Warranty
1. Instrumentation
A. This equipment and its accessories are warranted by BIO EX ME ICAL SYSTEMS,
INC., against defects in materials and workmanship for a period of two years from the date of
shipment from BIO EX ME ICAL SYSTEMS, INC. uring the warranty period, BIO EX
ME ICAL SYSTEMS, INC. will in its sole discretion, repair, recalibrate or replace the equip-
ment found to have such defect, at no charge to the customer.
EXCEPT AS STATE ABOVE, THERE ARE NO WARRANTIES, EXPRESSE OR IMPLIE ,
INCLU ING WITHOUT LIMITATION WARRANTIES OR MERCHANTABILITY OR FITNESS
FOR USE. BIO EX OES NOT ASSUME LIABILITY FOR INCI ENTAL, CONSEQUENTIAL
OR IN IRECT AMAGES INCLU ING LOSS OF USE, SALES, PROFITS OR BUSINESS
INTERRUPTION.
B. This warranty does not apply if the product, as determined by BIO EX ME ICAL
SYSTEMS, INC., is defective due to abuse, misuse, modification or service performed by
other than a BIO EX ME ICAL SYSTEMS, INC. authorized repair and calibration facility.
Misuse and abuse include, but are not limited to, subjecting limits and allowing the
equipment to become contaminated by radioactive materials.
C. In order to obtain warranty repair service, the equipment must be returned freight pre-
paid to one of our facilities. The Return Authorization number (R.A. #) should be included,
along with a statement of the problem. Equipment will be returned transportation prepaid.
2. Calibration
A. Instruments are warranted to be within their specified accuracy at the time of shipment.
If a question arises and BIO EX ME ICAL SYSTEMS, INC. determines that the initial cali-
bration is in error, the instrument will be recalibrated at no charge.
B. Mechanical products are warranted to meet written specifications and tolerances at the
time of shipment.
C. The return policy is as stated in paragraph 1.C.
3. Warranty is non transferable.
4. Non-Warranty Service
A. Repairs and/or replacements not covered by this warranty may be performed by
BIO EX ME ICAL SYSTEMS, INC. at a factory authorized service location. Estimates of
repair charges may be requested, however, a charge for estimate preparation may apply if
the repair is later not authorized by the customer.
B. The cost of transportation into and out of the service location will be the responsibility of
of the customer.
BIODEX
Biodex Medical Systems, Inc.
20 Ra say Road, Shirley, New York, 11967-4704, Tel: 800-224-6339 (Int’l 631-924-9000), Fax: 631-924-9241, E ail: [email protected] , www.biodex.co

Service Procedure
If you think you have a service problem, take the following action.
1. Check to see that the problem occurs more than once.
2. Check the instruction manual and operations procedure.
3. Check the instruction manual Trouble-shooting Guide.
If you still think you have a service problem, call BIO EX ME ICAL SYSTEMS, INC.,
Service epartment at (800) 224-6339.
eep yourself and the phone next to the equipment.
1. Service will ask you for a brief description of the problem. We will ask specific questions
about the malfunction that occurred. This diagnostic process may take a few minutes,
so call us when you have time to spare.
2. After taking the information, we will advise on the action we will take.
3. Sometimes service personnel must consult with engineering and it may take time to get
back to you. Be sure to let the service representative know your schedule so that we
can call at a convenient time.
4. The return call may be from a person other than whom you first reported the problem to.
5. After analyzing the problem, we will decide if the unit must be returned to us for repair,
or replacement parts will be sent.
6. If unit must be returned, it will be given a return authorization (R.A. #) number by us.
Pack the system in the carton that it was originally shipped in, or pack it safely and
securely to avoid shipping damage. It is the customer's responsibility for any damage
that occurs during shipping.
7. Non-warranty/non-service contract charges for repair are as follows:
a. Materials
+
b. Time
Service Currently $125.00 per Hour
+
c. Shipping Charges
BIODEX
Biodex Medical Systems, Inc.
20 Ra say Road, Shirley, New York, 11967-4704, Tel: 800-224-6339 (Int’l 631-924-9000), Fax: 631-924-9241, E ail: [email protected] , www.biodex.co

ATOMLAB Dose Calibrator Operation Manual Packing Slip
PAC ING SLIP
The Atomlab 100 ose Calibrator (#086-250 or #086-258
with RS-232 port) and its respective components comes
carefully packed in two cartons inside a large, single ship-
ping box. The cartons, each marked with an appropriate
serial number, are labeled:
• ISPLAY UNIT
• ETECTOR UNIT
Prior to removing any of the cartons from the shipping
box, visually inspect the box and the inside packing for dam-
age. If any damage is noted, do not unpack the contents.
Notify the carrier immediately so that a claim can be made if
necessary, and contact your Biodex Medical Systems Sales
Representative. If there is no visible damage, remove the
cartons and place them on a table or to the side. We suggest
removing the DISPLAY UNIT carton first.
Before deciding on a location to set up your Atomlab
for operation, be sure to read Chapter Two on installation.
This chapter notes operating and environmental require-
ments, and offers several tips on choosing a location for
your dose calibrator.
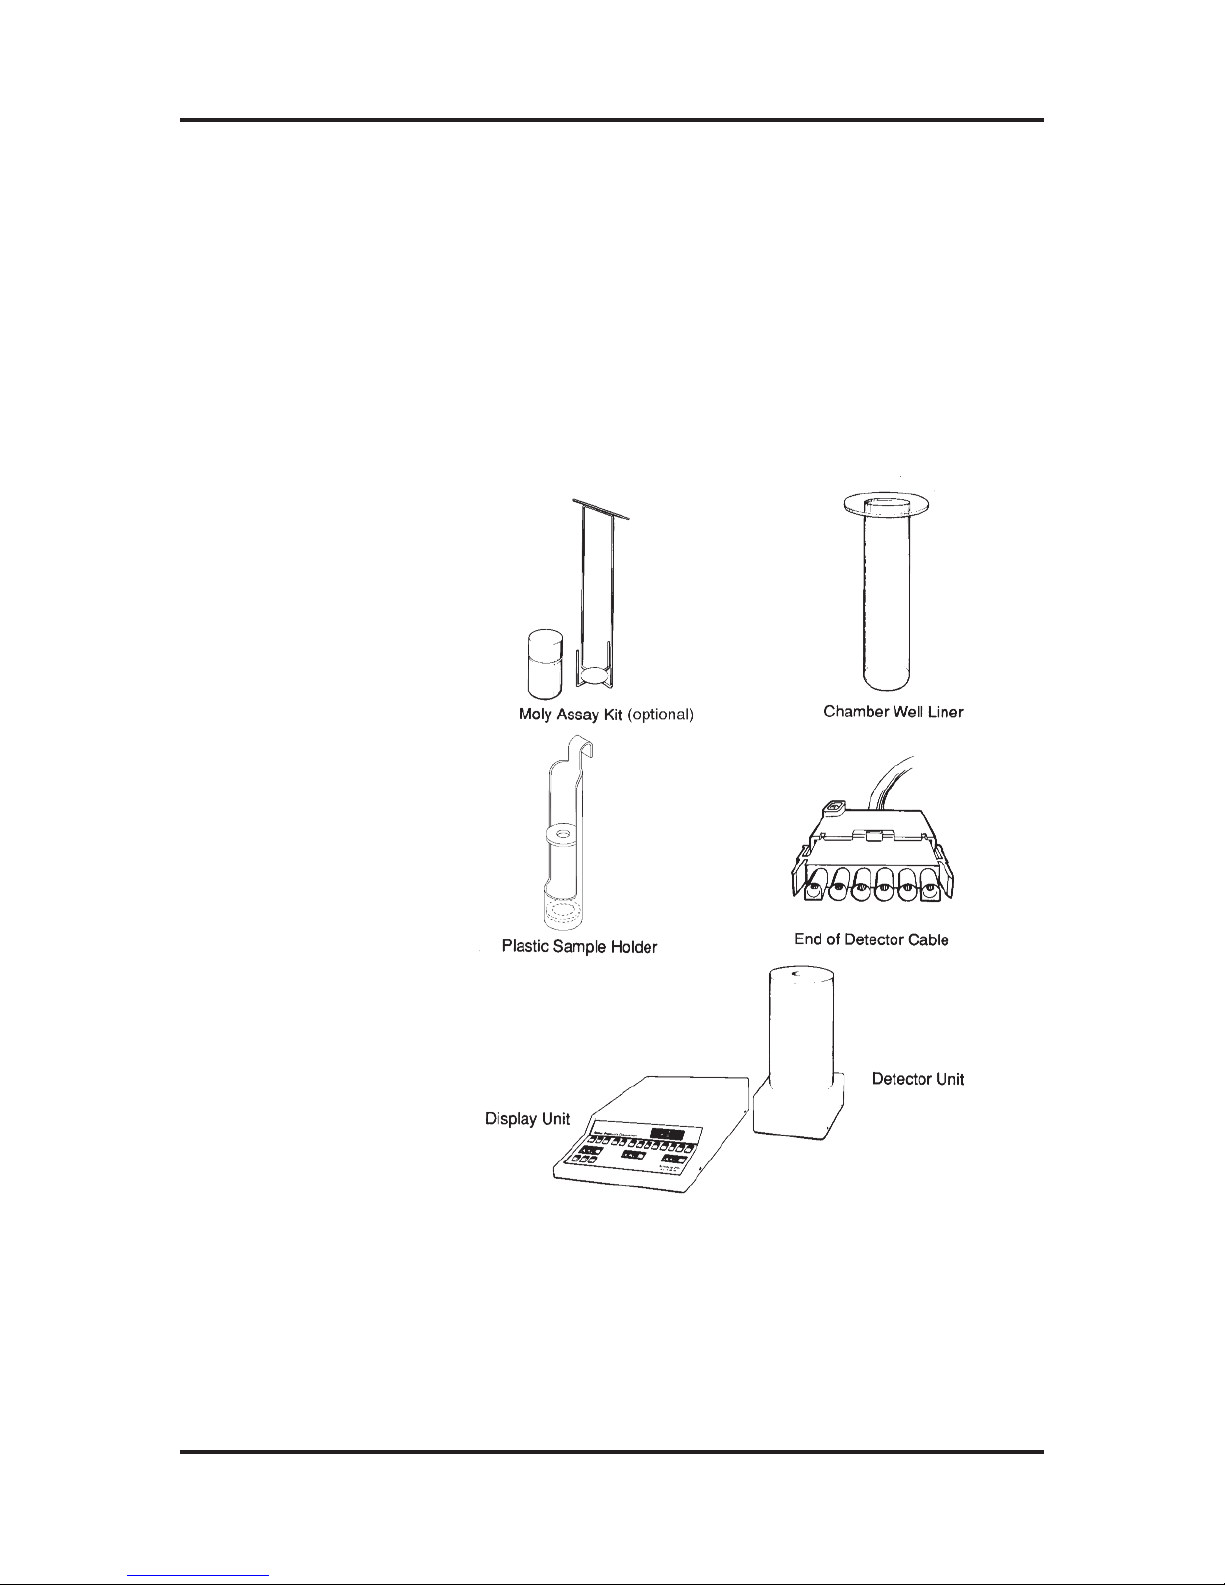
In addition to the isplay Unit itself, this carton contains the
Atomlab's Operation Manual, all the necessary connection
and power wires needed to run the system, and a Moly
Assay Kit. A Report of Calibration can be found in the
Instruction Manual's front, inside pocket.
The carton labeled DETECTOR UNIT is very
heavy, ~32 pounds. Severe damage to the unit may result if
this carton is dropped. Remove the detector from the carton
and carefully place it on the table or other counter where you
will set up and use your Atomlab unit. Make certain the table
top will support a minimum of 300 pounds. We suggest that
you place the carton on its side so that you can slide the
Detector Unit out of the carton onto its base. Inserted into the
Chamber Well should be a Chamber Well Liner. A Plastic
Sample older is packed with the Display Unit.
Shipping Cartons:
The DISPLAY
UNIT Carton:
The DETECTOR
UNIT Carton:
Biodex Medical Systems I Release 2.0

Le carton étiqueté UNITÉ DE DÉTECTION est très
lourd, ~32 livres. Cet appareil peut subir de sérieux dommages s’ii
est échappé. Retirez le détecteur de son carton et utiliserez le
avec prudence sur la table ou le computoir où vous installerez et
utiliserez l’unité Atomlab. Assurezvous que la table supportera un
minimum de 300 livres. Nous suggérons que vous placiez le car-
ton sur son côté afin que vous puissiez faire glisser L’UNITÉ DE
DÉTECTION du carton à sa base. Dans la chambre du calibra-
teur vous devriez trouver un manchon protecteur. Un échantillon
en plastique est emballé avec l’unité de présentation.
Do not discard the packing materials, cartons or
shipping boxes. You will need them should it become neces-
sary to return any of the Atomlab components in the future.
Biodex Medical Systems II Release 2.0
ATOMLAB Dose Calibrator Operation Manual Packing Slip
ATOMLAB Dose Calibrator Operation Manual Packing Slip
Figure P-1: The Atomlab ose Calibrator Major Components.
Biodex Medical Systems III Release 2.0

TABLE OF CONTENTS
Page
Chapter One: Introduction to the Atomlab Dose Calibrator.........................1-1
Introduction to the Atomlab ose Calibrators and this manual.
Chapter Two: Installing Your Dose Calibrator ...............................................2-1
escribes what you need to properly use your Atomlab ose Calibrator,
powering up, installation, and cleaning instructions.
Chapter Three: Getting Started .......................................................................3-1
This chapter allows you to gain a quick familiarization of the operation of
your ose Calibrator.
Chapter Four: Description ...............................................................................4-1
escribes features and functions of your ose Calibrator, including the
etector and isplay units.
Chapter Five: Operation...................................................................................5-1
escribes the full operation of your Atomlab 100 ose Calibrator
Glossary
%%#'
Appendix A
Atomlab ose Calibrator Troubleshooting Procedures ................................A-1
Appendix B
Atomlab 100 ose Calibrator Specifications ................................................B-1
Appendix C
ecay Calculations .......................................................................................C-1
Appendix D
Pre-Set Calibration Values............................................................................D-1
Appendix E
Calibration Values for Version Six Firmware Other Isotope Selections........E-1
(Includes Setting Information for Y-90)
Appendix F
Atomlab ose Calibrator Calibration and Traceability ..................................F-1
Appendix G
Atomlab Computer Interconnection..............................................................G-1
Appendix H
Electromagnetic Compatibility ......................................................................H-1
Appendix I
etermining The Firmware Level of Your ose Calibrator ............................I-1
Appendix J
Quality Assurance Testing of Atomlab ose Calibrators...............................J-1
Schematics
Atomlab Dose Calibrator Quick Reference Chart
Atomlab Dose Calibrator Trouble-Shooting Chart
ATOMLAB Dose Calibrator Operation Manual Table of Contents
Biodex Medical Systems V Release 2.0

CHAPTER ONE:
INTRODUCTION TO THE
ATOMLAB 100 DOSE CALIBRATOR
The Atomlab Dose Calibrator you have purchased is a high-
quality, dependable and reliable instrument. Before using it,
please review the following points.
Before using this device, be certain to read the entire opera-
tion manual. Failure to read the manual may result in user
error or inaccurate data.
The Atomlab Dose Calibrator should be used only as speci-
fied in the operation manual.
The Atomlab Dose Calibrator is designed for use in a patient
environment.
Quality Assurance Testing of Atomlab Dose Calibrators is
provided in Appendix J.
OVERVIEW
Biodex Medical Systems’ Atomlab 100 ose Calibrators are
designed to perform accurate radioisotope measurements
simply and quickly. ue to our unique electronics and soft-
ware, the performance you obtain when using these units
will surpass the latest stringent regulatory performance
standards.
By familiarizing yourself with the procedures presented in
this manual, you will be able to carry out dose measure-
ments while keeping your Atomlab 100 functioning optimally
and reliably for years to come.
ATOMLAB Dose Calibrator Operation Manual Chapter 1
Biodex Medical Systems 1-1 Release 2.0

CONVENTIONS OF THIS MANUAL
The following conventions are used to provide graphic and
other aids to facilitate following instructions given in this
manual.
The Increment/ ecrement keys are represented by ⇑and ⇓.
Keys in Boldface Type (i.e., PRINT) must be pressed for a
response.
When there is an option in a step, it will be represented by
upper case brackets { }.
ATOMLAB Dose Calibrator Operation Manual Chapter 1
Biodex Medical Systems 1-2 Release 2.0
ey Labels

CHAPTER TWO:
INSTALLING YOUR ATOMLAB 100 DOSE CALIBRATOR
OVERVIEW
We strongly suggest that you read this chapter before mov-
ing on to the operation chapter. This will help ensure that
your Atomlab ose Calibrator is up and running properly,
and that you have adequate access to the unit to perform all
the functions that will be discussed. It will also help you
become familiar with the various components of your dose
calibrator.
OPERATING REQUIREMENTS
Prior to installing your equipment, plan a layout for your
Atomlab unit that will ensure it is convenient for measuring
radionuclides and will not cause undue radiation exposure
because of extra handling of high activity sources. There
should be ample room to place a vial shield on the work
surface (preferably behind an L-Block shield), open the
shield and remove the vial using tongs, quickly place the
vial into the Sample Holder and then place both into the
Chamber Well.
Remember that to make radioisotope measurements you
will have to place the clear plastic Chamber Well Liner into
the Chamber Well and lower the plastic Sample Holder into
the liner. Make sure there will be no obstructions, such as
wall cabinets, above the etector Unit. Such obstacles may
make it difficult to insert and remove the Sample Holder.
Choose a table or other counter which is free of vibration,
does not wobble, and will easily support 300 pounds.
The surface area of the table top should provide ample area
to accommodate the etector Unit, isplay Unit, the Printer,
the L-Block Shield, the shielded radionuclide preparation
area, and room for writing. See Figure 2-1 for a typical dose
preparation layout.
ATOMLAB Dose Calibrator Operation Manual Chapter 2
Biodex Medical Systems 2-1 Release 2.0
Work Surface

Suggested dimensions of the table top are:
• 30 in. deep
• 48 in. wide
• 36 in. high
Figure 2-1: A typical dose preparation layout.
Frequently, dose calibrators are located in areas called hot
labs in which there is a wet sink with plumbing. o not
locate your dose calibrator on a table or other counter
which can become wet or is subject to splashing or spray-
ing.
Avoid areas which have drafts caused by heating or air con-
ditioners, or are in direct sunlight. Electronics work best
when constant temperature is maintained.
The temperature range is from 0 to 40° C, and the relative
humidity range from 0 to 95%.
Choose a location for your dose calibrator which is not fre-
quently used by other personnel — one where the table on
which it lies will not be bumped.
In general, make sure your work area is clean, dry, and dust
free.
ATOMLAB Dose Calibrator Operation Manual Chapter 2
Biodex Medical Systems 2-2 Release 2.0
Physical Location
and Environment

Avoid locating your dose calibrator near a radioactive mate-
rials storage area. The .25-inch lead shield around the
detector shields it from changes in radiation levels from
diagnostic energy radionuclides (i.e., Tc-99m); however, the
high energy radiation from sources such as Cs-137 and Co-
60 will easily penetrate the shield and change the back-
ground radiation level. The lower the ambient radioactivity,
the less background activity for which the Atomlab ose
Calibrator must compensate, and, the greater the accuracy
and reliability of the readings.
POWER REQUIREMENTS
Choose a line power source with a socket which mates
securely with the power plug provided.
Verify that the power line is properly grounded.
Do not choose an outlet that has a wall switch control.
100 to 120 VAC 1/2 A, or 200 to 240 VAC 1/4 A, selectable
with Fuse Holder (see Appendix A).
50/60 Hz.
POSITIONING
After you have chosen a suitable location for your Atomlab
ose Calibrator and familiarized yourself with its compo-
nents, position the various units. Make sure the etector
and isplay Units have been positioned to where they will
not have to be moved prior to connecting the cables.
CABLE CONNECTIONS
Refer to Figure 2-2 for an illustration of the etector Unit's
cable connector and rear panel. The etector Cable is gray,
ten feet long, and has white identical male connectors on
both ends. The connectors are of a self-locking type.
ATOMLAB Dose Calibrator Operation Manual Chapter 2
Biodex Medical Systems 2-3 Release 2.0
Line Voltage
Line Frequency
Detector Unit
Connection
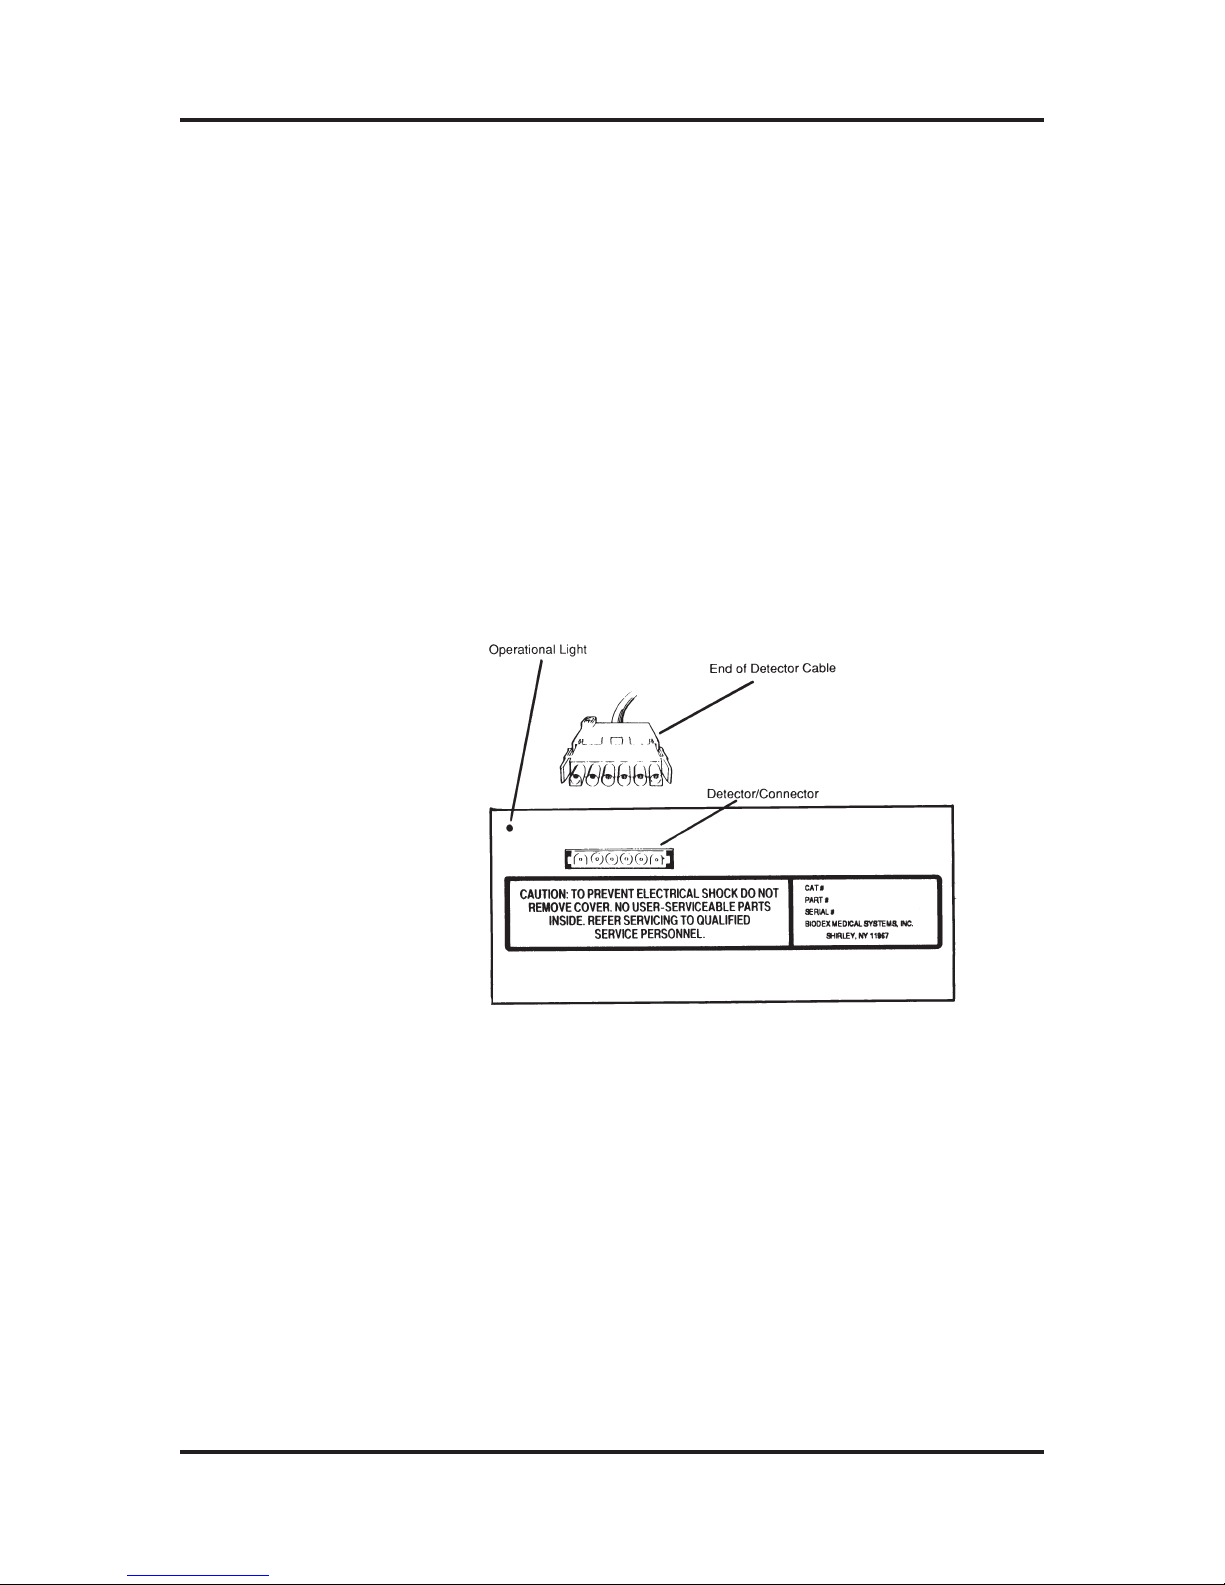
1) Rotate the etector Unit so that you can see the
rectangular opening in one side of the base.
2) Take one end of the etector Cable, orient its connector
so that it matches the openings on the connector of the
etector Unit (refer to Figure 2-2), and then insert the
connector firmly until you feel it click. Do not force the
connector, it is self-locking! Gently pull on the connector
to make sure it is firmly secured.
To remove the connector, squeeze both sides and pull.
3) Rotate the etector Unit to its normal position so that
the connector is facing away from the work area.
Figure 2-2: The Rear Panel of the etector Unit, end of the
etector Cable, and the Operational Light.
For the next procedure ensure your dose calibrator
is turned OFF.
1) Rotate the isplay Unit so that you are looking at the
rear panel. Locate the connector labeled CHAMBER.
ATOMLAB Dose Calibrator Operation Manual Chapter 2
Biodex Medical Systems 2-4 Release 2.0
Display Unit
Connection
2) Take the connector on the free end of the etector Cable,
orient it so that it matches the openings on the connector
of the isplay Unit, and then insert the connector firmly
until you feel it click. Do not force the connector, it is
self-locking! Gently pull on the connector to make sure it
is firmly secured.
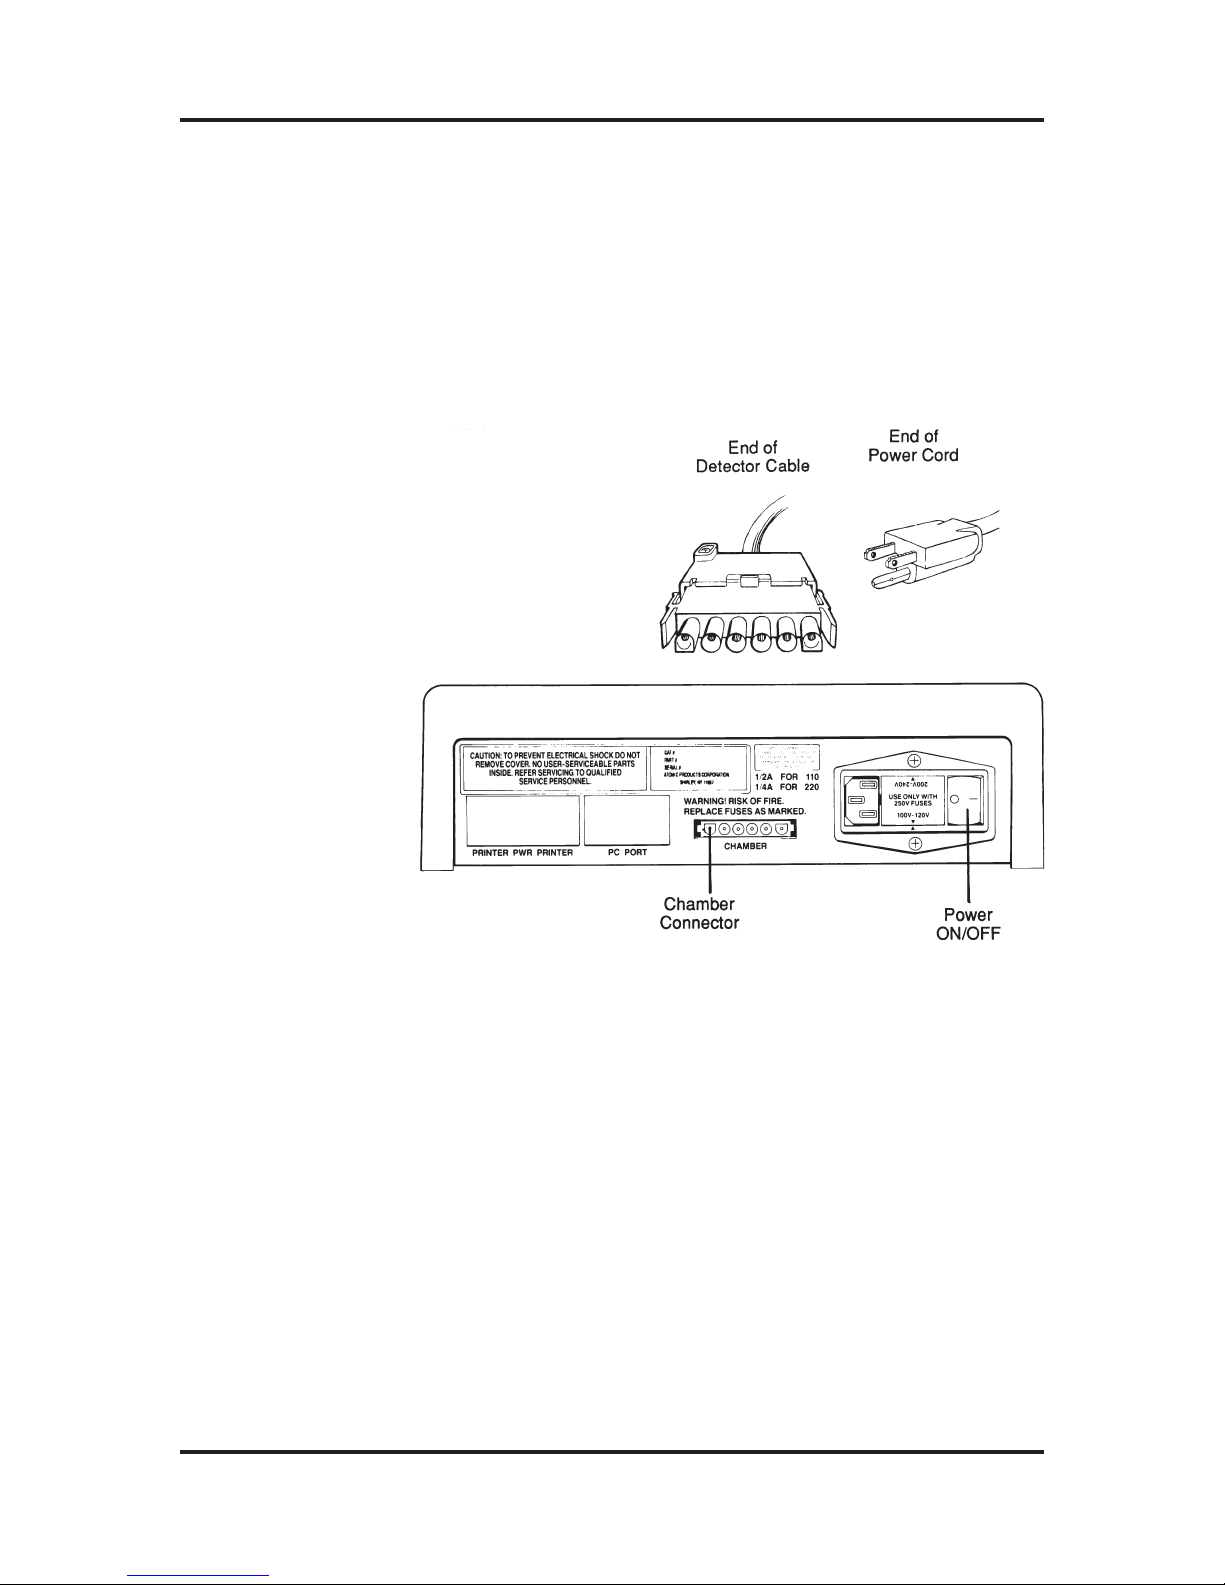
Figure 2-3: The rear panel of the isplay Unit with Chamber
Connector, the end of the etector Cable, and the isplay
end of the Power Cord.
1) Rotate the isplay Unit so that you are looking at the
rear panel. irectly to the right of the connector labeled
CHAMBER, locate the Fuse Holder. This is labeled USE
ONLY WITH 250V FUSES, with 100-120 read upright,
and 200-240 read upside down.
2) The orientation of the Fuse Holder determines the
power your dose calibrator requires. When the label
100-120 and its corresponding arrow points to the arrow
directly below the Fuse Holder, you can plug your unit
into an 100 VAC power source.
ATOMLAB Dose Calibrator Operation Manual Chapter 2
Biodex Medical Systems 2-5 Release 2.0
Power Cord
Connection

If, conversely, the label 200-240 and its corresponding
arrow points to the arrow directly below the Fuse Holder,
you must plug your unit into a 240 VAC power source.
Your Atomlab 100 has already been configured for
your use. If, however, you turn the Fuse older upside
down to change the voltage required, the fuses within the
Fuse older must have the proper rating. See Appendix A
for details.
3) Locate the Power Switch to the right of the Fuse Holder
and the socket for the Power Cable to the left.
4) Ensure the Power Switch is in the OFF position (0).
5) Plug the Power Cord into the socket.
6) Rotate the isplay Unit back to its normal position.
7) Take the remaining end of the Power Cord and plug it
into an outlet which meets the requirements previously
outlined.
POWERING UP
Reach behind the isplay Unit and power up your Atomlab
by flipping the Power Switch from the 0 (OFF) position to the
– (ON) position. The Self-Test will commence automatically.
Because the Atomlab 100 is capable of using multiple
Chamber Units, the Self-Test for this system checks to see if
more than one Chamber is in use. This causes the Self-Test
to pause approximately 20 seconds after power up. To com-
plete the test and place the unit in normal operating mode,
press the ENTER key when it begins to flash.
If an error is detected on either system, it will be noted on
the Electronic Thumbwheel isplay. You can then refer to
Appendix A or the Trouble-shooting Guide supplied with this
manual to resolve the problem.
ATOMLAB Dose Calibrator Operation Manual Chapter 2
Biodex Medical Systems 2-6 Release 2.0

After turning your Atomlab ON and completing the
Self-Test or chamber selections, do not press any keys for at
least an hour. This allows the sensitive electronics to stabilize.
PAC ING MATERIAL
Now that you have set up your Atomlab ose Calibrator, and
everything is intact and functioning properly, take a few
moments to repack the packing material. This material was
esp e cially designed for safe shipment of the Atomlab ose
Cal i brator and should be considered part of the instrument.
Place the shipping material in the appropriate boxes and put
the boxes back into the shipping carton. Label the carton and
store it in a safe, out-of-the-way location. If you ever need to
return your dose calibrator for updates, calibration, or repair,
use the original shipping carton, boxes, and shipping material.
GENERAL CLEANING INSTRUCTIONS
As required, wipe down the exterior of the unit using a soft
rag slightly dampened with alcohol.
ATOMLAB Dose Calibrator Operation Manual Chapter 2
Biodex Medical Systems 2-7 Release 2.0

CHAPTER THREE:
GETTING STARTED WITH YOUR
ATOMLAB 100 DOSE CALIBRATOR
OVERVIEW
This chapter provides a quick introduction to your Atomlab
ose Calibrator. It will familiarize you with the basic opera-
tion of making an Activity Measurement so that the instruc-
tions provided in the rest of the manual will make more
sense. This chapter will be especially valuable to those of
you who are already familiar with dose calibrator operation. A
detailed description of the isplay and etector Units is pro-
vided in Chapter 4, and of operation procedures in Chapter
5. Also consult the Appendices for further information.
METHODOLOGY
An understanding of the following key functions, and a
knowledge of the Atomlab isplay Unit, will facilitate your
use of the Atomlab ose Calibrator.
Whenever you initiate a mode, such as Setup, the Atomlab
ose Calibrator will guide you by causing the LE 's to flash
on the keys you need to press.
When the manual specifies that a LE comes ON, it always
means steadily, even if it was previously flashing. In some
instances, pressing a key will cause a flashing LE to turn
OFF or come ON steadily.
Refer to the Front Panel isplay illustrated in Figure 3-1. On
the Atomlab 100, the unlabeled key to the right of the ⇑⇓ on
the Electronic Thumbwheel is referred to as the ENTER key.
The 4-digit display associated with the Electronic
Thumbwheel is referred to as the Electronic Thumbwheel
isplay. See Chapter 4 for details.
ATOMLAB Dose Calibrator Operation Manual Chapter 3
Biodex Medical Systems 3-1 Release 2.0
LED eys
Front Panel
Display
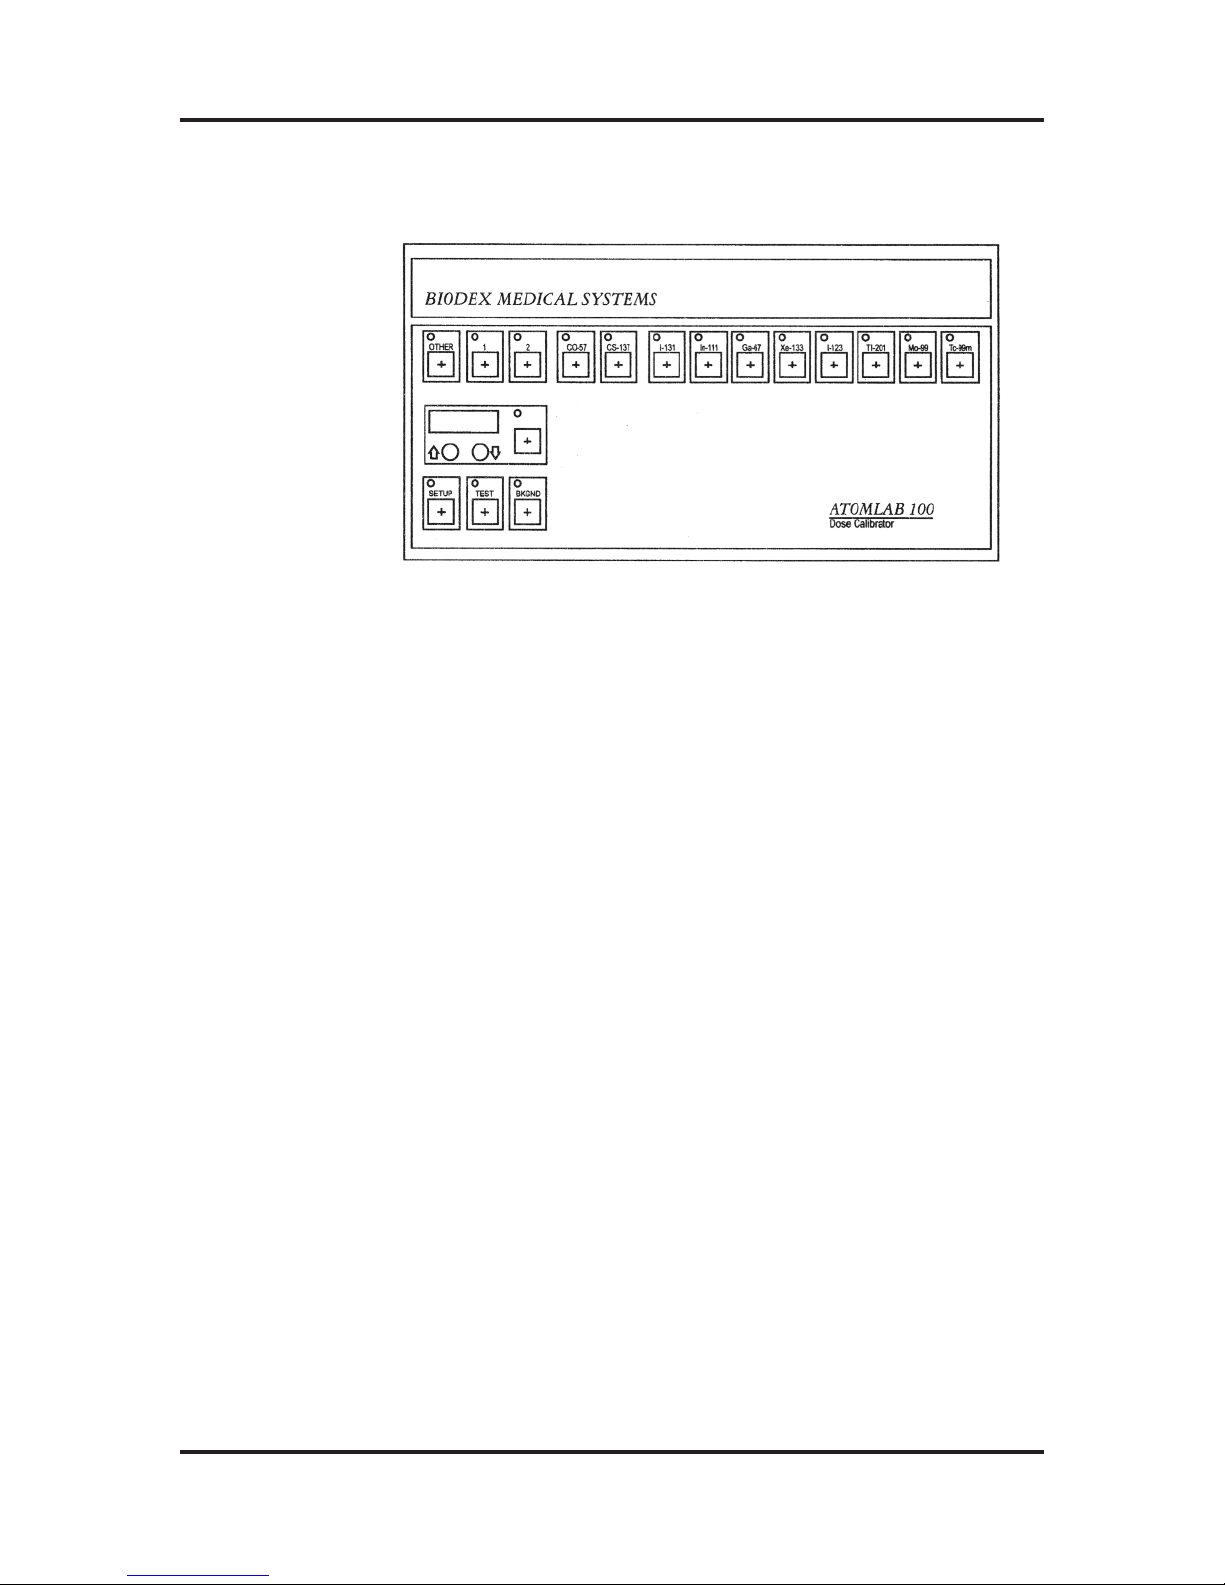
Figure 3-1: Atomlab 100 Front Panel isplay
GETTING STARTED
If you have not done so already, reach behind the isplay
Unit and flip up the power switch from the left position (0) to
the right (-) to power up your system. The TEST key LE
will illuminate and the Atomlab will automatically initiate a
Self-Test program.
For any Atomlab 100 Self-Test initiated by turning the unit
ON, a pause occurs approximately 20 seconds after power-
up. This allows the user to enter the number of Chamber
Units connected to the isplay. If you are using a single
chamber, press the ENTER key when it begins to flash. The
Self-Test will continue and, if no errors are detected, the
Atomlab 100 will enter its normal operating mode. If you are
using multiple chambers, refer to the Instruction Sheet pro-
vided with your Multi-Chamber Manual Interface for details
on entering multiple chambers during the Self-Test.
Note that Atomlab 100 Self-Tests initiated by pressing
the TEST key do not require the user to enter the number of
Chamber Units connected. They automatically place the
Atomlab in normal operating mode without a pause.
Any error detected during the Self-Test will show as an Error
Message in the Activity isplay. Refer to Appendix A for a
description of Error Messages and the proper course of action.
ATOMLAB Dose Calibrator Operation Manual Chapter 3
Biodex Medical Systems 3-2 Release 2.0
Power-up

The top right four-digit LED Activity Display always
indicates activity in the Detector's Chamber Well, no matter
which keys are pressed. (There are momentary exceptions:
when you press the TEST key, for example.)
To the right of the Activity isplay are the units of measure,
e.g., microcuries (µCi). At this time, the display will indicate
some numeric value and the µCi symbol. Also lit is a LE
associated with one of the Isotope Selection keys. When an
isotope is selected, the Atomlab ose Calibrator is automat-
ically calibrated to display the activity of that isotope. Press
the Tc-99m (or any other Isotope Selection key) and
observe the LE on the key come on (the Tc-99m key may
already be selected). If there is no activity in the etector,
the displayed value should be about 1.00 µCi or less. This
value may get lower after "warm-up".
The Mo-99 key has a special function for the Moly
Breakthrough test, which is described in Chapters 4 and 5.
The activity reading when you first power up your
dose calibrator may be any value, even negative, as you
have not yet corrected for the background radiation in your
work area. After you use the BKGND key as described below,
and after the dose calibrator has warmed-up, the activity
level should be close to zero (<0.1µCi).
Before activity measurements are normally made, a dose
calibrator requires a background adjustment to assure there
are no errors in the displayed value. The Atomlab ose
Calibrator automatically stores and subtracts the
Background Value before displaying the activity reading.
With nothing in the etector but the Chamber Well Liner
and empty Sample Holder, press the BKGND key. The LE
on the key will come ON while background measurements
are made. The LE will go OFF automatically when com-
pleted and the displayed value should be less than 0.1 µCi.
The activity value will remain in memory until the BKGND key
is pressed again or the system is turned OFF.
ATOMLAB Dose Calibrator Operation Manual Chapter 3
Biodex Medical Systems 3-3 Release 2.0
Read the Display
Background
Adjustment
Other manuals for ATOMLAB 100
1
Table of contents
Other biodex Test Equipment manuals

Popular Test Equipment manuals by other brands


BACtrack
BACtrack S75 PRO owner's manual

INNOMARK
INNOMARK delta operating manual

Chargerlab
Chargerlab Power Z manual

PCB Piezotronics
PCB Piezotronics 8159-0113A Installation and operating manual

haupa
haupa MultiClamp II operating instructions

Desco
Desco Combo Tester X3+ Installation, operation and maintenance


