BIOEASY LFDAUTINC User manual


Auto-Incubator
Manuale d’uso
1
BIOEASY Auto-Incubator
Cat. #.: LFDAUTINC
Manuale d’uso
1. INTRODUZIONE
L’Auto-Incubator BIOEASY è un dispositivo termostatico per l’incubazione dei tests
BIOEASY molto semplice da utilizzare. L’utente può impostare gli intervalli di tempo
desiderati.
Per l’utilizzo sicuro e affidabile di questo dispositivo termostatico, attenersi alle seguenti
misure di sicurezza:
•Verificare che il voltaggio in input stampato sull’adattatore AC e il tipo di presa siano
compatibili con il tipo di alimentazione elettrica locale.
•Assicurarsi che il cavo di alimentazione non rappresenti un potenziale ostacolo o
rischio di inciampo.
•Posizionare l’incubatore su una superficie stabile e piana.
•Scollegare il dispositivo termostatico dall’alimentazione elettrica quando lo si
pulisce.
•Seguire le istruzioni di questo manuale quando si lavora con il dispositivo
termostatico.
•La manutenzione dovrebbe essere fatta solo da personale autorizzato.
2. Apertura della confezione:
Aprire la confezione e verificare che siamo presenti i seguenti componenti:
•Auto-Incubator BIOEASY due parti separate;
•Commutatore dell’adattatore AC 12V o 24V;
•Cavo di alimentazione;
•Cavo per accendisigari di auto/camion;
•Manuale d’uso.
Conservare la confezione. Questo confezionamento assicura la migliore protezione
possible per conservazione e trasporto del prodotto.
3. Parametri Meccanici:
Lunghezza x Larghezza x
Altezza: 113x150x90mm
Peso: 0,800 kg
Scatola di copertura in
acciaio inossidabile

Auto-Incubator
Manuale d’uso
2
4. Parametri elettrici:
L’Auto-Incubator BIOEASY può essere alimentato con un’alimentazione elettrica da
12V o 24V. In base alle richieste del cliente il dispositivo può essere inviato con un
adattatore da 12V o 24V.
Dettagli dell’adattatore di commutazione:
Adattatore 12V:
Input: 100-240V ~ 50/60 Hz
Output: 12V … 3A
Adattatore 24V:
Input: 100-240V ~ 50/60 Hz
Output: 24V … 3.75A
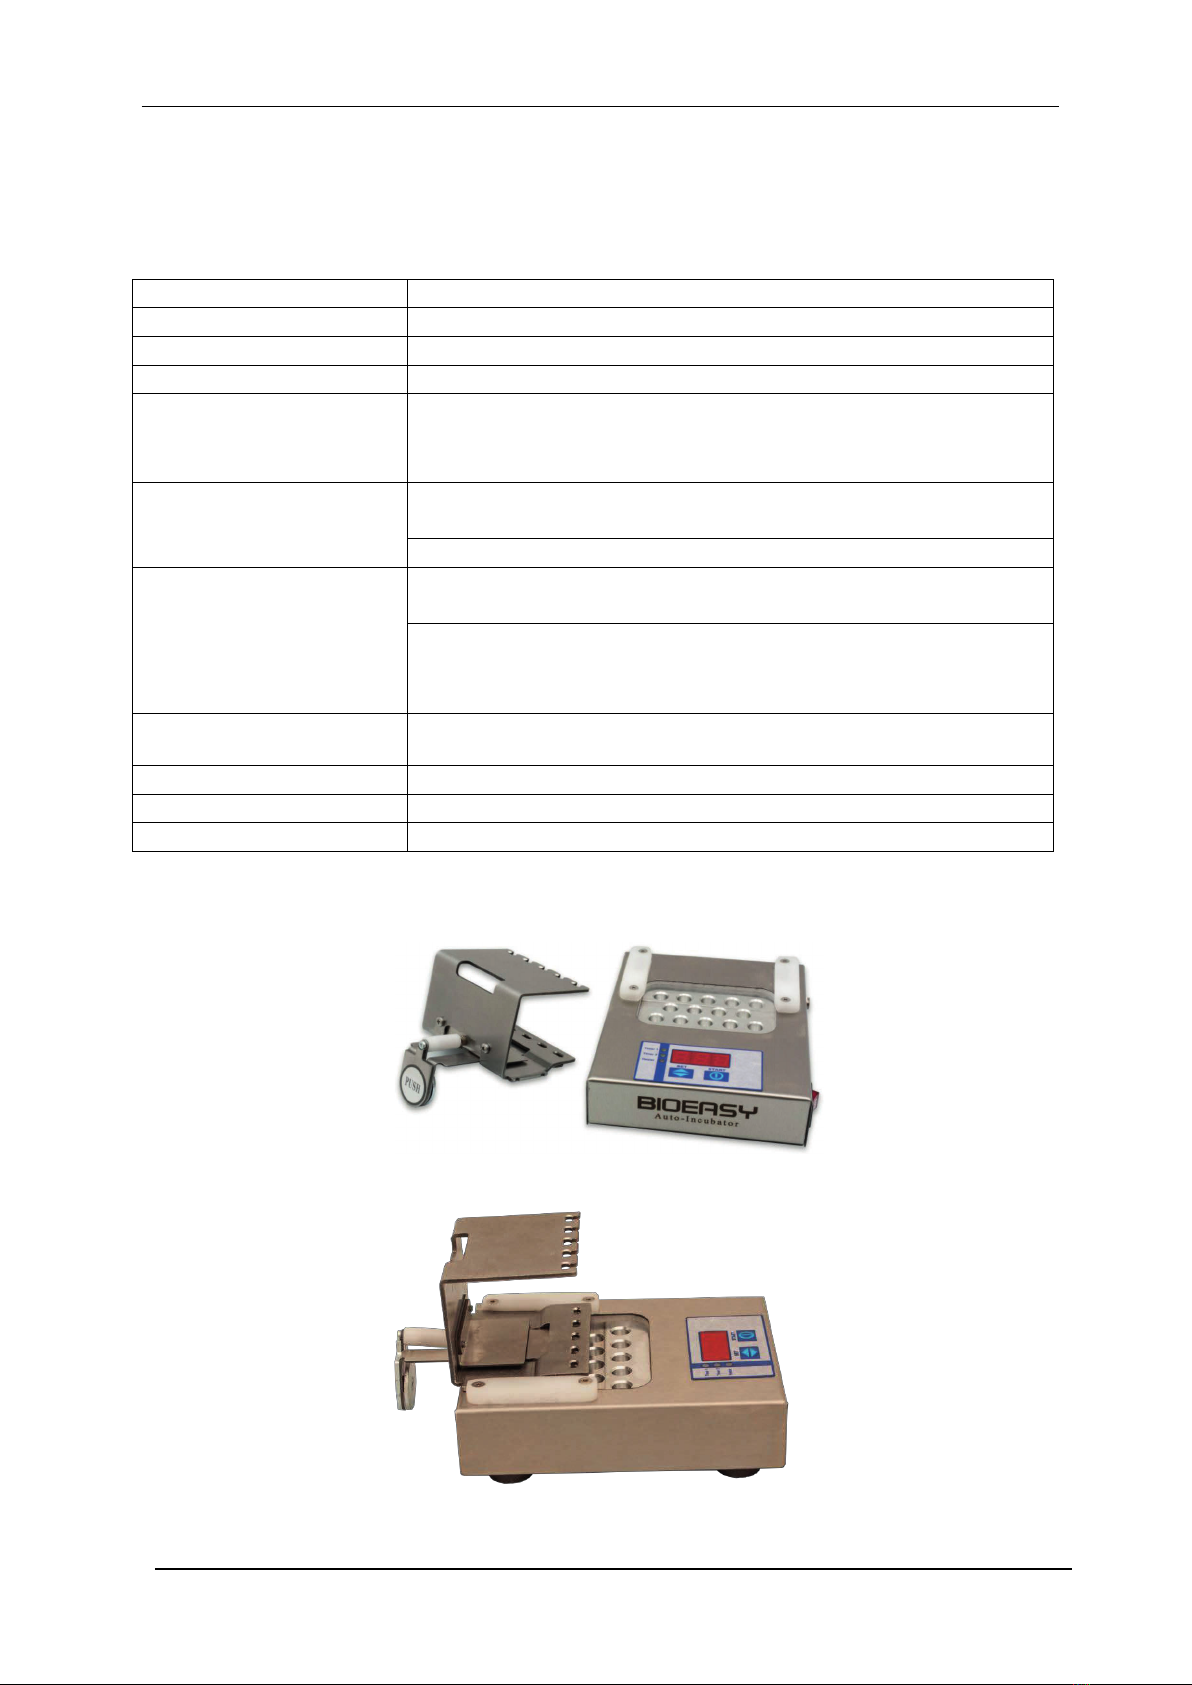
5. Prima di lavorare con il dispositivo termostatico:
Il dispositivo è composto da due parti diverse: supporto per le strips e dispositivo
termostatico.
Il supporto per le strips ha due posizionamenti possibili:
- Posizione 1: per posizionare le vials per i tests nel
dispositivo termostatico.
- Posizione 2: per posizionare le strips nel supporto.
Il dispositivo termostatico.
Prima di iniziare a lavorare con il dispositivo, posizionare il supporto per le strips nel
dispositivo termostatico nella Posizione 1.

Auto-Incubator
Manuale d’uso
3
6. Panoramica delle indicazioni del display e delle funzioni della tastiera:
Timer 1
Timer 2
Heater
Pulsante “SET” Pulsante “START”
Timer 1 (verde)– mostra lo stato del Timer 1 (anche in modalità di
programmazione).
Timer 2 (verde) – mostra lo stato del Timer 2 (anche in modalità di
programmazione).
Heater (rosso) – mostra lo stato dell’impianto riscaldante (on-off).
Pulsante “SET” – si utilizza per modificare il tempo.
Pulsante “START” – avvia i Timer 1 e 2.
Indicazione a tre cifre (display) – mostra temperature e tempo.
Punto decimale – lampeggia durante la misurazione della temperatura.
Display

Auto-Incubator
Manuale d’uso
4
7. Operazioni:
7.1. Impostazioni di fabbrica:
Il dispositivo termostatico è impostato per i seguenti parametri di temperatura e tempo:
Mode BioEasy test
Temperatura
40 °C
Timer 1
3 minuti
Timer 2
3 minuti
8. Avviare l’incubazione:
Prima di accendere il dispositivo, posizionare il support per le strips in
Posizione 1.
Accendere il dispositivo termostatico, attendere fino al raggiungimento della
temperatura impostata.
Posizionare le vials nel dispositivo termostatico.
Premere il pulsante START per far partire il Timer 1.

Auto-Incubator
Manuale d’uso
5
Muovere il support per le strips in Posizione 2 e premere il pulsante PUSH
situato nella parte posteriore.
Posizionare le strips nel support per le strips.

Auto-Incubator
Manuale d’uso
6
Quando il tempo del Timer 1 finisce, lo strumento emette un segnale
acustico e sul display compare il tempo del Timer 2. Lo strumento passa
automaticamente al Timer 2.
Quando il tempo del Timer 2 finisce, lo strumento emette un segnale
acustico e sul display verrà visualizzato il numero “2”; l’utente deve premere
il pulsante START per terminare.
9. Programmazione:
Per programmare o riprogrammare il dispositivo, l’utente deve seguire le seguenti
indicazioni:
9.1. Impostazione dei parametri:
Spegnere il dispositivo termostatico con l’interruttore ON/OFF sul lato destro.
Premere e tenere premuti i pulsanti SET e START.
Accendere il dispositivo termostatico.
Dopo 3 secondi il dispositivo emette un suono e sul display compare la
versione del software “n40” e SET.
Rilasciare i pulsanti SET e START.
Il dispositivo riparte e sul display compare la scritta 40.0.
Vedere le foto 1-5 sotto:
1. 2. 3. 4.

Auto-Incubator
Manuale d’uso
7
5.
9.1.1. Impostare la temperatura:
La temperatura è impostata a 40 °C e non può essere cambiata.
Premere il pulsante START per continuare con l’impostazione dei Timers.
Vedere le foto 1-2 sotto:
1. 2.
9.1.2. Impostare il tempo del Timer 1:
Sul display è visibile la scritta "001". Utilizza il pulsante SET per impostare il
tempo desiderato per il Timer 1. Il Timer 1 è in minuti. Può essere impostato
da 1 a 10 minuti. Premendo il pulsante SET l’intervallo di tempo viene
modificato di 1 minuto.
Premere il pulsante START per salvare la modifica del tempo.
Vedere le foto 1-3 sotto:
1. 2. 3.
9.1.3. Impostare il tempo del Timer 2:
Dopo aver salvato il tempo del Timer 1, sul display è visibile la scritta "001".
Utilizza il pulsante SET per impostare il tempo desiderato per il Timer 2. Il
Timer 2 è in minuti. Può essere impostato da 1 a 10 minuti. Premendo il
pulsante SET l’intervallo di tempo viene modificato di 1 minuto.
Premere il pulsante START per salvare la modifica del tempo.
Vedere le foto 1-3 sotto:
1. 2. 3.
Il dispositivo emette un segnale acustico e mostra la temperatura corrente. Le
impostazioni sono ora salvate.

Auto-Incubator
Manuale d’uso
8
10. Connettere l’Auto-Incubator BIOEASY all’accendisigari per auto a 12V o a
quello del campion a 24V:
L’utente può collegare lo strumento all’accendisigari dell’auto a 12 V o all’accendisigari
del camion a 24 V utilizzando il cavo per accendisigari di auto/camion.
11. Pulizia:
ATTENZIONE!
Per evitare di danneggiare qualsiasi parte del dispositivo termostatico, seguire le
istruzioni per la pulizia indicate sotto.
Pulire la scatola di copertura metallica del dispositivo termostatico con alcol etilico e
un panno morbido.
Pulire le parti plastiche del dispositivo termostatico con detersivo per piatti, acqua e
un panno morbido.
Auto-Incubator
Manuale d’uso
9
Auto-Incubator BIOEASY
Scheda Dati
Modello:
YRM-IN02
Numero di pozzetti:
14
Test/tubo compatibile:
Tests BIOEASY
Range di temperatura:
40°C (±0.5°C)
Modalità di lavoro:
•Temperatura: 40°C
•Primo intervallo di tempo: 3 minuti
•
Secondo intervallo di tempo: 3 minuti
Condizioni ambientali:
La temperatura dell’ambiente deve essere 5°C al di sotto
della temperatura impostata
Temperatura di lavoro: 0 to 40°C
Parametri elettrici:
Commutatore dell’adattatore:
Input 100 – 240 V ~ 1.6 A(max), 50 ~ 60 Hz
Consumo di energia:
25W (12V), 100W (24V) fino a quando lo strumento
raggiunge la temperatura impostata, dopo è circa 1/10
Dimensioni (Lun x Larg x
Alt):
113x150x90mm
Peso:
0.800 kg
Scatola di copertura:
Acciaio inossidabile
Applicazione:
Incubazione di test per antibiotici nel latte

Auto-Incubator
Manuale d’uso
10
Подпис: Печат:
SCHEDA DI GARANZIA
Auto-Incubator BIOEASY
Il periodo di garanzia è1 (un) anno dalla data di acquisto. Manipolazione, trasporto e
conservazione impropri rendono non valida la garanzia. La garanzia ènulla se le etichette
di garanzia vengono rimosse.
N. SerialeData di acquisto:
Password:
Distributore:
Distributore:
Firma:
Timbro:

Auto-Incubator
Manuale d’uso
12.02.2019
11
Shenzhen Bioeasy Biotechnology Co., Ltd si riserva il diritto di selezionare i metodi
utilizzati per analizzare un prodotto per determinare la validitàdella garanzia. Non è
prevista alcuna garanzia per i prodotti oltre la data di scadenza.
CERTIFICATO DI GARANZIA
Acquirente:
Rapporto di servizio:
Data di
accesso al
servizio
Danno Data di
Consegna
Firma
Generon S.p.A.
Via San Geminiano, 4
41030 San Prospero (MO)- Italia
:
+39
059
8637161
: +39 059 7353024
:
ie.techsupport@generon.it
www.generon.it

Auto-Incubator
Operation manual
12.02.2019
1
Cat.# LFDAUTINC
BIOEASY Auto-Incubator
Operation manual
1. INTRODUCTION
BIOEASY Auto-Incubator is very simple to use thermostatic device for incubation of
BIOEASY tests. The user can set the desired time periods.
For safe and dependable operation of this thermostatic device, please comply with the
following safety precautions:
Verify that the input voltage printed on the AC Adapter and the plug type
matches the local AC power supply.
Make sure that the power cord does not pose a potential obstacle or tripping
hazard.
Place the incubator on a firm and lever surface.
Disconnect the thermostatic device from the power supply when cleaning it.
Follow the instructions in this manual when operating with the thermostatic
device.
Service should be performed by authorized personnel only.
2. Unpacking:
Unpack and verify that the following components have been included:
BIOEASY Auto-Incubator two separate parts;
Switching AC adapter 12V or 24V;
Power cord;
Car/truck lighter connecting cord;
Instruction manual.
Save the packaging materials. This packaging ensures the best possible protection for
the storage or transport of the product.
3. Mechanical parameters:
W x L x H: 113x150x90mm
Weight: 0,800 kg
Stainless steel cover box

Auto-Incubator
Operation manual 2
4. Electrical parameters:
BIOEASY Auto-Incubator can be supplied with 12V or 24V power supply. On
customers` request the device is shipped with either 12V or 24V switching adapter.
Switching adapter details:
12V switching adapter:
Input: 100-240V ~ 50/60 Hz
Output: 12V … 3A
24V switching adapter:
Input: 100-240V ~ 50/60 Hz
Output: 24V … 3.75A
5. Before working with the thermostatic device:
The device is compared of two different parts: Strip holder and thermostatic device.
Strip holder with two positions:
1st for placing the test vials into the thermostatic device.
2nd for placing the test strips into the strip holder.
And thermostatic device.
Before working with the device, place the strip holder into the thermostatic device on
the 1st position.
6. Overview of display indications and keyboard functions:
Timer 1 (green)– shows the status of Timer 1 (also in the programming mode).
Timer 2 (green) – shows the status of Timer 2 (also in programming mode).
Heater (red) – shows the status of the heater (on-off).
Button “SET” – serves to adjust the time.
Button “START” – starts Timer 1 and Timer 2.
Three digits indication(display) - shows the temperature/time.
Decimal point – blinks when measuring the temperature.
Timer 1
Timer 2
Heater
Button “SET”
Button “START”
Display
12.02.2019
Cat.# LFDAUTINC

Auto-Incubator
Operation manual 3
7. Operations:
7.1. Factory settings:
The thermostatic device is factory set for the following temperature and time ranges:
Mode BioEasy test
Temperature
40 °C
Timer 1
3 minutes
Timer 2
3 minutes
8. Starting the incubation:
The strip holder has two positions:
1st when placing the test vials into the thermostatic device.
2nd when placing the test strips into the strip holder.
Before turning on the device, place the strip holder into the thermostatic
device on 1st position.
Turn on the thermostatic device, wait until it reaches the set temperature.
12.02.2019
Cat.# LFDAUTINC

Auto-Incubator
Operation manual 4
Place the vials into the thermostatic device.
Press the START button to start running Timer 1.
Move the strip holder into 2nd position and press the PUSH button on its
back.
Place the test strips into the strip holder.
12.02.2019
Cat.# LFDAUTINC

Auto-Incubator
Operation manual 5
When Timer 1 finishes, the device beeps, on the display appears the time of
Timer 2. The device automatically goes into Timer 2.
When Timer 2 finishes, the device starts beeping, on the display is written
number “2” and the user has to press the START button to stop the mode.
9. Programming:
For programming or reprogramming, the user must follow the step below:
9.1. Setting parameters:
Switch off the thermostatic device from the ON/OFF button on the right side.
Press and hold buttons SET and START, keep them pressed.
Switch on the thermostatic device.
After 3 seconds the device beeps and on the display is written the software
version “n40” and SET.
Release buttons SET and START.
The device restarts and on the display is written 40.0.
See photos 1-5 below:
1. 2. 3. 4.
12.02.2019
Cat.# LFDAUTINC

Auto-Incubator
Operation manual 6
5.
9.1.1. Setting the temperature:
The temperature is set to 40 °C and cannot be changed.
Press the button START to continue with setting the Timers.
See photos 1-2 below:
1. 2.
9.1.2. Setting time for Timer 1:
On the display is written "001". Use the button SET to adjust the desired
time for Timer 1. Timer 1 is in minutes.It can be set from 1 to 10 minutes.
By pressing the button SET the time interval is changed by 1 minute.
Press the button START to save the adjusted time.
See photos 1-3 below:
1. 2. 3.
9.1.3. Setting time for Timer 2:
After you have saved the adjusted time for Timer 1, on the display is written
"001". Use the button SET to adjust the desired time for Timer 2. Timer 2 is
in minutes. It can be set from 1 to 10 minutes. By pressing the button SET
the time interval is changed by 1 minute.
Press the button START to save the adjusted time.
See photos 1-3 below:
1. 2. 3.
The device beeps and shows the current temperature. Now time settings for the
thermostatic device are saved.
10.Connecting BIOEASY Auto-Incubator towards 12V car lighter or 24V truck
lighter:
12.02.2019
Cat.# LFDAUTINC

Auto-Incubator
Operation manual 7
The user can connect the device towards a car lighter voltage 12V or towards a track
lighter voltage 24V by using the car/truck lighter connecting cord.
11.Cleaning:
ATTENTION!
In order not to damage any part of the thermostatic device, please follow the
cleaning instructions below.
Clean the metal cover box of the thermostatic device with ethyl alcohol and soft cloth.
Clean the plastic parts of the thermostatic device with dishwashing liquid, water and
soft cloth.
12.02.2019
Cat.# LFDAUTINC

Auto-Incubator
Operation manual 8
BIOEASY Auto-Incubator
Data sheet
Model:
YRM-IN02
Number of wells:
14
Compatible test/tube:
BIOEASY tests
Temperature range:
40°C (±0.5°C)
Working mode:
Temperature: 40°C
1st time interval: 3 minutes
2nd time interval: 3 minutes
Environmental condition:
Ambient temperature has to be 5°C below the desired set
temperature
Operating temperature: 0 to 40°C
Electrical parameters:
Switching adapter:
Input 100 – 240 V ~ 1.6 A(max), 50 ~ 60 Hz
Power consumption:
25W (12V), 100W (24V) until the necessary temperature is
reached, after that it is 1/10th
Dimensions (W x L x H):
113x150x90mm
Weight:
0.800 kg
Cover box material:
Stainless steel
Application:
Incubating antibiotic test for raw milk
12.02.2019
Cat.# LFDAUTINC
Table of contents
Languages:
Popular Accessories manuals by other brands


Dini Argeo
Dini Argeo 3590EXT Series user manual

ASA Electronics
ASA Electronics VersaLogic VersaNet 2.0 Manual instructions

Franklin
Franklin 2719 Assembly instructions

DARCHE
DARCHE ECLIPSE T050801794 quick start guide

Monnit
Monnit ALTA Water Detection Puck Sensor user guide

Hydas
Hydas 4657.1.00 instruction manual