BIOS LIVING Glider Plus User manual

www.biosmedical.com
ROLLATOR
INSTRUCTIONS
56092
Plus
Plus

The Glider rollator comes with a removable shoulder bag, cane holder, safety light,
travel bag, locking brakes, and a seat with padded backrest. The handles are
adjustable in height and the rollator folds easily for transport or storage.
Please read these instructions before assembly or use of this rollator, and please
keep the manual in a safe place.
DONOTassembleorusethisequipmentwithoutrstreadingandunderstanding
this instruction manual.
INTENDED USE
Designed to assist the user to walk, rest and carry small items for both indoor and
outdooruse.Itisintendedforuseonatsurfacesbyasingleindividualwithlimited
mobility and a maximum weight as shown below.
The intended user should possess the necessary physical, visual and cognitive
skills to operate the rollator safely. If you have any doubt, please consult your
dealer/prescriber.
It is important that the user reads and understands the safety advice given within
this manual before attempting to operate the product. This advice aims to avoid
possible injury to the user or bystanders and avoid damage to the rollator or
surrounding property.
CAUTION: The Glider rollator should not be used to push the user while seated. The
frame is not designed for this.
SAFETY
The rollator can provide assistance to an individual weighing up to 300 lbs / 136 kg.
DO:
(1) Always ensure the brakes are in the locked position if the rollator is left unattended
(2) Check that all castors and wheels are secure before use
(3) Check that the brakes are functioning properly
(4) Check handle height, ensure hand knobs are secure before use
(5) Check to ensure the rollator is fully unfolded
(6) Ensure that the frame “locks” into position when it is being unfolded
(7) Take care when carrying the rollator when folded
(8) Keep your hands away from the folding mechanism to prevent any risk of pinching
(9) Seek the advice / recommendations of a medical professional to determine if
the rollator is suitable for your needs
(10) Use caution when lifting and carrying the rollator
DO NOT:
(1) Use the rollator as an aid to transport a person, it is not designed as a
complete wheelchair
(2) Sit on the rollator if the brakes are not locked, this could cause the rollator to
move resulting in injury to the user or bystanders
(3) Sit on the rollator when it is on an incline
(4) “Drop” into the seat of the rollator, always sit into the rollator in a smooth,
controlled motion. Seek assistance if necessary
(5) Hang objects on the brake levers or hand grips. This could affect brake
operation and/or stability of the rollator
(6) Stand on the rollator or use it as a step
ASSEMBLY INSTRUCTIONS
Please examine the rollator for any shipping damage. Do not use the rollator if there
is apparent damage. Contact your place of purchase for repair and/or return.
A
B
C
D
F
E
H
I
G
J
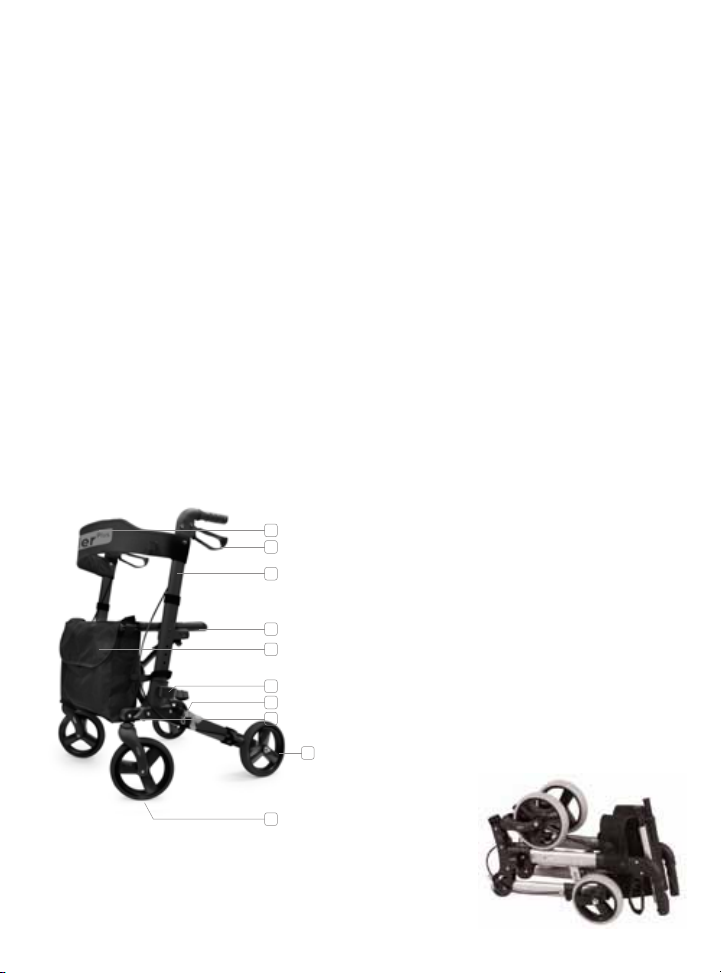
A - Backrest
B - Locking Handle Brakes
C - Height Adjustable Handles
D - Seat
E - Shoulder Bag
F - Cane Holder
G - Rear Folding Pins (2)
H - Fastening Knobs (2)
I- Rear 8” Wheels
J - Front 8” Wheels
1 . Remove all packaging. The rollator will be folded
as shown in Figure 1.
Figure 1

2. Unfold the front wheels and secure in place using the fastening knobs as shown
in Figure 2.
Figure 2
3. Fold out the rear legs as shown below and secure the legs in place with the
rear folding pins as shown in Figure 3.
Figure 3
Step 1 Step 2 Step 3 Step 4
4. Open the rollator, push down on either side of the seat as shown in Figure 4.
IMPORTANT: Both sides must “click” into position.
Figure 4
Press Here
5. Attach the shoulder bag.
Fastening Knob
ADJUSTING THE HEIGHT
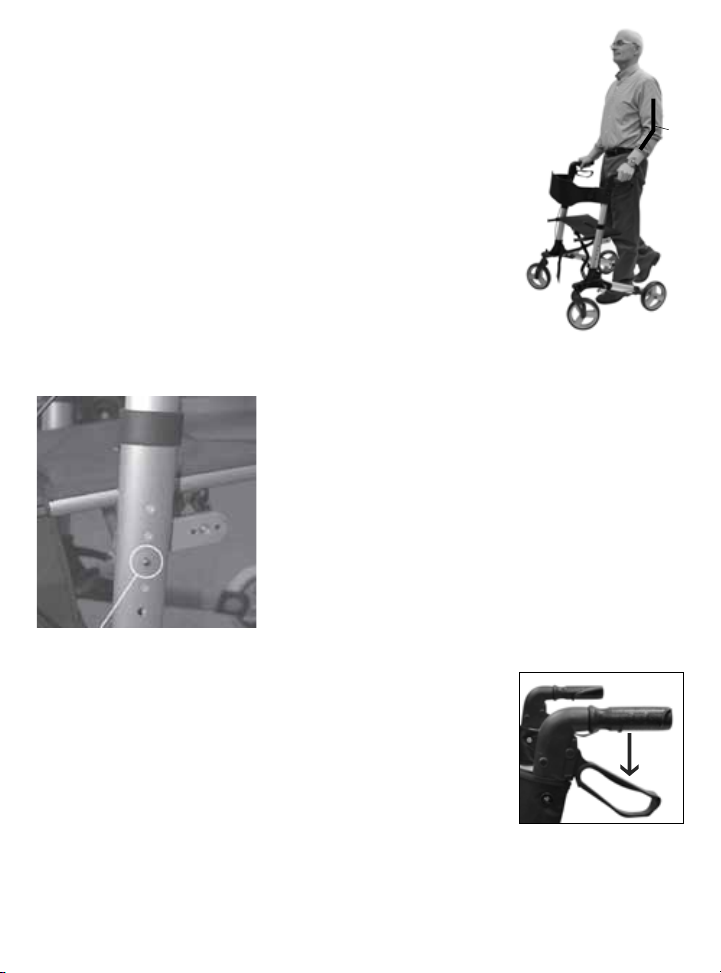
The Right Fit
Make sure your rollator is completely open before you walk
with it and ensure the rollator is locked in place and the frame
is rigid. It is important that you adjust your rollator to a height
that is high enough to hold it comfortably.
1. With your arms resting at your sides adjust the rollator so
that the handles are at the height of the wrist.
2. With your hand placed on the hand-grip, your elbow
shouldbeexed15˚-20˚.
3. Ifyoundthatyouhavetostoopdownorbringyourarmsuptoreachthe
rollator,adjustthelegstondthebestheight.
4. Simply press the spring button and set to the
desired height. Repeat for the opposite side and
make sure that both handles are secure and set at
the same height before use.
Handle Height: 31½” – 36” / 80 – 92.5 cm
NOTE: Consult with your physician or therapist to
determine proper height level.
BRAKE OPERATION AND ADJUSTMENT
1. Pull up on the brake handle to slow the rollator.
2. Push down on the brake handle to lock the rear wheels,
pull up on the brake handle to release the
lock (See Figure 5).
IMPORTANT: If brake adjustment is made to allow for light
pressure when braking, this could effect the brake when put
into lock position.
Spring Button
Figure 5
Lock
15o
Brake Adjustment: Turn the adjustment screw counter-
clockwise to increase the tension then lock the adjustment
by turning the locking nut clockwise while holding the
adjustment screw stationary (See Figure 6).
IMPORTANT: If brake adjustment is made to allow for
light pressure when braking, this could effect the brake
when put in the locked position.
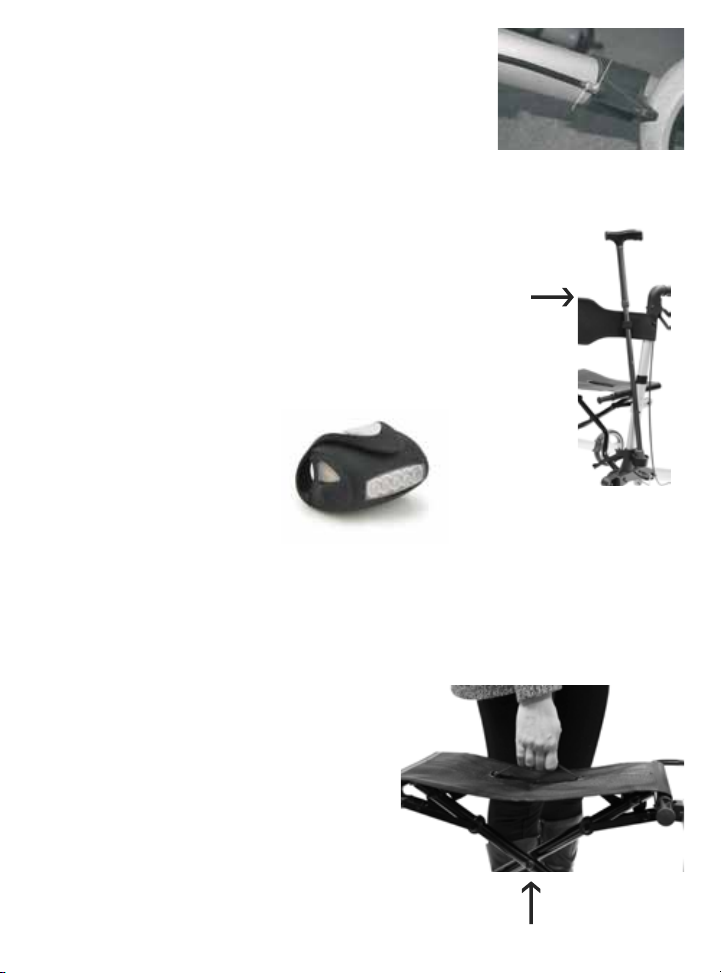
CANE HOLDER
You can place a cane in the cane holder for easy
transportation (See Figure 7).
SAFETY LIGHT
- 7 white LED lights
- Visible up to 600 metres
- Water resistant
-Madefromexiblesilicone
- Tool free assembly
- Quick release mount
- Batteries included: 3 x AAA
To turn ON, press button on side. Attach to the rollator.
FOLDING AND STORING THE ROLLATOR
1. Fold the rollator by pulling up on the
strap in the middle of the seat as shown
in Figure 8.
Figure 6
Locking Nut
Adjustment
Screw
Figure 7
Cane
Holder
Figure 8

2. Close the rollator. Remove the
rear folding pins and fold in the wheels
as shown in Figure 9.
3. To store the rollator in the travel bag, reduce the height of the handles to the
smallest height and then follow steps 1-2 above. Remove the fastening knobs
and fold the front wheels in.
4. Front wheels can be retracted for the most compact storage.
CARE & MAINTENANCE
1. Ensure ALL attached hardware is secured at all times.
2. Check all wheels and castors for loose bolts, nuts and knobs. Check to
ensure the brakes operate correctly and the handles are secure.
3. Replace any broken, damaged or worn items immediately.
CLEANING
The rollator can be cleaned with a damp cloth or sponge and warm soapy water.
Domestic anti-bacterial surface cleaners may be used if required. Care should be
taken not to leave any cleaning residue on the handgrips or seat, this may leave
the surface slippery. Do not use scouring pads or scrapers, this may damage
surface coatings.
ONE YEAR WARRANTY
If this product proves to be defective in material or workmanship within one year
of purchase, please return it to the address below. It will be repaired or replaced
without charge upon receipt of the unit prepaid with $20.00 to cover handling,
packaging and return postage. Please include proof of purchase, your full name,
address, daytime phone number or email address.
Toll Free: 1-800-387-8520
Figure 9

Thermor Ltd.
Repair Department
16975 Leslie Street
Newmarket, ON L3Y 9A1
www.biosmedical.com
This manual suits for next models
1
Table of contents
Other BIOS LIVING Mobility Aid manuals


Popular Mobility Aid manuals by other brands

HASE Bikes
HASE Bikes TRIX user manual

Revolution Healthcare
Revolution Healthcare REVERGO RH-XL-B user manual

Quantum Rehab
Quantum Rehab Synergy Solution none INSTALLATION AND CARE INSTRUCTIONS

Guldmann
Guldmann Stepless LP11 Manaul

Permobil
Permobil BodiLink Head Support Operation manual

Tuffcare
Tuffcare R270 operating manual


