BIOS Defender 500 Series User manual

Defender™500 Series
User Manual
Driving a Higher Standard
in Flow MeasurementSM

Table of Contents
Introduction .........................................................................1.0
Operation .............................................................................2.0
Battery ................................................................................ 2.1
Activation ............................................................................ 2.2
Connections ........................................................................ 2.3
Display Screen .................................................................... 2.4
Menu Navigation ................................................................. 2.5
Set Up .................................................................................. 2.6
Measurements .................................................................... 2.7
Single .................................................................................. 2.8
Burst ................................................................................... 2.9
Continuous .......................................................................... 2.10
Data Port ..............................................................................3.0
Optimizer Software ............................................................. 3.1
SKC CalChek®Interface ..................................................... 3.2
Defender Firmware Upgrades ........................................... 3.3
Annual Maintenance and Calibration ...................................4.0
Shipping ...............................................................................5.0
Storage ................................................................................6.0
Defender Specifications .......................................................7.0
Default Settings ...................................................................8.0
Limited Warranty .................................................................9.0
Troubleshooting ...................................................................10.0
Introduction
Operation
Data Port
Annual Maintenance and Calibration
Shipping
Storage
Defender Specifications
Default Settings
Limited Warranty
Troubleshooting
2.0
6.0
3.0
7.0
4.0
8.0
5.0
9.0
10.0
1.0

2
3
The Defender 510 measures volumetric gas flow with an accu-
racy of +/- 1% of reading. The Defender 520 measures volumetric
gas flow with an accuracy of +/- 1% of reading and measures
gas flow temperature and pressure. Both instruments use our
proven DryCal®technology to measure volumetric gas flow and
are produced in our accredited laboratory in Butler, N.J.
This manual will provide the information needed to operate your
Defender. If at any time you have questions regarding its opera-
tion, please contact Bios through our web site (www.biosint.com)
or call us at 973.492.8400 to speak with a member of our
professional customer service staff.
Your Defender
Your Defender comes with the following:
• ACPowerAdapter/Charger
• BiosOptimizerSoftwareCD
• PCSerialCable
• LeakTestCaps(2);SaveforuseduringtheLeakTest
• CalibrationCerticate
• Manual
Carrying cases and accessories are available for purchase from
Bios or your Bios distributor.
DataPort
Suction Fitting
Measuring Cell
PressureFitting
Charging Jack
CalibrationLabel
Reset Button
Display
Anti-tamperLabel
1.0 Introduction 1.0

4
5
2.2 Activation
Turning your Defender on and off
Simply press the power button.
• PresstheOn/Off button for 1 second to turn on your Defender.
• Whenrstturnedon,yourDefenderdisplaysanopening
screen showing the product name, model number and
flow range.
• PresstheOn/Off button for 3 seconds to turn your
Defender off.
2.3 Connections
Attaching your Defender to a device
Connect device to be calibrated to the appropriate Defender port.
Use 1/4 inch diameter tubing.
• Connecttooutletattop(suctiontting)whenadevicedraws
air (such as sampler).
• Connectiontubingtobottominletfordevicesthatpushairin
(pressure devices).
2.1 Battery
Charging, installing and monitoring your
Defender battery
Your Defender battery is charged at the factory, but we
recommend that you make sure it is fully charged before
initial use.
• ConnecttheACpoweradaptertotheDefender’s
Charging Jack (DC In).
• PlugtheACpoweradapterintoanACoutlet.
Initial charging should take about eight (8) hours.
After the initial charge:
• YoumaycontinuetochargeyourDefenderindenitely
simply by leaving it connected to the AC power adapter.
• Besuretochargethebatteryatleasteverythree(3)months,
to maintain battery life.
ThebatterysymbolontheLCDdisplayindicatesyourDefender’s
battery charge condition. A shaded battery icon indicates a full
charge. As the battery voltage drops, the indicator will empty
in 20% increments.
2.0 Operation
2.0

6
7
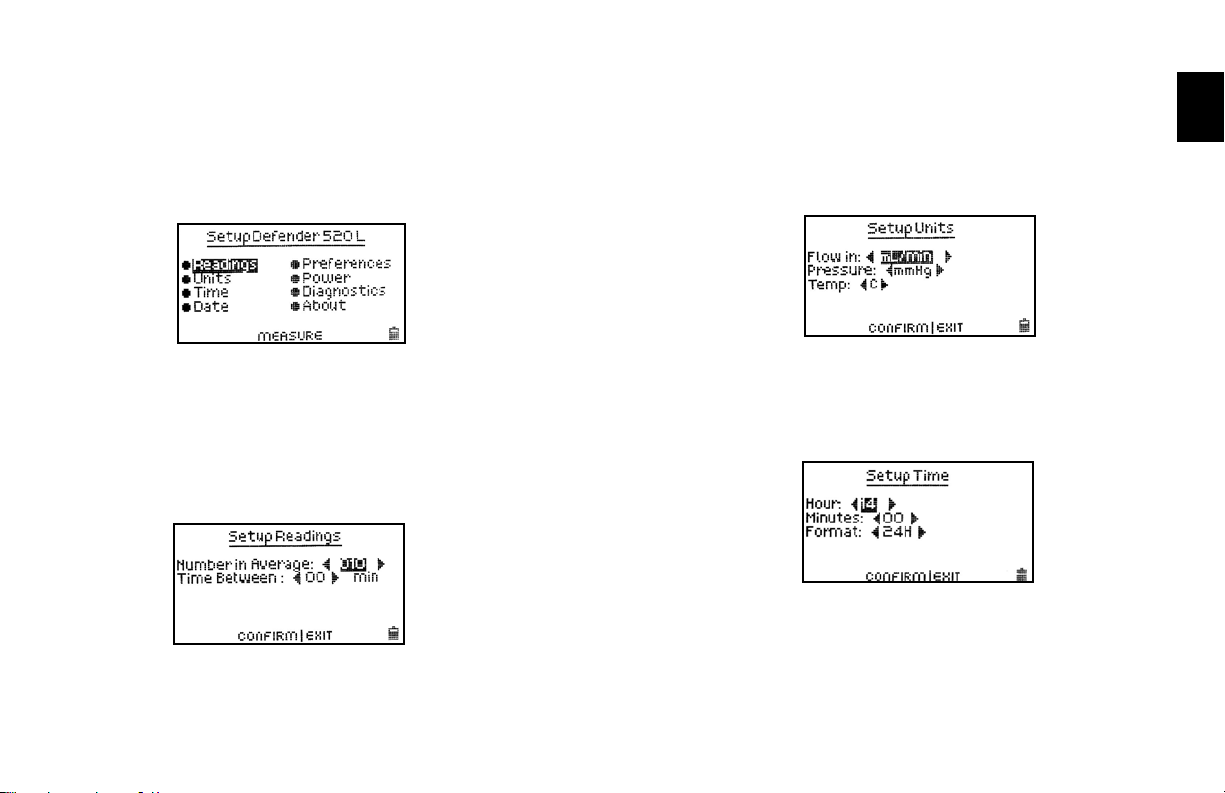
2.6 Set-up
Customizing the Defender to your needs
You can customize your Defender in the Setup menu. Highlight
SETUPintheintroductionscreentoentertheSetupMenu.Or,
highlight SETUP after resetting and then exiting a measurement
mode screen. The Setup menu has eight submenus.
To select a submenu, use the directional arrow buttons to high-
light the submenu and press the Enter button.
In submenus, brackets (i.e., <...>) indicate different selection
options. You can switch back and forth by pressing the forward or
backward (or ) arrow.
Highlight CONFIRM after making changes and press the Enter
button to save the changes made.
2.4 Display Screen
Understanding the screen components
The Defender provides a menu of operational settings and com-
mands. The four directional arrow buttons on the control panel
allow you to navigate through the menu and select the desired
settings for your Defender. Your location within the menu is
highlightedforeasyidentication.
2.5 Menu Navigation
Moving through operational menus
• Usethedirectionalarrows, , and on the control
paneltondyourwaythroughthemenu.
• Whenyourdesiredcommandishighlighted,simplypressthe
ENTER button on the control panel.
If you see a menu selection within angle brackets (<….>), that
meansyouhavemultipleoptionsforanitem.Presstheleftor
right (or ) arrow button to see the options.
If you wish to use the factory settings proceed to
section 2.7 Measurements.
Defender
Defender 520 M
Range:50–5,000mL/min
with DryCal Technology®
MEASURE|SETUP
LCDScreen
ControlPanel
On/Off Button
2.0
8
9
‘Confirmed, New Settings Will be Retained’ message will
appear in the screen for a brief period before it returns to
Setup menu.
Highlighting EXIT and then pressing the Enter button will return
you to the SETUP menu without saving any submenu changes.
Readings
Choose the number of measurements in the average from
1 to 100.
If you wish to incorporate a time delay between consecutive
measurements, set Time Between from 1 to 60 minutes.
Units
Measure gas Flow in cubic centimeters, milliliters, liters or
cubic feet (all units are per minute).
IntheDefender520model,measurePressureinmmHg, kPa
or PSI and Temperature in Celsius or Fahrenheit.
Time
Set the current time and the format.
The format can be selected as PM, AM, or 24H.
Date
Set the date and the format.
The format can be selected as DD (day)-MM (month)-YYYY (year)
or MM (month)-DD (day)-YYYY (year).
2.0

10
11
Preferences
Read Default
Select a preferred mode of measurement when the Defender is
initially turned on.
Default Settings
Select<No>toallowthe‘ReadDefault’change.Selecting<Yes>
will reset your Defender to the factory default settings. (Factory
default settings are provided elsewhere in this manual.)
Data Port
Set the data port interface by selecting:
<BIOS> to operate with Bios Optimizer software.
<SKC> to operate with SKC CalCheck®Interface.
Magnification
In the Defender 520 model, this controls the amount of data on
the display. Select <Zoom> to view only flow measurements in
larger font, or select <Detail> to simultaneously view flow mea-
surements, temperature, and pressure in a smaller font.
Power
Power Save
By selecting <On>, your Defender will save power by turning off
afterveminutesofinactivity.However,itwillnotturnoffwhen
connected to the AC power adapter/charger.
Select <Off>, and your Defender will remain on until you
manually turn it off.
Backlight
Select <On>toilluminatetheLCDdisplayor
<Off > to conserve battery power.
2.0
12
13
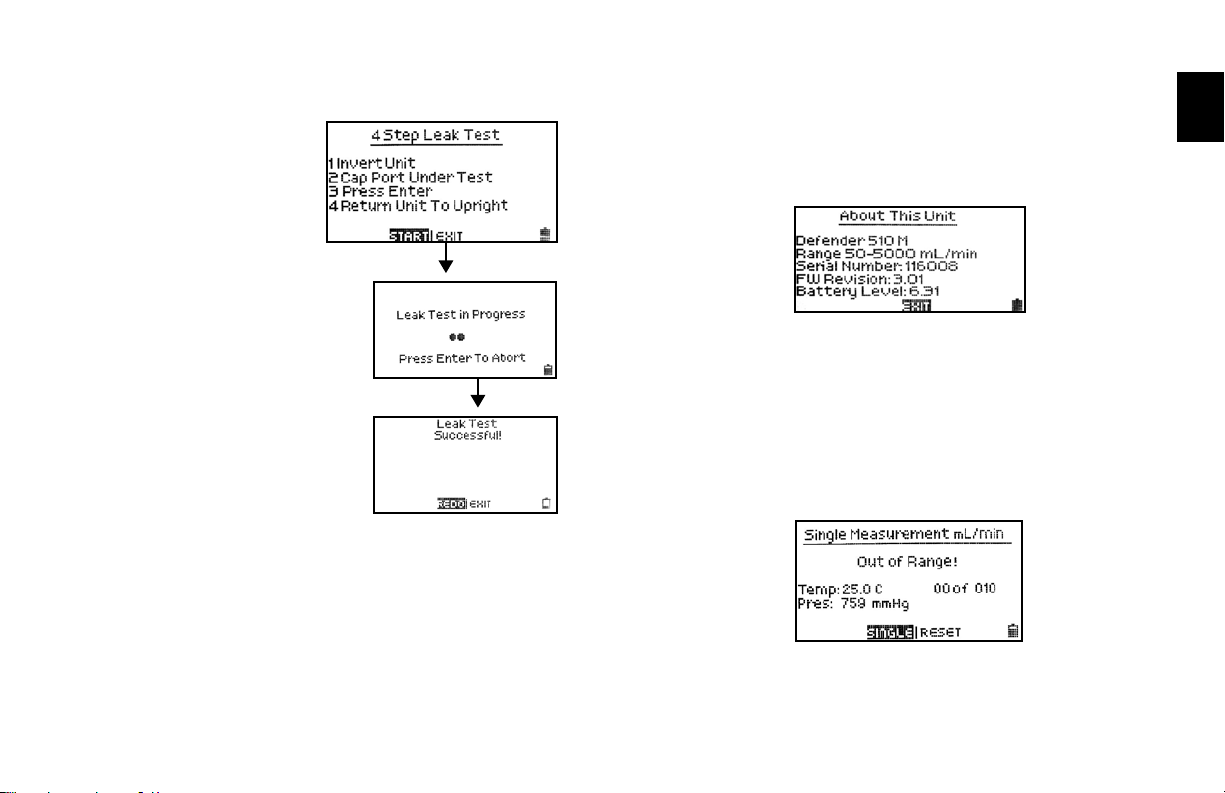
Diagnostics
TheDefenderLeakTestisde-
signed only to verify the internal
integrity of the instrument and
alert you to an internal leak.
Werecommendperformingthe
LeakTestonlyasaninterme-
diate quality control check or
whenever the integrity of the
instrument is questioned due to
misuse or accidental damage.
Pleasenotethataleaktest
is not a substitute for a com-
prehensive examination of the
unit’soverallperformance
and it does not ensure that
your Defender is operating
accurately.
• InvertyourDefenderandallowthepistontotraveltothetop
• CaptheportundertestusingtheBiossuppliedleaktestcap.
Leavetheotherportuncapped.
• PressEnteronthecontrolpanelwhiletheunitisstillinverted
• Returntheunitupright.Theleaktestwillprogress
• IfDefenderleaktestisunsuccessful,gotosection
10 Troubleshooting.
• Whentestiscomplete,selectexittoreturntomainmenu.
About
This screen provides basic information about your Defender,
which may be an especially helpful reference when speaking to
a Bios technical support representative or your Bios distributor.
Out of Range
IftheowyouaremeasuringisoutsidetheDefender’sow
range, (see section 7 Defender Specifications for ranges),
the “Out of Range!” warning appears. Immediately lower or
disconnecttheow.Whentheowiswithintheproperrange,
selectRESETtoclearyourDefender’slastmeasurement
2.0

14
15
2.7 Measurements
Taking gas flow readings
To maintain the best possible accuracy and minimize thermal
effects, Bios recommends fully charging your battery before
taking measurements. If this is not possible, we recommend
disconnecting your Defender from its AC power adapter/charger
while taking flow measurements — or to run gas through your
Defender for 10 minutes before starting the flow measurement.
First steps
Pressthepowerbutton.
• PresstheOn/Off button for 1 second to turn on your Defender.
• Whenrstturnedon,yourDefenderdisplaysanopening
screen showing the product name, model number and flow
range.
• PresstheOn/Off button for 3 seconds to turn your
Defender off.
Connect device to be calibrated to the appropriate Defender port.
Use ¼ inch diameter tubing.
• Connecttooutletattop(suctiontting)whenadevicedraws
air (such as sampler).
• Connecttoinletatbottom(pressuretting)whenadevice
pushes air.
• DonotcaptheunusedportontheDefender.
• Choosethemeasurementtype,Single,Burst,orContinuous,
then press enter.
2.8 Single Measurement
Each time the ‘Enter’ button is pressed, one measurement will
bemade.Wheneachsubsequentmeasurementismade,the
current flow and average of all prior readings will be displayed.
2.9 Burst Measurement
This setting functions in the same manner as ‘SINGLE’, but
measurements continue automatically until the preset number of
measurements has been made. Operation then ceases, and the
last reading and average are displayed.
Press‘Enter’ again to begin another preset sequence.
2.10 Continuous Measurement
This setting functions in the same manner as ‘BURST’, but new
sequences will automatically repeat until stopped by the user.
2.0

16
17
Note:
(010 in series) indicates the number of measurements. 10 is the
factory-presetnumber.Denethenumberofmeasurementyou
prefer, from 1 to 100, by accessing the SETUP menu.
In Continuous or Burst mode, select:
• PAUSE to terminate the current flow measurement but
to leave the average flow measurement and previous flow
measurement on the screen. This allows you to resume
the flow measurement sequence if you wish to do so.
• RESET to terminate the flow measurement and clear
the screen.
3.0 Data Port
Interfacing with Optimizer®and CalCheck®
Your Defender comes with a data port that provides a digital
Interface for use with Bios Optimizer Software or with the
SKC CalCheck®Interface. Visit www.biosint.comtondmore
information about Optimizer software, and for access to
availableOptimizerorDefenderrmwareupgrades.
3.1 Optimizer Software
Your Defender is supplied with Bios Optimizer Collect light. Bios
Optimizer Collect light captures flow data from your Defender
directly to a Microsoft Excel®pre-conguredspreadsheet.
You can upgrade to Bios Optimizer Collect for more features
such as hot key commends, instrument library, have multiple
instruments interface simultaneously and much more.
To run Optimizer Collect (upgraded version) or Collect light
youmusthaveWindows®XP,Windows®Vista (32 bit version),
Microsoft Excel®2000, 2003, 2007. See the Optimizer CD
cover for installation instructions.
3.0
2.0

18
19
3.2 SKC CalCheck®Interface
TheDefendermaybesettoautomaticallycalibrateSKC’s
Airchek®2000andLelandLegacypumps,withthepurchase
of a CalChek communications cable from SKC (for details
please contact SKC at www.skcinc.com). On your Defender,
setSetup>Preferences>DataPortto<SKC>highlightCONFIRM
and press the Enter button before taking measurements.
3.3 Defender Firmware Upgrades
TheDefenderrmwareisupgradablethroughtheDataPort.
Firmware upgrades and procedures for your Defender are
available online through our website (www.biosint.com).
4.0
4.0 Annual Maintenance and Calibration
Assuring top performance and accuracy
Your Defender is a precision measuring standard with moving
parts machined to extremely close tolerances. Various environ-
mental factors, product wear, drift of sensors, or inadvertent
damagemayadverselyaffectyourDefender’smeasurement
accuracy or general performance. For these reasons, Bios
highlyrecommendshavingyourDefenderannuallyveriedby
an ISO 17025–accredited laboratory, such as Bios, to ensure its
measurement integrity.
For the ultimate in Defender maintenance and to take advantage
of any available software and mechanical upgrades, Bios offers
anannualnon-mandatoryRecerticationprogram.Thisisa
service package that provides complete product refurbishment,
testingandavailableupgrades;calibrationandNIST-traceable
calibrationcerticates.
Recerticationincludesa90-dayservicewarrantyshouldany
related labor or parts replacements prove faulty.
Turnaround time is generally two weeks from time of receipt.
Expedited 48-hour turnaround is available.
3.0

20
21
Shipping
WhenshippingyourDefender,besuretofollowsomesimple
guidelines to avoid costly damage to your property.
• Useadequatepackingmaterial.Wheneverpossible,usethe
original packing that came with your Defender. Or use a Bios
Pelicancarryingcase,whichprovidesahardcaseshellfor
protection of your valuable equipment. If you do not already
haveaBiosPelicancase,visitusatwww.biosint.comfor
more information on obtaining one.
• Useamajorfreightcarrier(e.g.,FedEx,UPS)thatsupplies
tracking numbers.
• InsureyourDefender.Biosisnotresponsiblefordamage
occurred during transit.
• Understandourmutualshippingobligations.Biosis
responsible for shipping cost only if the issue is product
related and the Defender is still under warranty.
Tips and guidelines for sending your Defender to Bios
If you are sending your Defender for repair or evaluation (rather
thanelectiveRecertication),contactBiosfortechnicalsupport
ortroubleshootingassistancepriortoshippingtheunit.Pro-
vide us a detailed description of your issues. If we are unable
to resolve the situation by phone or email, we will issue you
an RMA (return merchandise authorization) number. Follow
online instruction for proper return procedure.
You can obtain an RMA number through our automated
web-based system at http://www.biosint.com/contactUs/
rmaform.aspx. RMAs also can be obtained through email
to service@biosint.com, or by telephone at 973.492.8400.
Our web site address is www.biosint.com.
Note: Bios will not evaluate or service your instrument without
an RMA number.
Ifwendtheissuesyouhaveidentiedareapplicationrelated
and not product related, an evaluation fee will be charged.
5.0
5.0 Shipping

22
23
6.0 Storage
Protecting your Defender when not in use
If you need to store your Defender for an extended period,
please follow these guidelines:
• Alwaysstoreitinaclean,dryplace.
• Ifpossible,leaveitattachedtoitsACpoweradapter/charger
while in storage.
• IfyourDefendercannotbeattachedtoitsACpoweradapter/
charger while in storage, please do the following:
– Fully charge it before extended storage. If the battery
is not fully charged prior to storage, it might be
permanently damaged.
• Fullychargeitatleastonceeverythreemonths.
• Rechargethebatteryforatleast8hourspriortoreusingyour
Defender after storage.
6.0
7.0
7.0 Defender Specifications
Technical data about your Defender
Models:
510L/520L,from5-500mL/min
510M/520M,from50-5,000mL/min
510H/520H,from300-30,000mL/min
Measurements:
Volumetric Accuracy: ±1% of reading
Time per Measurement: 1-15 seconds (approximate)
Type: Single, Continuous or Burst
Volumetric Flow Units:cc/min,mL/min,L/min,cf/min
Pressure Units (Defender 520):mmHg,PSI,kPa
Temperature Units (Defender 520): °C, °F
Basics:
Dimensions (H x W x D): 5.5 x 6 x 3 in / 140 x 150 x 75 mm
Weight: 29 oz / 820 g
Configuration: Integrated flow measuring cell,
valve and timing mechanism
Temperature & Pressure Sensors (Defender 520 model only):
In the flow stream
Press Accuracy: 3.5mmHg(typical),7.0mm(max);
Temp Accuracy: 0.8° C (typical), 1.3° C (max)
AC Power Adapter/Charger: 12VDC, 250ma, 2.5 mm,
center positive
Port Tube Diameter: 1/4 in / 6.35 mm

24
25
Battery: 6V rechargeable, sealed lead-acid,
6-8 hours typical operation
Battery Operational Time (5 cycles/min): 3 hrs backlight on,
8 hrs backlight off
Pressure & Suction Fittings: ¼”barbedtubettings
Display: BacklitgraphicalLCD
Usage:
Flow Modes: SuctionorPressure
Operating Pressure (Absolute):15PSI
Operating Temperature: 0-50° C
Ambient Humidity: 0–70%, non-condensing
Storage Temperature: 0–70 °C
Warranty:1year;battery6months
Bios Optimizer Software:
RequiresWindowsVista,WindowsXP–SP2orWindows
2000–SP3compatiblePCandRS-232(serial)connection
BiosOptimizerinstallationCD(supplied);norestrictionsapply
RS-232 cable (supplied) for Defender 500 Series data port to
PCRS-232(serial)portconnection
PCCard(optionalandasnecessary)createsanRS-232
portonyourPC
LicensedupgradetoBiosOptimizerCollectisavailable
7.0
8.0
8.0 Default Settings
Original factory settings for your Defender
The Defender is set with the following Default settings
from the factory:
• FlowUnits–mL/min
• NumberinAverage–10
• TimeBetween–0
• MeasurementMode–Single
• Backlight–On
• PowerSave–On
• TimeFormat–24hour
• DateFormat–MM-DD-YYYY
• TemperatureUnits(Defender520only)–C
• PressureUnits(Defender520only)–mmHg
• Magnication(Defender520only)–Zoom

26
27
9.0 Limited Warranty
Outlining our responsibilities
The Bios Defender 500 Series is warranted to the original end
user to be free from defects in materials and workmanship un-
der normal use and service for a period of one year from the date
ofpurchaseasshownonthepurchaser’sreceipt.TheDefender
500Series’batteryiswarrantedforsixmonthsfromtheoriginal
purchase date. If the unit was purchased from an authorized
reseller, a copy of an invoice or packing slip showing the date of
purchase may be required to obtain warranty service.
The obligation of Bios International Corporation under this war-
ranty shall be limited to repair or replacement (at our option),
during the warranty period, of any part that proves defective in
material or workmanship under normal use and service, pro-
vided the product is returned to Bios International Corporation,
transportation charges prepaid.
Notwithstanding the foregoing, Bios International Corporation
shall have no liability to repair or replace any Bios International
Corporation product:
1. That has been damaged following sale, including but not
limited to damage resulting from improper electrical voltages
or currents, defacement, misuse, abuse, neglect, accident,
re,ood,terrorism,actofGodoruseinviolationofthe
instructions furnished by Bios International Corporation
2. Whentheserialnumberhasbeenalteredorremoved
3. That has been repaired, altered or maintained by any person
orpartyotherthanBiosInternationalCorporation’sown
service facility or a Bios authorized service center, should
one be established.
This warranty is in lieu of all other warranties and all other
obligations or liabilities arising as a result of any defect or
deciencyoftheproduct,whetherincontractorintortor
otherwise. All other warranties, expressed or implied,
including any implied warranties of merchantability and
tnessforaparticularpurpose,arespecicallyexcluded.
In no event shall Bios be liable for any special, incidental or
consequential damages for breach of this or any other warranty,
express or implied whatsoever.
9.0

28
29
10.0 Troubleshooting
Answers to common operational questions
Bios is ready to help you with any operational issue you may
encounter with your Defender. But we may be able to save you
some time by providing a short checklist of the questions most
commonly asked of our customer service and technical
specialists.
Why won’t my Defender turn on?
If the Defender will not turn on, verify that the battery has been
charged.WhenconnectedtotheACpoweradapter/chargerand
power is present a small green indicator light should be visible
through the front viewing window
My Defender won’t respond to push-button commands.
If the Defender fails to respond to push-button commands, you
can perform a hard reset of the Defender. This can be done by in-
serting a paper clip into the reset opening in the back of the unit.
I’m not sure I have my Defender connected properly.
Verify that the flow source is connected to the pressure port of
your Defender for pressure sources or to the suction port for ver-
ifying suction pumps. The unused port should be at atmospheric
pressure with any cap or plug removed. If you are calibrating a
gas that requires an exhaust line to vent the measurement gas,
ensurethatthetubingisofsufcientdiameternottocreatea
pressure drop greater then 5 inches of water.
How do I protect against leaks?
Ensurethathoseandtubettingsaretightandleakfree.
The tubing connecting your flow source (pump, mass flow
controller, needle valve, sonic nozzle or restrictor) to the
meter should be kept as short as possible.
What do I do when my leak test fails?
First check to make sure that the leak test cap is on correctly and
it is not leaking through the leak test cap itself. If the leak test
cap is correct perform leak test both at the pressure and suction
side. If it fails, contact Bios Technical Support.
What’s the best way to connect to the filter medium?
Whencalibratingsamplingpumpsbestresultsareobtained
withtheltermediumconnectedtothepumpandtheDefender
connectedtotheinletsideoftheltermediumwithashortpiece
of tubing.
10.0

30
31
Why am I experiencing a temperature increase in my
Defender 520?
A temperature rise during initial battery charging, or while
charging a fully discharged battery is normal. To maintain the
best possible accuracy Bios recommends fully charging your
battery before taking measurements. If this is not possible, we
recommend disconnecting your Defender from its AC power
adapter/charger while taking flow measurements – or to run
gas through your Defender for 10 minutes before starting the
flow measurement.
Why doesn’t my piston return to the bottom of the cell?
If the piston fails to return to the bottom of the cell after a
measurement this could be caused by:
• Adischargedbatterynotprovidingenoughpowertooperate
the internal valve properly (Try charging the Defender)
• Brightlightshiningintotheunitresultinginanoverload
of the internal optical sensors (Try to operate the unit in
a shaded location)
• Moistureordirtinsidethecell(ReturntheDefenderto
Bios for service)
10.0
What is Dead Volume ?
Dead Volume is the gas volume between a flow generator
and the instrument taking the measurement. Since gas is
compressible, this gas can act as a spring between the flow
source and the measurement instrument. For best accuracy
this volume should be kept to a minimum.
Werecommendkeepingthetubinglengthbetweenthe
gas flow generator and your Defender to no more then
.5 meters/20 inches in length.

Driving a Higher Standard
in Flow MeasurementSM
Bios International Corporation
10ParkPlace
Butler, NJ, USA 07405
Phone:973.492.8400
Toll Free: 800.663.4977
Fax: 973.492.8270
Email: sales@biosint.com
web: www.biosint.com
© 2009 Bios International Corporation
MK01-24 REV D
This manual suits for next models
6
Table of contents
Other BIOS Test Equipment manuals


