Biowave GO User manual
user’s manual
Designed to Block Pain
at the Source™
Revised
Mar 2019

BioWaveGO User’s Manual
BioWave Corporation2
Rev: 190314 - rev 7

BioWave Corporation 1
Table of Contents
1. Indications For Use ...........................................................................................................5
2. Device Description............................................................................................................6
2.1 Device Accessories.................................................................................................... 7
Leadwire Cable ..........................................................................................................7
AC Charger.................................................................................................................9
BioWaveGO Reusable Pain Relief Pads...................................................................10
2.2 Device Controls....................................................................................................... 12
Power Button............................................................................................................12
Plus Button ...............................................................................................................12
Minus Button............................................................................................................12
2.3 Controls via the App Using Bluetooth.....................................................................12
2.4 LED Bar Graph Indicator......................................................................................... 14
3. When the Stimulator Should Not Be Used (Contraindications)............................... 16
3.1 When the Stimulator Should Not Be Used (Contraindications) ............................. 16
3.2 Risks/Benets .......................................................................................................... 17
3.3 Warnings...................................................................................................................18
3.4 Precautions ...............................................................................................................19
3.5 Adverse Reactions....................................................................................................20
4. User Instructions...................................................................................................... 21
4.1 First Time Set Up and Quick Operating Steps.........................................................21
4.2 Rationale for Pain Relief Pad Placements.................................................................22

BioWaveGO User’s Manual
BioWave Corporation2
4.3 Pad Placements for Different Pain Conditions ........................................................23
Two Locations of Pain...............................................................................................23
Single Location of Pain.............................................................................................23
Radiating Pain ..........................................................................................................23
Large Area of Pain....................................................................................................24
4.4 BioWaveGO Pain Relief Pad Placement Examples..................................................25
Low Back Pain ..........................................................................................................26
Mid Back Pain...........................................................................................................31
Hip Pain ....................................................................................................................32
Rib or Oblique Pain..................................................................................................33
Quadriceps Pain ..................................................................................................................... 34
Hamstring Pain ................................................................................................................... 35
Knee Pain ................................................................................................................... 36
Lower Leg Pain ................................................................................................................... 44
Ankle and Foot Pain.................................................................................................46
Neck Pain ........................................................................................................52
Shoulder Pain ........................................................................................................55
Elbow Pain ........................................................................................................62
Wrist Pain ........................................................................................................65
Hand and Finger Pain ..............................................................................................67
4.5 Pain Relief Pad Placement Tips................................................................................69
4.6 Body Position During the Treatment........................................................................70
4.7 Motion During the Treatment...................................................................................71
4.8 Using the BioWaveGO Stimulator............................................................................73
Starting Treatment....................................................................................................73
During Treatment .....................................................................................................73
End of Treatment......................................................................................................74
4.9 Importance of Monitoring the Activity of the Stimulator.........................................74
Table of Contents (continued)

BioWave Corporation 3
Table of Contents (continued)
5. Treatment Regimen Protocols ................................................................................. 75
5.1
Treatment Regimen for Chronic Pain ............................................................................75
5.2 Treatment Regimen for Acute Pain
(For example as Part of an Athletic Training Regimen) ...........................................76
5.3 Adjunct Treatment Regimen for Postoperative Pain and
During Physical Therapy and Rehabilitation............................................................77
6. Battery Indicator and Charging the Battery............................................................ 79
7. Maintenance, Cleaning and Storage Instructions.................................................... 80
8. Troubleshooting....................................................................................................... 82
8.1 Troubleshooting Error Conditions............................................................................82
Leadwire Cable Connection to the Stimulator ........................................................83
Pain Relief Pad Connection to the Leadwire Cable.................................................83
Pain Relief Pad Connection to the Patient...............................................................83
8.2 Use of Non-BioWave Pain Relief Pads .....................................................................85
8.3 Muscle Twitching ......................................................................................................86
8.4 Automatic Safety Function .......................................................................................86
8.5 Pain Relief Pad Spacing ...........................................................................................87
9. TechnicalSpecications ........................................................................................... 88
10. Contact Information and Warranty.......................................................................... 96

BioWaveGO User’s Manual
BioWave Corporation4
IMPORTANT!
Before using this product, read the
following information thoroughly.

BioWave Corporation 5
BioWaveGO®is indicated for:
• the symptomatic relief of chronic intractable pain
• the symptomatic relief of acute pain
• as an adjunctive treatment in the management of post-surgical and post-
traumatic acute pain
1. Indications for Use
Neck and
Cervical
Lower Back
Shoulder
AREAS OF TREATMENT
Wrist, Hand
and Fingers
Hip
Elbow
Knee
Ankle, Foot
and Toes
See Section 4.4 for examples of Pain Relief Pad placements.
Biceps
Shoulder
Calf
Triceps
Quadriceps
Hamstring
Forearm Mid Torso
IT Band
Buttock
Shin
BioWaveGO User’s Manual
BioWave Corporation6
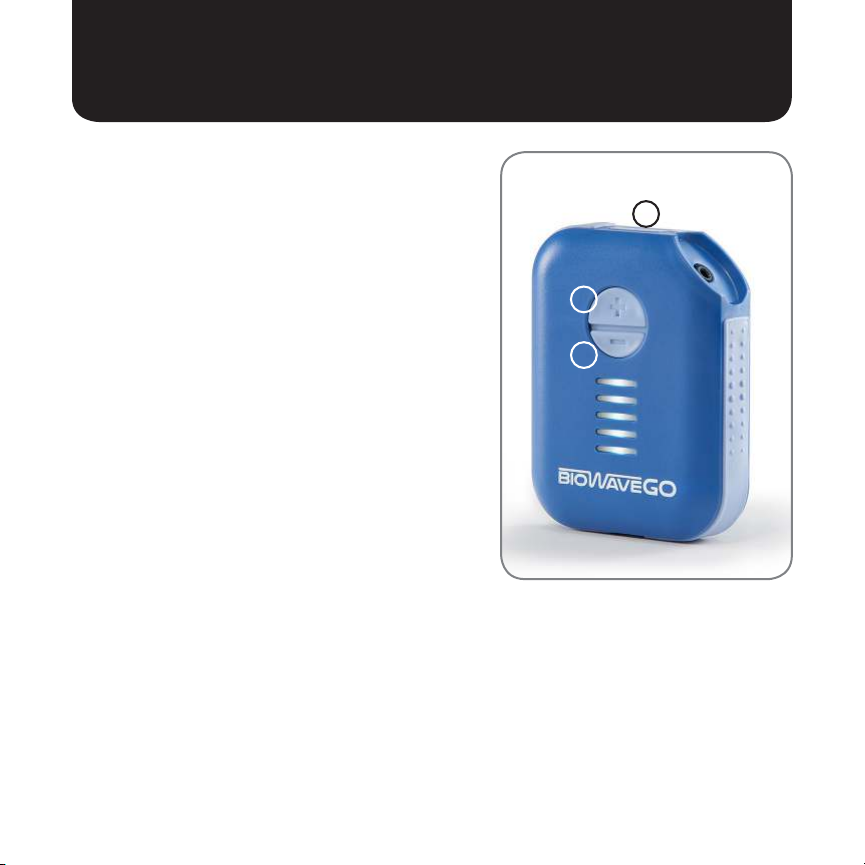
BioWaveGO®is a pain therapy neurostimulator
which utilizes a unique signal mixing technology
to deliver electrical signals through the skin
into deep tissue for blocking pain signals on
pain nerves inside the body and for improving
function.
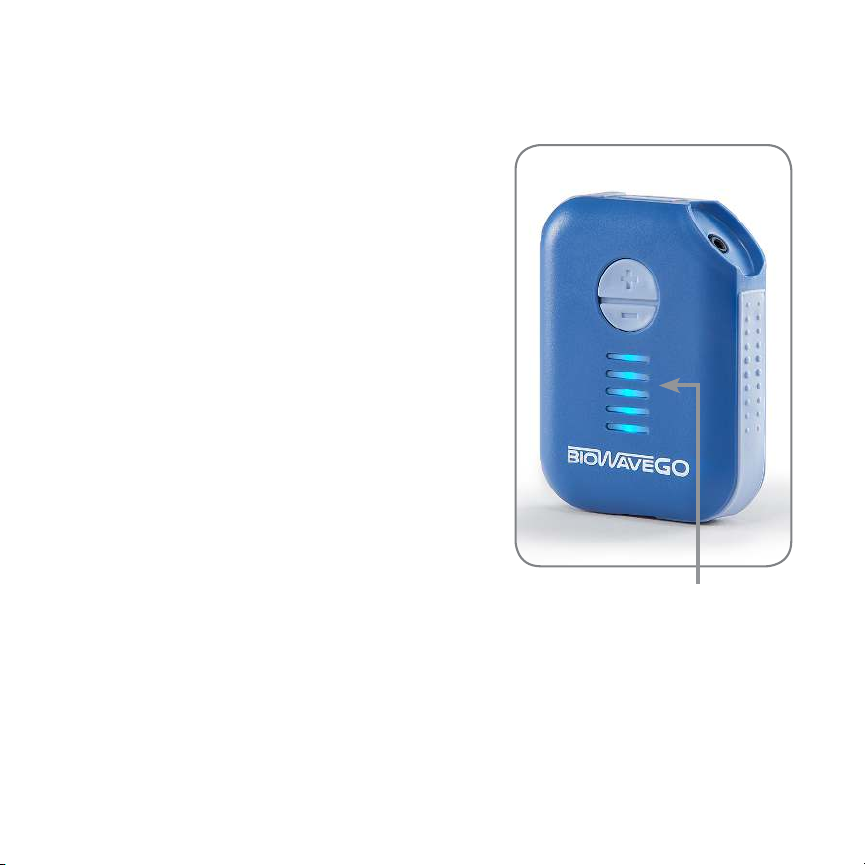
The stimulator is comprised of a plastic housing
containing the electronics and a rechargeable
battery. On the face of the stimulator is a large
LED Bar Graph which indicates the status of the
device. The LED Bar Graph provides information
on signal intensity, remaining treatment time,
battery life, blue tooth connectivity and battery
charging.
There are 3 buttons that control the
stimulator:
1. Power ON/OFF button
2. PLUS (+) button to increase intensity
3. MINUS (–) button to decrease intensity
2
3
1
2. Device Description
BioWaveGO®
Neurostimulator
BioWave Corporation 7
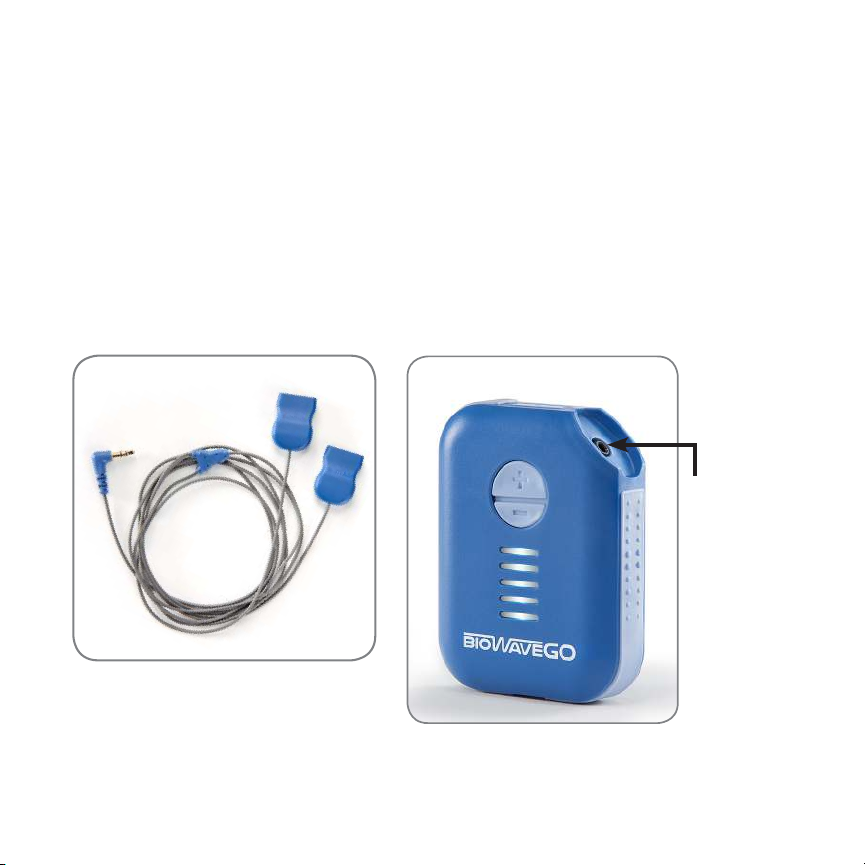
2. Device Description
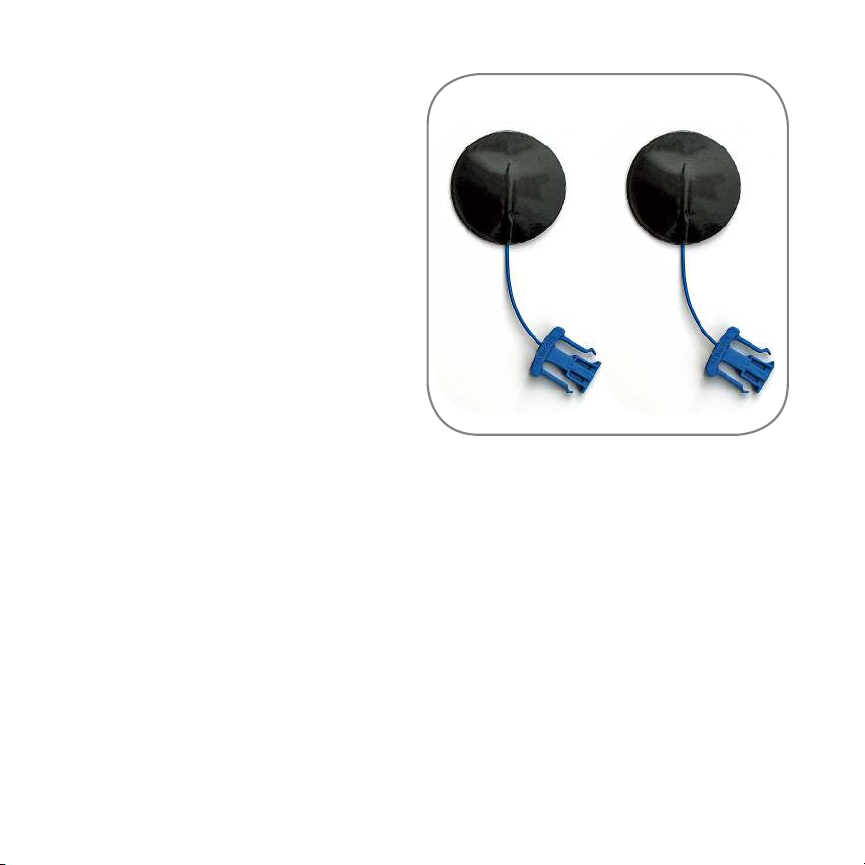
Leadwire Cable
Leadwire Cable
Plugs into
Stimulator
2.1 Device Accessories
Leadwire Cable
A “Y” shaped leadwire cable connects 2 disposable
Pain Relief Pads to the BioWaveGO®stimulator.
The single end of the leadwire cable plugs into a
connector at the top right of the stimulator as shown
in the photo to the right below.
Lever

BioWaveGO User’s Manual
BioWave Corporation8
Connecting the Leadwire Cable
to Pain Relief Pads
BioWaveGO®uses 2 Pain Relief Pads for a
treatment. Either Pain Relief Pad can be
connected to either blue connector at the end
of the leadwire cable (see photo to the right).
Orientation of the blue connectors (top or
bottom side) does not matter.
Line up the leadwire cable and Pain Relief
Pad connectors and plug them together
until they click in place. When connected
toegther, the Pain Relief Pad connector will
partially stick out from the leadwire cable
connector allowing an easy grip when pulling
them apart.
Removing the Pain Relief Pads from the Leadwire Cable
To remove the Pain Relief Pads from the leadwire cable, grasp each side of the blue
connectorwithyourthumbandindexngerandpullthemstraightapart.Youdonot
need to squeeze the prongs on the Pain Relief Pad connector to insert or remove
them.
Leadwire Cable
Connectors
Pain Relief Pad
Connectors
BioWave Corporation 9
2. Device Description
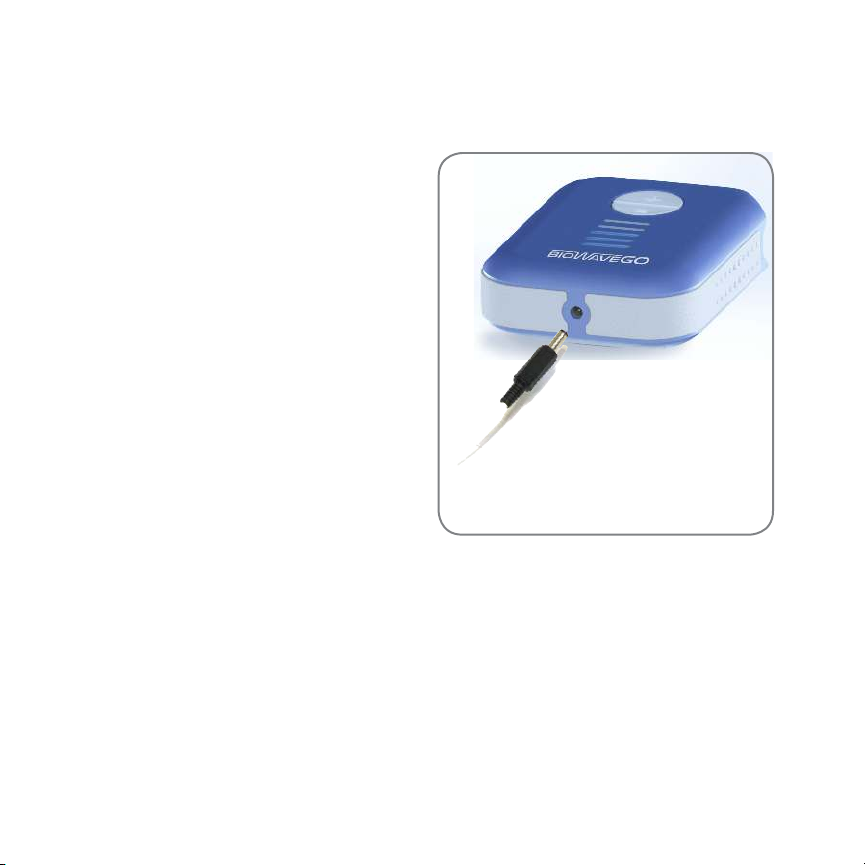
AC Charger
The universal AC Charger is only used to
recharge the battery in the stimulator. The
stimulatormustrstbeturnedoffbefore
plugging in the AC Charger. The stimulator
will not operate while the AC Charger is
plugged into the stimulator.
One end of the cord from the AC
Charger is plugged into the receptacle
on the bottom of the stimulator as
shown in the photo to the right. The
other end is plugged into a standard
electrical outlet. (100-240 Volts at 50-60
Hz).

BioWaveGO User’s Manual
BioWave Corporation10
BioWaveGO Reusable Pain Relief Pads
BioWaveGO Pain Relief Pads are reusable surface Pain Relief Pads typically used to
reduce pain and facilitate physical therapy activity such as active or passive range
of motion, exercise and stretching. Only BioWaveGO Pain Relief Pads work with the
BioWaveGO stimulator.
WARNING!
Pain Relief Pads MUST NEVER TOUCH EACH OTHER
• 1.0 inch is the minimum spacing between Pain Relief Pads
• There is NO maximum spacing between Pain Relief Pads
BioWave Corporation 11
BioWaveGO Pain Relief Pads are
comprised of two 2” diameter round
reusable pads that are placed:
• directly over
2 locations of pain.
• over a single location of pain and over
a bony prominence (a comfortable
location to receive stimulation).
• for radiating pain, one pad is placed
over the source of the pain (for example
over the spine), and the other pad
isplacedovertherstlocationpain
presents that is closest to the source.
• both pads can be placed one inch apart
from one another directly over a large
area of pain.
BioWaveGO Pain Relief Pads are reusable
but must be tacky to the touch. If not,
please use a new set of Pain relief Pads.
BioWaveGO Pain Relief Pads must not
touch each other when the unit is turned
on. One inch is the minimum spacing.
2. Device Description

BioWaveGO User’s Manual
BioWave Corporation12
2.2 Device Controls
Power Button
The Power Button is located on the top of the stimulator. Pressing the Power Button
turns the stimulator on. While the stimulator is on, pressing the Power Button once
immediately pauses the treatment (intensity is reduced to zero and the countdown
timer pauses). Holding the Power Button down for 2 seconds turns the stimulator off.
Power should be turned on after the Pain Relief Pads are attached to your body and to
the cable, and the cable is plugged into the stimulator.
PLUS Button (+)
Pressing the PLUS (+) Button starts the treatment and increases the intensity of the
signal and the level of the tingling/pressure sensation that you feel.
MINUS Button (–)
Pressing the MINUS (–) Button decreases the intensity of the signal and the level of the
tingling/pressure sensation that you feel.
2.3 Controls via the App Using Bluetooth
(Recommended)
Using the BioWaveGO App will greatly enhance your BioWave experience. You
can start, stop and adjust the intensity of your treatment using the app. You can
also track your pain relief progress over time. The treatment can also be controlled
simultaneously directly from the PLUS/MINUS button on the device.

BioWave Corporation 13
2. Device Description
To use the app follow these steps:
1. Download the BioWaveGO app from the App Store or Google Play.
2. Plug each Pain Relief Pad into the blue connectors on the leadwire cable.
3. Clean your skin with a damp wash cloth in the two locations the Pain Relief Pads
are to be placed.
4. Place at least one Pain Relief Pad over the pain site on your body. Place the second
Pain Relief Pad for your particular pain condition as shown in the appropriate
photo in Section 4.4 - Pain Relief Pad Placement Examples. Pain Relief Pads must
not touch each other.
5. Plug the leadwire cable into the top right corner of the device.
6. Press the power button on the top of the device. The device will connect with your
Smartphone and emit a single tone when the connection is complete.
7. Launch the BioWaveGO app and follow the instructions:
a. Click on the “Pair Your Phone with BioWaveGO” message that appears.
b. Click on the part of the body you want to treat on the body that appears.
c. Click on your pretreatment pain score on the scale that appears.
d. Press the PLUS button to increase intensity on the main screen that appears to
begin the treatment. Continue to increase the intensity to keep the sensation
strong but comfortable.
The PLUS/MINUS button on the app exactly mimics the PLUS/MINUS button on the device.
Make sure your smartphone and the device are within 10 feet of each other to ensure quality
of the bluetooth connection. If the bluetooth connection is lost, there is no effect on your
treatment - you can continue to control the treatment using the buttons on the device. Radio
frequency transmitters may affect the quality of the bluetooth connection. If you are using
the app, make sure to perform the treatment at least 50 feet away from any radio frequency
transmitter.
BioWaveGO User’s Manual
BioWave Corporation14
The LED bar graph on the front of the device has
5 segments and provides treatment information in
different colors:
•Battery Strength Indicator - GREEN
Remaining battery life is indicated in GREEN for
3secondswhenthedeviceisrstturnedon.
•Blue Tooth Connection - BLUE
When the device is connected to a
smartphone the top LED on the LED Bar
Graph will blink BLUE while the connection
is being established and will emit an audible
tone for 1 second indicating a bluetooth
connection to a smartphone.
oRemaining Treatment Time - WHITE
The remaining treatment time is displayed in
WHITE. As the 30-minute treatment continues
each bar dims and then turns off.
•Signal Intensity - BLUE
The intensity of the treatment is displayed in
BLUE for 3 seconds after the PLUS or MINUS
button is pressed. The higher the intensity, the
more bars that are displayed in BLUE.
LED Bar Graph
Indicator Displaying
Signal Intensity
2.3 LED Bar Graph Indicator

BioWave Corporation 15
2. Device Description
•Charging the Battery - GREEN
While the device is charging, each bar on the LED Bar Graph will be in GREEN
and will grow in brightness and then additional bars will light up as the battery
charges up. Once the device is fully charged, the LED Bar Graph will turn off.
oPause Treatment - WHITE
Pressing the Power Button once quickly PAUSES the treatment. All 5 LEDs will
breathe WHITE. To start back up, continue to press the PLUS button to manually
increase the intensity from zero.
•Troubleshooting - ORANGE
When there is a connection problem all 5 LEDs will blink ORANGE, the intensity is
immediately reduced to zero and the treatment time is paused. For example, after
multiple uses, if the Pain Relief Pads are no longer tacky to the touch, the device
may indicate a connection error because it does not see the Pain Relief Pads on
the skin. Use a new set of Pain Relief Pads and reconnect the cable to the device
and Pain Relief Pads. The LED bar graph will change to show WHITE bars if at the
beginning of a new treatment, or if the error occurs mid treatment, the WHITE bars
willbeashingonandoffindicatingthedeviceispaused.Tocontinuetreatment,
press the PLUS button to manually increase the intensity from zero to a strong but
comfortable treatment level.

BioWaveGO User’s Manual
BioWave Corporation16
Read these instructions, including When the Stimulator Should Not Be Used
(Contraindications),Risks/Benets,andallWarnings,PrecautionsandAdverse
Reactions BEFORE using BioWaveGO®to ensure proper use of the device.
3.1 When the Stimulator Should Not Be Used
(Contraindications)
• DO NOT use if you have an implanted cardiac pacemaker as the stimulator may
interfere with its function.
• DO NOT place the Pain Relief Pads on your chest over your heart as it can cause
injury.
•DO NOT place the Pain Relief Pads on the front or side of the neck.
• DO NOT place the Pain Relief Pads on the top of the head.
• DO NOT place the Pain Relief Pads over open wounds, broken skin, rashy skin or
sensitive skin areas like sunburned skin.
.
3.When the Stimulator Should
Not Be Used (Contraindications),
Risks/Benets, Warnings, Precautions
and Adverse Reactions

BioWave Corporation 17
3.2Risks/Benets
Risks
• There is a risk of rash underneath the Pain Relief Pad area. If you have sensitive skin
and routinely might have contact dermatitis (a rash), for example, from removing a
Band-Aid®from the skin, then there is a risk of rash upon removal of the Pain Relief
Pads.
• The device is programmed to deliver a limited amount of energy through the skin,
to protect against discomfort. However, it is also important for protecting against
discomfort, that BioWaveGO®not be used on any area of your body that you are
concerned may be overly sensitive to the impulses from the stimulator, for example,
on sunburned skin.
• There is a risk of infection if the Pain Relief Pads are placed on broken skin. Infection
can be avoided by using the stimulator and placing Pain Relief Pads on intact skin.
Pain Relief Pads may be placed over healed scar tissue or over tatoos.
Benets
• CustomersreportthatBioWavetreatmentsmayprovidesignicantpainrelief.
• BioWaveGO®is an easy to use 30-minute treatment.
• Treatment using the BioWaveGO®System may provide temporary relief of pain or
discomfort.
• Patients should expect to feel a light numbness in the volume of tissue treated, 5
minutes into the treatment, immediately after and for up to 20 minutes following a
30-minute treatment.
3. When the Stimulator Should Not Be Used

BioWaveGO User’s Manual
BioWave Corporation18
• Most patients should start to feel a reduction of pain during and immediately after their
rsttreatment.
• It is recommended that treatments are performed not longer than 24 hours apart,
asthisscheduleisintendedtomaximizethepotentialbenetsofeachsuccessive
BioWaveGO®treatment.
• Treatment with BioWaveGO®can be combined with heat, cold and compression
therapies as well as with treatment via conventional medicine.
3.3 Warnings
• BioWave Pain Relief Pads must never touch each other during a treatment. Pain
Relief Pads that touch each other during an active treatment will cause a burn. One
inch is the minimum spacing between Pain Relief Pads on the back. Half of one inch is
the minimum spacing between Pain Relief Pads on joints or extremities.
• DO NOT plug into an AC outlet during use. The stimulator is battery operated and
will not operate while the AC charger is plugged in.
• DO NOT use around water. Contact with water could cause electric shock, which can
result in serious injury to the patient.
• The safety of the BioWaveGO®stimulator for use during pregnancy or labor, for use
in the vicinity of cancerous legions and for use in patients with epilepsy or seizures
has not been established.
• The stimulator provides a symptomatic treatment and as such suppresses the
sensation of pain which would otherwise serve as a protective mechanism.
• The long-term effects of chronic electrical stimulation are unknown.
• Stimulation should not be applied over the front or side of the neck. Severe spasm
of the laryngeal and pharyngeal muscles may occur and the contractions may be
Other manuals for GO
2
Table of contents
Other Biowave Medical Equipment manuals


Popular Medical Equipment manuals by other brands

orfit
orfit AIO SOLUTION P-LD-PED Instructions for use

Moretti
Moretti MOPEDIA RS993M quick guide

ConvaTec
ConvaTec Little Ones One-Piece Extra Small Ostomy... Application

BD
BD BD FACSPresto Instructions for use

Sunrise Medical
Sunrise Medical Hoyer Fitting instructions

Ormesa
Ormesa DONDOLINO Series Use and maintenance handbook

Arjo
Arjo Maxi Sky 1000 Quick reference guide

Integra
Integra CUSA Clarity Cleaning Instruction Guide

alpro
alpro Weekend-System II Operating & installation instructions

Nonin
Nonin Onyx II 9560 Instructions for use

Alaris Medical Systems
Alaris Medical Systems Medley 8100 manual

GE
GE MAC 1200 Servicing instructions


