Biowave GO User manual

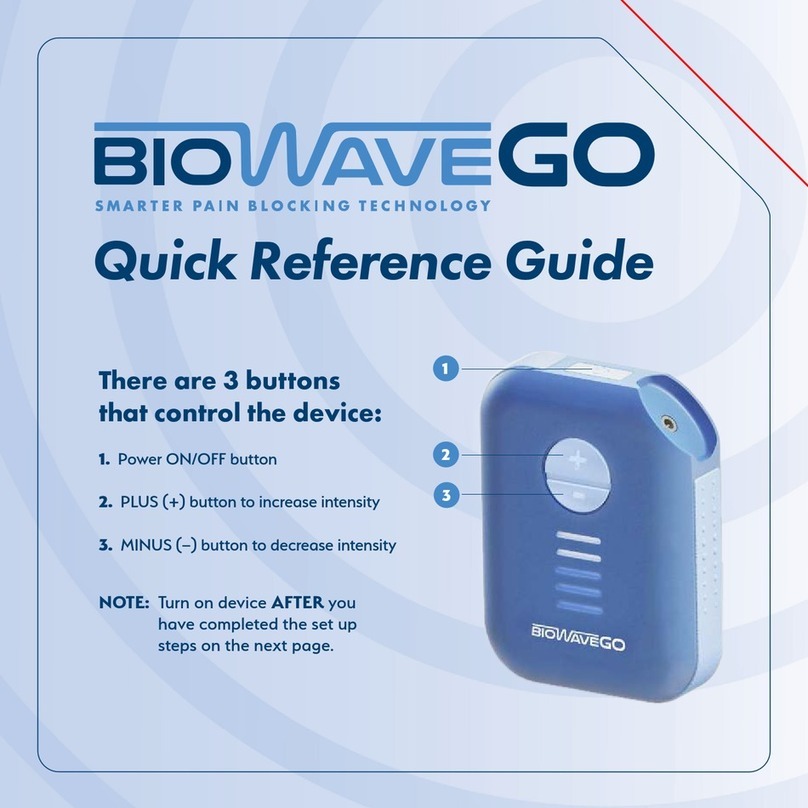
There are 3 buttons
that control the device:
1. Power ON/OFF button
2. PLUS (+) button to increase intensity
3. MINUS (–) button to decrease intensity
NOTE: Turn on device AFTER you have completed
the set up steps on the next page.
1
2
3
Quick
Reference
Guide
Questions? Call us!
1-877-BIOWAVE • (1-877-246-9283)
Battery Maintenance:
Please charge battery
at least 1x per week.

Do not turn on unit until Step 6.
Plug in the AC charger
into your BioWaveGO
unit to charge up the
battery. (Takes about
1 hour.)
1.
2.
3.
4.
5.
6.
7.
Find your PAD PLACEMENT PHOTO
for your specic pain site on pages
6-10 of this Quick Reference Guide
Plug blue Pad
CONNECTORS into
blue LEADWIRE CABLE
CONNECTORS.
Clean your skin with a
damp washcloth in the
location the PADS are
placed. Apply Pain
Relief Pads directly
over areas of pain.
Plug LEADWIRE
CABLE into device
so it clicks in place.
Press Power Button
to turn unit on.
(AC Charger must
be disconnected
from unit.)
Press the PLUS (+)
button to start
treatment. Continue
to press the PLUS (+)
button throughout
treatment to keep a
strong but comfortable
sensation.
Directions for Use

LED Bar Graph
Indicator
The LED bar graph provides
treatment information in
different colors:
Battery Strength Indicator - GREEN
Charging the Battery - GREEN
Blue Tooth Connection - BLUE
Signal Intensity - BLUE
Remaining Treatment Time - WHITE
Pause Treatment - WHITE
Troubleshooting - ORANGE
If the unit is turned on and the lights
blink orange, please make sure that
the lead wire cable is rmly plugged
into the BioWaveGO unit and into
the pain relief pads, and that the
pain relief pads have good adhesion
to clean skin.

Using the Device
Make sure pads are tacky and placed
correctly on the body based on the Pad
Placement Photos on pages 6-10 of this
Guide or at BioWave.com/start
Users should increase intensity to a level
that is strong but still comfortable by
pressing the PLUS (+) button
Users should continue to press the PLUS
(+) button throughout the 30-minute
treatment to keep the sensation at a
strong steady level
Research shows users should try to reach a
minimum intensity level of 3 blue bars (or
if you are using the App, 40%) during the
course of the treatment for the best effect.
Some people may feel comfortable with
more, some with less.
Most users generally can tolerate higher
intensity levels in the knee, foot and ankle;
medium intensity levels on the back and
shoulder; and lower intensity levels on the
neck, elbow, wrist, hand and ngers.
Mobile App Control
Alternative
Treatment Tips
BioWaveGO can
be used with or without the App
• First make sure you are connected to the
BioWaveGO device and you have completed
steps 1-6 or 1-7 on page 2.
• Launch the BioWaveGO app on your
smartphone and click the pair button that
appears on your iPhone. Android phones will
pair automatically. Once you hear a couple
of tones, your phone has paired with your
BioWaveGO.
• Intensity number and countdown timer are
viewable on the App.
• Intensity can be controlled from either the
App or the Device.
The App can be
downloaded
on your
smartphone at:

Troubleshooting
My BioWaveGO is turned on
and all it does is beep and the
lights blink ORANGE.
Answer: The device does not see a complete
connection to your skin. Therefore, please
make sure of the following:
1. The leadwire cable is rmly plugged into the
BioWaveGO unit.
2. Both pads are plugged into the other ends
of the lead wire cable.
3. Your skin has been thoroughly cleaned with
a damp towel.
4. The pads are tacky and have good
adhesion to your skin.
I cannot get the BioWaveGO
and my cell phone to pair.
Answer: Make sure the bluetooth function
on your phone is turned on. Next, connect
BioWaveGO to your body and then turn on the
unit. Now launch the app and click the pair
button that appears on your iPhone. Android
phones will pair automatically. Once you hear
a couple of tones, your phone has paired with
your BioWaveGO.
The pads are not sticking
to my skin.
Answer: It is important to clean the skin prior
to placing the pads directly over locations of
pain. Rub the skin vigorously with a slightly
damp towel in the two areas the pads will be
placed. Make sure skin is dry and intact prior
to placing pads on the skin.
If there is a lot of hair in the area of the
pain site, shave the hair before placing the
pad(s) in that location. The gel on the pads
needs to have good direct adhesion to the
pores of the skin to allow the therapeutic
signals to pass into deep tissue.
If the pads are not tacky, place a few drops
of saline on the gel side of the pad and rub it
in with your nger across the entire surface
of the pad so the gel glistens. Wait 60
seconds to allow the saline to absorb in and
rehydrate the gel. The pads can now be used
or stored on the plastic liner.
You can also use a wrap, ace bandage or
piece of medical tape over the pads to help
hold them in place, however the pads still
need to be tacky.
Questions?
biowave.com/start • support@biowave.com
1-877-BIOWAVE • (1-877-246-9283)

PAIN RELIEF PAD
PLACEMENT
AREAS OF TREATMENT
Refer to biowave.com/start
for more information on Pad Placement
BioWaveGO pad placements are different from TENS and other conventional electrical stimulation.
The BioWave active electrical eld forms beneath and surrounding each pad. As a result, pads
need to be placed directly over specic locations of pain.
See pad placement photos on the next 4 pages.
NECK
SHOULDER
BICEPS | TRICEPS | FOREARM
ELBOW
WRIST | HANDS | FINGERS
HAMSTRINGS
QUADRICEPS
IT BAND
KNEE
CALF | SHIN
ANKLE | FOOT | TOES
RIB / MID TORSO
BACK
HIP
BUTTOCK
1. TWO LOCATIONS OF PAIN –
each pad should be placed
directly over a painful area.
2. ONE LOCATION OF PAIN –
one pad is placed directly over a
single location of pain; the second
pad is placed over a bony area
which is a comfortable location
to receive stimulation.
3. Pads must not touch each other
when the unit is turned on - one
inch is the minimum spacing.
4. Pads are reusable but must be
tacky to the touch. If not, please
use a new set of pads.

Back Pain in 2 Locations
(e.g. Bilateral Low Back Pain)
Back Pain Over Large Area
(e.g. Rotational Strain)
Mid-Back Pain (e.g. bilateral
thoracic pain) Hip Pain Quadriceps Pain Hamstrings Pain
Back Pain in 1 Location
(e.g. Unilateral Low Back Pain
to the Right of the Spine)
Low Back Pain Focused over a
Facet Joint Low Back Pain Focused Over
the Spine
Radiating Back Pain - One
Pad Over Origin of Pain,
One Pad Over First Pain Site
(Pads Must be on Skin)
Sacroiliac (SI) Joiny Pain;
Pain from Interstitial Cystitis
Pads Must
Never Touch
Each Other
Back
Hips Quadriceps Hamstrings

Shin Pain (e.g. Shin Splints)
Calf Pain - One Pad Over Pain Site
(e.g. Gastrocnemius Strain) Other
Pad is Placed Toward Bottom of
Knee Cap
Pain from Diabetic Neuropathy
(Tibial Nerve Stimulation)
Pads Must
Never Touch
Each Other
Calves Shins Ankles | Feet
Pain Throughout Entire Knee
(e.g. OA or Total Knee
Replacement
Pain in Inside of Knee
(e.g. Bursitis, OA, MCL Sprain) Pain in Outside of Knee
(e.g. Bursitis, OA, LCL Sprain)
Pain in Back Sides of Knee
(e.g. PCL Sprain)
Pain in Illiotibial (IT) Band Pain Above Knee
(e.g. Quadriceps Tendinitis)
Central Knee Pain Near Front of
Knee (e.g. ACL Sprain) Pain Below Kneecap
(e.g. Patellar Tendinitis)
Knees

Ankle or Foot Pain on
Outside of Foot (e.g. Sprain)
Neck or Cervical Pain in
Multiple Discs Shoulder Pain in Two Locations
or Frozen Shoulder Pain at Top or Throughout
Shoulder (e.g. AC Sprain or
Frozen Shoulder)
Pain in Edge of Shoulder
(e.g. Rotator Cuff Tendinitis)
Pain in Top of Foot. Second Pad
on Bottom of Foot Under Pad on
Top (e.g. Metatarsal or
Neuroma Pain)
Neck or Cervical Pain in Two
Locations Bilateral Neck or Cervical Pain
Ankle or Foot Pain on
Inside of Foot Plantar Fasciitis
Pads Must
Never Touch
Each Other
Ankles | Feet
Neck
Shoulders
Achilles Tendinitis

Pads Must
Never Touch
Each Other
Shoulders
Pain in Front of Shoulder
(E.g. Biceps Tendinitis)
Trap Pain in 2 Locations
(E.g. Bilateral Trapezius Pain)
Pain in Back Of Wrist. Second Pad
on Front Of Wrist (E.g. Sprains,
Strains, Tendinosis)
Pain in Front of Wrist. Second
Pad on Back of Wrist (E.g.
Sprains, Strains, Tendinosis)
Thumb Pain (E.g. Thumb Or
UCL Sprain) Pain In Finger Joints
Pain in Inside of Elbow
(E.g. Golf Elbow) Pain Behind Elbow
(E.g. Triceps Tendinitis)
Pain in Outside of Elbow
(E.g. Tennis Elbow)
Pain in Back of Shoulder
(E.g. Infraspinatus Strain) Trapezius Pain in One
Location (E.g. Trigger Point)
Elbows
Wrists | Hands | Fingers

1"
Pain Relief Pads Must
Never Touch Each Other
During the Treatment
• 1.0 inch is the minimum
spacing between pads
• There is no maximum
spacing between pads
• Pads typically can be
reused about 10 times
Questions?
Call technical support:
1-877-BIOWAVE
(1-877-246-9283)
biowave.com/start
IMPORTANT
Contraindications
When Not to Use BioWaveGO
• Do NOT place pads over the heart, on the front or side of the neck,
or on top of the head.
• Do NOT place pads over open wounds, broken skin, rashy skin or sensitive
areas like sunburned skin.
• Do NOT use BioWaveGO if you have an implanted cadiac pacemaker.
• Do NOT use BioWaveGO if you are prone to siezures (e.g. epilepsy).
NOTE: BioWaveGO MAY BE USED over any location on the body that contains
implanted metal hardware including total joint replacements, rods,
plates, screws, anchors or pins.

Need help?
BioWave Corporation
8 Knight St., Suite 201
Norwalk, CT 06851
P14 Medical Ltd.
65 Bath Road
Stroud GL5 3LA
United Kingdom
The information, including but not
limited to text, graphics, images
and other material contained
herein are for informational
purposes only. Learn more at
BioWave.com/terms-of-use
Device must only
be used with
power supply
provided.
©2018 -2020 BioWave CorporationRev 7 - 200521
12 8 2
MADE IN
USA
Contact us at:
1-877-BIOWAVE •(1-877-246-9283)
Other manuals for GO
2
Table of contents
Other Biowave Medical Equipment manuals
Popular Medical Equipment manuals by other brands

Mallinckrodt
Mallinckrodt INOblender 10026 Operation and maintenance manual

Respironics
Respironics BiPAP AVAPS user manual
Nidek Medical
Nidek Medical Mark 5 Nuvo Lite user guide
Mizuho
Mizuho LawtonElite Atraumatic Malleable Suctions Instructions for use
Puritan Bennett
Puritan Bennett GoodKnight 425 Service manual
Guilin Woodpecker Medical Instrument
Guilin Woodpecker Medical Instrument Ai-Motor MotoPex instruction manual

