Bison BNP0701 User manual

1
P A R T S L I S T
Item 7 1/2’
Qty 15’
Qty 21’
Qty Description Item 7 1/2’
Qty 15’
Qty 21’
Qty Description
A 1 1 1 Aluminum Seat H 8 12 16 Plastic Tube Plug
B 2 34 Leg Assembly I 4 6 8 Rubber Feet
C 4 6 8 3/8 X 3” Carriage Bolt J 4 6 8 3/8” Flat Washer
D 4 6 8 3/8 X 1 1/2” Hex Bolt K 2 2 2 Seat End Cap
E 4 6 8 Bench Clamp L 4 4 4 #10 X 3/4” Sheet Metal Screw
F 10 15 20 3/8” Hex Nut M 1 2 3 Brace
G 10 15 20 3/8” Lock Washer N 2 3 4 3/8" X 3" Hex Bolt
Inspect all contents prior to installation. Report any missing parts to dealer immediately.
Read all instructions before proceeding.
Date: 3/28/2016 Rev: 9 B.A. N.J.C. File: BNPA Ref#: 990008
Customer Service
(800) 247-7668
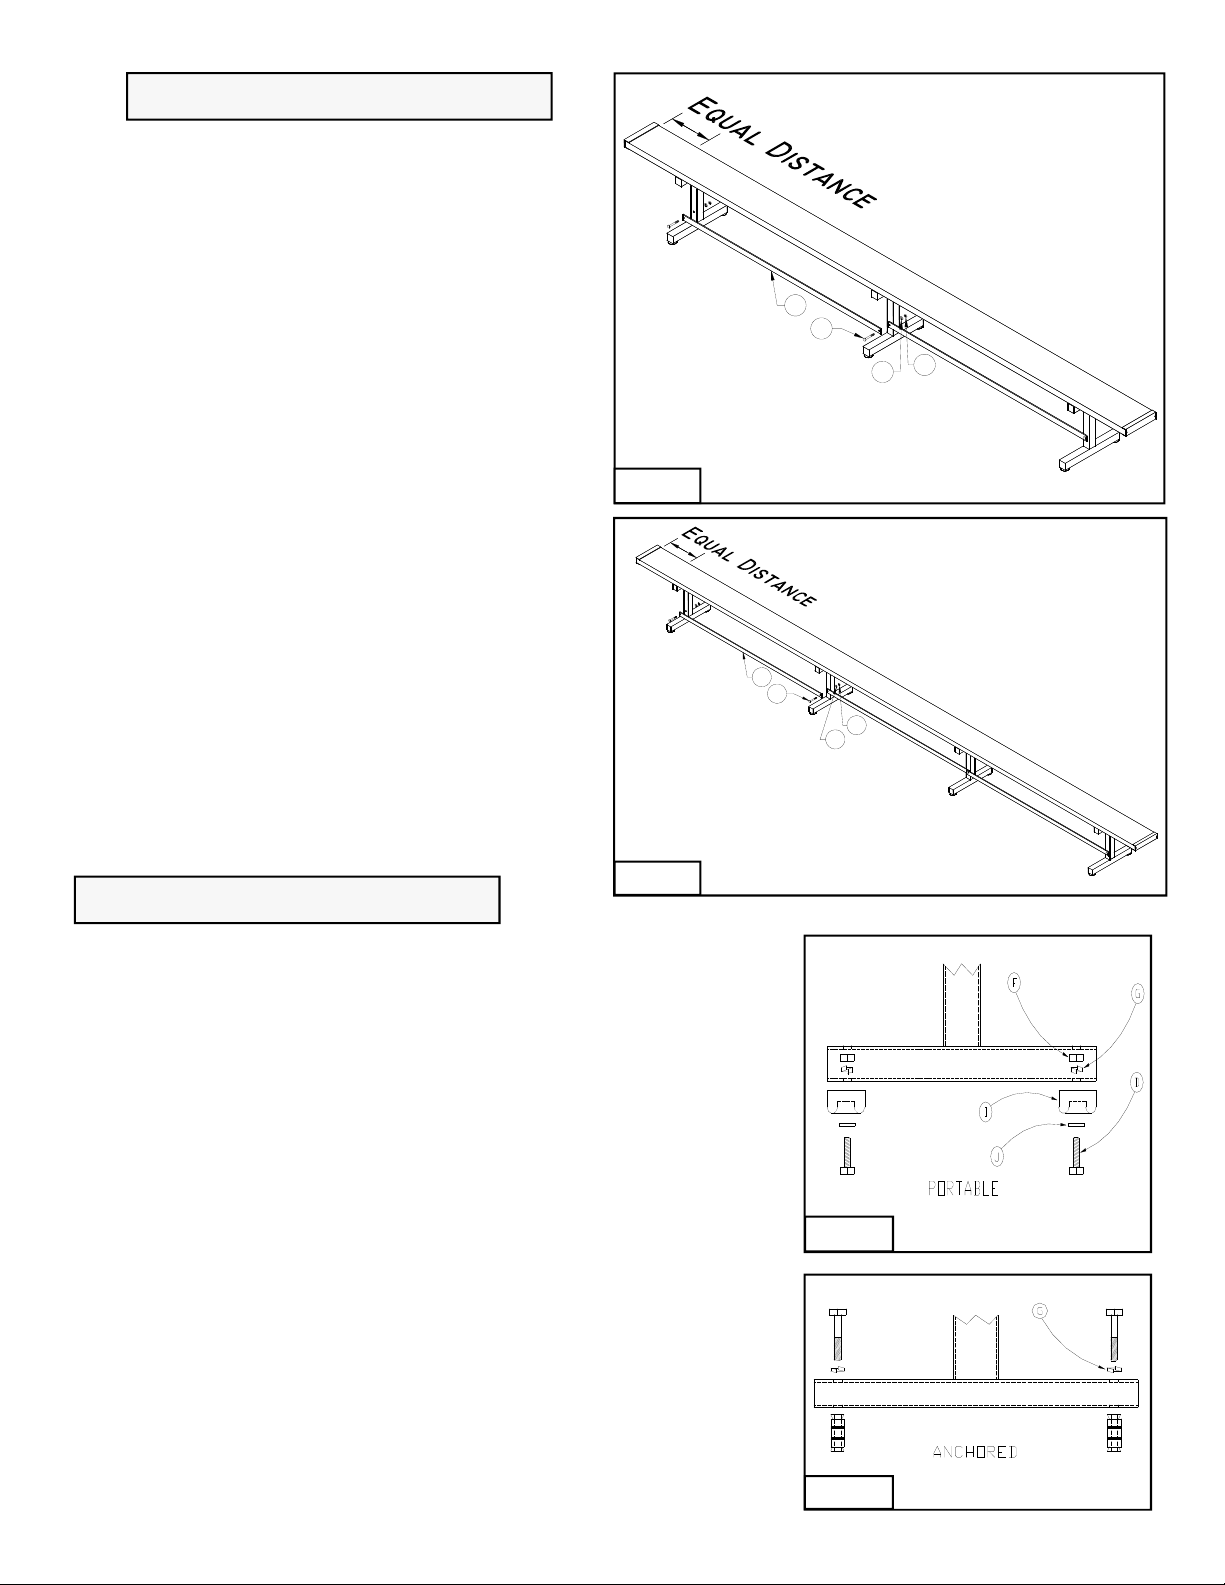
If Your Bench Is 7 1/2’ In Length
Figure 2
1. Attach Brace (M) to the Leg Assemblies (B) with 3/8" X 3"
Hex Bolts (N), 3/8" Lock Washers (G) and 3/8" Hex Nuts
(F). Leave hardware finger tight. See Figure 1.
2. Attach the 7 1/2’ Aluminum Seat (A) to Leg Assemblies (B)
with 3/8”X 3” Carriage Bolts (C), 3/8” Hex Nuts (F),
3/8”Lock Washers (G) and Bench Clamps (E). The Aluminum
Seat (A) should extend equal distance on both sides from the
outside Leg Assemblies (B).Tighten all hardware.
See Figures 1 and 2.
3. If you want the bench to be portable attach the Rubber
Feet (I) to the Leg Assemblies (B) with 3/8” X 1 1/2”Hex
Bolts (D), 3/8” Flat Washers (J), 3/8” Lock Washers (G),
3/8”Hex Nuts (F). See Figure 6.
4. If you want the bench to be fixed, anchor each Leg Assembly
(B) in 2 places using the appropriate anchors (not included)
for the mounting surface. See Figure 7.
5. Insert Plastic Tube Plugs (H) in Leg Assemblies (B).
See Figure 2.
6. Install seat End Caps (K) using #10 X 3/4” Sheet Metal
Screws (L). See Figure 3.
—— Instruction Manual ——
BNP0701 / BNP1501 / BNP2101
7 1/2’ / 15’ & 21’ Portable Player Bench
Aluminum or Powdercoated Steel Frame Assembly
G
F
N
M
Figure 1
Figure 3
2
Figure 6
Figure 7
1. Attach Braces (M) to the Leg Assemblies (B) with
3/8" X 3" Hex Bolts (N), 3/8" Lock Washers (G) and
3/8" Hex Nuts (F). Leave hardware finger tight.
See Figure 4.
2. Attach the 15’ Aluminum Seat (A) to Leg Assemblies
(B) with 3/8”X 3” Carriage Bolts (C), 3/8” Hex Nuts
(F), 3/8”Lock Washers (G) and Bench Clamps (E).
The Aluminum Seat (A) should extend equal distance
on both sides from the outside Leg Assemblies
(B).Tighten all hardware. See Figures 2 and 4.
3. If you want the bench to be portable attach the
Rubber Feet (I) to the Leg Assemblies (B) with 3/8”
X 1 1/2”Hex Bolts (D), 3/8” Flat Washers (J), 3/8”
Lock Washers (G), 3/8”Hex Nuts (F). See Figure 6.
4. If you want the bench to be fixed, anchor each Leg
Assembly (B) in 2 places using the appropriate
anchors (not included) for the mounting surface.
See Figure 7.
5. Insert Plastic Tube Plugs (H) in Leg Assemblies (B).
See Figure 2.
6. Install seat End Caps (K) using #10 X 3/4” Sheet
Metal Screws (L). See Figure 3.
If Your Bench Is 15’ In Length
If Your Bench Is 21’ In Length
1. Attach Braces (M) to the Leg Assemblies (B) with 3/8" X 3" Hex Bolts
(N), 3/8" Lock Washers (G) and 3/8" Hex Nuts (F). Leave hardware
finger tight. See Figure 5.
2. Attach the 21’ Aluminum Seat (A) to Leg Assemblies (B) with 3/8”X 3”
Carriage Bolts (C), 3/8” Hex Nuts (F), 3/8”Lock Washers (G) and Bench
Clamps (E). The Aluminum Seat (A) should extend equal distance on both
sides from the outside Leg Assemblies (B).Tighten all hardware.
See Figures 2 and 5.
3. If you want the bench to be portable attach the Rubber Feet (I) to the Leg
Assemblies (B) with 3/8” X 1 1/2”Hex Bolts (D), 3/8” Flat Washers (J),
3/8” Lock Washers (G), 3/8”Hex Nuts (F). See Figure 6.
4. If you want the bench to be fixed, anchor each Leg Assembly (B) in 2
places using the appropriate anchors (not included) for the mounting
surface. See Figure 7.
5. Insert Plastic Tube Plugs (H) in Leg Assemblies (B). See Figure 2.
6. Install seat End Caps (K) using #10 X 3/4” Sheet Metal Screws (L).
See Figure 3.
GF
N
M
Figure 4
G
F
N
M
Figure 5
This manual suits for next models
2
Popular Outdoor Furnishing manuals by other brands


Northcote Pottery
Northcote Pottery SPENCE LETTERBOX installation instructions

Kozyard
Kozyard Rosana Assembly manual

Blumfeldt
Blumfeldt Pomporto manual

Carolina Outdoors
Carolina Outdoors COB1848-OIL Assembly instructions

Sunjoy
Sunjoy L-GZ660PST-D Assembly instructions

National Public Seating
National Public Seating Cluster Swivel instructions

Sunjoy
Sunjoy D-PB176PCO ASSEMBLY INTRUCTION

Displays2go
Displays2go CLEDSN Series Assembly instructions

Pacific Casual
Pacific Casual Tiara 183-W5A-SDC2 Assembly instructions

Outsunny
Outsunny 84B-771 manual

Clas Ohlson
Clas Ohlson TPGAZ18-030 Assembly instructions

deVRIES
deVRIES TRENDY PURE COMFORT XL Care & assembly instructions