Bisque Tetro TEF 58-60 User manual
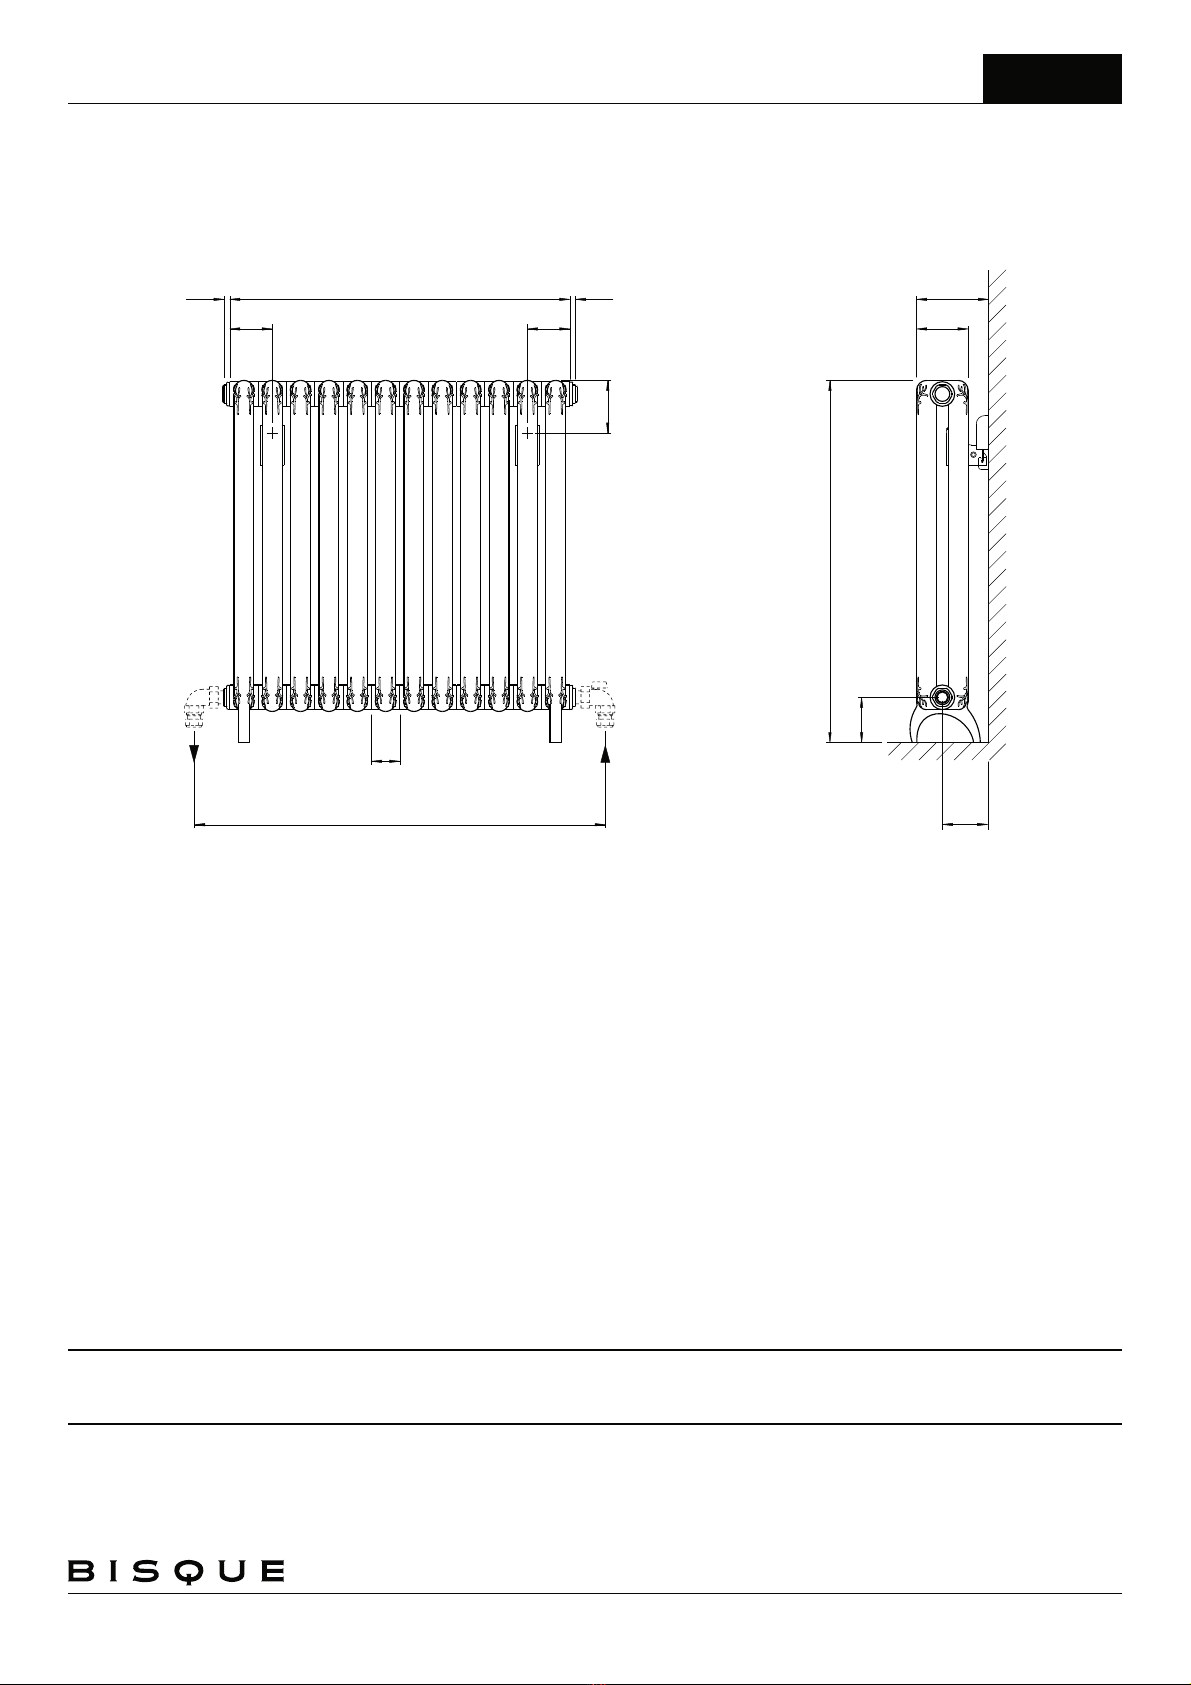
TECHNICAL DATA
Issue 2.0
Tetro
All dimensions shown are in millimetres
Test pressure:
Max. working pressure:
Max working temperature:
Aluminium construction:
Connections:
24 BAR
16 BAR
120º C
cast headers with 35mm
½ inch BSP bottom opposite end
dia tubes
tappings
Heat output determined in accordance with EN 442
Manufactured for Bisque by Fondital of Italy
Model
TEF 58-60
TEF 58-80
TEF 58-100
TEF 58-120
383
510
638
765
1.27
1.27
1.27
1.27
13.8
18.4
23.0
27.6
11
14
18
22
639
639
639
639
600
800
1000
1200
n/a
n/a
n/a
n/a
n/a
n/a
n/a
n/a
Output
T=30KÄ
Watts
Output
T=50KÄ
Watts
n
Water
Content
litres
Weight
kg
Height
± 2mm
Length
± 2%
Tapping
Centres
± 2mm
Fixing
Centres
± 2mm
© Bisque, a division of Zehnder Group UK Ltd
Floor Mounted
80
91
125
height
80
75
90
min
flow
50
75
length
= length + 20 + dim X
from relevant Valve Data Sheet
return
piping centres
1010
note: flow & return can be reversed if required
feet can be reversed
if required
note:
732
976
1220
1464
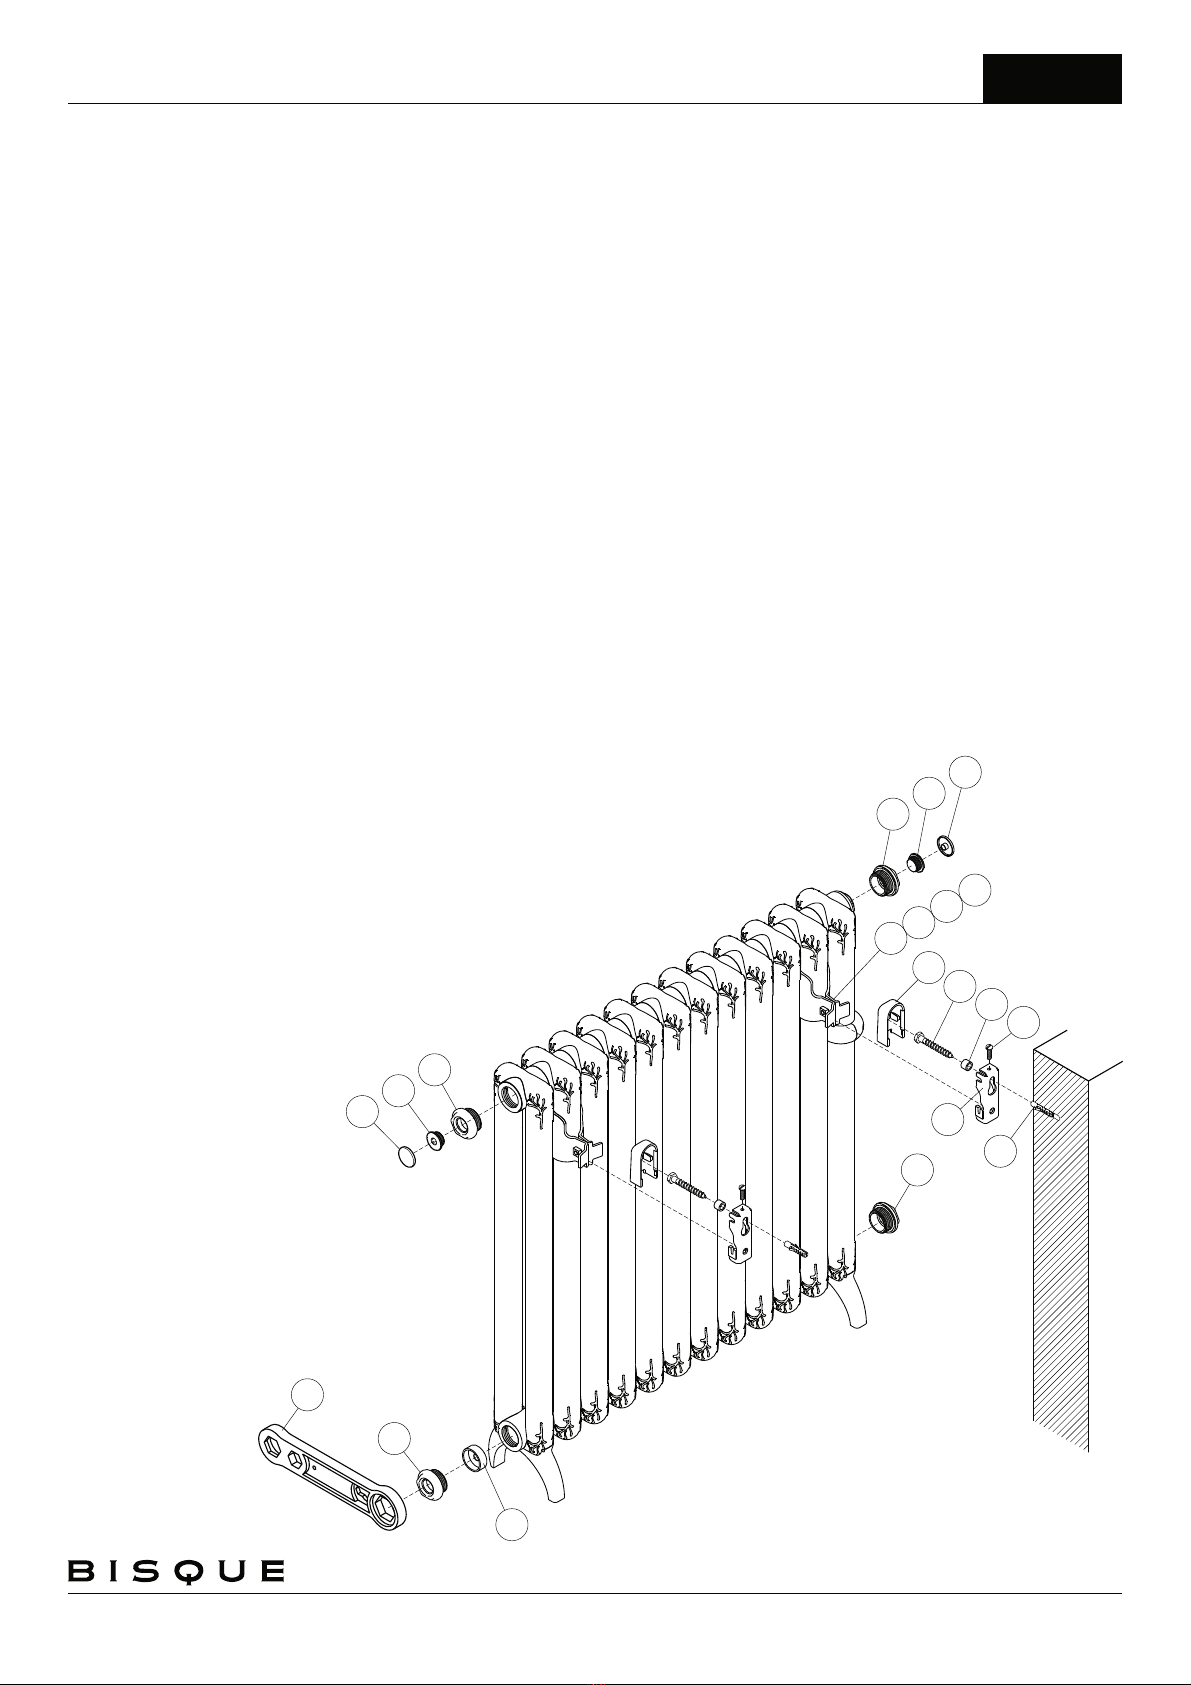
Assembly Instructions
Sufficient PTFE tape must be applied to valve-tail threads
prior to their installation.
must
Silicone thread sealant should be applied to all threaded components manufactured
with ‘O-rings’.
note: radiator be secured to wall
using top brackets
Using the handle of a screwdriver, push diverter (A) into flow side until resistance is felt
(about 35mm).
Using plastic spanner (B) and ensuring o-rings are seated properly, screw end caps
to radiator. Please note that two of the caps have a lefthand thread so will need
to be screwed in anti-clockwise.
Fit air vent (E), blanking cap (F) and cover caps (G).
Accurately mark out 2 bracket holes on wall to dimensions as shown on Technical Data
Sheet.
Drill 8mm diameter holes in wall to a minimum depth of 65mm and insert wall plugs (H).
Ensuring collar (I) is around screw (J), fix brackets (K) to wall.
Loosely fit adjusting screw (L) into top of bracket (K).
Assemble lefthand (M) and righthand (N) clamps onto radiator
using screw (O) and nut (P).
Fix radiator onto wall.
Fit bracket cover (Q).
Plumb radiator to heating circuit with
flow opposite air vent.
(C & D)
This radiator should be installed onto
a central heating system that has been
cleaned/flushed and contains water treatment
and inhibitors in accordance with BS7593.
Air vent is recessed so flathead screwdriver
must be used to vent radiator.
Key Component Qty
A1
B1
C2
D2
E1
F1
G2
H2
I2
J2
K2
L2
M2
N2
O2
P2
Q2
Diverter
Plastic Spanner
End Cap - righthand thread
End Cap - lefthand thread
Blanking Plug
Cap
Wall Plug*
Collar
Screw - dia 6 x 65*
Bracket
Adjusting Screw
Clamp - lefthand
Clamp - righthand
Screw M5
Nut M5
Bracket Cover
Air Vent
Suitable valves
PTFE tape
Silicone thread sealant
Tape measure
Allen key - 13mm & 12mm (when installing Bisque valves)
Spirit level
Stepladder
Screwdriver
Electric drill
Masonry drill bit - 7mm diameter
FITTING INSTRUCTIONS
Tools & Material Required Key Component Qty
Issue 1.1
© Bisque, a division of Zehnder Group UK Ltd
Tetro
Floor Mounted
DEG
DH
JIL
K
MNOP
Q
C
A
C
GF
B
always fit on flow side
use to prevent
damage to end caps
The screws & plugs supplied are for solid walls only.
Please use appropriate fixings for the type of wall
that the radiator is being installed onto.
*

All dimensions shown are in millimetres
Test pressure:
Max. working pressure:
Max working temperature:
Aluminium construction:
Connections:
24 BAR
16 BAR
120º C
cast headers with 35mm
½ inch BSP bottom opposite end
dia tubes
tappings
Heat output determined in accordance with EN 442
Manufactured for Bisque by Fondital of Italy
Model
TEW 75-30
TEW 75-40
TEW 75-50
TEW 75-60
TEW 118-30
TEW 118-40
TEW 118-50
TEW 118-60
TEW 148-30
TEW 148-40
TEW 148-50
TEW 148-60
TEW 178-30
TEW 178-40
TEW 178-50
TEW 178-60
239
319
399
478
367
490
613
735
459
612
765
918
550
733
916
1100
1.28
1.28
1.28
1.28
1.29
1.29
1.29
1.29
1.29
1.29
1.29
1.29
1.30
1.30
1.30
1.30
7.1
9.4
11.8
14.2
11.3
15.0
18.8
22.6
14.2
18.9
23.6
28.3
17.1
22.8
28.5
34.2
6
8
10
12
8
10
13
16
10
13
16
19
12
16
20
24
749
749
749
749
1184
1184
1184
1184
1484
1484
1484
1484
1784
1784
1784
1784
300
400
500
600
300
400
500
600
300
400
500
600
300
400
500
600
n/a
n/a
n/a
n/a
n/a
n/a
n/a
n/a
n/a
n/a
n/a
n/a
n/a
n/a
n/a
n/a
n/a
n/a
n/a
n/a
n/a
n/a
n/a
n/a
n/a
n/a
n/a
n/a
n/a
n/a
n/a
n/a
Output
T=30KÄ
Watts
Output
T=50KÄ
Watts
n
Water
Content
litres
Weight
kg
Height
± 2mm
Length
± 2%
Tapping
Centres
± 2mm
Fixing
Centres
± 2mm
TECHNICAL DATA Tetro
Wall Mounted
91
125
75
90
min
75
length 1010
80
24
flow
50
= length + 20 + dim X
from relevant Valve Data Sheet
return piping centres
height
Allow minimum of
75mm for valves
150 min
Issue 2.0
© Bisque, a division of Zehnder Group UK Ltd
note: flow & return can be reversed if required
460
614
767
920
710
947
1184
1421
887
1182
1478
1774
1068
1424
1780
2136

Key Component Qty
Assembly Instructions
Sufficient PTFE tape must be applied to valve-tail threads
prior to their installation.
Silicone thread sealant should be applied to all threaded
components manufactured with ‘O-rings’.
Using the handle of a screwdriver, push diverter (A) into flow side
until resistance is felt (about 35mm).
Using plastic spanner (B) and ensuring o-rings are seated properly,
screw end caps (C & D) to radiator. Please note that two of the caps
have a lefthand thread so will need to be screwed in anti-clockwise.
Fit air vent (E), blanking cap (F) and cover caps (G).
Accurately mark out 3 bracket holes on wall to dimensions as
shown on Technical Data Sheet.
Drill 8mm diameter holes in wall to a minimum depth of 65mm and
insert wall plugs (H).
Ensuring collar (I) is around screw (J),fix brackets (K) to wall.
Loosely fit adjusting screw (L) into top of bracket (K).
Assemble lefthand (M) and righthand (N) clamps onto radiator
using screw (O) and nut (P).
Hang radiator onto wall and level using adjusting screw (L).
Fit bracket cover (Q).
Plumb radiator to heating circuit with flow opposite air vent.
This radiator should be installed onto a central heating system
that has been cleaned/flushed and contains water treatment and
inhibitors in accordance with BS7593.
Air vent is recessed so flathead screwdriver must be used to vent
radiator.
Suitable valves
PTFE tape
Silicone thread sealant
Tape measure
Allen key - 13mm & 12mm (when installing Bisque valves)
Spirit level
Stepladder
Screwdriver
Electric drill
Masonry drill bit - 7mm diameter
FITTING INSTRUCTIONS
Tools & Material Required Key Component Qty
Issue 1.1
© Bisque, a division of Zehnder Group UK Ltd
DEG
D
H
JIL
K
MNOP
Q
Tetro
Wall Mounted
A1
B1
C2
D2
E1
F1
G2
H3
I3
J3
K3
L3
M3
N3
O3
P3
Q3
Diverter
Plastic Spanner
End Cap - righthand thread
End Cap - lefthand thread
Blanking Plug
Cap
Wall Plug*
Collar
Screw - dia 6 x 65*
Bracket
Adjusting Screw
Clamp - lefthand
Clamp - righthand
Screw M5
Nut M5
Bracket Cover
Air Vent
The screws & plugs supplied are for solid walls only.
Please use appropriate fixings for the type of wall
that the radiator is being installed onto.
*
C
GF
A
C
B
always fit on flow side
use to prevent
damage to end caps
This manual suits for next models
3
Other Bisque Heater manuals


Popular Heater manuals by other brands


STIEBEL ELTRON
STIEBEL ELTRON CFK 5 Operation and installation

Sinbo
Sinbo SFH 3364 operating instructions

Webasto
Webasto Air Top Evo 3900 Series installation instructions

Panasonic
Panasonic FY-08ESN operating instructions

Stadler Form
Stadler Form Peter Black P-013 operating instructions

BRAYER
BRAYER BR4803 instruction manual


