manuals.online logo
Brands
  1. Home
  2. •
  3. Brands
  4. •
  5. Bissell
  6. •
  7. Vacuum Cleaner
  8. •
  9. Bissell POWERFORCE HELIX 3313 Series User manual

Bissell POWERFORCE HELIX 3313 Series User manual

9
10
Meet your new BISSELL product!
Go to support.BISSELL.com for a comprehensive walkthrough
of your new purchase, including videos, tips, support, and more.
Want to get started right away? This guide has all the information
you need to set up your new product. Let’s take a look…
Product Overview
1. Upper Handle
2. Tank Release Button
3. Washable Pre-Motor Filter
4. Dirt Tank
5. Dirt Tank Empty Button
6. Washable Post-Motor Filter
7. Hose Clip
8. Power Cord
9. Lower Cord Wrap
10. Hose Wand
11. Power Switch Pedal
12. Handle Recline Pedal
POWERFORCE® HELIX™
UPRIGHT VACUUM | 3313 SERIES
What’s In The Box?
Handle &
Body
2 Screws (taped
to Upper Handle)
Hose Lower Cord
Wrap
Dusting
Brush
Crevice
Tool
Extension
Wand
1
2
3
4
11
12
56
7
8
2BISSELL.com
WARNING
TO REDUCE THE RISK OF FIRE, ELECTRIC SHOCK OR INJURY:
•Do not leave vacuum when it is plugged in. Unplug from outlet when
not in use and before servicing.
•Do not use outdoors or on wet surfaces.
•Do not allow to be used as a toy. Close attention is necessary when used
by or near children.
•Do not use for any purpose other than described in this user guide. Use
only manufacturer’s recommended attachments.
•Do not use with damaged cord or plug. If appliance is not working as it
should, has been dropped, damaged, left outdoors, or dropped into water,
have it repaired at an authorized service center.
•Do not pull or carry by cord, use cord as a handle, close a door on cord,
or pull cord around sharp edges or corners. Do not run appliance over
cord. Keep cord away from heated surfaces.
•Do not unplug by pulling on cord. To unplug, grasp the plug, not the cord.
•Do not handle plug or vacuum with wet hands.
•Do not put any object into openings. Do not use with any opening
blocked; keep openings free of dust, lint, hair, and anything that may
reduce air flow.
•Keep hair, loose clothing, fingers, and all parts of body away from
openings and moving parts.
•Turn OFF all controls before plugging or unplugging vacuum.
•Use extra care when cleaning on stairs.
•Do not use to pick up flammable or combustible materials (lighter fluid,
gasoline, kerosene, etc.) or use in areas where they may be present.
•Do not use vacuum in an enclosed space filled with vapors given off
by oil-based paint, paint thinner, some moth-proofing substances,
flammable dust, or other explosive or toxic vapors.
•Do not use to pick up toxic material (chlorine bleach, ammonia, drain
cleaner, etc.).
•Do not pick up anything that is burning or smoking, such as cigarettes,
matches or hot ashes.
•Do not use without filters in place.
•Do not pick up hard or sharp objects such as glass, nails, screws, coins, etc.
•Use only on dry, indoor surfaces.
•Keep appliance on a level surface.
•Do not carry the vacuum while it is running.
SAVE THESE INSTRUCTIONS
THIS MODEL IS FOR HOUSEHOLD USE ONLY. COMMERCIAL USE OF THIS UNIT VOIDS THE MANUFACTURER’S WARRANTY.
THIS APPLIANCE HAS A POLARIZED PLUG To reduce the risk
of electric shock, this appliance has a polarized plug (one blade is wider than the other). This plug will fit in a polarized outlet only
one way. If the plug does not fit fully in the outlet, reverse the plug. If it still does not fit, contact a qualified electrician to install a
proper outlet. Do not change the plug in any way.
WARNING Plastic film can be dangerous. To avoid danger of suocation, keep away from children.
• Do not plug in your vacuum until you are familiar with all instructions and operating procedures.
• To reduce the risk of electrical shock, turn power OFF and disconnect polarized plug from electrical outlet BEFORE performing
maintenance or troubleshooting checks.
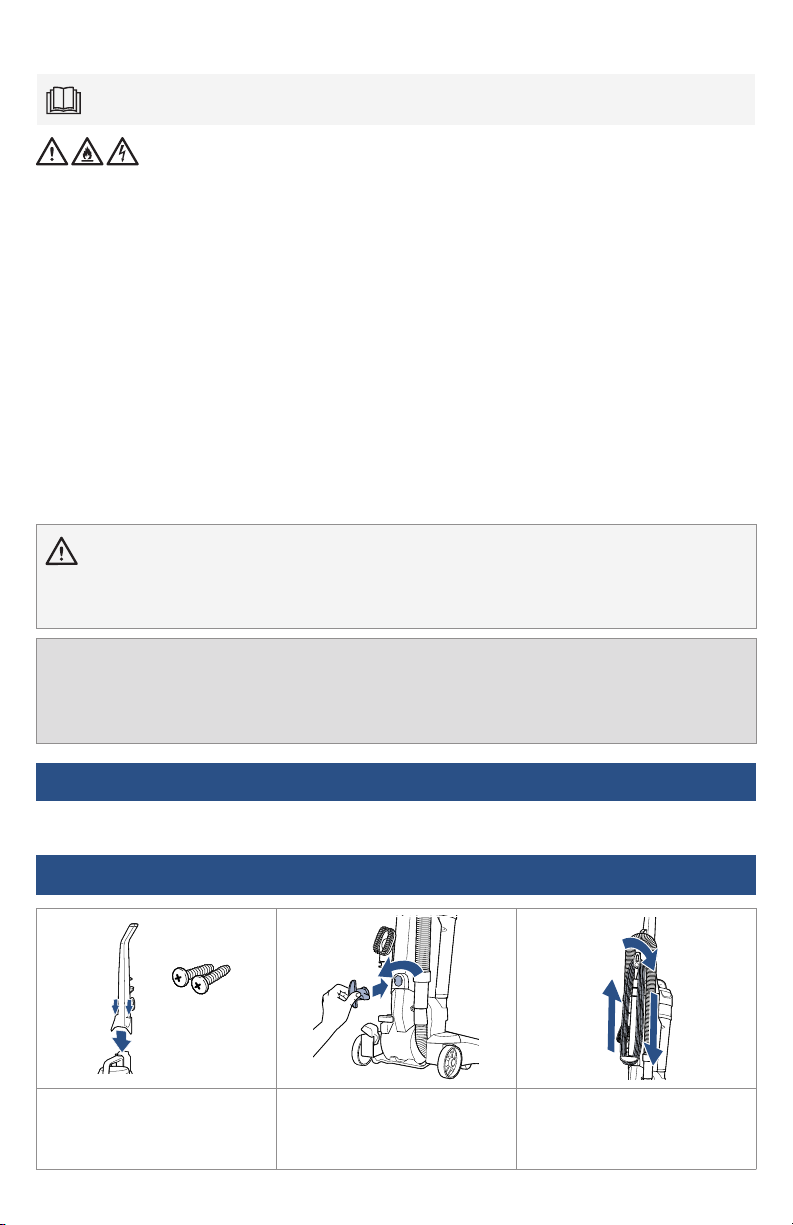
1. Place upper handle onto
base and push down. Attach
handle using two screws taped
to the handle in a plastic bag.
2. Insert lower cord wrap and
turn it left to lock into place.
3. Wrap power cord around
cord release clips and clip end
of plug to power cord.
Assembly
Warranty
Limited 2-year warranty, may vary by state. Visit support.BISSELL.com or call 1-800-237-7691 for
complete warranty information.
IMPORTANT SAFETY INSTRUCTIONS
READ ALL INSTRUCTIONS BEFORE USING YOUR APPLIANCE.
When using an electrical appliance, basic precautions should be observed, including the following:
BISSELL.com 3
4. Insert end of hose into back
of vacuum and twist right to
lock into place.
5. Wrap hose through hose
clip and connect hose wand
to the foot hose at bottom of
vacuum.
6. Attach desired tool.
The crevice tool is stored
inside the extension wand.
1. Turn ON ( ) vacuum using
power ( ) pedal and lean
back using recline pedal. When
finished, press pedal switch
again to turn OFF ( ). Return
to upright position.
2. Press the handle recline
pedal to lean your vacuum
back. Press pedal a second
time to recline further. When
finished, lean vacuum all the
way up to lock it into upright
position.
3. Vacuum can be raised or
lowered to adjust to different
types of flooring. Turn knob
towards desired flooring type.
If vacuum becomes difficult to
push, move to a higher setting.
Note: Some frieze and Berber carpets have long delicate fibers or threads that may be damaged by
rotating brush. Repeated strokes in the same area may enhance this condition.
Using Your Vacuum
Assembly (continued)
1. Press the tank release button
and pull handle to lift dirt tank
away from vacuum.
2. Holding dirt tank over a trash bin, press release button on
back to open tank and dump debris.
Snap bottom back into place when empty.
Emptying the Dirt Tank
4
Maintaining Your Vacuum
For more helpful maintenance tips, check out support.BISSELL.com.
Replacing the Brush and Belt
1. Unplug vacuum, turn over and unscrew five
Phillips-head screws to remove bottom cover.
2. Lift brush roll straight out. Inspect belt and
replace if it appears damaged.
3. Replace brush roll and belt by looping the
belt over motor shaft and brush roll. Line up
the endcaps and pull brush forward into place,
stretching the belt. Replace cover and screws.
Clearing a Clog
1. Remove hose from back of vacuum by twisting
it to the left. Remove any debris.
2. Check foot hose on the back of vacuum
towards bottom. If necessary, remove screw from
foot hose and check for clogs.
3. Check air passageway on bottom of vacuum.
Remove bottom cover and brush. Remove any
debris.
©2023 BISSELL Inc. All rights reserved.
Part Number 1629463 11/22 RevB
Every Purchase Saves Pets™
BISSELL proudly supports BISSELL Pet Foundation® and its mission to help save homeless pets.
When you buy a BISSELL® product, you help save pets, too. We’re proud to design products that help
make pet messes, odors and pet homelessness disappear. Visit BISSELLsavespets.com to learn more.
For a comprehensive walkthrough of your product and support tips, visit support.BISSELL.com.
Troubleshooting
1. Remove dirt tank by
pressing release button and
lift tank away from vacuum.
2. With dirt tank removed,
press filter cover release
button to access post-motor
filter.
3. Clean filters with mild
detergent, rinsing and
squeezing to remove water.
Allow filters to dry completely
before reinserting.
4. To access pre-motor filter,
lift release latch on front
of tank to lift lid.
5. Remove pre-motor filter
from tank lid. Clean with
warm water and allow to dry
completely before reinserting.
6. Remove separator from tank
by twisting counterclockwise.
Pull out through the bottom.
Rinse and dry with a cloth.
Cleaning the Filters & Separator

Other Bissell Vacuum Cleaner manuals

Bissell BG15 User manual

Bissell

Bissell BG15 User manual

Bissell CROSSWAVE CORDLESS MAX 2590 Series User manual

Bissell

Bissell CROSSWAVE CORDLESS MAX 2590 Series User manual

Bissell Versus 21R9 Series User manual

Bissell

Bissell Versus 21R9 Series User manual

Bissell PowerForce 6594 Series User manual

Bissell

Bissell PowerForce 6594 Series User manual

Bissell CROSSWAVE Installation instructions

Bissell

Bissell CROSSWAVE Installation instructions

Bissell LITTLE GREEN 1400 SERIES User manual

Bissell

Bissell LITTLE GREEN 1400 SERIES User manual

Bissell Spotbot 1200 series User manual

Bissell

Bissell Spotbot 1200 series User manual

Bissell Pro Heat Pro-Tech BS-7920F Programming manual

Bissell

Bissell Pro Heat Pro-Tech BS-7920F Programming manual

Bissell SURFACESENSE 3415 User manual

Bissell

Bissell SURFACESENSE 3415 User manual

Bissell powerglide 9182 series User manual

Bissell

Bissell powerglide 9182 series User manual

Bissell HYDROCLEAN COMPLETE 81 User manual

Bissell

Bissell HYDROCLEAN COMPLETE 81 User manual

Bissell 2012 3 series User manual

Bissell

Bissell 2012 3 series User manual

Bissell 2387 Series User manual

Bissell

Bissell 2387 Series User manual

Bissell POWERWASH LIFT-OFF 1190 User manual

Bissell

Bissell POWERWASH LIFT-OFF 1190 User manual

Bissell PowerSteamer 1697 Series User manual

Bissell

Bissell PowerSteamer 1697 Series User manual

Bissell 1699 SERIES - 120V User manual

Bissell

Bissell 1699 SERIES - 120V User manual

Bissell Magic Vac / FeatherWeight 3106 SERIES User manual

Bissell

Bissell Magic Vac / FeatherWeight 3106 SERIES User manual

Bissell 3750/6595 User manual

Bissell

Bissell 3750/6595 User manual

Bissell 93Z6 SERIES User manual

Bissell

Bissell 93Z6 SERIES User manual

Bissell PowerForce 3522 User manual

Bissell

Bissell PowerForce 3522 User manual

Bissell LITTLE GREEN 1400 SERIES User manual

Bissell

Bissell LITTLE GREEN 1400 SERIES User manual

Bissell 3590 8990 3591 User manual

Bissell

Bissell 3590 8990 3591 User manual

Bissell SPOTBOT 1200/7887 User manual

Bissell

Bissell SPOTBOT 1200/7887 User manual

Bissell SPOTCLEAN AUTOMATE 4720 Series User manual

Bissell

Bissell SPOTCLEAN AUTOMATE 4720 Series User manual

Popular Vacuum Cleaner manuals by other brands

Roborock Roborock S5 Series manual

Roborock

Roborock Roborock S5 Series manual

Mellerware Whooshy! Wireless manual

Mellerware

Mellerware Whooshy! Wireless manual

Miele Triflex HX1R operating instructions

Miele

Miele Triflex HX1R operating instructions

Pullman Holt UV9 Operation & care instructions

Pullman Holt

Pullman Holt UV9 Operation & care instructions

DeWalt DCV517 Original instructions

DeWalt

DeWalt DCV517 Original instructions

Oreck XL20R7RH user guide

Oreck

Oreck XL20R7RH user guide

Wetrok ParkerVac 35 operating instructions

Wetrok

Wetrok ParkerVac 35 operating instructions

Comelec ASP 2209 instruction manual

Comelec

Comelec ASP 2209 instruction manual

Kärcher KM 130/300 R Bp quick start

Kärcher

Kärcher KM 130/300 R Bp quick start

Sanitaire TRANSPORT SC535A owner's guide

Sanitaire

Sanitaire TRANSPORT SC535A owner's guide

Windsor SRXP15 operating instructions

Windsor

Windsor SRXP15 operating instructions

Philips FC8526/09 Important information

Philips

Philips FC8526/09 Important information

Philips 8000 Series manual

Philips

Philips 8000 Series manual

Vax Remo Classic VS-077 Easy guide

Vax

Vax Remo Classic VS-077 Easy guide

HOME ELEMENT HE-VC1803 user manual

HOME ELEMENT

HOME ELEMENT HE-VC1803 user manual

Black & Decker BCHV001 Service manual

Black & Decker

Black & Decker BCHV001 Service manual

inxni X6S owner's manual

inxni

inxni X6S owner's manual

Vax HF86-FM-T instruction manual

Vax

Vax HF86-FM-T instruction manual

manuals.online logo
manuals.online logoBrands
  • About & Mission
  • Contact us
  • Privacy Policy
  • Terms and Conditions

Copyright 2025 Manuals.Online. All Rights Reserved.