Bizfon 2000 Service manual

Bizfon Manual II: Administrator's Guide
Bizfon2000 and Bizfon4000 (SW Version 4.1.x)
Manual II:
Administrator’s Guide
Edition 1 SW Release 4.1.28 and higher, June 2007

Bizfon Manual II: Administrator's Guide
Bizfon2000 and Bizfon4000 (SW Version 4.1.x)
Table of Contents
Manual I: see Installation Guide
Step-by-step guide to install and configure Bizfon basically.
Manual II: Administrator's Guide
About this Administrator's Guide ................................................................................................................ 4
Bizfon’s Graphical Interface ....................................................................................................................... 5
Administrator’s Main Page ............................................................................................................................................ 5
Recurrent Buttons ....................................................................................................................................................... 6
Recurrent Functional Buttons........................................................................................................................................ 6
Entering a SIP Addresses correctly ................................................................................................................................ 6
Administrator’s Menus .............................................................................................................................. 7
System Menu ............................................................................................................................................................. 7
System Configuration Wizard .................................................................................................................................... 7
Internet Configuration Wizard ................................................................................................................................... 9
Status ...................................................................................................................................................................11
General Information ............................................................................................................................................11
Network Status ...................................................................................................................................................12
Lines Status .......................................................................................................................................................13
Memory Status ...................................................................................................................................................15
Hardware Status .................................................................................................................................................16
SIP Registration Status ........................................................................................................................................16
IP Routing Configuration..........................................................................................................................................16
Configuration Management ......................................................................................................................................19
Automatic Firmware Update .................................................................................................................................20
Legible Configuration Management........................................................................................................................21
Events ..................................................................................................................................................................21
Time/Date Settings.................................................................................................................................................24
Mail Settings ..........................................................................................................................................................24
SMS Settings .........................................................................................................................................................25
Firmware Update ....................................................................................................................................................26
Networking Tools....................................................................................................................................................27
SNMP Settings .......................................................................................................................................................28
Diagnostics ............................................................................................................................................................29
Automatic Provisioning ............................................................................................................................................30
Features................................................................................................................................................................31
User Rights Management.........................................................................................................................................31
Users Menu ...............................................................................................................................................................34
Extensions Management..........................................................................................................................................34
User Extension Settings .......................................................................................................................................36
Pickup Group Extension Settings ...........................................................................................................................40
Call Park Extension Settings .................................................................................................................................41
Paging Group Extension Settings...........................................................................................................................41
Attendant Extension Settings................................................................................................................................43
Extension Codecs ................................................................................................................................................45
Call Park Service .................................................................................................................................................46
Upload Universal Extension Recordings ..................................................................................................................47
BLF Management....................................................................................................................................................47
Extensions Directory ...............................................................................................................................................50
Authorized Phones Database....................................................................................................................................51
Call Back Services ...............................................................................................................................................52
Telephony Menu ........................................................................................................................................................53

Bizfon Manual II: Administrator's Guide
Bizfon2000 and Bizfon4000 (SW Version 4.1.x)
Call Statistics .........................................................................................................................................................53
RTP Statistics .....................................................................................................................................................55
SIP Settings...........................................................................................................................................................56
RTP Settings ..........................................................................................................................................................57
NAT Traversal Settings ............................................................................................................................................58
Line Settings..........................................................................................................................................................60
Onboard Line Settings .........................................................................................................................................60
IP Line Settings ..................................................................................................................................................61
Supported SIP Phones......................................................................................................................................62
Loopback Settings ...............................................................................................................................................62
FXO Settings..........................................................................................................................................................62
External PSTN Gateways .........................................................................................................................................63
Gain Control ..........................................................................................................................................................64
SIP Trunk Settings..................................................................................................................................................64
Call Routing ...........................................................................................................................................................66
Best Matching Algorithm ......................................................................................................................................74
VoIP Carrier Wizard ................................................................................................................................................77
RADIUS Client Settings ...........................................................................................................................................78
Voice Mail Common Settings ....................................................................................................................................79
Dial Plan Settings ...................................................................................................................................................80
Internet Uplink Menu ..................................................................................................................................................81
PPP/ PPTP Settings .................................................................................................................................................81
Advanced PPP Settings ........................................................................................................................................81
VPN Configuration ..................................................................................................................................................82
Dynamic DNS Settings ............................................................................................................................................88
Firewall and NAT ....................................................................................................................................................89
Advanced Firewall Settings...................................................................................................................................90
Filtering Rules ........................................................................................................................................................90
Service Pool .......................................................................................................................................................92
IP Pool...............................................................................................................................................................92
IDS Log.................................................................................................................................................................94
Network Menu ...........................................................................................................................................................95
DNS Settings .........................................................................................................................................................95
DNS Server Settings ...............................................................................................................................................95
DHCP Settings for the LAN Interface .........................................................................................................................96
Administrator’s Additional Features ..............................................................................................................................97
Incoming Call Blocking and Outgoing Call Blocking .....................................................................................................97
Logout......................................................................................................................................................................97
PBX Services for Bizfon’s Administrator.........................................................................................................................98
Appendix: Extension User's Welcome Page ................................................................................................ 99
Appendix: System Default Values............................................................................................................100
Administrator Settings ..............................................................................................................................................100
Extension Settings ...................................................................................................................................................104
Appendix: Software License Agreement ...................................................................................................105
Manual III: see Extension User's Guide
Describes detailed the menus available for extension users and includes further all call codes at a glance.

Bizfon Manual II: Administrator's Guide About this Administrator's Guide
Bizfon2000 and Bizfon4000 (SW Version 4.1.x) 4
About this Administrator's Guide
The Bizfon Manual is divided into three parts:
•Manual-I: Installation Guide
gives step-by-step instructions to provision the Bizfon IP PBX and configure the phone extensions with the Bizfon SIP Server. After successfully
configuring the Bizfon IP PBX, users will be able to make SIP phone calls to remote Bizfon devices, make local calls to the PSTN and access
the Internet from devices connected to the LAN.
•Manual-II: Administrator's Guide explains all Bizfon management menus available for administrators only. It includes a list of all System Default
Values.
•Manual-III: Extension User's Guide explains all Bizfon management menus available for extension users. A list of all call codes can be found
there, too.
This Administrator's Guide explains all Bizfon2000 and Bizfon4000. Throughout this Administrator's Guide, the Bizfon4000 is shown as the reference
system.
This guide contains many example screen illustrations. Since Bizfon IP PBXs offer a wide variety of features and functionality, the example screens
shown may not appear exactly the same for your particular Bizfon IP PBX as they appear in this manual. The example screens are for illustrative and
explanatory purposes, and should not be construed to represent your own unique environment.
Bizfon’s Graphical Interface describes to the Bizfon‘s graphical user interface and explains all recurrent buttons.
Administrator’s Menus explains the Administrator's management pages according to the menu structure shown on the main page of the Bizfon
management.
Administrator’s Additional Features explains some input-options for administrators only that may be selected from the extension user's main
page.
PBX Services for Bizfon’s Administrator explains PBX features for administrator accessible from the handset.
Appendix: Extension User's Welcome Page includes a form that allows the administrator to inform his extension user with all individually needed
addresses and phone numbers.
Appendix: System Default Values lists all factory defaults.
Appendix: Software License Agreement includes the contract for using Bizfon's hardware and software.
Bizfon Manual II: Administrator's Guide Bizfon’s Graphical Interface
Bizfon2000 and Bizfon4000 (SW Version 4.1.x) 5
Bizfon’s Graphical Interface
Administrator’s Main Page
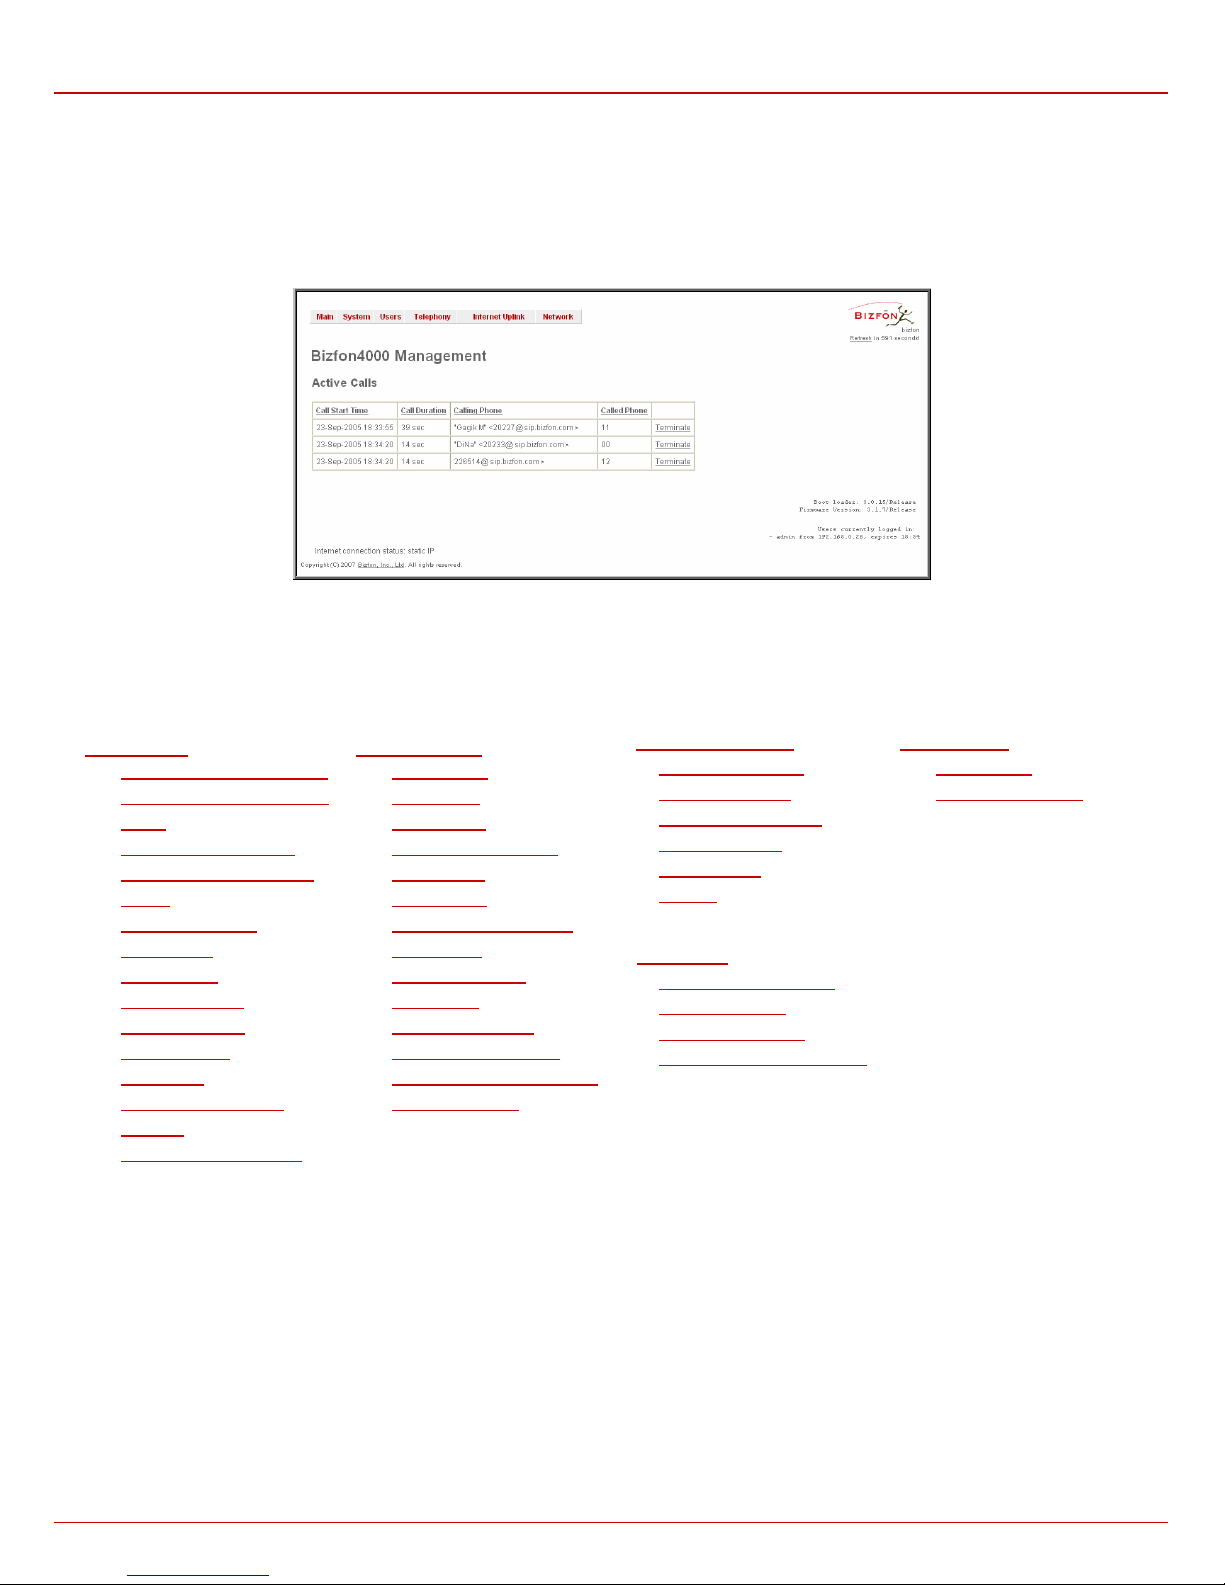
When the administrator logs in, the Bizfon Management page is displayed with a table of active calls (including information about call peers, call
duration and start time) at the startup. The button Terminate next to each active call is used to terminate the corresponding call. Here the
administrator may access the following settings and perform the actions:
Fig. II-1: Bizfon4000 Management
By clicking on System, Users, Telephony, Internet Uplink or Network the administrator may access the following settings in each respective
category and perform actions specific to each category.
The Install Checklist option in the Main Menu opens a page that lists the most useful actions and the corresponding hyperlinks for the Bizfon’s
initial setup and configuration procedure. From this page you can be linked to the appropriate pages where the corresponding configuration can be
done. Here, you can also save your progress of Bizfon’s setup by selecting the corresponding action’s checkbox and pressing Save.
System Menu
•System Configuration Wizard
•Internet Configuration Wizard
•Status
•IP Routing Configuration
•Configuration Management
•Events
•Time/Date Settings
•Mail Settings
•SMS Settings
•Firmware Update
•Networking Tools
•SNMP Settings
•Diagnostics
•Automatic Provisioning
•Features
•User Rights Management
Telephony Menu
•Call Statistics
•SIP Settings
•RTP Settings
•NAT Traversal Settings
•Line Settings
•FXO Settings
•External PSTN Gateways
•Gain Control
•SIP Trunk Settings
•Call Routing
•VoIP Carrier Wizard
•RADIUS Client Settings
•Voice Mail Common Settings
•Dial Plan Settings
Internet Uplink Menu
•PPP/ PPTP Settings
•VPN Configuration
•Dynamic DNS Settings
•Firewall and NAT
•Filtering Rules
•IDS Log
Users Menu
•Extensions Management
•BLF Management
•Extensions Directory
•Authorized Phones Database
Network Menu
•DNS Settings
•DNS Server Settings
•DHCP Settings for the LAN
Interface
2
Logout
The functional button Renew Wan IP Address appears on the administrator’s main Bizfon Management page if the Bizfon device acts as a DHCP
client. The Renew WAN IP Address button is used to obtain a new WAN IP address in case, e.g., the Bizfon moves to another network.
The functional button Establish Your Internet Connection Now respectively Terminate Your Internet Connection Now occurs on the Bizfon
Management page if PPPoE is used as WAN interface protocol.
The link Please Check Your Pending Events will be displayed on the administrator Main Menu page if new system events exist. The link leads to
the Events page that can be also accessed from the System menu.
The list of Users currently logged into the system is seen in the lower right corner of the Administrator's Main Menu. Information about IP address
user accessed Bizfon GUI from, the username user is logged in and the time until the next automatically logout is provided herein. The current
version of the Bizfon's firmware and of its boot loader is also available here. The idle session timeout is set to 20 minutes. If no action is performed
during that time, user will be automatically moved to the Login page and will be requested to login again.
The link Refresh in occurs in the upper right corner beside the field displaying the number of seconds until the next refresh and is used to perform a
manual reload of the page. If a page with a Refresh counter is left opened, the session time-out counter will be updated periodically and the logout
timeout will never expire.

Bizfon Manual II: Administrator's Guide Bizfon’s Graphical Interface
Bizfon2000 and Bizfon4000 (SW Version 4.1.x) 6
Recurrent Buttons
Throughout this guide, you will see a variety of recurrent buttons. Below is a description of these buttons.
Button Description Button Description
This button leads back to the previous
page of a fixed sequence of pages (used
mainly in wizards).
This button returns you to the page you were
previously on.
This button leads forward to the next page
of a fixed sequence of pages (used mainly
in wizards).
This button confirms an operation you started
before.
This button discards the latest not yet
confirmed entries.
This button confirms an operation you chose
before.
This is the last button of a fixed sequence
of pages that completes and saves the
entries of an entire sequence.
This button discards an operation you chose
before.
This button opens the help page
belonging to the currently active Bizfon
management page.
This button saves the settings modified on the
currently active management page.
This button opens a window where the last
inserted IP addresses are listed. It allows
the user to make a quick selection of an IP
address that has been previously used.
This will avoid the user needing type it
again. The clipboard can hold up to 10 IP
addresses and a new IP address will
replace the oldest one from the list.
This button opens a window where the last
inserted SIP addresses are listed. It allows the
user to make a quick selection of an IP address
that has been previously used. This will avoid
the user needing type it again. The clipboard
can hold up to 10 SIP addresses and a new
SIP address will replace the oldest one from the
list.
Recurrent Functional Buttons
In connection with the tables, the following are the few buttons you will see:
Functional Button Description
Add Allows adding a new record to the displayed table. A new page will be displayed to enter any new settings.
Edit Allows modifying the settings of the record selected by a checkbox. Normally only one (1) record may be selected. A new
page will be displayed to enter the modified settings.
Delete Deletes the selected entry(s) of a table. A warning message will ask for confirmation before deleting an existing entry.
Select All Selects all table entry(s) for example for further deletion.
Inverse Selection Inverses (opposites) an existing selection of table entry(s). If no entries are selected, clicking the button will select all
records.
Refresh in... May be shown in the upper right corner of a page. It displays the number of seconds remaining until the next refresh of the
page will occur. It may be used to reload the page manually.
Most of the tables offer the option to sort the entries in ascending or descending order by clicking the headings of the columns. A small arrow next to
the column heading indicates the direction of sorting - upward or downward. The entries of the table can be selected by using the corresponding
checkboxes in order to edit or delete them.
Entering a SIP Addresses correctly
Calls over IP are implemented based on Session Initiating Protocol (SIP) on the Bizfon. When making a call to a destination that is somewhere on
the Internet, a SIP address must be provided.
SIP addresses needs to be specified in one of the following formats:
“display name” <username@ipaddress:port>
“display name” <username@ipaddress>
username@ipaddress:port
username@ipaddress
username
The display name and the port number are optional parameters in the SIP
address. If a port is not specified, 5060 will be set up as the default one.
The range of valid ports is between 1024 and 65536.
A flexible structure of wildcards is allowed. In comparison with a wildcard,
the “?” character stands for only one unknown digit and the “*” character
stands for any number of any digits.
For your convenience, the following combinations can be used:
*@ipaddress - any user from the specified SIP server
username@* - a specified user from any SIP server
*@* - any user from any SIP server
Please Note: Wildcards are available for caller addresses only. No
wildcard characters are allowed for called party addresses. Exceptions are
addresses in the Supplementary Addresses table that are used by
Outgoing Call Blocking and Hiding Caller Information Settings
services. To use “*” and “?” alone (as non wildcard characters), use “\*” and
“\?” correspondingly.
Bizfon Manual II: Administrator's Guide Administrator’s Menus
Bizfon2000 and Bizfon4000 (SW Version 4.1.x) 7
Administrator’s Menus
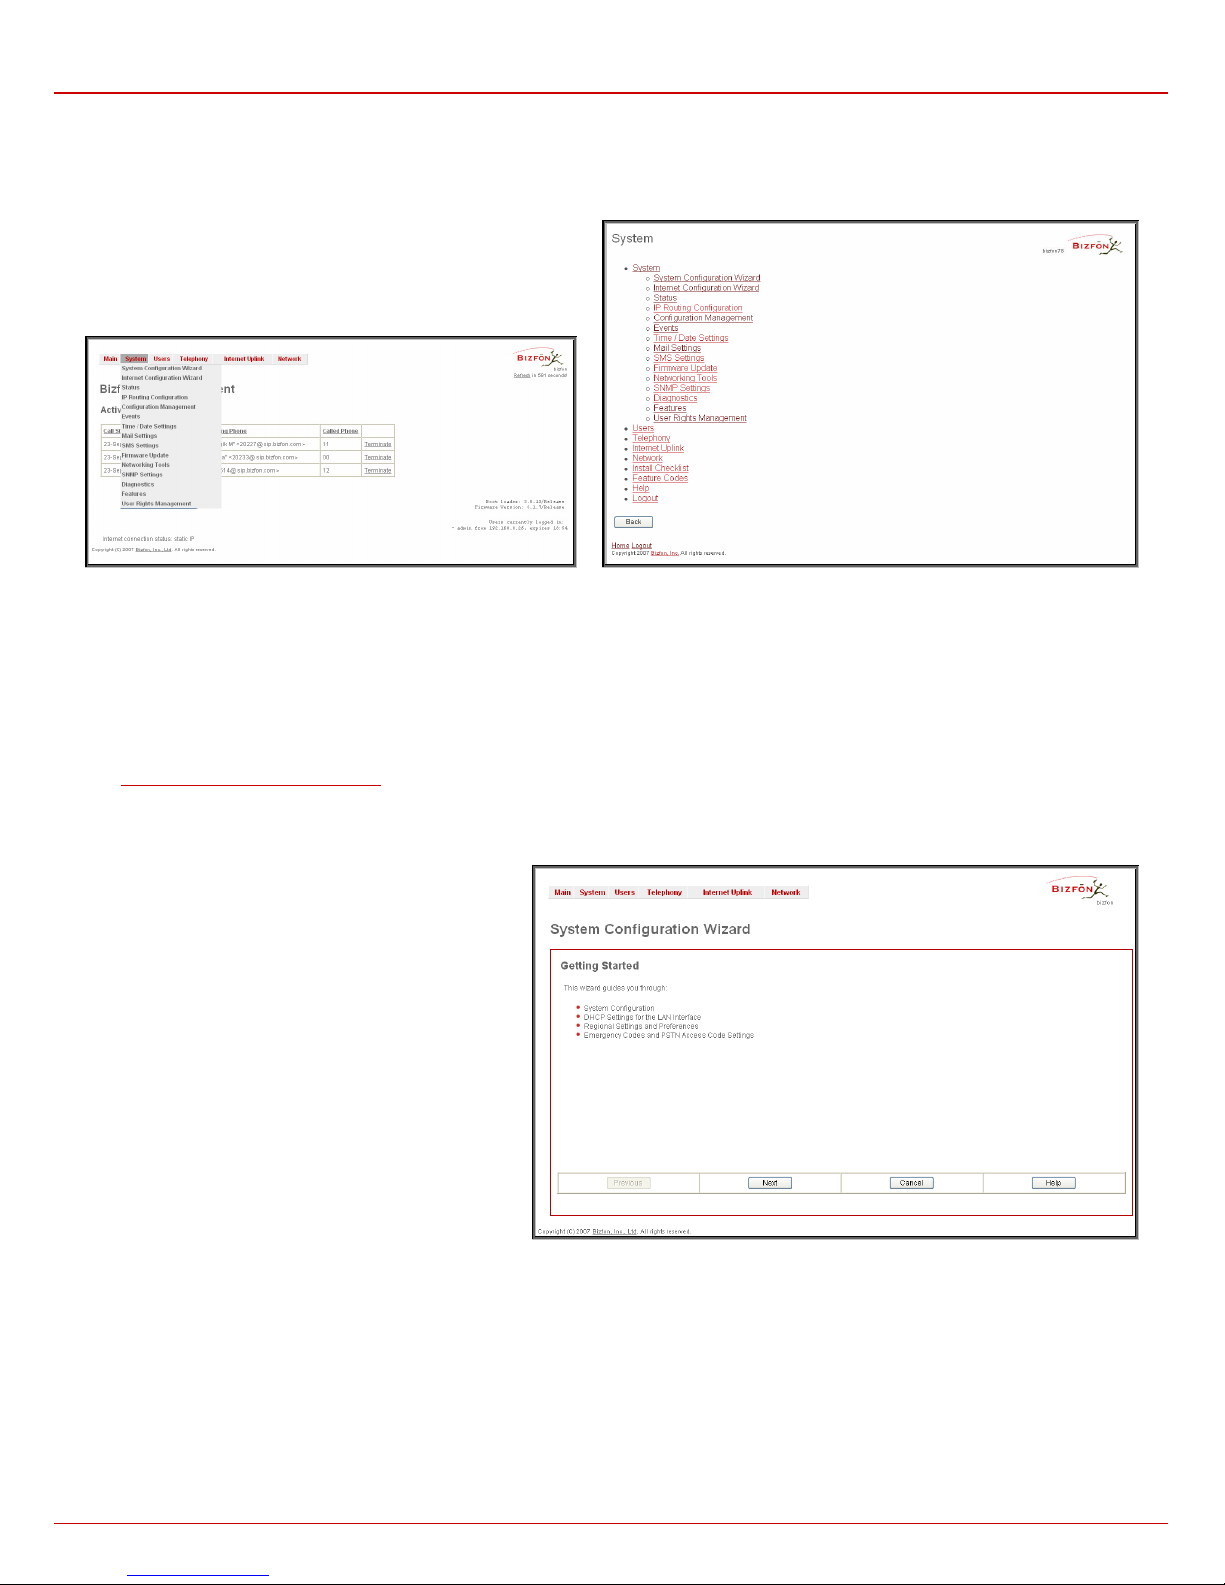
System Menu
Fig. II-1: System Menu in Dynamo theme
Fig. II-2: System Menu in Plain theme
System Configuration Wizard
The System Configuration Wizard allows the administrator to define the Bizfon’s Local Area Network settings and to specify regional configuration
settings to make Bizfon operational in its LAN. The System Configuration Wizard MUST be run upon Bizfon's first startup to make sure that it
works properly in its network environment. The Wizard allows navigating through the following basic configuration parameters and settings:
•System Configuration (see below)
•DHCP Settings for the LAN Interface
•Regional Settings and Preferences (see below)
•Emergency Codes and PSTN Access Codes Settings (see below)
DHCP Settings for the LAN are described in the chapters
below. The LAN configuration and regional settings will be
described later in this chapter.
Please Note: It is strongly recommended to leave the
factory default settings if their meanings are not fully
clear to the administrator.
Fig. II-3: System Configuration Wizard - Start page

Bizfon Manual II: Administrator's Guide Administrator’s Menus
Bizfon2000 and Bizfon4000 (SW Version 4.1.x) 8
The System Configuration page contains the host name,
IP address and Subnet Mask information about the Bizfon
LAN interface. These settings make Bizfon available to the
internal network.
The System Configuration page offers the following input
options:
Host Name requires a host name for the Bizfon device.
Domain Name requires the LAN side domain name which
the Bizfon belongs to.
IP Address requires the Bizfon host address for the LAN
interface.
Subnet Mask requires the Bizfon hosts’ Subnet Mask.
Fig. II-4: System Configuration Wizard - System Configuration page
The Regional Settings and Preferences are used to
select settings specific to the location of the Bizfon. This is
important for the functionality of the voice subsystem.
The Regional Settings and Preferences page has two
drop down lists to select the Location (country) and a
corresponding Timezone.Bizfon will support Daylight
Savings (DST) correction if it is available for the selected
time zone.
This page also has a manipulation radio button group to
choose:
•System Language – selection is available only when
the custom Language Pack has been uploaded and it
is used to enable custom language for system voice
messages or returning back to the default language
English.
•GUI Theme - selection used to select the GUI theme
style of the web based configuration pages.
Fig. II-5: System Configuration Wizard - Regional Settings page
The Emergency Codes and PSTN Access Codes
Settings are used to configure the emergency dial plan.
The Emergency Codes text field requires the PSTN
numbers of the emergency or lifeline services. Multiple
emergency codes, separated by commas, can be inserted
in this field. For each emergency code, a routing pattern will
be generated in the Call Routing Table, which will allow
faster and easier calls to emergency destinations.
The PSTN Access Code drop down list allows you to
select the prefix code for accessing the PSTN line in the
routing mode. Dialing the digits inserted in this text field will
provide the PSTN dial tone when dialed from the handset.
Fig. II-6: System Configuration Wizard - Emergency Codes and PSTN Codes Settings page

Bizfon Manual II: Administrator's Guide Administrator’s Menus
Bizfon2000 and Bizfon4000 (SW Version 4.1.x) 9
Internet Configuration Wizard
The Internet Configuration Wizard allows the administrator to configure the WAN interface settings and to adjust Bizfon’s connectivity with an
external network. The Internet Configuration Wizard MUST be run for Bizfon to be connected to the Internet.
All the settings of the Internet Configuration Wizard are
described in the chapters below except those for the IP settings,
which will be described in this chapter.
Please Note: It is strongly recommended not to change the
factory default settings if their meanings are not fully clear
to an administrator.
Fig. II-7: Internet Configuration Wizard - Start page
The Wizard allows navigating through the following basic configuration parameters and settings:
•Uplink configuration (see below)
For WAN Interface protocol PPPoE, PPPoA,
1483B and 1483R:
•PPP/ PPTP Settings
•WAN Interface Configuration (see below)
•DNS Settings
•System Mail Settings (see below)
For WAN Interface protocol PPTP:
•WAN IP Configuration (see below)
•PPP/ PPTP Settings
•WAN Interface Configuration (see below)
•DNS Settings
•System Mail Settings (see below)
For WAN Interface protocol Ethernet:
•WAN IP Configuration
•WAN Interface Configuration (see below)
•DNS Settings
•System Mail Settings (see below)
The Switch to Auto Provisioning link moves you to the Automatic Provisioning page where Bizfon can be configured automatically.
The Uplink Configuration page allows you to select the Bizfon‘s
WAN interface connection type and its bandwidth settings. These
settings will make Bizfon available to the external network.
Depending on the Uplink Interface Protocol selection, the page
following the Uplink Configuration page is different. Thus if
PPPoE is selected, the next page will be PPP Configuration, while
selecting Ethernet will bring up the WAN IP Configuration page.
The Uplink Configuration page offers the following components:
The WAN Interface Protocol radio buttons are used to choose the
protocol depending on the requirements of the ISP (Internet Service
Provider):
PPPoE - turns on the PPP over an Ethernet connection.
PPTP – turns on the Point to Point Tunneling Protocol (PPTP)
interface used for the connection between Bizfon and ADSL
modem. A fixed IP address configuration is needed in this
case.
Ethernet - turns on the Ethernet connection. Fig. II-8: Internet Configuration Wizard - Uplink Configuration page
The WAN Interface Bandwidth settings allow the specification of the upstream and downstream speeds in kbit/s, helping to assure the quality of IP
calls. An IP call looses the voice quality if there is no available bandwidth. When approaching the limits of bandwidth capacity, another IP call will be
declined.
The bandwidth provided by the ISP has to be specified in the text fields Upstream Speed and Downstream Speed. The default entry in both fields
is 10000, the maximum bandwidth of a 10 MB Ethernet. In most cases, providers offer a smaller bandwidth than 10000 kbit/s.
The bandwidth required by an IP call depends on the codecs used and these specifications are listed in the tables below:

Bizfon Manual II: Administrator's Guide Administrator’s Menus
Bizfon2000 and Bizfon4000 (SW Version 4.1.x) 10
Required Bandwidth for Standard Packets:
Needed bandwidth in kbit/s using the Codecs:Packet
Size in
msec. G.711u/G.711a G.726-16 G.726-24 G.726-32 G.726-40 G.729a G.723 iLBC-13.33
10 105 58 66 74 82 50 - -
20 84 37 45 53 61 29 - -
30 76 30 38 45 53 22 21 27
40 74 27 34 42 50 19 - -
50 71 25 32 40 48 17 - -
60 67 22 30 37 45 15 13 20
Required Bandwidth for Encrypted Packets when a VPN is used:
Needed bandwidth in kbit/s using the Codecs:Packet
Size in
msec. G.711u/G.711a G.726-16 G.726-24 G.726-32 G.726-40 G.729a G.723 iLBC-13.33
10 148 98 105 118 124 92 - -
20 105 59 65 74 81 49 - -
30 90 43 52 60 66 35 35 41
40 85 38 45 53 61 30 - -
50 80 34 41 48 56 26 - -
60 74 29 37 45 52 22 20 26
The Min Data Rate text field requires the amount of upstream bandwidth that ought to remain for data applications even if voice applications use the
entire available upstream bandwidth. The value selected here needs to be smaller than the upstream bandwidth and is measured in kbit/s.
The WAN IP Configuration page is only displayed if Ethernet or
PPTP has been selected to be the uplink protocol. It offers the
following components:
The Assign automatically via DHCP radio-button selection
switches to automatic retrieval of the WAN IP address from a DHCP
server at the ISP/uplink.
Please Note: DHCP referred to here is the one that runs on the
provider’s side and not the Bizfon’s personal DHCP server.
The Assign Manually radio-button switches to the manual
adjustment of IP settings. This selection requests the following
parameters:
IP Address requires the IP address for the Bizfon WAN interface.
Subnet Mask requires the subnet mask for the Bizfon device WAN
interface.
Default Gateway requires the IP address of the router where all
packets are to be sent to, for example, to the router of the provider.
Fig. II-9: Internet Configuration Wizard - WAN IP Configuration page
The WAN Interface Configuration page may be used to modify the
MAC address of the Bizfon. This might be necessary if the ISP
(Internet Service Provider) requires a specified MAC address, for
example, for authentication. This page offers the following
components:
MAC Address Assignment manipulation radio-buttons:
•This Device turns to the default MAC address of the Bizfon.
•User Defined requires user defined MAC Address.
The MTU drop down list allows you to select the maximum packet
size on the Ethernet (in bytes). MTU is used to fragment the packets
before transmitting them to the network. The MTU preferred value is
dependent on the Ethernet connection. The default MTU size is 1500
Bytes for Ethernet and 1400 Bytes for PPPoE.
Please consult with your ISP administrator to get the corresponding
settings. Fig. II-10: Internet Configuration Wizard - WAN MAC Address Configuration page
Bizfon Manual II: Administrator's Guide Administrator’s Menus
Bizfon2000 and Bizfon4000 (SW Version 4.1.x) 11
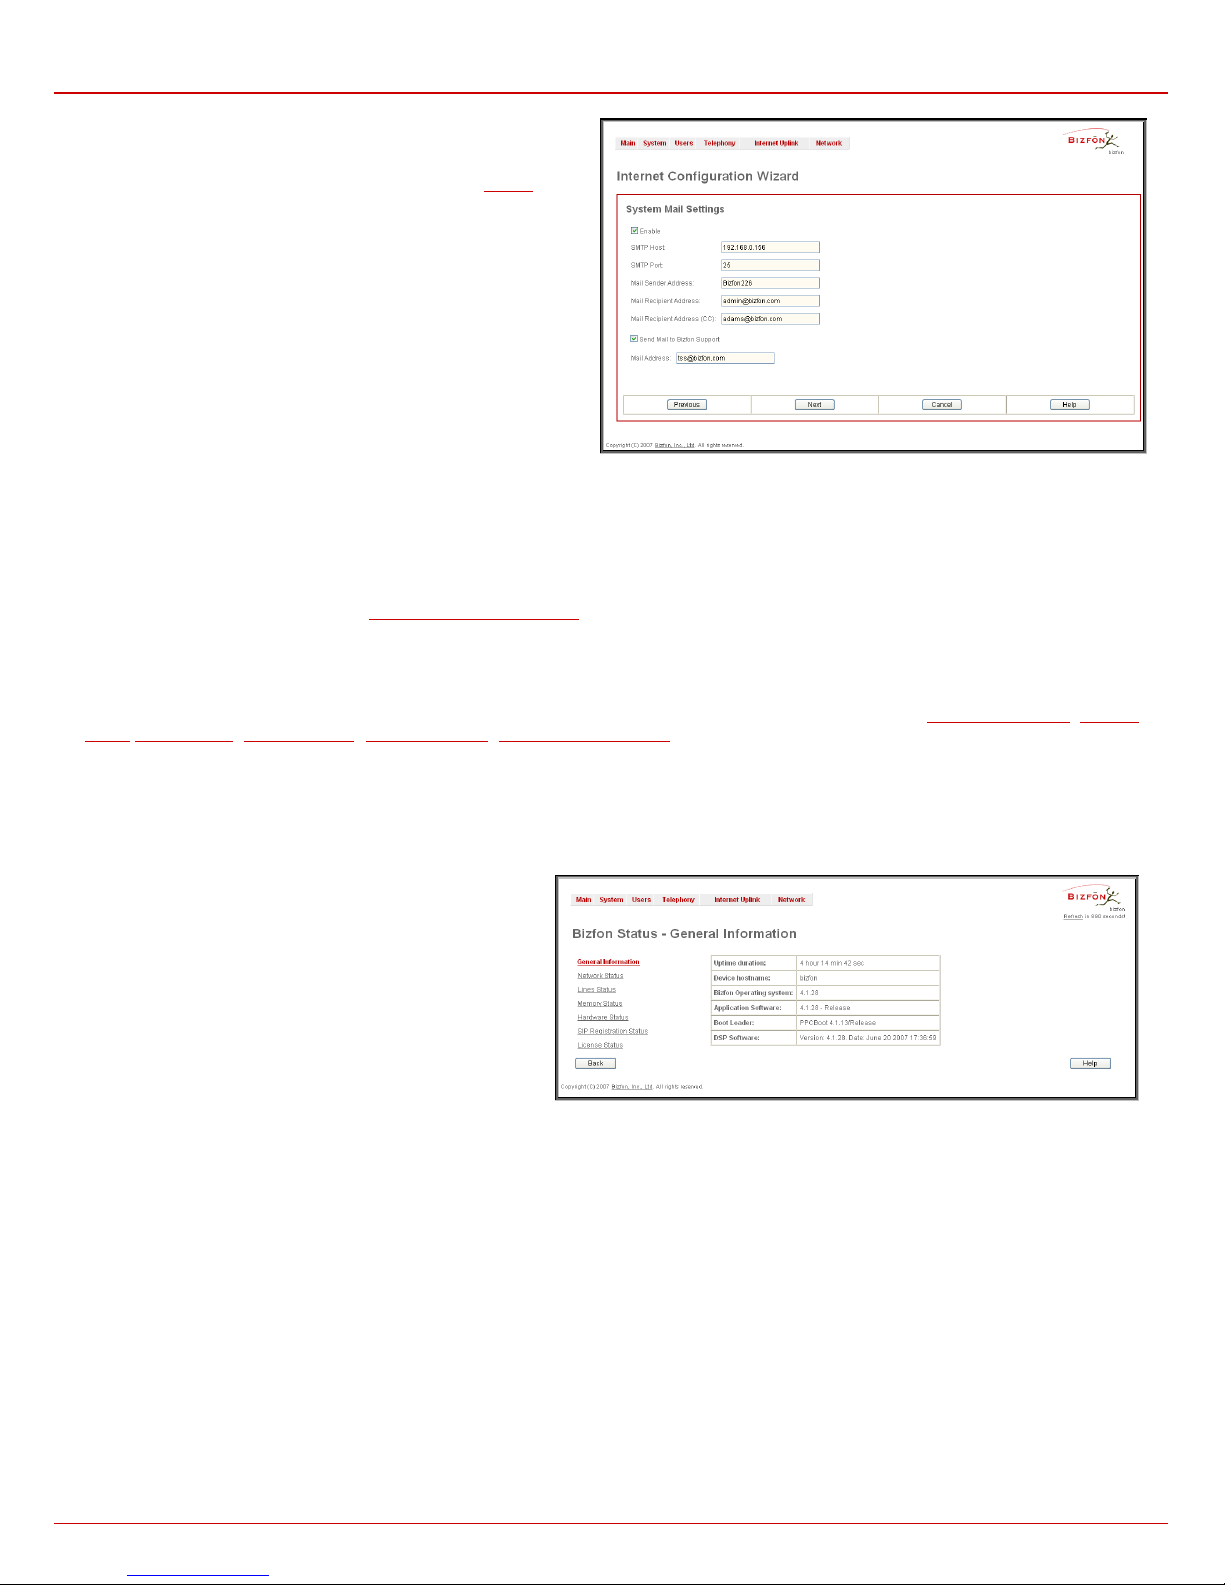
The System Mail Settings page is used to configure the mail
settings for delivering Bizfon’s notification emails to the administrator
or users. The notification emails may be sent to the Bizfon device’s
administrating person when a new event occurs in the Events table.
Additionally, new voice mails can be delivered to the user’s e-
mailbox, if appropriately configured.
With the Enable checkbox system mail sending and voice messages
transmission to the extension user's mailbox could be enabled.
SMTP Host requires the IP address or host name of the Simple Mail
Transfer Protocol (SMTP) server. This SMTP server is part of your
mail server that you normally use to receive and send mails.
SMTP Port requires the SMTP host port number.
Mail Sender Address text field requires the source address for the
Bizfon notification emails. The email address defined here should be
an existing valid email address registered on the selected SMTP
server or it should have permission to use that particular SMTP
server for e-mail transmission. Fig. II-11: Internet Configuration Wizard – System Mail Settings page
Mail Recipient Address text field requires an active email address where system emails will be delivered. The e-mail recipient here can be a Bizfon
administrator or someone responsible for network and system problems.
Mail Recipient Address (CC) text field requires an active email address where a carbon copy (CC) of the system e-mails will be delivered.
Send Mail to Bizfon Support is used to inform the Bizfon's Technical Support about the main network parameter changes on the Bizfon device.
This checkbox enables the Mail Address text field where the email address of Bizfon's Technical Support Office should be inserted. When this
option is enabled, every time when the 2Internet Configuration Wizard is passed, the Bizfon's Technical Support Office will get an email about WAN
IP, MAC address and device's Unique ID changes.
Status
The system status window displays non-editable tables providing extensive system status information about Bizfon: General Information, Network
Status,Lines Status, Memory Status, Hardware Status, SIP Registration Status. The links on this page lead to device Transfer Statistics, user
mailboxes and supplementary services configuration pages.
The System Status page has several tables providing system information.
General Information
The General Information page includes the following
information:
•Uptime duration - Period Bizfon is on since last reboot.
•Device hostname - Bizfon device host name.
•Bizfon Operating System - Bizfon operating system
version.
•Application Software - Software and file system versions
of the Bizfon.
•Boot Loader - Bizfon boot loader version.
•DSP Software - Bizfon DSP software version and the
date of build.
Fig. II-12: Bizfon Status - General Information page
Bizfon Manual II: Administrator's Guide Administrator’s Menus
Bizfon2000 and Bizfon4000 (SW Version 4.1.x) 12
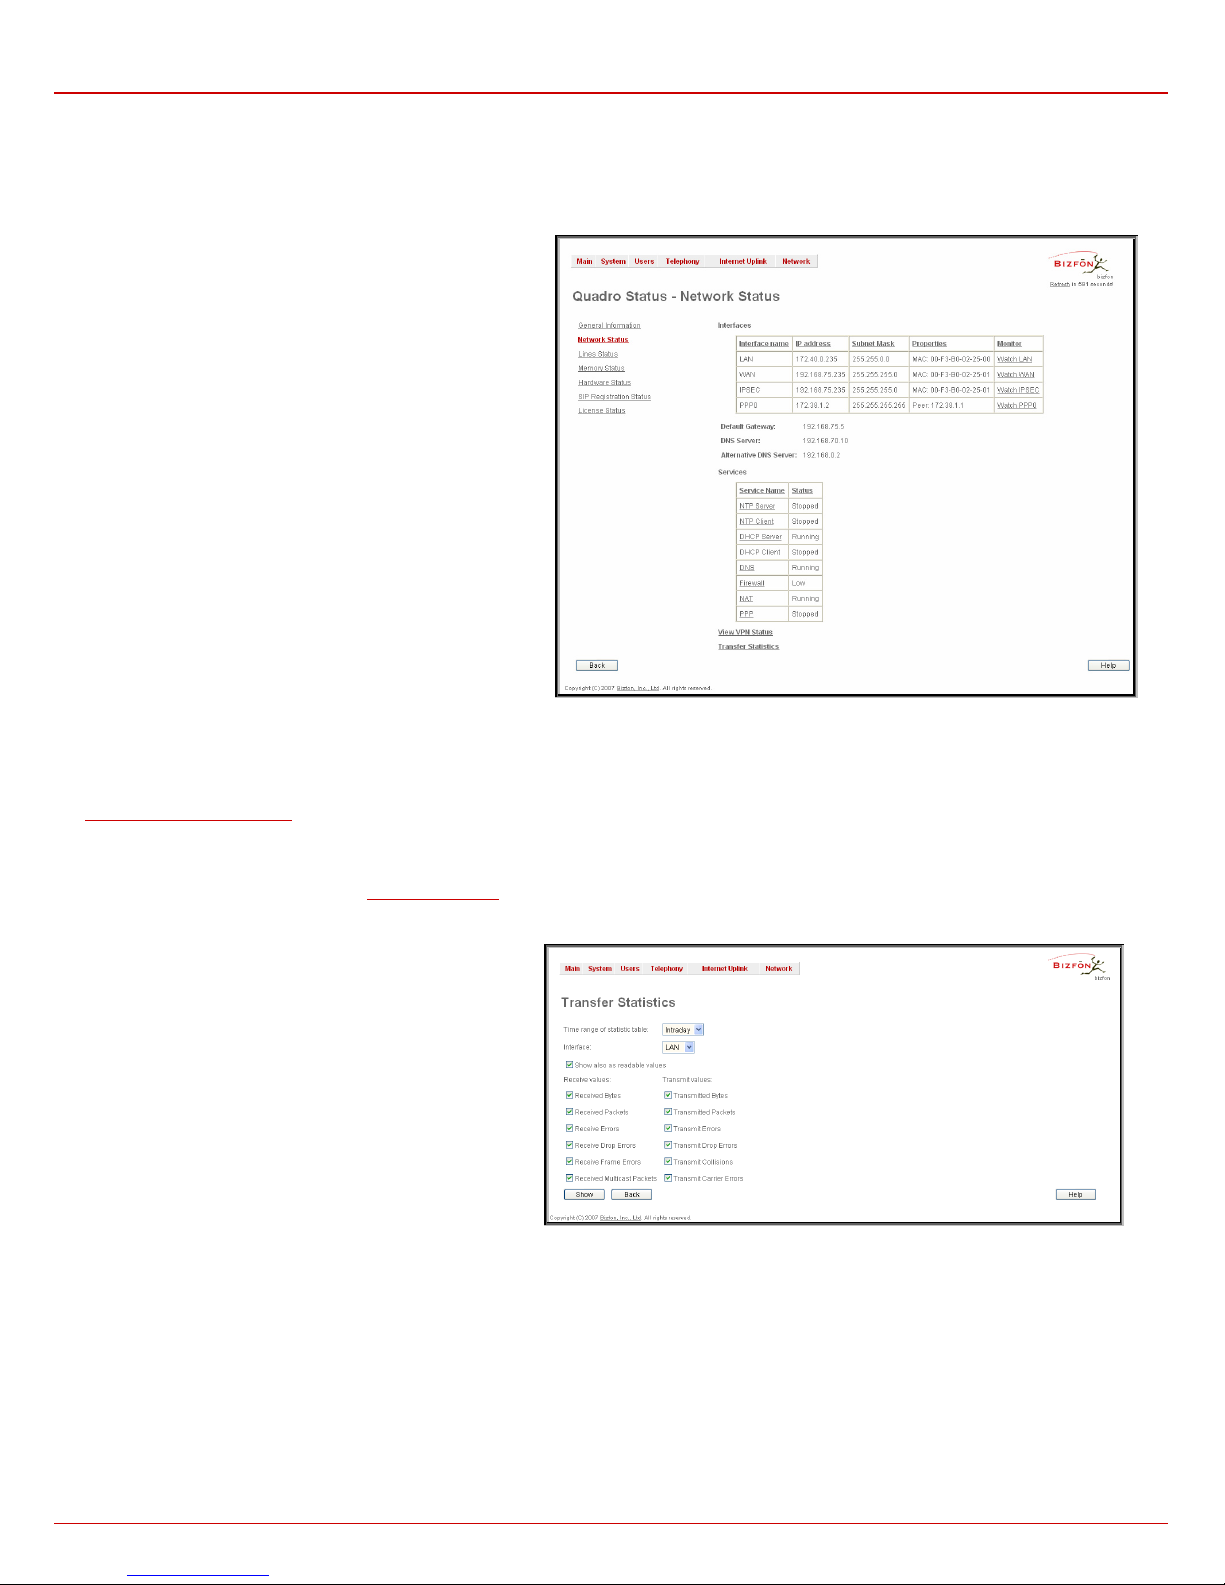
Network Status
The Network Status page includes the following information
about Interfaces:
Interface Name lists the Network interfaces available on the
Bizfon (LAN, WAN, IPSec and a number of PPPs, depending
on the number of active PPP connections).
IP Address lists the IP addresses corresponding to each
network interface.
Subnet Mask lists the subnet masks corresponding to each
network interface.
Properties will list either the MAC address corresponding to
each network interface on the Bizfon or the PPTP, L2TP and
IPSec peer IP address if an active VPN (IPSec or PPP)
interface exists.
Monitor includes links to survey LAN, WAN, IPSec and PPP
traffic correspondingly. The VPN traffic link will be displayed
only if a VPN has been configured. The selection of these links
will open a new window with a table of network traffic statistics
on the following selected interfaces:
•Received Bytes
•Received Packets
•Received Errors
•Received Drop Errors
•Received Overrun Errors
•Received MultiCast
Packets
•Transmitted Bytes
•Transmitted Packets
•Transmitted Errors
•Transmitted Drop Errors
•Transmitted Carrier Errors
•Transmitted Collisions
Fig. II-13: Bizfon Status Network Status page
When opening the corresponding interface statistics window, no traffic values are displayed at first. After opening the window, the tables will serve as
a counter and traffic statistics will be updated every minute.
DNS Server, Alternative DNS Server and Default Gateway - these display the Bizfon settings corresponding to what has been configured with the
System Configuration Wizard.
Services (NTP Server and Client, DHCP Server and Client, DNS, Firewall, NAT, PPP, IDS) statuses: shows if they have stopped or if they are still
running.
The View VPN Status link refers to the VPN Configuration page where all VPN (IPSec, PPTP and L2TP) connections can be viewed and edited.
Transfer Statistics - link to the Transfer Statistics page.
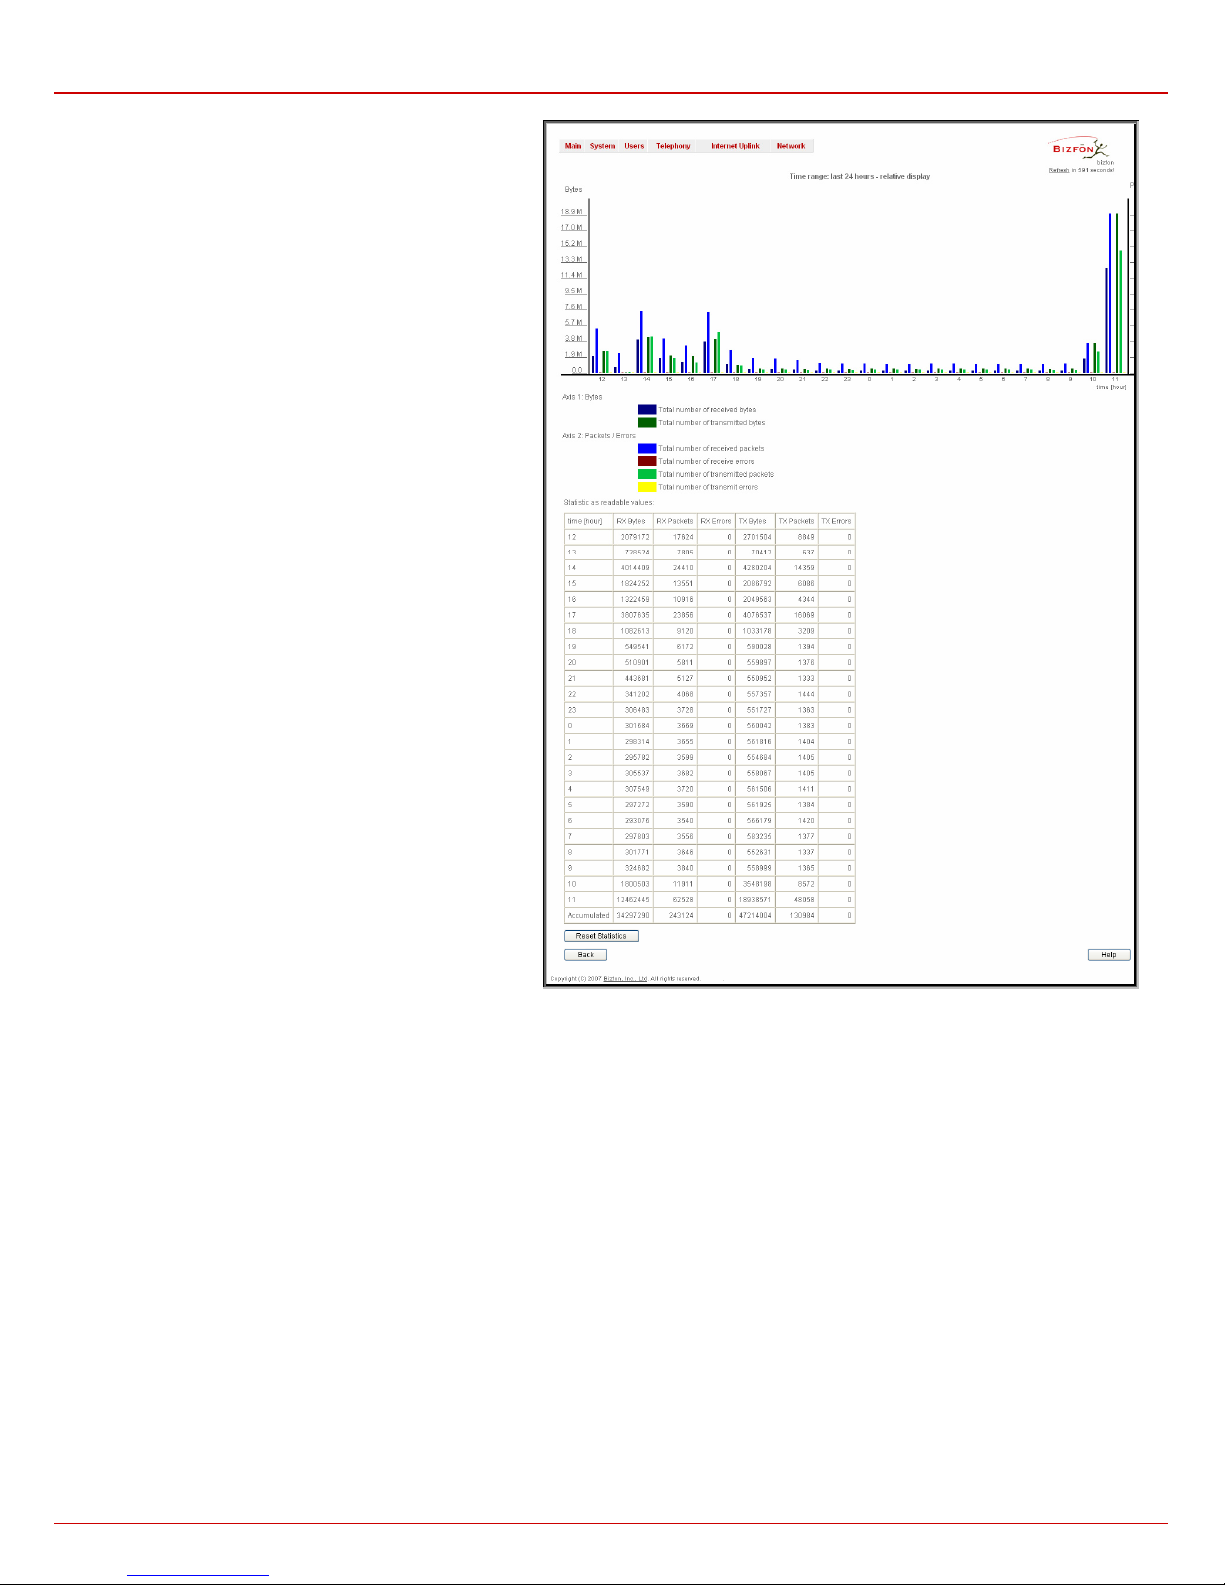
The Transfer Statistics page shows a user-defined statistics
table with the transmit/receive value (criteria), interface type
and time period. It contains the following components:
Time range of statistic table - the drop down list includes
the period (in days) statistics data that is to be collected and
the corresponding diagram charts that are to be built.
Interface - the drop-down list offer the values:
•WAN - Wide Area Network (WAN) events only
•LAN - Local Area Network (LAN) events only
When Show also as readable values checkbox is selected,
an additional table with statistics values will be displayed on
the next page.
Fig. II-14: Transfer Statistics page
Bizfon Manual II: Administrator's Guide Administrator’s Menus
Bizfon2000 and Bizfon4000 (SW Version 4.1.x) 13
The area Receive Values provides the following:
•Receive Bytes - number of received bytes.
•Receive Packets - number of received Ethernet
packets.
•Receive Errors - number of received packets
containing errors.
•Receive Drop Errors - number of received packets that
have been discarded.
•Receive Overrun Errors - number of received overrun
errors that occur when the receive buffer is not large
enough to hold all incoming packets. This error usually
appears due to a slow receiving system.
•Receive MultiCast Packets - number of received
broadcast packets.
The area Transmit Values provides the following:
•Transmit Bytes - number of transmitted bytes
•Transmit Packets - number of transmitted Ethernet
packets.
•Transmit Errors - number of transmitted packets
containing errors.
•Transmit Drop Errors - number of transmitted packets
that have been discarded.
•Transmit Carrier Errors - number of transmit carrier
errors that occur due to a defective or lost connection on
the Ethernet link.
•Transmit Collisions - number of transfer errors that
occurred during a simultaneous packet transmission
from both sides.
Fig. II-15: Transfer Statistics Diagram Chart
To see the Transfer Statistics Diagram Charts, select the desired criteria and click Save to generate the corresponding chart and the table
showing the transfer statistics values (if enabled). The letters M(millions) and K(thousands) used in the legend of the displayed diagrams show the
total number of specified criteria. The Reset Statistics button is used to reset the chart and the table (if enabled).
Lines Status
The Bizfon Status - Lines Status page shows the current status of each of the FXS, IP and FXO lines including details of the attached extension.
Since only one line of information can be displayed at a time, the Line, IP Line and FXO functional buttons are used to navigate through the
information regarding other lines.
The Lines Status table displayed for FXS and IP lines includes a group of static and dynamic parameters. Static parameters are always displayed.
Dynamic parameters only appear when an event takes place on the extension.

Bizfon Manual II: Administrator's Guide Administrator’s Menus
Bizfon2000 and Bizfon4000 (SW Version 4.1.x) 14
Static Parameters:
Extension shows the extension number of the selected telephone line.
Display Name shows the corresponding name.
Phone State may have the value on hook or off hook.
Number of Active Calls shows the number of calls that are currently
present on the phone.
Dynamic Parameters:
Call State shows the current state of the extension (in voice mail, in
call, waiting, busy, call out, ring in, etc.).
Caller Party appears when a call is received and indicates the caller
extension and the IP address or a phone number, depending on type of
call.
Called Party appears when a call is placed and indicates the
destination extension and the IP address or a phone number,
depending on type of call.
Call Type shows whether the call is Internal or External and whether it
is a PSTN call, PBX call or IP call.
Call Start Time shows the call start date and time.
Call Duration shows the current call duration.
RX Codec shows the codec used to encrypt the incoming packets. TX
Codec shows the codec used to encrypt the outgoing packets. If RX
and TX codecs are the same, only one Codec field will be displayed.
Fig. II-16: Lines Status - Lines Status page upon established call
The list of supplementary services provides the following additional status
information for each telephone line: Enabled or Disabled.
For Incoming and Outgoing Call Blocking, Speed Calling, Hiding
Caller Info, Voice Mailbox and Group List services, the number of
Entries will be displayed in the corresponding service table. For Voice
Mail Service, the voice mailbox configuration mode is displayed here.
This allows administrator to view the status and to be notified about
services running on Bizfon for every line. The services are designed as
links that guide the administrator to the corresponding service page of the
selected user.
Fig. II-17: Bizfon Status - Lines Status
The Lines Status table of each FXO Line provides information about the
Allowed Call Types, the extension number (attendant or routing client), to
whom the Incoming Call is Routed To and the State of the line (Free or
Busy).
The FXO Channel Usage Statistics link is only present for local FXO lines
(this option is not available for shared FXO lines) and leads to the page
where diagram chart of FXO lines usage can be viewed. Fig. II-18: Line Status - FXO Status page
Bizfon Manual II: Administrator's Guide Administrator’s Menus
Bizfon2000 and Bizfon4000 (SW Version 4.1.x) 15
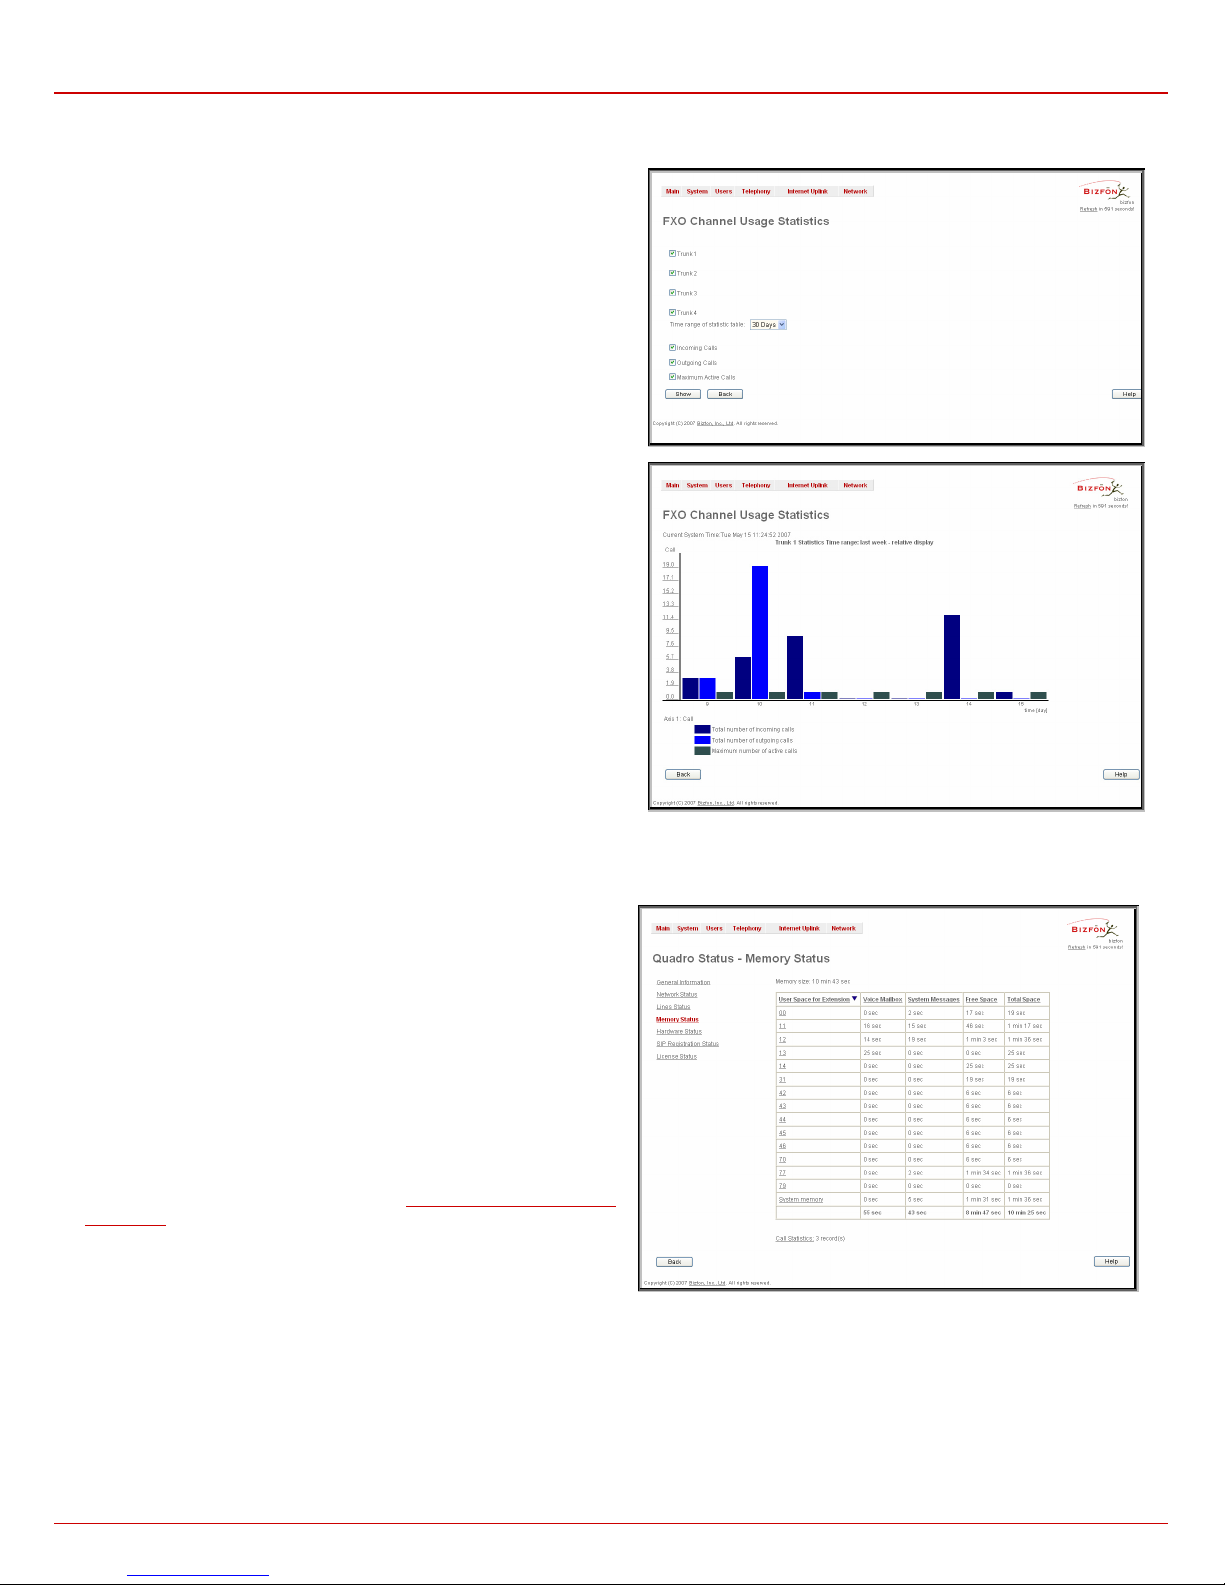
The FXO Channel Usage Statistics page consists of following components
used to define the chart parameters:
Trunk checkboxes are used to select the FXO line number(s) over which
the FXO traffic chart will be built. At least one Trunk checkbox should be
selected, otherwise error message appears.
Time range of statistic table drop down list includes the period (in days)
statistics data that is to be collected and the corresponding diagram chart
that is to be built.
Incoming Calls and Outgoing Calls checkboxes are used to select
whether the FXO traffic statistics for only incoming or outgoing or for both
type of calls should be displayed in the diagram chart.
Maximum Active Calls checkbox is used to have the number of maximum
active calls displayed in the diagram chart.
At least one of these checkboxes should be selected, otherwise error
message appears. Fig. II-19: FXO Channel Usage Statistics page
Show button is used to generate an FXO channels usage diagram chart
over the parameters selected above.
When this button is pressed, FXO Channel Usage Statistics chart
appears. It represents dependency between the time frame and the number
of calls performed during that period. Additionally it may display the
maximum number of calls performed in the selected time frame. Fig. II-20: FXO Channel Usage Statistics chart
Memory Status
The Memory Status page includes tables with the available User Space
information for each extension. These tables display the space used by the
voice mailbox and uploaded/recorded system greetings. It shows the free
and total space (counted in minutes/seconds) for every extension. This
page includes the following information:
Memory Size shows total memory space (counted in minutes/seconds)
available on the Bizfon and assigned to all extensions.
The table’s links lead the administrator to the extension settings page
where User Space may be altered.
The System Memory row indicates the space occupied by the universal
extension recordings. Link refers to the Upload Universal Extension
Recordings page where universal extension system messages may be
uploaded.
Call Statistics shows the current number of calls with recorded statistic
entries.
Fig. II-21: Memory Status page
Bizfon Manual II: Administrator's Guide Administrator’s Menus
Bizfon2000 and Bizfon4000 (SW Version 4.1.x) 16
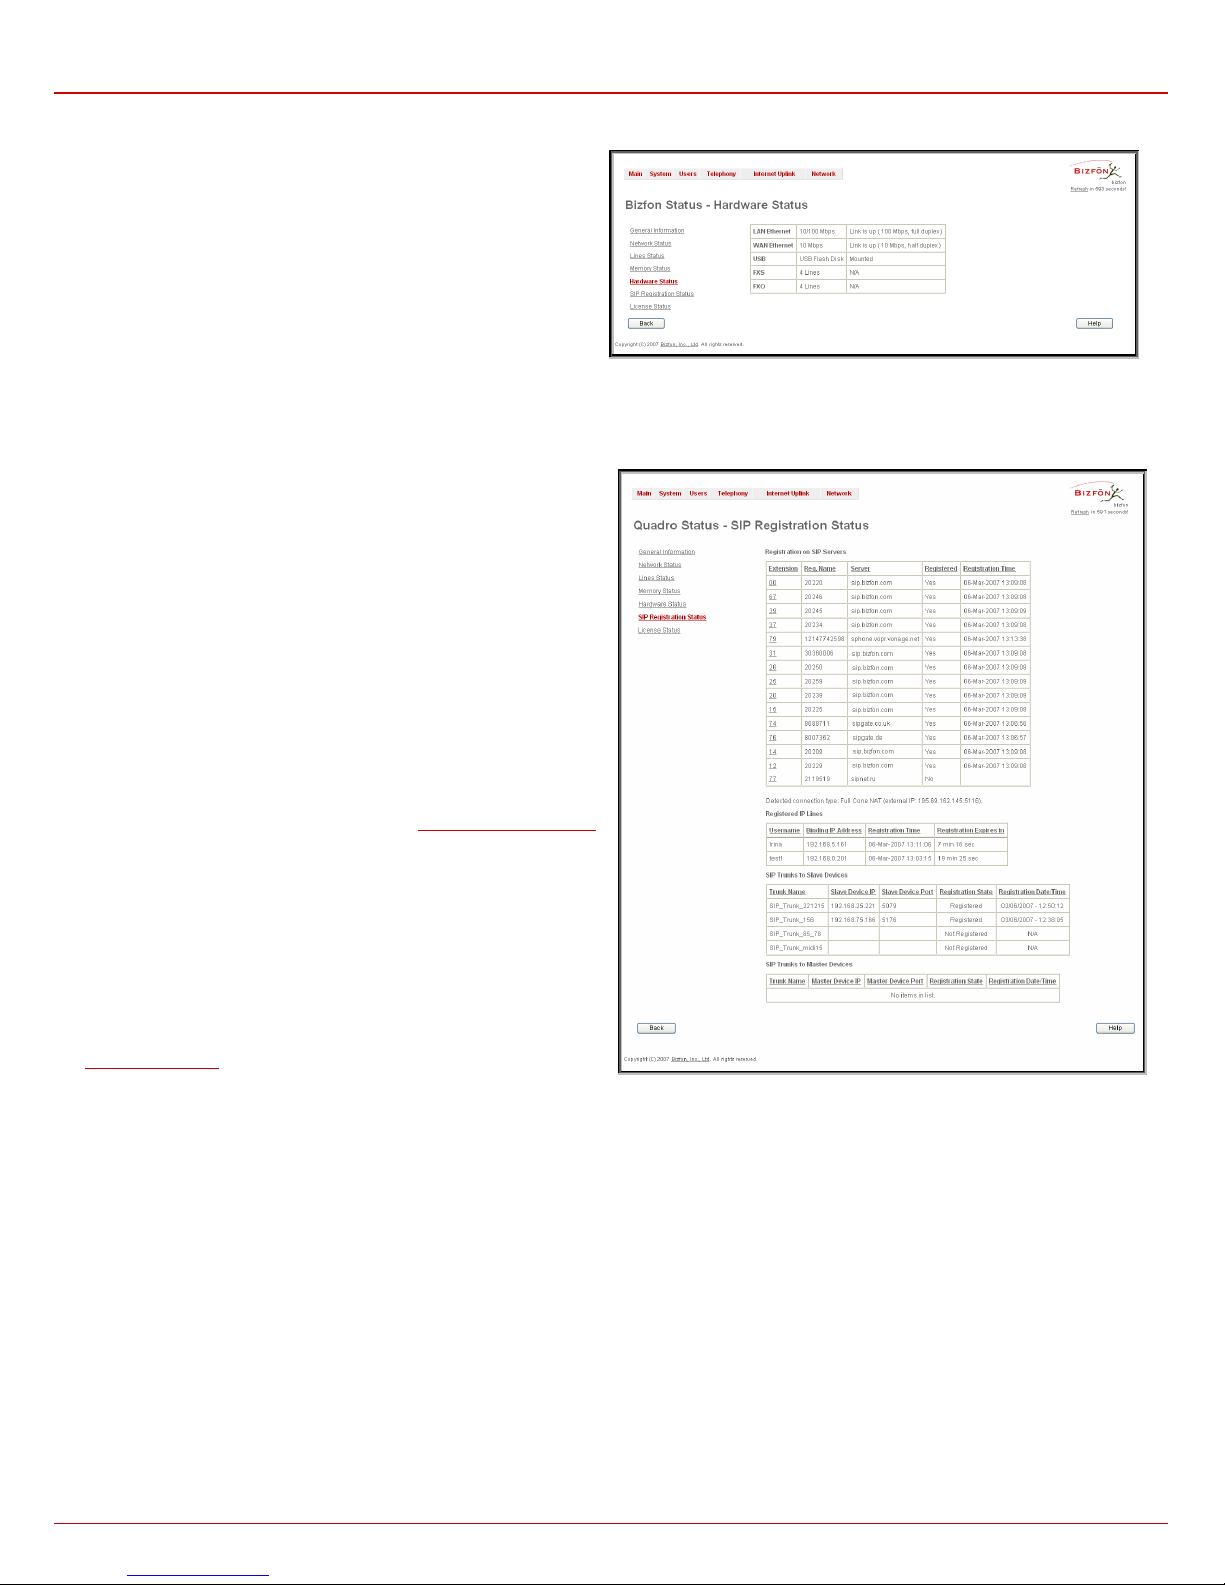
Hardware Status
The Hardware Status table displays a list of the hardware devices
present and currently available on the Bizfon board. The hardware
device version number and additional comments about its state are
indicated here.
Fig. II-22: Hardware Status page
SIP Registration Status
The SIP Registration Status is a table displaying the SIP registration
information of the Bizfon extensions.
The table contains a list of all the registered extensions of Bizfon, SIP
registration name for each extension, addresses of SIP servers where
they are registered (if applicable), whether or not it is registered for each
extension, and the registration date and time. By clicking on the row
heading, the table will be sorted by the selected column. When sorting
(ascending or descending), arrows will be displayed next to the column
heading.
The links inside the table will link you to the Extensions Management
page where the SIP registration settings may be altered.
The Detected Connection Type field displays the connection type
Bizfon currently is acting in (direct connection or behind NAT). If Bizfon
is acting behind NAT, the NAT machine IP address is also displayed.
The Registered IP Lines table lists the IP lines and remote extensions
registered on the Bizfon. The table indicates the actual IP addresses of
the remote devices, the usernames by which the devices have been
registered on the Bizfon, as well as the registration status information.
The SIP Trunks to Slave Devices and SIP Trunks to Master Devices
tables list the SIP tunnels between local and the remote Bizfons (see
SIP Trunk Settings). The SIP Trunks to Slave Devices table lists those
trunks where local Bizfon acts as a master. The SIP Trunks to Master
Devices table lists those trunks where local Bizfon acts as a slave. Fig. II-23: SIP Registration Status page
IP Routing Configuration
Routing is used to relay information across the Internet from a source to a destination. Along the way, at least one intermediate node is typically
encountered. Routing is different than bridging. The main difference between bridging and routing is that bridging operates at the OSI Data Link
Layer (Level Two Media Access Control Layer) and routing operates at OSI Network Layer (Level Three).
Bizfon’s IP Routing service allows you to route IP packets from one destination to another (or to a specified router) through Bizfon or a Bizfon VPN.
The IP Routing Configuration page is used to make IP Static, IP Policy and VPN routes for IP packets routing. This page consists of three tables.
Entries in the tables are color coded according to the state of the route. For example, yellow indicates disabled routes, green indicates successful
routes and red indicates routes with an error.
Bizfon Manual II: Administrator's Guide Administrator’s Menus
Bizfon2000 and Bizfon4000 (SW Version 4.1.x) 17
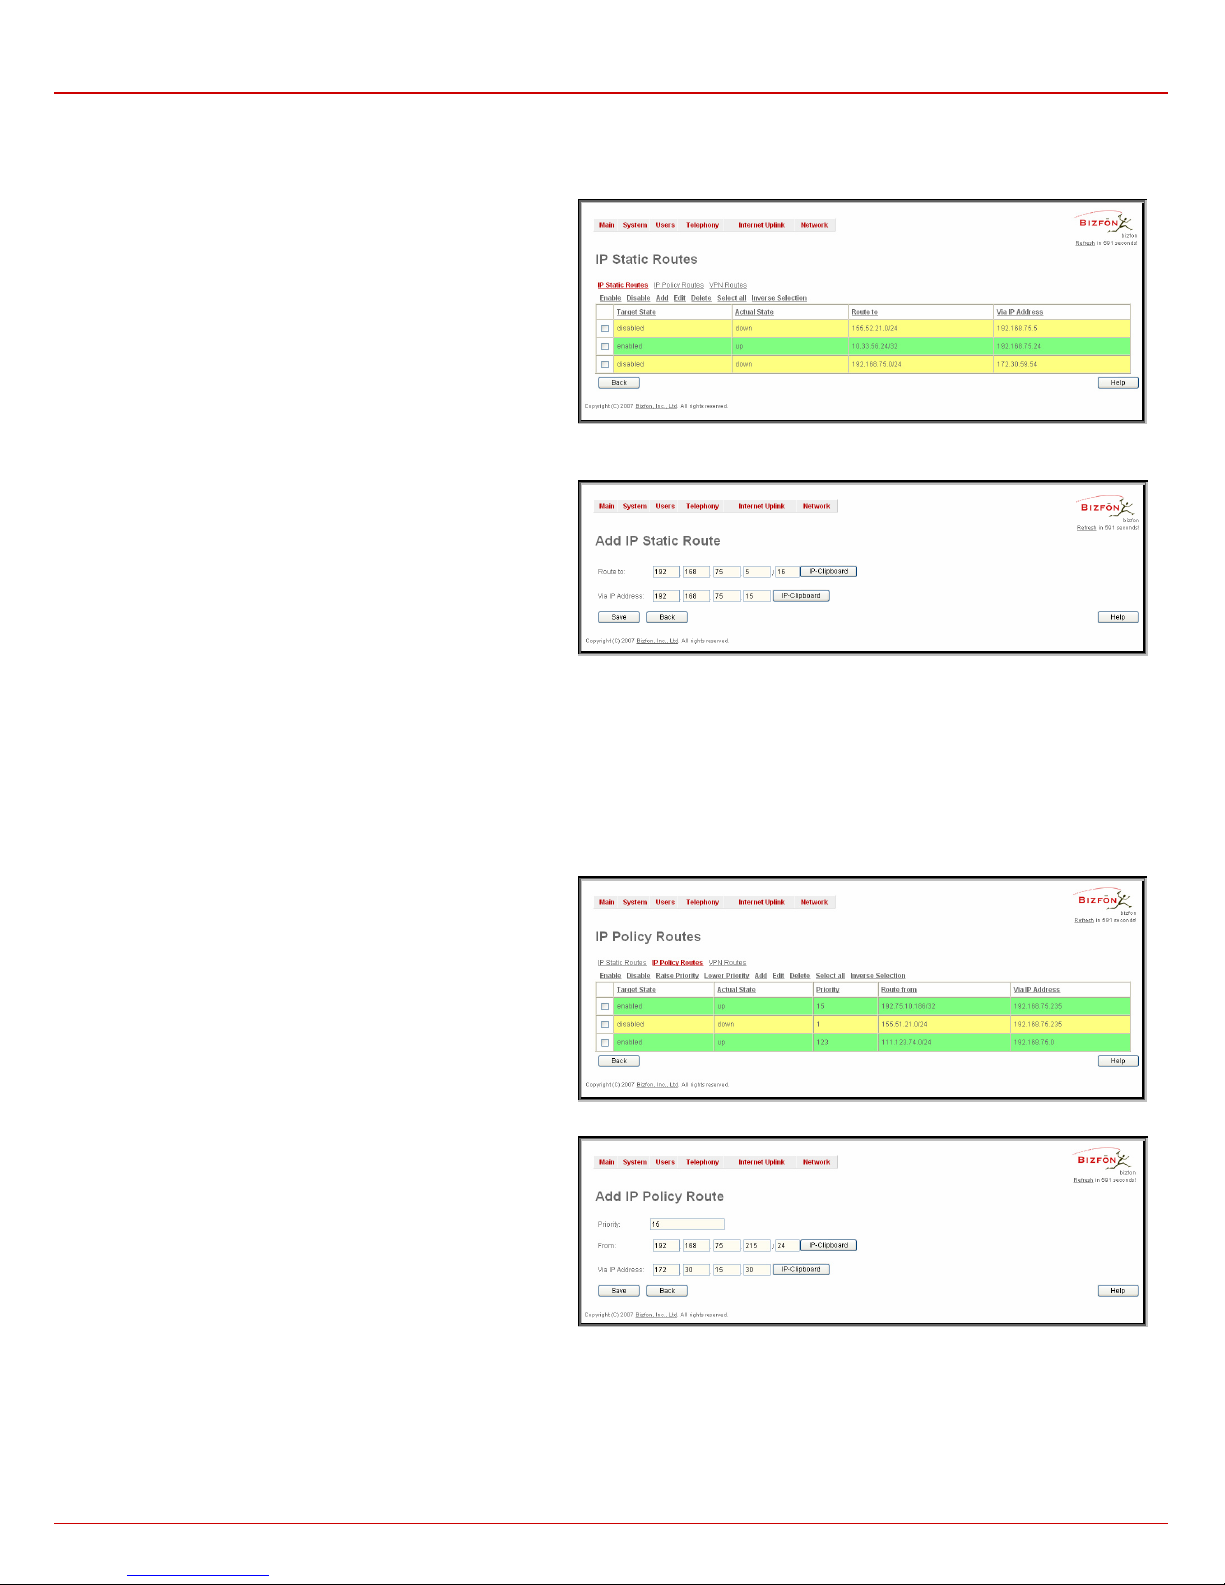
IP Static Routes are used to forward IP packets from the
Network, where the Bizfon is connected, to the specified
destination.
The IP Static Routes table displays all established IP static
routes with their parameters: Target State for the state of the
route (enabled or disabled), Actual State for the state of the route
connection (up, down or erroneous), Route To for the subnet
where the incoming packets should be routed to and Via IP
Address for the router IP address where incoming packets should
be routed through.
Add opens the Add IP Static Route page where a new static
route can be established.
Enable/Disable is used to activate and deactivate a selected
route(s). At least one route should be selected in order to use
these functions, otherwise the following error message will
appear: “No record(s) selected.” Fig. II-24: IP Static Routing table
The Add IP Static Route page offers the following components:
Route To requires the IP address and subnet mask for the
destination the IP packet should be forwarded to.
Via IP Address requires the IP address of the subsequent router
for IP packet forwarding to the specified destination.
Attention: The rule with the longest subnet (smallest IP range)
will take effect when having two or more IP Static routing rules
with the coinciding subnets. Fig. II-25: Add IP Static Routing page
IP Policy Routes allow IP packets forwarding to the specified
router depending on the source IP address as well as defining the
priority for the current routing rule.
The IP Policy Routes table displays all specified IP policy routes
with their parameters: Target State for the state of the route
(enabled or disabled), Actual State for the state of the route
connection (up, down or erroneous), Priority for the route priority,
Route From is where the subnet, routed packets come from and
Via IP Address is where the router IP address incoming packets
should be routed through.
Add opens the Add IP Policy Route page to establish a new
policy route.
Enable and Disable are used to activate or to deactivate the
selected route(s).
Raise Priority and Lower Priority are used to increase or
decrease the priority of the selected policy route(s) by one. At
least one route should be selected to use these functions,
otherwise the error message “No record(s) selected” will appear.
Fig. II-26: IP Policy Routing table
The Add IP Policy Route page offers the following input options:
Priority requires a numeric value (from 1 to 252) to define the
priority of the routing rule. The lower the number, the sooner the
routing rule will take effect (higher priority).
From requires the packet source IP address and subnet mask of
the specified destination to match with the rule.
Via IP address requires the IP address of the subsequent router
for IP packet forwarding.
Fig. II-27: Add IP Policy Route page

Bizfon Manual II: Administrator's Guide Administrator’s Menus
Bizfon2000 and Bizfon4000 (SW Version 4.1.x) 18
The VPN Routes allow IP packets forwarding through the PPTP
and L2TP tunnels of the Bizfon. If PPTP/L2TP connections do not
exist on Bizfon, VPN routes cannot be generated.
The VPN Routes table displays all generated VPN routes with
their parameters: Target State for the state of the route (enabled
or disabled), Actual State for the state of the route connection
(up, down or erroneous), Route To for the subnet where the
incoming packets should be routed, Via Tunnel for the VPN
tunnel incoming packets should be routed through and Tunnel
State for the actual state of the route tunnel (up or down).
The Add button opens the Add VPN Route page where a new
VPN route can be generated.
Fig. II-28: VPN Routing table
The Add VPN Route page offers the following components:
Route Via contains the available PPTP and L2TP connections on
the Bizfon. A connection selected from this list will be used to
route the IP packet from the Bizfon’s LAN to the peer behind the
PPTP/L2TP tunnel.
Route To requires the IP address range of the possible peers
behind the PPTP/L2TP tunnel whereto the IP packets should be
routed. Fig. II-29: Add VPN Route page
The Enable and Disable functional buttons are used to activate or to deactivate the selected route(s). At least one route should be selected to use
these functions, otherwise the error message “No record(s) selected” will appear.
To Add an IP Static Route
1. Select the IP Static Routes link on the Routing Configuration page.
2. Press the Add button on the IP Static Routes page. The Add Entry page will appear in the browser window.
3. Enter the destination IP address and subnet mask in the Route To text fields. Use the IP-Clip button to select a previously entered IP address.
4. Enter the router IP address into the Via IP Address text fields.
5. Press the Save button to make the static route with these settings.
To Add an IP Policy Route
1. Select the IP Policy Routes link on the Routing Configuration page.
2. Press the Add button on the IP Policy Routes page. The Add Entry page will appear in the browser window.
3. Specify the policy routing rule priority in the Priority text field.
4. Enter the packet source IP address and subnet mask in the From text fields. Use the IP-Clip button to select a previously entered IP address.
5. Enter the router IP address into the Via IP Address To text fields.
6. Press the Save button to make the policy route with these settings.
To Add a VPN Route
1. Select the VPN Routes link on the Routing Configuration page.
2. Press the Add button on the VPN Routes page. The Add Entry page will appear in the browser window.
3. Choose the VPN connection from the Route Via drop down list.
4. Enter the destination IP address and the subnet mask into the Route To text fields.
5. Press the Save button to make the VPN route with these settings.

Bizfon Manual II: Administrator's Guide Administrator’s Menus
Bizfon2000 and Bizfon4000 (SW Version 4.1.x) 19
Configuration Management
The Configuration Management page assists the administrator with managing the system configuration settings and voice data. For example, the
administrator is able to backup and download the settings to a PC and then upload and restore them back to the Bizfon. Additionally, this page
provides the possibility of restoring the factory default configuration settings.
The Backup & Automatically Download all config & voice
data link leads to the Automatically Backup Configuration
Settings page where the automatic backup of the system
configuration and the voice data can be configured. The
service allows you to setup Bizfon so it will automatically
backup the system configuration and the voice data and
store it in the specified location.
Fig. II-30:Configuration Management page
The Automatically Backup Configuration Settings page
allows you to enable the automatic backup of the system
configuration and the voice data on the Bizfon. With this
service, Bizfon will automatically backup the system
configuration and the voice data and store it in the specified
location.
This page contains the following components:
The Enable Automatically Backup checkbox enables
automatic backup mechanism on the Bizfon.
The following group of manipulation radio buttons allows you
to select whether the backup files will be delivered by email
or stored in some location:
•The Send via Email radio button is used to send the
automatically backed up files via email. The selection
enables Email Address text field that requires the email
address of the administrating person to receive the
automatically backup files.
•The Send to Server radio button is used to store the
automatically backup files on a remote server. This
selection enables the following fields to be inserted:
Fig. II-31:Configuration Management page
The Server Name requires the IP address or the host name of the remote server.
The Server Port requires the port number of the remote server.
The Path on Server requires the path on the server to store the backup files in.
The Send Method manipulation radio buttons allow you to select the remote server type: TFTP or FTP. In case of FTP selection, the
authentication username and the password need to be inserted. In case these fields are left empty, anonymous authentication will be used.
The Backup Interval Selection checkboxes are used to select the time interval automatically backup the Bizfon's configuration and the voice data.
The Time based checkbox is used to select the hour when the configuration and the voice data will be automatically backed up on the daily basis.
The Weekday checkbox is used to select the weekday when the configuration and the voice data will be automatically backed up on the weekly
basis. At least one of these checkboxes needs to be selected.
Backup Now button is used to perform a manually immediate backup of the system configuration and the voice data.
The Backup & Download all config & voice data link generates a backup file with all configuration settings and user uploaded greeting messages.
It opens a file chooser window for immediate download to the users PC.
The Upload & Restore all config & voice data link opens a page that has a Browse button, (which opens a file chooser to select a backed-up file)
and a Configuration to Upload field requiring the file path to upload and to restore it immediately. Pressing Save will restore the selected backup
file, and delete all current user defined greetings and replace configuration settings.
Attention: Restoring the configuration and voice data requires switching Memory Allocation (see chapter Voice Mail Common Settings) to the state
that was selected when the configuration and voice data were backed up, otherwise an error message prevents uploading the backup file.
The Restore Default Configuration functional button resets all configuration settings and restores the board’s factory default configuration. By
restoring the default configuration you will replace your current configuration, lose all voice mails and reboot the device. You will not be automatically
redirected to the GUI start page. After the successful reboot you will need to enter into the management page and login again to access the Bizfon’s
configuration. A warning message will ask you to confirm your selection before restoring the default configuration.

Bizfon Manual II: Administrator's Guide Administrator’s Menus
Bizfon2000 and Bizfon4000 (SW Version 4.1.x) 20
Please Note: Unlike the factory default settings restore procedure initialized from the Reset button on the Bizfon device, this link will keep the
following data:
•Call Statistics
•Transfer Statistics
•System Events
•Feature Keys
•Device Registration state
The Automatic Firmware Update link leads you to the page where the automatic update of the Bizfon's firmware (software image) can be configured.
The Download current configuration in a legible format and Upload a legible configuration file links leads you to the Legible Configuration
Management page where legible configuration can be downloaded and uploaded back after the required edits.
Automatic Firmware Update
The Automatic Firmware Update page allows you to configure an automatic update of the Bizfon’s firmware (software image) as it becomes
available on the server. When this service is enabled, on the configured day and time Bizfon will automatically check for a new available firmware on
the server and will either notify the administrator or update the firmware right away, depending on the configured settings.
The server configuration can be done manually or through the DHCP server. In case of DHCP server replying configuration, the corresponding
adjustments should be done on the DHCP server to automatically point the Bizfon to the destination where the firmware is stored.
Please Note: Independent on the selected server type, there should be an “auto-update” folder in the root directory of the server. Bizfon will check
for any new firmware in that specific folder only. Besides the firmware *.bin file, the “auto-update” folder should contain supplementary file(s) to point
to the correct firmware file.
The detailed instructions on the functionality of automatic firmware update as well as server configuration are described in the “Automatic Firmware
Update” document for which you may ask Bizfon’s technical support.
This page consists of the following components:
The Enable Automatically Firmware Update checkbox selection enables the automatic firmware update service on the Bizfon.
Attention: When the older firmware is installed on the Bizfon, the system configuration will be lost and the device will be factory reset.
The first manipulation buttons group on this page allows you to choose between the manually configured firmware server and the server defined by
the DHCP server.
•Assign automatically via DHCP - choose this selection if the Bizfon acts as a DHCP client in its WAN interface. In this case the firmware
server’s configuration will be automatically obtained from the DHCP server. This selection requires previous configuration on the firmware
server and will work only if the “auto-update” directory is created on the TFTP server. The DHCP server should also be configured to
provide the parameters of the TFTP server to the Bizfon.
•Assign manually – this selection is used to manually configure the firmware server settings. The Server Name (the IP address or
hostname), the Server Port and the Update Method should be defined. The Update Method drop down list provides a possibility to
choose among TFTP, FTP, HTTP or HTTPS methods. For some of these selections, authentication Username and Password can be
entered.
The second manipulation buttons group on this page allows you
to select the frequency of checking for a new update.
•Check and notify – choose this selection if you only
wish to be notified about the new available firmware
on the server. With this selection, on the indicated
weekday and time, on daily or weekly basis, the Bizfon
will check for a new firmware available on the server.
The way of notification is configured from the Events
page.
•Check and update – choose this selection to check
and automatically install the new firmware on the
Bizfon as it becomes available on the server. With this
selection, on the indicated weekday and time, on daily
or weekly basis, the Bizfon will check for a new
firmware available on the server, will automatically
download and install it on the Bizfon. Fig. II-32:Upload Configuration page
Other manuals for 2000
3
This manual suits for next models
1
Table of contents
Other Bizfon PBX manuals


Popular PBX manuals by other brands


Yeastar Technology
Yeastar Technology S20 Extension user guide

Nortel
Nortel Remote Office 9150 Installation and administration guide

Nortel
Nortel TFC002 manual

Panasonic
Panasonic HYBRID IP-PBX KX-TDA100 Features guide

Nortel
Nortel Meridian 1 PC Console Interface Unit Feature description and administration

Auerswald
Auerswald COMmander 6000 Advanced information


