Bizhub C258 User manual

201802
Troubleshooting Guide
Best Practices
bizhub 8 Series

1
Table of Contents
The Initial Operation During MFP Start-up.....................................................................................................2
bizhub C258/C308/C368/C458/C558/C658/ 308/ 368/ 458/ 558 Troubleshooting Guide..............................6
Boot-Up Issue................................................................................................................................................6
Error Code Issue...........................................................................................................................................7
Firmware Issue..............................................................................................................................................8
C-DFA0 (ASIC image access failure)..........................................................................................................11
Paper full message on the exit tray 1...........................................................................................................12
The speaker volume wasdifficultto hear.....................................................................................................14
Fusing offset image.....................................................................................................................................14
Frequent jam code J20-01, J20-02 (misfeed, vertical transport section).....................................................16
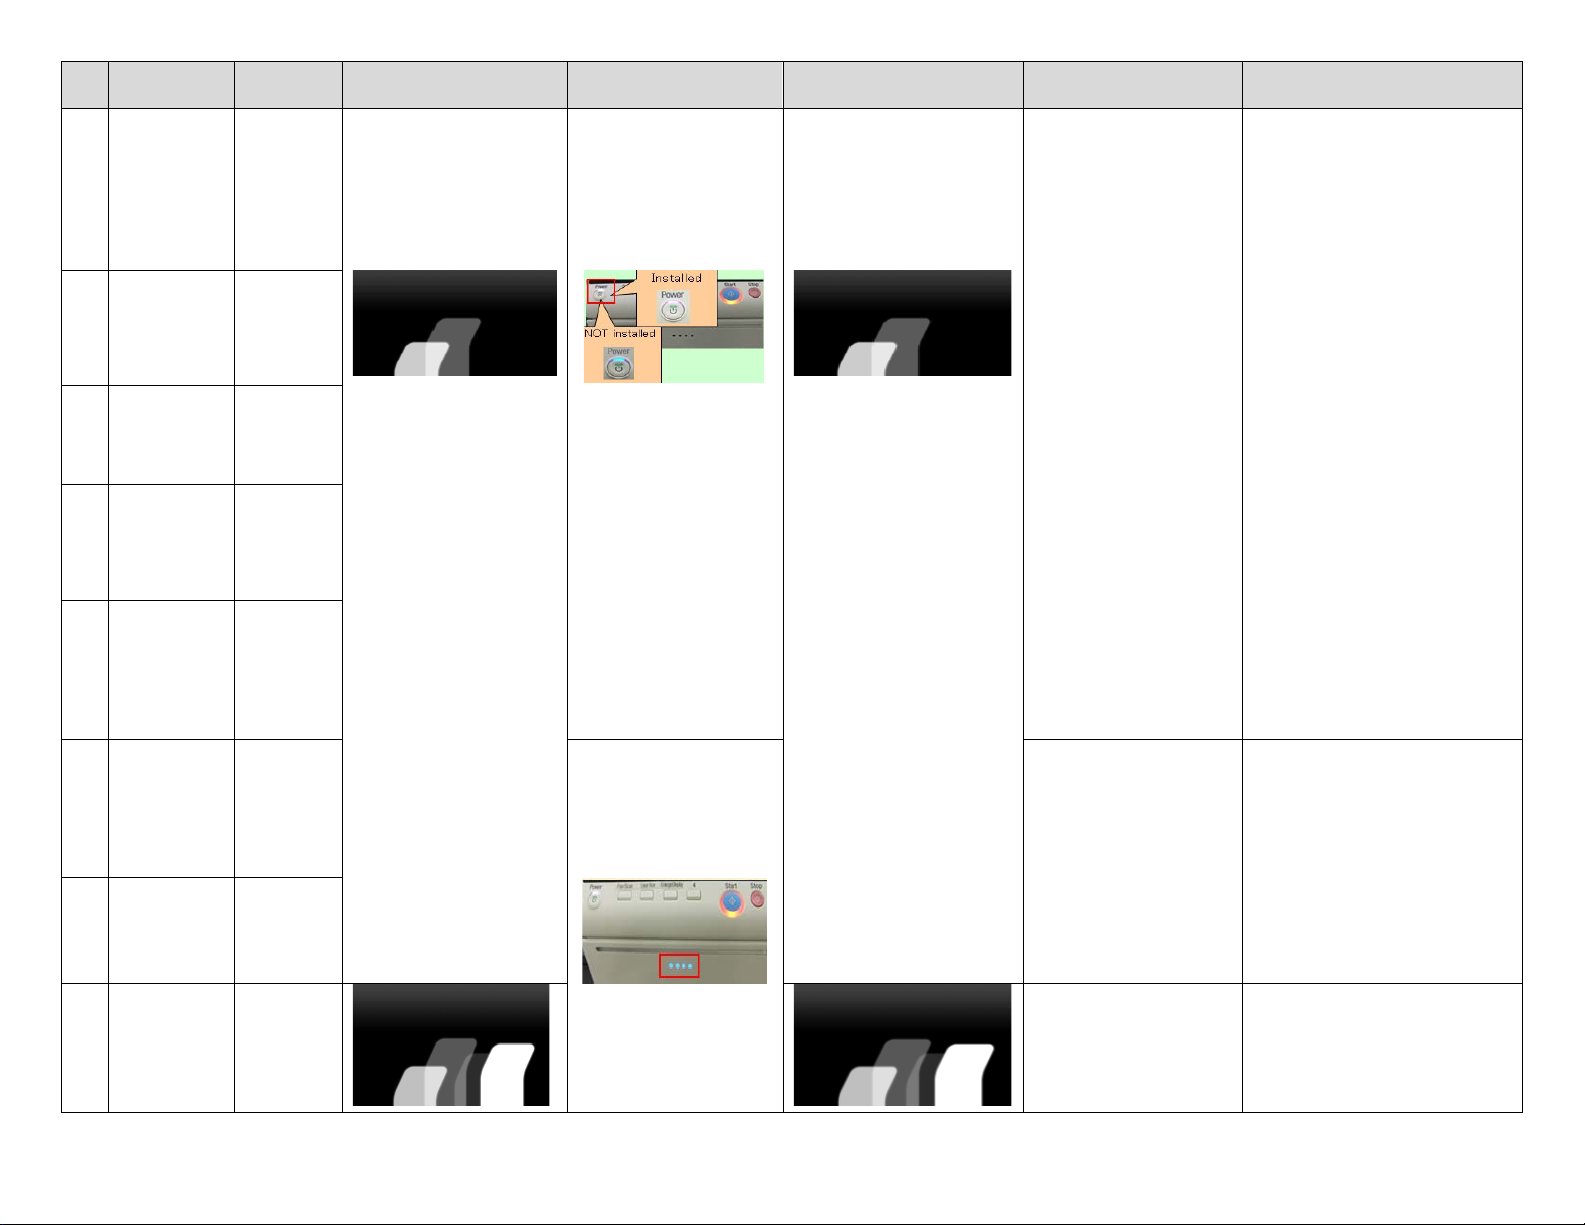
Notice ofsetting the FK-513/514/515..........................................................................................................17
Installation of the FK-514 is difficult.............................................................................................................18
No Fax Reception........................................................................................................................................19
Handling instruction for SC-508...................................................................................................................20
How to Safely Remove an EEPROM...........................................................................................................21
Self-Diagnostic Function (KBA01400523)...................................................................................................23
C9401 Refresh-Models ONLY (KBA00034462)...........................................................................................26
How to Obtain Log Files from the MFP(KBA00032414).............................................................................27
How do Iconfirm that the content in a Log gathered iscorrect? (KBA00035540)........................................40
MFP Log Acquisition Tool............................................................................................................................46
How can Icheck if mysoftware switches are set to factorysettings? (KBA00035539)...............................47

2
The Initial Operation during MFP Start up
No.
Boot up
Process
PWB
Boards
Operation Panel
Status of LEDs
Operation Panel
Malfunction/ Probable
Cause
Corrective Action
Boot Diagnosis
(Turn Main SW on while
pushing power key)
1
Turn ON Main
Power SW
Black Screen
No LED’s are turned on.
Black Screen
Remains Black screen
[Probable Cause]
Power is NOT supplied
Contact failure of Option
DIMM
MFPB Failure
Op Panel contact failure
1. Check the power supply
2. When the Option DIMM is
installed, disconnect it and check if
the machine boots up.
3. Check the connector between
MFPB- Operation Panel
4. Replace the MFPB
5. Replace the Op Panel cable
6. Replace the Op panel unit
2
Startup Boot
program on
SPI Flash
MFPB
(SPI-Flash)
3
<START>
Initialize DIMM,
RTC, TPM
MFPB
(CPU->
DIMM, RTC,
TPM)
3
No.
Boot up
Process
PWB
Boards
Operation Panel
Status of LEDs
Operation Panel
Malfunction/ Probable
Cause
Corrective Action
4
<END>
Initialize
DIMM, RTC,
TPM
MFPB
(CPU -->
DIMM,
RTC, TPM)
Two Bars
LED of Start Key turns
Orange and LED of Power
Key turns as follows.
Two Bars
LED of Power Key: ON
Data Indicator lamp: OFF
[Probable Cause]
1. When option DIMM is installed,
disconnect it and check if the
machine boots up.
If the machine boots up, reinstall
Option DIMM or replace one.
5
Check option
DIMM
MFPB< -- >
Option
DIMM
Contact failure of Option
DIMM
SPI-Flash or DIMM on
MFPB
Contact failure of eMMC
2. Reinstall eMMC board
3. Download the FW
4. Replace the MFPB
6
<START>
Download
Boot program
into DIMM
MFPB
(SPI-Flash-
> DIMM on
board)
Installed: Purple
Not Installed: Orange
5. Replace the eMMC board.
7
<END>
download
Boot program
into DIMM
MFPB
(SPI-Flash-
> DIMM on
board)
8
<START>
Download FW
from eMMC
into DIMM
eMMC -->
MFPB
(eMMC -->
DIMM on
board)
9
<END>
download FW
from eMMC
into DIMM
eMMC -->
MFPB
(eMMC -->
DIMM on
board)
Data indicator lamp turns
ON.
Data indicator lamp turns
ON, but the screen does
not switch to “4 bars”
screen.
1. Download the FW.
2. Replace the MFPB.
10
Startup FW
on DIMM
MFPB
(DIMM on
board)
4 Bars
4 Bars
[Probable Cause]
DIMM on MFPB failure
11
<START>
FW
Initialization
MFPB
Screen does not switch to
Boot up screen.
[Probable Cause]
MFPB failure
When option DIMM is installed,
disconnect it and check if the MFP
boots up.
If the MFP boots up, reinstall the
option DIMM again or replace it.
4
No.
Boot up
Process
PWB
Boards
Operation Panel
Status of LEDs
Operation Panel
Malfunction/ Probable
Cause
Corrective Action
12
<END>
FW
Initialization
MFPB
KM’s Logo and 5 Bars
LED of Power Key & Data
KM’s Logo and 5 Bars
Remain Boot up screen
1. Check the connector between
CCD board - MFPB for proper
connection.
13
<START>
Initial
communication
to HDD
MFPB<- ->
HDD
(Boot up screen)
Indicator lamp turn OFF
(Boot up screen)
[Probable Cause]
Connection with CCD
board failure
MFPB failure
HDD failure
14
<START>
Initial
communication
to ENG
(Printer)
MFPB <-->
MFPB
2. Check the connector on MFPB
from CCD board.
3. Check the HDD SATA cable,
then disconnect & connect it.
15
<START>
Initial
communication
to CCD Board
MFPB < -- >
CCD Board
4. Download the FW
5. Replace the MFPB
16
<END>
Initial
communication
to ENG
(Printer)
MFPB < -- >
MFPB
17
<END>
Initial
communication
to CCD Board
MFPB < -- >
CCD Board
5
No.
Boot up
Process
PWB Boards
Operation Panel
Status of LEDs
Operation Panel
Malfunction/ Probable
Cause
Corrective Action
18
<END>
Initial
communication
to HDD
MFPB < -- >
HDD
LED of Start Key turns
Blue.
The Self diagnostic screen is
displayed after Boot
diagnosis.
Trouble Code is displayed.
[Probable Cause]
C-FA14 or C-D**
Connection failure of HDD
HDD failure
C-B003
Connection failure of
FAX board
FAX board failure
Refer to the Service manual for
corrective actions to each Trouble
Code.
19
<START>
Initial
communication
to FAX board
MFPB < -- >
FAX board
C-6753
Connection failure of
DSIPB
DSIPB failure
20
<END>
Initial
communication
to FAX board
MFPB < -- >
FAX board
C-D271
Connection failure of
Option DIMM
Option DIMM failure
21
<START>
Initial Network
settings
MFPB
C-6901
Connection failure of
DSC board
DSC board failure
22
<END>
Initial Network
settings
MFPB

6
bizhub C258/C308/C368/C458/C558/C658 Troubleshooting Guide
This troubleshooting guide has been developed to assist field service representatives. The goal is to reduce down time,
avoid multiple service calls, avoidunnecessaryparts replacement, and increase dependability. Common stepswill be
covered if the MFP experiences operationalissues inthe following areas:
•Boot Up Issue
•Error Code Issue
•Firmware
BOOT UP ISSUE
1. If the 8 series MFP is LOCKED during the boot sequence, follow the steps below.
A. Power off the main switch, wait 10 seconds, power the MFP back on while holding down the sub power
switch on the op-panel. Wait for a “beep” and then release the sub power switch. The op-panel should
display the Self Diagnostics mode. Press the start button when it turns blue. Once the diagnostics has
completed, look for any “NG” results.
When the machine is stuck atany pillar during boot up, always remove all accessories from the main body.
(DF, Finisher, and any optional paper trays)
2. Understanding the “phases ortiming of thebootprocess
•Specific boot-up processes take place at each pillar.
oFirst Pillar
Machine startsboot cycle and verifies thefirmware file.
oSecond Pillar
Machine memory check (standard onboard memory, DIMM, ASIC777, ASIC30EFI,
ASIC777 DS board)
Scannermovesand initializes, energizesscan lights
oThird Pillar
Accesses EMMCB board
oFifth Pillar
Scannerhomesand exposure lamp calibrates
3. Many faults areattributed tothe MFPB, however, manytimesthe MFPB doesn’t need to be replaced.
•MFP board replacement
•Before replacing an MFPB,perform the following:
oReseat all connectors
oCheck DCPU for all 24v,12v, and 5v outputs
oReload/update firmware
oAlways reference and followthe installation instructions that accompany new firmware.
7
bizhub C258/C308/C368/C458/C558/C658 Troubleshooting Guide
BOOT UP ISSUE (Cont.)
4. If the MFPB actuallyneedsto be replaced,it may be necessary toflashthe machine with the reset tar file
“a789be.tar” ifit was a “repaired”or “cleansed”board.See below regarding how arepaired board will be labelled.
ERROR CODE ISSUE
1. CD0010/CD0011/CFA14 errors.
•Reference Bulletin 10072
oUse firmware
oRecovery GXX-A8
oPreventive GXX-B0
•GC1-A7 has been released addressing CFA14
oAlways reference and followthe installation instructions that accompany new firmware.
2. CC-163/CC-164
•With the repaired MFPB installed inthe machine,please do the following
oFlash the machine withG00-16 firmware
oPut GG9-84 firmware on USB drive, hold down the Reset button, (C258/C308/C368 only)
oGo through the screen calibration
oWhen firmware screen appears, at the bottom right you will see Boot Rom, select itand update boot
Rom only.
oRemove USB drive andboot machine.
Note:
If EEproms have also been replaced,you mayneed theoriginalCSV file to recover from this condition.
Please call the contact support Center (CSC)
.
8
bizhub C258/C308/C368/C458/C558/C658 Troubleshooting Guide
FIRMWARE ISSUE
1. USB sticks suitable for use for F/W upgrades.
•Bulletin 10072 has a link for approved USB drives KBA00026635 for list.
•Unableto load firmware reference KBA00026634
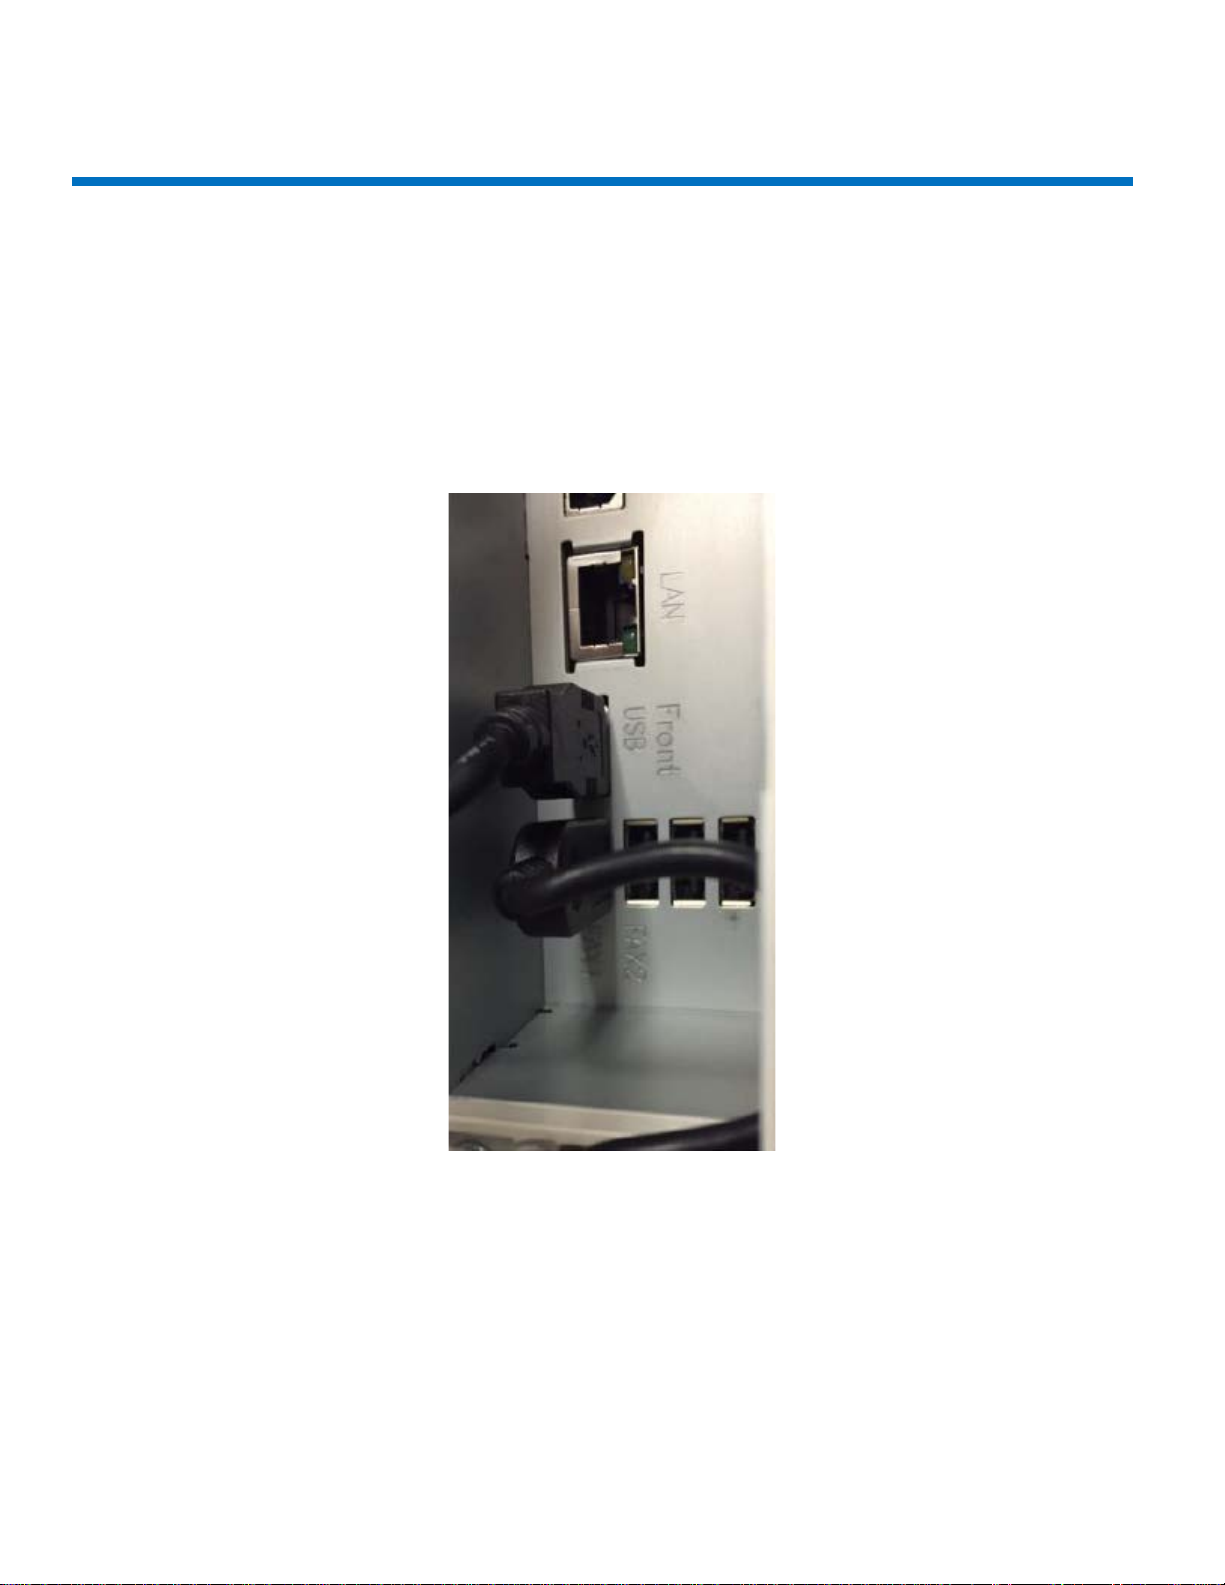
CAUSE: Incorrect placement offront USB cable and/orincorrect procedure for loading firmware.
SOLUTION: Checkplacementof “Front USB”cable
9
bizhub C258/C308/C368/C458/C558/C658 Troubleshooting Guide
FIRMWARE ISSUE (Cont.)
After cable is checked forproper position, perform the following:
1. Prepare USB drive, (This procedure outlines how to load a single version.)
A. Format USB drive in FAT 32. See attached instructions.
B. Extract the firmware onto the PC.
C. Copy the entire “FW0002”folder tothe root ofthe USB drive.
2. Firmware upgrades
•Failure to perform firmware upgrades correctly can resultin corrupt MFPB.
oAlways reference and followthe installation instructions that accompany new firmware.
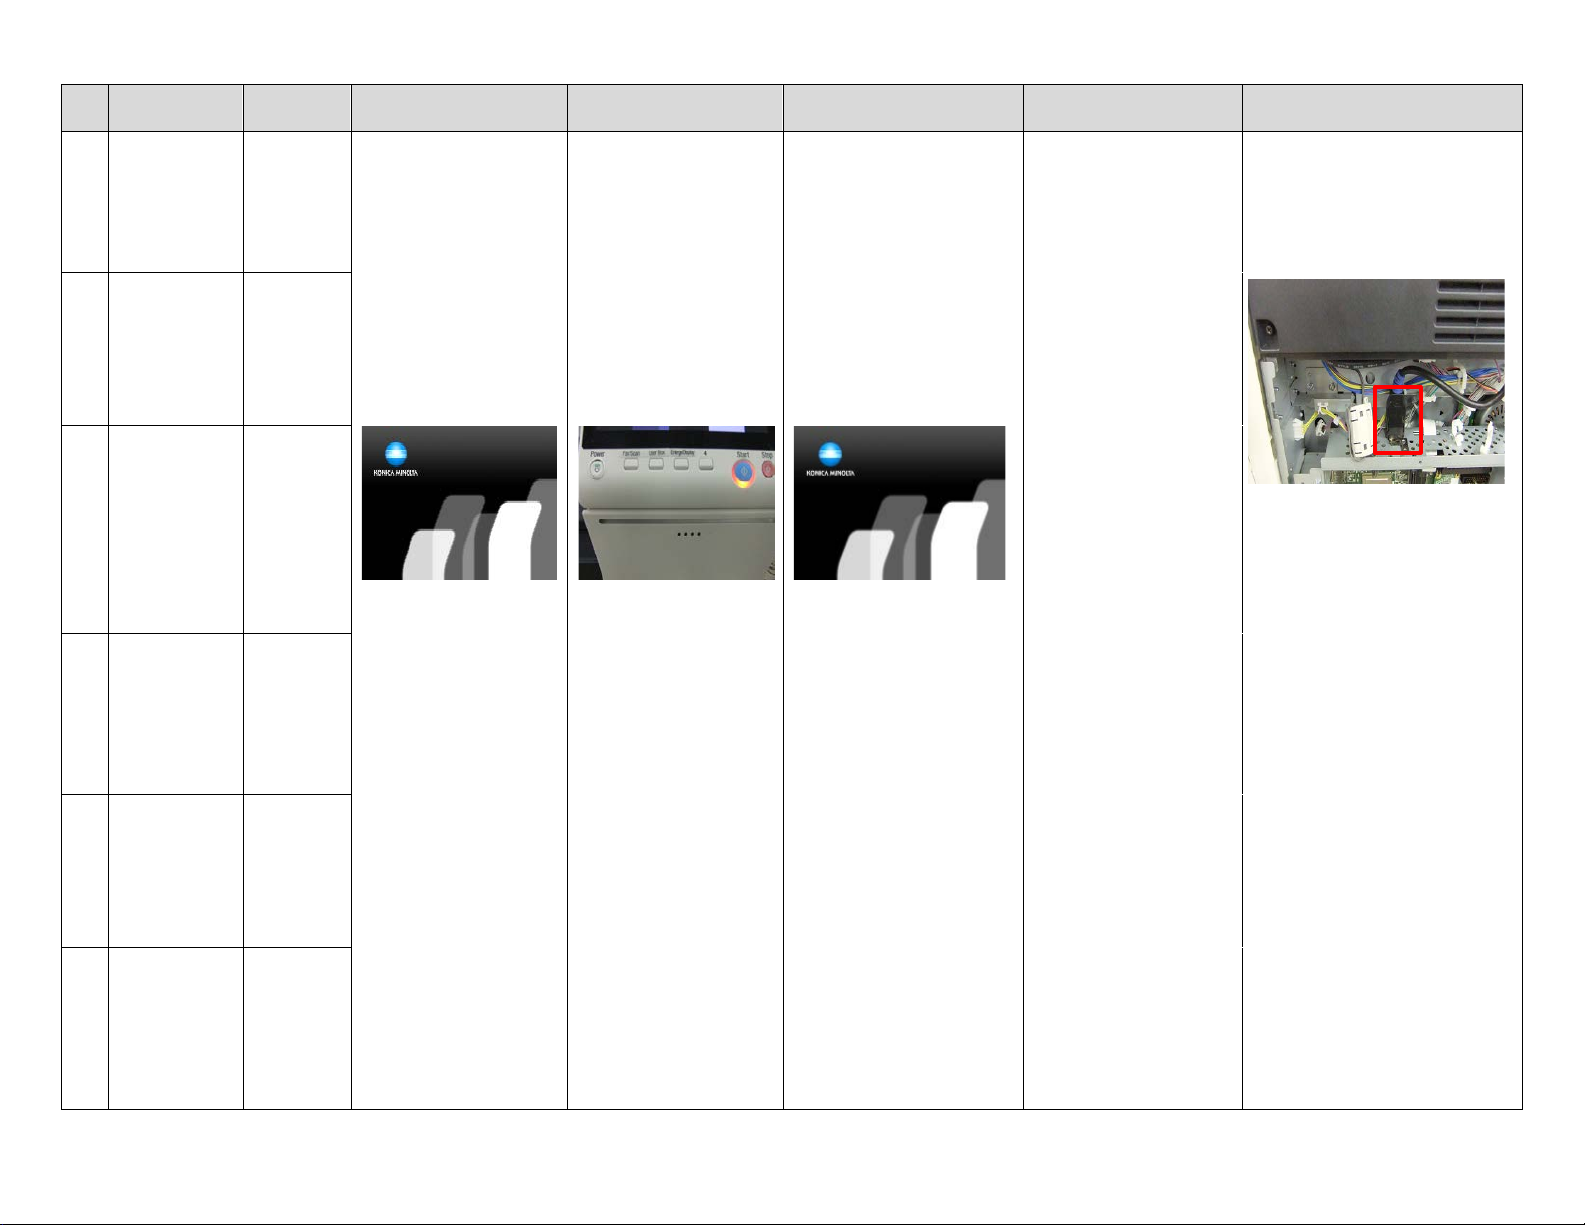
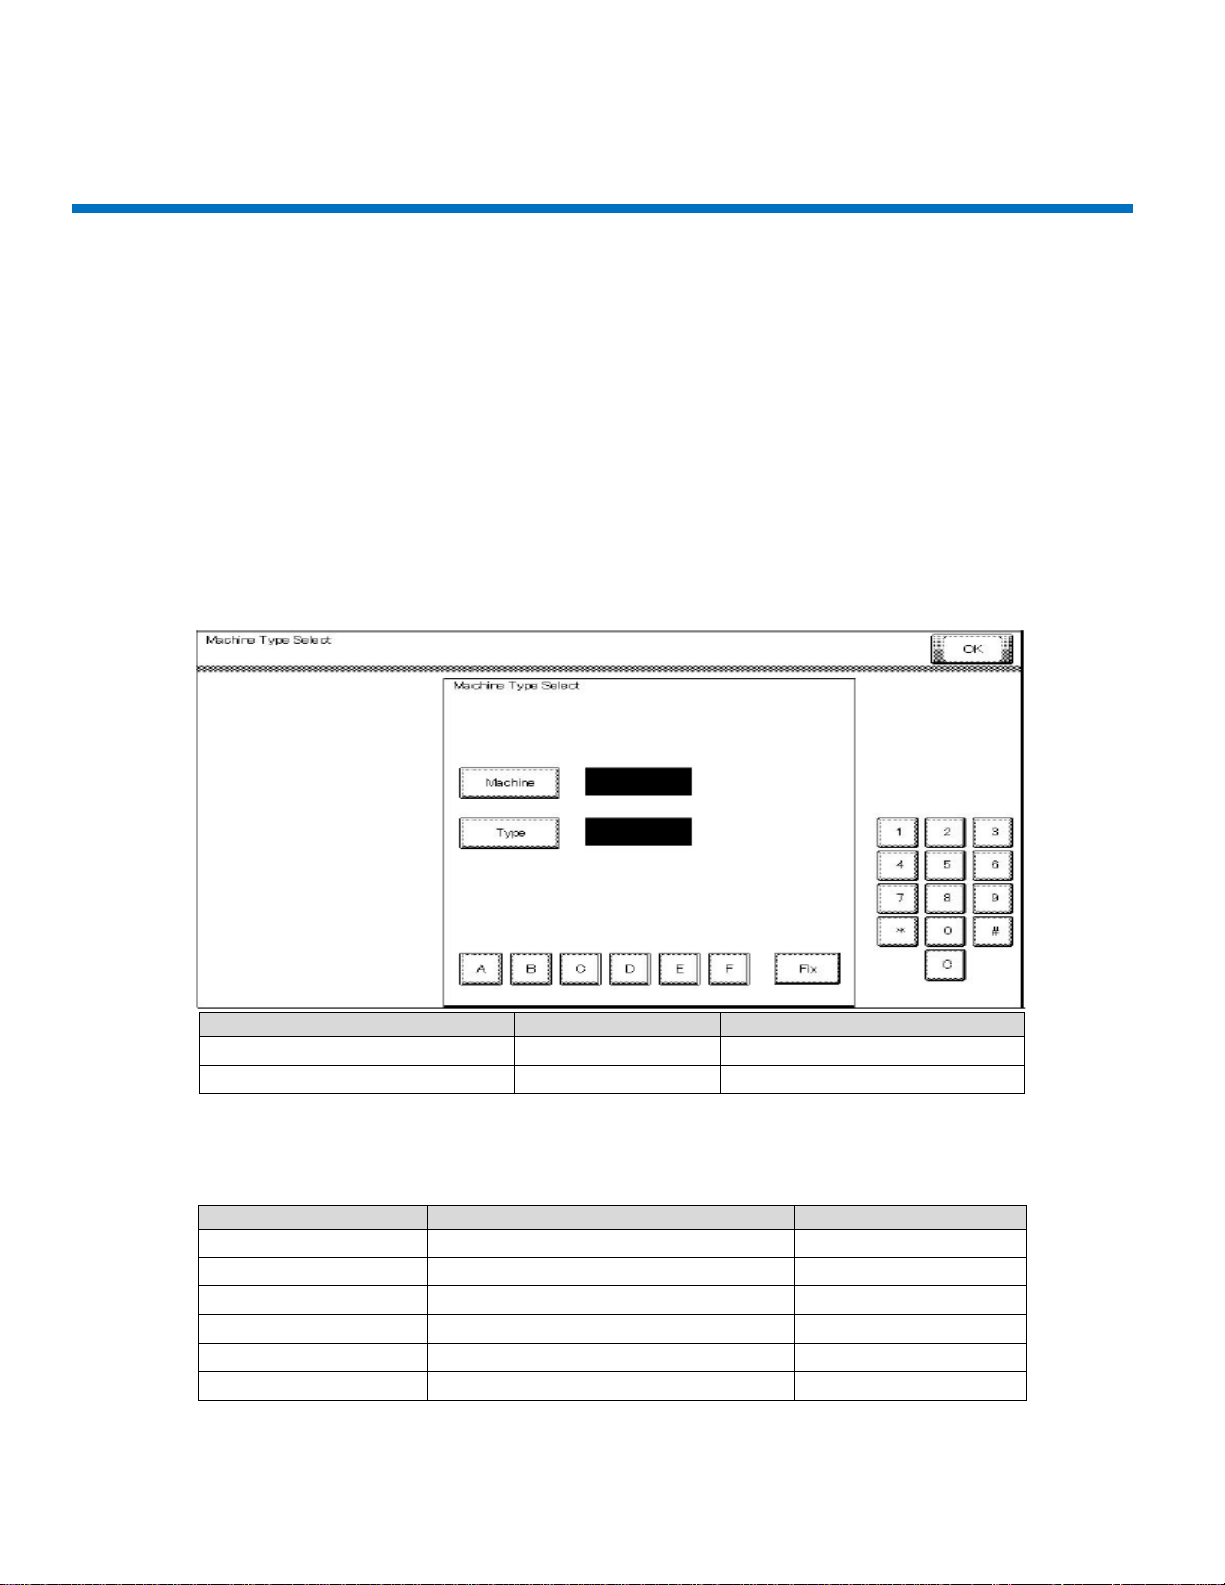
3. When flashing firmwware or replacing the MFPB,always check and set the [Machine] and [Type]as listed below.
Enter [Machine]and [Type] information according to the following table. Thentouch [Fix].
First four digits of the serial number
A7PU
A7PY
[Machine]
6
6
[Type]
1
2
Note: The [Machine] and [Type] values should be setby referencing the firstfour digits ofthe MFP’s “Serial Number”
located on the serial number plateon theback ofthe machine(notthe model).
Serial Number
Machine
Type
A79J
9
7
A79K
9
9
A79M
9
0
A7PU
6
1
A7PY
6
2
A7R0
6
D
10
bizhub C258/C308/C368/C458/C558/C658 Troubleshooting Guide
4. When replacingEEproms for any reason, load base 16 firmware followed by every base firmware after that.
.
5. In Service mode, before replacing the transferbeltand fusing unit, clear the counters.
Note: Since the counters will be cleared when the EEprom is replaced witha new one, replace the following with
new parts:
•Developing Units Y,M,C,K
•Drum Units Y, M, C, K
•Toner Cartridge Y, M, C, K
•Transfer Belt
•Fusing Unit
•Transfer roller
6. Performthe following adjustmentsin this order (Servicemanual5.4.4)
Note: Ensure the front door is open.
Note:
Conductthe readjustments listed above before starting the initialwarm-up operation, after replacing the
EEproms.

11
bizhub C258/C308/C368
C-DFA0 (ASIC image access failure)
1. Symptom
Trouble Code C-DFA0 (ASIC image access failure)occurs frequently inmachine setting up.
Procedure
A. Touch “Auto Stop Position Adjustment”in the ADF/Service Mode.
B. Perform the items listed below many times.
•Sub Scanning Direction 1-side
•Sub Scanning Direction 2-side
•Main Scanning Direction (Front)
•Main Scanning Direction (Back)
C. After performing the items listedabove, make a copy.
D. Trouble code C-DFA0 continues to occur.
2. Cause
Firmware (FW) bug
Trouble code C-DFA0 occurred when error bitappearedin the FW.
3. Measures
3-1 Counter measure
Turn off the main power SW and wait for 10 seconds or more before turning on.
3-2 Preventive measure
The firmware was modified and released on the CSES site.
DLBT1509417EN
4. Model
DF-629/DF-704

12
bizhub C258/C308/C368
Paper full Message on exit tray 1
1. Symptom
There is a possibility thatpaperfull message appears for exit tray 1
Condition:
C368/C308/C258 and JS-506 combination, using upper side tray for JS-506
Using paper: Kannet paper (A4: 64g/m2) Japanese paper
2. Cause
The paperwith low rigiditywould not discharge to the upper exit tray. The paperwould stop in the vicinity of the
paper exit roller. An over capacity condition resultedafter several sheets were discharged.
13
bizhub C258/C308/C368
3. Measures
Modify the two-upper (centered) paper exit rollers on the upper side.
To improve paper conveyance so paper does not stop in the vicinity ofthe paper exit roller.
4. Model
C368/C308/C258/+JS-506
The PMN (Parts Modification Notice) was issued to the field.
PMN # KOM16121

14
bizhub C258/C308/C368
The speaker volume was difficult to hear
1. Symptom
The speaker volume wasdifficultto hearfromthis machine when the bankbalance waschecked by on-hook mode.
2. Cause
The output signal is different fromthe Faxmodemand the C384 series and could not be amplified to the maximum
level. The speaker volume was difficult to hear when the signal output changed.
3. Measures
To modify the 3 resistor (R358, R361, and R1301) values on the MFP board, as a result, to improve the speaker
volume.
4. Model
C368/C308/C258
The PMN (parts Modification Notice) was issued to the field.
PMN # KOM162399, BEU only: KOM162253
Fusing offset image
1. Symptom
Fusing offset image
Condition
•Finisher not installed
•Sleep Mode Settings: Yes
•Tray: 1st Tray
•Paper: A4 LEF, 140mm solid color has leading edge on A4 LEF.
Procedure
A. When this machine enters sleep modeand the cooling fan stopsafter3.5 seconds,a print job is sent from
a PC.
B. The Fusing offset image occurs.
2. Cause
•Firmware bug
•The fusing rollers are warming up in retractionmode
•The printjob issentto themachine fromthe PCwhenthe fusing roller is warming for 300ms.
•The problem condition is during thefollowing modes:
oPC printing
oFax received and return to low power mode

15
bizhub C258/C308/C368
3. Measures
3-1 Counter measure
A. Input #13 Engine FW DipSW
B. Access Service mode
C. Access Enhanced security mode. (*1)
D. Set #13 Engine DipSW. (*2)
(*1) Enhanced security mode: Pressthe “Stop key” -> “0’ -> “C” while in service mode.
(*2) Engine FW DipSW: Press the “System 2”-> “Engine FW DipSW” -> 13.
Turn OFF/ON the main power switch, SW1.
3-2 Preventive measure
•The modified FW (Special FW) released the end of October, 2016.
DLBT1615717EN
•The modified FW(MRFW)releasedthe end of January, 2017.
DLBT1617775EN #82
4. Model
C368/C308/C258

16
bizhub C258/C308/C368
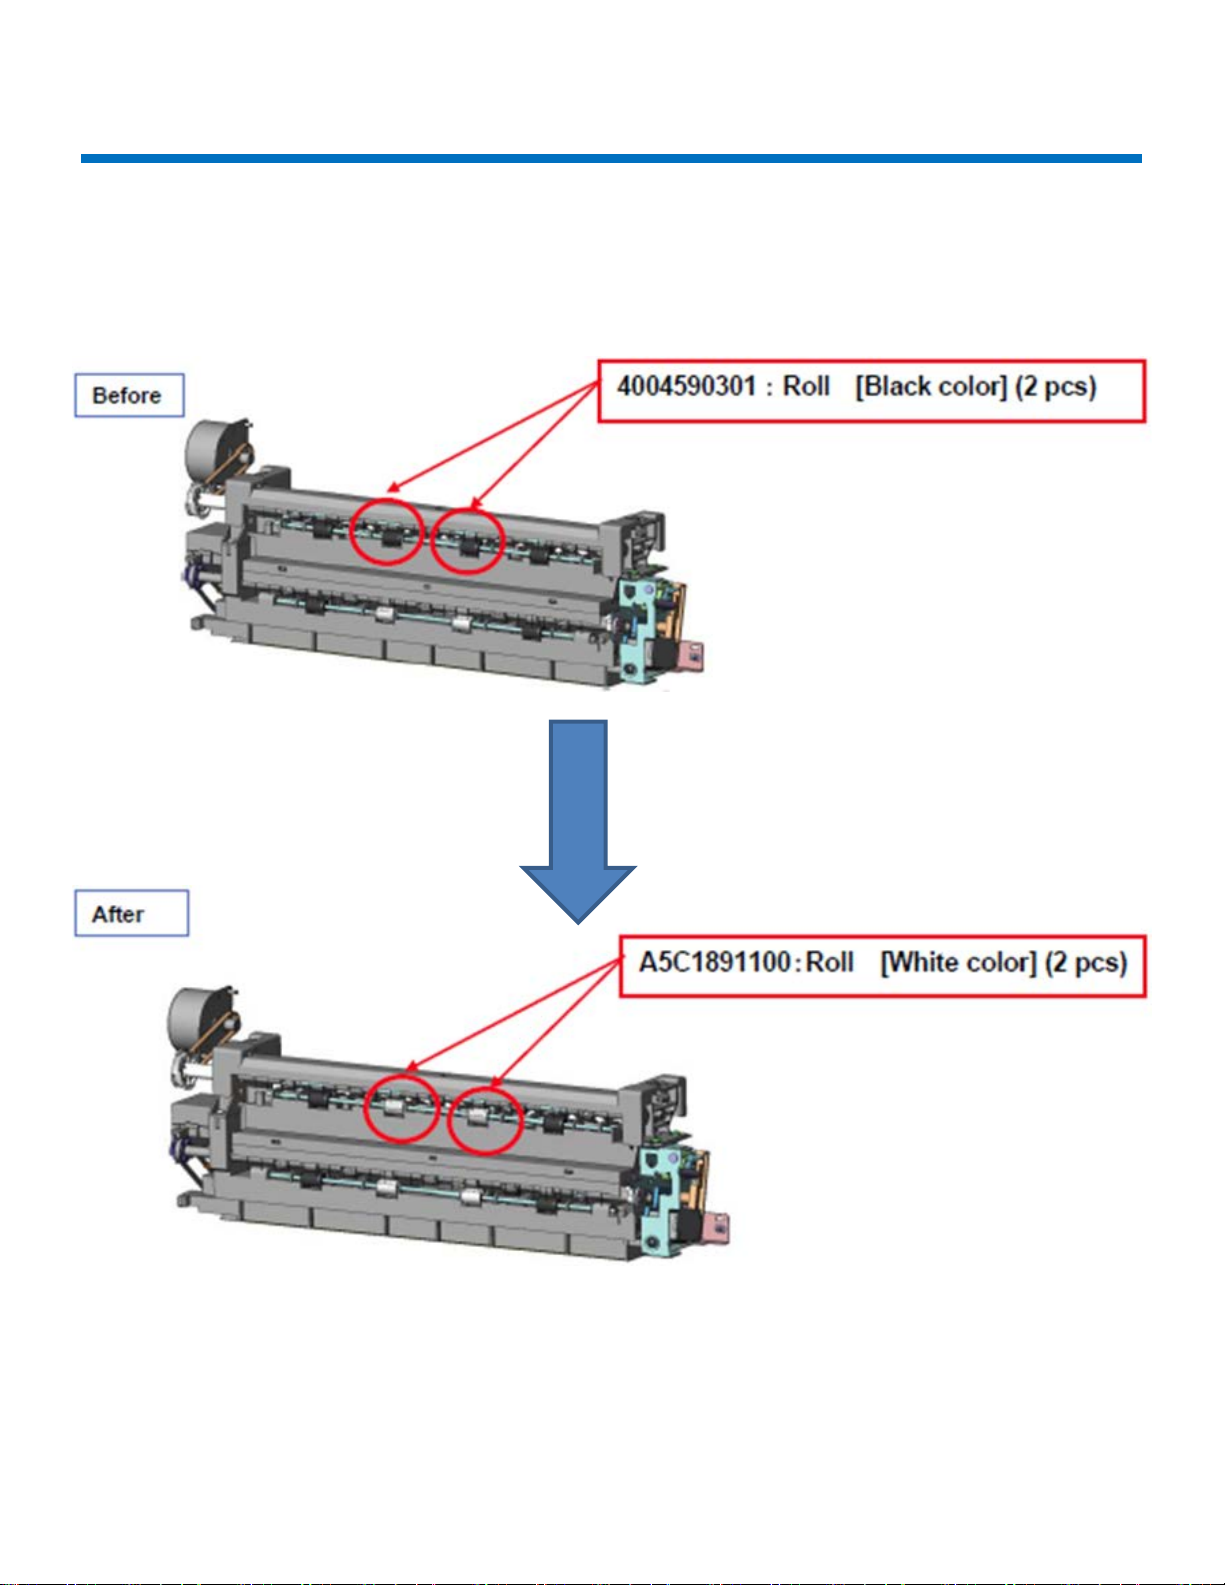
Frequent jam code(s) J20-01, J20-02 (Misfeedat vertical transport section)
1. Symptom
When the clawof the cover(A161160403)was damaged, error code J20-01, j20-02 occurs frequently.
2. Cause
The clawfor the coverdoesn’t get damaged undernormal use,but prolonged usewith repeated opening/closing
the vertical transport door,the claw maybecome damagedover time.
3. Measures
The clawhas been modifiedas illustrated below.

17
bizhub C258/C308/C368
Notice of setting the FK-513/514/515
1. Symptom
There isa possibilitythatthe initialization doesn’tperform correctly. Fax transmitting and receiving fail.
2. Cause
The install manual was wrong for the FK-513/514/515.
3. Measures
3-1 Counter Measures
Add the item for FK-513/514/515. The detail items are as follows:
A. Plug thepower cord into the poweroutletand turn on the power switch.
B. Access the service mode screen, (refer tothe Service manualdetails on accessing the service mode).
C. Select “System 2”.
D. Select “Optical Board Status”.
E. Select “set”of Fax (circuit 1).
F. Select “End”.
G. Turn the powerswitch OFF and ON. Refer to the detailed notice listedbelow.
<Notice>
Exit theService mode screen, turnOFF the powerswitch.
After 10 seconds, turn ON the powerswitch again.
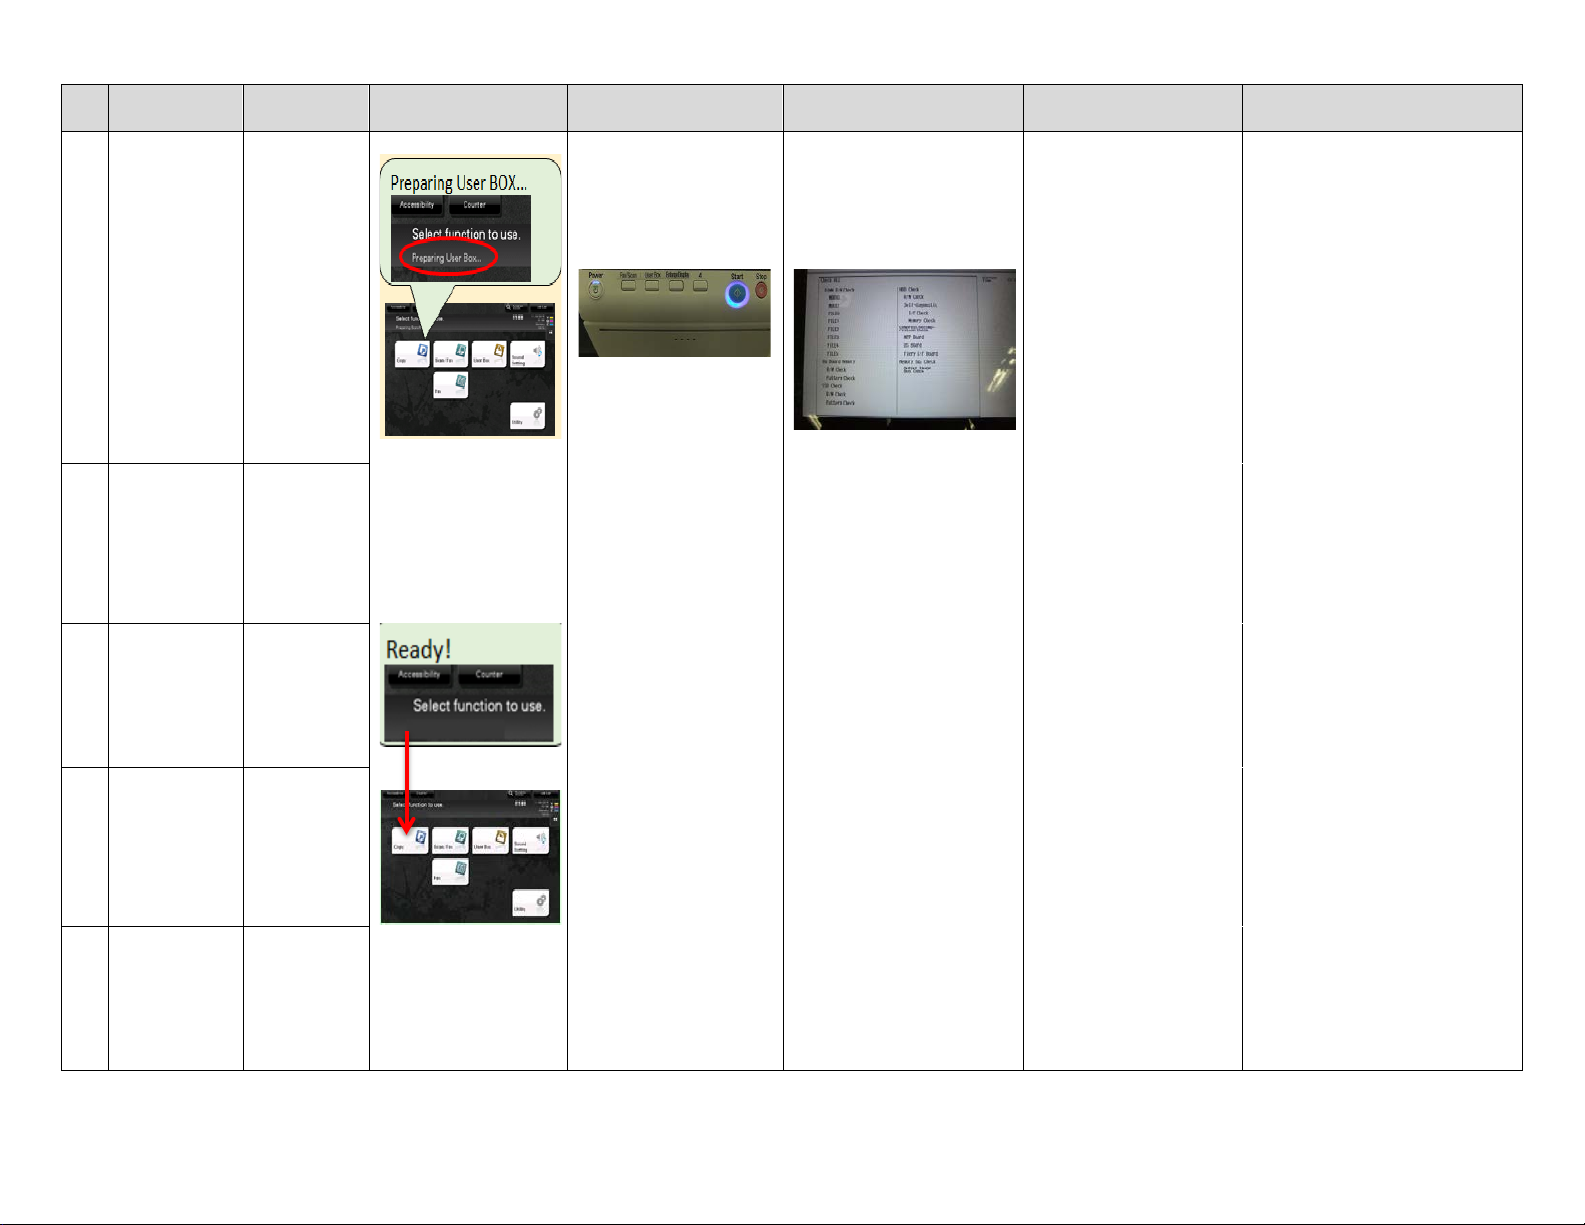
When “Preparing UserBox…” and “Preparing Scan/Fax…” messages are gone, the messages on the display,
please set “Marketing area” and “initialization” for FK-513/514/515 appear.
3-2 Permanent Measures
The install manual will be modified as listed above (Counter Measures)for FK-513/514/515.
4. Model
FK-513: bizhub 367/287/227
FK-514/515: bizhub C368/C308/C258
18
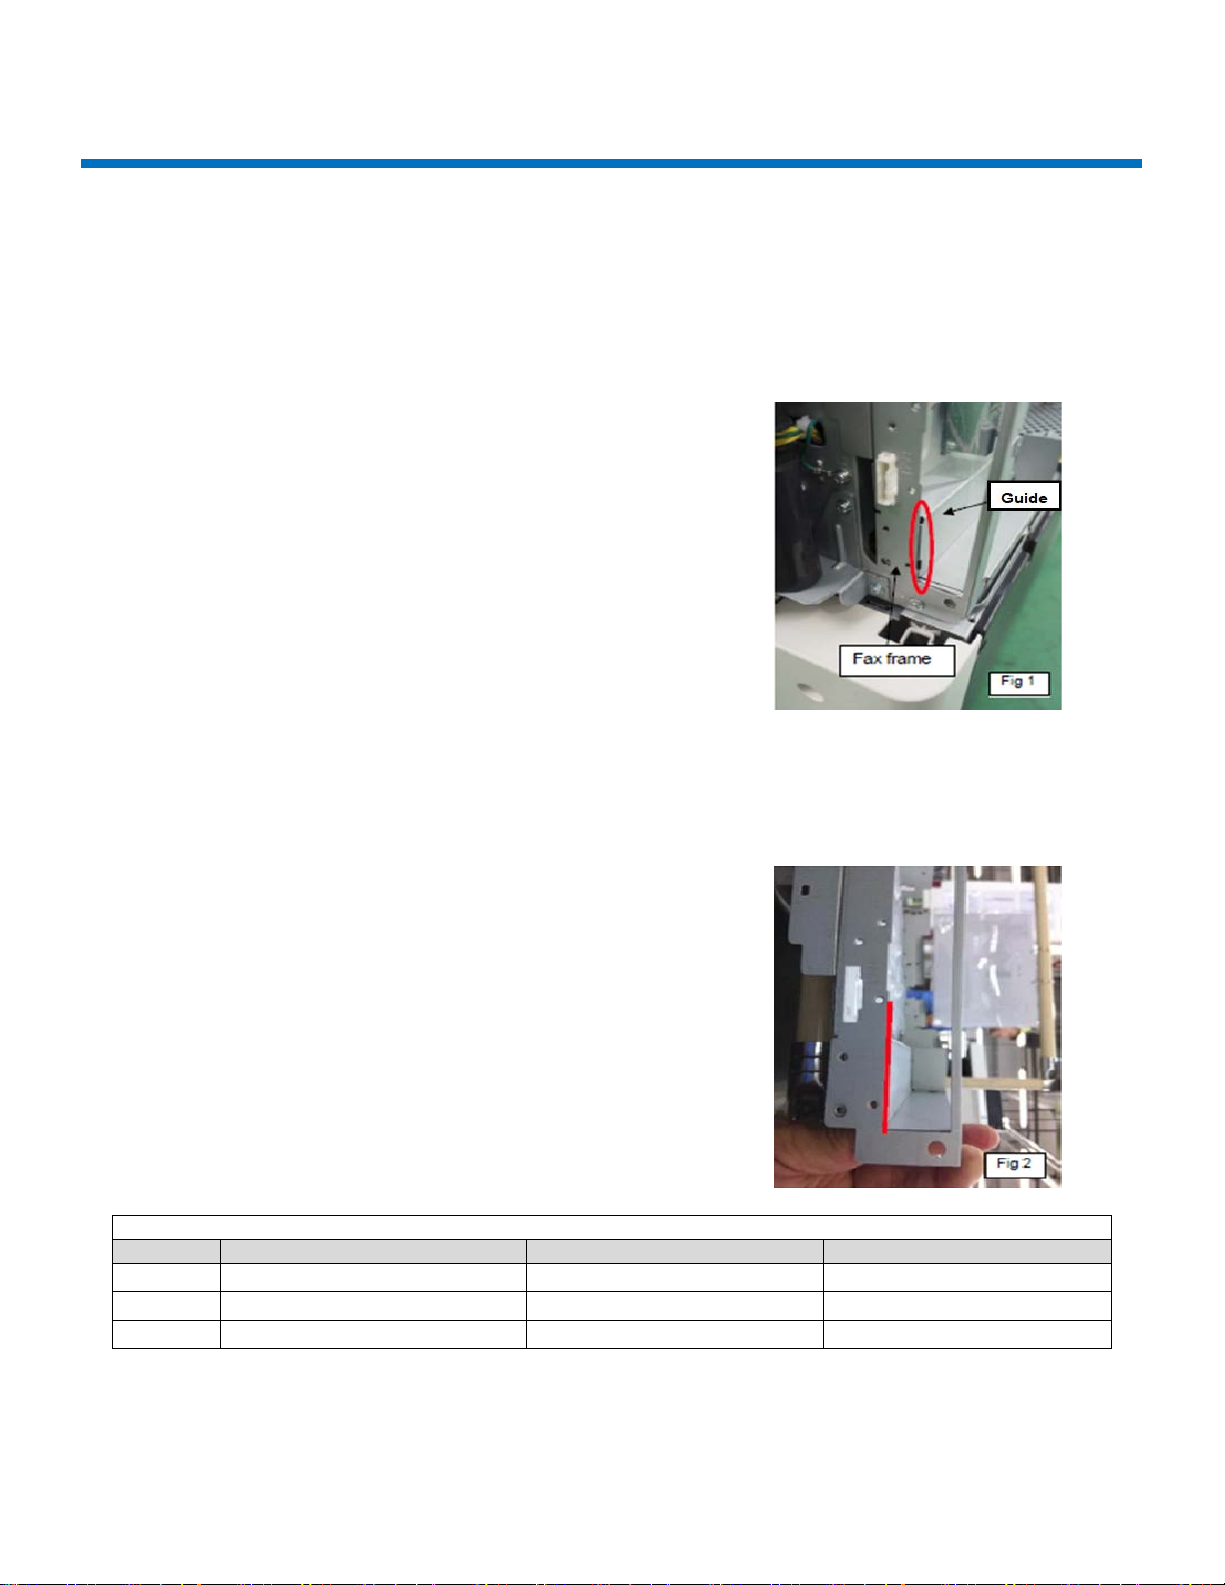
bizhub C258/C308/C368
Installation of FK-514 is difficult
1. Symptom
It is difficultto insert FK-514 in the area of the Guide plate and fax frame.
2. Cause
The problem isdue to the gap between the Fax frame and the Guide plate as illustrated with the red elliptical in
figure #1.
3. Measures
The Faxframe and Guide plate no longerhave agap asillustratedbelow.Refer to the red line marking.
Effective Serial Numbers (S/N)
Machine
BUS (001)
BEU (021)
BCN/BSA/BAU (041)
C368
A7PU011001401 and above
A7PU021002726 and above
A7PU041000025 and above
C308
A7PY011001984 and above
A7PY021003841 and above
AYPY041000175 and above
C258
A7R0011000001 and above
A7R0011000001 and above
A7R0041000001 and above
4. Model
C368/C308/C258 & FK-514

19
bizhub C258/C308/C368
No Fax Reception
1. Symptom
The following symptoms can be seen when the MFP is in LowPowerMode /Sleep Mode (*hearafter it is called
“Power Save Mode”).
A. Cannot receive Fax
B. Cannot recover from Power Save Mode by Power Save Mode releaseoperations.
•Power Save Mode release operations:
oFax reception, original paper set on ADF, Front Dooropen/close, CSRC Modem reception,
print out from IC-418 controller, motion detection sensor activation, key operation, WiFi
connections.
(Remarks)
No problem printing from a PC during the Power Save Mode.
No problem receiving a fax after recovering from Power Save Mode.
By pressingthe power button, it recovers from Power save Mode.
By turning the power switch off/on, it recovers from the abnormal condition.
2. Cause
When the multiple Power Save Mode release operations are done, for example, set anoriginal on the ADFandany
keystrokes, the command for the second operation,keystroke in this case, cannotfinish completely and cannot
recover from Power Save Mode. As a result, it cannot receive any Fax afterwards.
3. Measures
Modify the power sub-CPU from ver. G00-07 to Ver. G00-10 and above.
Other issues were modified FW, too. Released FW (DL No.DLBT1509417EN) on the CSES site
Current Ver. G00-16 -> New Ver. G00-54
4. Model
bizhub C308/C368
This manual suits for next models
9
Table of contents


