Black & Decker GST33 User manual

Desbrozadora a Gasolina
Brush-Cutter
MANUAL DE INSTRUCCIONES
INSTRUCTION MANUAL
Cat. N° GST33
ADVERTENCIA: LEASE ESTE INSTRUCTIVO ANTES DE USAR EL PRODUCTO.
WARNING: READ INSTRUCTION MANUAL BEFORE USING PRODUCT.
Español 4
English 12

FIG. A
FIG. B FIG. C
FIG. D
1
7
2
3
4
5
10
13
14
11
12
9
8
6
Caja de Engranaje
Gear Case M5 x 20
Tornillos
Screws
M5x25
Tornillos
Screws
M5 x 20
Tornillos
Screws
Base
Bracket
Manubrio Derecho Right
Handle ASS’Y
Tapa Superior
Upper Cap
Base de Manubrio
Brachet
Manubrio Izquierdo
Left Handle ASS’Y
Guarda
Shield

FIG. E
FIG. I
FIG. F
FIG. G
FIG. H
4
Caja de Engranaje
Gear Case
Caja de Engranaje
Gear Case
Eje
Axis
Eje
Axis
Llave tipo “L”
Locking Tool
Retenedor “A”
Holder A
Retenedor “A”
Holder A
Agujero
Hole
Agujero
Hole
Hoja de Tres Puntas
Tri-Blade
Retenedor “B”
Holder B
Arandela de Presión
Lock-in Washer
Tuerca de Rosca Izquierda
Left Handed Nut
Pasador
Pin
1
2
3
Llave tipo “L”
Locking Tool

4 • ESPAÑOL
NO DEVUELVA ESTE PRODUCTO A LA TIENDA,
comuníquese antes a las oficinas locales o con el Centro
de Servicio Black & Decker más cercano a usted.
NORMAS GENERALES DE SEGURIDAD
¡Advertencia! Lea y comprenda todas las instrucciones.
El incumplimiento de todas y cada una de las instrucciones
enumeradas debajo puede provocar incendio o lesiones
personales graves.
¡Advertencia! Al utilizar herramientas para jardín,
siempre deben cumplirse las precauciones de seguridad
básicas para reducir el riesgo de incendio, descarga
eléctrica y lesiones personales.
Pautas de Seguridad/Definiciones
Es importante que lea y comprenda este manual. La
información que contiene se relaciona con la protección
de su Seguridad y la Prevención de Problemas. Los
símbolos que siguen se utilizan para ayudarlo a reconocer
esta información.
¡Peligro! Indica una situación de peligro inminente que,
si no se evita, provocará la muerte o lesiones graves.
¡Atención! Indica una situación de peligro potencial
que, si no se evita, provocará la muerte o lesiones graves.
¡Precaución! Indica una situación de peligro potencial
que, si no se evita, provocará lesiones leves o moderadas.
¡Precaución! Utilizado sin el símbolo de alerta de
seguridad indica una situación de peligro potencial que,
si no se evita, puede provocar daños en la propiedad.
CONSERVE ESTAS INSTRUCCIONES
INSTRUCCIONES DE SEGURIDAD
Advertencias de seguridad generales
para esta herramienta.
¡Atención! Lea todas las advertencias e instrucciones
de seguridad. En caso de no respetarse las advertencias
e instrucciones indicadas a continuación, podría
producirse un incendio y/o lesión grave.
Conserve todas las advertencias e instrucciones
para su posterior consulta. El término empleado en
las advertencias indicadas a continuación se refiere a la
herramienta alimentada por combustible.
1. Seguridad del área de trabajo
a. Mantenga limpia y bien iluminada el área de trabajo.
El desorden o una iluminación deficiente en las áreas
de trabajo pueden provocar accidentes.
b. No utilice la herramienta en un entorno con
peligro de explosión, en el que se encuentren
combustibles líquidos, gases o material en polvo.
Las herramientas producen chispas que pueden
llegar a inflamar los materiales en polvo o vapores.
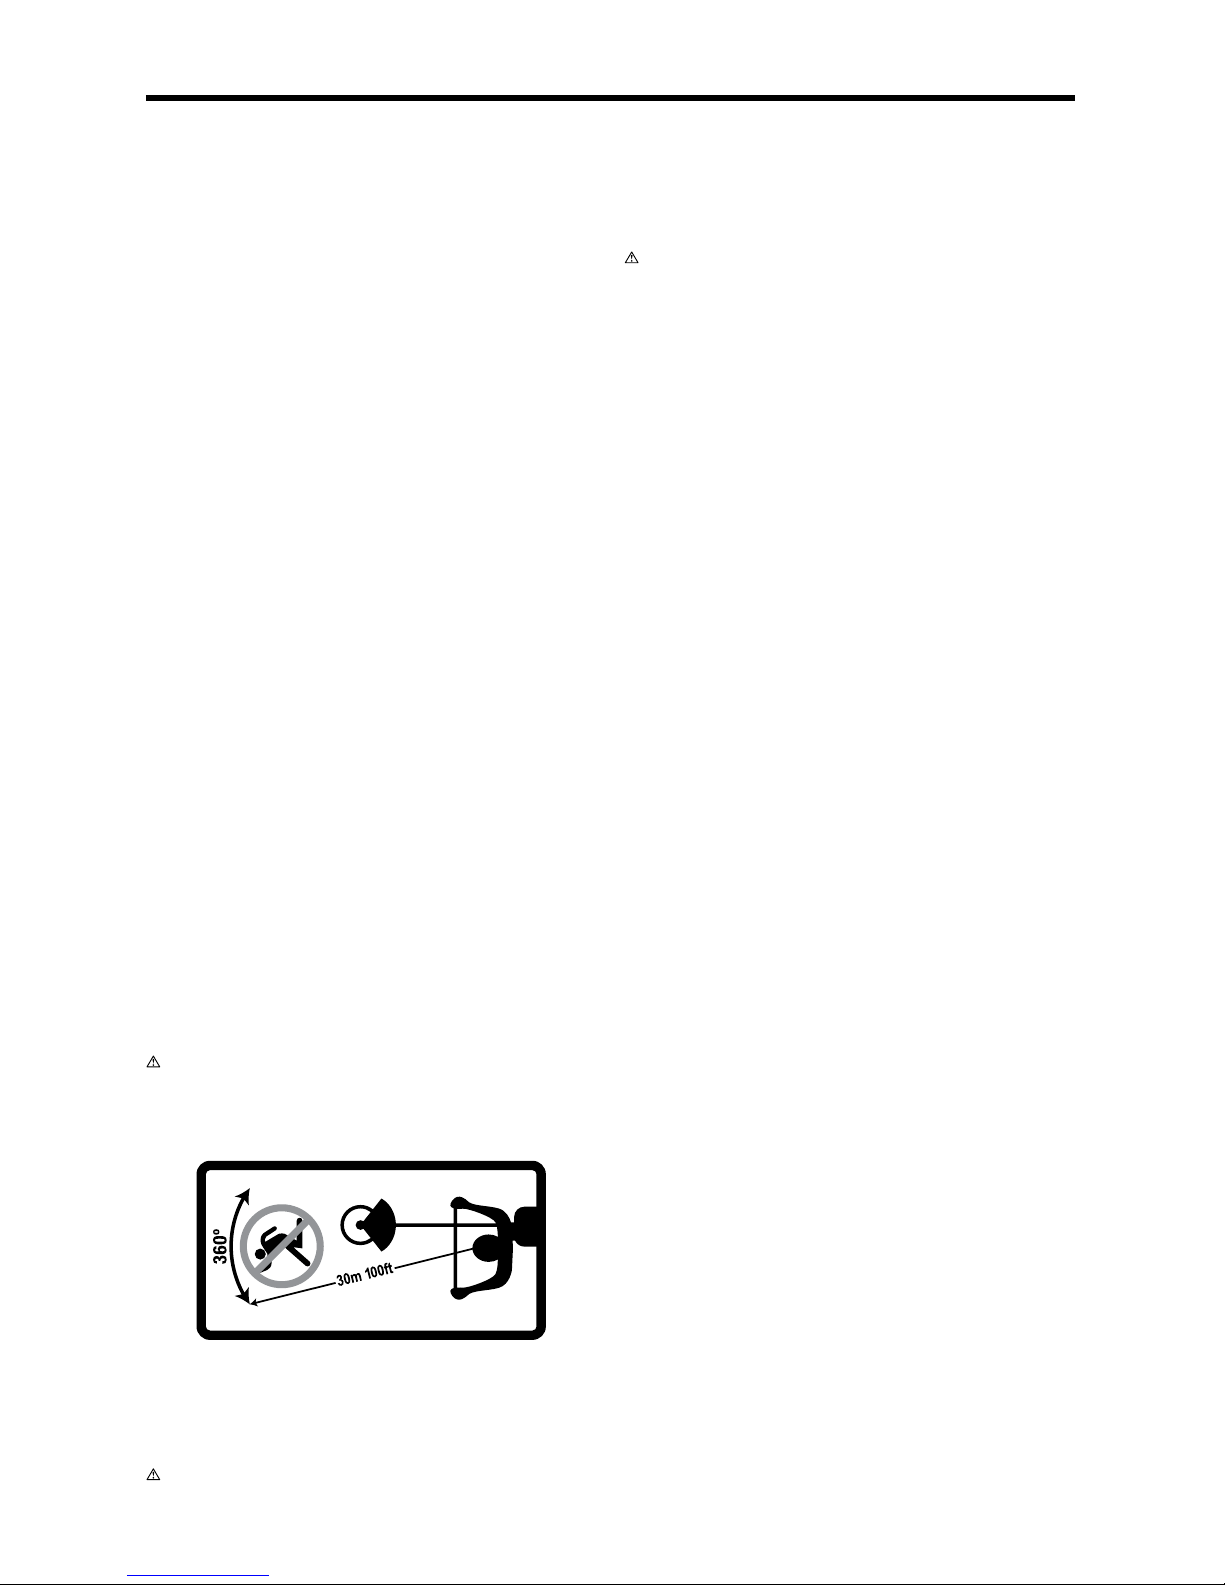
c. Mantenga alejados a los niños y otras personas
del área de trabajo al emplear la herramienta
eléctrica. Una distracción le puede hacer perder
el control sobre la herramienta.
d. No mezcle el combustible en un espacio cerrado
o cerca de llamas abiertas. Asegúrese de tener una
ventilación adecuada para realizar esta labor.
e. Nunca encienda o coloque el motor en marcha en
un espacio o edificio encerrado. Los vapores del
escape contienen monóxido de carbono peligroso.
f. Nunca deje la máquina desatendida.
2. Seguridad personal
a. Esté atento a lo que hace y emplee la herramienta
con prudencia. No utilice la herramienta si estuviese
cansado, ni tampoco después de haber consumido
alcohol, drogas o medicamentos. El no estar atento
durante el uso de una herramienta puede provocarle
serias lesiones.
b. Utilice equipos de protección personal.
Lleve siempre protección ocular, respiratoria
y auditiva. Los equipos de protección tales como
una mascarilla antipolvo, zapatos de seguridad
con suela antideslizante, casco o protectores
auditivos, utilizados en condiciones adecuadas,
contribuyen a reducir las lesiones personales.
c. Sea precavido. Evite adoptar una posición que
fatigue su cuerpo; mantenga un apoyo firme
sobre el suelo y conserve el equilibrio en todo
momento. Ello le permitirá controlar mejor la
herramienta eléctrica en caso de presentarse una
situación inesperada.
d. Utilice ropa apropiada. No vista ropa suelta o
joyas. Mantenga su cabello, vestimenta y guantes
lejos de las partes móviles. Ropa suelta, joyas o
cabello largo partes móviles.
e. Siempre que sea posible utilizar unos equipos
de aspiración o captación de polvo, asegúrese
que éstos estén montados y que sean utilizados
correctamente. El empleo de equipos de recogida
de polvo reduce los riesgos derivados del polvo.
f. No use ningún aditamento con este cabezal sino
aquellos recomendados por Black & Decker.
De lo contrario, el operador o transeúntes pueden
sufrir una lesión grave y la máquina se puede dañar.
g. Nunca intente ajustar el motor con la unidad
en marcha y amarrada alrededor del operador.
Realice siempre los ajustes del motor con la unidad
descansando sobre una superficie plana y despejada.
h. No toque el área cercana al escape o el cilindro;
estas partes se calientan a causa de su operación
normal.

ESPAÑOL • 5
i. Se piensa que una condición llamada “Fenómeno
Raynud”, la cual afecta los dedos de ciertos individuos
podría producirse producto de la vibración y el frío.
Exposición a la vibración y el frío puede causar
hormigueo y ardura seguido por palidez y
endormecimiento de los dedos. Recomendamos
seguir las siguientes precauciones ya que se
desconocen las posibles causas que podrían activar
dicha condición.
j. Mantenga su cuerpo cálido, especialmente la
cabeza, cuello, tobillos, manos y munecas.
k. Mantenga buena circulacion sanguinea por medio
de ejercicios en entre tiempos laborales, también
no fumando.
l. Limite las horas de operación. Trate de alternar sus
actividades en los dias laborales en que no este
operando el equipo.
m. Si experimenta incomodidad, enrojecimiento e
inflamación de los dedos seguido de palidez y perdida
de sensación, consulte a su médico antes de
exponerse al frío y la vibración.
3. Uso y cuidado de su herramienta
a. Guarde la herramienta fuera del alcance
de los niños y de las personas que no estén
familiarizadas con su uso. Las herramientas
utilizadas por personas inexpertas son peligrosas.
b. Cuide sus herramientas con esmero.
Controle si funcionan correctamente, sin
atascarse, las partes móviles de la herramienta,
y si existen partes rotas o deterioradas
que pudieran afectar al funcionamiento de
la herramienta. Si la herramienta estuviese
defectuosa haga que la reparen antes de volver a
utilizarla. Muchos accidentes se deben a herramientas
con un mantenimiento deficiente.
c. Mantenga las herramientas de corte limpias
y afiladas. Las herramientas de corte mantenidas
correctamente se dejan guiar y controlar mejor.
d. Utilice la herramienta, los accesorios, los
útiles de la herramienta, etc. de acuerdo con
estas instrucciones, y tenga en cuenta las
condiciones de trabajo y la tarea a realizar. El uso
de herramientas para trabajos diferentes de aquellos
para los que han sido concebidas puede resultar peligroso.
4. Servicio técnico
a. Haga reparar su herramienta sólo por personal
técnico autorizado que emplee exclusivamente
piezas de repuesto originales. Solamente
así se garantiza la seguridad de la herramienta.
5. Etiquetas sobre la herramienta. La etiqueta de su
herramienta puede incluir los siguientes símbolos:
ADVERTENCIAS ADICIONALES
PARA PODADORAS/BORDEADORAS
A GASOLINA
fSiempre utilice protección para los ojos: Utilice
gafas o anteojos de seguridad en todo momento
que esta herramienta esté en uso.
fProtector: Nunca utilice esta herramienta sin
el protector.
fUtilice la vestimenta adecuada: No utilice ropa
holgada ni joyas. Pueden atascarse en las piezas
móviles. Se recomienda utilizar guantes de goma
y calzado con una suela de goma considerable
al trabajar al aire libre. No opere la herramienta
descalzo ni con sandalias abiertas. Utilice pantalones
largos para protegerse las piernas. Recójase y cubra
el cabello largo.
fCuerda de nylon: Mantenga la cara, las manos
y los pies lejos de la cuerda de nylon giratoria en todo
momento.
fLa cuerda giratoria realiza una función de corte:
Tenga precaución al podar alrededor de pantallas
y plantas que desea.
fMantenga alejados a todos los trabajadores:
A una distancia segura, especialmente a los niños.
fAdvertencia importante: Al utilizar la herramienta
como bordeadora, las piedras, las piezas de metal
y otros objetos pueden ser arrojados a alta velocidad
por la acción de la cuerda. La herramienta y el
protector están diseñados para reducir el peligro.
fAsegúrese de que las demás personas y mascotas
estén a no menos de 30m (100 pies) de distancia.
fPara reducir el riesgo de lesiones por repercusión
(rebote), trabaje lejos de cualquier objeto sólido
cercano, como pared, escalones, piedras grandes,
árboles, etc. Tenga suma precaución al trabajar
cerca de objetos sólidos y, cuando sea necesario,
pode o recorte los bordes en forma manual.
¡Advertencia! y/o
¡Peligro!
Precauciones que envuelven su
seguridad.
Lea el Manual de
Instrucciones
Para reducir el riesgo de lesiones,
el usuario debe de leer y entender
el manual de instrucciones.
Use siempre protección de ojos y oídos. Use casco.
Use siempre guantes Use siempre botas
Riesgo de envenenamiento Riesgo de fuego
Superficie caliente Riesgo de corte o lesión

6 • ESPAÑOL
fEvite el arranque accidental: Nunca transporte la
herramienta enchufada con el dedo en el interruptor.
fNo fuerce la herramienta: A una velocidad más
rápida de la velocidad para la que fue diseñada para
cortar en forma eficaz.
fUtilice la herramienta adecuada: No utilice esta
herramienta para un trabajo diferente a aquéllos para
los que fue diseñada.
fNo se estire: Conserve el equilibrio adecuado y
manténgase parado correctamente en todo momento.
fDaño a la unidad: Si golpea la herramienta o ésta se
atasca con un objeto extraño, deténgala de inmediato,
apáguela, verifique que no se haya dañado y
repare cualquier daño antes de seguir utilizándola.
No opere la herramienta si la bobina o el carrete
están dañados.
fEvite las condiciones ambientales peligrosas: No
utilice herramientas eléctricas en lugares húmedos o
mojados. Siga todas las instrucciones incluidas
en este manual de instrucciones para una operación
adecuada de la herramienta. No utilice la herramienta
bajo la lluvia.
fNo opere herramientas a combustión portátiles
en atmósferas gaseosas o explosivas: Los motores
de estas herramientas normalmente chispean, y las
chispas pueden encender los vapores.
fGuarde las herramientas que no se utilicen en el
interior: Cuando no las utilice, las herramientas
deben guardarse en un lugar seco, alto o bajo llave,
fuera del alcance de los niños.
fEsté alerta: Fíjese en lo que está haciendo. Use
el sentido común. No opere la herramienta si está
cansado.
fConserve las herramientas adecuadamente: Siga
las instrucciones en la sección de mantenimiento.
Mantenga los mangos secos, limpios y libres de
aceite y grasas.
fVerifique las piezas averiadas: Antes de volver
a utilizar la herramienta, se debe controlar cualquier
protección u otra pieza que esté averiada para
determinar si funcionará correctamente y realizará
la función para la que fue diseñada. Verifique la
alineación y la sujeción de las piezas móviles, la
rotura de piezas, el montaje y cualquier otra condición
que pueda afectar el funcionamiento. Cualquier
protección u otra pieza que esté dañada debe ser
reparada correctamente o reemplazada por un centro
de mantenimiento autorizado, a menos que este
manual indique otra cosa.
fMantenga las manijas libres de aceite y combustible.
fUse siempre las manijas y la correa de hombro
adecuados cuando corte.
fNo fume mientras mezcla el combustible o llena el tanque.
fMezcle y almacene siempre el combustible en un
recipiente adecuadamente marcado y cuyo uso sea
aprobado por los códigos y reglamentos locales
para ese uso.
fNunca retire la tapa del tanque de combustible con
el motor en marcha.
fNunca se aserque al operador de la máquina,
cuidadosamente llame su atención y confirme que
apague el motor. Evite distraer al operador, esto
puede poner en riezgo al mismo.
fNunca toque el carrete cuando el motor este en
marcha. Si es necesario hacer ajustes al protector o
al carrete, asegurese de apagar el motor y confirme
que el carrete se haya detenido completamente.
fEl motor debe estar apagado cuando la máquina se
transporta entre áreas de trabajo.
fDurante el encendido, o la operación del motor, nunca
toque partes calientes tales como, escape, cable de
alto voltage o la bujía.
fLuego de apagar el motor, el escape continuará
caliente. Nunca coloque la máquina en lugares
inflamables (pasto seco, etc), combustible o gases.
fPreste atención a la operación luego de la lluvia ya
que el piso puede estar resbaloso.
fSi se resbala o cae al suelo o en un agugero, suelte el
gatillo inmmediatamente.
fUtilize guantes anti-resbalantes de uso pesado para
mejorar el agarre del mango en la desmalezadora.
Guates tambien ayudan a reducir la vibracion en
sus manos.
fSiempre detenga el motor y remueva el cable de la
bujía antes de hacer qualquier ajuste o reparaciones
con excepcion de ajustes al carburador.
fMescle y guarde el conbustible en un contedor
aprobado para almacenar gasolina. No fume cuando
este manipulando gasolina.
fMezcle combustible en areas abiertas en donde
no hayan chispas o llamas. Liempie cualquier
combustible derramado inmmediatamente. Muevase
30 pies de el lugar de carga de gasolina antes de
encender el motor.
fDetenga el motor y permita su enfriamiento antes
de recargar combustible o guardar la unidad.
fAntes de transportar en álgun vehículo, deje enfriar
el motor y vacíe el tanque de combustible.
CARACTERÍSTICAS (Fig. A)
1. Cuchilla de Tres Puntas
2. Lanza o Eje
3. Gatillo Acelerado
4. Botón de Encendido/Apagado
5. Gatillo de Seguridad
6. Manubrio
7. Arnés
8. Tapa de Filtro de Aire (Filtro esta en su interior)
9. Tapa del Tanque de Combustible
10. Tanque de Combustible (Filtro de gasolina esta

ESPAÑOL • 7
en su interior)
11. Bomba Cebadora
12. Guarda
13. Cuchilla Corta Nylon
14. Carrete y Nylon
ENSAMBLAJE
Instalación de la guarda (Fig. B)
Instale la guarda de seguridad en el eje con la abrazadera
y los tornillos incluidos. Apriete bien los tornillos luego de
colocar la guarda en la posición indicada en la grafica.
Instalación del carrete y nylon (Fig. I)
Alinee bien los orificios de la placa con el eje utilizando la
llave Allem provista junto con el manual e instale retenedor
“A” con su cara plana hacia abajo. Enrosque el carrete
(en dirección a las manecillas del reloj) hasta que apriete.
Seguidamente, destrabe el retenedor “A”.
Instalación del manubrio (Fig. D)
Instalación de la base del manubrio: Coloque el
manubrio en una posición cómoda para el operador, luego
apriete los cuatro tornillos M5x25 incluidos.
Instalación de la cuchilla (Fig. E)
fInstale el retenedor “A”, la hoja de tres puntas,
el retenedor “B” y la arandela de presión en este orden.
Seguidamente sujete con la tuerca de rosca izquierda.
fAlinee el agujero de la caja de engranaje con
el retenedor “A” e inserte la llave tipo L para sujetar.
fApriete la tuerca de rosca izquierda con la llave
incluida en dirección al as manijas del reloj hasta que
este segura. Instale el pasador de 2x16 para asegurar
finalmente en su sitio la hora.
RECOMENDACIÓN
¡Advertencia! Todos los modelos de orilladoras
y desmalezadoras pueden lanzar piedras pequeñas,
metales o objetos diminutos al igual que el material que
se este cortando. Lea bien las instrucciones de seguridad
antes de usar el producto.
COMBUSTÍBLE
Carga y recarga de combustible de la
desbrozadora
¡Atención! Uso de gasolina sin mezcla, mezclada
incorrectamente o combustible mas almacenada por
mas de 90 días, (Combustible viejo), puede causar fallas
al encendido, mal funcionamiento o daños severos
al motor los cuales anularían la garantía. Lea y sigua
las instrucciones y recomendaciones de almacenaje
prolongado en este manual.
¡Advertencia! Gasolinas alternativas con contenido,
Metanol o combustibles fuera de los requerimientos de
Black & Decker, NO están aprobados para su uso en
motores 2 tiempos Black & Decker. El uso de gasolinas
alternativas pueden causar problemas de rendimiento,
perdida de poder, sobre calentamiento, congestión
de vapor y reacciones involuntarias incluyendo, y no
limitadas, a mal funcionamiento del embrague.
Requerimientos de combustible
Gasolina: Use gasolina sin plomo de 89 octanos (o más).
Utilice gasolina común encontrada en su parque automotor
local. En caso de tener que utilizar gasolina con contenido
de Etanol, recomendamos que el mismo sea en
proporciones mínimas.
Aceite 2 tiempos: Se debe utilizar aceite para motor 2
tiempos que cumpla con los estándares ISO-L-EGD (ISO/
CD 13738) y J.A.S.O FC/FD. La marca CASTROL modelo
A747 2 tiempos cumple con dichos estándares. Cualquier
problema producto de lubricación inadecuada a causa de
falta de uso de un lubricante ISO-L-EGD (ISO/CD 13738)
and J.A.S.O. FC/FD, anularía la garantía de el motor.
PELIGRO
La gasolina es muy inflamable. Tenga cuidado extremo
cuando este mezclándola, guardándola, o manejándola.
El no hacerlo, le podría ocasionar lesiones graves.
fUse un contenedor aprobado para gasolina.
fNo fume cerca del combustible.
fNo permita llamas o chispas cerca del combustible.
fContenedores para gasolina pueden estar bajo
presión por gases. Siempre suelte la tapa lentamente
para permitir que la presión de estabilice.
fNunca recargue combustible cuando el motor este
CALIENTE o EN MARCHA.
fNo recargue combustible en interiores. Siempre
recargue en áreas abiertas sobre superficie libre.
fNo sobre cargue el tanque. Limpie cualquier derrame
rápidamente.
fAsegure bien la tapa y cierre el contenedor luego
de recargar.
fInspección bien si hay alguna fuga de combustible.
De encontrar alguno, no opere la unidad hasta que
el mismo sea reparado.
fSepárese por lo menos 3m (10ft) de la locación de
recarga de combustible antes de encender el motor.

8 • ESPAÑOL
Mezcla Proporcional de
gasolina a aceite - Relación
40:1
La relación necesaria para el
funcionamiento perfecto de este
producto es 40 partes de gasolina por 1 de aceite.
Cualquier otra proporción puede malograr el motor.
Asegúrese de hacer la mezcla correcta.
Instrucciones para hacer la mezcla
1. Llene el contenedor con la mitad de la gasolina
requerida para la mezcla.
2. Agregue la cantidad apropiada de aceite 2 tiempos
a la gasolina.
3. Cierre el contenedor y agite para para mezclar
el aceite y la gasolina.
4. Agregue la gasolina restante, cierre el contenedor
y agite de nuevo.
Importante! Inspeccione bien el contenedor y asegúrese
de que este limpio. Siempre utilice gasolina fresca.
DESPUÉS DEL USO
NUNCA guarde la unidad con gasolina en el tanque ya
que siempre hay riesgo de derrames. Retorne la mezcla
sobrante a un contenedor apropiada para guardar gasolina.
ALMACENAJE
Como precaución, guarde el combustible en un contenedor
aprobado para este uso y que sea hermético. Guarde en
lugar ventilado, desocupado y libre de llamas y chispas.
Siga las ordenabas locales en cuanto a el almacenaje
de combustible.
OPERACIÓN
Como encender el motor frío (Fig. F, G y H)
1. Botón de Encendido/Apagado: Coloque el interruptor (1)
en posición (I) de encendido.
2. Estrangulador: Mueva la manija (2) a la posición
cerrada .
3. Bomba Cebadora: Oprima suavemente la bomba
cebadora (3) varias veces (7 a 10 veces) hasta que
ingrese combustible en la bomba.
4. Manija/Cuerda del Arrancador: Tome firmemente
con su mano derecha. A la vez, oprima el gatillo
acelerador. Rápidamente hale la manija/cuerda
del arrancador (4) hasta que el motor haga intento
de arranque/explosión (o por un Máximo de 5 veces).
5. Estrangulador: Luego que el motor intente arrancar,
mueva la manija (2) a la posición de ARRANQUE/
RUN .Mantenga el acelerador presionado y
hale la manija/cuerda (4) hasta que el motor arranque
por completo. Suelte el acelerador y permita que el
motor caliente en posición neutral por varios minutos.
Nota: Si el motor no arranca con la manija (2) en
posición ARRANQUE/RUN luego de 5 intentos, repita
los pasos del 2 a 5.
6. Acelerador: Luego que el motor caliente, presione
gradualmente para incrementar las revoluciones a
velocidad de operación.
Como encender el motor caliente (Fig. F, G y H)
El procedimiento de partida es igual al de ENCENDIDO
EN FRÍO a excepción de que NO SE PUEDE cerrar el
estrangulador. También recomendamos no presionar el
acelerador.
1. Botón de encendido/apagado: Coloque el interruptor (1)
en posición (I) de encendido.
2. Bomba Cebadora: Oprima suavemente la bomba
cebadora (3) varias veces (7 a 10 veces) hasta que
ingrese combustible en la bomba.
3. Manija/Cuerda del Arrancador: Coloque la unidad
en una superficie plana manteniendo las partes movibles
fuera de obstáculos. Rápidamente hale la manija/
cuerda (4) hasta que el motor encienda.
Como apagar al el motor (Fig. F y G)
1. Suelte el Acelerador: Permita que el motor camine
en posición neutral antes de apagarlo.
2. Botón de Apagado: Mueva el botos (1) hacia atrás
a la posición (O) de apagado.
¡Advertencia! Si el motor no se apaga luego de oprimir
el botón de APAGADO, cierre el estrangulador para
ahogar el motor. Seguido lleve la unidad a un centro de
servicio Black & Decker autorizado para que reparen el
interruptor antes de usar la unidad nuevamente.
CORTES USANDO EL CARRETE DE NYLON
¡Advertencia! Siempre sujete la desmalezadora
separado de su cuerpo. Mantenga espacio entre su cuerpo
y el producto. Cualquier contacto con la cubierta o el
carrete puede resultar en quemaduras y/o serias heridas.
Recomendaciones de uso
fSiempre evite el contacto con superficies calientes
y manténgalas alejadas de su cuerpo.
fMantenga la desbrozadora inclinada hacia el área
de corte.
fLa lanza o Eje corta cuando se pasa la unidad de
izquierda a derecha. Esto evita lanzar escombros
a el operador.
fUtilice la puna del nylon para cortar, no fuerce
el cabezal adentro del pasto o maleza.
fAlambres y cercas causan desgaste adicional
y disparejo en el nylon. Igualmente rocas, muros de
ladrillo, aceras y madera pueden acelerar el desgaste.
fEvite cortar árboles y arbustos gruesos, Macetas,
cercos de madera, y divisiones pueden dañar el nylon.

ESPAÑOL • 9
Como usar el sistema de alimentación de nylon
por bombeo
El sistema de alimentación de nylon puede ser controlado
por medio de golpes ligeros al cabezal o carrete contra el
pasto mientras el motor esta en marcha completa.
fColoque el motor en marcha máxima.
fGolpe ligeramente el carrete contra el suelo para
soltar nylon.
fEl nylon se soltara a medida que el carrete impacte
en el suelo.
fPuede que se requieran de varios golpes ligeros hasta
que el nylon sea cortado por la cuchilla de corte
instalada en la guarda.
fContinúe su trabajo de corte
Nota: si el embobinado de nylon esta llegando a
su fin, es posible que no pueda avanzar el nylon
por medio de goles ligeros al carrete. En el caso,
DETENGA EL MOTOR y manualmente hale el nylon
hacia afuera.
Alimentación de nylon manual
Con el motor apagado oprima el retenedor y manualmente
hale el nylon hacia afuera.
Cuchilla de corte en la guarda
Este producto viene equipado con una cuchilla de corte
en la guarda protectora. Para mejores resultados, avance
el nylon hasta que el mismo tenga una longitud capaz de
tocar la cuchilla. Extienda el nylon cada vez que escuche
el motor andando mas rápido en revolucione de lo normal
o cuando su eficiencia disminuya. Esto lo ayudara a
mantener un rendimiento optimo.
CORTES CON LA HOJA DE TRES PUNTAS
La hoja de tres puntas se utiliza para cortar arbustos y
malezas de hasta 3/4” de diámetro.
¡Advertencia! Use el arnés todo el tiempo. Ajuste el
mismo de manera que la unidad cuelgue unas cuantas
pulgadas del suelo. el cabezal y la guarda deben estar
nivelados y el arnés debe estar ubicado a la derecha del
operador.
¡Advertencia! No utilice la desmalezadora para cortar
árboles.
MANTENIMIENTO
Filtro de aire
Residuos acumulados en el filtro de aire reducen la
eficiencia del motor. Además, incrementan el consumo de
gasolina y permite que articulas pasen al motor. Remueva
y limpie el filtro tantas veces como sea necesario para
mantener buenas condiciones de el motor.
1. Cierre la manija de el estrangulador (ARRANQUE ).
Esto evitara que partículas entren en el carburador
mientras remueve el filtro. Cepille el sucio acumulado
de toda la sección del filtro de aire.
2. Remueva la tapa del filtro. Cepille el sucio acumulado.
3. Remueva el filtro y ligeramente líbrelo de elementos
e impurezas. Reemplace el filtro si esta visualmente
dañado, empapado en combustible, muy sucio, o
deformado. (Lleve a un centro de servicio autorizado).
4. El filtro puede ser re-utilizado si:
a. Entra perfectamente en la cavidad original.
b. Si es instalado con su orientación original.
5. Re-instale la tapa del filtro.
Ajuste del carburador
Nota: No ajuste el carburador a menos de que sea
necesario. Si tiene problemas, lleve la unidad a un centro
de servicio Black & Decker autorizado. Ajusto inapropiado
puede malograr el motor y anular la garantía.
Filtro de combustible
Revise el filtro de combustible de manera regular. NO
permita que partículas o sucio entre en el tanque. Un filtro
obstruido puede causar dificultades para encender el
motor o anormalidades en su rendimiento.
fEl tanque de combustible esta equipado con un filtro.
El mismo esta ubicado al final de la línea y puede ser
extraído cuidadosamente con un alambre en forma
de gancho.
fCuando el filtro este sucio reemplace llevándolo a un
centro de servicio Black & Decker autorizado.
fCuando el tanque de gasolina este sucio, puede
limpiarlo enjuagando su interior con gasolina.
Inspección de bujía
¡Importante! Este producto usa una bujía marca
Champion modelo RCJ6Y con una abertura de 0.6 - 0.7mm
(0.023”-0.028”). Use la misma bujía de reemplazo.
Reemplazo de la bujía
1. Remueva la bujía y revise si hay danos, desgaste
o curvaturas.
2. Limpie el área y reemplace con una bujía nueva.
No lave a presión.
3. Ajuste la abertura de la bujía doblando el electrodo
a la medida indicada arriba.
4. Apriete la bujía con un torque de 145-155 kgf• cm
(25-135 in•lbf).
SOLUCIÓN DE PROBLEMAS
Fallas tales como dificultad para encender el motor,
funciones irregulares y fallas de rendimiento pueden ser
prevenidas si se siguen cuidadosamente las instrucciones
de el manual y los procedimientos de mantenimiento. En
case de alguna falla de en el motor, revise lo siguiente:
fQue el sistema de de combustiible este en buenas

10 • ESPAÑOL
condiciones y el combustible este corriendo libremente
al motor.
fQue el sistema de ignicion este en buenas condiciones
y la bujia haga chispa (explosión) correctamente.
fQue la compresion del motor sea adecuada.
Revise siempre:
fSi hay depósitos grandes de aceite en la bujia,
limpie o reemplace inmediatamente.
fSi el centro del electrodo esta desgastado o
redondeado en la parte superior, de estarlo,
cambien la bujía.
fQue la abertura de la bujía sea 0.6 - 0.7mm
(0.023”- 0.028”)
fQue la bujía esta apretada con un torque igual a
145-155kg•cm (125-135in•lb)
Problemas de arranque:
fRemueva el combustible del tanque.
fAsegurarse de colocar combustible fresco y limpio.
fRevise el filtro de combustible y asegúrese de que
este limpio. Reemplace de ser necesario.
fAsegúrese que el filtro de aire este limpio.
fInstale una bujía nueva y la abertura adecuada.
fDe encontrar un problema serio en la unidad, no lo
trate de reparar usted, llévelo a un Centro de Servicio
Autorizado Black & Decker.
ACCESORIOS
Los accesorios recomendados para emplearse con
su herramienta se encuentran a su disposición con su
distribuidor local o en los centros de servicio autorizado.
¡Advertencia! El uso de accesorios no recomendados
para utilizar con esta herramienta puede resultar peligroso.
PROTECCIÓN DEL MEDIO AMBIENTE
Separación de desechos. Este producto no debe
desecharse con la basura doméstica normal. Si
llega el momento de reemplazar su producto
Black & Decker o éste ha dejado de tener
utilidad para usted, no lo deseche con la basura
doméstica normal. Asegúrese de que este
producto se deseche por separado.
La separación de desechos de productos usados
y embalajes permite que los materiales puedan
reciclarse y reutilizarse. La reutilización de
materiales reciclados ayuda a evitar la contaminación
medioambiental y reduce la demanda de materias
primas. La normativa local puede ofrecer la
separación de desechos de productos eléctricos
de uso doméstico en centros municipales de
recogida de desechos o a ravés del distribuidor
cuando adquiere un nuevo producto.
INFORMACIÓN DE SERVICIO
Todos los Centros de Servicio de Black & Decker cuentan
con personal altamente capacitado dispuesto a brindar
a todos los clientes un servicio eficiente y confiable en
la reparación de herramientas eléctricas. Para mayor
informacion acerca de nuestros centros de servicio
autorizados y si necesita consejo técnico, reparaciones o
piezas de repuesto originales de fábrica, comuniquese a su
oficina local o visitenos en www.BlackandDecker-la.com
ESPECIFICACIONES GST33
Cilindrada 33cc
Potencia 1.2HP / 0,9kW
Velocidad 6500 rpm
Motor 2 tiempos
Tipo de carburador Diafragma
Arranque Easy - Start
Mezcla 40:1
Capacidad de tanque 1,0L
Cuchilla 3 Puntas (255 x 1,4)
Carrete de Nylon 3,0 mm
Peso 7,1 kg / 15,6 Lb

ESPAÑOL • 11
Engine Problem Troubleshooting Chart
Problema Revisar Estado Causa Solución
Motor Intenta encender
- Enciende muy fuerte/
No enciende.
Combustible en el
carburador
No combustible
llegando al carburador
• Estrangulador obstruído
• Línea de gasolina
obstruída
• Carburador malo
• Limpie o reemplace
• LLeve a un Centro de
Servicio Black & Decker
autorizado
Gasilina en el cilindro
Falta de gasolina en el
cilindro Carburador
• LLeve a un Centro de
Servicio Black & Decker
autorizado
Escape impregnado en
gasolina
Mezcla muy rica en
gasolina
• Abra el estrangulador
• Limpie/reemplace filtro
de aire
• Ajuste el carburador
• LLeve a un Centro de
Servicio Black & Decker
autorizado
Chispa al final del cable
de bujía Ausencia de chispa • Botón apagado
• Problema eléctrico
• Coloque en (I) Encendido
• LLeve a un Centro de
Servicio Black & Decker
autorizado
Bujía Ausencia de chispa
• Abertura incorrecta
• Carbonizada
• Empapada en combustible
• Defectuosa
• Ajuste a 0.65mm (0.26”)
• Limpie o reemplace
• Reemplace bujía
El motor enciende pero
se apaga rápido o no
acelera adecuadamente
Filtor de Aire Filtro de aire sucio Uso regular Limpie o reemplace
Filtro de Gasolina Filtro de combustible
sucio Contaminates o reciduos Reemplace
Bujía Bujía sucia o desgastada Desgaste normal Liempe o reemplace
Carburador Ajuste incorrecto Vibación
LLeve a un Centro de
Servicio Black & Decker
autorizado
Sistema de enfriamiento Sistema sucio o tapado Uso prolongado/Zonas
alto polvo Limpie
Motor no enciende
del todo N/A N/A Problema interno de
motor
LLeve a un Centro de
Servicio Black & Decker
autorizado

12 • ENGLISH
DO NOT RETURN THIS PRODUCT TO THE STORE,
first contact your local Black & Decker office
or nearest authorized service center.
GENERAL SAFETY RULES
Warning! Read and understand all instructions. Failure
to follow all instructions listed below, may result in fire and/
or serious personal injury.
Warning! When using electric gardening appliances,
basic safety precautions should always be followed to
reduce risk of fire, electric shock, and personal injury.
Safety Guidelines/Definitions
It is important for you to read and understand this manual.
The information it contains relates to protecting Your
Safety and Preventing Problems. The symbols below
are used to help you recognize this information.
Danger! Indicates an imminently hazardous situation
which, if not avoided, will result in death or serious injury.
Atention! Indicates a potentially hazardous situation
which, if not avoided, could result in death or serious injury.
Warning! Indicates a potentially hazardous situation
which, if not avoided, may result in minor or moderate injury.
Warning! Used without the safety alert symbol
indicates a potentially hazardous situation which, if not
avoided, may result in property damage.
SAVE THESE INSTRUCTIONS
SAFETY INSTRUCTIONS
General Power Tool Safety Warnings.
Warning! Read all safety warnings and all
instructions. Failure to follow the warnings and instructions
listed below may result fire and/or serious injury.
Save all warnings and instructions for future reference.
The term used in the warnings listed below refers to the
tool powered by fuel.
1. Work area safety
a. Keep work area clean and well lit. Cluttered and
dark areas invite accidents.
b. Do not operate power tools in explosive atmospheres,
such as in the presence of flammable liquids,
gases or dust. Power tools create sparks which may
ignite the dust or fumes.
c. Keep children and bystanders away while
operating a power tool. Distractions can cause you
to lose control.
d. Do not mix fuel in an enclosed room or near open
flames. Assure adequate ventilation.
e. Never start or run the engage inside a closed room or
building. Fumes from the exhaust contain dangerous
carbon monoxide.
f. Never leeave the machine unattended.
2. Personal safety
a. Stay alert, watch what you are doing and use
common sense when operating a power tool. Do
not use a power tool while you are tired or under
the influence of drugs, alcohol or medication. A
moment of inattention while operating power tools
may result in serious personal injury.
b. Utilice equipos de protección personal.
Lleve siempre protección ocular, respiratoria
y auditiva. Los equipos de protección tales como
una mascarilla antipolvo, zapatos de seguridad
con suela antideslizante, casco o protectores
auditivos, utilizados en condiciones adecuadas,
contribuyen a reducir las lesiones personales.
b. Use personal protective equipment. Always wear
eye protection. Protective equipment such as dust
mask, non-skid safety shoes, hard hat, or hearing
protection used for appropriate conditions will reduce
personal injuries.
c. Prevent unintentional starting. Ensure the switch
is in the off-position before connecting to power
source and/or battery pack, picking up or carrying
the tool. Carrying power tools with your finger on the
switch or energising power tools that have the switch
on invites accidents.
e. If devices are provided for the connection of dust
extraction and collection facilities, ensure these are
connected and properly used. Use of these devices
can reduce dust related hazards.
f. Do not use any attachment with this power head
other than the ones recommended by Black & Decker.
Serious injury to the operator or bystanders could
result as well as damage to the machine.
g. Never attempt to make engine adjustments while
the unit is running and strapped to the operator.
Always make engine adjustments with the unit resting
on a flat, clear surface.
h. Do not touch area around the muffler or cylinder
of the unit; these parts get hot from operation.
i. It is belived that a condition called “Raynaud’s
Phenomenon”, which affects the fingers of certein
individuals may be brought about by exposure to
vibration and cold. Exposure to vibration and cold
may cause tingling and burning sensations folowed
by loss of color and numbness in the fingers. The
following precautions are strongly recommended
because the minimum exposure which might trigger
the ailment is unknown.
j. Keep you body warm, especially the head, neck,
feet, ankles, hands and wrists.
k. Maintain good blood circulation by performing

ENGLISH • 13
vigorous arm exercises during frequent work breaks
and also by not smoking.
l. Limit the hours of operation. Try to fill each day with
jobs where operating the brush cutter or other
handheld power equipment is not required.
m. If you experience discomfort, redness and swelling
of the fingers followed by whitening and loss of
feeling, consult your physician before further exposing
yourself to cold and vibration.
3. Power tool use and care
a. Store idle power tools out of the reach of children
and do not allow persons unfamiliar with the power
tool or these instructions to operate the power
tool. Power tools are dangerous in the hands of
untrained users.
b. Maintain power tools. Check for misalignment
or binding of moving parts, breakage of parts
and any other condition that may affect the power
tools operation. If damaged, have the power tool
repaired before use.Many accidents are caused
by poorly maintained power tools.
c. Keep cutting tools sharp and clean. Properly
maintained cutting tools with sharp cutting edges are
less likely to bind and are easier to control.
d. Use the power tool, accessories and tool bits etc.,
in accordance with these instructions, taking
into account the working conditions and the
work to be performed. Use of the power tool for
operations different from those intended could result
in a hazardous situation.
4. Service
a. Have your power tool serviced by a qualified repair
person using only identical replacement parts.
This will ensure that the safety of the power tool is
maintained.
8. Labels on tool
The label on your tool may include the following
symbols:
ADDITIONAL WARNINGS
FOR GAS STRING TRIMMERS
fAlways wear eye protection: Wear safety spectacles
or goggles at all times when this tool is plugged in.
fGuard: Do not use this tool without guard attached.
fDress properly: Do not wear loose clothing or jewelry.
They can be caught in moving parts. Rubber gloves
and substantial rubber soled footwear are recommended
when working outdoors. Don’t operate the tool when
barefoot or earing open sandals. Wear long pants to
protect your legs. Wear protective hair covering to
contain long hair.
fNylon line: Keep face, hands and feet clear
of rotating nylon line at all times.
fLa cuerda giratoria realiza una función de corte:
Tenga precaución al podar alrededor de pantallas
y plantas que desea.
fMantenga alejados a todos los trabajadores:
A una distancia segura, especialmente a los niños.
fImportant warning: When being used as an edger,
stones, pieces of metal and other objects can be
thrown out at high speed by the line. The tool and
guard are designed to reduce the danger.
fMake sure that other persons and pets are at least
100 feet (30m) away.
fTo reduce the risk of rebound (ricochet) injury,
work going away from any nearby solid object
such as wall, steps, large stone, tree, etc. Use
great care when working close to solid objects and
where necessary, do edging or trimming by hand.
fAvoid accidentally starting: Don’t carry plugged-in
tool with finger on trigger.
fDo not force the tool: At a rate faster than the rate
at which it is able to cut effectively.
fUse the right tool: Do not use this tool for any job
except that for which it is intended.
fDon’t overreach: Keep proper footing and balance
at all times.
fDamage to unit: If you strike or become entangled
with a foreign object, stop tool immediately, unplug,
check for damage and have any damage repaired
before further operation is attempted. Do not operate
with a broken hub or spool.
fAvoid dangerous environmental conditions:
Do not use electric tools in damp or wet locations.
Follow all instructions in this instruction manual for proper
operation of your tool. Don’t use the tool in the rain.
fDo not operate portable tools in gaseous or
explosive atmospheres: Motors in these tools
normally spark, and the sparks might ignite fumes.
fStore idle tools indoors: When not in use, tools
should be stored indoors in a dry, locked-up place out
of reach of children.
Warning! and/or Danger! Precautions that involve your
safety.
Read instruction
manual
To reduce the risk of injury, user must
read and understand the instruction
manual.
Always wear eye and ear protection. Use a helmet.
Always use gloves Always use boots
Risk of poisoning Risk of fire or explosion
Hot surface Risk of cut or hurt

14 • ENGLISH
fStay alert: Watch what you are doing. Use common
sense.
fDo not operate tool when you are tired.
fMaintain appliances with care: Follow instructions
in maintenance section. Inspect extension cords
periodically and replace if damaged. Keep handles
dry, clean and free from oil and grease.
fCheck damaged parts: Before further use of the
appliance, a guard or other part that is damaged
should be carefully checked to determine that it will
operate properly and perform its intended function.
Check for alignment of moving parts, binding of
moving parts, breakage of parts, mounting, and any
other condition that may affect its operation. A guard
or other part that is damaged should be properly
repaired or replaced by an authorized Service Center
unless otherwise indicated elsewhere in this manual.
fKeep the handles free from oil and fuel.
fAlways use proper handles and shoulder strap
when cutting.
fDo not smoke while mixing fuel or filling tank.
fAlways mix and store fuel in a properly marked
container that is approved by local codes and
ordinances for such usage.
fNever remove the fuel tank cap while the engine
is running.
fWhen ever approaching an operator of the machine,
carefully call his attention and confirm that the operator
stops the engine. Be careful not to startle or distract
the operator which can cause an unsafe situation.
fNever touch the nylon cutting head when ever the
engine is running. If it is necessary to adjust the
protector or nylon cutting head, be sure to stop the
engine and confirm that the nylon cutting head has
stopped running.
fThe engine should be turned off when the machine is
moved between work areas.
fIn strt-up or during operation of the engine, never
touch hot parts such as the muffler, the high voltage
wire or the spark plug.
fAfter the engine has stopped, the muffler is still hot.
Never place the machine in any places where there
are flammable materials (dry grass, etc.), combustible
gasses or combustible liquids.
fPay specials attention to operation in the rain or just
after the rain as the ground may be slippery.
fIf you slip or fall to the ground or into a hole, release
the throttle lever immediately.
fWear no-slip heavy duty work gloves to improve your
grip on the brush cutter handle. Gloves also reduce
the transmission of machine vibration to your hands.
fAlways stop the engine and remove the spark plug
wire before making any adjustments or repairs except
for carburetor adjustments.
fMix and store fuel in a container approved for
gasoline. Do not smoke while fueling or mixing fuel.
fMix fuel outdoors where there are no sparks or flames.
Wipe up any fuel spillage. Move 30 ft. away from
refueling site before starting engine.
fStop the engine and allow to cool before refueling
or storing the unit.
fAllow the engine to cool; empty the fuel tank and secure
the unit from moving before transporting in a vehicle.
FEATURES (Fig. A)
1. Blade
2. Drive Shaft Assembly
3. Throttle Trigger
4. Ignition Switch
5. Safety Lever
6. U-Handle
7. Harness Assembly
8. Air Cleaner Cover
9. Fuel Tank Lid
10. Fuel Tank
11. Purge Bulb
12. Debris Shield
13. Cut-Off Knife
14. Nylon Cutter Head
ASSEMBLY
Installing plastic shield (Fig. B)
Install the safety cover on the shaft with the safety cover
bracket and the screws provided. Tighten the screws after
setting the safety cover bracket at the appropiate position.
Installing nylon line cutter head (Fig. I)
Align well plate holes with the shaft using the Allem key
provided with the manual and install retainer “A” with its flat
side down. Thread the bobbin (direction clockwise) until
tight. Then, unlock the retainer “A”.
Installing handle (Fig. D)
Install handle in bracket: Position handle in a comfortable
operating position and tighten four M5x25 screws.
Blade installation (Fig. E)
fInstall holder A, the tri-blade, holder B, teeth washer.
In this order. Then clamp with a lefthand thread net.
fAlign hole of gear case and holder A, and insert
S=4mm bar wrench.
fRotate blade-fastening nut with plug box wrench in
clockwise direction until securely tightened. Install
the pin 2x16 and disjoin it.
RECOMMENDATION
Warning! All models trimmers and brushcutters
can throw small stone, metal or small objects as well
the material being cut. Follow the instructions on the
“Instruction Manual”.

ENGLISH • 15
FUEL
Fueling and refueling the brush cutter
Warning! Use of unmixed, improperly mixed, or fuel
older than 90 days, (Stale Fuel), may cause hard starting,
poor performance, or severe engine damage and void
the product warranty. Read and follow instructions in the
“Storage Section” on this manual.
Warning! Alternative fuels, which contain, Methanol or
any fuels not meeting Black & Decker requirements are
NOT approved for use in Black & Decker 2-stroke gasoline
engines. Use of alternative fuels may cause performance
problems, loss of power, overheating, fuel vapor lock, and
unintended machine operation, including, but not limited
to, improper clutch engagement. Alternative fuels may
also cause premature deterioration of fuel lines, gaskets,
carburetors and other engine components.
Fuel requirements
Gasoline: Use 89 Octane (or higher) unleaded gasoline
known to be good quality and commonly used in the local
automotive segment. Should it contain Ethanol, make sure
it has low contents.
Two Stroke Oil: A two-stroke engine oil meeting ISO-L-
EGD (ISO/CD 13738) and J.A.S.O. FC/FD Standards must
be used. Castrol brand A747 2-Stroke Oil meets these
standards. Engine problems due to inadequate lubrication
caused by failure to use an ISO-L-EGD (ISO/CD 13738)
and J.A.S.O. FC/FD certified oil will void the two-stroke
engine warranty.
DANGER
Fuel is very flammable. Use extreme care when mixing,
storing, or handling or serious personal injury may result.
fUse an approved fuel container.
fDo not smoke near fuel.
fDo not allow flames or sparks near fuel.
fFuel tanks/cans may be under pressure. Always
loosen fuel caps slowly allowing pressure to equalize.
fNever refuel a unit when the engine is HOT or
RUNNING.
fDo not fill the fuel in indoor areas. Always fill the fuel
in outdoor over bare ground.
fDo not overfill fuel tank. Wipe up spills immediatly.
fSecurely tighten fuel tank cap and close fuel container
after refueling.
fInspect for fuel leakage. If fuel leakage is found,
do not start or operate unit leakage is repaired.
fMove at least 3m (10ft.) from refueling location before
starting the engine.
Fuel to oil mix – 40:1 Ratio
Fuel ration other than 40:1 may
cause damage engine. Ensure
mixture is correct.
Mixing instructions
1. Fill an approved fuel container with half of the required
amount of gasoline.
2. Add the proper amount of 2-stroke oil to gasoline.
3. Close container and shake to mix oil with gasoline.
4. Add remaining gasoline, close fuel container, and remix.
Important! Inspect fuel tank making sure it is clean.
Always use fresh fuel.
AFTER USE
DO NOT store a unit with fuel in its tank. Leaks can occur.
Return unused fuel to an approved fuel storage container.
STORAGE
As a precaution, store fuel in an approved, airtight container.
Store in a well-ventilated, unoccupied building, away from
sparks and flames. Check for local ordinances on type and
location of storage container.
OPERATION
Starting cold engine (Fig. F, G and H)
1. Stop Switch: Move stop switch button (1) forward
away from the STOP position.
2. Choke: Move choke lever (2) to COLD START
position.
3. Purge Bulb: Pump purge bulb (3) 7 to 10 times
until fuel is visible and flows freely in the clear fuel
tank return line.
4. Recoil Starter: Firmly grasp right hand grip and
throttle trigger lockout with left hand and fully depress
throttle trigger to wide open position. Rapidly pull
recoil starter handle/rope (4) until engine fires
(or maximum five -5- pulls).
5. Choke: After engine fires (or 5 pulls), move choke
lever back to Run position. Hold throttle trigger
and throttle trigger lockout fully depressed, and
pull recoil starter handle/rope until engine starts and
runs. Release throttle trigger, and allow unit to warm
up at idle for several minutes. Note: If engine does
not start with choke in RUN position after 5 pulls,
repeat instructions 2 to 5.
6. Throttle Trigger: After engine warm-up, gradually
depress throttle trigger to increase engine RPM to
operating speed.

16 • ENGLISH
Starting warm engine (Fig. F, G and H)
The starting procedure is the same as COLD START
except DO NOT close the choke, and do not hold throttle
trigger fully depressed.
1. Stop Switch: Move stop switch button (1) forward
away from the STOP position.
2. Purge Bulb: Pump purge bulb (3) until fuel is visible
in the “Clear” fuel return line.
3. Recoil Starter: Lay the unit on a flat area and keep
movable attachment parts clear of all obstacles.
Rapidly pull the recoil starter handle (4) until the
engine fires.
Stopping engine (Fig. F and G)
1. Release Throttle: Allow engine to return to idle
before shutting off engine.
2. Stop Switch: Move stop switch button (1) backward
to STOP position.
Warning! If engine does not stop when the stop switch
is moved to STOP position, close choke -COLD START
position- to stall engine. Have your Black & Decker Service
Center repair stop switch before using trimmer again.
CUTTING WITH A NYLON HEAD
Warning! Always hold the string trimmer away from
your body, keeping clearance between your body and the
product. Any contact with the housing or string trimmer
cutting head can result in burns and/or other serious
personal injury.
Cutting tips
fAvoid hot surfaces by always keeping the tool away
from your body.
fKeep the trimmer tilted toward the area being cut;
this is the best cutting area.
fThe curved shaft trimmer cuts when passing the unit
from right to left. The straight shaft trimmer cuts
when passing the unit from left to right. This will
avoid throwing debris at the operator. Avoid cutting
in the dangerous area.
fUse the tip of string to do the cutting; do not force
string head into uncut grass.
fWire and picket fences cause extra string wear, even
breakage. Stone and brick walls, curbs, and wood
may wear string rapidly.
fAvoid trees and shrubs. Tree bark, wood moldings,
siding, and fence posts can easily be damaged
by the string.
Advancing string using bump feed system
String advance is controlled by tapping string head on
grass while running engine at full throttle.
fRun engine at full throttle.
fTap string head on ground to advance string.
String advances each time the head is tapped.
fSeveral taps may be required until string strikes
the cut off blade.
fResume trimming.
Note: If the string is worn too short you may not be
able to advance the string by tapping it on the ground.
If so, STOP THE ENGINE, and manually advance
the string.
Advancing the string manually
With the engine off, push the spool retainer down while
pulling on string(s) to manually advance the string.
Cut-Off knife
This trimmer is equipped with a cut-off blade on the grass
deflector. For best cutting, advance string by tapping the
string head until the string is trimmed to length by the cut-
off blade. Advance string whenever you hear the engine
running faster than normal, or when trimming efficiency
diminishes. This will maintain best performance.
CUTTING WITH A BLADE
There are many types of blades, however the two most
commonly used are the following.
Warning! Use the shoulder arness at all time. Adjust
both harness and harness clamp on the unit so that the
unit hangs a few inches above ground lavel. the cutting
head and the metal debris shield should be level in all
directions. Harness the unit on the right side of your body.
MAINTENANCE
Air filter
Accumulated brush in the air filter will reduce engine
efficiency. Increase fuel consuption and allow abrasive
particles to pass into the ingine. remove the air filter as
often as necessary to maintain in a clear condition.
1. Close choke (COLD START position ). This
prevents dirt from entering the carburetor thrat when
the air filter is removed. Brush accumulated dirt from
air cleaner area.
2. Remove air filter cover. Brush dirt from inside cover.
3. Remove air filter and lightly brush debris from.
Replace filter if it is damaged, fuel soak, very dirty,
or the rubber sealing edges are deformed.
4. If filter can be certain it:
a. Fits tightly in the air filter cavity.
b. Is installed with the original side out.
5. Install air filter cover.
Adjusting carburetor
Note: Do not adjust carburetor unless is necessary. If you
have trouble with the carburetor, see your Black & Decker
Service Center. Improper adjustment may cause engine

ENGLISH • 17
damage and void warranty.
Fuel filter
Check the fuel filter periodically. Do not allow dust to enter
into fuel tank. Clogged filter will cause difficulty in starting
engine or abnormalities in engine performance.
fFuel tank is fitted with a filter. Filter is situated at the
free end of fuel pipe and can be picked out througth
fuel port with a piece of hooked wire or something similar.
fWhen filter is dirty, replace he filter.
fWhen the inside of the fuel tank is dirty, it can be
cleaned by rising the tank out with gasoline.
Check spark plug
Important! This engine uses a champion RCJ6Y with a 0.6
- 0.7mm (0.023”-0.028”)gap. Use the exact replacement.
Spark plug
1. Remove sparks plug and check for fouling, worm
and rounded.
2. Clean the plug or replace with a new one. Do not sand
blast to clean.
3. Adjust spark plug gap by bending outer electrode.
4. Tighten spark plug to 145-155 kgf• cm (25-135 in•lbf).
TROUBLE SHOOTING
Failures such as difficulty in starting engine, irregularities
in funtions, and abnormalities in preformance can normally
be prevented if careful attention is paid to all operating
instructions and maintenance procedures. Should the
engine not funtion properly, check the following:
fThat the fuel system is in good condition and fuel
is flowing to the engine.
fThe ignition system is in good condition and the spark
plug, sparks correctly.
fCompression of the engine is adequate.
Always check:
fClean or replace the plug if fouled with heavy
oily deposits.
fReplace the plug if the center electrode is worm
rounded at the end.
fSparks gap 0.6 - 0.7mm (0.023”- 0.028”)
fFastening torque = 145-155kg•cm (125-135in•lb)
Failure to start:
fDispose of fuel in tank.
fInsure that fuel is fresh and clean.
fCheck fuel filter to make sure it is clean.
Replace filter if is necessary.
fMake sure air filter elements are clean.
fInstall new, properly gapped spark plug.
fWhen there is serious trouble with the unit, do not try
to repair it yourself, but have your Black & decker
Service Center or dealer do it for you.
ACCESSORIES
Recommended accessories for use with your tool are
available at extra cost from your local dealer or authorized
service center.
Warning! The use of any accessory not recommended
for use with this tool could be hazardous.
PROTECTING THE ENVIRONMENT
Separate collection. This product must not be
disposed of with normal household waste.
Should you find one day that your Black & Decker
product needs replacement, or if it is of no further
use to you, do not dispose of it with household
waste. Make this product available for separate
collection.
Separate collection of used products and packaging
allows materials to be recycled and used again.
Re-use of recycled materials helps prevent
environmental pollution and reduces the demand
for raw materials. Local regulations may provide for
separate collection of electrical products from the
household, at municipal waste sites or by the
retailer when you purchase a new product.
SERVICE INFORMATION
Black & Decker offers a full network of company-owned and
authorized service locations. All Black & Decker Service
Centers are staffed with trained personnel to provide
customers with efficient and reliable power tool service.
For more information about our authorized service centers
and if you need technical advice, repair, or genuine factory
replacement parts, contact the Black & Decker location
nearest you, or visit us at www.BlackandDecker-la.com
SPECIFICATIONS GST33
Displacement 33cc
Power 1.2HP / 0,9kW
Speed 6500 rpm
Engine 2 Stroke
Carburator type Diaphragm
Start Easy-Start
Fuel mix 40:1
Tank cap. 1,0L
Blade 3 Teeth (255x1.4)
Nylon spool 3,0 mm
Weight 7,1 kg / 15,6 lb

18 • ENGLISH
Engine Problem Troubleshooting Chart
Problem Check Status Cause Remedy
Engine cranks - starts
hard/doesn’t start
Fuel at carburetor No fuel at carburetor
• Fuel dtrainer clogged
• Fuel line clogged
• Carburetor
• Clean or replace
• Clean or replace
• See your Black & Decker
Service Center
Fuel at cylinder
No fuel at cylinder Carburetor See your Black & Decker
Service Center
Muffler wet with fuel Fuel mixture too rich
• Open choke
• Clean/Replace air filter
• Adjust carburetor
• See your Black & Decker
Service Center
Spark at end of plug wire No spark
• Stop switch off
• Electrical problem
• Interlock switch
• Turn switch to ON (I)
• See your Black & Decker
Service Center
Spark at plug No spark
• Spark gap icorrect
• Covered with carbon
• Fouled with fuel
• Plug defective
• Adjust to 0.65mm (.026”)
• Clean or replace
• Clean or replace
• Replace plug
Engine runs, but dies
or does not accelerate
properly
Air filter Air filter dirty Normal wear Clean or replace
Fuel filter Fuel filter dirty Contaminants/residues
in fuel Replace
Spark plug Plug dirty/worn Normal wear Clean and adjust or
replace
Carburetor Improper adjustment Vibration Adjust
Cooling system Cooling system dirty/
plugged
Extended operationin
dirty/dusty locations Clean
Engine does not crank N/A N/A Internal engine problem See your Black & Decker
Service Center
Solamente para propósito de Argentina:
Importado por: Black & Decker Argentina S.A.
Pacheco Trade Center
Colectora Este de Ruta Panamericana
Km. 32.0 El Talar de Pacheco
Partido de Tigre
Buenos Aires (B1618FBQ)
República de Argentina
No. de Importador: 1146/66
Tel.: (011) 4726-4400
Imported by/Importado por:
Black & Decker do Brasil Ltda.
Rod. BR 050, s/n°- Km 167
Dist. Industrial II
Uberaba ˆ MG ˆ Cep: 38064-750
CNPJ: 53.296.273/0001-91
Insc. Est.: 701.948.711.00-98
S.A.C.: 0800-703-4644
Solamente para propósitos de Colombia
Importado por: Black & Decker de Colombia, S.A.
Carrera 85D # 51-65, Bodega 23
Complejo Logístico San Cayetano
Bogotá - Colombia
Tel.: 744-7100
Solamente para propósito de Chile:
Importado por: Black & Decker de Chile, S.A.
Av. Pdte. Eduardo Frei M. 6001-67 Conchalí
Santiago de Chile
Tel.: (56-2) 687 1700
Impreso en China
Impresso em China
Printed in China
04/16/12
Solamente para propósito de México:
Importado por: Black & Decker S.A. de C.V.
Avenida Antonio Dovali Jaime
# 70 Torre B Piso 9
Colonia La Fé, Santa Fé
Delegación Alvaro Obregón,
México D.F. 01210
Tel. (52) 555-326-7100
R.F.C.: BDE810626-1W7
Black & Decker del Perú S.A.
Av. Enrique Meiggs 227.
Pque. Industrial - Callao
Tel.: (511) 614-4242
RUC 20266596805
Table of contents
Languages:
Other Black & Decker Brush Cutter manuals

Black & Decker
Black & Decker VP4200 User manual

Black & Decker
Black & Decker LST300 User manual

Black & Decker
Black & Decker TR016 User manual

Black & Decker
Black & Decker GST43 User manual

Black & Decker
Black & Decker LINEA PRO GST43 User manual

Black & Decker
Black & Decker Powerful Solutions GL652 User manual

Black & Decker
Black & Decker 82267 User manual

Black & Decker
Black & Decker GL300 User manual

Black & Decker
Black & Decker GPC1820L20 User manual

Black & Decker
Black & Decker DS600 User manual