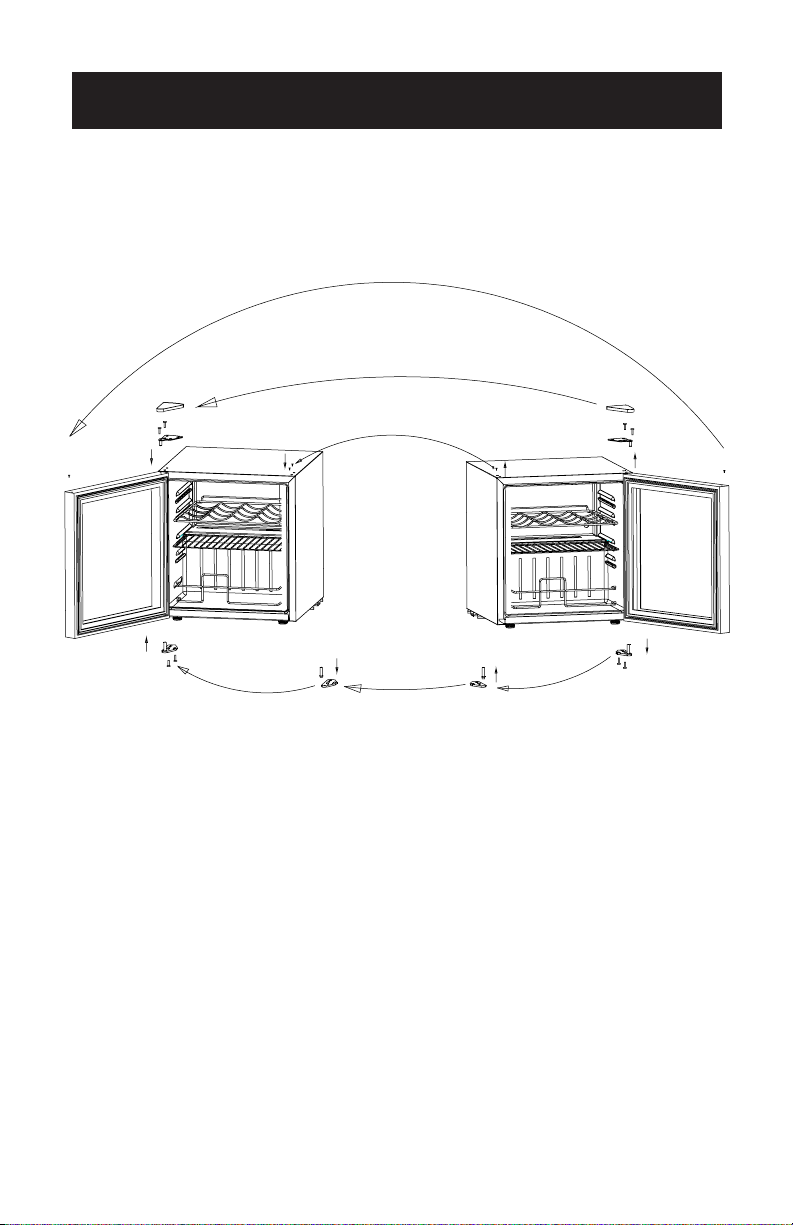
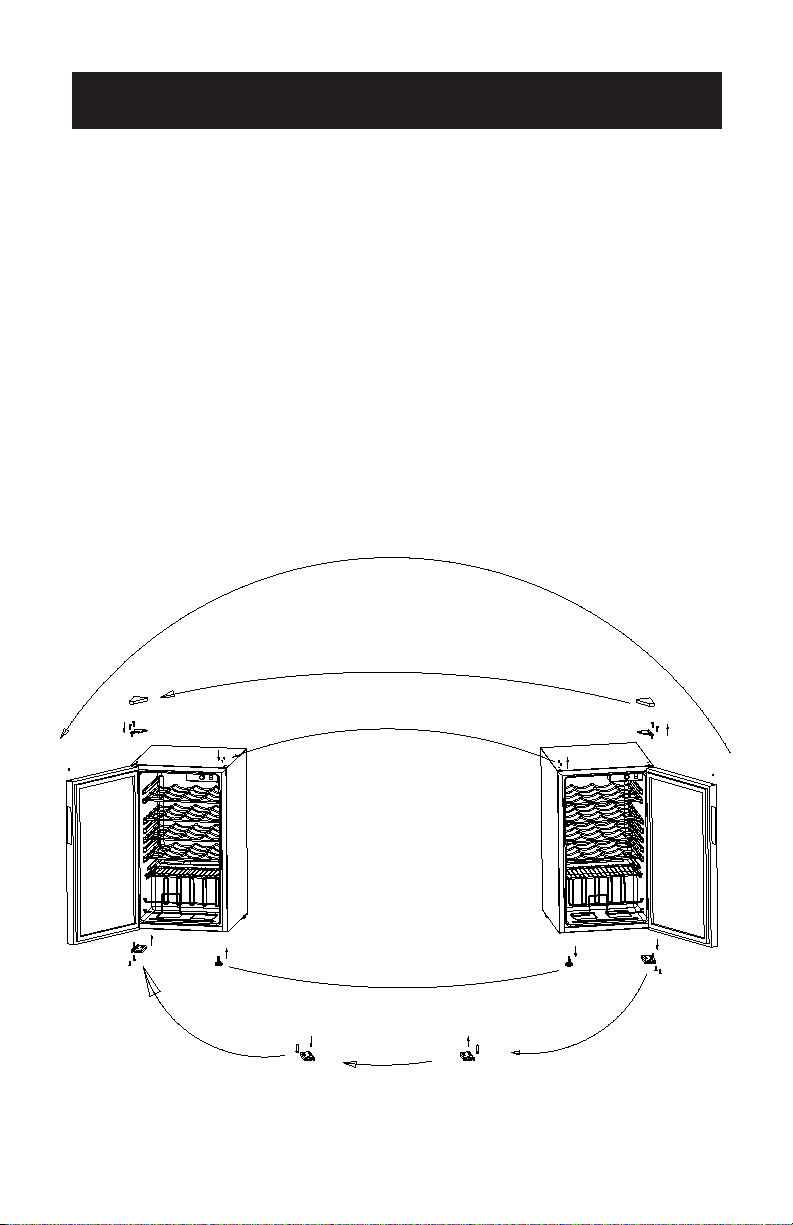
Black & Decker BD61516 User manual

INSTRUCTION MANUAL
Thank you for choosing BLACK+DECKER!
PLEASE READ BEFORE RETURNING THIS PRODUCT FOR
ANY REASON.
If you have a question or experience a problem with your BLACK+DECKER
purchase, go to www.blackanddecker.com/instantanswers
If you can’t find the answer or do not have access to the Internet, call
844-299-0879 from 10:30 a.m. to 6:30 p.m. EST Mon. - Fri. to speak with an
agent. Please have the catalog number available when you call.
SAVE THIS MANUAL FOR FUTURE REFERENCE.
CATALOG NUMBER
BD61516
BD61536
14 Bottle Capacity Wine Cellar
26 Bottle Capacity Wine Cellar

Page 2
Thank you for purchasing our
BLACK+DECKER product. This
easy-to-use manual will guide you
in getting the best use of your Wine
Cellar.
Remember to record the model and
serial numbers. They are on a label
on the rear.
Staple your receipt to your manual.
You will need it to obtain warranty service.
Model number
Serial number
Date of purchase
PRODUCT REGISTRATION
CONTENTS
SAFETY INFORMATION
Important Safety Instructions.............................................................................................................................................. 3
Refrigerant ....................................................................................................................................................................................4
Grounding Instructions .......................................................................................................................................................4-5
SET UP & USE
Parts & Features ......................................................................................................................................................................... 6
Installation Guide ....................................................................................................................................................................... 7
Reversing the Door Hinge ...............................................................................................................................................8-10
Operation Instructions....................................................................................................................................................... 11-12
CLEANING & CARE.........................................................................................................................................13-15
TROUBLESHOOTING & WARRANTY
Before You Call For Service.................................................................................................................................................16
Customer Service......................................................................................................................................................................16
Troubleshooting.........................................................................................................................................................................17
Limited Warranty ......................................................................................................................................................................18

Page 3
SAFETY INFORMATION
NOTE: If the Wine Cellar has been placed in a horizontal or tilted
position for any period of time, wait 24 hours before plugging
the unit in.
1. Use this appliance only for its intended purpose as described in this use
and care guide.
2. This Wine Cellar must be properly installed in accordance with the
installation instructions before it is used. See grounding instructions in
the installation section.
3. Never unplug the Wine Cellar by pulling on the power cord. Always
grasp the plug firmly and pull straight out from the outlet.
4. Do not operate any appliance with a damaged cord or plug. Return
appliance to the nearest authorized service facility for examination,
repair or adjustment.
5. Unplug the wine cellar before cleaning or before making any repairs.
NOTE: If for any reason this product requires service, we strongly
recommend that a certified technician performs the service.
6. This Wine Cellar should not be recessed or built-in in an enclosed
cabinet. It is designed for freestanding installation only.
7. Do not operate your Wine Cellar in the presence of explosive fumes.
WARNING
When using electrical appliances, basic safety precautions
should be followed, including the following:
READ ALL INSTRUCTIONS BEFORE USING THE UNIT
DANGER
DANGER - Immediate hazards
which WILL result in severe
personal injury or death
WARNING
WARNING - Hazards or unsafe
practices which COULD result in
severe personal injury or death
CAUTION
CAUTION - Hazards or unsafe
practices which COULD result in
minor personal injury
IMPORTANT SAFETY INSTRUCTIONS

Page 4
SAVE THESE INSTRUCTIONS
HOUSEHOLD USE ONLY
DANGER
Risk of child entrapment. Before disposing of any refrigerator
or freezer, remove all doors. Leave any shelves in place so that
children may not easily climb inside.
REFRIGERANT
GAS WARNINGS
DANGER - Risk of fire or explosion. Flammable refrigerant used.
DO NOT use mechanical devices to defrost refrigerator. DO NOT
puncture refrigerant tubing.
DANGER - Risk of fire or explosion. Flammable refrigerant used. To
be repaired only by trained service personnel. DO NOT puncture
refrigerant tubing.
WARNING - Risk of fire or explosion. Flammable refrigerant used.
Consult repair manual/owner’s guide before attempting to service
this product. All safety precautions must be followed.
WARNING - Risk of fire or explosion. Dispose of properly in
accordance with federal or local regulations. Flammable refrigerant
used.
WARNING - Risk of fire or explosion due to puncture of refrigerant
tubing; Follow handling instructions carefully. Flammable refrigerant
used.
SAFETY INFORMATION
GROUNDING INSTRUCTIONS
ELECTRICAL REQUIREMENTS
In the event of malfunction or breakdown, grounding provides a path of
least resistance for electric current to reduce the risk of electric shock.
The appliance must be connected to a cord having an equipment-
grounding conductor and a grounding plug. The plug must be plugged
into an appropriate outlet that is properly installed and grounded in
accordance with all local codes and ordinances.

Page 5
SAFETY INFORMATION
DANGER - Improper connection of the equipment grounding conductor
can result in a risk of electric shock. The conductor with insulation
having an outer surface that is green with or without yellow stripes is
the equipment grounding conductor. If repair or replacement of the
cord or plug is necessary, do not connect the equipment-grounding
conductor to a live terminal. Check with a qualified electrician or
service person if the grounding instructions are not completely
understood, or if in doubt as to whether the [tool/appliance] is properly
grounded. Do not modify the plug connected to the [tool/appliance] –
if it will not fit the outlet, have a proper outlet installed by a qualified
electrician.
FOR GROUNDED, CORD-CONNECTED [TOOL/APPLIANCE] RATED
LESS THAN 15A AND INTENDED FOR USE ON A NOMINAL 120V
SUPPLY CIRCUIT
The appliance is for use on a nominal 120V circuit and should be
connected to a grounding outlet that looks like the one illustrated
below. The use of a temporary adaptor is not recommended.
POWER SUPPLY CORD
1. Avoid the use of an extension cord because of potential safety
hazards under certain conditions. Have a qualified electrician or
serviceman to install an outlet near the appliance.
2. If it is absolutely necessary to use an extension cord, extreme care
must be exercised.
a) Use only a grounding type 3-wire extension cord that has a
3-blade grounding plug and a 3-slot receptacle that will accept the
plug on the appliance.
b) The marked electrical rating of the extension cord must equal to or
greater than the electrical rating of the appliance. The longer cord
should be arranged so that it will not drape over the counter top
or table top where it can be pulled on by children or tripped over
unintentionally.
NOTE: Neither BLACK+DECKER nor the dealer can accept any liability for
damage to the product or personal injury resulting from failure to
observe the electrical connection procedures.

Page 6
SET UP & USE
PARTS & FEATURES
Double Pane
Glass Door
Chrome bottom
Rack
MODEL BD61516
Chrome Shelves
Adjustable leveling legs
Temperature
Control Dial
(Back of Unit)
Double Pane
Glass Door
Interior Light switch
Chrome bottom Rack
MODEL BD61536
Chrome Shelves
Interior Light
Adjustable leveling legs
Temperature
Control Dial
35mm
31mm
2mm2mm
White
OFF
Red

Page 7
INSTALLATION GUIDE
1. Unpack your Wine Cellar by removing all packaging materials like
carton, base, foams, adhesive tape, etc.
2. Remove all accessories, internal packaging material that was used to
hold shelves, etc., in place during transport.
3. Clean the remains of all adhesive tape used and remove all printed
material supplied.
4. Install the Wine Cellar in a convenient location away from extreme
heat and cold. Allow sufficient clearance between the Wine Cellar
and side wall so the door(s) will open without obstruction. Wine
Cellar is not designed for recessed installation.
5. The floor on which the Wine Cellar should be placed must be flat,
hard, solid, and even. The Wine Cellar should not be placed on any
soft material such as carpeting, foam, plastic, etc.
6. To level your Wine Cellar, use the two leveling legs located on the
bottom front of your Wine Cellar. Adjust by turning the legs counter
clockwise to raise or clockwise to lower your Wine Cellar. The door
will close easier if the leveling legs are extended.
7. The following is the recommended minimum clearance behind the
Wine Cellar for proper air circulation:
Sides: 2” (50mm)
Top: 2” (50mm)
Proper air circulation will help your Wine Cellar work at maximum
efficiency.
NOTE: The appliance must be correctly connected to the power supply.
SET UP & USE
WARNING
It is important to keep the power cord away from the compressor at the
back of the Wine Cellar as during operation, the compressor can reach a
high temperature and could cause serious damage to the power cord.
CAUTION
Care should be taken during handling, moving and use to avoid damaging
the refrigerant tubing or increasing the risk of a leak

Page 8
Door hole
plug
SET UP & USE
PROTECTION FROM HEAT AND MOISTURE
• Do not install your Wine Cellar in any location where heavy moisture
is present or if the location is not properly insulated. This Wine
Cellar is not designed to operate in temperature setting below 55°
Fahrenheit.
• Location for the Wine Cellar should be on a hard surface and away
from direct sunlight and heat source, e.g., radiators, baseboard
heaters, cooking appliances, etc.
REVERSING THE DOOR HINGE (MODEL BD61516)
1. Remove the top hinge cover.
2. Using a Phillips Head Screwdriver, loosen and remove the 2 screws
holding the top hinge in place.
3. Remove top hinge and carefully lift off the door.
4. Remove the screw hole plugs from the opposite side of the cabinet
and the door and insert the plugs in the screw hole openings of the
just removed screws.
5. Remove any loose items in the wine cellar and carefully place the
wine cellar on its back.
6. Loosen the screws holding the lower hinge bracket to the wine cellar
and remove screws and bracket.
7. Remove (2) screws from the other side and insert in the previously
removed screw holes. Tighten the screws.
8. Remove the door pin from the lower hinge bracket by turning it
counter-clockwise. Turn over the bracket, then reinsert the door pin
into the threaded hole, and tighten.
9. Align the door with the cabinet first. Then install the lower hinge
bracket to the bottom opposite side of the cabinet. Then insert (2)
remaining screws into the holes. Tighten the screws.
10. Align top hinge bracket with screw holes, insert screws and partially
secure, check that door and cabinet are properly aligned and then
secure tightly.
11. Align upper hinge bracket with screw holes insert screws and
partially secure, check that door and cabinet are properly aligned
and then secure tightly.

Page 9
SET UP & USE
12. Place the unit back in an upright position. Replace the top hinge
cover.
NOTE: If the top of the door is not aligned with the cabinet, loosen the top
hinge screws, adjust door and re-tighten the screws.
Top hinge and
hinge cover
Top hinge and
hinge cover
Door Pin Door Pin
Lower hinge bracketLower hinge bracket Turn over
Cabinet hole plug Cabinet hole plug
Door hole
plug
Door hole
plug
REVERSING THE DOOR HINGE (MODEL BD61536)
1. Remove the top hinge cover.
2. Using a Phillips Head Screwdriver, loosen and remove the 2 screws
holding the top hinge in place.
3. Remove top hinge and carefully lift off the door.
4. Remove the screw hole plugs from the opposite side and insert the
plugs in the screw hole openings of the just removed screws.
5. Remove any loose items in the wine cellar and carefully place the
wine cellar on its back.
6. Loosen the screws holding the lower hinge bracket to the wine cellar
and remove screws and bracket.

Page 10
SET UP & USE
Top hinge and
hinge cover
Top hinge and
hinge cover
Door Pin
Leveling leg Lower hinge
bracket
with leveling leg
Lower hinge
bracket
with leveling leg
Leveling leg
Door Pin
Cabinet hole plug Cabinet hole plug
Door hole
plug
Door hole
plug
7. Remove one screw from the other side and insert in the previously
removed screw holes. Tighten the screw. Remove the adjustable
leveling leg from the other side, then install to the opposite
corresponding hole and tighten it.
8. Remove the door pin from the lower hinge bracket by turning it
counter-clockwise, then reinsert it into the neighboring treaded hole
and tighten.
9. Align the door with the cabinet first. Then install the lower hinge
bracket to the bottom opposite side of the cabinet. Then insert (2)
remaining screws into the holes. Tighten the screws.
10. Align top hinge bracket with screw holes, insert screws and partially
secure, check that door and cabinet are properly aligned and then
secure tightly.
NOTE: If the top of the door is not aligned with the cabinet, loosen the top
hinge screws, adjust door and re-tighten the screws.

Page 11
SET UP & USE
OPERATING INSTRUCTIONS
STARTING YOUR NEW WINE CELLAR
After cleaning your wine cellar thoroughly. Wipe the outside with a soft dry
cloth and the interior with a clean moist cloth. Insert the power supply cord
into the socket.
NOTE: If the wine cellar has been placed in a horizontal or tilted position for
any period of time, wait 24 hours before plugging the unit in.
TEMPERATURE CONTROL
• Turn the variable temperature control knob to the setting appropriate for
the type of wine you are storing.
Red is the warmest setting most suitable for red wine. Setting the
temperature control to the red setting selects a temperature around 64
degrees Fahrenheit. White is the coolest setting suitable for storing white
wine. Turning the temperature control knob all the way to the coolest
setting selects a temperature at approximately 40 degrees Fahrenheit
If you are storing both red and white wine, select a temperature in the
middle. It is suggested you store the red wine on the top and white wine
on the bottom. Allow up to 12 hours for temperature to stabilize if the
wine cellar is loaded to capacity.
• If you choose to change the thermostat setting, adjust thermostat control
one increment at a time. Allow several hours for temperature to stabilize
between adjustments.
• Large amounts of wine will lower the cooling eciency of the appliance.
• Turning the temperature to “0” position will shut o the cooling cycle, but
does not turn o the electrical power to the unit.
NOTE: Wait 3-5 minutes before restarting if you unplug the wine cellar.
The unit may fail to operate properly if restarted too quickly.
• Make sure wine bottles do not touch the back of the cabinet.
• Do not overload wine cellar.
35mm
31mm
2mm2mm
White
OFF
Red
BD6151
W
h
i
t
e
R
e
d
OFF
BD6153

Page 12
INTERIOR LIGHT (MODEL BD61536)
You can turn the interior light ON or OFF by pressing “O” on the light switch
located on the front of the control panel. To turn the light OFF press the
switch again.
SET UP & USE

Page 13
CLEANING AND CARE
CLEANING AND MAINTENANCE
CAUTION
To avoid personal injury or product damage always read and
follow manufacturer’s instructions and warnings before
using any cleaning products.
WARNING
Always unplug appliance before cleaning to avoid electric shock.
Ignoring this warning may result in death or injury
POWER INTERRUPTION
In case of a power interruption/outage, unplug the power cord from the wall
outlet. Replug the power cord to the wall outlet once the power has been
restored.
CLEANING METHOD
Prepare a cleaning solution of 3-4 tablespoons of baking soda mixed with
warm water. Use sponge or soft cloth, dampened with the cleaning solution
to wipe down your wine cellar.
• Rinse with clean warm water and dry with a soft cloth.
• Do not use harsh chemicals, abrasives, ammonia, chlorine bleach,
concentrated detergents, solvents or metal scouring pads. Some of these
chemicals may dissolve, damage and/or discolor your wine cellar.

Page 14
CLEANING AND CARE
DOOR GASKET
Clean door gaskets every three months according to general instructions.
Gasket must be kept clean and pliable to assure a proper seal.
• Petroleum jelly applied lightly on the hinge sides of gaskets will keep the
gasket pliable and ensure a good seal.
VACATION AND MOVING CARE
• For long vacations or absences, set the temperature dial to “OFF”,
unplug the unit, empty contents from wine cellar and clean the wine
cellar and door gaskets according to “General Cleaning” section. Prop
doors open, so air can circulate inside.
• When traveling or moving the wine cellar, always transport the unit
vertically. Moving the unit on its sides may damage the wine cellar
and/or its compressor. Do not move or store the unit on its side

Page 15
CLEANING AND CARE
ENERGY SAVING TIPS
• The wine cellar should be located in the coolest area of the room,
away from heat-producing appliances or heating ducts, and out of
direct sunlight.
• Overloading the wine cellar forces the compressor to run longer and
thus increase energy consumption.
• The shelves should not be lined with aluminum foil, wax paper, or
paper towels. This will interfere with cold air circulation, making the
wine cellar less ecient.
• Organize wine to reduce door openings and extended searches.
Remove as many items as needed at one time, and close the door as
soon as possible.

Page 16
TROUBLESHOOTING & WARRANTY
BEFORE YOU CALL FOR SERVICE
IF THE APPLIANCE FAILS TO OPERATE:
A) Check to make sure that the wine cellar is plugged in securely. If it is
not, remove the plug from the outlet, wait 10 seconds and plug it in
again securely.
B) Check for a blown circuit fuse or a tripped main circuit breaker. If
these seem to be operating properly, test the outlet with another
appliance.
IF NONE OF THE ABOVE SOLVES THE PROBLEM, CONTACT A
QUALIFIED TECHNICIAN. DO NOT TRY TO ADJUST OR REPAIR
THE APPLIANCE YOURSELF.
IMPORTANT
DO NOT RETURN THIS PRODUCT TO THE STORE
If you have a problem with this product, please contact the
BLACK+DECKER Customer Satisfaction Center at
844-299-0879 or service@equitybrands.com
DATED PROOF OF PURCHASE, MODEL # AND SERIAL #
REQUIRED FOR WARRANTY SERVICE

TROUBLESHOOTING & WARRANTY
Troubleshoot your problem by using the chart below. If the wine cellar still
does not work properly, contact BLACK+DECKER customer service center
or the nearest authorized service center.
TROUBLE POSSIBLE CAUSE POSSIBLE REMEDY
Wine Cellar does
not work
• Wine Cellar is not
switched on
• Unit is not plugged
in
• A household fuse
has blown or circuit
breaker has tripped
• Wall power socket is
defective
• Turn on the temperature
control dial. It may be in
the OFF, “0” position
• Plug in the wine cellar
• Replace the household
fuse or reset circuit
breaker
• To be corrected by a
qualified electrician
The wine is
too cold
• Temperature is not
properly adjusted
• Set the temperature
control dial to a warmer
setting
The wine is
too warm
• Temperature is not
properly adjusted
• Door was open for
an extended period
• A large quantity of
wine was placed in
the wine cellar within
the last 24 hours
• The wine cellar is
near a heat source
• Set the temperature
control dial to a cooler
setting
• Open the door only as
long as necessary. Check
door gasket for proper
seal
• Set the temperature
control dial to a colder
setting temporarily
• Refer to “Protection From
Heat and Moisture” section
Popping or
cracking sounds
• When compressor
comes on
• This is a normal sound of
coolant flowing through
condenser coils
Wine cellar door
does not shut
properly
• The wine cellar
door is not properly
aligned
• Possible blockage
from bottles shelves,
bins, etc.
• Re-align the wine cellar
door. Refer to the “Door
Alignment” section
• Ensure nothing is blocking
the door
Wine cellar has an
odor
• Interior needs
cleaning
• Please refer to “Cleaning
and Care” section

Page 18
LIMITED WARRANTY
Any repair, replacement, or warranty service,
and all questions about this product should be
directed to BLACK+DECKER at 844-299-0879
from the USA or Puerto Rico.
BLACK+DECKER warrants to the original purchaser
that the product will be free from defects in material,
parts and workmanship for the period designated for
this product. The warranty commences the day the
product is purchased and covers up to a period of
1 year (12 months) for labor/1 year (12 months) for
parts (manufacturing defects only)/and a total of
2 years (24 months) for compressor part only.
BLACK+DECKER agrees that it will, at its option,
replace the defective product with either a new
or remanufactured unit equivalent to your original
purchase during the warranty period.
Exclusions: This warranty does not apply to the
below:
1. If the appearance or exterior of
the product has been damaged or
defaced, altered or modified in design or
construction.
2. If the product original serial number
has been altered or removed or cannot
be readily determined.
3. If there is damaged due to power line
surge, user damage to the AC power
cord or connection to improper voltage
source.
4. If damage is due to general misuse,
accidents or acts of God.
5. If repair attempts are done by
unauthorized service agents, use of
parts other than genuine parts or parts
obtained from persons other than
authorized service companies.
6. On units that have been transferred
from the original owner.
7. On products that have been purchased
as refurbished, like new, second-hand, in
a “As-Is” or “Final Sale” terms.
8. To products used in a commercial or
rental setting.
9. To products used in settings other than
ordinary household use or used other
than in accordance with the provided
instructions.
10. To damages for service calls for
improper installations.
11. Transportation and shipping costs
associated with the replacement of the
unit.
12. Service calls to instruct you how to use
your product.
13. Service calls to repair or replace the
house fuse, reset the circuit breaker or
correct the wiring in the house.
REPAIR OR REPLACEMENT AS PROVIDED UNDER
THIS WARRANTY IS THE EXCLUSIVE REMEDY OF
THE CUSTOMER; BLACK+DECKER. SHALL NOT BE
LIABLE FOR ANY INCIDENTAL OR CONSEQUENTIAL
DAMAGES FOR BREACH OF ANY EXPRESS OR
IMPLIED WARRANTY ON THIS PRODUCT, EXCEPT
TO THE EXTENT PROHIBITED BY APPLICABLE LAW.
ANY IMPLIED WARRANTY OF MERCHANTABILITY
OF FITNESS FOR A PARTICULAR PURPOSE ON THIS
PRODUCT IS LIMITED TO THE DURATION OF THE
WARRANTY.
Some states do not allow the exclusion or limitations
of incidental or consequential damages, or limitations
on how long the warranty lasts. In these cases the
above exclusions or limitations may not apply to you.
This warranty gives you specific legal rights and you
may also have other rights which vary from state to
state.
Obtaining Service: To obtain service, product
literature, supplies or accessories please call
844-299-0879 to create a ticket for exchange/repair.
Please make sure to provide the date of purchase,
model number and a brief description of the problem.
Our customer service representative
will contact you or send detailed return instructions.
BLACK+DECKER does not warrant that the appliance will work
properly in all environmental conditions, and makes no warranty
and representation, either implied or expressed, with respect
to the quality, performance, merchantability, or fitness for a
particular purpose other than the purpose identified within this
user’s manual. BLACK+DECKER has made every eort to ensure
that this user’s manual is accurate and disclaims liability for any
inaccuracies or omissions that may have occurred. Information in
this user’s manual is subject to change without notice and does
not represent a commitment on the part of BLACK+DECKER.
BLACK+DECKER reserves the right to make improvements to
this user’s manual and/or to the products described in this user’s
manual at any time without notice. If you find information in this
manual that is incorrect, misleading, or incomplete, please contact
us at 844-299-0879.
W Appliance Co.
1356 Broadway
New York, NY 10018


Page 20
BLACK & DECKER, BLACK+DECKER, the BLACK & DECKER and
BLACK+DECKER logos and product names and the orange and black color
scheme are trademarks of The Black & Decker Corporation, used under license.
All rights reserved.
Product in this box may differ slightly from that pictured. Does not affect
function. Not all accessories shown in photography are included in this
package.
Imported by W Appliance, Inc., 1356 Broadway, New York, NY 10018
March 2020 Printed in China
This manual suits for next models
1
Table of contents
Other Black & Decker Wine Cooler manuals