BLACK STAR HT VENUE Series User manual
Blackstar Amplification Ltd, Beckett House, 14 Billing Road, Northampton, NN1 5AW, UK
For the latest information go to: www.blackstaramps.com
Whilst the information contained herein is correct at the time of publication, due to our policy of constant improvement
and development, Blackstar Amplification Ltd reserves the right to alter specifications without prior notice.
Designed and Engineered by
Blackstar Amplication UK
Owner’s Manual
For

System Requirements
To run Architect, your computer should meet (or exceed) the following hardware
requirements:
Windows requirements:
64 bit Microsoft® Windows® Operating System
Intel® Pentium® 4 2GHz or faster (or equivalent)
1GB RAM or greater
1GB free HDD space
Minimum display resolution of 1366x768
Internet connection for accessing the Online Community
Apple® Mac requirements:
Mac OS® X 10.9 or later
1GB RAM or greater
1GB free HDD space
Minimum display resolution of 1366x768
Internet connection for accessing the Online Community
Systems that do not meet the required specification may still be capable of running
Architect, but these systems will not be actively supported by Blackstar.
3
Introduction
CabRig, available on all HT Venue MK III series amps, is Blackstar’s next-generation
DSP speaker simulator. CabRig awards budding musicians the ability to access
previously unattainable technology, that has long been reserved for professional
sound engineers and producers. Cutting edge advancements in speaker cabinet
and microphone simulation will allow any player to achieve unparalleled quality in
their live sound and recorded music.
Blackstar’s Architect software provides access and in-depth control over every
aspect of CabRig, granting a vast collection of gear that, in the real world, can
only be found in professional recording environments. Over 250 combinations of
cabinets and microphones allow the user to inhabit the role of a sound engineer and
get outstanding results every time, without any of the hassle.
With the sheer quantity of sonic options available from CabRig, it can be
overwhelming. This handbook will simplify and explain the fundamentals of achieving
the sound in your head using CabRig. Get a great tone quick using the Blackstar
Presets or spend hours fine-tuning the perfect tone. The choice is yours.
2
English
English
54
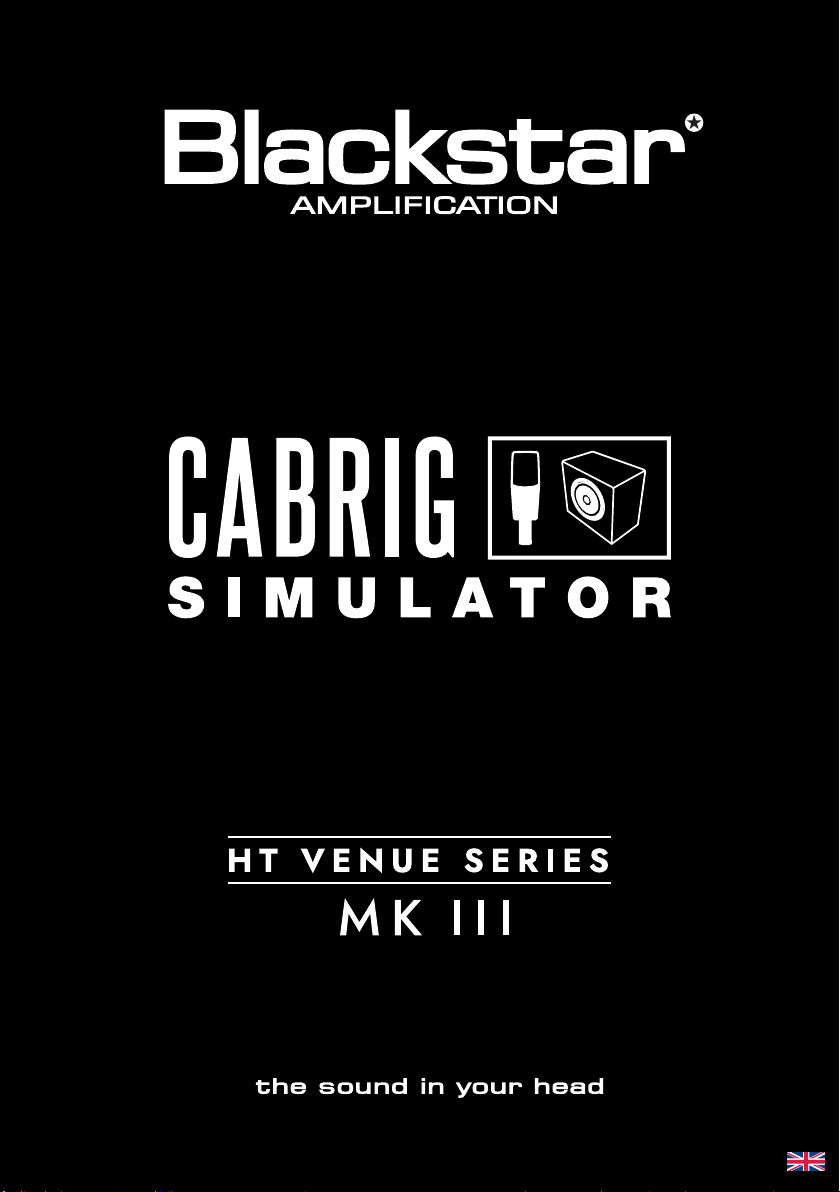
1. Cabinet Selection
Select your virtual cabinet using the Cabinet Selection panel. Choose from
23 distinct speaker cabinets or select DI (Direct Injection) for the direct power
amp output.
NOTE: For use with 3rd party IR (Impulse Response) loaders, select the DI option.
1. Microphone Selection
Mic up your virtual cabinet with a choice of 6 industry standard microphones. Toggle
the axis of your microphone choice for a dierent tonal avour. In general, OFF AXIS
will darken your tone and shift the mid-range character.
English
English
Power Amp Emulation
Before entering CabRig, the guitar signal is processed through power amp
emulation, meticulously designed to match the feel and response of the physical
power amp in your HT Venue MK III. The signal for CabRig is taken before the
physical power amp and so the Master volume control will have no aect over the
CabRig outputs. Instead, the amount of power amp drive can be dialled in using
the POWER AMP DRIVE control within Architect.
Higher settings of POWER AMP DRIVE will push the emulated power amp harder,
resulting in a more saturated and compressed sound.
Two Cab Channel Strips
The Cab Channel strips allow you to craft and control your virtual cabinets. CabRig
gives you the ability to run two separate cabinet, microphone and EQ combinations
at once.
1
4
1 12 13
Microphone Character
57 - Dynamic
Bright and cutting, with controlled lows. A classic
microphone choice for recording guitar cabinets. Use
this microphone o-axis for a less sharp, mid-focussed
tone. Typically paired with a ribbon microphone for a
balanced sound.
421 - Dynamic
Aggressive and tight. Use this microphone for an
upfront sound or o-axis for a more mellow sound.
Pair with a thicker microphone for a full bodied tone.
67 - Condenser
Balanced with an extended top end. O-axis this
microphone gives a similar tone to a ribbon, but with a
controlled low end.
414 - Condenser
Rich and bold. An extended top and bottom end
make this microphone pair perfectly with mid-focussed
microphones.
121 - Ribbon Thick and warm. A great choice for a vintage sound.
Pair with a brighter microphone for more cut in a mix.
160 - Ribbon
Punchy mids with smooth highs. Use this microphone
for a more controlled ribbon sound. Pair with a brighter
microphone for more bite.
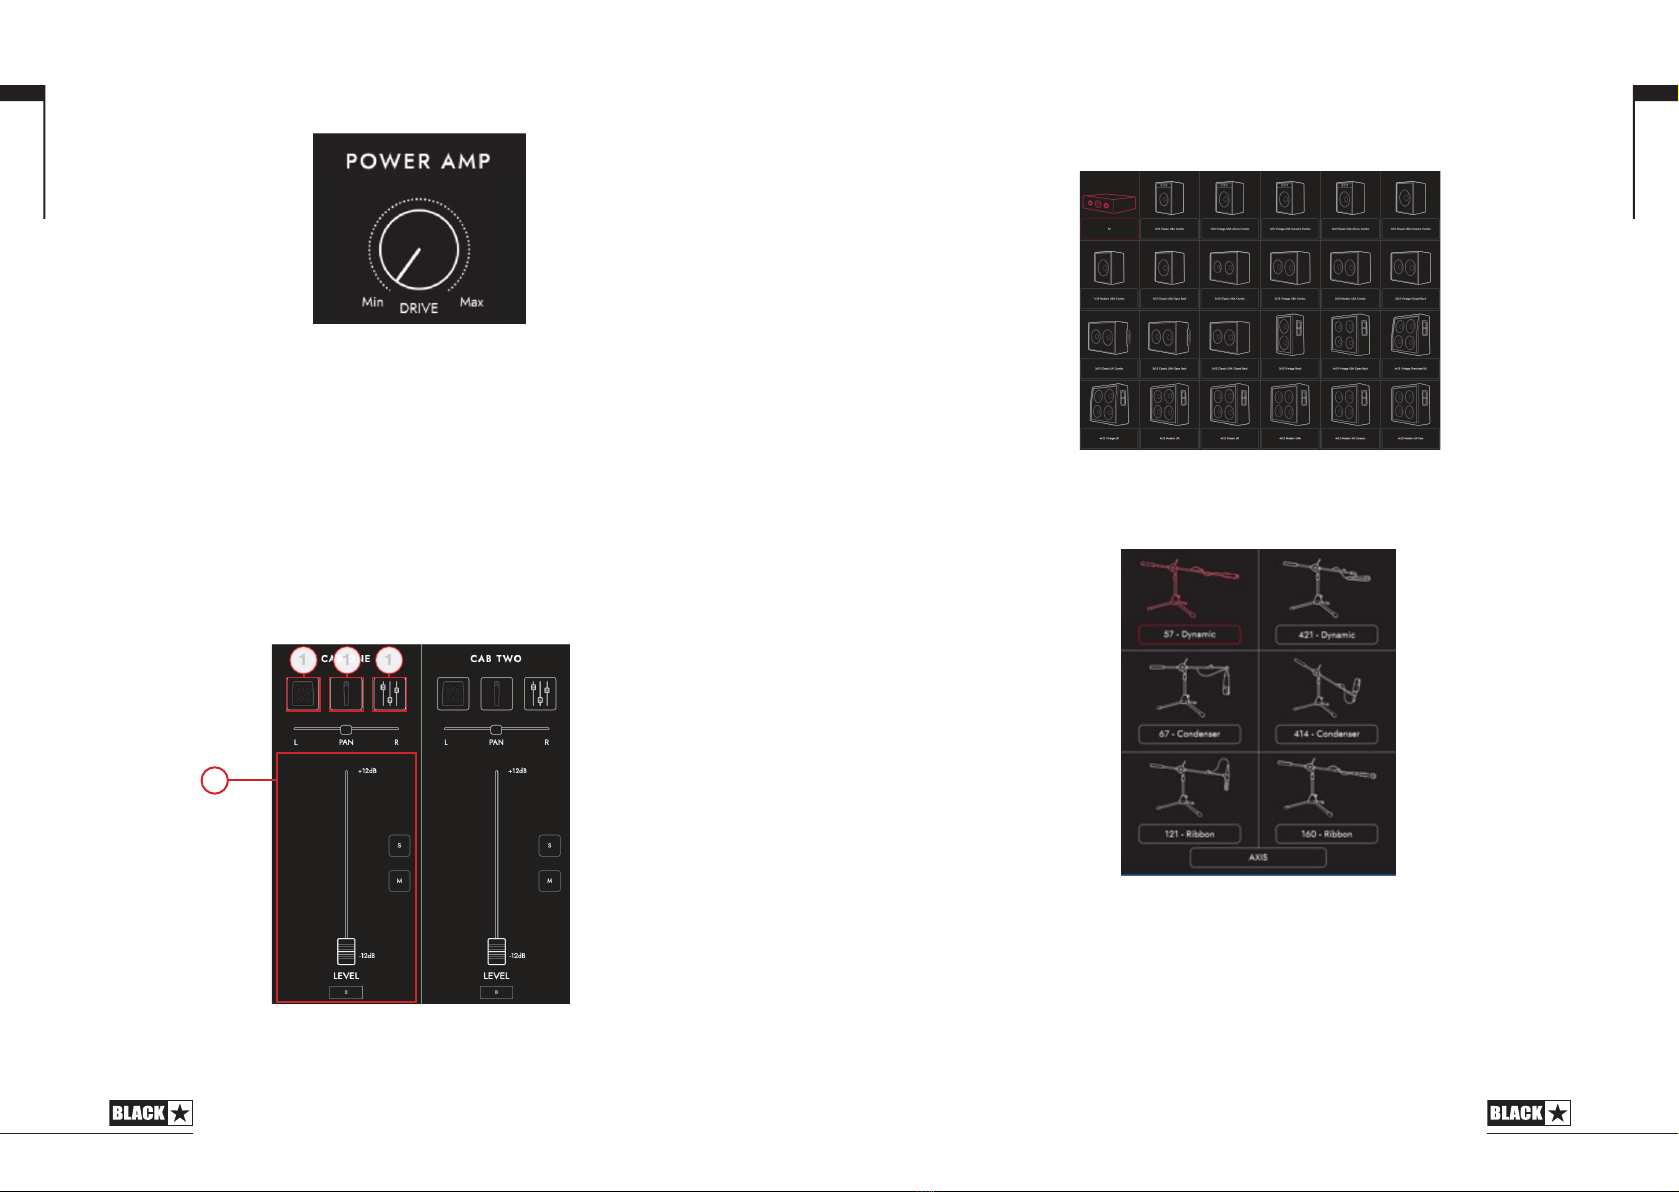
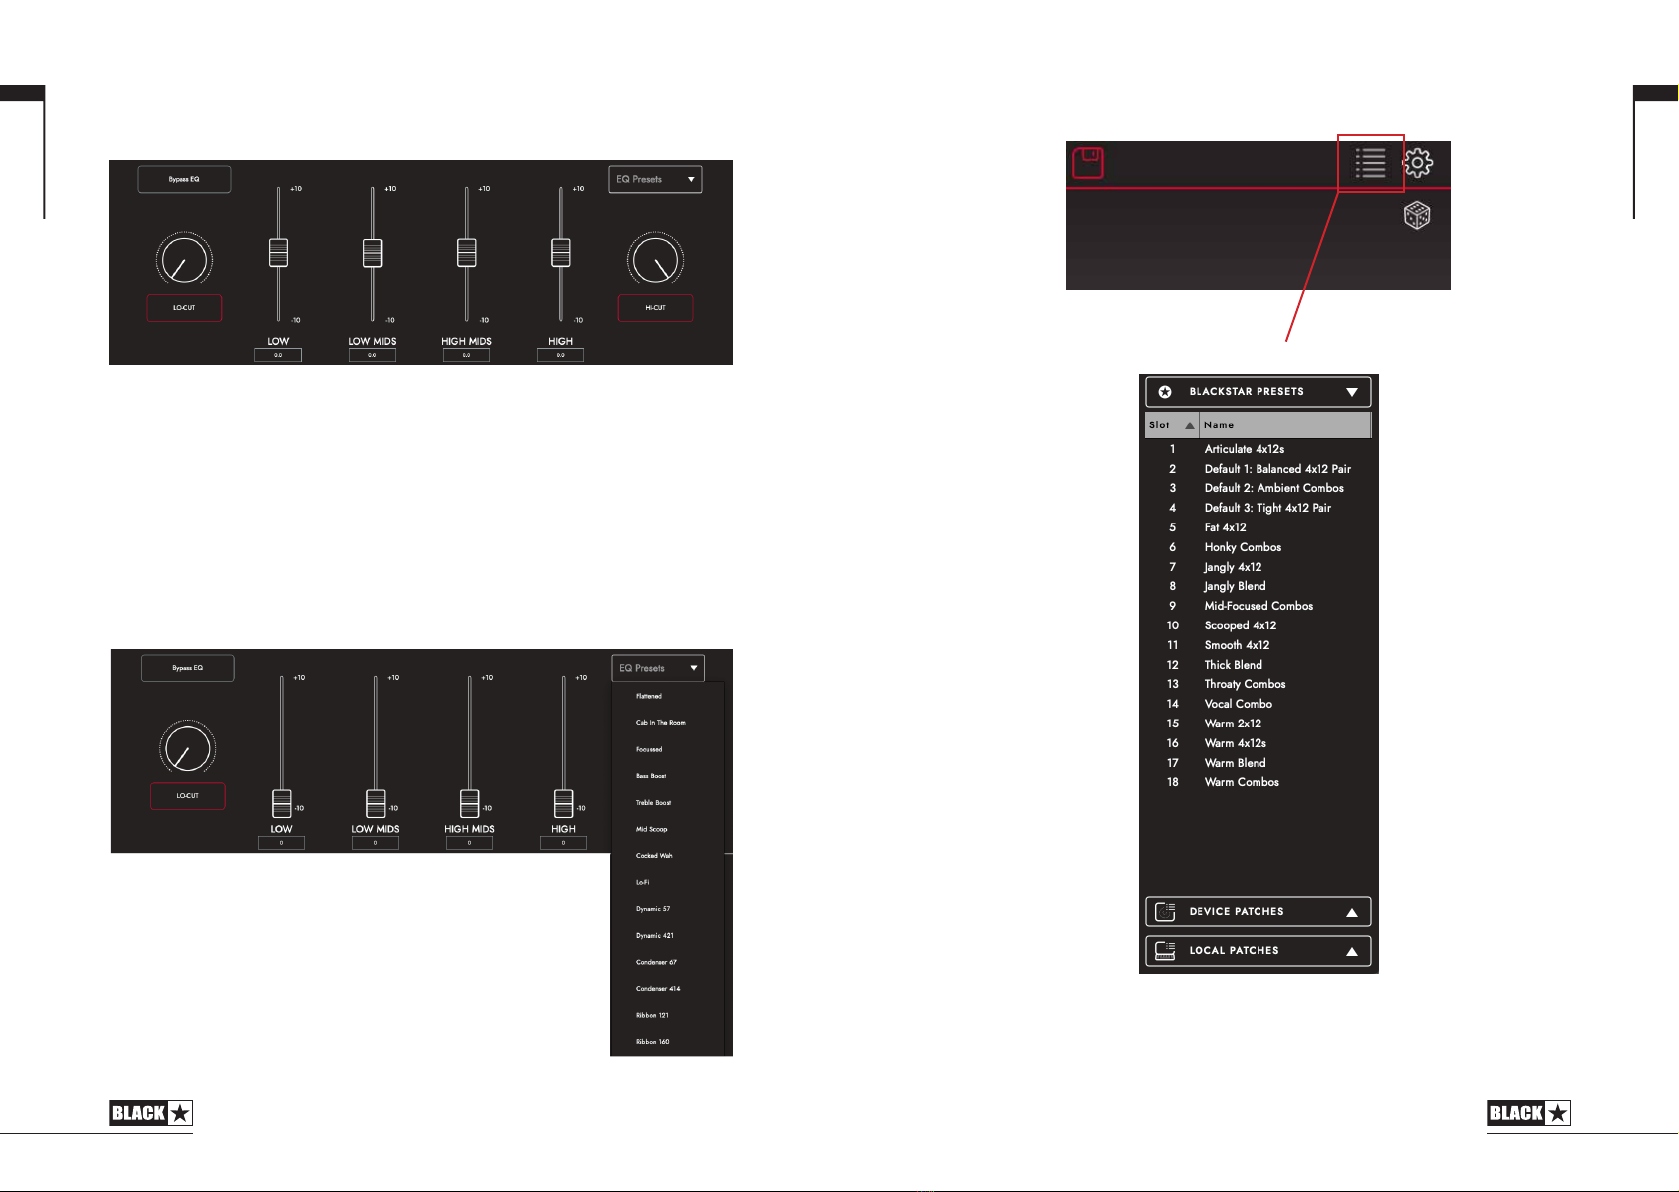
3. EQ
The channel EQs provide the ability to shape the tone of each of your cab and mic
combinations individually. The EQ can be bypassed for a quick comparison.
LOW-CUT: Controls a 2nd order high pass filter
LOW: Controls a low shelf filter at 120Hz +/- 10dB
LOW MIDS: Controls a peak filter at 400Hz +/- 10dB
HIGH MIDS: Controls a peak filter at 1KHz +/- 10dB
HIGH: Controls a high shelf filter at 4KHz +/- 10dB
HI-CUT: Controls a 2nd order low pass filter
TIP:
Choose one of the EQ Presets from the drop-down box (shown below) for
a good place to start. This is like having your own sound engineer, getting you
to the sound you want quickly. The EQ Presets also provide a great platform for
experimentation should you wish to tweak your tone further.
76
Mix Controls
Continuously pan each of your cab and mic selections individually with the PAN
slider and balance the levels of your cabs using the channel faders. Use the solo
button to isolate one of your cabs, or the mute button to silence it.
English
English
LR
L R
L R RLL+R
XLR
MASTER EQ
MIXER
USB 1+2 LINE OUT
EQ
MIC 1
CAB 1
EQ
MIC 1
CAB 2 ROOM
CAB 2CAB 1
USB 3+4
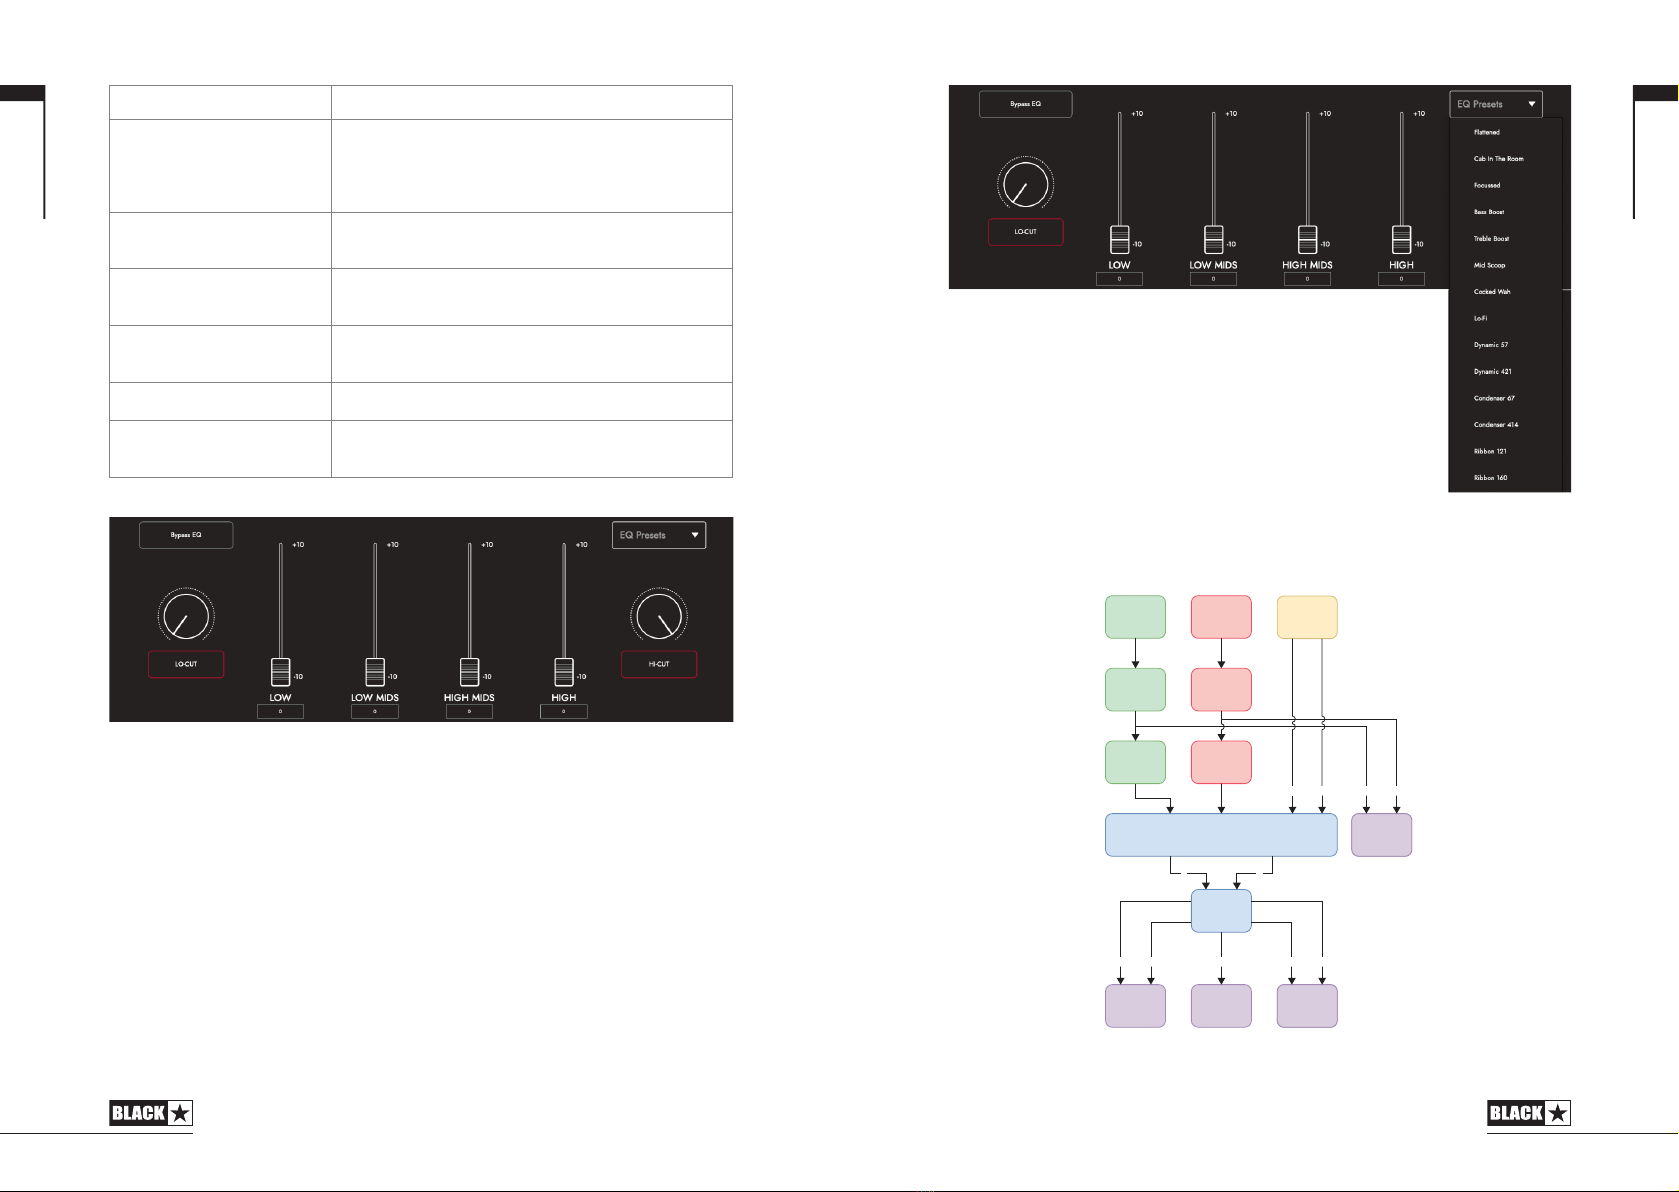
Room
1. Room Selection
Support your cab and mic selection with room ambience. Select the type of room
using the drop-down menu. Each room type has a “Damped” option; selecting this
will result in a shorter and more rened sound.
98
2. Width Selection
Adjust the stereo width of your room choice using this drop-down. These are
emulations of three dierent micing techniques (shown below): mono mic, XY pair
and spaced pair.
NOTE: The “Wide” setting will enhance and widen the stereo image, resulting in an
expansive stereo experience.
English
English
CAB 1 MIC
MONO
CAB 1
CAB 2 MIC
CAB 2
STEREO
WIDE
SMALL ROOM
MEDIUM ROOM
LARGE ROOM
1
3
2
Master
1. EQ
The Master EQ provide the ability to shape the overall tone of your CabRig
conguration. The EQ can be bypassed for a quick comparison.
LOW-CUT: Controls a 2nd order high pass filter
LOW: Controls a low shelf filter at 120Hz +/- 10dB
LOW MIDS: Controls a peak filter at 400Hz +/- 10dB
HIGH MIDS: Controls a peak filter at 1KHz +/- 10dB
HIGH: Controls a high shelf filter at 4KHz +/- 10dB
HI-CUT: Controls a 2nd order low pass filter
TIP:
Choose one of the EQ Presets from the drop-down box
(shown here) for a good place to start. This is like having your
own sound engineer, getting you to the sound you want quickly.
The EQ Presets also provide a great platform for experimentation
should you wish to tweak your tone further.
1110
Patches and Presets
Click here to show/hide the patches library.
Device (HT VENUE MK III) Patches
These are the patches that are currently loaded on your amplier, selectable via the
CabRig switch. Press the save button and “Save Patch to Device” to save your
current CabRig settings to one of your “Device Patches”.
English
English
Blackstar Presets
The “Blackstar Presets” are a collection of patches created by the team at
Blackstar. These presets come pre-installed when you install Blackstar Architect.
The Blackstar Presets are a great place to start if you are new to CabRig. Find a
preset that suits your tone and adjust the CabRig settings from there.
Local Patches
“Local Patches” are saved on your computer (Documents – Blackstar – Saved
Patches), instead of loaded onto your amp.
To save a local patch, click the save button and “Save Local Patch”. You can save
as many “Local Patches” as you like and these can be recalled at any point by
double clicking on the patch in the patches panel or right clicking on the patch and
selecting “Load Patch”.
TIP: To organise your “Local Patches” in the patch panel go to “Documents –
Blackstar – Saved Patches” and create your own folders. Simply drag your patches
into the folders you have created and your folders will appear in the patch panel.
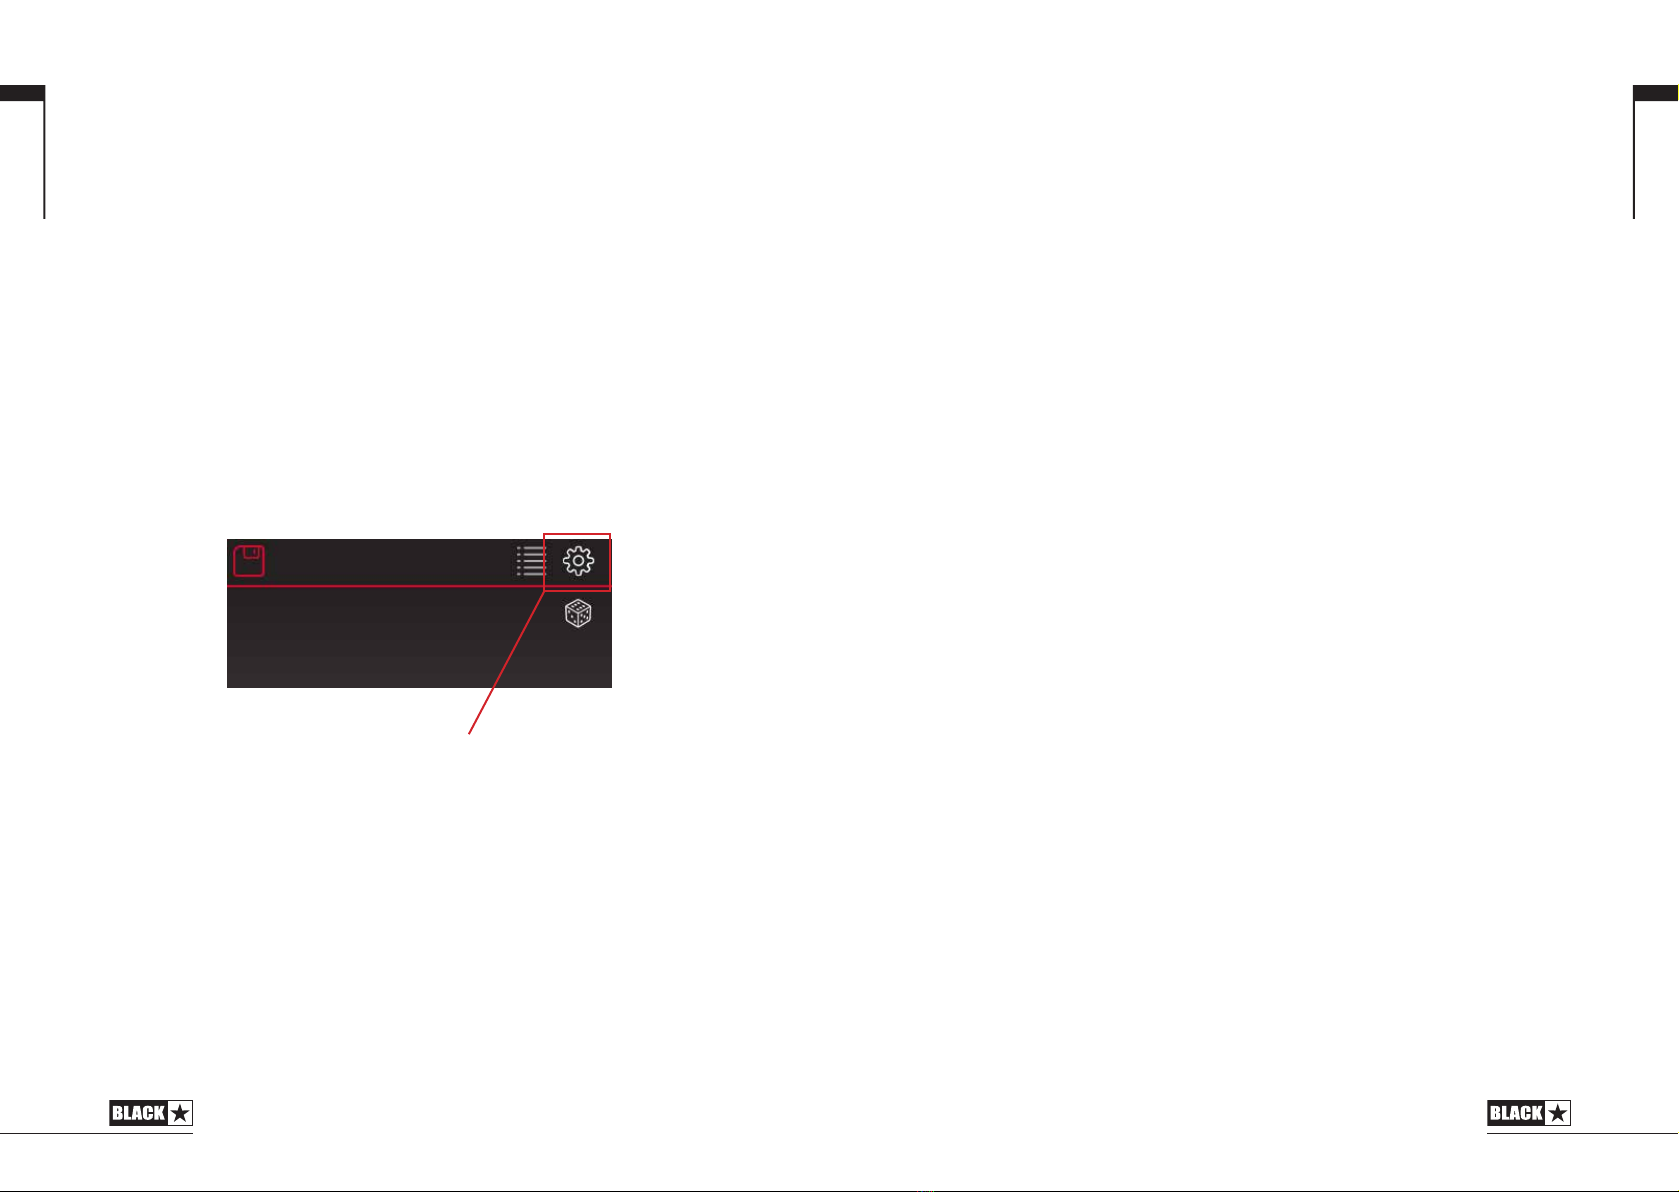
Settings Panel
Click the gear icon to open the settings panel.
Audio
Adjust audio settings here. Changes made here will automatically update, but will
not be permanently saved to the amp. To save your changes, click “Save Amp
Settings” at the bottom of the page.
Reverb Time
The Reverb time and tone can be customised independently for both the Clean
and Overdrive channels using the min to max sliders and saved to your amp.
Reverb Tails
Reverb Tails can be turned on and o via the drop down menu under “Reverb
Tails”.
1312
CabRig Out Level
This control allows quick access, physical control over the XLR, Line Out and USB
audio channel 3 output level. At maximum (fully clockwise), this control has no
effect on the signal level. At minimum (fully anti-clockwise), this control attenuates
the signal on these outputs by 20dB.
About
Information about your amplifier will be displayed here.
Reset Default Patches and Settings
The default factory CabRig patches and settings can be restored to your amplifier
at any time. This can only be done using Blackstar’s Architect software. Download
Architect from the Blackstar website: https://blackstaramps.com/architect/
Navigate to the ‘General’ settings panel within Architect and click ‘Restore Patches
and Settings’. Follow the on screen instructions to complete the reset.
IMPORTANT NOTE: This process will overwrite any user content saved to
the amp.
Firmware Upgrade
When a firmware upgrade for your amplifier is available, Architect will automatically
prompt you, upon connection to your amp, to upgrade to the latest version. Follow
the onscreen instructions to perform the firmware upgrade.
Audio Outputs/Rear Panel
BALANCED - Mono XLR CabRig OUTPUT
Use a 3 pin XLR cable to connect this output to an audio interface, stage box or
mixing desk. This provides a low noise, low impedance, high quality connection for
recording or live use.
The signal from this output is the fully processed guitar sound, with power amp
and CabRig speaker cabinet emulation.
NOTE: The XLR output is a summed mono mix of the main stereo CabRig output.
CabRig is derived from before the physical power amp and so the Master control
will have no eect over the signal level sent from this output.
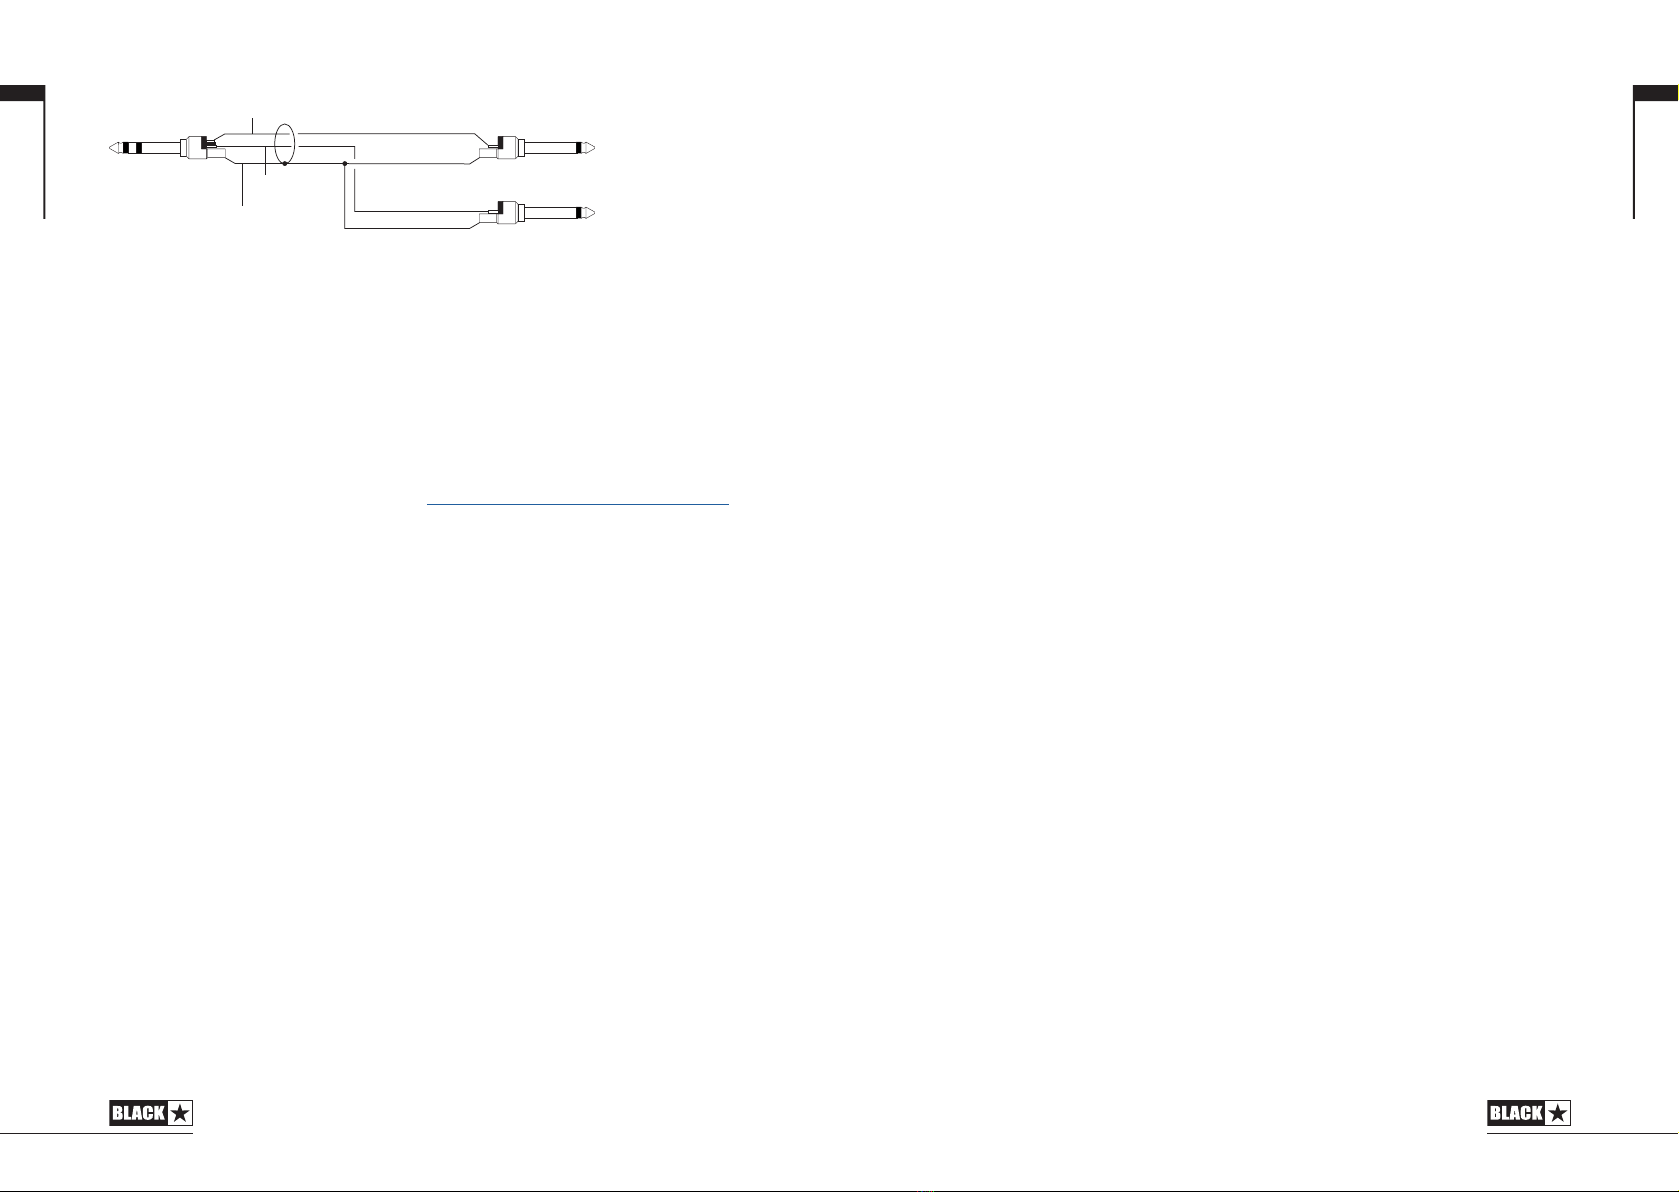
Line Out/Phones – Stereo CabRig Output
This ¼” TRS jack socket provides a stereo connection to a recording device,
mixing desk or headphones. Always use a good quality TRS (stereo) type lead or
TRS to 2 x TS (mono) lead (see diagram below).
The signal from this output is the fully processed guitar sound, with power amp and
CabRig speaker cabinet emulation. The sound is dependent on the CabRig switch
setting and the more in-depth settings within the CabRig section of Blackstar’s
Architect software.
NOTE: This output is the full stereo CabRig mix. CabRig is derived from before the
physical power amp and so the Master control will have no eect over the signal
level sent from this output.
English
English
USB AUDIO Socket
This B-type USB socket is for the connection to a computer via a suitable lead
(not supplied).
This is for USB digital audio output and for connecting to the CabRig software.
Again, the signal for the digital audio will be derived from the actual speaker output
via the CabRig technology; providing a high-quality authentic mic’d cab response.
The actual sound is dependent on the CabRig switch setting and the more in
depth settings within the CabRig software.
For USB audio, standard audio drivers are used to connect the amplier to a PC,
Mac or other applicable recording device. No specic drivers are required. For a
guide on low latency USB recording visit: www.blackstaramps.com/usbrecording
The audio output via USB from your amplier directly to your computer is carried
across four independent, simultaneous channels:
Channel 1: Stereo emulated, left channel – The fully processed guitar sound,
with CabRig speaker cabinet emulation. Contains the left channel of the main
CabRig output.
Channel 2: Stereo emulated, right channel - The fully processed guitar sound,
with CabRig speaker cabinet emulation. Contains the right channel of the main
CabRig output.
Channel 3: This channel contains the raw cab and mic selection of CAB 1 without
EQ, mix controls or room. The signal is taken straight from the microphone.
Channel 4: This channel contains the raw cab and mic selection of CAB 2 without
EQ, mix controls or room. The signal is taken straight from the microphone.
1514
These audio streams can be recorded simultaneously within your chosen recording
software/DAW.
TIP: To record a truly Stereo-eected sound – which is faithfully recreated when
playing back your recorded tracks on any stereo speakers – pan the stereo
emulated left channel 100% left in the mix, and pan the right channel 100% right.
TIP: To record a DI track alongside a single Cab with a stereo room, mute the DI
channel inside of CabRig. Use USB audio channels 1 and 2 for your processed
cab and channel 3 or 4 for your DI signal.
NOTE: Always connect the amplier via a main USB port; often found on the rear
of the computer or side of the laptop. The amplier will appear as an audio capture
device within recording software.
English
English
Ring
Screen
Tip
Left channel
to mixer
Right channel
to mixer

Blackstar Amplification Ltd, Beckett House, 14 Billing Road, Northampton, NN1 5AW, UK
For the latest information go to: www.blackstaramps.com
Whilst the information contained herein is correct at the time of publication, due to our policy of constant improvement
and development, Blackstar Amplification Ltd reserves the right to alter specifications without prior notice.
Designed and Engineered by
Blackstar Amplication UK
Owner’s Manual
202402M-1 09/23
This manual suits for next models
1
Table of contents
Other BLACK STAR Music Equipment manuals


