BLACK STAR HT STAGE 60 112 MK III User manual

11
202410M-VA-1 09/23
32
USA / Canada
IMPORTANT SAFETY INSTRUCTIONS
1. Read these instructions.
2. Keep these instructions.
3. Heed all warnings.
4. Follow all instructions.
5. Do not use this apparatus near water.
6. Clean only with dry cloth.
7. Do not block any ventilation openings.
8. Install in accordance with the manufacturer’s instructions.
9. Do not install near any heat sources such as radiators, heat registers, stoves, or
other apparatus (including ampliers) that produce heat.
10. Do not defeat the safety purpose of the polarized or grounding-type plug. A
polarized plug has two blades with one wider than the other. A grounding type
plug has two blades and a third grounding prong. The wide blade or the third
prong are provided for your safety. If the provided plug does not t into your outlet,
consult an electrician for replacement of the obsolete outlet.
11. Protect the power cord from being walked on or pinched particularly at plugs,
convenience receptacles, and the point where they exit from the apparatus.
12. Only use attachments/accessories specied by the manufacturer.
13. Unplug this apparatus during lightning storms or when unused for long periods of
time.
14. Refer all servicing to qualied service personnel. Servicing is required when the
apparatus has been damaged in any way, such as power-supply cord or plug is
damaged, liquid has been spilled or objects have fallen into the apparatus, the
apparatus has been exposed to rain or moisture, does not operate normally, or
has been dropped.
“TO COMPLETELY DISCONNECT THIS APPARATUS FROM THE AC MAINS,
DISCONNECT THE POWER SUPPLY CORD PLUG FROM THE AC RECEPTACLE”.
“WARNING: TO REDUCE THE RISK OF FIRE OR ELECTRIC SHOCK, DO NOT
EXPOSE THIS APPARATUS TO RAIN OR MOISTURE AND OBJECTS FILLED WITH
LIQUIDS, SUCH AS VASES, SHOULD NOT BE PLACED ON THIS APPARATUS”.
This symbol is intended to alert the user to the presence of important operation
and maintenance (servicing) instructions in the literature accompanying the
appliance.
This symbol is intended to alert the user to the presence of uninsulated
“dangerous voltage” within the product’s enclosure that may be of sucient
magnitude to constitute a risk of electric shock to persons.
54
English
English
Warning!
Important safety information!
READ THE FOLLOWING INFORMATION CAREFULLY. SAVE ALL
INSTRUCTIONS FOR FUTURE REFERENCE!
Follow all warnings and instructions marked on the product!
Danger! High internal operating voltages.
Do not open the equipment case. There are no user serviceable parts in this
equipment. Refer all servicing to qualied service personnel.
Clean only with a dry cloth.
Condensation can form on the inside of an amplier if it is moved from a cold
environment to a warmer location. Before switching the unit on, it is recommended
that the unit be allowed to reach room temperature.
Unauthorised modication of this equipment is expressly forbidden by Blackstar
Amplication Ltd.
Never push objects of any kind into ventilation slots on the equipment casing.
Do not expose this apparatus to rain, liquids or moisture of any type.
Avoid placing vessels lled with liquid on top of the amplier.
Do not place this product on an unstable trolley, stand or table. The product may
fall, causing serious damage to the product or to persons!
Do not cover or block ventilation slots or openings.
This product should not be placed near a source of heat such as a stove, radiator,
or another heat producing amplier.
Use only the supplied power cord which is compatible with the mains voltage
supply in your area.
Power supply cords should always be handled carefully and should be replaced if
damaged in any way.
Never break o the earth (ground) pin on the power supply cord.
The power supply cord should be unplugged when the unit is to be unused for long
periods of time.
Before the unit is switched on, the loudspeaker should be connected as described
in the handbook using the lead recommended by the manufacturer.
Always replace damaged fuses with the correct rating and type.
Never disconnect the protective mains earth connection.
High loudspeaker levels can cause permanent hearing damage. You should
therefore avoid the direct vicinity of loudspeakers operating at high levels. Wear
hearing protection if continuously exposed to high levels.
If the product does not operate normally when the operating instructions are
followed, then refer the product to a qualied service engineer.
Only suitable for safe use under non-tropical climate conditions.
Maximum ambient temperature for operation: 35℃
Always make sure that the power cable is connected to a socket/outlet with an
earthed connection.
Mains Voltage: 100-240V~ 50/60Hz
This amplier is only designed and evaluated for safety at a maximum altitude of 2000m
If the product does not operate normally when the operating instructions are
followed, then refer the product to a qualied service engineer.
The U.S. Government´s Occupational Safety and Health Administration (OSHA) has
specied the following permissible noise level exposures:
Duration Per Day In Hours Sound Level dBA, Slow Response
8 90
6 92
4 95
3 97
2 100
1½ 102
1 105
½ 110
¼ or less 115
According to OSHA, any exposure in excess of the above permissible limits could
result in some hearing loss.
Ear plug protectors in the ear canals or over the ears must be worn when operating
this amplication system in order to prevent a permanent hearing loss if exposure is
in excess of the limits as set forth above. To ensure against potentially dangerous
exposure to high sound pressure levels, it is recommended that all persons exposed to
equipment capable of producing high sound pressure levels such as this amplication
system be protected by hearing protectors while this unit is in operation.
All electrical and electronic products should be disposed of separately
from the municipal waste stream via designated collection facilities
appointed by the government or the local authorities.

76
English
English
Introduction
Thank you for purchasing this Blackstar HT Venue MK III amplier. Like all our
products, this amp is the result of countless hours of painstaking Research and
Development by our world-class design team. Based in Northampton (UK), the
Blackstar team are all experienced musicians themselves and the sole aim of the
development process is to provide guitarists with products which are the ultimate
tools for self-expression.
All Blackstar products are subjected to extensive laboratory and road testing to
ensure that they are truly uncompromising in terms of reliability, quality and above
all TONE.
The HT Stage MK III’s exible three channel design features the unique patented
ISF (Innite Shape Feature) control and although it has a comprehensive control set,
it is still simple and intuitive to use. Please read through this handbook carefully to
ensure you get the maximum benet from your new Blackstar product.
If you like what you hear and want to nd out more about the Blackstar range of
products, please visit our website at www.blackstaramps.com.
Thanks!
The Blackstar Team
Features
This HT Venue MK III is a highly versatile amplier suited to a wide range of
playing styles and situations.
The Clean Channel has two voices; one based on a classic American circuit
and the other based on a classic British tone. The Voice switch recongures
the preamp voicing, EQ and valve gain structure, as well as the power amplier
damping. This produces a clean, bright, solid bass response for the American
tone and a highly responsive ‘chime’ with looser bottom for the British tone that
can be pushed into a midrange overdrive when driven hard. The Voice setting
can also be selected via footcontroller.
The HT Stage MK III has two Overdrive channels which share a common EQ
section and, like the Clean Channel, each of the Overdrive channels has a Voice
switch which allows the character of each channel to be changed, providing a
broad palette of overdriven tones.
As with the Clean Channel, each of these voices can also be selected by
footcontroller. When switching between channels, the amplier will recall the
specic Voice setting last used on that channel.
The Overdrive channels are characterised by a tone which is high in gain, but avoids
any of the detached top-end ‘zz’ often found in other designs. This is a result of
unique preamplier and power amplier shaping techniques, which also benet the
player in the way the overdrives clean up beautifully as the guitar volume is reduced.
Even at the most extreme settings, the Overdrive channels remain natural sounding.
The patented ISF (Innite Shape Feature) control is unique to Blackstar Amplication
and represents a major step forward in tone shaping exibility. The ISF control shifts
the response of the three control tone stack between, a US type response at one
end, and at the other, a UK type response. Importantly, in between the two extremes
lie an innite number of alternative tone choices that would be otherwise unavailable.
The amplier features naturally sounding digital reverb that can be adjusted via
the Reverb control on the front panel or turned on and o via the optional 5-way
footcontroller. A switch on the rear panel selects between ‘Dark’ and ‘Light’. The Dark
setting is based on a room reverb and the Light setting is based on a plate reverb.
The reverb decay times can also be adjusted dierently for each channel by
connecting via USB to our proprietary Architect software.
A Power Switch is provided on the front panel to switch the amplier between full
power and 10% power. This means that the full tonal depth of the valve power
stage can be enjoyed at any volume, retaining the distinctive sound of power
valves working hard.
A USB connector allows for sending up to 4 channels of the guitar signal (dry,
preamp out and stereo emulated out) into a computer for recording purposes.
It also enables the connection to the previously mentioned Architect software for
deep editing of not only the reverb, but also extensive control of CabRig parameters
for power amp/speaker/cabinet/mic/room emulations from the USB, balanced DI
and stereo headphone/line outputs, for practicing, recording and live use.

98
English
English
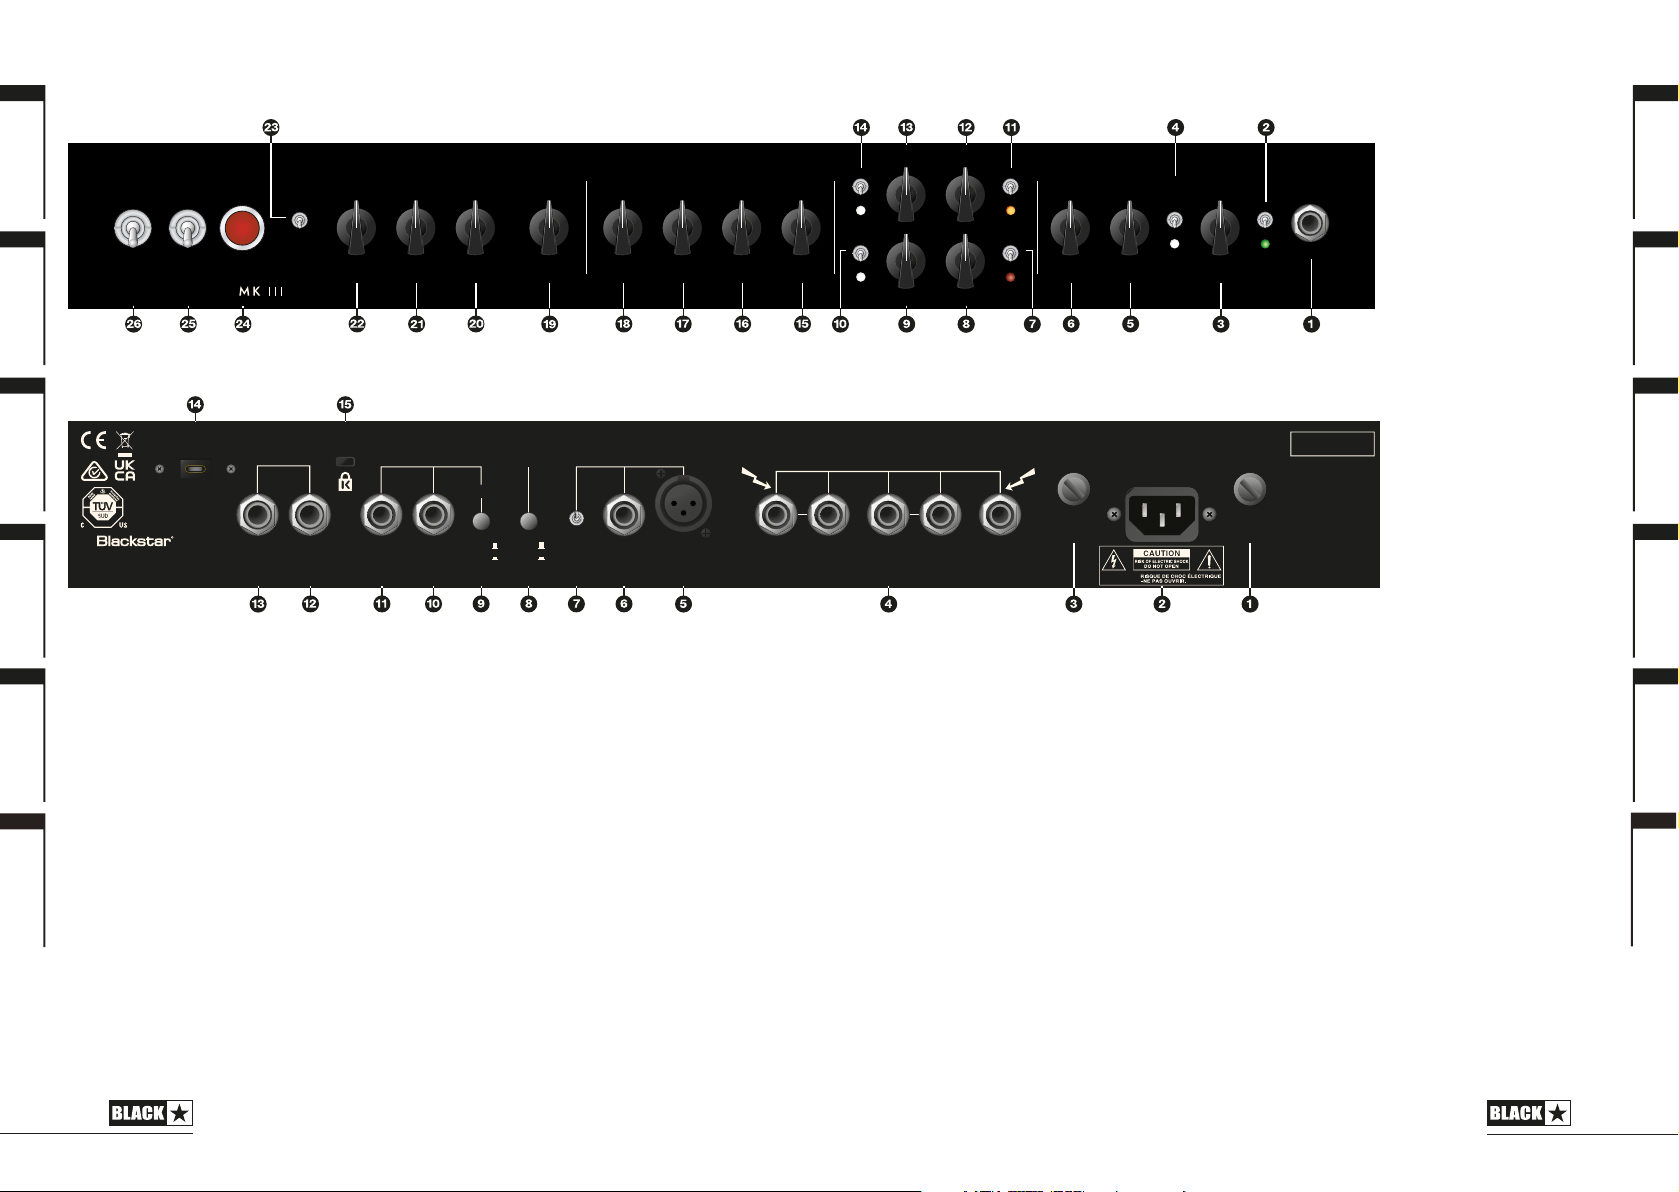
Front Panel
1. Input
Plug your guitar in here. Always use a good quality screened guitar lead.
If no connection is made then the power amplier will automatically switch to a safe
‘standby’ mode. In situations where the user wants to use the power amp (Return
to Speaker Outputs) without the preamp(s) (Input to Send) – for example; when
using the amp as a second amp in a stereo rig, or if connecting an external multi-
eects or modelling unit to the Return – then, to un-mute the power amp, connect a
jack plug (preferably shorted) or short ‘patch lead’ to the Input and turn the channel
controls to minimum.
Clean Channel
2. Clean Select Switch
Press this switch to select the Clean Channel. When the green LED is on, the Clean
Channel is selected.
3. Clean Volume
This controls the volume of the Clean Channel. Turning it clockwise increases
the volume. At extreme clockwise settings the preamplier will start to overdrive,
particularly in the ‘British’ mode which is with white Voice LED on.
4. Clean Voice Switch
This is a momentary toggle switch that selects between the two clean voices. The
‘American’ setting is very clean and bright but with a solid low end; this Voice is
selected when the Voice LED is unlit. The ‘British’ setting has a looser bass response
with warmer mid-range and is very sensitive to the output level of the guitar and the
player’s dynamics; this Voice is selected when the Voice LED is lit. The EQ voicing and
valve gain structure is completely recongured between each voice.
5. Bass
The Bass control adjusts the amount of bass frequencies in your tone. Fully counter
clockwise the sound will be tighter in character. Rotating the control clockwise will
progressively increase the bass response of the channel.
6. Treble
The Treble control allows adjustment of the treble frequencies within the sound. At
low settings (counter clockwise) the sound will be warm and darker in character. As
the Treble control is rotated clockwise the sound will become brighter.
OD 1 (Overdrive 1) Channel
7. OD 1 Select Switch
Press this switch to select the OD 1 Channel. When the orange LED is on, the OD
1 Channel is selected.
8. OD 1 Gain
The OD 1 Gain control adjusts the amount of the OD 1 Channel’s overdrive or
distortion. Low settings (anti-clockwise) will deliver a clean sound on the edge
of break-up. As the Gain control is increased clockwise the sound will become
more overdriven, moving through crunch tones until, at its maximum position, a full
distorted tone is reached.
9. OD 1 Volume
This control adjusts the overall volume of the OD 1 Channel. Turning it clockwise
increases the volume.
This control is for balancing the volumes between the three channels. Its setting
will depend on the other Gain and Volume settings, as well as the specic needs
of the user.
10. OD 1 Voice Switch
This is a momentary toggle switch that selects between the two voices of the OD 1
Channel. When the associated white LED is unlit, this channel has a ‘classic’ overdrive
voicing. With the white LED lit the overdrive sound has a more ‘modern’ voicing, with
a greater bass response and a looser, more aggressive sound due to reduced power
amp damping.
OD 2 (Overdrive 2) Channel
11. OD 2 Select Switch
Press this switch to select the OD 2 Channel. When the red LED is on, the OD 2
Channel is selected.
12. OD 2 Gain
The OD 2 Gain control adjusts the amount of overdrive or distortion in this channel.
With low settings (anti-clockwise) the tone will be mildly overdriven. As the Gain
control is increased clockwise the sound will turn from crunch to a high gain,
saturated lead tone.
13. OD 2 Volume
This controls the overall volume of the OD 2 Channel. Turning it clockwise increases
the volume.
Again, this control is for balancing the volumes between the three channels. Its
setting will depend on the other Gain and Volume settings, as well as the specic
needs of the user.
14. OD 2 Voice Switch
This is a momentary toggle switch that selects between the two voices of the OD 2
Channel. With the associated white LED unlit this channel has a ‘classic’ but ‘hot-
rodded’ overdrive, with medium power amp damping. With the white LED lit the
overdrive sound has a more ‘modern’ voicing that includes a strong mid-emphasised
pre-overdrive boost, as well as a looser, more aggressive sound due to reduced
power amp damping.
1110
OD 1 and OD 2 EQ
15. Bass
The Bass control adjusts the amount of low-end frequencies in your tone. This amp
has an advanced tone shaping circuit which allows the tone to be varied from tight
and cutting when counter clockwise, to warm and thumping when fully clockwise.
16. Middle
The Middle control adjusts the amount of middle
frequencies in your tone. The middle frequencies are
particularly important in setting the amount of ‘body’
your tone has. With the Middle control set to its minimum
position (fully counter clockwise) the sound will be
aggressive and scooped, a tone ideal for aggressive
rhythm playing. As the Middle control is increased
(clockwise) the amount of ‘body’ is increased, which is
more suitable for sustained lead guitar tones.
17. Treble
The Treble control allows exact adjustment of the treble frequencies within the
sound. At low settings (counter clockwise) the sound will be warm and darker in
character. As the Treble control is increased (clockwise) the sound will become
brighter. At the maximum settings the sound will be aggressive and cutting.
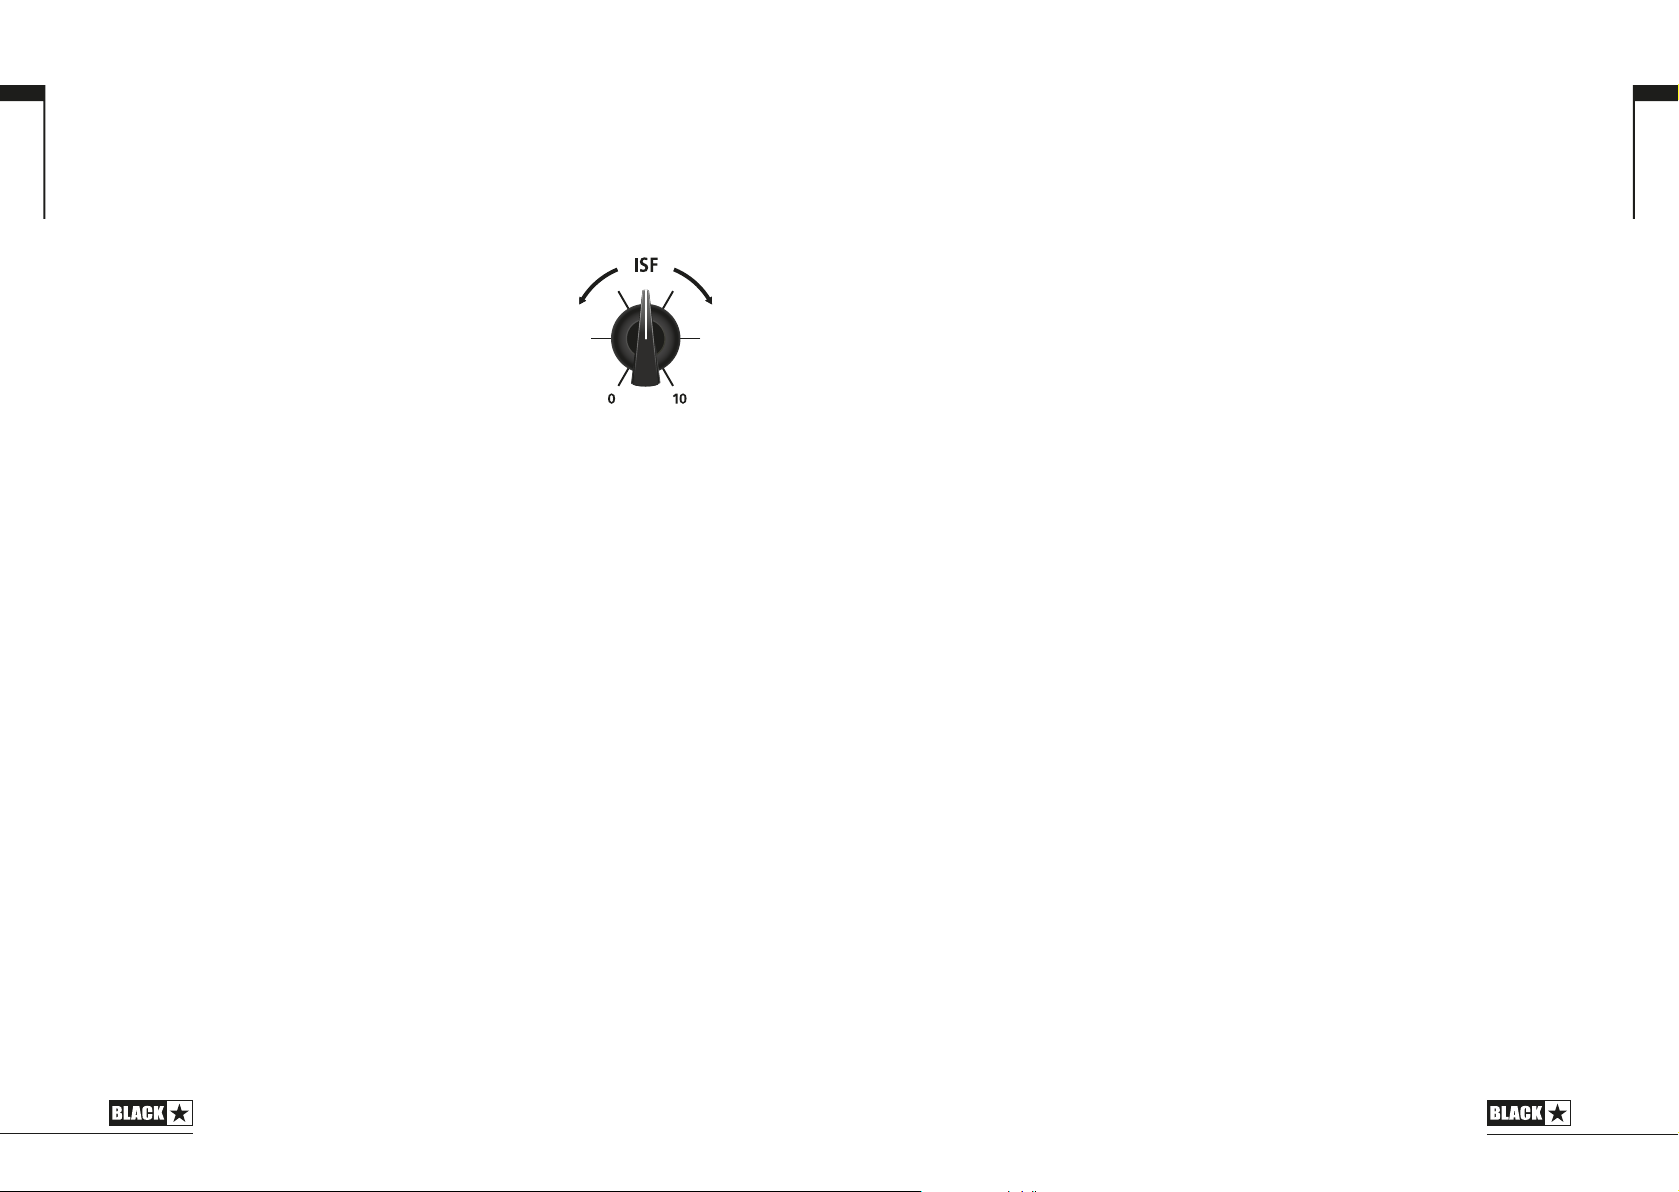
18. ISF (Infinite Shape Feature)
The patented ISF control works in conjunction with the Bass, Middle and Treble
controls. It allows you to choose the exact tonal signature you prefer. Fully counter
clockwise has a more American characteristic with a tight bottom-end and more
aggressive middle, and fully clockwise has a British characteristic which is more
‘woody’ and less aggressive.
Unlike conventional ‘contour’ controls and parametric equalisation systems, the Bass,
Middle and Treble controls remain interactive with each other just like in a traditional
guitar amplier tone stack. This leads to a very familiar, musical response.
Master
19. Reverb
The Reverb control sets the overall level of the reverb eect. With the control fully
counter clockwise there will be no reverb. Turning the control clockwise will increase
the amount of reverb.
The Reverb tone can be adjusted by the Dark/Light switch on the rear panel. The
Reverb decay times can be adjusted for the Clean and OD channels by connecting
to our Architect deep-editing software.
20. Resonance (HT Stage 60 212 MK III and HT Stage 100 MK III only)
TThe Resonance control sets the overall bass response of the amplier. At lower
settings the cleans will be tight and funky and overdrives will be focused in their bass
response. At increased settings the clean sounds will become full and warm, whilst
the crunch and overdrive tones will be more bass heavy and resonant.
English
English
21. Presence
The Presence control sets the overall treble response of the amplifer. Percussive
high-end can be accentuated on clean sounds and the amount of aggressive treble
controlled with crunch and overdrive settings.
22. Volume
This controls the overall volume of your amplier. Turning it clockwise increases the volume
.
23. Power Switch
This switch allows the reduction of the output stage from full power down to
10% power. This means the full tonal depth of the valve power amplier can
be enjoyed at lower volumes, therefore making the HT Venue MK III ideal for
recording, smaller gigs and even home practise use. Working in conjunction with
the power reduction systems.
24. Power Indicator Light
The Power Indicator will light when the amplier is switched on.
25. Standby
This switch enables the output stage. Always turn this switch on at least 30 seconds
after the Power switch (26) and preferably turn the Power switch o after switching
to Standby. During short breaks in playing use just this switch to turn ‘o’ and ‘on’
the amplier’s output. To prevent any unwanted noise being sent to your speaker(s)
we recommend always switching to Standby for a few seconds before switching
the main Power switch to OFF.
26. Power
This switch is used to turn the amplier on and o. You should always turn this
switch on before turning on the Standby switch (25).
Rear Panel
1. Mains Fuse
The value of the Mains Fuse is specied on the rear panel. Never use a fuse of the
incorrect value or attempt to bypass it.
2. Mains Input
The supplied detachable mains lead is connected here. The lead should only be
connected to a power outlet that is compatible with the voltage, power and frequency
requirements stated on the rear panel. If in doubt get advice from a qualied technician.
3. H.T. Fuse
The value of the H.T. Fuse is specied on the rear panel. Never use a fuse of the
incorrect value or attempt to bypass it.
4. Speaker Outputs
The output marked ‘1x16 Ohm’ is for the connection of a single 16 Ohm extension
speaker cabinet.
US
AU
K

1312
The outputs marked ‘1x8 Ohm or 2x16 Ohm’ are for the connection of either a
single 8 Ohm extension cabinet or two 16 Ohm cabinets.
The outputs marked ‘1x4 Ohm or 2x8 Ohm’ are for the connection of either a single
4 Ohm extension cabinet or two 8 Ohm cabinets. Also, the internal loudspeaker of
the HT Stage 60 MK III combo can be plugged in here if it is used with an 8 Ohm
extension cabinet. See table below.
‘1x16 Ohm’ ‘1x8 Ohm or 2x16 ‘1x4 Ohm or 2x8
output Ohm’ outputs Ohm’ outputs
Internal 2x8 Ohm combo speakers ✓X X X X
(HT Stage 60 212 MK III only)
Internal 2x8 Ohm combo speakers X ✓✓X X
plus one16 Ohm extension cab
(HT Stage 60 212 MK III only)
Internal 16 Ohm combo speaker ✓X X - -
(HT Stage 60 112 MK III only)
Internal 16 Ohm combo speaker X ✓✓ - -
plus one 16 Ohm extension cab
(HT Stage 60 112 MK III only)
One 16 Ohm extension cabinet ✓X X X X
Two 16 Ohm extension cabinets X ✓✓X X
One 8 Ohm extension cabinet X ✓X X X
Two 8 Ohm extension cabinets X X X ✓✓
Single 4 Ohm extension cabinet X X X ✓X
WARNING: The output marked ‘1x16 Ohm’ should never be used at the same
time as any of the outputs marked ‘1x8 Ohm or 2x16 Ohm’ or ‘1x4 Ohm or 2x8
Ohm’ outputs. The outputs marked ‘1x8 Ohm or 2x16 Ohm’ or ‘1x4 Ohm or 2x8
Ohm’ outputs should never be used at the same time. Failure to correctly match the
impedance of the amplier and speakers will damage the amplier.
5. CabRig Output – Mono Balanced XLR Socket
This output provides a balanced, low impedance connection to a recording device,
stage box or mixing desk using a standard XLR cable.
6. CabRig Output - Stereo Line Out / Phones Socket
This output provides a stereo unbalanced connection to a recording device or mixing
desk. Always use a good quality screened TRS lead. The stereo jack socket also
accommodates connection of headphones, allowing you to practice silently.
NOTE: Both the XLR and Stereo Emulated outputs remain active even when in
Standby mode. This allows for silent recording or practice when the amplier is in
Standby, regardless of any connected speaker.
7. CabRig Switch
The switch enables you to instantly select between one of the three stored CabRig
presets. This will apply to both the balanced XLR, Line Out / Phones and the
relevant USB outputs.
English
English
8. Reverb Dark/Light
With the switch in the ‘out’ position (Dark) the reverb is voiced to have a warm
‘room’ quality. Set to the ‘in’ position (Light), the reverb is voiced to have a bright,
airy quality, typical of a ‘plate’ style reverb. The setting chosen will apply to all
channels and voices.
9. Effects Loop Level
The Eects Loop Level switch sets the eects loop to either +4dBV/-10dBV, which
enables you to use it with either professional equipment (+4dBV setting), or with
guitar level eects such as eects pedals (-10dBV setting).
10. Effects Loop Return
Connect the (mono) output of an external eects unit here.
11. Effects Loop Send
Connect the (mono) input of an external eects unit here.
12. 5-Way Footcontroller Socket
The optional 5-way FS-14 footcontroller (not supplied), is connected here. This
footcontroller enables instant access to all channels and voices, plus the global
boost function and Reverb switching. This should be connected to your amplier
using the cable provided with the FS-14. Alternatively a good quality shielded guitar
cable may be used.
Pressing a Channel button on the footcontroller once will select the relevant channel.
Pressing the currently selected channel will toggle its voice. The previously selected
Voice will be retained for each Channel when switching to it. The Boost switch will
provide a 6dB volume boost that can be applied to any Channel and Voice, and the
Reverb switch will turn the eect on and o for all channels.
13. 2-Way Footswitch Socket
The supplied 2-way footswitch is connected here. The FS-15 footswitch enables
the selection of the Clean Channel’s two voices, and a chosen Voice from each
Overdrive Channel.
Pressing the Channel switch on the FS-15 will toggle between the Clean Channel
and an Overdrive Channel. When the Clean Channel is selected, pressing the Voice
switch on the FS-15 will toggle between the two Clean voices. When an Overdrive
Channel is selected, pressing the Voice switch on the FS-15 will toggle between
OD 1 and OD 2.
The Voice selection for OD 1 and OD 2 can still be operated from the front panel
and the amplier will retain the chosen Voice when switching between channels.
If the supplied FS-15 footswitch is unavailable then a generic 2-way latching
footswitch with TRS jack connection can be used.
EXTERNAL SWITCHING MODE: This mode is intended for people who wish to
control the same main features of the amp using an external switching device that
connects via the TRS connection of the socket.

1514
To switch to External Switching Mode: simply press and hold the Clean Select
and Clean Voice switches for 5 seconds. The green LEDs will then ash together
to indicate the change of mode. The amplier will retain this mode, even when
switched o, until it is changed back to normal/footswitch mode.
Once in External Switching Mode the following settings will apply when a suitable
TRS connection is made:
TIP RING CHANNEL VOICE
Closed Closed Clean Voice 1
Closed Open Clean Voice 2
Open Closed Overdrive Set by front panel
Open Open Overdrive Set by front panel
NOTE: Both the 5-way (with FS-14) and 2-way (with external control) sockets can
be used at the same time. This gives the ultimate exibility of automated and instant
manual control.
14. USB Socket
This C-type USB socket is for connection to a computer via a suitable lead (not
supplied). It is capable of multiple simultaneous inputs and outputs. It is also for
connection to our Architect software for deep-editing of CabRig and other functions.
Standard audio drivers are used to connect the amplier to a PC, Mac or other
applicable recording device. No specic drivers are required. For a guide on low-
latency USB recording visit:
www.blackstaramps.com/usbrecording
NOTE: Always connect the amplier via a main USB port, often found on the rear
of the computer.
The amplier will appear as an audio capture device within recording software.
The audio output via USB from your amplier directly to your computer is carried
across four independent, simultaneous channels:
Channel 1: Stereo emulated, left channel – The fully processed guitar sound, with
speaker cabinet emulation. This will include the left channel of the internal stereo reverb.
Channel 2: Stereo emulated, right channel – The fully processed guitar sound,
with speaker cabinet emulation. This will include the right channel of the internal
stereo reverb.
Channel 3: Preamp output – The preamp sound of the channels, voices and EQ
stages, taken before the reverb and without any speaker cabinet emulation. Ideal
for use with your own eects and cabinet emulation plugins within your recording
software/DAW.
Channel 4: Unprocessed dry guitar signal – This is the direct signal from your
guitar as received by the amp.
These audio streams can be recording simultaneously within your chosen recording
software/DAW.
TIP: To record a stereo reverb eected sound, pan the stereo emulated left channel
100% left in the mix and pan the right channel 100% right.
The HT Stage MK III can also receive audio input from your computer:
Channel 1: Line input, left channel – Used for audio monitoring or backing track
playback via the Emulated Output.
Channel 2: Line input, right channel – Used for audio monitoring or backing track
playback via the Emulated Output.
15. Kensington Lock
Also known as a Kensington Security Slot or K-Slot this is a specically sized hole
for connecting a compatible Kensington Lock to secure the amplier to a xed
point. For more information, please refer to www.kensington.com
English
English

1716
Technical Specification
HT Stage 60 112 MK III
Power (RMS): 60 Watts
Valves: 2 x EL34, 2 x ECC83
Weight (kg): 25.1
Dimensions (mm): 619 x 500 x 260
Footswitch: FS-15 included, optional FS-14 for control of channels, voices, boost
and reverb
HT Stage 60 212 MK III
Power (RMS): 60 Watts
Valves: 2 x EL34, 2 x ECC83
Weight (kg): 29.4
Dimensions (mm): 707 x 520 x 260
Footswitch: FS-15 included, optional FS-14 for control of channels, voices, boost
and reverb
HT Stage 100 MK III
Power (RMS): 100 Watts
Valves: 4 x EL34, 2 x ECC83
Weight (kg): 17.8
Dimensions (mm): 591 x 245 x 225
Footswitch: FS-15 included, optional FS-14 full control of channels, voices, boost
and reverb
Please note: Although, the HT Venue MK III series is tted as standard with EL34
type power valves, they also have intentionally been designed to be ‘retro-tted’
with 6L6 power valve types instead. As is normal with power valve changes, this
will require ‘re-biasing’ of the valve power stage
This is simple but will not be included in the scope of this user manual.
It will however be freely provided to approved Blackstar service centres
English

1918
POWER
TREBLEBASSVOLUME
CLEAN
ON ON
POWER
CLEAN MASTERREVERB
VOICE
VOICE
OD 1
OD 2HT STAGE 60
VOLUME
VOLUME
GAIN
GAIN
TREBLE ISF
MIDDLEBASS LEVEL PRESENCE VOLUME
60W
6W
OD EQUALISATION
VOICE
STANDBY
INPUT
5-WAY
USB AUDIO
2-WAY
CONNECT SPEAKERS BEFORE USE
“CLASS 2 WIRING”
OUTPUT: 60 WATTS RMS
T630mAL250V220V-240V - T1.6AL250V
100V/120V - T3.15AL250V
WARNING!: RISK OF HAZARDOUS ENERGY
ATTENTION!: ENERGIE ELECTRIQUE DANGEREUSE!
H.T. FUSE
MAINS INPUT
MAINS FUSE
220V-240V~50/60Hz
215 WATTS
EFFECTS LOOPREVERB
RETURN SEND
LEVEL
FOOTSWITCH
1 x 16 OHM 1 x 8 OHM OR 2 x 16 OHM
SPEAKER OUTPUTS
ATTENTION:
+4dBu
-10dBV
DARK
LIGHT
Blackstar Amplication Ltd
Designed and Engineered by
Northampton, England
Made under license in China
CABRIG OUTPUT
LINE OUT/
PHONES
CABRIG
3
2
1
BALANCED
HT STAGE 60 112 MK III
MODEL: 119104-VC
APPARATETS STIKPROP SKAL TILSLUTTES EN STIKKONTAKT MED JORD SOM GIVER
FORBINDELSE TIL STIKPROPPENS JORD. LAITE ON LIITETTÄVÄ SUOJAKOSKETTIMILLA
VARUSTETTUUN PISTORASIAAN. APPARATET MÅ TILKOPLES JORDET STIKKONTAKT.
APPARATEN SKALL ANSLUTAS TILL JORDAT UTTAG.
WARNING!: DO NOT OBSTRUCT VENTILATION GRILLES
ATTENTION!: NE PAS OBSTRUER LES GRILLES DE VENTILATION
This device complies with Part 15 of the FCC Rules. conditions: (1) this device may not cause
harmful interference, and (2) this device must accept any interference received, including
interference that may cause undesired operation.
WARNING!: TO REDUCE THE RISK OF FIRE OR ELECTRIC SHOCK DO NOT EXPOSE
THIS EQUIPMENT TO RAIN OR MOISTURE. THIS APPARATUS MUST BE EARTHED.
CAN ICES-3 (B) / NMB-3 (B)
CALIFORNIA 93120
COMPLIANT FOR FORMALDEHYDE
ATTENTION!: POUR EVITER LES RISQUES D’INCENDIE ET DE DECHARGES
ELECTRIQUES, N’EXPOSEZ JAMAIS CET APPAREIL L’ HUMIDITE OU A LA PLUIE.
CONNECTER CET APPAREIL A LA TERRE.
HT Stage 60 112 MK III Front Panel
HT Stage 60 112 MK III Rear Panel
HT Stage 60 212 MK III Front Panel
HT Stage 60 212 MK III Rear Panel
LEVEL
ATTENTION:
3
2
1
WARNING!: TO REDUCE THE RISK OF FIRE OR ELECTRIC
SHOCK DO NOT EXPOSE THIS EQUIPMENT TO RAIN OR
MOISTURE. THIS APPARATUS MUST BE EARTHED.
ATTENTION!: POUR EVITER LES RISQUES D’INCENDIE ET DE
DECHARGES ELECTRIQUES, N’EXPOSEZ JAMAIS CET APPAREIL
L’HUMIDITE OU A LA PLUIE. CONNECTER CET APPAREIL A LA TERRE.
This device complies with Part 15 of the FCC Rules. conditions: (1) this device may not cause harmful interference,
and (2) this device must accept any interference received, including interference that may cause undesired operation.
Blackstar Amplication Ltd
Designed and Engineered by
Northampton, England
Made under license in China
MAINS FUSE
220V-240V - T1.6AL250V
100V/120V - T3.15AL250V
MAINS INPUT
220V-240V~50/60Hz
215 WATTS
T630mAL250V
H.T. FUSE
CONNECT SPEAKERS BEFORE USE
“CLASS 2 WIRING”
OUTPUT: 60 WATTS RMS
WARNING!: RISK OF HAZARDOUS ENERGY
ATTENTION!: ENERGIE ELECTRIQUE DANGEREUSE!
SPEAKER OUTPUTS
1 x 16 OHM 1 x 8 OHM OR 2 x 16 OHM 1 x 4 OHM OR 2 x 8 OHM
WARNING!: DO NOT OBSTRUCT VENTILATION GRILLES
ATTENTION!: NE PAS OBSTRUER LES GRILLES DE VENTILATIONAPPARATETS STIKPROP SKAL TILSLUTTES EN STIKKONTAKT MED JORD SOM GIVER FORBINDELSE TIL STIKPROPPENS JORD. LAITE ON LIITETTÄVÄ
SUOJAKOSKETTIMILLA VARUSTETTUUN PISTORASIAAN. APPARATET MÅ TILKOPLES JORDET STIKKONTAKT. APPARATEN SKALL ANSLUTAS TILL JORDAT UTTAG.
CAN ICES-3 (B) / NMB-3 (B)
CALIFORNIA 93120
COMPLIANT FOR FORMALDEHYDE
CABRIG OUTPUT
BALANCED
DARK
LIGHT
REVERB EFFECTS LOOP FOOTSWITCH
RETURN SEND 5-WAY 2-WAY
+4dBu
-10dBV
USB AUDIO
HT STAGE 60 212 MK III
MODEL: 119105-VC
LINE OUT/
PHONES
CABRIG
INPUT
VOICE
CLEAN POWERMASTEROD EQUALISATION REVERB
HT STAGE 60
STANDBY POWER
ON ON
RESONANCELEVEL PRESENCE VOLUME
ISF
TREBLE
MIDDLEBASS
BASSVOLUME TREBLE
VOICE
VOICE
OD 1
OD 2
VOLUME
VOLUME
60W
6W
CLEAN
GAIN
GAIN
Español
Español
Français
Français
Deutsch
Deutsch
English
English
中文
中文
Japanese
Japanese
2120
STANDBY
ON
POWER REVERB OD EQUALISATION
VOICE
VOICE OD 1
OD 2
INPUT
VOICE CLEAN
CLEAN
RESONANCE LEVEL ISFVOLUME TREBLE MIDDLE BASS BASSTREBLE VOLUME
HT STAGE 100
POWER
ON
MASTER
PRESENCE
10W
100W
GAIN
GAIN
VOLUME
VOLUME
5-WAY RETURN
USB AUDIO
2-WAY SEND
CONNECT SPEAKERS BEFORE USE
“CLASS 2 WIRING”
OUTPUT: 100 WATTS RMS
Blackstar Amplication Ltd
Designed and Engineered by
Northampton, England
Made under license in China
HT STAGE 100H MKIII
MODEL: 119106-VC
T1AL250V 220V-240V - T2AL250V
100V/120V - T5AL250V
ATTENTION:
H.T. FUSE
MAINS INPUT
220V-240V~50/60Hz
335 WATTS
MAINS FUSE
EFFECTS LOOP REVERB
LEVEL
+4dBu
-10dBV
FOOTSWITCH CABRIG OUTPUT
DARK
LIGHT
1 x 16 OHM1 x 8 OHM OR 2 x 16 OHM1 x 4 OHM OR 2 x 8 OHM
WARNING!: RISK OF HAZARDOUS ENERGY
ATTENTION!: ENERGIE ELECTRIQUE DANGEREUSE!
SPEAKER OUTPUTS
1
2
3
WARNING!: TO REDUCE THE RISK OF FIRE OR ELECTRIC SHOCK DO NOT EXPOSE THIS
EQUIPMENT TO RAIN OR MOISTURE. THIS APPARATUS MUST BE EARTHED. WARNING!: DO NOT OBSTRUCT VENTILATION GRILLES
ATTENTION!: NE PAS OBSTRUER LES GRILLES DE VENTILATIONATTENTION!: POUR EVITER LES RISQUES D’INCENDIE ET DE DECHARGES ELECTRIQUES, N’EXPOSEZ
JAMAIS CET APPAREIL L’HUMIDITE OU A LA PLUIE. CONNECTER CET APPAREIL A LA TERRE.
APPARATETS STIKPROP SKAL TILSLUTTES EN STIKKONTAKT MED JORD SOM GIVER FORBINDELSE TIL
STIKPROPPENS JORD. LAITE ON LIITETTÄVÄ SUOJAKOSKETTIMILLA VARUSTETTUUN PISTORASIAAN.
APPARATET MÅ TILKOPLES JORDET STIKKONTAKT. APPARATEN SKALL ANSLUTAS TILL JORDAT UTTAG.
This device complies with Part 15 of the FCC Rules. conditions: (1) this device may not
cause harmful interference, and (2) this device must accept any interference received,
including interference that may cause undesired operation.
CAN ICES-3 (B) / NMB-3 (B)
CALIFORNIA 93120
COMPLIANT FOR FORMALDEHYDE
BALANCED
CABRIG LINE OUT/
PHONES
HT Stage 100 MK III Front Panel
HT Stage 100 MK III Rear Panel
Español
Español
Français
Français
Deutsch
Deutsch
English
English
中文
中文
Japanese
Japanese
This manual suits for next models
2
Table of contents
Other BLACK STAR Music Equipment manuals


