blackloud Buzzi Sprinkler User manual
Quick Guide - 1
Quick Guide - 2
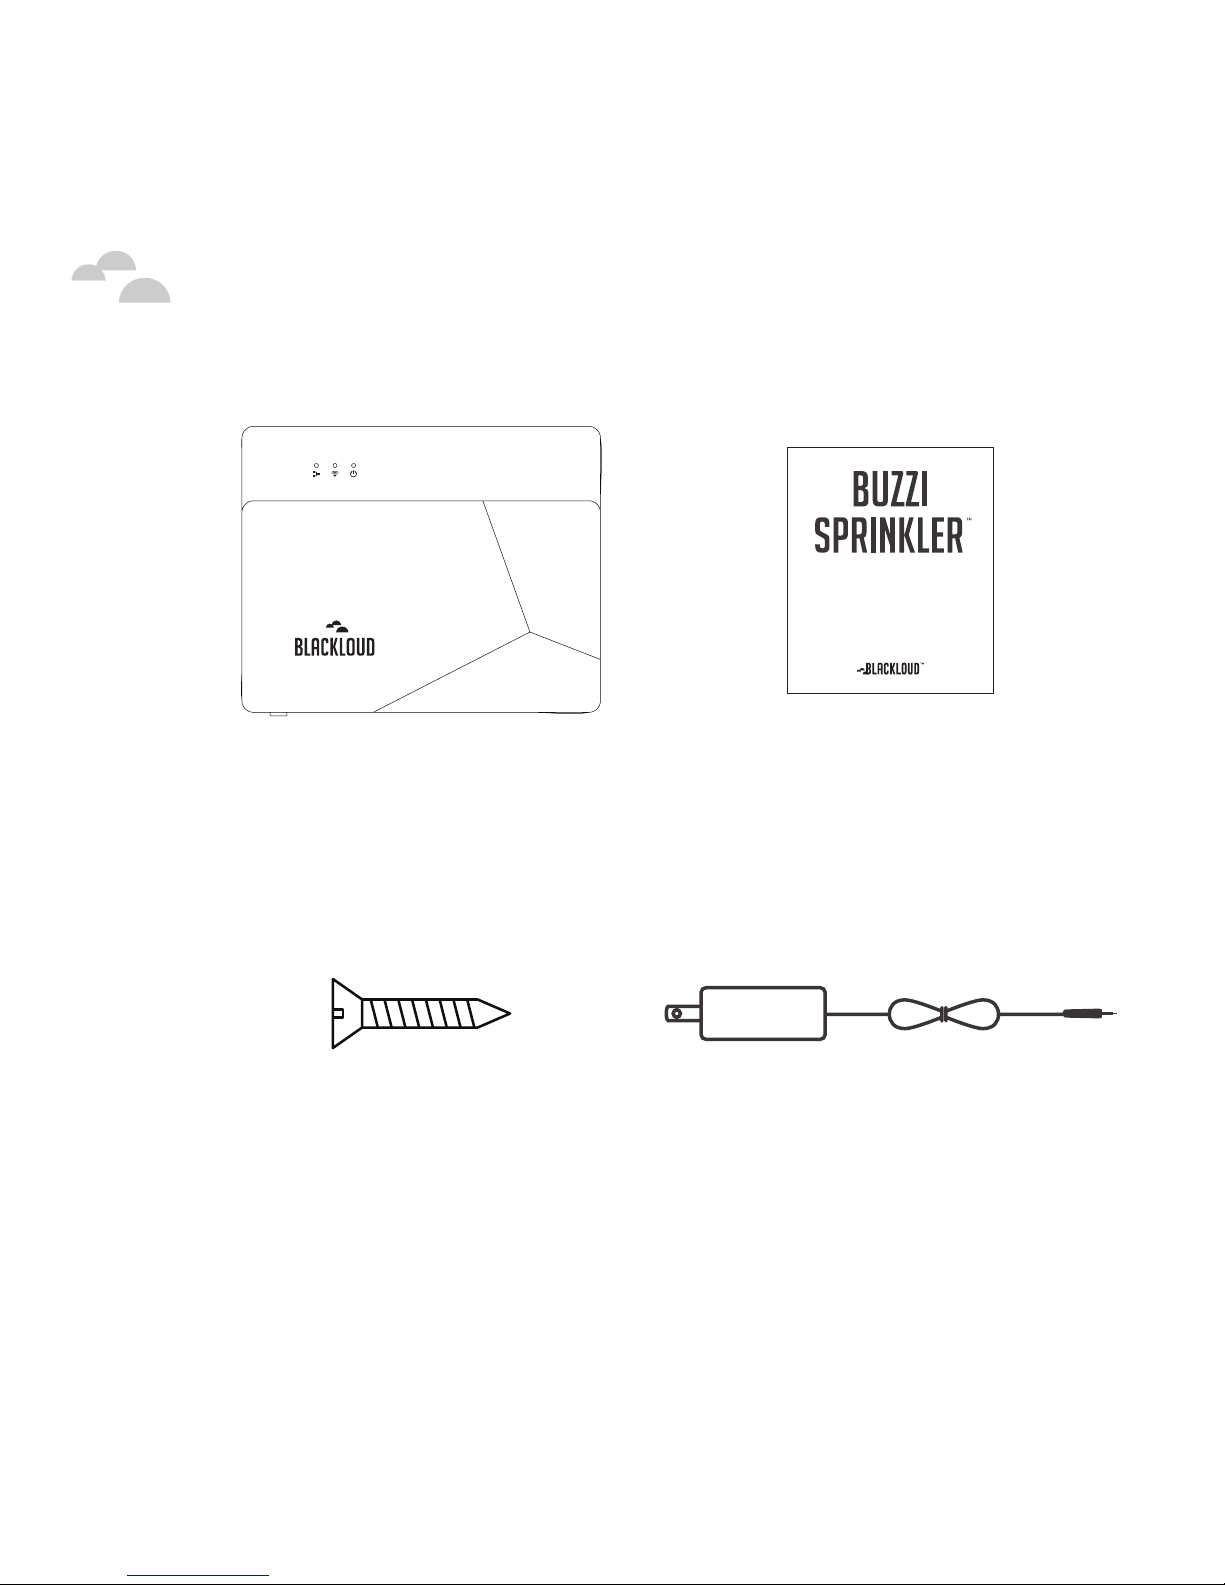
Package Contents
Quick Guide
Smart sprinkler controller
BUZZI Sprinkler This quick guide
2 x mounting screws Power adapter & cable

Quick Guide - 3
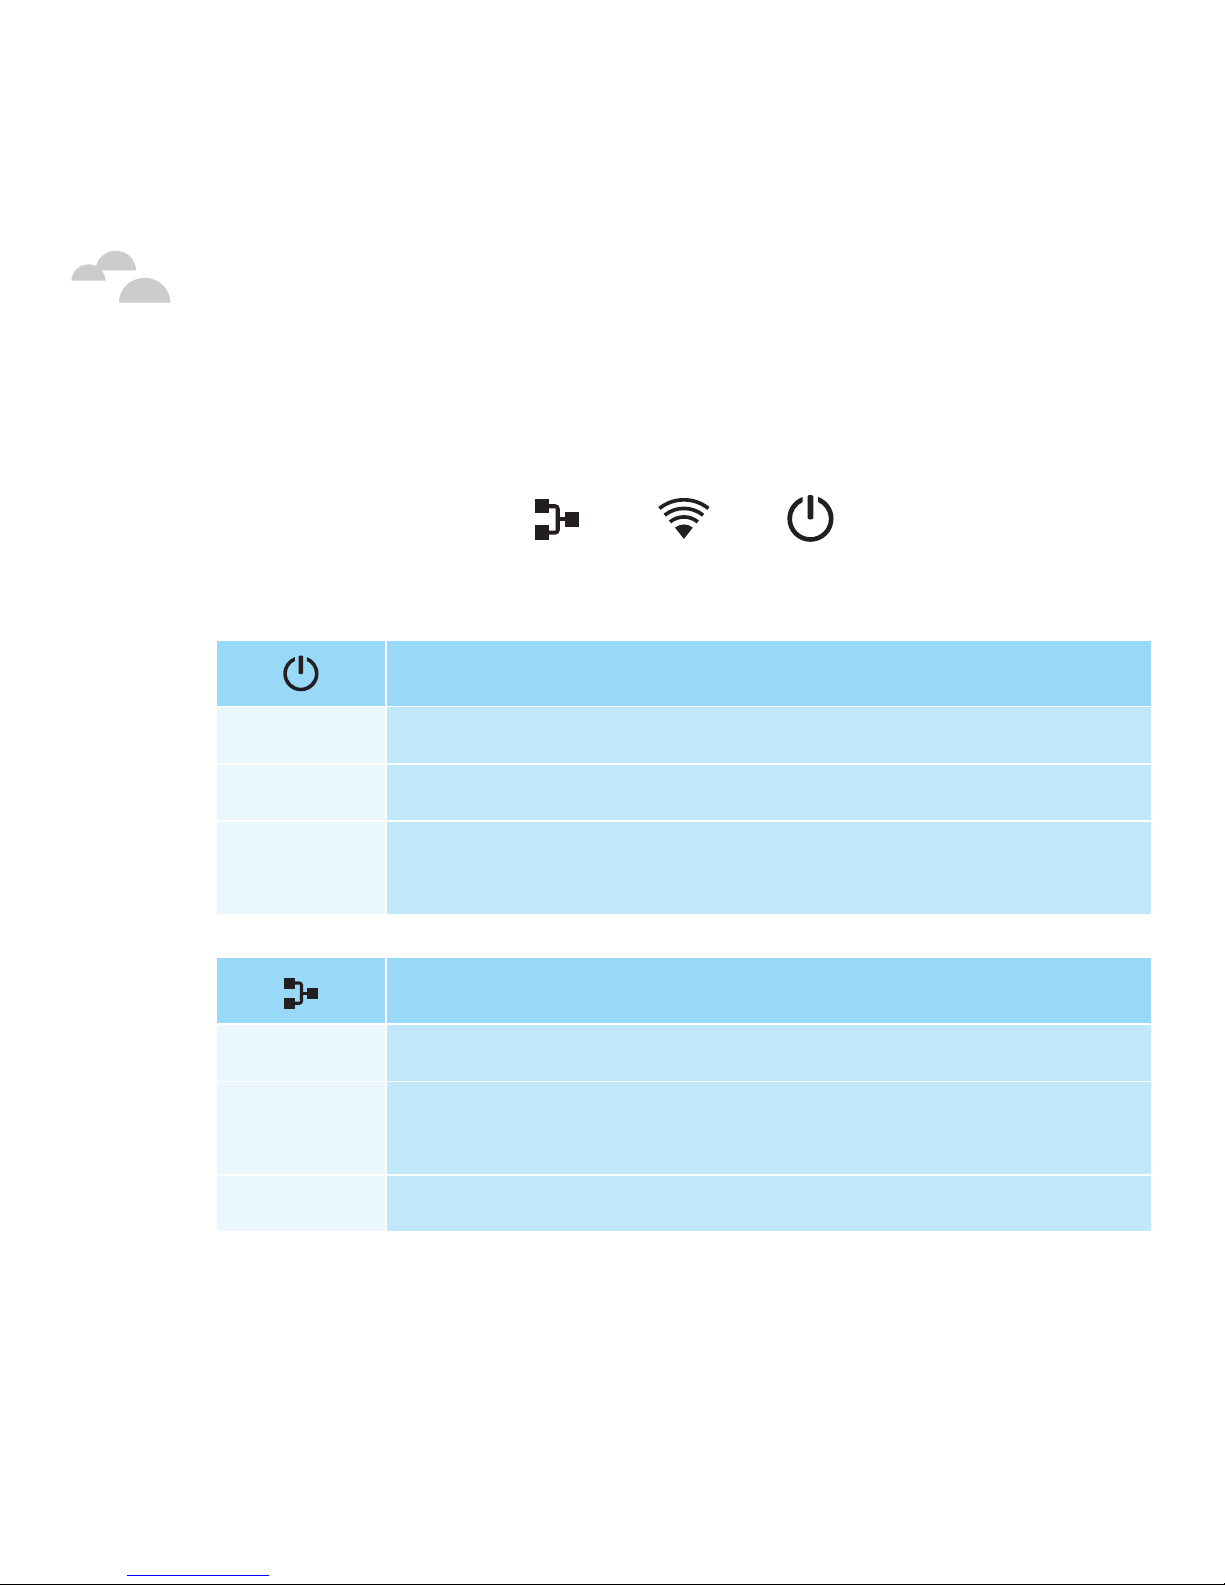
Setting Up BUZZI Sprinkler
No. Item Description
1Ethernet LED Displays current Ethernet connection status.
See the “LED Indicators” section below.
2WiFi LED Displays device and wireless connection status.
See the “LED Indicators” section below.
3Power LED Displays current power status. See the “LED
Indicators” section below.
4Wireless
Switch
Toggles wireless access point (AP), mode
between On and Auto. The default mode is On
and should not be changed.
5USB Port For connecting BUZZI Sprinkler with future
products (not for powering BUZZI Sprinkler).
123
4 5

Quick Guide - 4
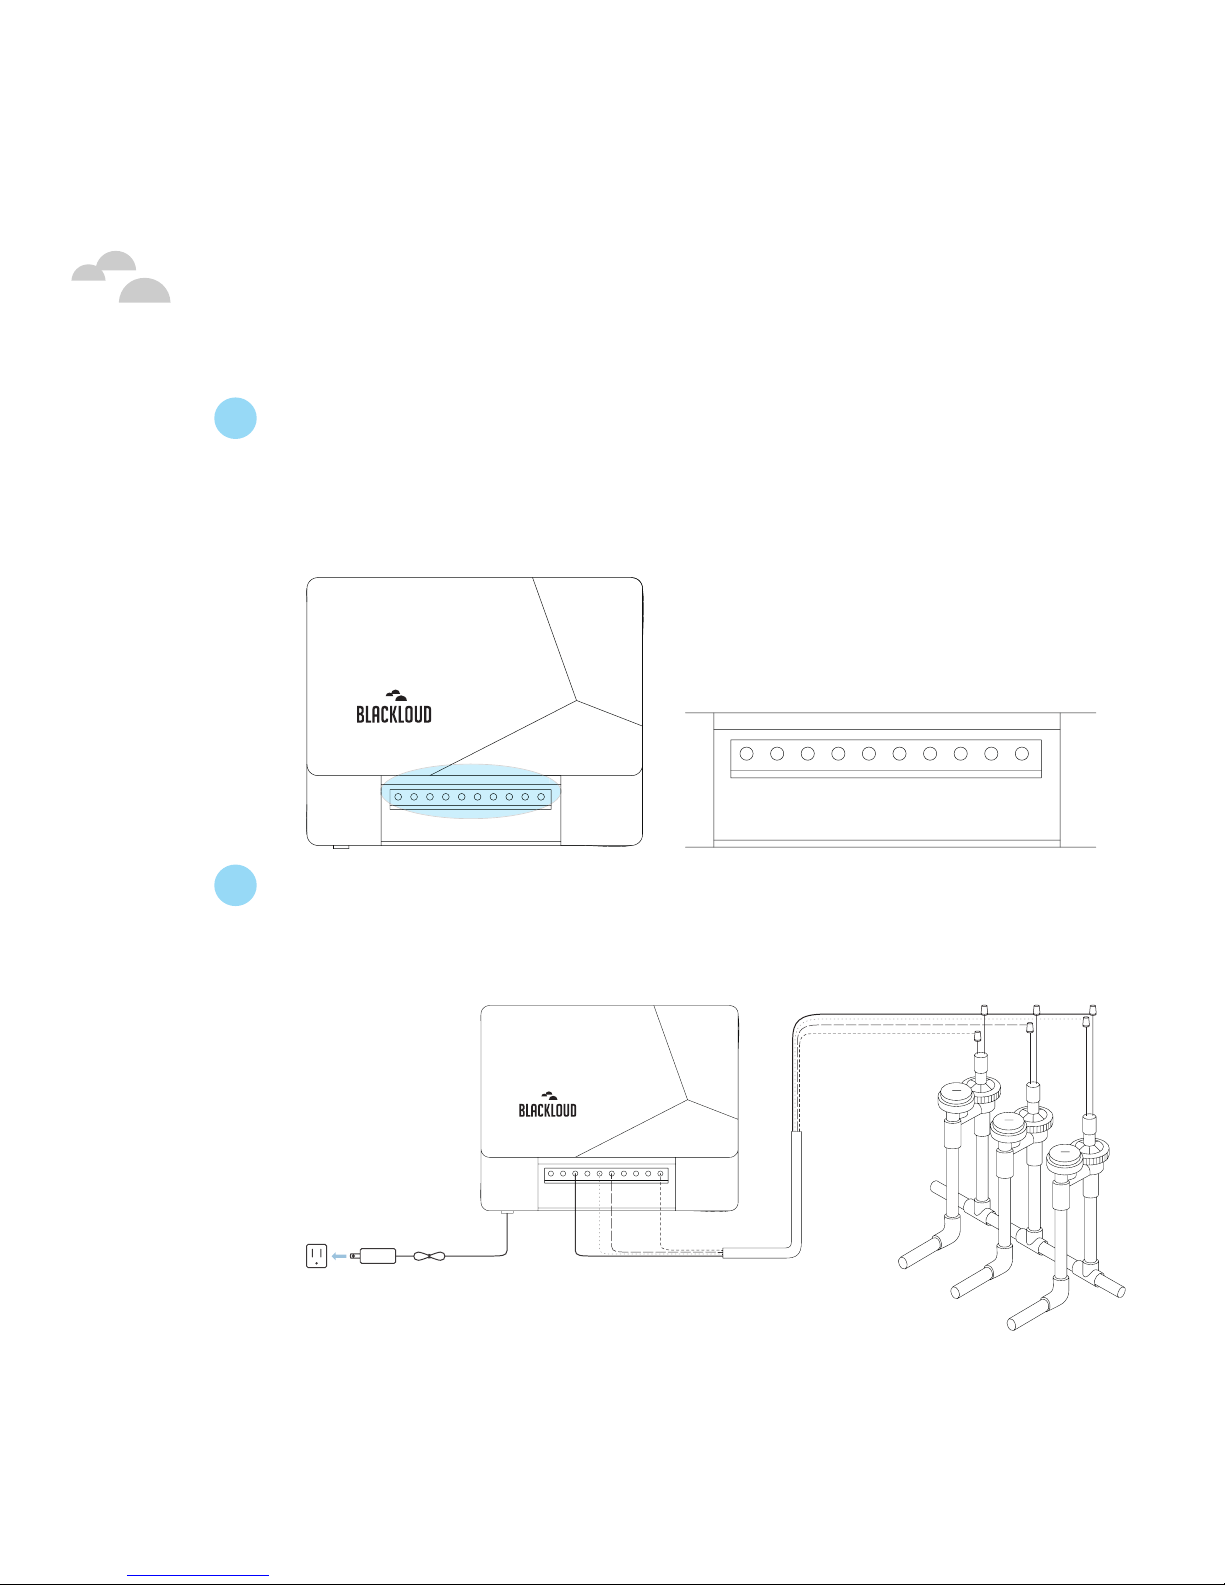
Setting Up BUZZI Sprinkler
No. Item Description
6Reset Button Resets BUZZI Sprinkler to default factory
settings. Press and hold until device resets (red
WiFi LED blinks).
7DC power in For supplying power to BUZZI Sprinkler via the
supplied power adapter.
8Zone Wire
Connectors
For connecting BUZZI Sprinkler to a total of
eight sprinklers.
9Ethernet port For connecting BUZZI Sprinkler to an Ethernet
network.
Caution: Only use the supplied power adapter; do not use other power adapters with BUZZI
Sprinkler.
6789
Quick Guide - 5
Setting Up BUZZI Sprinkler
The front of BUZZI Sprinkler features three LED indicators that notify
you of the Sprinkler’s status when it is powered on.
The following tables describe the various statuses.
Power LED Status (Blue)
On BUZZI Sprinkler is on.
Off BUZZI Sprinkler is off.
Blinking Firmware upgrade in process or your mobile device is
connected to BUZZI Sprinkler via the Internet.
Ethernet LED Status (Blue)
On BUZZI Sprinkler is connected to an Ethernet network.
Off BUZZI Sprinkler is not connected to an Ethernet
network.
Blinking Firmware upgrade in process.

Quick Guide - 6
WiFi LED Status (Amber/Blue)
Amber LED
blinking
BUZZI Sprinkler is resetting or connecting to a WiFi
network.
Blue LED
blinking
BUZZI Sprinkler is either waiting for connection or
connected (check app for current connection status).
Off BUZZI Sprinkler is off.
Setting Up BUZZI Sprinkler

Quick Guide - 7
Setting Up BUZZI Sprinkler
Hardware Setup
1. PreparingBUZZISprinklerforuse
a (Optional) Mount BUZZI Sprinkler on a wall, using the screw
holes on the bottom of the device. The screw holes are four
inches apart.
4”
4”
Quick Guide - 8
Setting Up BUZZI Sprinkler
b Insert the common wires, and the control wires for up to eight
individual sprinklers, to the zone wire connectors at the front
of BUZZI Sprinkler. Secure each wire by tightening the screw at
the top of its wire connector.
1 2 3 4 5 6 7 8 common
1 2 3 4 5 6 7 8 common
1 2 3 4 5 6 7 8 common
c Connect the common wires, and the control wires for up to
eight individual sprinklers, to your sprinkler system, as shown in
the following image.
1 2 3 4 5 6 7 8 common

Quick Guide - 9
Setting Up BUZZI Sprinkler
2. PoweringonBUZZISprinkler
Plug BUZZI Sprinkler into a power socket using the supplied
power adapter. See the LED status table in the previous section, to
understand LED activity.
3. ConnectingBUZZISprinklertotheInternet
aFor Wifi connection: Have an internet-enabled WiFi router
available. This router will be the wireless communication bridge
between your mobile device and your BUZZI Sprinkler.
Note: Alternatively, you can use your mobile device to create a WiFi hotspot. See
“Connecting to BUZZI Sprinkler” later in this guide, for connection instructions.
bFor LAN connection: Have an internet-enabled Local Area
Network (LAN), available. Plug a LAN connected Ethernet
cable into the Ethernet port at the rear of your BUZZI Sprinkler.

Quick Guide - 10
Setting Up BUZZI Sprinkler
Setting Up The BUZZI Sprinkler App
1. InstallingandlaunchingtheBUZZISprinklerapp
a On your mobile device, download and install the BUZZI
Sprinkler app from either the Google Play Store or the iOS App
Store.
b Make sure that WiFi is enabled on your mobile device, then
launch the BUZZI Sprinkler app. BUZZI Sprinkler will try to
sign in.
c If no account settings can be found, the message Sign in fail
will appear. You will now have the option to sign in with a
BLACKCLOUD account, or create an account.

Quick Guide - 11
Setting Up BUZZI Sprinkler
2. SigninginwithaBLACKLOUDaccount
a At the BUZZI Sprinkler app’s main menu, touch Sign in.
b If you already have a BLACKLOUD account, you can skip the
BLACKLOUD account creation and activation process and
go to step (e). If you do not have a BLACKLOUD account,
touch Create New Account.
c Enter the registration information in the
fields indicated, then touch Register.
d An account confirmation email will be
sent to your email address. Confirm the
registration in the email and in the app
swipe right to return to the main menu.
e If you have a registered BLACKLOUD
account, at the BUZZI Sprinkler app’s
main menu touch Sign in and enter
your username and password. Your
BLACKLOUD account information will appear in the main
menu.
Quick Guide - 12
Getting Connected
Connecting Via The App
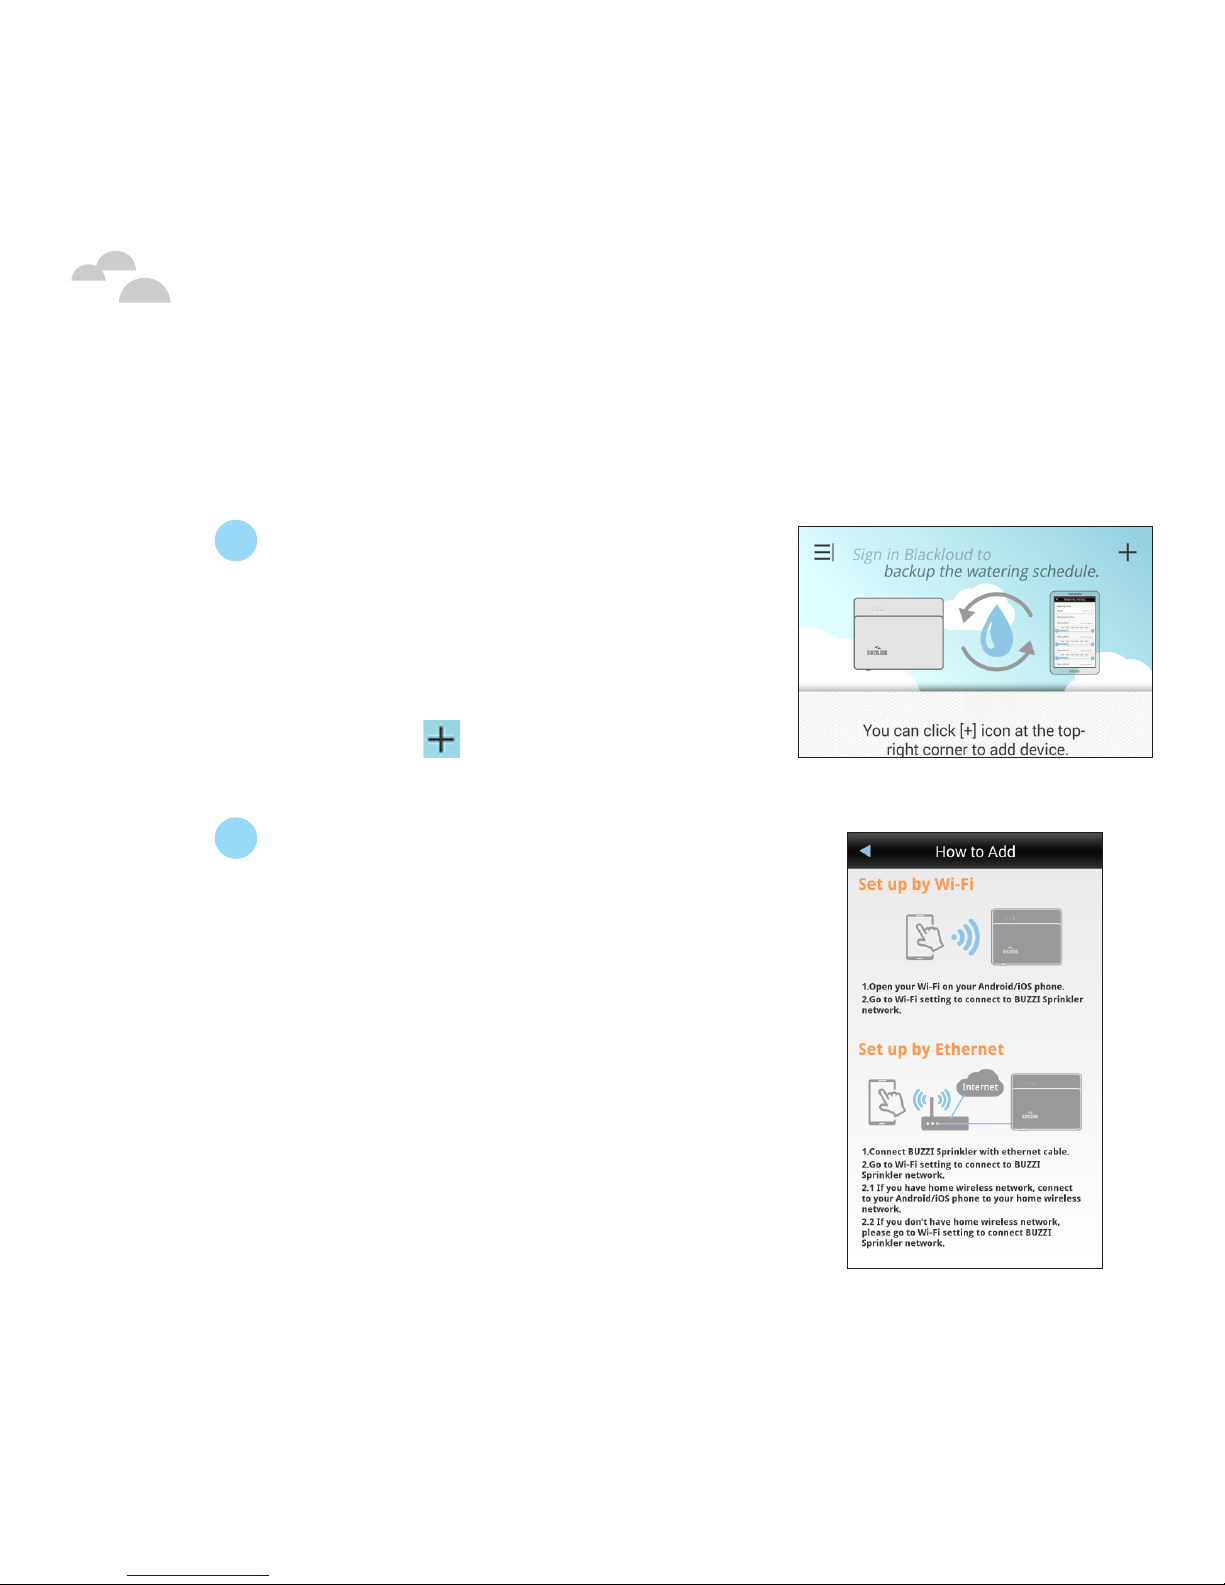
1. AccessingBUZZISprinklerviatheapp
a Open the BUZZI app and
swipe left. The BUZZI Sprinkler
connection screen will display, and
the app will attempt to connect
to BUZZI Sprinkler. When it fails,
click the icon at the top right to
add your BUZZI Sprinkler.
b Follow the onscreen instructions
to configure BUZZI Sprinkler
access via Ethernet or WiFi. See
“Connecting BUZZI Sprinkler
to the Internet” for connection
options.

Quick Guide - 13
Getting Connected
cFor WiFi connection only: Locate
the BUZZI Sprinkler in your
mobile device’s WiFi settings, and
connect to it.
d Return to the BUZZI app main
menu. The app will connect to
BUZZI Sprinkler, and this screen
will display. Enter your country
and zip code to retrieve weather
forecasts for your location.
Quick Guide - 14
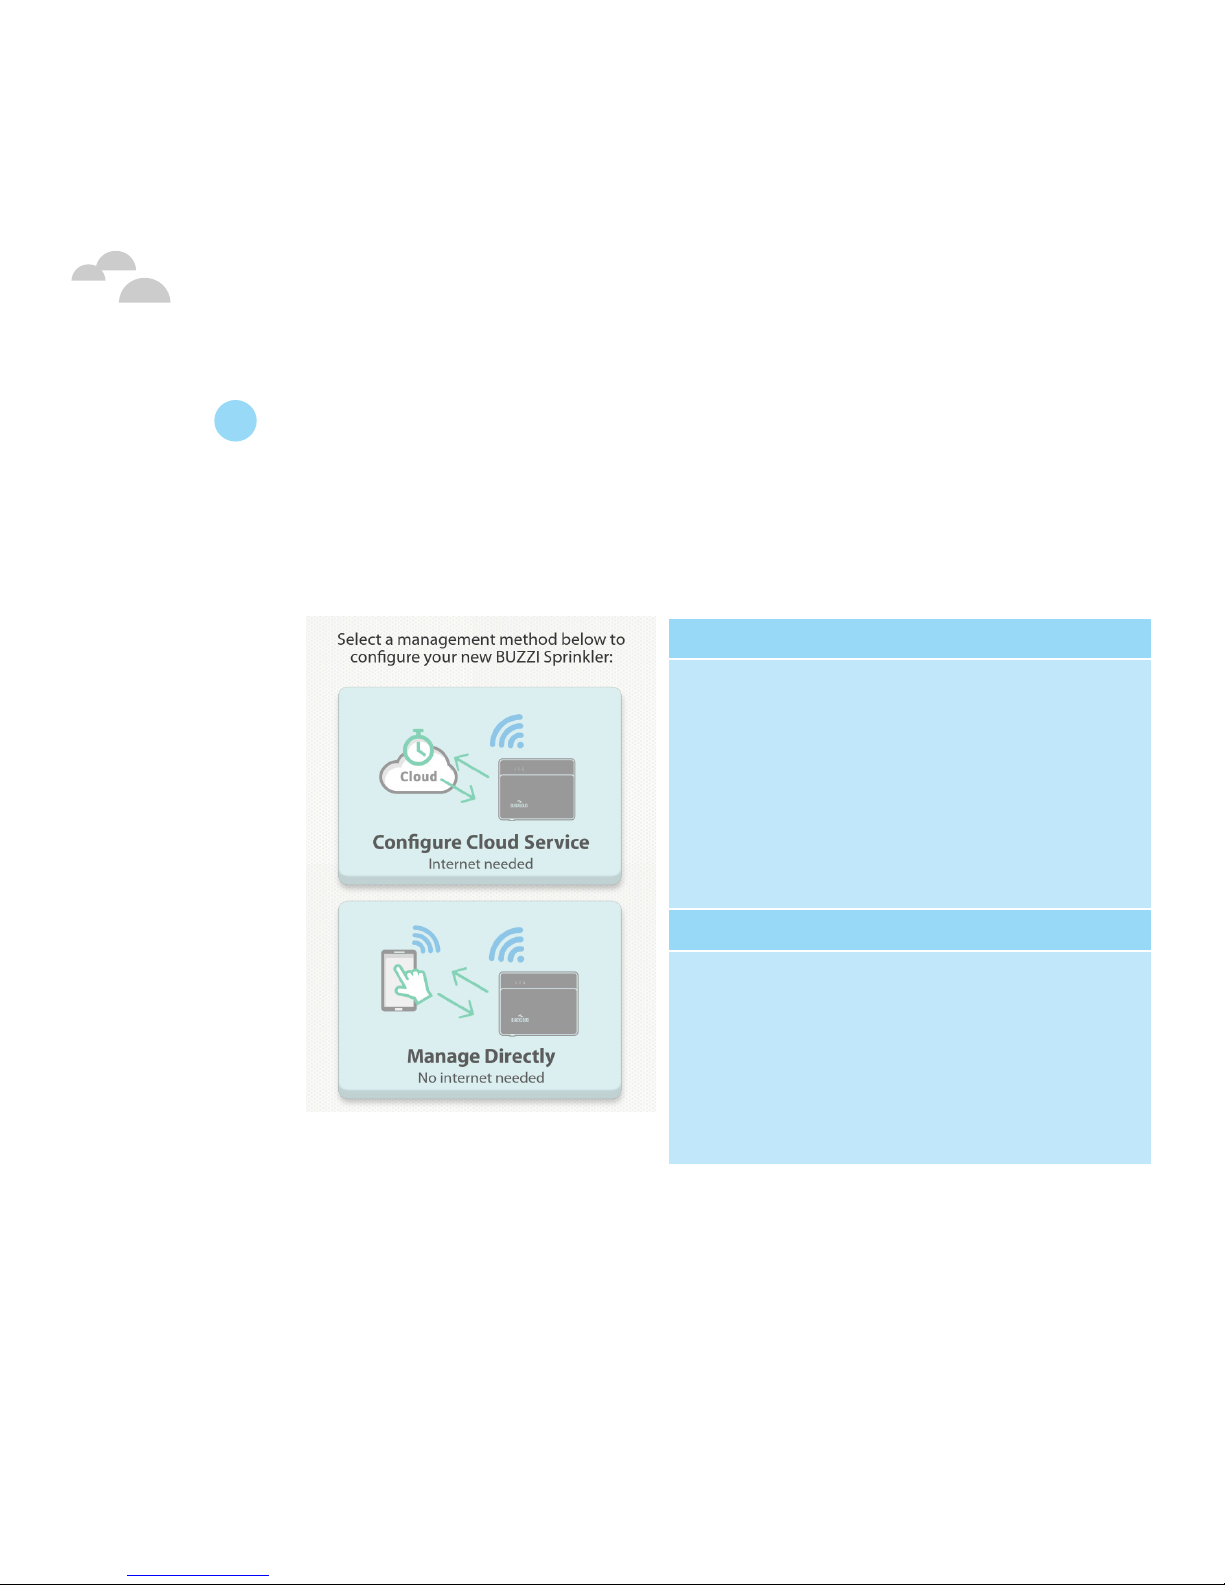
e Select your preferred management method. To control BUZZI
Sprinkler through the Internet via the app, use Configure
CloudService. To control BUZZI Sprinkler through a direct WiFi
connection with your mobile device (limited to the range of
your WiFi network), use Manage Directly.
*Important: In order to configure the Cloud Service, you will need to enable “Remote
Access” in the Device Information menu.This option will be provided during the initial
setup if the “Configure Cloud Service” option is selected. See “Device information” later
in this guide, for instructions.
Getting Connected
ConfigureCloudService
Control BUZZI Sprinkler with your
mobile device through the Internet
Cloud. This allows you to control BUZZI
Sprinkler from anywhere, as long as you
have internet access.* BUZZI Sprinkler
must be connected to a WiFi or LAN
network.
Manage Directly
Control BUZZI Sprinkler with your
mobile device directly through BUZZI
Sprinkler’s direct WiFi signal. This allows
you to control BUZZI Sprinkler without
internet access, within the range of
BUZZI Sprinkler’s WiFi network.

Quick Guide - 15
Additional Information
Main Features
1. Easywateringschedulemenu
a Open the main menu of the BUZZI
app and swipe left. The BUZZI
Sprinkler connection screen will
display, and the app will connect to BUZZI Sprinkler. Touch
BUZZI Sprinkler.
b The easy schedule tutorial appears. Use these four steps to set
up a simple watering schedule.

Quick Guide - 16
Additional Information
2. Mainwateringschedulemenu
After the easy schedule tutorial has been completed, the main
watering menu will display. This menu displays device and weather
information, and provides access to BUZZI Sprinkler’s main functions.
No. Description
1Return to BUZZI Sprinkler
connection screen
2Weather information
3Device name; touch to
change
4Zone name
5Easy setup schedule
6Configure WiFi
7Configure Ethernet
8Power BUZZI Sprinkler on/off
9Zone watering schedule
10
Zone watering schedules
menu; described in the next
section
11 Main watering menu (current)
12 Device information
Quick Guide - 17
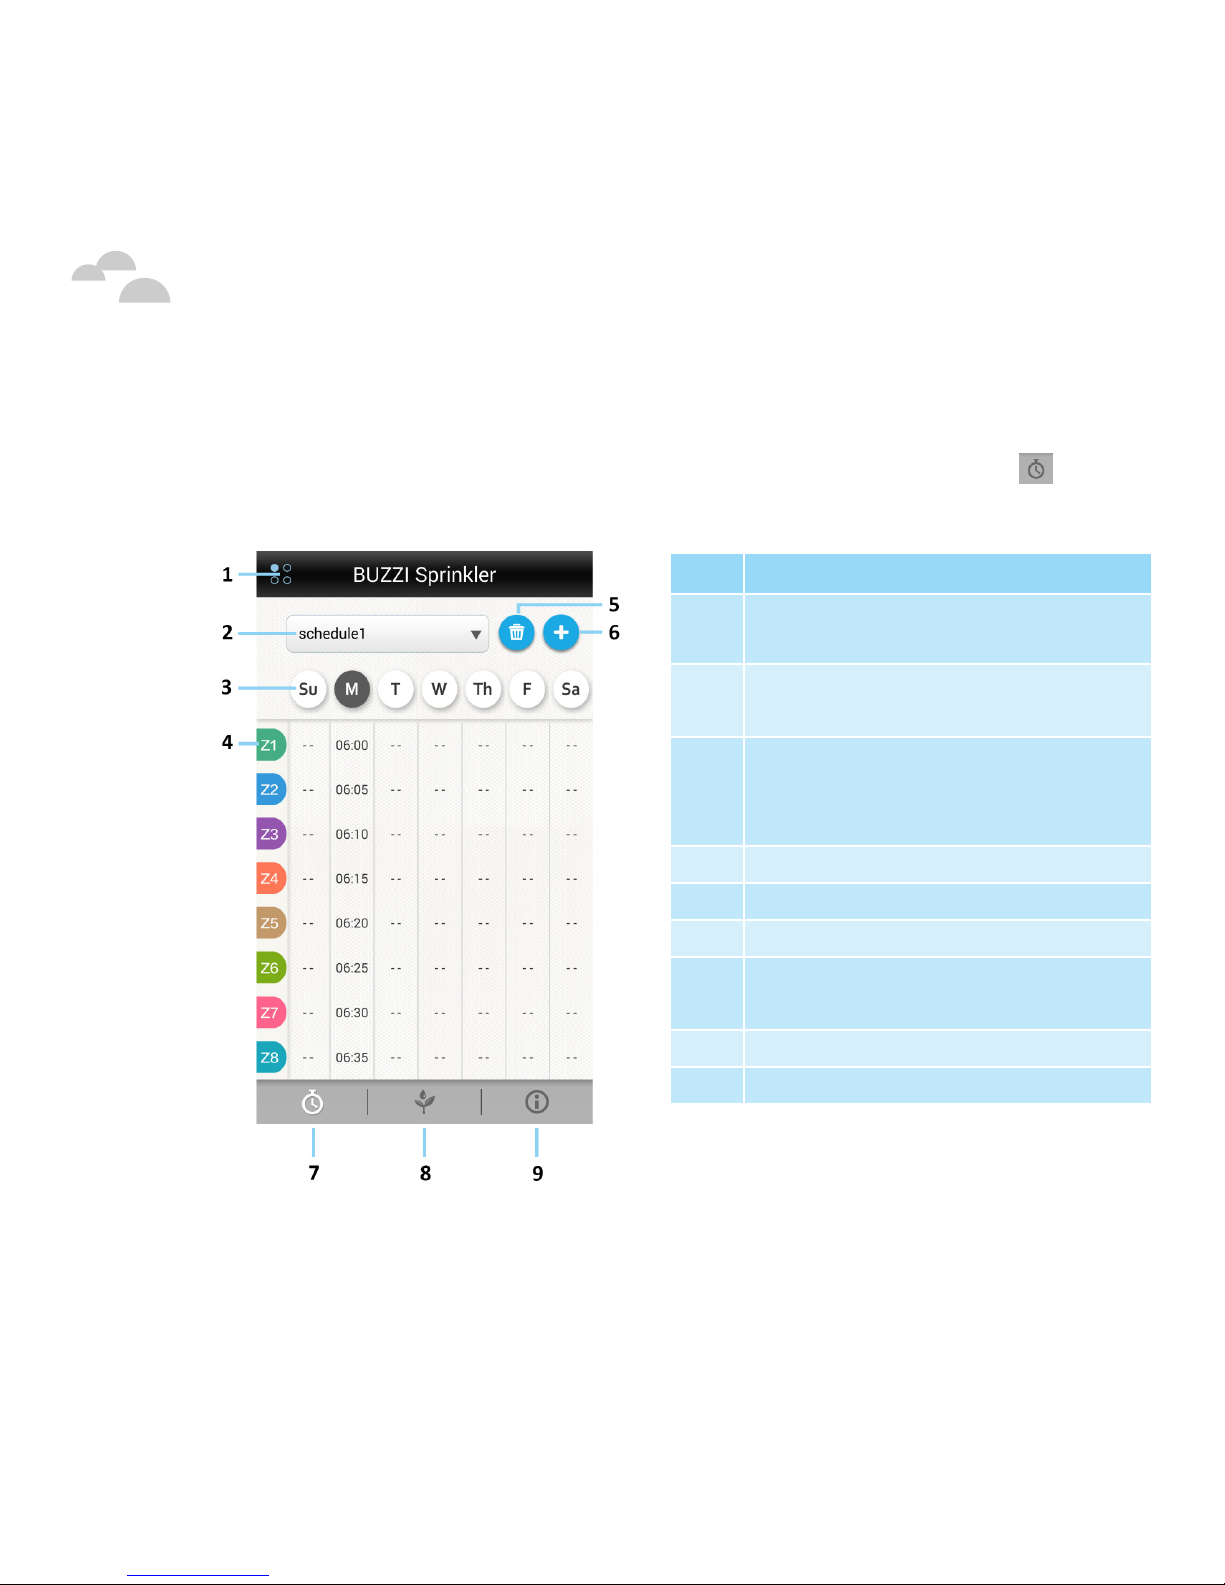
3. Zonewateringschedulesmenu
Access the zone watering schedules menu by clicking on the at the
bottom left of the main watering menu.
Additional Information
No. Description
1Return to BUZZI Sprinkler
connection screen
2Current schedule; touch to
change
3
Select days to schedule
watering; click on times to set
watering time
4Zone number
5Delete current schedule
6Add new schedule
7Zone watering schedules
menu
8Main watering menu
9Device information

Quick Guide - 18
Additional Information
Additional Features
1. Deviceinformation
Access the device information menu by clicking on the at the
bottom right of the main menu.
No. Description
1Return to BUZZI Sprinkler
connection screen
2
Turn on Remote Access to
control BUZZI Sprinkler via the
BLACKLOUD service (see page
14 for details).
3
Smart Forecast Service option
(provides local weather
forecasts)
4Current time zone
5Device firmware version
6Device SSID (for direct WiFi
connection)
7Backup schedules (requires
Blackloud account sign in)
8Zone watering schedules menu
9Main watering menu
10 Device information menu

Quick Guide - 19
Additional Information
FCC Regulatory Statement
Federal Communication Commission Interference Statement
This equipment has been tested and found to comply with the limits for a Class B digital device,
pursuant to Part 15 of the FCC Rules. These limits are designed to provide reasonable protection
against harmful interference in a residential installation. This equipment generates, uses and can
radiate radio frequency energy and, if not installed and used in accordance with the instructions,
may cause harmful interference to radio communications. However, there is no guarantee that
interference will not occur in a particular installation. If this equipment does cause harmful
interference to radio or television reception, which can be determined by turning the equipment
off and on, the user is encouraged to try to correct the interference by one or more of the following
measures:
• Reorient or relocate the receiving antenna.
• Increase the separation between the equipment and receiver.
• Connect the equipment into an outlet on a circuit different from that to which the receiver is connected.
• Consult the dealer or an experienced radio/TV technician for help.
FCC Caution: Any changes or modifications not expressly approved by the party responsible for
compliance could void the user’s authority to operate this equipment.
This device complies with Part 15 of the FCC Rules. Operation is subject to the following two
conditions: (1) This device may not cause harmful interference, and (2) this device must accept any
interference received, including interference that may cause undesired operation.
This device and its antenna(s) must not be co-located or operating in conjunction with any other
antenna or transmitter.
IMPORTANT NOTE:
FCC Radiation Exposure Statement:
This equipment complies with FCC radiation exposure limits set forth for an uncontrolled
environment. This equipment should be installed and operated with minimum distance 20cm
between the radiator & your body.
Country Code selection feature to be disabled for products marketed to the US/CANADA

Quick Guide - 20
Copyright information
Trademarks and trade names are those of their respective owners. Android
is a trademark of Google Inc. iOS is a trademark or registered trademark of
Cisco in the U.S. and other countries and is used under license.
BLACKLOUDInc.
42 Corporate Park #250 Irvine, CA 92606 USA
888-783-0378
www.blackloud.com
Additional Information
Table of contents
Other blackloud Controllers manuals

Popular Controllers manuals by other brands

Firetrol
Firetrol FTA1100 Series Installation and maintenance guide

SMC Networks
SMC Networks ITV SEN DUX02357 Series Operation manual

KMC Controls
KMC Controls CSC-3501 installation guide

Stage right
Stage right SRP200 user manual

Parker
Parker A4AT-DN Installation and Service Information

HomeSeer
HomeSeer HS-WV100+ manual


HORNER
HORNER XL6 Prime Data Sheet / Manual

Mitsubishi
Mitsubishi FX2N Hardware manual

Nos
Nos Launcher 15975NOS Installation and operation instructions

Gira
Gira KNX 1039 00 operating instructions

HighPoint
HighPoint RocketRAID eSATA 6G series installation guide

Consort
Consort SLTI Installation & Control Guide