BlackTrax BTSensor User manual

BlackTrax Wiki
A Complete BlackTrax User Wiki
BlackTrax Wiki
1 of 298
5/14/2019

About Introduction
This wiki provides instructions for the installation, configuration and operation of the BlackTrax system.
This version is current as of May 2019.
© CAST Group of Companies Inc., 2002-2019 All rights reserved. BlackTrax, WYSIWYG, CAST Software,
and Autofocus are trademarks of the CAST Group of Companies Incorporated. All other trademarks and
logos are the property of their respective owners. Depending on your product/version, CAST incorporates
source code or libraries which are licensed to CAST and copyright protected. For more information, go to
http://cast-soft.com/third-party-libraries/.
A BlackTrax License will authorize the use of the BlackTrax system for a restricted number of output
connections based on the type of License that was purchased. For more information, go to Licensing.
BlackTrax Wiki
2 of 298
5/14/2019


Text Conventions
The following text conventions are used in this wiki:
Instructions titles appear in Bold and Orange. For example, "To view a BTCamera’s video feed
in the visible spectrum"
Menus and menu commands appear in Bold and Navy. For example, “To open the window if
closed, go to the View menu and click Cameras.”
User interface elements such as buttons, tools, shortcuts, and dialog boxes appear in Italics and
Medium Blue. For example, “To close the project, click Yes.”
Keyboard keys are indicated in CAPITALS AND BLUE. For example, “To call up the save menu, enter
in the command CTRL+SHIFT+B.”
References to manuals appear in Italics Underlined in Blue. For example, “For an in depth
understanding on BTWYSIWYG and its capabilities, please refer to the WYSIWYG Reference Guide.”
Instructions to direct you to different features of the BTSystem or areas in the physical Space are
indicated by being Green and Underlined. For Example “In the Physical Space, take the BTBeacon.”
BlackTrax Wiki
4 of 298
5/14/2019

BlackTrax System Overview
1 BTSensor Installation :
1.1 Environment Considerations for BTSensor Installation :
1.2 Installing a BTSensor Lens :
1.3 BTSensor Placement and Orientation :
2 BTSystem Hardware Configuration :
2.1 BTSystem Configuration :
2.2 Optional Equipment Configuration :
3 BTSystem Components :
3.1 Standard System Components :
3.2 BTServer :
3.3 TimeKeeper :
3.4 BTRouter :
3.5 Ferrite Filter :
3.6 eSync 2 Controller :
3.7 BTSensors :
3.7.1 SLIM 13E :
3.7.2 PRIME 41 :
3.8 BTBeacon :
3.9 BT Smart Charger :
3.10 Calibration Kit :
3.10.1 Calibration Kit functions :
3.10.2 Wand Head :
3.10.3 Triangular Wand Holder :
3.10.4 Telescopic Wand Handle :
3.10.5 Ground Plane :
3.10.6 Hybrid Power Supply Unit (HPSU) :
3.10.7 Lighting Wand :
3.10.8 BTCalibration Kit Case :
3.11 Stringer :
3.12 Discontinued :
3.12.1 eSync Controller :
3.12.2 S250e Slim :
3.12.3 Power Supply Unit (PSU) :
3.12.4 BTServer (Legacy) :
3.12.5 TimeKeeper (Legacy) :
4 General System Information :
4.1 BTSystem Information Flow and Connections :
4.2 BTX Dongle :
4.3 Saved System Data :
4.4 FCC Information :
5 Not Included Mandatory Components :
5.1 Category 6 Ethernet Cabling :
5.2 Power Over Ethernet Gigabit Switch for BTSensors :
6 Optional Components :
6.1 DMX/Ethernet Node for Tracking with Moving Lights :
BlackTrax Wiki
5 of 298
5/14/2019

6.1.1 Compatible DMX/Ethernet nodes :
6.1.2 Luminex Node Settings :
6.1.3 Common ArtGate Node Setup Guide :
7 System Procedures :
7.1 Licensing :
7.2 Charging BTBeacons :
7.3 Replacing a BTBeacon's Lithium-Ion Battery :
7.4 Installing Third Party Software :
7.5 Server Failover :
BlackTrax Wiki
6 of 298
5/14/2019


Environment Considerations for
BTSensor Installation
The environment of the Space has a great impact on the capacity of BlackTrax to function as intended.
When you install the BTSystem, always remember the following precautions to limit interference and
make the ideal tracking environment.
Infrared interference: External infrared sources and reflections may cause interference with
BTSensors. For best results, ensure the venue is free from sunlight, lights which emit infrared
spectrum, infrared based devices, fire, and highly reflective materials. For infrared sources and
reflections which cannot be removed from the venue, there are provisions within the software to
mask out the affected areas of the BTSensor's field of view.
Note: Infrared interference is more critical during the BTSensor calibration than during
tracking operation. Since the BTSystem looks for a unique signal during tracking, there is
some tolerance for other infrared sources.
Reflective surfaces: Reflective materials that are present in a venue might reflect and mimic a
BTBeacon’s unique LED pulse, creating errors with tracking. Complex objects inside the tracking
area must be covered to block reflections. Reflective objects outside the tracking area can be
blocked out.
Cabling: Ethernet connected BTSensors are subject to the limitation of Ethernet communication
standards. The total Ethernet connection between any component to the BTServer can not be
longer than 91.44m for BlackTrax to function correctly. This range may be extended with a PoE
switch to link cables together.
Sensor stability: Ensure that the location where you choose to install BTSensors is stable, sturdy
and always stationary. Any movement of a BlackTrax sensor will require recalibration of the entire
sensor system.
Example: If a BTSensor is hung on a truss system which sways, the accuracy and
performance of the BTSystem will be affected. If the sway is small, you can decrease
accuracy in the system and may be able to track with lesser accuracy.
Sensor blocking: Ensure that BTSensors have an unimpeded view of the intended tracking area.
Multiple BTSensors need to see the same area at the same time for tracking to occur. Care should
be taken to ensure temporary objects do not obscure tracking.
BlackTrax Wiki
8 of 298
5/14/2019

Installing a BTSensor Lens
To install a BTSensor lens
Note: Only used on s250e and Slim 13E sensors.
Screw the lens onto the BTSensor with the included plastic lens tensioner between the M12 lens1.
adapter and the lens itself. Tighten until proper focus is achieved.
Once you achieve the desired focus, hold the lens in place while you tighten down the lens2.
tensioner.
Note: The s250e comes with a spring for the lens instead of a tensioner. No tightening is required for
this lens.
BlackTrax Wiki
9 of 298
5/14/2019

BTSensor Placement and Orientation
In order for tracking to function correctly, multiple BTSensors must be arranged to have overlapping
fields of view of the Space. A BTSensor's field of view is the part of the Space that is visible through the
BTSensor while the BTSensor is in a fixed position and orientation.
Attention: Sensors must not be installed closer than 1m apart to help ensure optimal sensor calibration.
Good sensor placement and orientation are absolutely critical to proper operation of the BTSystem!
BlackTrax Wiki
10 of 298
5/14/2019

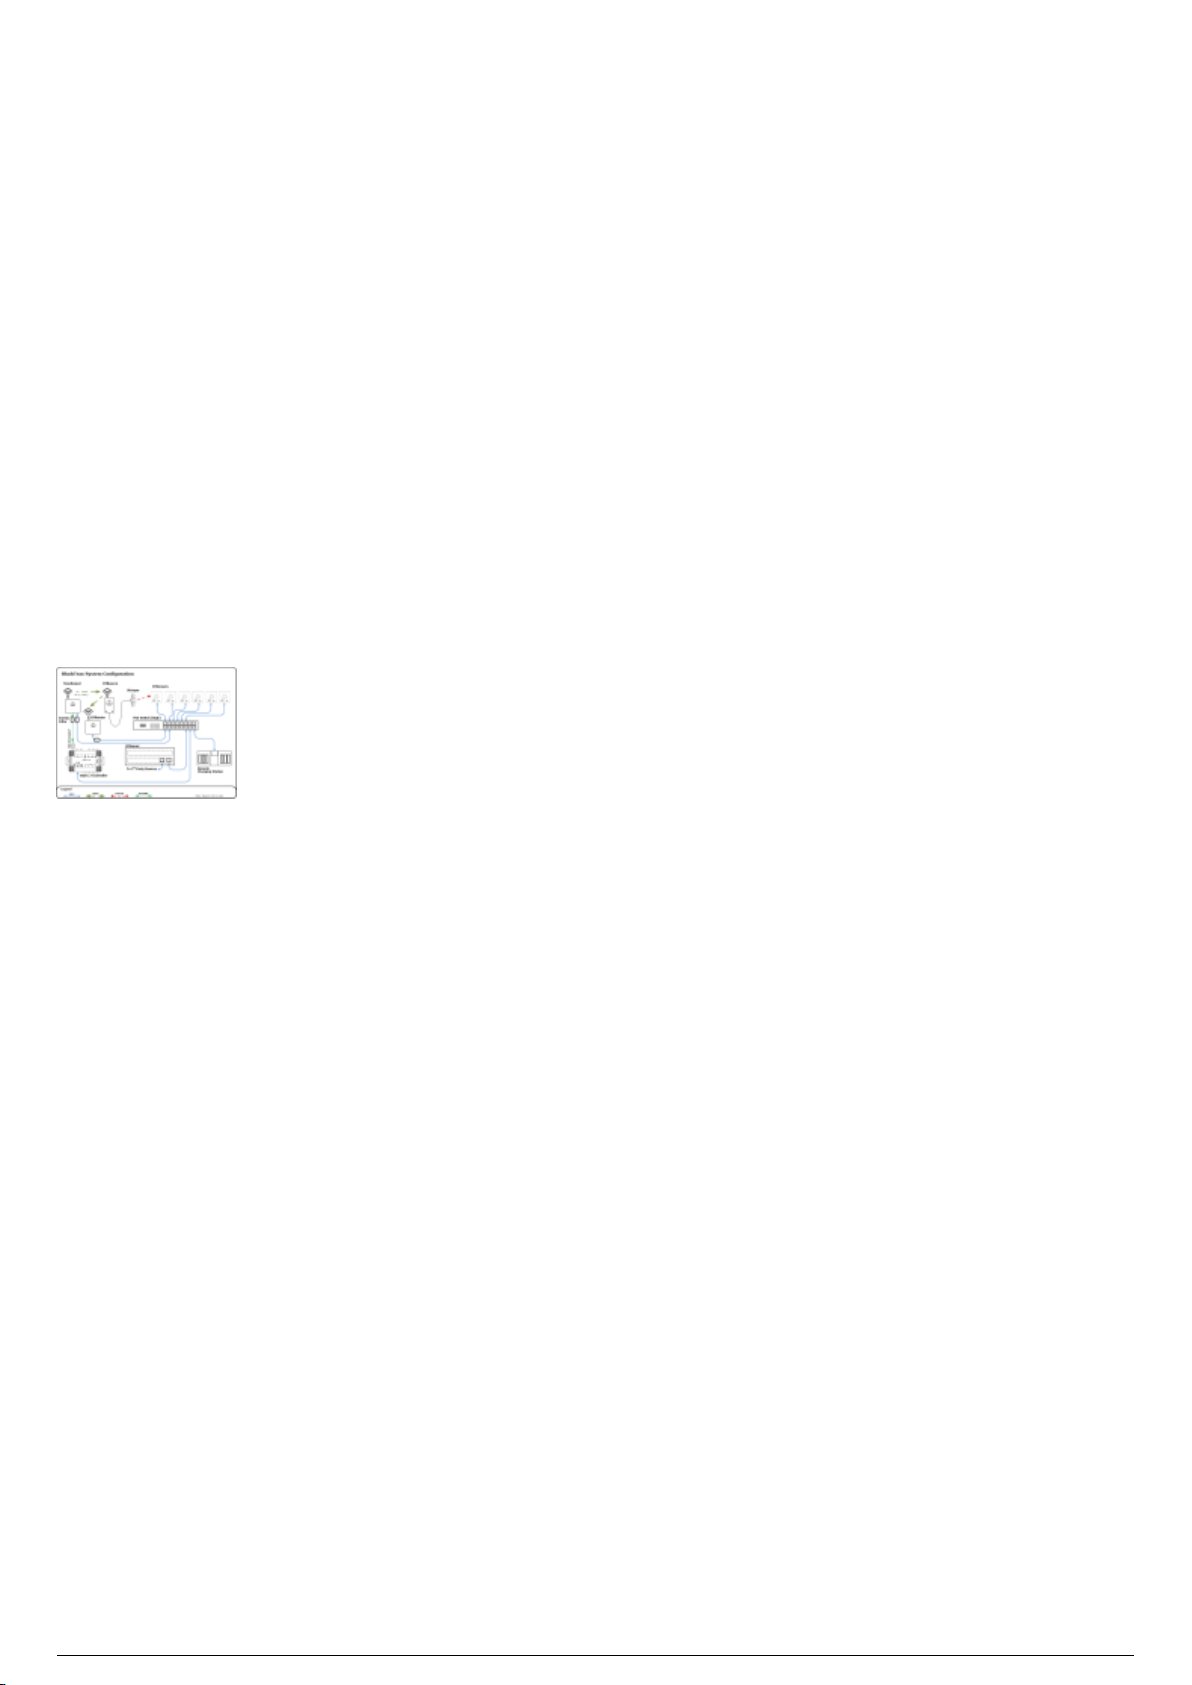
BTSystem Configuration
System Configuration Overview
Hardware modules that connect directly to the BTServer should be located in the same location outside
of the tracking area. BTSensors must be positioned where they will not be disturbed and have the best
unblocked view of the tracking area. TimeKeeper, BTRouter and eSync 2 Controller can be positioned
closer to the tracking space.
The following diagram outlines a typical hardware configuration and demonstrates how all BlackTrax
hardware modules are connected together.
Attention: The Timekeeper and BTRouter Ethernet port are designed only to connect to a commercially
available Power over Ethernet (PoE) network switch. The TimeKeeper and BTRouter are not designed to
be a peripheral device to a Class B personal computer. As such, the Ethernet port shall not be connected
to a Class B personal computer in any operating configuration.
BlackTrax System Configuration Diagram
BlackTrax Wiki
12 of 298
5/14/2019
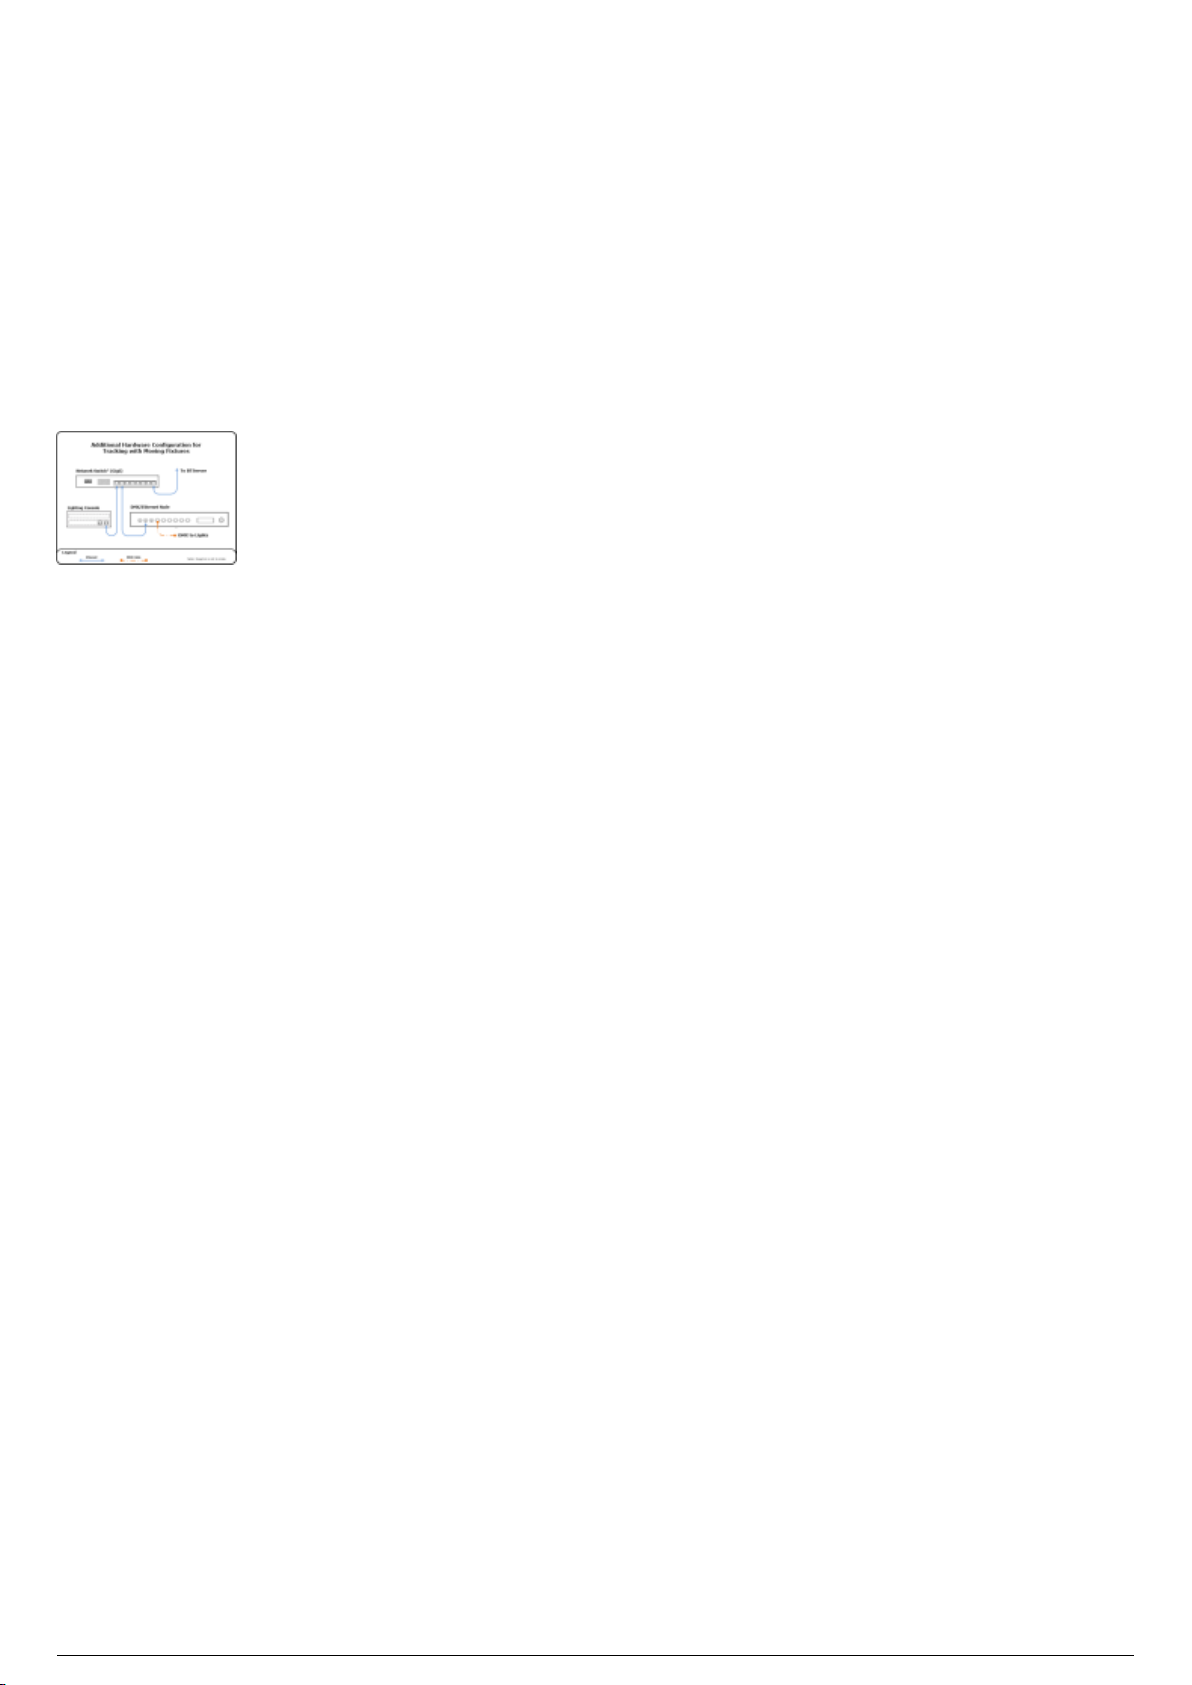
Optional Equipment Configuration
Optional Equipment Overview
Depending on your tracking needs, additional components must be connected with the BTSystem. The
following outlines how to connect this optional equipment with the BTSystem.
Tracking with Moving Light Fixtures Diagram
BlackTrax Wiki
13 of 298
5/14/2019

BTSystem Components
Table of contents:
Standard System Components
BTServer
TimeKeeper
BTRouter
Ferrite Filter
eSync 2 Controller
BTSensors
SLIM 13E
PRIME 41
BTBeacon
BT Smart Charger
Calibration Kit
Calibration Kit functions
Wand Head
Triangular Wand Holder
Telescopic Wand Handle
Ground Plane
Hybrid Power Supply Unit (HPSU)
Lighting Wand
BTCalibration Kit Case
Stringer
Discontinued
eSync Controller
S250e Slim
Power Supply Unit (PSU)
BTServer (Legacy)
TimeKeeper (Legacy)
BlackTrax Wiki
14 of 298
5/14/2019

Standard System Modules
List of Standard System Components
Note: The quantity of BTSensors, BTBeacons, BTSmart Chargers, and Stringers delivered with a
BTSystem are dependent on each user’s needs and on the individual sale.
(1) BTServer (pre-installed software below)
Hardware secured inside the server
BTX Dongle
Motive Dongle
Pre-installed software
BTWYSIWYG
Motive for BlackTrax
BlackTrax Software Suite
Device Manager
(1) BTRouter
(1) TimeKeeper
Ferrite filters
(1) eSync 2 Controller*
BNC/RCA Adapter
BTSensors
BTBeacons
Stringers
BTSmart Charger
(1) BTCalibration Kit
(1) BTCalibration Wand Head
(1) BTCalibration Triangular Wand Holder
(1) BTCalibration Telescopic Wand Handle
(1) BTCalibration Ground Plane
(1) BTCalibration Hybrid Power Supply Unit
(1) BTLighting Calibration Wand
(1) Carrying case
Attention: *The original eSync Controller is discontinued.
Not Included Mandatory Components
Category 6 Ethernet cable
Power over Ethernet (PoE) gigabit Switch
Optional Components
DMX/Ethernet Node (for tracking with moving lights)
Additional Power over Ethernet (PoE) gigabit Switches
BlackTrax Wiki
15 of 298
5/14/2019
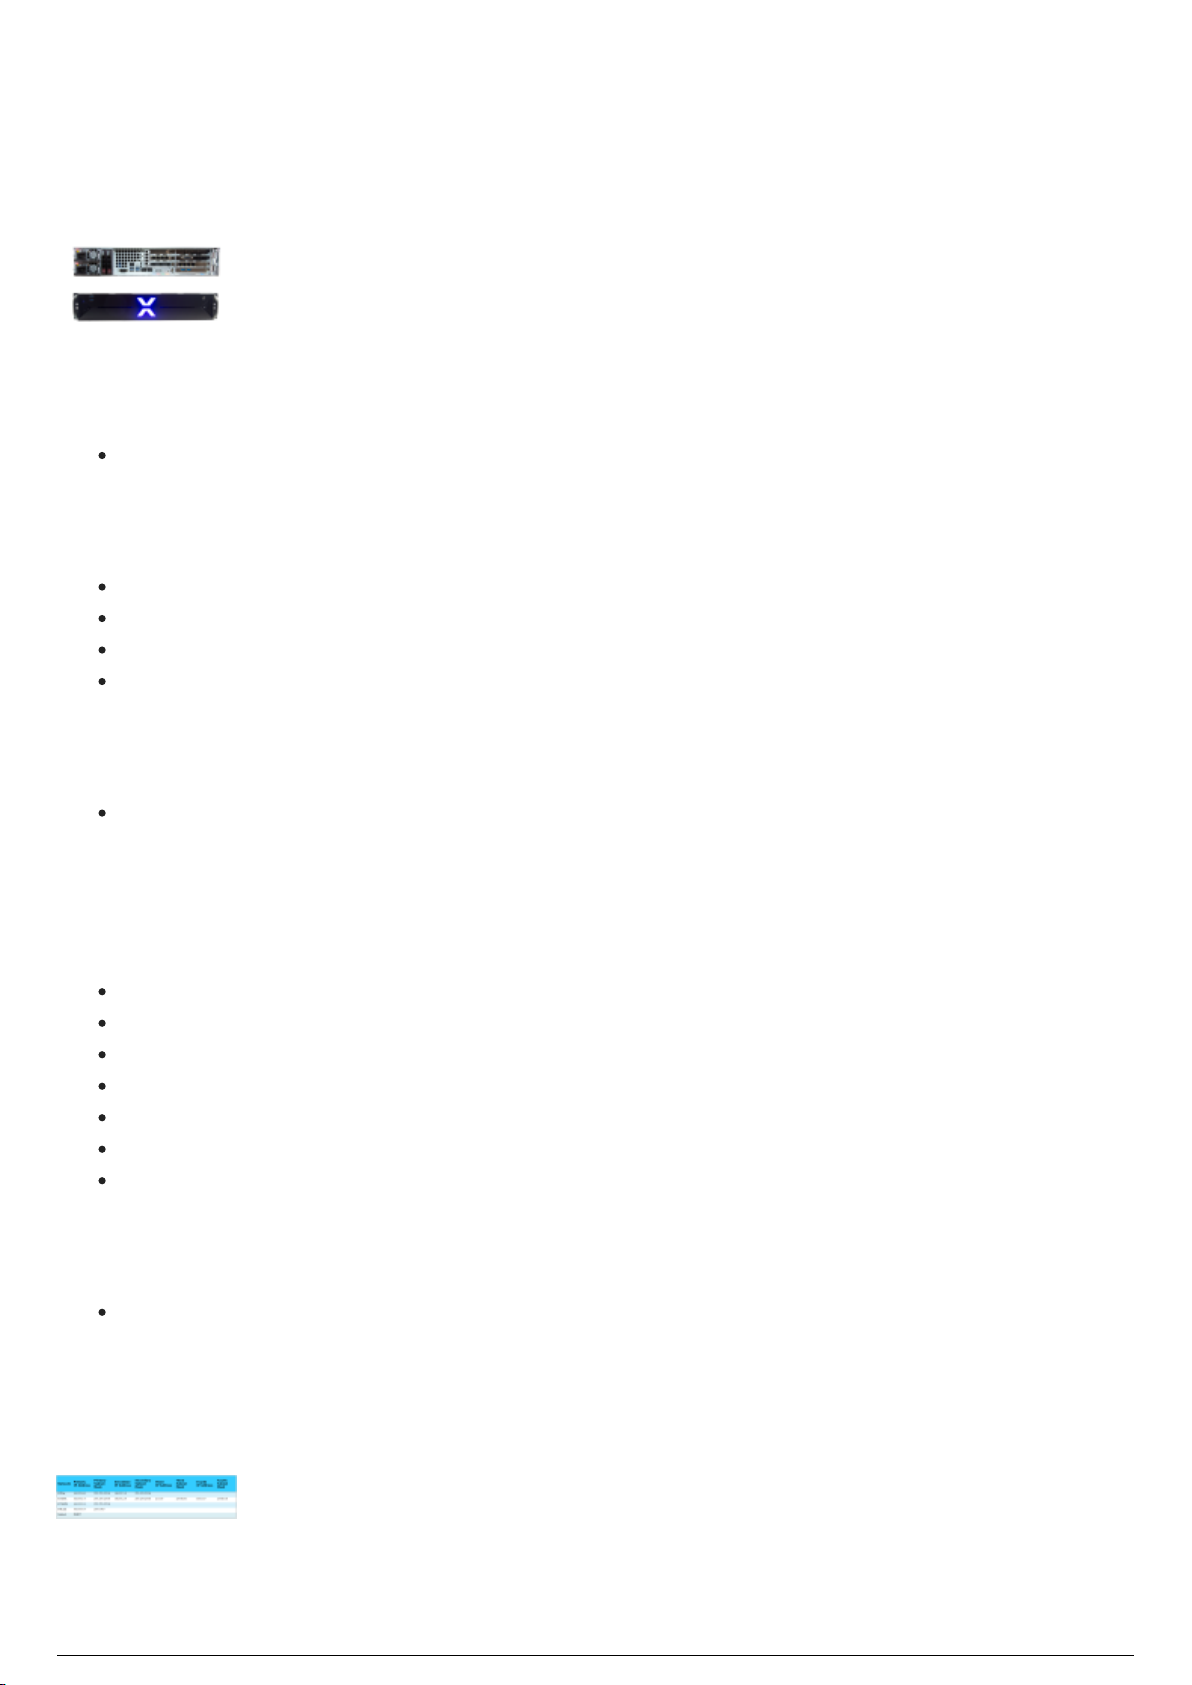
BTServer
BTServer 2.0 (Rev 5)
Product ID
Model: BTServer 2.0 (Rev 5)
Physical Characteristics
Width: 48 cm (19")
Height: 9 cm (3.5")
Depth: 48.5 cm (19")
Weight: 15.2 kg (33.5 lb.)
Operating Temperature
0°C - 40°C
Technical Specifications
BTServer 2.0 (Rev 5):
(2x) Inter Xeon Silver 4110 @ 2.1GHz (3.00 GHz Turbo, 2400 MHz, 11M L3 Cache, 8 Core, 85W)
(2x) 2.5" 480GB SSD SATA in RAID1 on LSI MegaRAID SAS 9341-4i
32GB (8x4GB) RAM (DDR4, ECC, 2666 MHz)
Nvidia GeForce GTX1060 with 6GB GDDR5
100-240VAC, 800W redundant power supply with IEC
(2x) Intel I350 Quad-Port Gigabit Ethernet Controller (1 dedicated, 1 definable)
Windows 10 IoT Enterprise LTSB 2016
Default User Login
User name: btuser
Note: There is no password associated with the default user account for the BTServer
Default Network Address (Main)
BlackTrax Wiki
16 of 298
5/14/2019
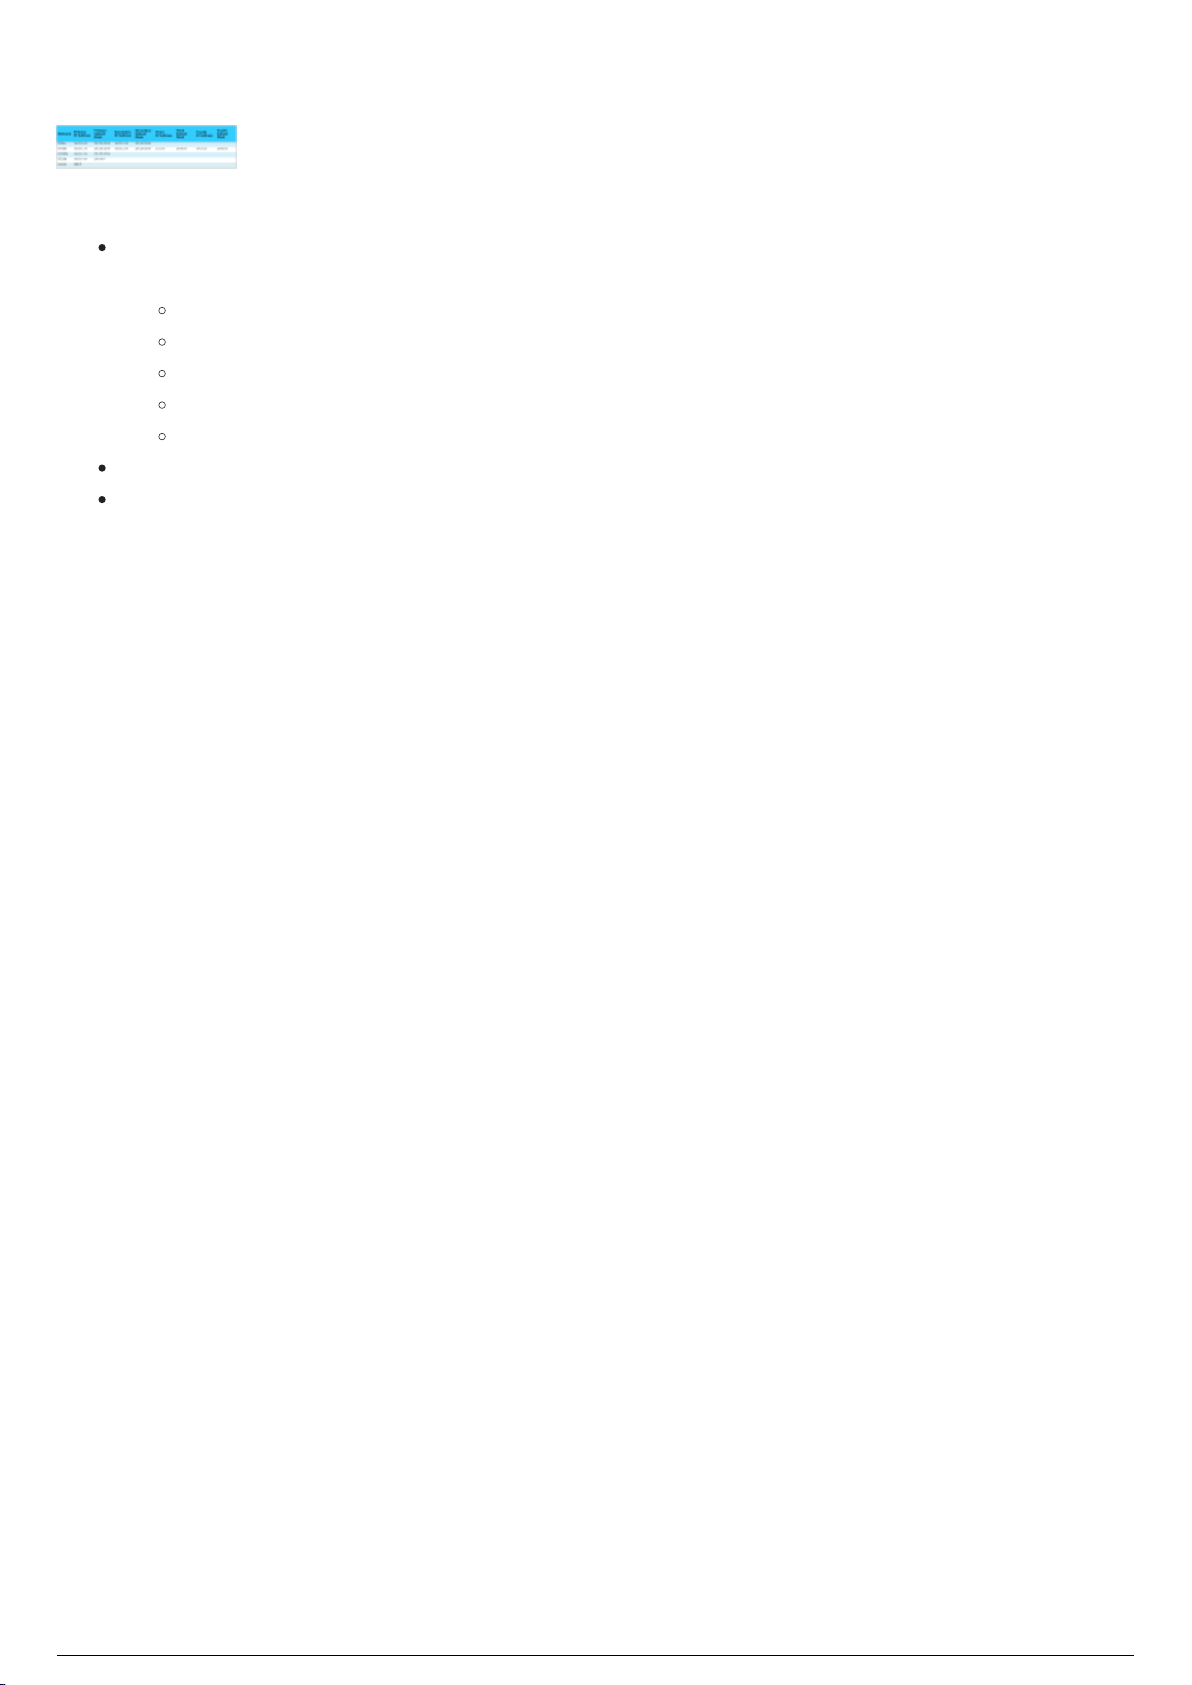
Default Network Address (Backup)
Note:
The BTServer is built with 2 Network Interface Cards (NIC) with 4 ports on each card, and the
functions are: (see BlackTrax detailed system diagram)
Port 1: BTNet (PoE Switch - Tracking, BTSensors, BT Smart Chargers)
Port 2: RTTrPL and Lighting Input (Network Switch - Lighting)
Port 3: RTTrPM (Network Switch - 3rd Party)
Port 4: BTLink (links to BTServers)
Port 5-8: (User Defined)
Lighting Input and RTTrPL are combined into the RTTrPL port.
BTLink is the network connection link to the other BTServers.
Attention: Windows Remote Desktop Connection should not be used with a BlackTrax system. Security
measures on the BTX dongle installed in the BTServer will prevent it from working. Users should use
TeamViewer or VNC if remote access to a BTServer is required.
BlackTrax Wiki
17 of 298
5/14/2019

TimeKeeper
TimeKeeper (Rev J) Diagram
Product ID
FCC ID: RKT-BTTKV01
IC: 10858A-BTTKV01
Model number: BTTKV01
Physical Characteristics
Width: 6.46 cm (2.545")
Height: 7.50 cm (2.951")
Depth: 2.50 cm (0.968")
Weight: 86.64 g (3.056 oz)
Operating Temperature
0°C to +40°C (32°F to 104°F)
Input/Output & Power
Data: Ethernet, Radio 2.4(GHz) 10Hz
Power: 48VDC/15.6W from PoeE Network Switch via Ethernet port (No input power via USB port)
Status LEDs
Note: The Ethernet status lights on the TimeKeeper are not enabled while the TimeKeeper is in use.
BlackTrax Wiki
18 of 298
5/14/2019
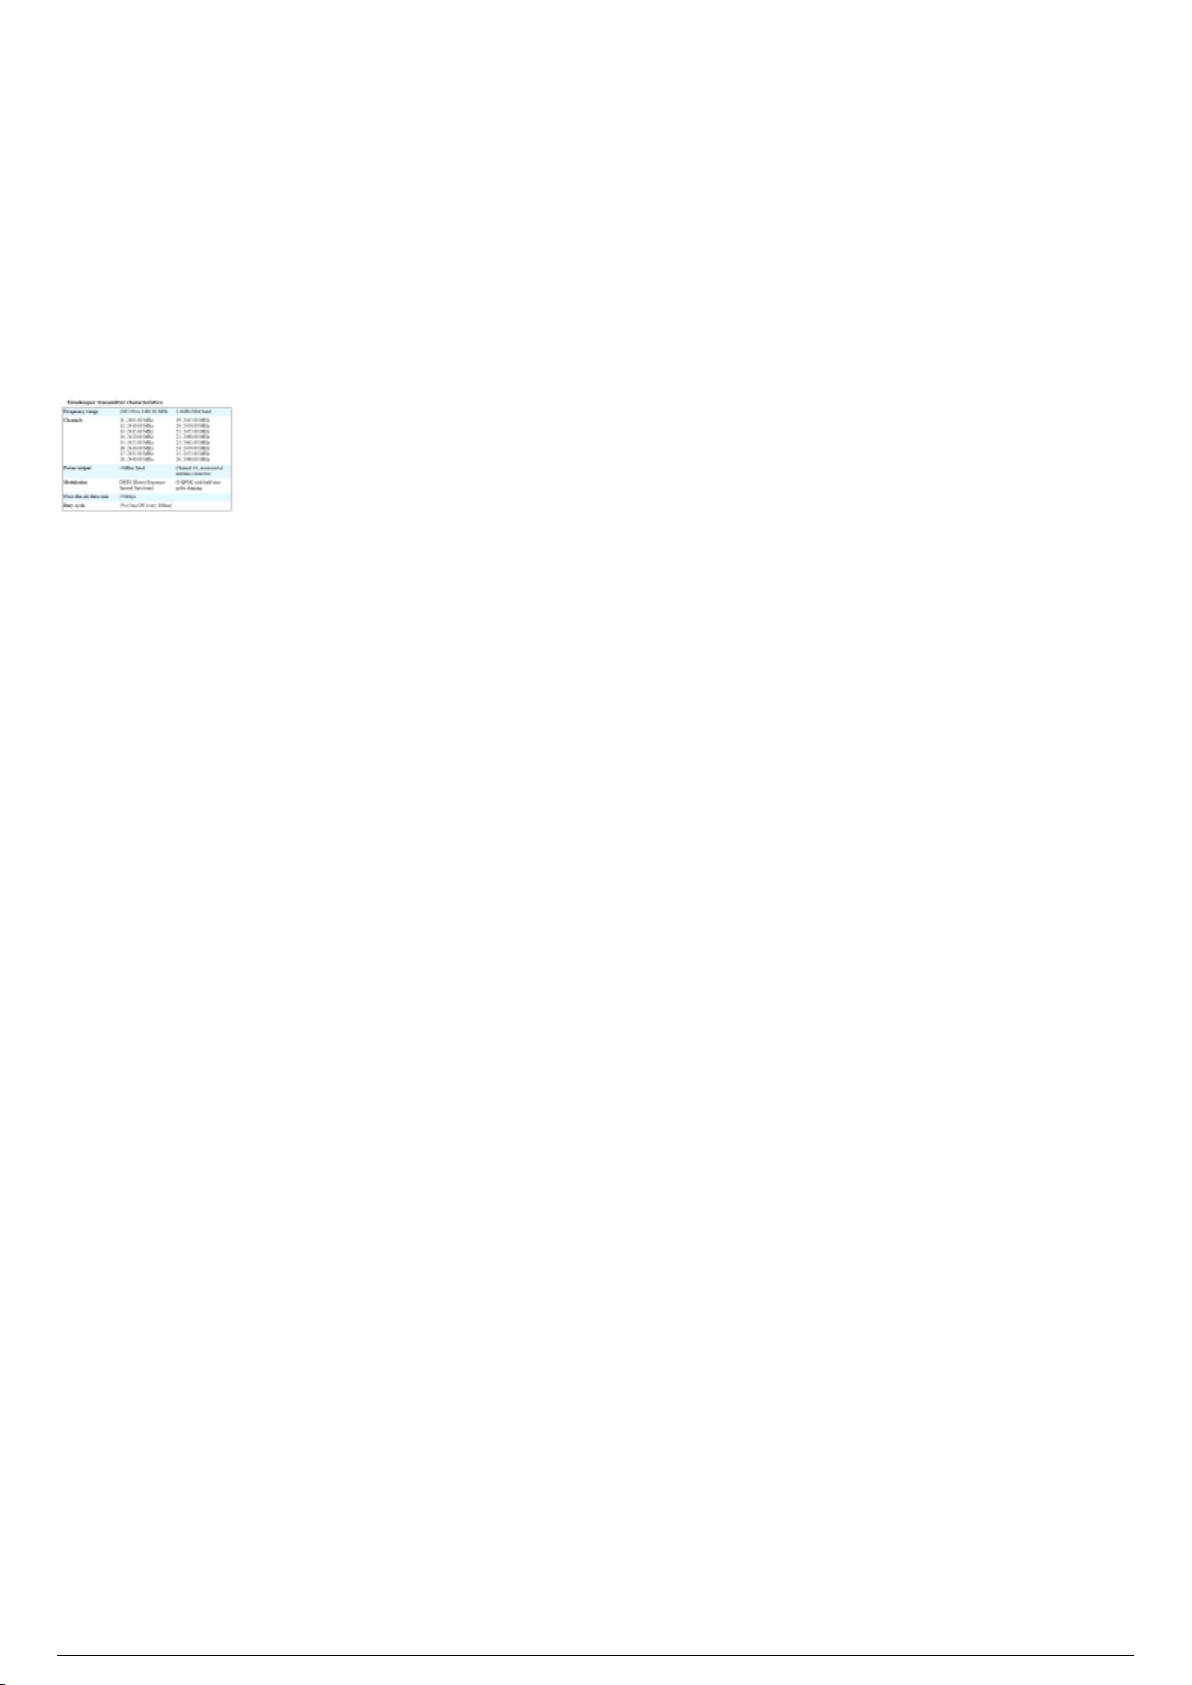
TimeKeeper Functions
The TimeKeeper is a single wireless access point that uses a proprietary radio system running on the 2.4
Ghz frequencey to send data to all BTBeacons. Data sent includes a signal used to synchronize the
BTBeacons with the BTSensors and configuration commands sent to the eSync Controller via a BNC
cable.
TimeKeeper Transmitter Characteristics
BlackTrax Wiki
19 of 298
5/14/2019

BTRouter
BTRouter Diagram
Product ID
FCC ID: RKT-BTTKV01
IC: 10858A-BTTKV01
Model number BTTKV01
Physical Characteristics
Width: 5.7 cm (2.245")
Height: 7.11 cm (2.8")
Depth: 2.57 cm (1.013")
Weight: 125 g (4.41 oz)
Operating Temperature
0°C to +40°C (32°F to 104°F)
Input/Output & Power
Data: Ethernet, Radio 2.4(GHz) 10Hz
Power: 48VDC/15.6W from PoE Network Switch via Ethernet port (No input power via USB port)
Status LEDs
BlackTrax Wiki
20 of 298
5/14/2019
Table of contents


