Blaupunkt SANJOSE120 User manual

BLAUPUNKT
6.2"Touch
Screen
Display
DVD Receiver
Instruction
Manual
SAN
JOSE
120

IN
CAR
MULTI-MEDIA
PLAYER
OPERATION
MANUAL
IMPORTANT NOTICE &PRECAUTIONS
Thankyou for buying a
BLAUPUNKT
product.
To
operate this
unit
correctly, please read
the
operation manual carefully before using. Keep this operation manual for future reference.
The
unit
designed only for
DV
12V negative
ground
operation system. Make sure
your
vehicle
is
connected
to
DC
12V negative
ground
operation system.
Be
sure
to
connect
the
speaker(-) leads
to
the
speaker(-) terminal. Never connect
the
left and
right
channel speaker wires together or
to
the
vehicle body.
The normal remperature for operation
is
between -20 and +60 degree Fahrenheit. Do
not
operate
in extreme temperature and lockvents
or
radiator panels
of
the
unit,
as
this will cause heat
to
build
up inside
the
unit
and may cause damage or afire.
This
unit
can play
the
following
discs (4.72 in) and media files: DVD±R/RW/RMVB/MPEG4/ AVI/
SVCD/
VCD/ MP3/
WMA/
CD-R/ RW/
JPEG.
This operation manual shows
the
full version
of
the
unit.
GPS
navigation system, dynamic
multi-colour
illumination; back
USB
connection; iPod connection, digital
TV
tuner; analog
TV
tuner; Bluetooth and AM radio are optional features
of
the
software and may
not
be include.
Please
refer
to
the
exact funtions & features
that
equipped
with
this
unit
for operation.
[ 1 ]

INSTALLATION
Bracket
Exlatlng
parts
.
aupplled
to
your
car
......__....J
WIRING CONNECTION
BACK OF MAIN UNIT
000000o01J&JUU
9®§@
00
~
®®®C0
@@®®
8
A
.
POWER
AUDIO-OUT
VIDE().()UT
A/V·IN
[ 2 ]
NOTES:
-Installation varies
by
car model and
supplied parts.
-Store small articles in places
not
accessible
by
children.
-Use
only
supplied screws for installation.
-lntallation
of
the
unit
by
a professional
technician
is
strongly recommended.
Remarks:
Mounting
Brackets and screws are
not
provided in this unit.
Remarks:
Due
to
the law of some countries,
video playback
is
not allowed
during driving. To allow video
playback during driving, the brown
wire (brake) should
be
connected
to
ground (8-) of the car battery.

IPortion
/Colour
IConnection
Connecting Socket POWER Red Ignition switch (B+)
Black
_(Coarse)
Ground (B-)
Yellow Memory back up (B+)
White Front left speaker(+)
White I Black Front left speaker
(-)
Grey Front right speaker (
+)
Grey I Black Front right speaker (-)
Green Rear left speaker (
+)
Green I Black Rear left speaker (-)
Purple Rear right speaker(+)
Purple I Black Rear right speaker(-)
Blue I White Auto antenna (B+)
Pink Back sight (B+)
Pink I Black Front camera (B+)
Grey Steering wheel control (
1)
Green Steering wheel control (2)
Black (Fine) Steering wheel control (Ground)
Orange Headlamp detection
(Connect to on/off control of car headlamp)
Blue Amplifier control (B+)
Brown Brake (B-)
ANT Radio antenna
Audio output jack
sw
Green Sub-woofer output
FL White Front left speaker output
FR
Red Front right speaker output
RL White Rear left speaker output
RR
Red
Rearrightspeakeroutput
Audio input jack L White Auxiliary left speaker input
R Red Auxiliary right speaker input
Video output jack
V1
Yellow Video output
V2 Yellow Video output
Video input jack R-CAM Yellow Back sight camera input
V-IN Yellow Video input
F-CAM Brown Front camera input
[ 3 ]

MAIN
UNIT
OPERATION
6
3
2
12
13
7
11
-
:---
1 4 9
I I I
l !
I!
:n
p-
~
~
-
~
~
~ ~
~
~
t~
,__.
~
~
II
0 /
5
10
8
I
I
llJ~~
I
./'
..........
Symbol/
Function Operation & Control
1.
RES I RST
Press
using a pointed
object
to
reset the
unit
to
its initial factory settings
2.
(.!)I
POWER
VOL+ I VOL
MUTE
I£){
3.
MIN
4.
IR
5.
DISC SLOT
6.
~I
EJECT
7. USB
8.
MICRO
SO/.
9.
MIG
10.
TFT SCREEN
11.
AUX
12. DVD
13. BND
When the
unit
is
turned off, press
to
turn
the
unit
on
When
the
unit
is
turned on, press and hold briefly
to
turn
the
unit
off
Twist
nob
to
adjust sound
output
level
Press
to
turn
on/off
sound
of
unit
Press
to
shift between MAIN
MENU
and current operation
mode
Sensor for remote control and Infrared
(IR)
enabled products
Slot for inserting
or
removing disc
Press
to
eject disc from
the
disc slot
when
a disk
has
been inserted
Insert
USB
device
into
this slot for digital file playback
Insert for microSD card
to
this
port
for digital files
For voice reception under Bluetooth operation
Shows the status
of
the
unit.This screen
is
also atouch screen display
which can be used
to
operate different playback modes
Insert an external device
to
the auxiliary
port
for sound
output
to
the
unit
Press
to
shift the current operation
mode
to
disc operation
mode
While in Radio mode, press
to
select radio band (AM/FM) for playback.
[ 4 ]

Note:
he
mentioned
symbolsI
functions
I operationsI controls
shown
in
this
user manual
may vary
between
units,
and
may
not
be available
for
control
in
this
unit.
Printings and symbols
may
vary
from
the
unit. Refer
to
the
main
unit
for
the
exact
functions and features available.
It
is
recommended
that
touch
screen controls
be used
to
operate
the
unit.
REMOTE
HANDSET-GENERAL
OPERATION
~~~~~~~~~
15
7
.....,.._+-
16
....,....__..,~"+-+-
17
......lr+-+-
18
~
:::o:::::~~t-
19
~"'f'-!~-+-2
0
a
~~
'---.::=-
-H-
-=
::....__r
21
9
--+--~+-
"
10
-+----'
ll
......j---...1
....._;;;.__~22
"-----+-23
.._
____
..,..._24
BATTERY
REPLACEMENT
Refer to the
back
of remote handset for details on
how to replace the battery.
Remove this tab before using the remote handset
[ 5 ]

NO.
SYMBOL
1.
2.
3.
4.
5.
6.
7.
8.
9.
«
SOURCE
SYS
I
CLR
EQ
LOUD
AUDIO
OSD
1-6
0-9
ZOOM
BND
•
10.
ADM
11.
INT
12.
....
••
13.
A.ITI~I""4
OPERATION&CONTROL
MODES
When
the
unit
is
turned
off, press
to
turn
the
unit
on
When
the
unit
is
turned
on, press and
hold
briefly
to
turn
the
unit
off
During
unit
operation, press
to
turn
on/off
sound
of
the
unit
Press
repeatedly
to
select
the
desired
operation
mode
While in Bluetooth mode, press
to
erase
number
inputs
Press
repeatedly
to
select
the
desired preset sound equalization mode.
Press
&
hold
briefly
to
turn
loudness
control
ON
or
OFF
In Video and Music playback mode, press &
hold
briefly
to
select
different
audio
output
channels. (Note: Available
inly
with
input
devices
or
media files
that
have
different
output
channels.
Not
available in
Bluetooth
mode)
While in Media playback
mode,
press
to
display
information
about
playback
on
screen.
(Note:
Not
available
during
Music playback
mode)
Radio
Mode
Press
any
one
of
the
number
keys 1-6
to
select a station
that
had been stored in
the
preset
memory
Disc I
USB
I
SD
I
Input
Mode
Press
to
input
the
number
of
a track
for
playback
Bluetooth
Mode
Press
to
input
a desired
phone
number
to
call
TV
Mode
Press
to
input
the
channel
number
for
viewing
Disc I
USB
I
SD
Input
Mode
During
Video &
Photo
playback, press &
hold
shortly
to
zoom
in and
out
of
the
screen
Radio
Mode
Press
to
start scanning
for
preset stations saved in
the
unit's
memory.
Press
&
hold
briefly
to
start searching
for
stations
to
store
into
the
preset
memory
station
numbers
1-6. After storing
the
stations,
the
unit
will
start scanning all
of
the
preset stations stored in
the
unit's
memory
and stop briefly
to
broadcast stations.
Radio
Mode
Press
repeatedly
to
select
the
desired radio band (AM/FM)
for
playback
Disc I
USB
I
SD
Input
Mode
During
playback, press
to
stop playbackand return
to
the
device's playlist
for
playback selection (Note:
depending
on
the
input
device, a playlist
may
not
be available)
Bluetooth
Mode
Press
to
end
a
current
call
or
reject an
incoming
call
During
Disc I
USB
I
SD
input
playback, press and
hold
briefly
to
turn
on/off
random
playback (Note:
not
available
during
Bluetooth
mode)
During
music playback, press and
hold
briefly
to
turn
on/off
in
the
introductory
playback
During
Disc I
USB
I
SD
input
and
Bluetooth
mode, press
to
pause/resume/start playback
DVD
Mode
During
DVD
menu/title
display mode, press
to
select
the
desired
setting/setup
option
and press
ENT
to
confirm/enter
[ 6 ]

14. ENT
16.
REP
17.
ANGLE
18.
TITLE
19.
SUB-T
20.
21
.
22.
SLOW
VOL+IVOL-
MENUIPBC
23. SETUP
24. '
Folder
I
Playlist Mode
During media playback
mode
when
the
folder/playlist display
is
visible, press
repeatedly
to
select atrackfor playback. Once selected, press
ENT
to
confirm
Photo Playback Mode
Press
to
rotate
photo
position
or
display
photo
in
up-down,
left-right
mirror image positions
DVD Mode
I
FolderiPiaylist Mode
During media playback
mode
when viewing
DVD
menu/title
display
mode
and folder
/playlist display, press
(ICONS)
to
select
the
desired setting/setup and
press
ENT
to
confirm/enter
Radio Mode
Press
repeatedly
to
fine
tune
radio frequency up or
down
the
band
Press
and hold briefly
to
tune
radio frequency
up
or
down
the
band
and stop broadcasting when a station signal
is
found
Disc
I
USB
I
SD Input Mode (Playback Mode)
Press
repeatedly
to
shift
to
the
next
or
previous track for playback
Press
and hold
to
fast-forward
or
rewind atrack
Bluetooth Mode
Press
to
shift
to
the
next
or
previous trackfor
playbac~
TV
Mode
Press
repeatedly
to
shift
to
the
next
or
previous trackfor playback
Press
and hold briefly
to
switch between channels
During playback
of
Disc
I
USB
I
SD
input, press and hold briefly
to
repeat playback.
During video playback mode, press and hold briefly
to
view angle changes in
sequential order (Note: available on media files recorded
with
this feature)
DVD Mode
Press
and hold briefly
to
display
the
title
of
the
disc
Video Playback Mode
Press
& hold briefly
to
select different subtitles
that
are available through the
input
device
or
media files.
Radio
Mode
While on an
FM
radio band, press
to
select local settings for reception
of
strong signal
stations and distant setting for reception
of
weak signal stations (Note:
LOC
appears on
screen on local settings whereas no indication for distant settings)
During Video playback mode, press & hold briefly
to
select different speeds on slow
motion
playback
Press
repeatedly
or
press and hold
to
adjust sound
output
level
DVD Mode
Press
and hold briefly
to
display
the
main menu
of
the
disc
VCDMode
Press
and hold briefly
to
turn
on/off
PBC
playback
During
unit
operation, press and hold briefly
to
activate setup menu on screen.
Press
and hold briefly again
to
return
to
previous operation mode (Note: Setup
of
unit
cannot be operated by remote control. Setup
of
unit
can only be operated
by
touch
screen -refer
to
ON
SCREEN
OPERATION
for details)
Bluetooth Mode
Press
to
pick
up
an
incoming call; make an
outgoing
call after
inputting
a phone
number; redial last
number
called
[ 7
1

25.
~I
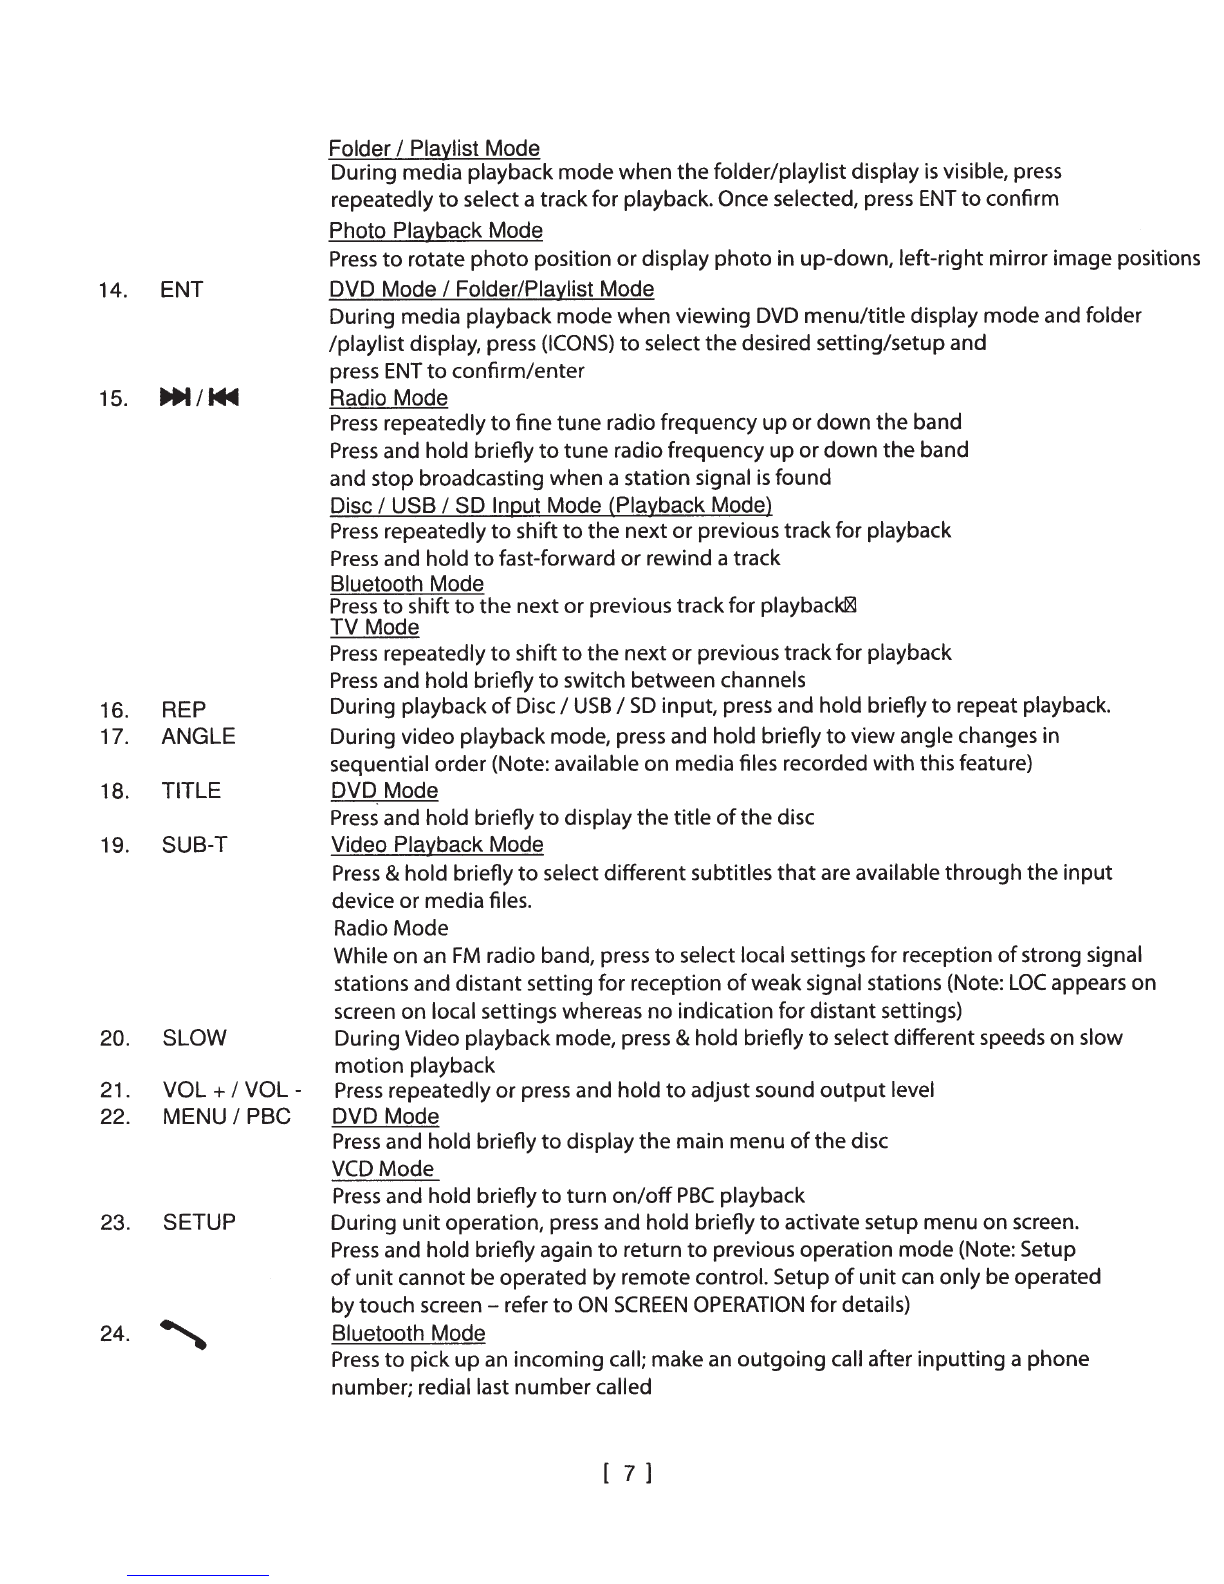
PHONE Bluetooth Conversation Mode
Press
and hold briefly
to
shift conversation between main
unit
and mobile phone.
Notes:
Depending on the
input
devices and playback media files, functions may be varied
or
not
available on this device.
ON
SCREEN-
MAIN
MENU
OPERATION
~
During unit operation and when this icon appeared on screen, touch to shift screen to MAIN
i.&,i
MENU for various operation and setup. Touch the icon on the desired mode on screen and
the unit will then enter into the mode that selected for operation. If no selection has been
made for a while, the unit will shift back to the previous operation mode.
MAIN
MENU AUDIO CONTROL MENU
9 8 7 6 5
15
16
1.
Touch
to
start radio operation (when the radio antenna connected).
2. Touch
to
start disc input operation (when a disc inserted).
3. Touch to start USB input operation (when
an
USB device inserted).
4. Touch to start
SO
card input operation (when a micro SO card inserted).
5. Touch to start Bluetooth operation (when connected to a mobile phone).
6. Touch repeatedly to select the desired background (wallpaper) of the unit.
7. Touch to activate SYSTEM SETUP MENU on screen to have various setup of the unit.
8. Touch to start viewing front camera (when connected to front camera and pink/black wire).
9. Touch to start auxiliary input operation (when an auxiliary device inserted).
10. Touch to turn off the screen. When the screen has been turned off, touch any portion of
the screen to turn it on again.
11. Touch
to
activate
AUDIO
CONTROL
MENU
for
various audio setup.
12. Touch
to
start Bluetooth operation (when connected to a mobile phone).
Note: When a mobile phone has been connected, Bluetooth icon will be highlighted
13. Touch repeatedly to select brightness
of
screen or turn off the screen. When the screen is
off, touch any portion of the screen
to
turn the screen on again. Following preset
brightness modes can be selected:
..
~,...II
II
At this brightness mode, the brightness of screen is set
r..t
~ ~
by the user (user setting).
[ 8 l

14. Touch to select the desired preset equalization mode. At r User
J
mode, bass
&
treble c
an
be
set by user.
15. Hold
&
slide up/down to set for the output level on bass
&
treble at r User
J
mode.
16. Hold
&
slide to set for the output level on front I rear I left I right speakers.
17. Touch to close
AUDIO
CONTROL
MENU
ON SCREEN-
UNIT
SETUP OPERATION
~At
MAIN
MENU
,
touch to activate various setup of the unit.
SYSTEM SETUP MENU DISC SETUP MENU CALENDAR SETUP MENU
AUDIO SETUP MENU VISUAL SETUP MENU
SCREEN
SETUP MENU
ILLUMINATION SETUP MENU
SW
SETUP MENU VERSION MENU
1. Touch to shift screen to
MAIN
MENU
for various operation and setup.
2. Touch to shift to Bluetooth operation.
Note: This icon will only be appeared when the unit has been linked up with a mobile phone.
3. Touch
to
activate
AUDIO
CONTROL
MENU
for
various audio setup.
[ 9 ]

4.
Touch to turn off the screen. When the screen turned off, touch any portion of the screen to
turn on the screen again.
5.
Hold
&
slide
to
show
the
hidden
operatio
icons.
6.
Touch
to
shift to SYSTEM SETUP MENU for various setting.
7.
Touch
to
shift
to
DISC
SETUP
MENU
for
various
setting.
8.
Touch
to
shift
to
CALENDAR SETUP MENU for various setting.
9.
Touch
to
shift
to
AUDIO SETUP MENU for various setting.
10.
Touch
to
shift
to
VISUAL SETUP MENU for various setting.
11.
Touch
to
shift to SCREEN SETUP MENU for various setting.
12.
Touch
to
shift to ILLUMINATION SETUP MENU for various setting.
13.
Touch
to
shift
to
SW SETUP MENU for various setting.
14.
Touch
to
shift
to
VERSION MENU for various setting.
15. Touch repeatedly to select the default
on
screen language.
16
. Touch
to
turn on or off of allowing watching video during driving (when the
brake-
brown wire
has not been connected).
17.
Touch to turn
on
or off of beep sound when touching
on
screen for control.
18. Touch
to
turn
on
or off of front camera input (when front camera and the pink/black wire
connected):
....
when the front camera input
is
turn
on
and the car
is
shifted from backward mode
to
forward mode, front camera input will be display for 10 seconds
....
the default setting after first installation is off and at this moment, no front camera input will
be display when the car is shifted from backward mode to forward mode
19. Touch repeatedly to select "Audio Language"; "Subtitle Language"
&
"Menu Language"
Language" for DVD playback provided the DVD recorded with relative languages.
Note: During DVD playback mode, new setting cannot be activated. It is recommended
to set before inserting a DVD for playback
20. Touch to activate SCREEN RATIO MENU to select aspect ratio of screen for viewing.
21. Touch repeatedly to set for year I month I day I hour I minute I 12/24 hour format.
22. Touch repeatedly to set for output level
on
volume I treble (TRE) I bass (BAS) I fader (FAD) I
balance (BAL).
23. Touch repeatedly to set for brightness I contrast I hue I saturation of screen.
24. Touch to reset and brightness I contrast I hue I saturation will return to its default stage.
25. Touch repeatedly to set for the dimmer (brightness) of screen.
26. Touch
to
activate SCREEN CALIBRATION MENU
on
screen. Follow the r +
J
mark appeared,
touch
to
complete the calibration.
!I
27. Touch
to
select the desired illumination backlight colour.
At AUTO mode, colour of backlight will change automatically (cycle change).
At USER mode, colour of backlight can be set by user.
28. Touch to select the function for setting (when the steering wheel control wires
-grey
&
green
as well as the ground wire connected).
29. Touch
to
reset.
30. Touch repeatedly to select the radio frequency that suit the country/region located.
31. These show the version of the unit and not available for setting.
[
10]

ON SCREEN- RADIO OPERATION
At MAIN MENU, touch 1 Radio
J
icon to shift screen to RADIO MENU for radio operation.
RADIO MENU RADIO MENU RADIO MENU
:~:
.
011
:1
r-:.
.,
..
,
.....
'
:k
:~L
(lt1:
1
/""'.
,
,,
"'
•..t
'
,\
Otll
I
:k
1
""1"
.l....l..
lol
...
cl~
..
l
11
cluuI
111111111
J: o
looul
IU~.fll
~~
~
~~~
1
1
1111
1
II
'I
II
"I
Ill
I
IIII
I
.....
'1
1111
1
....
..
«
IM1
87.50
MHr
» «
IMI
87
.SO
MI~t
»
--
,..
,.,.
~
·~
....
AM
, M
.i
< >
Q)
< >
Q)
Q.
~
AM
I'
M
.i
< >
Q)
7
8 9
10
11 11
12
7 7
11
9
11
12
13
14 7
7
8
10
11
11
12
7
1.
Touch to shift to MAIN MENU for various operation and setup.
2. Touch to turn off the screen. When the screen turned off, touch any portion of the screen to
turn on the screen again.
3. Touch
to
activate AUDIO
CONTROL
MENU
for
various audio setup.
4.
Touch to start Bluetooth operation (when connected to a mobile phone).
Note: When a mobile phone has been connected, Bluetooth icon will be highlighted
5. Hold & slide to select the radio frequency for broadcasting.
6. Touch to tune the radio frequency to upward
or
downward station for broadcasting.
7. Hold & slide to show the hidden setup modes.
8. Touch to select FM
&
AM radio band for broadcasting.
9. Touch to activate the preset memory stations list on screen.
1
0. Touch
to
start searching the radio frequency & storing the strongest signal station into memory.
Afteronecycle searcher, the unit starts intro broadcasting
of
the present memorystations for
a
few
seconds. Touch again
to
stop
this intro broadcasting.
11
. Touch repeatedly to fine tune radio frequency upward or downward.
Touch
&
hold shortly to turn frequency upward or downward and stop broadcasting when a
station received.
12. Touch to select stereo (ST) or mono mode at
FM
radio band. When stereo signal received,
stereo indicator will be appeared on screen and this is no indicator for mono signal.
13. Touch to start intro broadcasting of the preset memory stations for a few seconds.
Touch
&
hold shortly to start searching the radio frequency
&
storing the strongest signal
stations into memory. After storing, the unit starts intro broadcasting
of
the preset memory
stations for a few seconds.
14. Touch to select local (LOC) setting for reception of strong signal stations and a distant setting
for reception of weak stations. When local (LOC) setting
is
selected, LOC will appear on
screen and this
is
no indication for distant setting.
15.
Touch the desired preset station number (any of 1-20) to start broadcasting selected station.
Touch & hold shortly the preset station number can store the current broadcasting station
(frequency) into that station number.
[
11
]

ON
SCREEN- DISC/USB/SO CARD INPUT OPERATION
At MAIN MENU, touch r DISC
J
I
r USB
J
I
r CARD
J
icon
on
screen to shift to multi-media
playback mode and playback will start automatically. Depends
on
the input device and playback
media, touch on screen to show various menus for operation.
DVD
VIDEO
DVD
VIDEO
DVD
VIDEO
PLAYBACK
MENU
PLAYBACK
MENU
PLAYBACK
MENU
VCD/VIDEO
PLAYBACK
MENU
VCD/VIDEO
PLAYBACK
MENU
18
2 3 4
I -
~
jt
•
VCD/VIDEO
PLAYBACK
MENU
MUSIC
PLAYBACK
MENU
MUSIC
PLAYBACK
MENU
PHOTO
PLAYBACK
MENU
18
2 3 4
18
2 3 4 1
19
2 3 4
PHOTO
PLAYBACK
MENU
PHOTO
PLAYBACK
MENU
FOLDER/PLAYLIST
MENU
1 19
2 3 4 1
19
2 3 4
2 3 4
[
12]

KEYBOARD MENU AUDIO CONTROL MENU 1 AUDIO CONTROL MENU 2
411'
0000/0055 -
1 ? 1 A
'i
R 7 R q 0
30
32
33
1.
Touch to shift to
MAIN
MENU for various operation and setup.
2. Touch
to
shift to Bluetooth operation.
Note: This icon will only be appeared when the unit has been linked up with a mobile phone.
3. Touch to activate AUDIO
CONTROL
MENU 1 for various audio setting.
4.
Touch
to
turn off the screen. When the screen has been turned off, touch any portion of the
screen to turn it
on
again.
5. Hold & slide to show the hidden setup modes.
6.
At DVD mode, touch to show on screen the menu of the disc.
At VCD mode, touch to shift PBC
on
or off. At PBC
on
mode, touch to start the playback at
the beginning
in
sequence order.
At media playback mode, touch to activate FOLDER/PLAYLIST MENU (available for input
device recorded with folder) to select folder I track for playback.
7. Touch to shift
to
next or previous track for playback.
Each time touch & hold shortly
to
activate various fast forward I fast rewi
nd
speeds for playback.
8.
Touch to pause or resume playback.
9. Touch repeatedly to select repeat playback mode.
1o. Touch to turn
on
or off of random playback.
11. Touch repeatedly to view the angle changes
in
sequential order.
12. Touch repeatedly to zoom in and zoom out of screen for viewing.
13. Touch repeatedly to select the audio output channels that recorded
in
the
playback device.
14. Touch repeatedly to select different sub-titles that recorded
in
the playback
device.
15. Touch repeatedly to select various slow motion playback.
16. At DVD playback mode, touch to show the on-screen menu of the disc
At VCD playback mode, touch to shift PBC on or off. At PBC on mode, touch
to start the playback at the beginning
in
sequence order.
17
. Touch
to
activate KEYBOARD MENU
to
direct input track number for playback.
18. Hold & slide
to
select the desired position (time) for playback.
19.
This
shows
the
current input
playback
device.
20.
At
video playback
mode
under
disc
input, touch
to
stop playback.
At
music I photo playback
mode
under
disc
input and playback
mode
under
USB
I
SD
card input, touch to
stop
playback
temporarily
and
resume
normal
playback
after a
few
seconds. [
13]

21. Touch
to
rotate photo position or show up-down, left-right mirror image for viewing.
22. At sub-folder playback, touch to shift touch to show folders on FOLDER/PLAYLIST MENU.
23. Touch to shift to MUSIC FOLDER/PLAYLIST MENU to select music folder/track for playback.
24. Touch to shift to PHOTO FOLDER/PLAYLIST MENU to select photo folder/track for playback.
25. Touch to shift to VIDEO FOLDER/PLAYLIST MENU to select video folder/track for playback.
26. Touch to show folders on FOLDER/PLAYLIST MENU.
27. Touch to shift page up and down.
28. Touch to confirm after inputting channel number for broadcasting.
29. Touch
to
erase the input channel number.
30. Touch directly to input channel numberfor broadcasting.
31. Touch to select the desired preset equalization mode. At r UserJ mode, bass
&
treble can be
set by user.
32. Hold
&
slide up/down to set for the output level
on
bass
&
treble at r User
J
mode.
33. Hold
&
slide to set for the output level on front I rear I left I right speakers.
34. Touch to close AUDIO CONTROL MENU
1.
35. Touch repeatedly to select volume I treble (TRE) I bass (BAS) I Fader (FAD) I balance (BAL)
for output level setting.
36. Hold
&
slide to adjust output level.
37. Touch repeatedly or touch
&
hold to adjust output level.
38. Touch repeatedly to select the desired preset equalization mode.
Note
:Depending
on
the
input
devices and playback media files,
not
all
of
the
mention
operation maywork.
ON
SCREEN- AUXILIARY INPUT OPERATION
At MAIN MENU, touch "AV in" icon on screen to shift to auxiliary input operation (provided an
auxiliary device had been connected). At auxiliary input operation, touch any portion of screen to
activate AUX INPUT MENU for operation.
AUX INPUT MENU 1. Touch to shift to MAIN MENU for various operation and
setup.
2.
Touch to turn off the screen. When the screen has been
turned off, touch any portion of the screen to turn
it
on
again.
3. Touch to activate AUDIO CONTROL MENU FOR various
audio setup.
4. Touch to shift to Bluetooth operation.
Note: This icon will only be appeared when the
un
it has
been linked up with a mobile phone.
[
14]

ON SCREEN- BLUETOOTH OPERATION
At MAIN MENU or at other operation modes, touch "BT" icon on screen to shift to Bluetooth
operation.
LINK
UP
WITH MOBILE PHONE
To linkup Bluetooth connection with the mobile phone, take your phone and follow the steps:
-set the mobile phone to Bluetooth state
-start to search new device
-after
searched, new device (SAN JOSE120 I CAR BT or similar) searched out, confirm the search
-
in
case of need, input default code "0000" or "8888"
in
the mobile phone
-once
connected, BT icon appeared
on
screen & "Connected" appeared
on
BT PHONE MENU.
-connection succeeded and you can start using Bluetooth function
BT
DIAL MENU
BT
PHONEBOOK MENU
BT
PHONE MENU
...
.t .
011
. I
~
~
~"
.,
...
:..t
\;.
,.,.
\;. t
1#1'\a~A
I:''-'~"
•·
,.
'1'•
1
"1.
" '
\jl
'
\.
\:·
.1.
n 0
BT
MUSIC MENU
BT
SETUP
MENU
4 5 6
2J
7 8 4 5 6 7 8
1. Touch to shift to MAIN MENU for various operation and setup.
2. Touch to activate
AUDIO
CONTROL
MENU
forvarious audio setup.
3. Touch to turn off the screen. When the screen has been turned off, touch any portion of the
screen to turn it
on
again.
4. Touch to shift to BT DIAL MENU for dial out
of
phone.
5. Touch to shift to BT PHONE MENU to show record
on
dial out I incoming call I missing call.
6.
Touch to shift to BT PHONEBOOK MENU to show phonebook.
7.
Touch to shift
to
BT MUSIC MENU for transmission of music playback from the connected
mobile phone.
8. Touch to shift to BT SETUP MENU
to
show the device name & pin code for pairing.
(Note: This menu
is
not available for setting)
9.
Touch to dial out after input the phone number or redial when
no
phone number input.
10. Touch
to
hang up or refuse
an
incoming call.
11
. Touch directly to input the phone number.
12. Touch
to
erase the digit input by error.
13. Touch
to
shift conversation between mobile phone & Bluetooth of the unit.
[
15]

14. Touch
to
shift page up or down.
15
.
Touch
to
act
i
vate
or
close
the
key
board
for
phone
book
searching
.
16. Touch to start downloading the outgoing call from the linked mobile phone.
Touch anyone of the contact for dial out.
17. Touch to start downloading the incoming call from the linked mobile phone.
Touch anyone of the contact for dial out.
18.
Touch to start downloading the missing call from the linked mobile phone.
Touch anyone of the contact for dial out.
19. Touch to start I pause I resume music playback transmitted from the mobile phone.
20
. Touch repeatedly to select upward or downward track for playback.
ON SCREEN- FRONT CAMERA INPUT OPERATION
At
MAIN MENU,
touch "F.CAM" icon on screen to shift to front camera viewing. At front camera
viewing mode, touch any portion of screen to activate
FRONT
CAMERA
INPUT
MENU
for
operation.
FRONT CAMERA
INPUT MENU
4 3 2
1. Touch to shift to
MAIN MENU
for various operation and
setup.
2. Touch to turn off the screen. When
th
e screen has been
turned off, touch any portion of the screen to turn it
on
again.
3. Touch to activate
AUDIO
CONTROL
MENU FOR
various
audio setup.
4. Touch to shift to Bluetooth operation.
Note: This icon will only be appeared
wh
en the unit has
been linked up with a mobile phone.
IMPORTATION NOTICE
FOR
ON
SCREEN
OPERATION
Interfaces, photos, images, icons
&
location as shown
in
this part of operation manual may be
varied from the exact unit. However, all of them come with similar outlook of the same type and
with the same operation method.
[
16]

SPECIFICATION
GENERAL
Power Requirement:
Load Impedance:
Maximum Power Output:
RADIO
SECTION
Frequency Range:
IF:
Area:
Europe
OIRT
Australia
Middle East
America 1
America 2
America 3
America 4
Japan
Brazil
China
DISC
SECTION
Disc
Play
Mounting
Angle
VIDEO
Video
Video Output Level:
Horizontal Resolution:
AM
Section
Frequency
522 -1620
KHz
522 -1620 KHz
522-1710
KHz
531-
1602KHz
530 -1620
KHz
530 -1620
KHz
530-1710
KHz
530-
1710KHz
522-
1629KHz
520-1710
KHz
522 -1620
KHz
450KHz
BLUETOOTH
SECTION
Communication type:
Maximum Distance:
AUDIO
SECTION
Maximum Output Level:
Frequency Response:
Signal
to
Noise Ratio:
Channel Separation:
Stepping
9KHz
9KHz
9KHz
9KHz
10KHz
10KHz
10KHz
10KHz
9KHz
10KHz
9KHz
DC
12
Volts, negative ground
40hms
40
watts x 4 channels
FM
Section
Frequency
87.5-108
MHz
65-74
MHz
87.5-
108 MHz
87.5-
108 MHz
87.5-
108 MHz
87.5-
107.9 MHz
87.5-107.9
MHz
87.5-
108 MHz
76-90
MHz
87.5-
108 MHz
87.5-
108 MHz
10.7 MHz
Stepping
50 KHz
30KHz
100KHz
100KHz
50
KHz
100KHz
100KHz
50 KHz
50 KHz
100KHz
50 KHz
DVD
I
VCD
I
MP3
I
CD
IMPS
+1-
30"
PAL
I
SECAM
I
NTSC
1.0Vp-p
75
Ohms
500
V2.1
5 meters
2 Vrms (
+1-3
dB)
20
Hz
to 20 KHz
85 dB
80 dB
NOTE:
Specification and design; functions and features;
unit
illumination; colour and display
segment
are
subject
to
change
without
prior notice. Photos and drawings on
gift
box or
operation manual
might
be varied from the exact unit. Depending on the
input
devices,
operation
might
be varied from the operation manual described.
[
17]

SIMPLE
TROUBLE
SHOOTING
PROBLEMS,
CAUSES
&
SOLUTIONS
--------------------------------------------------
No
power
-Check
and
make
sure
the connecting
wires
are
connected properly
-Check
whether the
fuse
is
blown.
Replace
with the propet
value
fuse
if
necessary.
No
sound
-
Check
and
make
sure
the
speaker
wires
are
connected correctly.
No
picture
-Check
whether the video wire
is
connected to the video device
Unit hang-up
-Press
the
RESET
button to
reset
the unit to
its
default
stage.
No
function when pressing the buttons or
TFT
screen
-Press
the
RESET
button to
reset
the unit to
Its
default
stage
Poor effect or unable to receive radio I
TV
-
Check
whether the radio/TV antenna
is
inserted or properly connected.
-Antenna
may
not
be
the proper length.
Make
sure
the antenna
Is
fully extended.
-
Antenna
may
be
not poorly grounded.
Check
and
make
sure
the antenna
is
properly grounded.
Stereo cannot
be
received under radio mode
-Tune
the radio frequency
accurately.
-The
broadcasting singnal
is
too
weak,
set
the mode to
MONO.
Disc Inserted but cannot play
-Check
whether the
disc
inserted upside down.
-Check
whether the
disc
is
dirty or badly
cracked.
-Lens
is
dirty.
Clean
lens
by
using
the
lens
clean
disc.
Picture without colour or no sound under disc I
TV
mode
-Improper setting ofcolour
system.
Set
again
to
''PAt:~
'SECAM"
or"
NTSC"
·The
disc
is
dirty or
demange.
Wipe
the
disc
with adry soft cloth or
replace
anew
disc.
Abnormal moving, skipping or sound during playback
-The
disc
is
dirty or
damange.
Wipe
the
disc
with adry soft cloth or replace.wlth.(l
~.eV\1
~lsc,!
~
..
-.-.,
........
,~
....
-~.
,,_,
-~-
...............
Mo•'•'
·n<-•·······"·"'''
Remote handset does not work
·Replace
with anew battery ofthe remote
handset.
-Point the remote handset directly
at
the remote
sensor
ofthe
main
unit.
-Clean
the
surface
ofthe remote
sensor.
BLUETOOTH
not
working
-Check
to
make
sure
the
devices
are
linked up correctly.
NOTE:
After attempting the above effort,
if
the
unit
cannot operate normally, consult
your service dealer. Never
attempt
to
disassemble the
unit
by yourself. No service
part inside the unit.
[18]

NOTE:
This equipment
has
been tested and found
to
comply
with
the limits for a
class
Bdigital
device, pursuant
to
part
15
of
the
FCC
Rules.
These limits are designer
to
provide reasonable
protection harmful interference in a residential installation.This equipment generates,
uses
and can radiate radio frequency energy and,
if
not
installed and used in accordance
with
the
instructions, maybe cause harmful interference
to
radio communications. However, there
is
not
guarantee
that
interference will
not
occur in a particular installation.
If
this equipment
does cause harmful interference
to
radio or television reception, which can be determined
byturning the equipment
off
and on, the user
is
encouraged
to
try
to
correct the interference
by one or more
of
the following measures:
-Reorient or relocate the receiving antenna.
-Increase the separation between the equipment and receiver.
-Connect the equipment
into
an
outlet on acircuit different from
that
to
which
the
receiver
is
connected.
-Consult the dealer
or
an
experienced radio/TV technician for help.
"Due to
Safety
regulations
the
video
will
not
display
while
the
vehicle
is
being
operated"
[
19]
Table of contents
Other Blaupunkt Receiver manuals

Blaupunkt
Blaupunkt MIAMI620 User manual

Blaupunkt
Blaupunkt MMP440 User manual

Blaupunkt
Blaupunkt AUGSBURG RCR 87 User manual

Blaupunkt
Blaupunkt DAB+Tuner Box 945 User manual

Blaupunkt
Blaupunkt AUS440 User manual

Blaupunkt
Blaupunkt Las Vegas 950 User manual

Blaupunkt
Blaupunkt SACRAMENTO290MC User manual

Blaupunkt
Blaupunkt BD-20 User manual