Blichmann BrewEasy Compact NPT Installation instructions
BrewEasy™ Compact NPT V1 © Blichmann Engineering, LLC 2021
For replacement parts, visit: blichmannengineering.com/genuine-replacement-parts
1
BrewEasy™Compact NPT
Assembly, Operation, & Maintenance
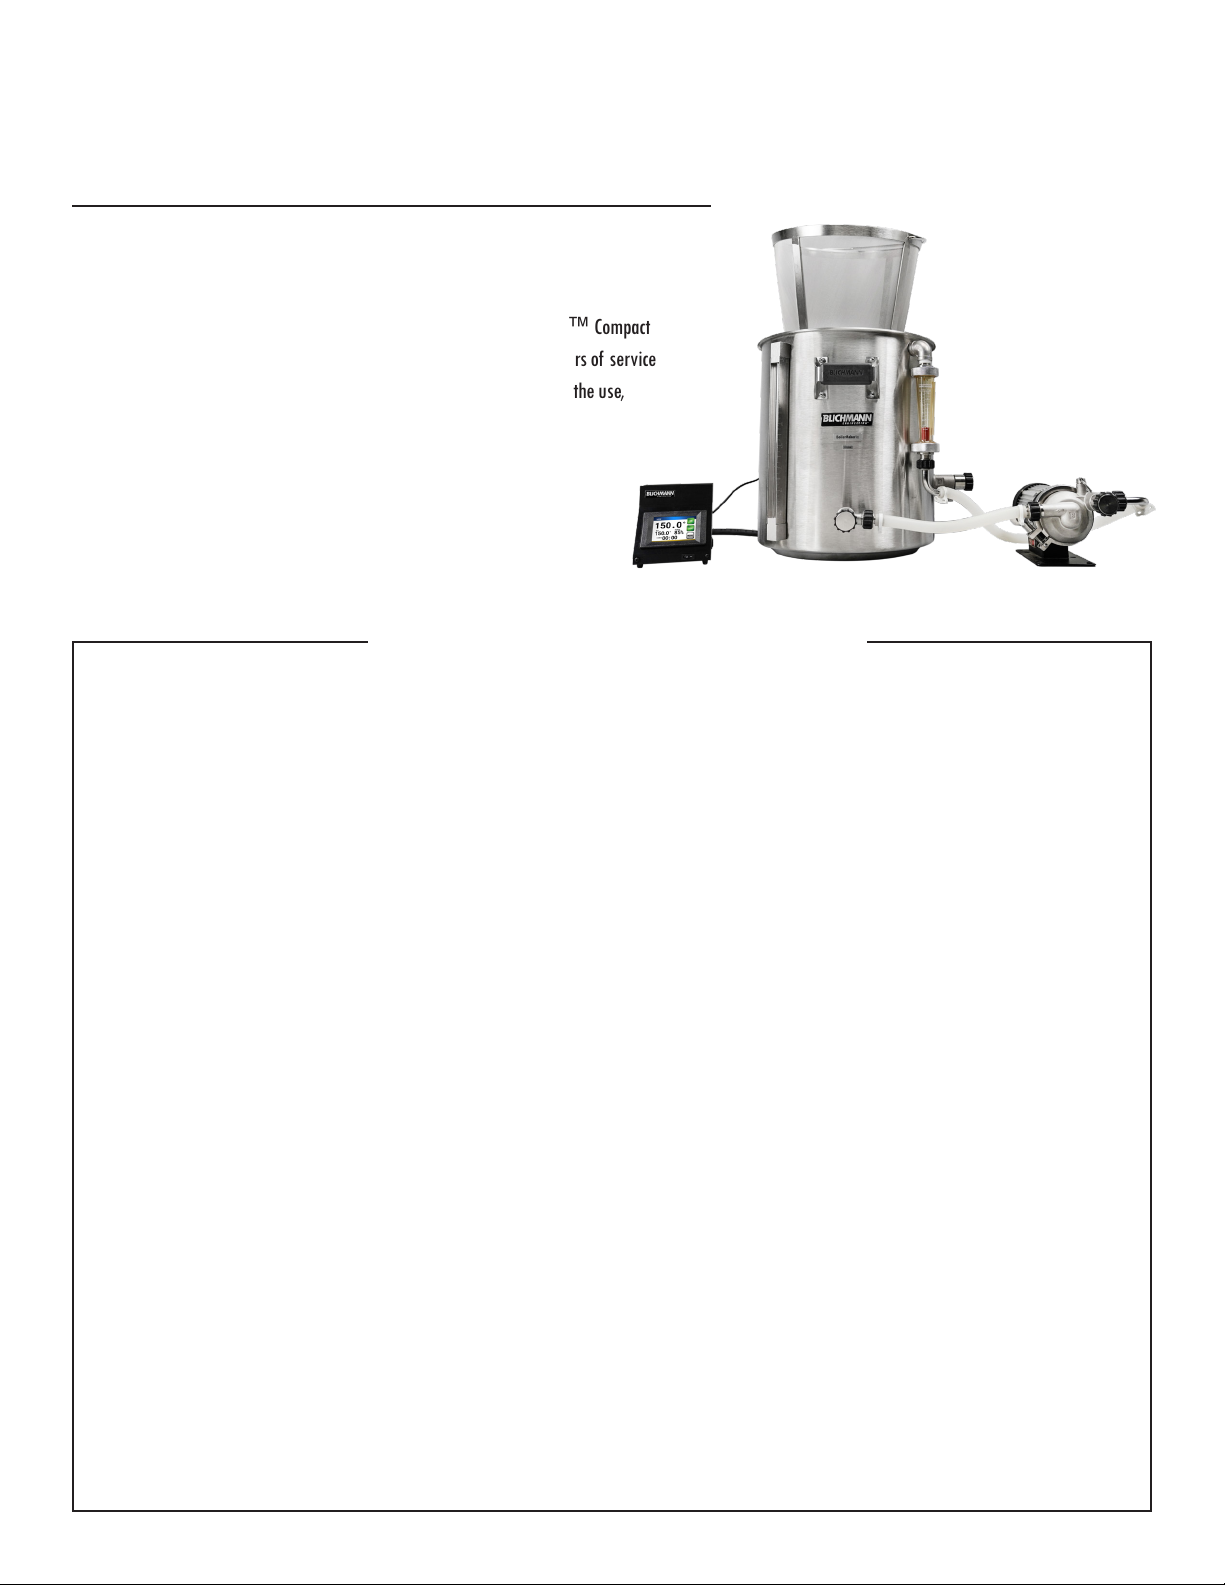
Congratulations on your purchase and thank you for selecting the BrewEasy™ Compact
from Blichmann Engineering™. We are condent that it will provide you years of service
and many gallons of outstanding beer. This manual will familiarize you with the use,
assembly, and sanitation procedures for the product.
Sections labeled “Warning” can lead to serious injury or death if not followed. Please thoroughly read these sections
and understand them completely before use. If you do not understand them or have any questions, contact your
retailer or Blichmann Engineering (www.BlichmannEngineering.com) before use.
Sections labeled “Caution” can lead to equipment damage or unsatisfactory performance of the equipment. Please
read these sections thoroughly. If you have any questions, contact your retailer or Blichmann Engineering
(www.BlichmannEngineering.com) before use.
Sections labeled “Important” should specically be followed to ensure satisfactory results with the product.
WARNING:
CAUTION:
IMPORTANT:
IMPORTANT INFORMATION
PLEASE READ AND THOROUGHLY UNDERSTAND THIS MANUAL PRIOR TO USE
FOR IMPORTANT SAFETY INFORMATION!
Brewing has inherent hazards and requires care, focus, and a mindset of safety and precaution. Hot liquids, steam, ame,
electricity, heavy lifting, slippery surfaces, cuts, and harsh chemicals to name a few.
• Always thoroughly read and understand all product manuals before using the product.
• Always keep children and pets safely away from the brewing area.
• Always wear protective clothing, safety glasses/goggles, shoes, and burn/chemical resistant gloves.
• Always use GFCI protected circuits for ALL electrical equipment.
• Always keep ame away from ammable surfaces.
• Always brew on hard surfaces such as concrete.
• Always disconnect electrical equipment from power and propane tanks after each use.
• Never lift hot and/or heavy liquids.
• Never use drugs or alcohol while brewing.
• Never leave the brewing area unattended.

BrewEasy™ Compact NPT V1 © Blichmann Engineering, LLC 2021
For replacement parts, visit: blichmannengineering.com/genuine-replacement-parts
2
What’s In the Box?
Part Number Description Quantity
G2Pot-10gal-NPT G2 BoilerMaker™ 10 Gallon NPT Kettle 1
BE-001593-03 Grain Basket w/ Handle 1
aSightGlass-10gal External Level Gauge 1
N/A Basket Side Catches 2
N/A Basket Hardware (Screw, Nut, & Washer) 4 of each
BE-000346-06 G2 Linear Flow Valve 1
BE-000503-00 Valve O-ring 1
BE-500004-00 Dip tube Fitting 1
KTL-004-02 Dip tube 1
KTL-005-05 Shaft Collar 1
N/A Cleaning Toolkit 1
Optional Parts:
Heating Source Parts:
aBoilCoil-10gal-240V BoilCoil™ 10 Gallon 240V Kit 1 Comes with 240V selection
aBoilCoil-10gal-120V BoilCoil™ 10 Gallon 120V Kit 1 Comes with 120V selection
aHellFireBurner-FLR Hellre™ Burner 1 Comes with gas selection
Controller Parts:
aBrewCommander-240V Electric 240V BrewCommander™ 1 Comes with 240V selection
aBrewCommander-120V Electric 120V BrewCommander™ 1 Comes with 120V selection
aBrewCommander-Gas Gas BrewCommander™ 1 Optional with gas selection
BMA-002F-A Brewmometer™ °F 1 Optional with gas selection
Recirculation Kit Parts:
BE-001996-00 Sparge Tube Assembly 1
BE-500004-00 Sparge Tube Port Bulkhead 1
BE-000067-00 Retaining O-ring 2
KTL-010-00 Retaining Washer 2
BE-000623-01 Wort Flow Meter 1
BE-000359-00 Silicone Hose 3ft
BE-000374-00 Reusable Hose Clamps 4
aRipTide-Pump NPT RipTide™ Pump 1
BE-001997-00 1/2” QuickConnect™ Straight Barb 2
BE-001998-00 1/2” QuickConnect™ Elbow Barb 2
Therminator™ Cooling Kit:
HE-002-03 Therminator™ 1
BE-001997-00 1/2” QuickConnect™ Straight Barb 3
BE-000359-00 Silicone Hose 6ft
aThruMometer-1/2 Thrumometer™ 1
BE-000374-00 Reusable Hose Clamps 5
Immersion Chiller Kit:
AB-500067-00 Stainless Immersion Chiller 1
AB-500071-00 GTH Adapter - Brass 1
BE-000722-00 Hose Clamps - Stainless 3
BE-000730-01 3/8” Vinyl Hose 10ft
Whirlpool Kit:
aWhirlpool-G2 G2 Whirlpool Valve Assembly 1
BrewEasy™ Compact NPT V1 © Blichmann Engineering, LLC 2021
For replacement parts, visit: blichmannengineering.com/genuine-replacement-parts
3
Set-Up
Step One:
For electric BrewEasy™ Compact installations, place the kettle on stable, level surface such as the KettleKart™.
For gas BrewEasy™ Compact installations, place the kettle on the burner. Be sure to read the manual for the burner and
follow any setup instructions it may have.
IMPORTANT: If you are using the Blichmann HellFire™ Burner, it comes congured for LP operation. For use with
natural gas, you will need to install a natural gas conversion kit.
Step Two:
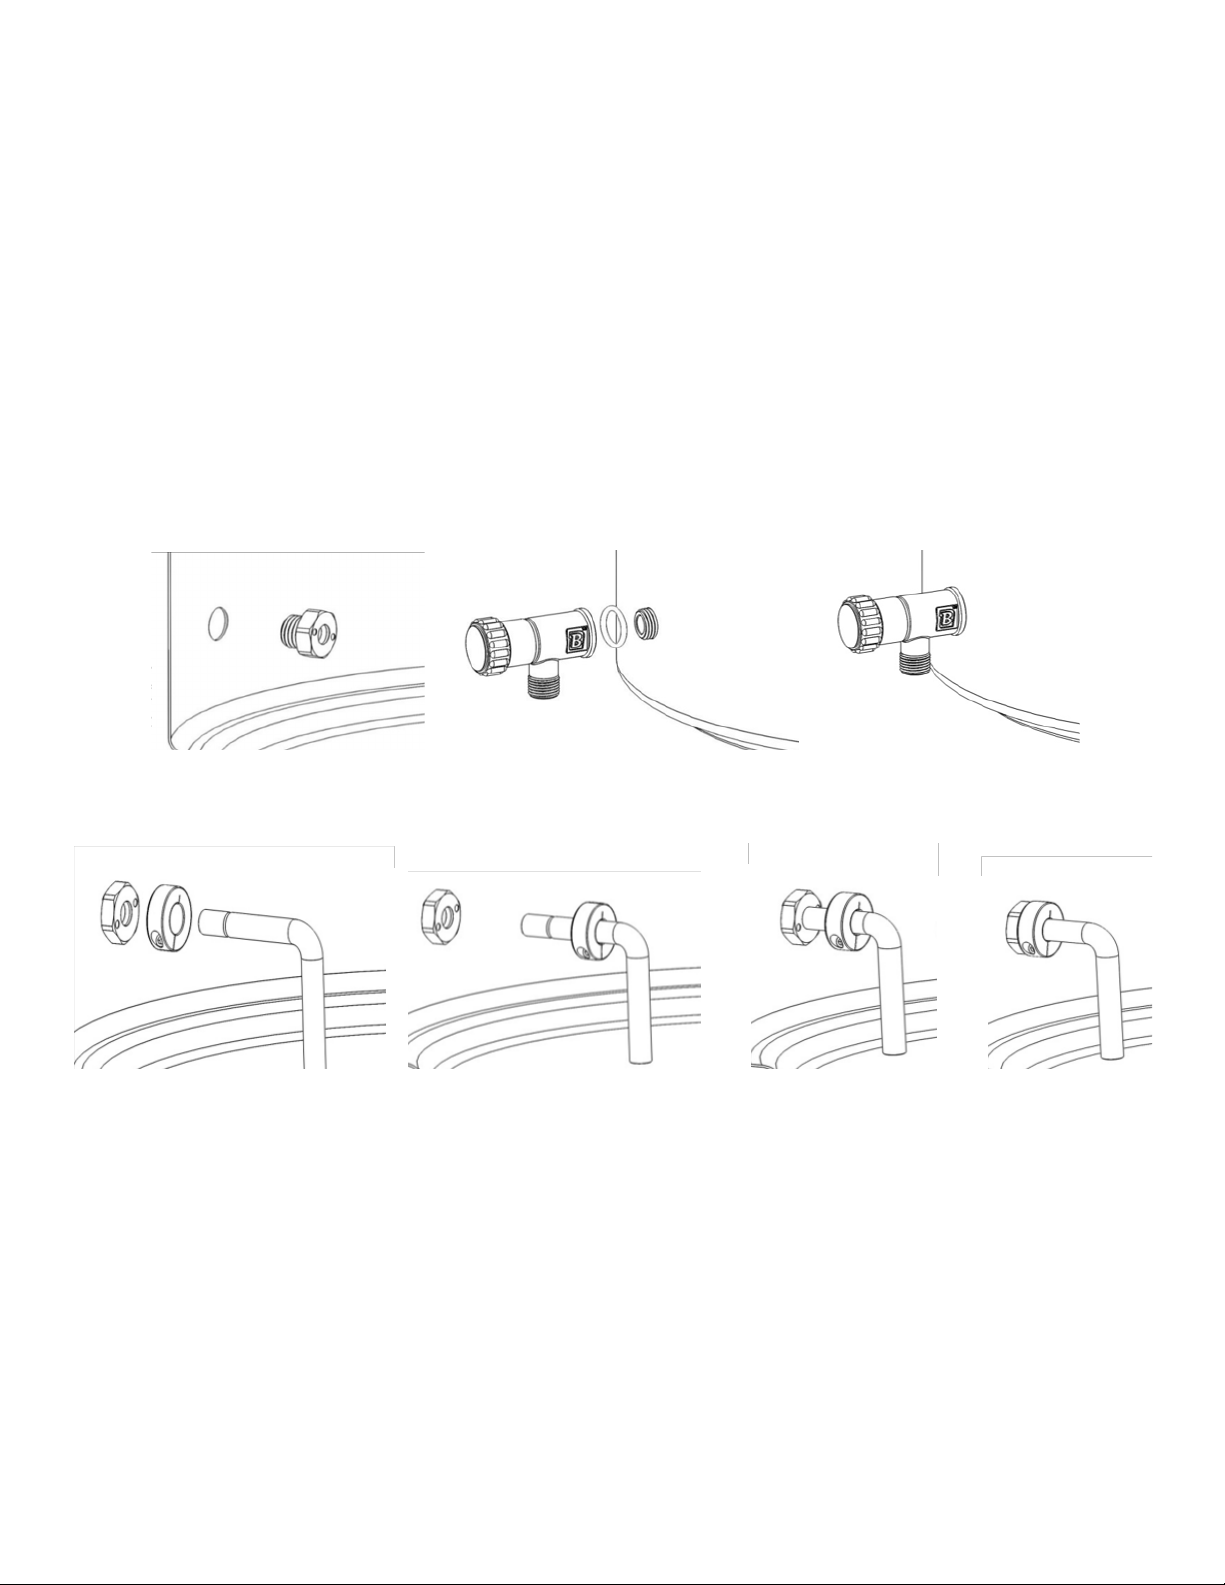
Next, install the dip tube and drain valve on the front of your kettle. To do so, put the dip tube shaft, collar, tting, and
the silicone, white o-ring into the bottom hole on the inside of the front of the kettle. Then, place the drain valve, with
the red o-ring in the end, on the outside of the kettle and screw it onto the dip tube.
The following steps contain assembly procedures for optional accessories that
may not pertain your systems.

BrewEasy™ Compact NPT V1 © Blichmann Engineering, LLC 2021
For replacement parts, visit: blichmannengineering.com/genuine-replacement-parts
4
Step Four (Optional Recirculation Kit):
To install the ow meter onto the side of your kettle, gather the ow meter, sparge tube port bulkhead, retaining o-rings,
and the retaining washers. Place one o-ring and one retaining washer on the threaded side of the bulkhead, and insert
the threads through the inside of the upper hole on the right side of the kettle. The threads should be facing outward.
Install the remaining retaining o-ring and retaining washer on the outside of the kettle. Then, screw the bulkhead into
the stainless steel elbow of the ow meter. No thread tape is required.
Kettle wall
Step Three:
In the lower hole on the back of the left of the kettle, install the temperature probe as shown in the exploded view
below.
If you purchased your system without a controller, install the included Brewmometer™ in the 1/2” hole in the front of
the kettle.
TEMPERATURE SENSOR ASSEMBLY
Number Part Number Description
1 BE-000882-01 Sanitary Nut
2 BE-000882-01 Sanitary Nut Inner Seal
3 BE-000882-01 Sanitary Nut Outer Seal
4 BE-000013-00 Bulkhead O-ring -113
5 BE-001474-00 Weldless Captive Bulkhead
6 BE-001511-00 Captive Nut O-ring
7 BE-001475-00 Captive Nut
8 BE-001500-00 Temperature Sensor Probe
1 2 3
Kettle Wall
with ½”Hole
4 5 6 7 8
To Temperature
Probe Port
Inside Kettle Outside Kettle
COMPLETE TEMPERATURE SENSOR ASSEMBLY
CAUTION:
• Do not pull sensor by cord, pull by stainless sheath only.
• Do not remove sensor when kettle is full of liquid without
optional thermowell.

BrewEasy™ Compact NPT V1 © Blichmann Engineering, LLC 2021
For replacement parts, visit: blichmannengineering.com/genuine-replacement-parts
5
Step Five (Optional Recirculation Kit):
Next, you will measure and cut your silicone hose into two lengths to facilitate your recirculation kit. One of the hoses
will connect the bottom of the ow meter to the outlet of your RipTide™ pump. The other hose will connect the kettle
drain valve to the inlet of your pump.
After you measure the lengths that you will need your hoses to be, cut them and install QuickConnectors™ and plastic
clamps on each silicone hose end. Place the plastic clamp over the hose before installing the QuickConnector™. We
recommend that the elbow-barbed QuickConnectors™ go on the hose that attaches to the ow meter and the pump
outlet. We recommend that the straight-barb QuickConnectors™ go on the hose that attaches to the drain valve and
the pump inlet.
TIP: On straight QuickConnectors™ leave approximately 1/8”of space between the QuickConnector™ nut and silicone
hose before tightening the plastic clamp.
TIP: Install the QuickConnectors™ is such a way that minimizes the potential for kinks that can restrict ow.
TIP: Do not mount the pump higher than the standard liquid level within the kettle.
Step Six (Optional BoilCoil™):
Install your BoilCoil™ into the two smaller holes on
the back-right side of your kettle. The threaded ends
should point outward and will be used to connect
the power cable to the BoilCoil™. Slide the
rectangular metal frame onto the two protruding
ends and, using a 7/8”socket wrench, tighten the
nuts onto the threads of the BoilCoil™. Plug the
power cable into the BoilCoil™ and connect the
other end to the BrewCommander™.
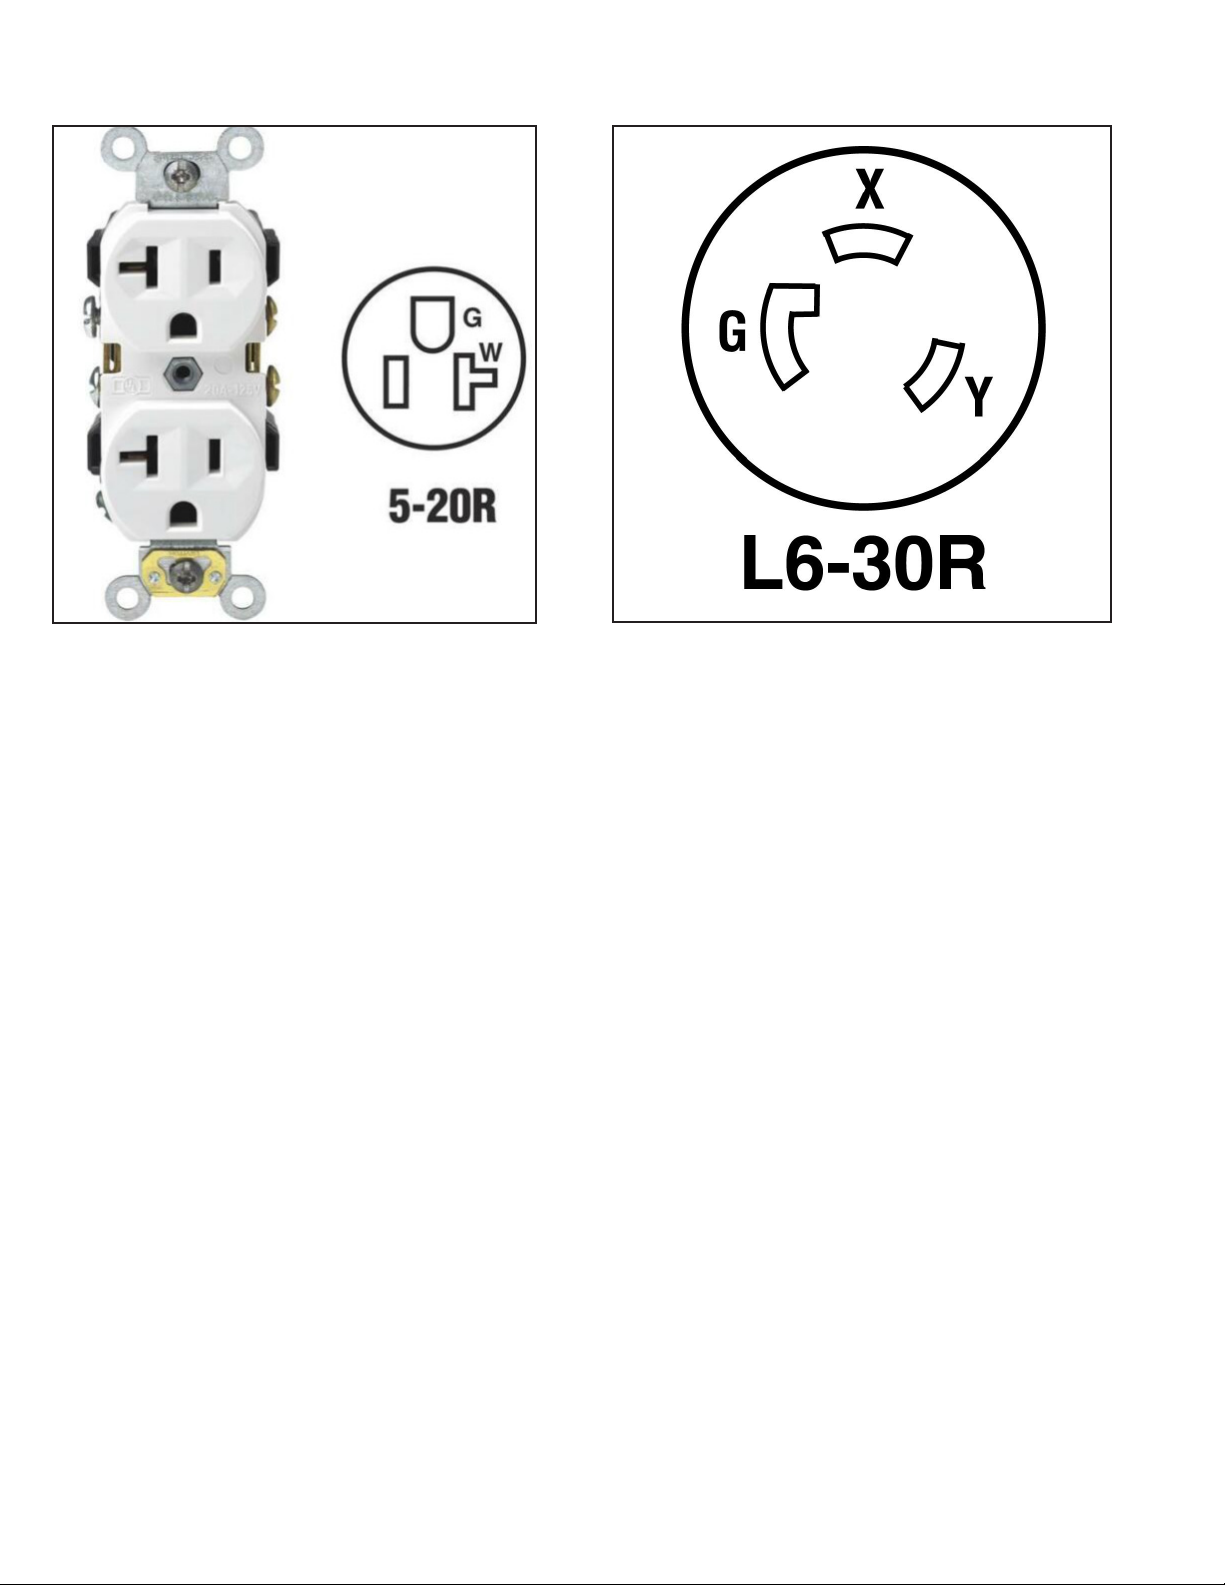
PUMP RECEPTACLE
TEMPERATURE
SENSOR PORT
Female 240V
L6-30R
Male 240V
L6-30P
PUMP POWER
SUPPLY

BrewEasy™ Compact NPT V1 © Blichmann Engineering, LLC 2021
For replacement parts, visit: blichmannengineering.com/genuine-replacement-parts
6
Step Eight (Optional Recirculation Kit):
During the mash, install the sparge tube by pushing it into the hole at the top of the kettle that conencts to the ow
meter.
Operation:
Prep and Adding Water
Clean all equipment as recommended in the cleaning section, ll with the desired amount of water, make any water
mineral additions as needed, and heat to the desired strikewater temperature. Free online calculators or brewing soft-
ware such as BeerSmith2™ will help to calculate these water volumes based on mash parameters such as grain absorp-
tion, boil o, wort lost in your lines, and other downstream losses including shrinkage from cooling.
Note: After adding water, be sure to check for any leaks in the system and check that the pump is functioning
properly.
Dough-In
After the brewing water has reached the desired strike temperature, reset the set temperature on the
BrewCommander™ to the desired mash temperature. With the grain basket already in the kettle, add the grains into
the basket. Slowly stir in the crushed grains being certain to break up any and all clumps (dough balls). After the entire
grain bill has been added to the grain basket, plug in the sparge tube arm if using the optional recirculation kit, and
allow a minimum of 10 minutes for air entrained in the grist to escape before recirculating.
Mashing (Optional with Recirculation Kit)
After dough-in and waiting the recommended 10 minutes, turn the pump on and allow the BrewEasy™ to continuous-
ly recirculate the wort for the duration of the mashing period. Set the ow of the pump to 0.75 gallons per minute and
monitor this ow by checking the ow meter throughout the mash.
If desired, after starch conversion, you can heat the mash to the desired mash-out temperature using the same
method described in the Mashing section of this manual. Allow the mash to rest at the mash-out temperature for an
adequate amount of time to stop enzymatic activity. Generally, a minimum of ten minutes for the mash-out is required
to denature saccharication enzymes.
After the completion of the mash, shut o the pump and remove the sparge tube arm from the kettle. Then, lift the
basket out and allow it to drip drain by mounting it on the lip of the kettle using the side catches on the basket. You
may begin heating the wort to a boil as soon as the grain basket is pulled out.
Optional Sparge
At this point, to achieve a better mash eciency, a sparge can be done by dumping hot sparge water over the grain in
the basket to rinse the grains and extract any remining sugars present on the grains.
Boil
Once the draining of the wort from the basket has slowed to a light drip, you can remove the basket from the edge of
the kettle and dispose of the grains in a careful manner as to not get burnt from the still very hot basket and grain.
Proceed with your typical boil process by adding hops and other boil ingredients as required. Chill and transfer to your
sanitized fermentor after the boil is complete.
Step Seven (Optional Whirlpool):
Install the Whirlpool™ into the lower hole on the right side of your kettle. Similarly to the dip tube installation, the
shaft, collar, and bulkhead go on the inside of the kettle. The bulkhead’s threads should point outward. With the o-ring
in the groove of the ow valve that faces the kettle, screw the ow valve onto the bulkhead’s threads.

BrewEasy™ Compact NPT V1 © Blichmann Engineering, LLC 2021
For replacement parts, visit: blichmannengineering.com/genuine-replacement-parts
7
Tips for success:
• Do not skip the pH measurements! If your mash is much above the recommended pH you risk astringency in your
beer among other detrimental changes. Adding water salts and acid may be necessary to achieve proper pH in
any all-grain brewing system.
• During dough-in, an occasional gentle stirring will break up any clumps and release air pockets. The dough-in
process is vital for problem free recirculation.
• Let the grain sit (dough-in) for about 10 min to absorb the liquor and for the air to purge out of the grain.
• Consult the two recommended books, How to Brew and Water by John Palmer and Colin Kaminski (published by
the Brewers Association) to learn how to properly adjust your mash pH and to educate yourself on good brewing
practices.
• Measure the specic gravity periodically. The SG of the mash is the same as the pre-boil wort SG. Make adjust-
ments to your wort such as adding malt extract, water, or mashing longer to achieve the desired SG of the pre-boil
wort
Tip: As with any new system it will take a few batches to dial in your eciency and water usage requirements. Always
make careful notes, and closely follow recommendations found in this manual. If you are new to all grain brewing we
suggest reading John Palmer’s book “How to Brew”, published by the Brewers Association before your rst batch. This
manual is not intended to be a complete all-grain brewing text.
IMPORTANT: The quality of your nished beer will be directly related to the quality of your brewing water. If you have
especially hard water in your area, it is strongly recommended that you dilute your tap water with distilled or reverse
osmosis water or build your brewing water from scratch. For optimum results, the mash pH must fall within a range
of 5.2 – 5.6 at room temperature. Additionally, a minimum of 100 ppm of Ca is required. For more information, further
reading is recommended, specically John Palmer & Colin Kaminski’s book “Water”, published by the Brewers
Association.
IMPORTANT: We highly recommend the purchase of a digital pH meter for monitoring pH. Test strips, while
inexpensive, do not provide adequate precision for brewing. Despite many pH meters being automatic temperature
correcting, pH levels change with temperature. If you are reading the meter at mash temperatures, the range for mash
pH is between 5.1 and 5.4 pH. This will result in a room temperature pH at the recommended range of 5.2-5.6 pH.
Cleaning Procedures
Cleaning of the BrewEasy™ Compact system is very straight-forward. Clean any components that will contact the
liquid, wort, or other brewing ingredients with a mild detergent (non- chlorine) or Powdered Brewery Wash (PBW)
before your rst use and after every subsequent use. Soak the hoses in a PBW solution, rinse with hot tap water and
soak in a non-chlorine sanitizer.
BrewEasy™ Compact NPT V1 © Blichmann Engineering, LLC 2021
For replacement parts, visit: blichmannengineering.com/genuine-replacement-parts
8
A. Limited Warranty
1. Blichmann Engineering warrants to the original purchaser that this product will be free from manufacturing defects in material and workmanship for a period of one (1) year from the date of purchase by the customer. Proof of
purchase is required. Blichmann Engineering’s obligation to repair or replace defective materials or workmanship is the sole obligation of Blichmann Engineering under this limited warranty.
2. This product is for home use only. The limited warranty covers only those defects that arise as a result of normal use of the product and does not cover any other problems, including, but not limited to, those that arise as a
result of:
a. Improper maintenance or modication;
b. Damage due to incorrect voltage or improper wiring by customer;
c. Operation outside of the product’s specications;
d. Carelessness or neglect to operate the product in accordance with instructions provided with the product;
e. Damaging the tamper label on the product;
f. Damage by over-tightening the fasteners;
g. Failure to follow cleaning and / or maintenance procedures; or
h. Exceeding published operational temperatures.
3. Blichmann Engineering reserves the right to request delivery of the defective component for inspection before processing the warranty claim. If Blichmann Engineering receives, during the applicable warranty period, notice
of a defect in any component that is covered by the warranty, Blichmann Engineering shall either repair or replace the defective component with a new or rebuilt component at Blichmann Engineering’s option.
4. Blichmann Engineering must be notied within seven (7) days of the delivery date of any shipping damage. Customer is responsible for shipping damage outside of this time period. Approval for return must be provided by
Blichmann Engineering prior to any return. Customer is responsible for keeping all original packaging material for warranty returns. Blichmann Engineering is not responsible for damage from improperly packaged warranty
returns, and these repair costs will be the sole responsibility of the customer. Shipping costs for warrantee returns are covered only for the contiguous United States.
5. Blichmann Engineering’s limited warranty is valid in any country where the product is distributed.
________________________________________
B. Limitations of Warranty
1. Any implied warranty that is found to arise by way of state or federal law, including any implied warranty of merchantability or any implied warranty of tness, is limited in duration to the terms of this limited warranty and is
limited in scope of coverage to this warranty. Blichmann Engineering disclaims any express or implied warranty, including any implied warranty of tness for a particular purpose or merchantability, on items excluded from
coverage as set forth in this limited warranty.
2. Blichmann Engineering makes no warranty of any nature beyond that contained in this limited warranty. No one has authority to enlarge, amend, or modify this limited warranty, and Blichmann Engineering does not authorize
anyone to create any other obligation for it regarding this product.
3. Blichmann Engineering is not responsible for any representation, promise, or warranty made by any independent dealer or other person beyond what is expressly stated in this limited warranty. Any selling or servicing dealer
is not Blichmann Engineering’s agent, but an independent entity.
________________________________________
C. Limitations of Liability
1. The remedies provided in this warranty are the customer’s sole and exclusive remedies.
2. Except for the obligations specically set forth in this warranty, in no event shall Blichmann Engineering be liable for direct, indirect, special, incidental, or consequential damages, whether based on contract, tort, or any other
legal theory and whether or not advised of the possibility of such damages.
3. This warranty does not cover, and in no event shall Blichmann Engineering be liable for, travel, lodging, or any other expense incurred due to manufacturing defects in material and workmanship, or any other reason.
4. Any performance of repairs after the warranty coverage period has expired or performance of repairs regarding anything excluded from coverage after this limited warranty shall be considered good-will repairs and they will
not alter the terms of this limited warranty, or extend any warranty coverage period.
5. Venue for any legal proceedings relating to or arising out of this warranty shall be in Tippecanoe County, Indiana, United States, which courts will have exclusive jurisdiction.
________________________________________
D. Local Law
1. This warranty gives the customer specic legal rights. The customer may also have other rights that vary from state to state in the United States or other countries.
2. To the extent that this warranty is inconsistent with local law, it shall be deemed modied, only to the extent necessary to be consistent with such local law.
This product uses food grade materials anywhere the product touches the beverage.
Warning: This product contains or may contain chemical(s) known to the State of California to cause cancer, birth defects, or other reproductive harm.
Blichmann Engineering Product Warranty
Outlets Required for This System
Table of contents
Other Blichmann Industrial Equipment manuals


Popular Industrial Equipment manuals by other brands


Turbosmart
Turbosmart TS-0565-1002 quick start guide

Rockwell Automation
Rockwell Automation Discrete Machine Performance Solution user guide

Festo
Festo YXCR operating instructions

Peter electronic
Peter electronic VersiSafe Speed 27810 Series Assembly instructions

transnorm
transnorm TS 2920 operating instructions

Graco
Graco 24G774 Kit instructions


