Blimo Travel Lite User manual

User Manual
BEFORE using this product, read this
manual and save for future reference.
Version 1.2 January 01, 2021
© NORDBUTIKER AB
Travel Lite
www.blimo.se/dk/no/fi

Dear User,
WE congratulate you on your choice of mobility scooter –Travel Lite. Our goal is for you to
continue to feel satisfied with your choice of both vendor and product.
1General
1.1 Symbols
Signal words are used in this manual and apply to hazards or unsafe practices which could
result in personal injury or property damage. See the information below for definitions of the
signal words.
Danger Admonition
Warning indicates a potentially hazardous situation which, if not avoided, could
result in death or serious injury.
Warning Admonition
Indicates a hazardous situation that could result in damage to property if it is not
avoided.
Notice Admonition
Indicates an important but not hazardous situation which, if not avoided, could
result in damage to the product or other property.
1.2 Safety Instructions
All information, pictures, illustrations and specifications are based upon the product
information available at the time these operating instructions were printed. Pictures and
illustrations used in these operating instructions are representative examples and not
intended to be exact depictions of the various parts of the scooter. We reserve the right to
make changes to the product without prior notice.
Check ALL parts for shipping damage. If shipping damage is noted, DO NOT use.
Contact carrier or dealer for further instruction.
Weight Limitation
The weight limitation of the Travel Lite is 100 kg (220 lbs).
Use for only one person, DO NOT carry any other passenger.
General Warnings
DO NOT use this product or any available optional equipment without first
completely reading and understanding these instructions and any additional
instructional material such as owner’s manuals, service manuals or instruction
sheets supplied with this product or optional equipment. If you are unable to
understand the warnings, cautions or instructions, contact a healthcare

professional, dealer or technical personnel before attempting to use this
equipment - otherwise, injury or damage may occur.
ALWAYS check the mobility scooter for proper tightness before using.
BLIMO is not responsible for personal injuries or property damage resulting from any
person’s failure to follow the warnings and instructions in this manual. BLIMO is not
responsible for injuries or damage resulting from failure to exercise good judgment.
Unapproved Replacement of Parts
If any part is replaced without approval from BLIMO, the scooter warranty will
become void. BLIMO accepts no liability for any loss that occurs as a result of a
control system component being opened, adjusted or modified without
permission.
2 Warnings and Precautions
2.1 Operation
In some instances, including where certain medical conditions exist, users should
practice operating their scooter under the supervision of an assistant who is familiar
with the operation of the scooter and with the abilities and limitations of the user.
Do not drive the scooter over any curbs or obstacles higher than specified in the
technical specifications section of the manual. When driving over a curb or similarly
elevated surface, cross it at a 90 degree angle (perpendicular). Crossing such surfaces
at any other angle may result in the scooter’s tipping.
Reduce your speed when driving on uneven terrain or soft surfaces. Never use your
scooter on stairs or escalators. Always take the elevator.
Do not lift or move the scooter by any of its removable parts. Doing so could lead to
personal injury and property damage, including damage to the scooter.
Do not use the scooter to pull any kind of object and never hang excessive weights on
the backrest. Doing so could lead to personal injury and property damage, including
damage to the scooter.
In the event of a collision with a wall, door or other fixed object when operating the
scooter, always make sure all parts of the scooter are undamaged before operating it
again. Failure to do so could lead to personal injury.
Do not let children drive the scooter without supervision. Do not drive the scooter on
public streets or roads. Obey all local pedestrian rules and be aware that vehicle
drivers may have difficulty seeing you.

Do not operate your scooter under the influence of alcohol. Consumption of alcohol
may impair your ability to operate your scooter safely.
Some physical impairments or the use of prescription and nonprescription medication
may limit your ability to operate your scooter safely. Be sure to consult with your
physician about your physical limitations and medications.
2.2 Operation - Slopes
When driving downhill, select the slowest speed and proceed with caution. Driving
down a slope may shift the user’s center of gravity forward. If the scooter rolls faster
than you would like, stop the scooter by releasing the joystick and begin descending
again more slowly.
Avoid sudden stops or starts. Stop by releasing the joystick rather than by turning the
power off. Turning off power while the scooter is in motion will cause the scooter to stop
suddenly.
When driving up a slope, try to keep moving at a steady speed. Stopping and starting
the scooter while moving up a slope makes the scooter more difficult to control.
Do not drive up or down slopes with gradients greater than those set forth in the
technical specifications section of this User’s Manual. There is a risk that the scooter will
not maneuver safely.
Do not drive up or down ramps that are not equipped with proper edge protection
along the sides to prevent the scooter from falling off the ramp.
Do not drive up or down hazardous inclines such as a surfaces covered with snow, ice,
or wet leaves, or a surface that is uneven.
2.3 Operation - Turning
Turning your scooter at high speeds may cause it to topple with personal injury as a
result. The risk of tipping over is increased by high turning speeds, sharp turns, uneven
surfaces, abrupt changes in direction, and driving from an area of low traction (e.g.
lawn) to an area of high traction (e.g. sidewalk). To avoid tipping over, personal injury
and property damage, reduce speed and turn less sharply.
2.4 Driving
The Driving Range stated in the technical specifications of this manual represents the
theoretical driving range, actual driving ranges will vary depending on battery status,
tire selection and driving conditions. Frequent driving on slopes, rough ground or
frequently climbing curbs etc., will also reduce the driving range.

Driving in the dark is only permissible if the scooter is equipped with functioning lighting
at the front and rear, or as per applicable national or local traffic regulations.
2.5 Transfer into or out of the scooter
Make sure the power is turned off before getting into or out of the scooter. When
transferring into or out of the scooter, every precaution must be taken to reduce the
distance between the scooter and the place to which the user is transferring. Too great
a distance may cause the user to overexert him or herself, lose balance or fall. BLIMO
recommends that users transfer in the presence of or with the assistance of an
attendant.
2.6 Transporting the Scooter
The scooter may only be transported in vehicles approved for this purpose. The vehicle
must be suitably designed, insured and equipped to transport a person in a scooter. No
matter how securely it is fastened in the vehicle, a scooter is not designed to be a car
seat and cannot offer the same degree of safety as offered by standard car seats.
Before transportation, check that the scooter is properly secured and that wheels are
locked.
2.7 Environmental Conditions
Protect the scooter from exposure to any type of moisture, including rain, snow, mud or
spray. Exposure to moisture may cause the scooter to short-circuit, catch fire and
cause personal injury or property damage. If it has been exposed to moisture, do not
operate your scooter until it has dried completely.
If any of the shrouds or the panel has cracks or tears, they must be replaced
immediately. Failure to do so may allow moisture to enter the electronics and cause
personal injury or property damage, including fire.
Be extremely careful when operating your scooter during icy or slippery conditions.
Such conditions can lower the performance and safety of your scooter which could
lead to an accident, personal injury and property damage, including damage to the
scooter.
Exercise extreme caution when using oxygen in close proximity to electrical circuits
and other combustible materials. Contact your oxygen supplier for instruction in the
use of oxygen.

3Getting to know your scooter
3.1 Overview
3.2 Technical Specifications
Item No.
Travel Lite
Scooter frame
Aluminum alloy
Measurements (L*W*H)
(780-945) * 510 * (800-960) mm (Adjustable length and height)
Front wheels
8 inch PU solid tire (9 inch optional)
Rear wheels
8 inch PU solid tire (9 inch optional)
Max. speed
8 km/h
Ground clearance
70 mm
Drive
Rear wheel
Brake
Electromagnetic brake
Total weight
21 kg (without battery)
Loading capacity
100 kg
Endurance mileage
15 km
Max. grade ability
8°
Height of crossing
40mm
Controller
Brushless controller 24V 60A
Motor
Brushless motor 180W
Charger
DC24V/2.0A
Lithium battery
24V 12.5Ah, Net weight 1.9 kg, Charging time 2-8 hours
Scooter frame
Scooter foldable, frame forward-backward adjusting, height
adjustable of steering column.
Note: The actual endurance mileage after the battery is fully charged will
decrease with the service life, which is a normal loss.
Front LED light
Operation Panel
Joystick
Height adjusting handle
Locker of steering column
Front wheels
Bumper bar
Lithium battery
Switch: Drive-Manual
Seat
Handgrip
Rear/Drive wheels
Frame adjusting handle

3.3 Parts (Packing) List
Mobility Scooter
Charger
Charging Cable
(Just as gift, free of charge)
Power Key * 2
Battery Box Key * 2
Backrest and Knobs
(Need to buy)
User Manual
4Preparing for Use
4.1 Unfold and Adjust your scooter
Unwrap all packing
Lift the steering column
upward and lock the locker
Turn the buckle to make
locker more safe and avoid
releasing
❶Grip the back of seat
and lift upward;
❷Grip the front of seat and
push backward until the
right position.
❶
❷

Turn left or right to lock the
seat
(This knob is at the back of
seat)
Seat locked
Please make sure both sides
pins of the seat are pop-up
after locking
Open both sides handles
One hand hold the seat,
another hand push the
steering column forward,
then lock both sides
handles
Drive-Manual mode switch
(Please switch to Drive
mode before driving)
Open the handle and
adjust the height of steering
column to fit for you, then
lock
Backrest
(Need to buy)
Insert the backrest to seat
Lock it by knobs
(Remove backrest by
opposite steps)

4.2 Fold your scooter
Open both sides handles
One hand hold the seat,
another hand push the
steering column backward,
then lock both sides
handles
Pull out and Turn left or right
(This knob is at the back of
seat)
Seat released
and could be folded
Grip the back of seat and
lift upward a little, push
forward and press
downward at the same
time.
Release the handle of
locker
Fold the steering column

5Driving
5.1 Operation panel
Battery level
indicator
Speed indicator
Driving distance
indicator
LED front light turn ON/OFF
Setting top speed:
High: Top speed limit –8km/h
Low: Top speed limit –4km/h
Buzzer/Trumpet
Power turn ON/OFF
(Left) PULL:
Backwards
(Right) PULL:
Forwards
Left handgrip
Right handgrip

5.2 Operation
The scooter is designed for use both indoors and out. When driving indoors, take care
in e.g. narrow passages, when passing through doors and entrances and when using
lifts, ramps, etc. When driving outdoors, remember to drive very slowly down steep
slopes and to take great care when driving on uneven surfaces, up slopes, on side
slopes and over obstacles. Always observe a good safety distance when driving near
edges and drops.
Please fully charge for battery at first time BEFORE you firstly use your scooter.
Make sure the power is turned off before getting into or out of the scooter.
Always make sure your feet are correctly and securely positioned on the foot plate
before you operate.
Operation steps and instructions
1) Make sure switch to the Drive mode, insert and clockwise turn the power key to turn on
the scooter. Check all indicators on LCD
2) Choose fitting limit speed –High or Low and decide if turn on/off the LED light
according to using situation. ( You have to turn on the light when drive at night or in
weak light surroundings.)
3) Adjust the steering column of your scooter to position which you feel comfortable.
4) Slowly pull the joystick right side to drive your scooter forward. Or slowly pull the joystick
left side to drive your scooter backward ( Please choose Low: Top limit speed –
4km/h when drive backward). Release the joystick, you scooter stop.
5) Pull Left or Right handgrip to control the driving direction of your scooter when drive.
6) After use, park your scooter at a safety and stable place and anticlockwise turn the
power key to turn off the power.
7) Switch to the Manual mode, then could pull your scooter.
( Your scooter is with some resistance which motor generated in manual mode. This
is normal, not means damage.)
8) Press the button of Buzzer/Trumpet to remind or warn for driving safety and
accident prevention, please use in time.
5.3 Electromagnetic brake
Your scooter is equipped with electromagnetic brake, theoretical braking distance is
800mm on flat surface. The brake start braking in following situation:
a) Scooter is OFF.
b) Scooter is ON, but joystick is released.
DO NOT turn off the power of scooter when drive, will cause brake suddenly.
DO NOT switch to Manual mode on the way uphill and downhill, in this case, there is
no any braking effect.

Braking distance is changing along with the different driving surroundings. If need to
brake, please prepare in advance.
6Battery and Charging
How frequently you need to charge the scooter’s batteries will depend on a number
of factors including how you use the scooter, the temperature and the age of the
batteries. All batteries gradually lose capacity as they age.
To achieve the best service life, never let batteries discharge completely. Always
charge the batteries immediately after they have been discharged.
If the battery voltage indicator shows that the batteries lose power faster than normal,
the batteries could be worn out and need to be replaced.
If the power on the scooter is turned ON during the charging process, it must be
switched off again and the charger disconnected before the scooter can be driven.
For long-term battery storage the room should be unheated, but to guard against
battery corrosion, make sure the room is a few degrees warmer than its surroundings,
as this will keep the room drier. The batteries must be fully charged before storage.
Batteries in storage require charging every 2 months.
6.1 2 Ways charging for battery
1st Way: Charging port on
scooter
1st Way: Charging for
battery on scooter
2nd Way: Open battery box
by turn box key clockwise

2nd Way: Pull out the plug
and then lift up the battery
from box
2nd Way: Connect the
charging cable to battery
port
2nd Way: Directly charge for
battery
2nd Way: Install the batter should adopt the above steps on the contrary. And to press
lightly when put battery back to the box, make it stick to the bottom magic tape and
more stable.
Charger indicator light:
Red : Power On / Charging Green : Full charging
7Transporting and Storage your scooter
Compact scooter
Only need a little space
Carry and Lift easily
Put into car boot easily
Preparations for air transportation: Airlines have different rules regarding mobility
scooter transportation. Please contact your specific airline for more information and
to make sure the mobility scooter can be transported safely.
For long-term your scooter storage makes sure it in a dry environment to prevent
mould from growing or the surface from being damaged and rusting. Disconnect the
battery to prevent it from being damaged. And protect your scooter from dirtiness
and dust.
8Maintenance and repairs
For the scooter to work well, it is important that it is used correctly and regularly maintained.
A well maintained scooter last longer and has a lower risk of defects.
Only qualified service technicians should perform the maintenance and repair specified,
read all instructions carefully before proceeding. If any questions arise, contact your
distributor.
8.1 Frequency of maintenance and inspection
It is recommended compliance with the following maintenance and inspection schedule.
Maintenance and inspection schedule
Daily
Weekly
Monthly
Yearly
Check battery level indicator and charge if
necessary.
Check joystick work well, drive forward and
backward, stop once release.
Make sure all handles, knobs, lockers and other
removable parts are securely fastened.
Check positioning of speed button and
drive-manual switch.
Check control panel is not damaged and LED
light is operational and clean.
Ideally, use a soft cloth or sponge, water and a
mild detergent for normal wiping.
Check the metal surfaces, remove scratches from
shiny surfaces using car polish, then apply soft car
wax to restore the original surface gloss.
Complete inspection, safety check and service
performed by your specialist distributor.
8.2 Battery replacement (Specific steps of removing could refer to 6.1 - 2nd Way)
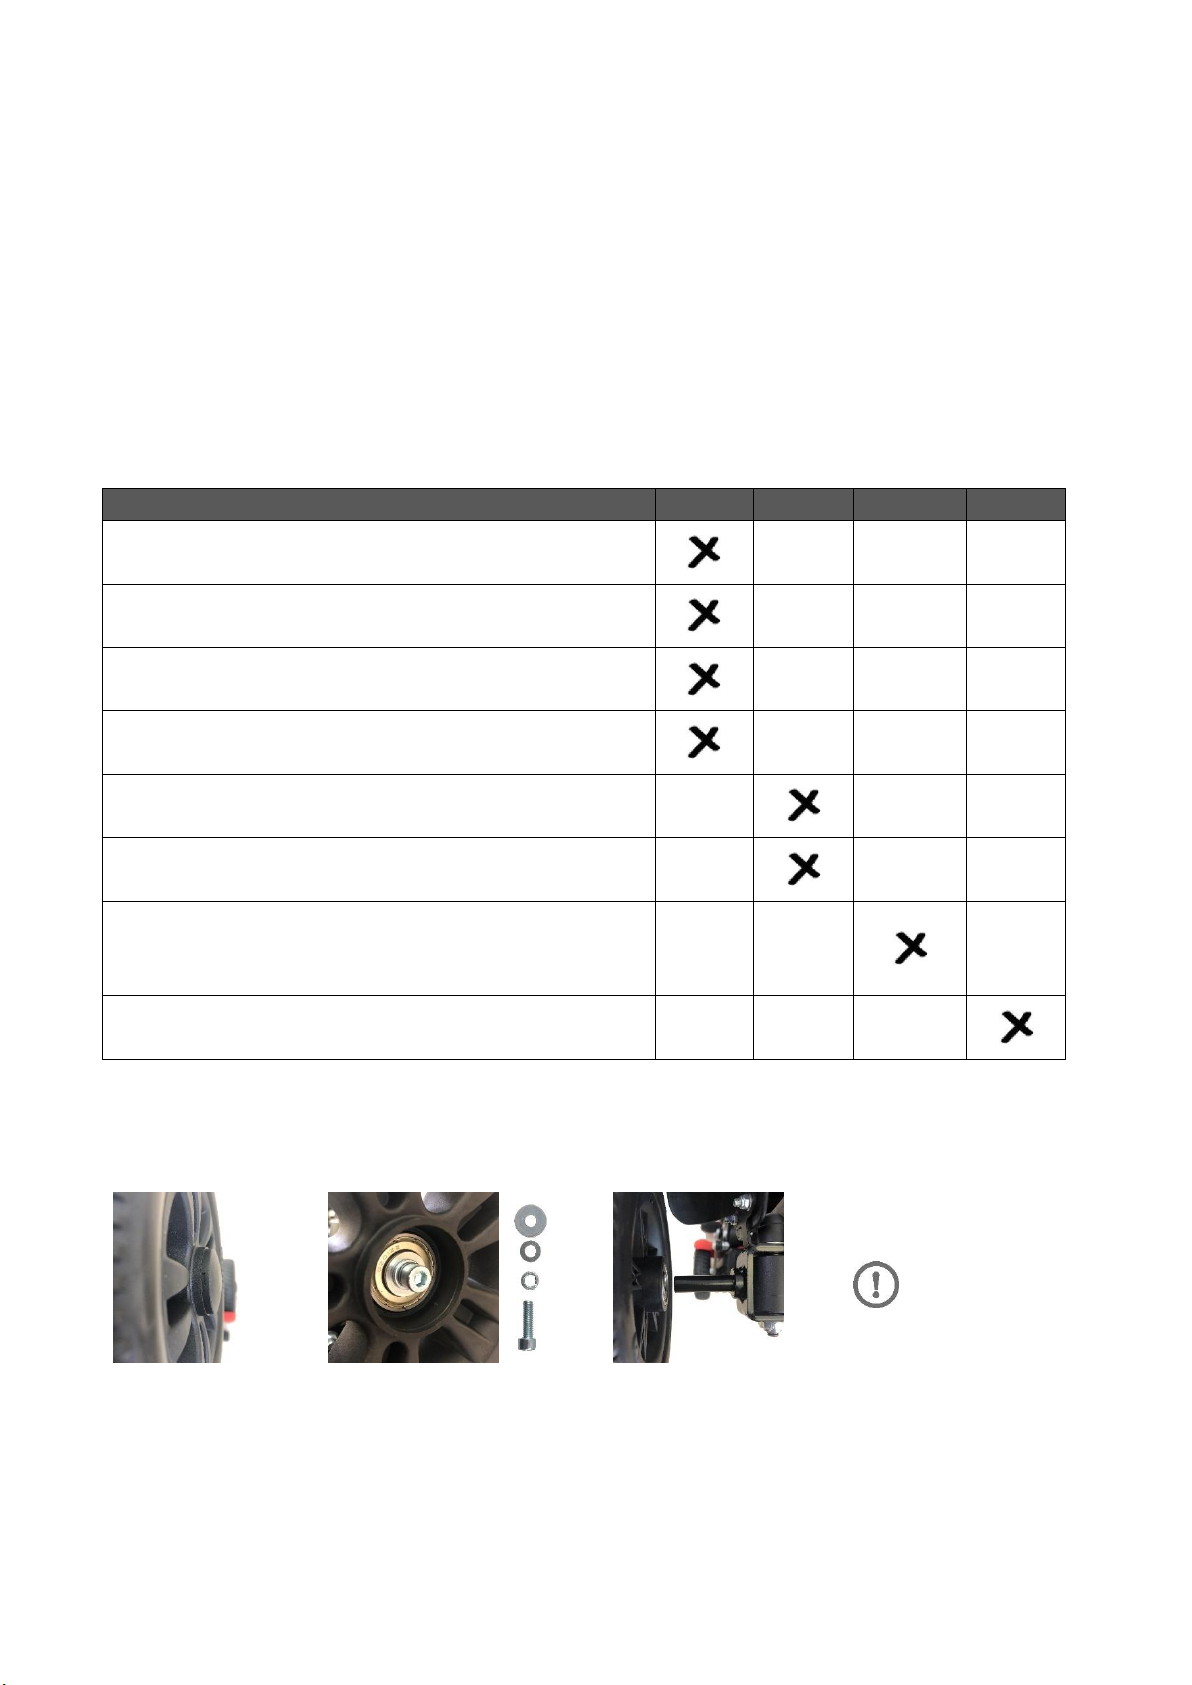
8.3 Wheels replacement
1st.Remove cap from groove easily; 2nd.Remove the screw by M5 wrench; 3rd.Remove
wheel and replace new one.
9Troubleshooting
The following troubleshooting guide describes a number of faults and events which may
Installing steps
on the contrary

occur when you use the scooter, together with suggested remedies. Note that the guide
cannot describe all the problems and events which may occur and you should always
contact your service provider in case of doubt.
Controller have included a warning system with function of identifying trouble, the
buzzer is always on warning status until the trouble removal.
Fault
Code
Code
Instruction
Trouble
Remedy
* **
1, 2
Joystick open-circuit fault
Check its circuit connection or
contact your distributor.
** *****
2, 5
Joystick short fault
Check if exist short or contact your
distributor.
* ******
1, 6
Joystick lever is not in the
center
Switch off power and poke the
joystick lever to the center, or
contact your distributor if do not
solve it.
*** **
3, 2
Electromagnetic brake
fault
Check if the Drive-Manual lever is at
the Drive position.
* ***
1, 3
Charging status
Stop charging. Disconnect the
charging cable from the scooter
charger socket.
** **
2, 2
Undervoltage protection
Charge the battery.
*****
1, 4
Motor hall fault
Contact your distributor.
** ****
2, 4
Controller fault
Contact your distributor.
** *****
2, 5
Electric circuit overload
Restart, or contact your distributor.
******
1, 5
Overvoltage protection
Restart, or contact your distributor.
10 Limited warranty
This warranty is extended only to the original purchaser/user of our products.
IDEAL warrants its product to be free from defects in materials and workmanship for one
year for the original purchaser. If within such warranty period any such product shall be
proven to be defective, such product shall be repaired or replaced. Product repairs shall
not extend this warranty - coverage for repaired product shall end when this limited
warranty terminates. IDEAL’s sole obligation and your exclusive remedy under this warranty
shall be limited to such repair and/or replacement. For warranty service, please contact
the dealer from whom you purchased. The defective unit or parts must be returned for
warranty inspection.
This warranty does not cover device failure due to owner misuse or negligence, or normal
wear and tear. The warranty does not extend to non-durable components, such as rubber
accessories, casters, and grips, which are subject to normal wear and need periodic
replacement.

NORDBUTIKER AB www.blimo.se/dk/no/fi
Gösvägen 28
76141 Norrtälje,
Sweden
Tel: +46-812350720
[email protected]/dk/no/fi
Table of contents
Other Blimo Scooter manuals


