Blu LW6030A User manual

2017-12
1 866 907 0122 blubathworks.com
LW6030A
Wall-Mount Toilet
Installation Guide
LW6020A
FLOOR

2017-12
1 866 907 0122 blubathworks.com
1
Attention — Before Installation
If you are installing this product in a new construction or remodel, please make sure you are following all local plumbing and
building codes. Carefully unpack and examine your new xture for damage. To help insure that the installation process will
proceed smoothly and correctly, please read these instructions carefully before you begin.
- We recommend that the installation be done by a minimum of 2 people as a security precaution. Also make sure
to adopt the proper posture when lifting the basin.
- Adhere to all local building and plumbing codes. The diagrams in this guide are not construction plans. They are visual aids.
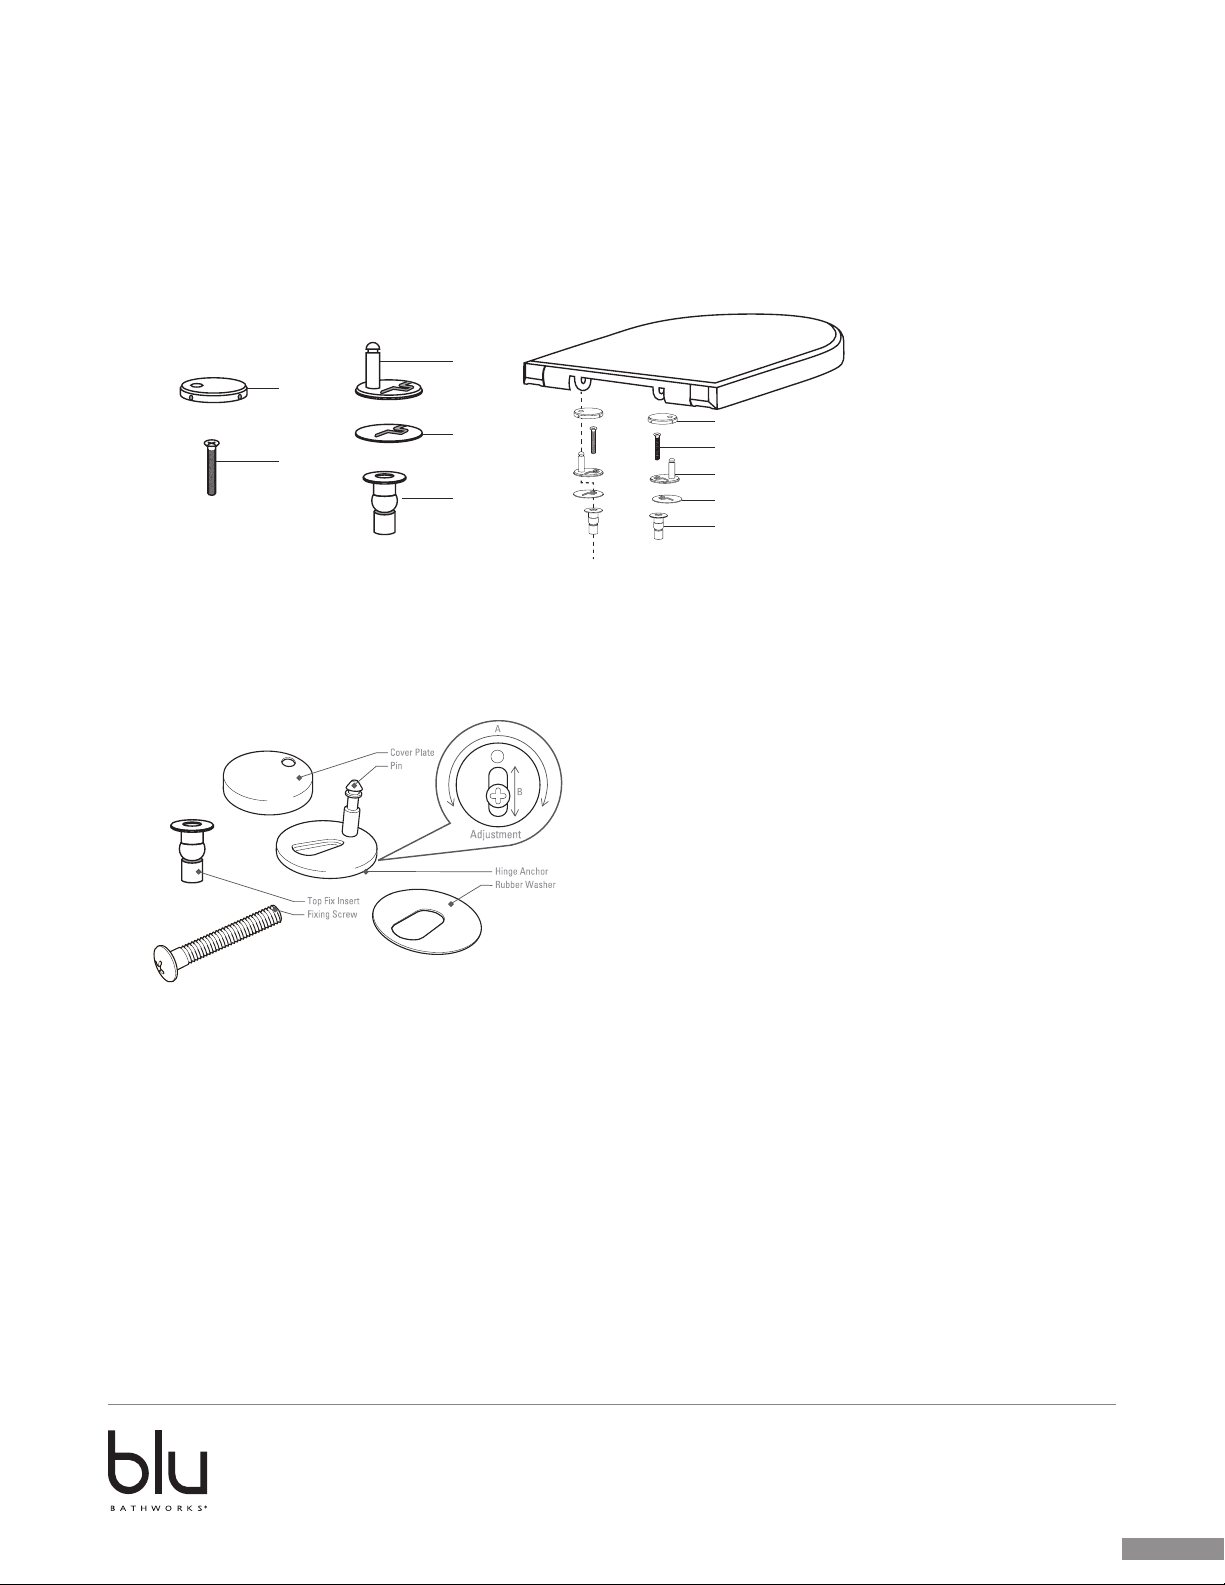
1. Inspect this product to ensure you have all parts as shown that are required for proper installation. Blu recommends that the
installer refer to the Geberit toilet system installation and maintenance instructions.
2. Read this entire instruction sheet to ensure proper installation.
3. Compliance and conformity to local building codes and ordinances is the responsibility of the installer.
4. Compliance and conformity to local re codes and ordinances is the responsibility of the installer.
5. Purge all the water supply lines before making connections.
Installation Requirements
Please read the instructions carefully so as to avoid any damage to the xture.
1. To ensure this product is installed properly, you must read and follow these guidelines.
2. The owner/user of the product must keep this information for future reference.
3. Consult local building codes to make sure the installation complies with standards.
4. Remove the unit from its packaging. Before disposing of it, inspect the unit to make sure its in good shape. Should inspection
reveal any damage or defect in the nish, contact your distributor. The warranty does not cover damages or defects in the nish
once it has been installed. Blu Bathworks’ responsibility for shipping damages ceases upon delivery of the product in good
order to the carrier. All complaints regarding damage due to transport must be made directly to the carrier.
5. Place the unit in the bathroom before you start working. Conserve all nuts and bolts.
6. To protect the unit during installation, we recommend that you lay a piece of cardboard on the bottom.
7. If the unit is covered with polyethylene protective lm, do not remove until installation is complete to grant maximum protection.
However, remove lm where any two surfaces will be in permanent contact.
8. Verify that all dimensions on the plan are the same as the ones of the unit.
9. For use on installations with vertical discharge only. DO NOT CUT DISCHARGE PIPE.
10. 3" DWV vertical waste line connection.
11. Water supply will be ½" copper, recommended water pressure from 25 PSI to 90 PSI.
12. Materials suitable for wall construction include Gypsum-green board, cement board, or tile backer board.
Wall thickness not to exceed 2".
13. When installing remote actuator, use of access panel kit Geberit 461.043.00.1 or 115.767.11.1 is recommended.
14. When mounting bowl on tile or marble, use of a tile cushion pad Geberit 156.055.00.1 is recommended.
15. All installations must conform to local and national plumbing, building and re codes.
16. Inspect this product to assure you have all parts required for proper installation.
17. Do NOT use putty during this installation.

2017-12
1 866 907 0122 blubathworks.com
2
Cleaners for Fittings and Accessories
To avoid damaging the surface and working components of the ttings, certain precautions must be taken
in terms of usage and subsequent cleaning as many cleaning agents contain acids for general cleaning
and removing calcium deposits. When caring for your ttings and accessories, please note the following:
- Only apply cleaners which are expressly intended for the use
- Never use any cleaner containing hydrochloric acid, formic acid or acetic acid on or near the tting, as they can
cause considerable damage even with just one application
- Do not use cleaners containing phosphoric acid
- Do not use cleaners containing chlorine bleach solutions
- Never mix or combine cleaning agents
- Abrasive cleaners and unsuitable scouring agents such as scouring pads.
Installation Notes
Important! Install this product according to the installation guide. Our products must be installed by certied professionals only
and according to our installation guide as well as federal, provincial / state and local building codes and regulations.
Technical Support Assistance
If further assistance is required, please contact:
Product Support at 1.866.907.0122 (09:00 – 17:00hrs PST) or email [email protected]
North America
Blu Bathworks Inc.
188 Smithe Street,Vancouver, BC, Canada, V6B 6A9
T +1.604.299.0122 F +1.604.299.0125
Please refer to blubathworks.com for warranty, terms & conditions under warranty & procedure for warranty service.

2017-12
1 866 907 0122 blubathworks.com
3
Installation Instructions for Wall-mount Toilet
LW6020A · LW6030A
1
Y
Y
1
2
X
X
+
1/8"
+(3mm)
1
Water inlet pipe
Water outlet pipe
1
1
2
2
Insert discharge pipe into the pipe hub in the wall. Place a
straight edge flush against the wall and mark a line on the
pipe. Fit finned rubber seal onto flush pipe. Repeat same
procedure for discharge pipe.
Place discharge pipe with gasket into waste outlet of bowl.
Also place flush pipe with fin gasket into inlet of bowl. Then
mark a second line on both pipes.
Add dimension X and 8". Using that dimension, mark a line on
the pipe measuring from the hub side. Cut off the pipe at the line
with a pipe cutter.
Add dimension Y and 8". Using that dimension, mark a line on
the pipe measuring from the hub side. Cut off the pipe at the line
with a pipe cutter.
Bevel the sharp edges as shown to ensure a smooth
insertion into the pipe hubs in the wall.
2
nut
mounting fi ttings
from the flat su rface to the top
Connecting bolt
Bearing bolt
Installation hole
1s"e"
provided with the toilet
provided with wall carrier
a). Use hexagonal key to screw the
conical nut into mounting fittings.
+
1/8"
+(3mm)
2
Decide the Size of Drainage Pipe
Install the connecting bolt
b). Insert the auxiliary part into the aiming
screw by pushing the part tothe top from
its flat surface.
c). the auxiliary part is totally inserted into
the aiming screw.
d). Put the mounting fittings into the installation hole on toilet.
e). Turn the toilet and make the installation hole vertically
upside.The leg side of screw should lock the fixed position
on back side of toilet.
f). Adjust the position of bearing bolt well and screw it into
the connecting bolt
⅛
⅛

2017-12
1 866 907 0122 blubathworks.com
4
1
Y
Y
1
2
X
X
+
1/8"
+(3mm)
1
Water inlet pipe
Water outlet pipe
1
1
2
2
Insert discharge pipe into the pipe hub in the wall. Place a
straight edge flush against the wall and mark a line on the
pipe. Fit finned rubber seal onto flush pipe. Repeat same
procedure for discharge pipe.
Place discharge pipe with gasket into waste outlet of bowl.
Also place flush pipe with fin gasket into inlet of bowl. Then
mark a second line on both pipes.
Add dimension X and 8". Using that dimension, mark a line on
the pipe measuring from the hub side. Cut off the pipe at the line
with a pipe cutter.
Add dimension Y and 8". Using that dimension, mark a line on
the pipe measuring from the hub side. Cut off the pipe at the line
with a pipe cutter.
Bevel the sharp edges as shown to ensure a smooth
insertion into the pipe hubs in the wall.
2
nut
mounting fi ttings
from the flat su rface to the top
Connecting bolt
Bearing bolt
Installation hole
1s"e"
provided with the toilet
provided with wall carrier
a). Use hexagonal key to screw the
conical nut into mounting fittings.
+
1/8"
+(3mm)
2
Decide the Size of Drainage Pipe
Install the connecting bolt
b). Insert the auxiliary part into the aiming
screw by pushing the part tothe top from
its flat surface.
c). the auxiliary part is totally inserted into
the aiming screw.
d). Put the mounting fittings into the installation hole on toilet.
e). Turn the toilet and make the installation hole vertically
upside.The leg side of screw should lock the fixed position
on back side of toilet.
f). Adjust the position of bearing bolt well and screw it into
the connecting bolt

2017-12
1 866 907 0122 blubathworks.com
5

2017-12
1 866 907 0122 blubathworks.com
6
continued...

2017-12
1 866 907 0122 blubathworks.com
7
Toilet Seat Installation Instructions
LSeat-004 · LSeat-slim
Hinge Adjustment
Maximum adjustment of the pin position is achieved by rotating the hinge anchor
around the screw (adjustment A in the parts diagram above.) Further ne adjustment
of the pin position can be achieved by sliding the screw in the
adjustment plate (adjustment B).
1
2
3
4
5
5
4
3
2
1

2017-12
1 866 907 0122 blubathworks.com
8
1
2
3
Fixing the Hinge Anchor
Fitting the Seat
Quick-Release Mechanism
• Place the Top Fix Inserts into the xing holes in the
toilet pan. Insert the screws within the Hinge Anchors
as shown and begin to tighten the screws until they
are loosely secured to allow for adjustment of the seat
on the pan.
• Align and insert the pins into the seat hinge sockets
and rmly press down until you hear them ‘click’ into
position. Adjust the hinge anchors to make sure the
seat lines up with the edges of the toilet pan.
• When you are satised the seat is in the correct
position, remove the seat from the hinge anchors (see
step 3) and fully tighten the screw in the Top Fix lnsert
(shown in step 1). Place the Cover Plates over the
Hinge Anchors.
• Replace the seat and click into position.
• This toilet seat is designed for quick and easy removal
when cleaning the toilet pan. To activate the quick
release lift the lid, seat up and press the button in the
centre of the hinges and lift.
• To replace the seat, align the sockets with the pin and
rmly press into position.
• Seat is designed to activate the quick release with NO
BUTTON. To release, lift lid and seat up, then pull up.

2017-12
1 866 907 0122 blubathworks.com
9
Toilet Seat Maintenance
• Wipe the toilet seat with a soft wet cloth
• Clean the toilet seat with a neutral cleanser, and then dry it with a clean cloth
Caution
• Do not stand on the lid or ring of your toilet seat
• Do not use any abrasive cleaning agents
• Keep toilet seat away from chemicals and cosmetics
• Please do not close the seat or cover forcibly to extend the soft-close function lifespan.
• Please do not clean the seat or cover with strong chemical cleansers or scouring brushes to avoid harming the seat & cover

2017-12
1 866 907 0122 blubathworks.com
10
LW6020A
7"
[180]
21½"
[545]
19"
[485]
9¾"
[250]
13"
[330]
2¼"
[60]
13½"
[342]
14¼"
[360]
11"
[280]
18½"
[470]
7"
[180]
14¼"
[360]
5½"
[140]
Ø2¼"
[55]
Ø1"
[25]
Ø4"
[100]
6½"
[165]
1½"
[35]
4¼"
[105]

2017-12
1 866 907 0122 blubathworks.com
11
LW6030A
18½"
[470]
14¼"
[360]
11"
[280]
13½"
[345]
7"
[180]
2¾"
[70]
21¼"
[540]
17¼"
[440]
10¼"
[260]
12½"
[320]
4"
[100]
1½"
[35]
7¼"
[185]
5¼"
[135]
1½"
[40]
Ø4"
[100]
Ø1"
[25]
Ø2¼"
[55]
14¼"
[360]
7"
[180]
This manual suits for next models
1
Table of contents
Popular Toilet manuals by other brands

Kohler
Kohler K-11452 Installation and care guide

Dometic
Dometic CT 4110 installation manual

Heng's Industries
Heng's Industries TraveLoo user guide

noken
noken 100257861 N370170540 quick start guide

American Standard
American Standard Studio Cadet 3 2589 INSTALLATION INSTRUCTIONS CARE AND MAINTENANCE

sanindusa
sanindusa WCA 111500 Assembly instructions