bluBathworks LF1062 User manual

Installation Guide
Freestanding Toilet
1 604 299 0122 1 866 907 0122 blubathworks.com
2011-08
LF1062
LF1235
LF1269
LF8004

2
Installation Requirements
Please read the instructions carefully so as to avoid any damage to the fixture.
1. To ensure this product is installed properly, you must read and follow these guidelines.
2. The owner/user of the product must keep this information for future reference.
3. Consult local building codes to make sure the installation complies with standards.
4. Remove the unit from its packaging. Before disposing of it, inspect the unit to make sure its in good shape.
Should inspection reveal any damage or defect in the finish, contact your distributor. The warranty does not
cover damages or defects in the finish once it has been installed. Blu Bathworks’ responsibility for shipping
damages ceases upon delivery of the product in good order to the carrier. All complaints regarding damage
due to transport must be made directly to the carrier.
5. Place the unit in the bathroom before you start working. Conserve all nuts and bolts.
6. To protect the unit during installation, we recommend that you lay a piece of cardboard on the bottom.
7. If the unit is covered with polyethylene protective film, do not remove until installation is complete to grant
maximum protection. However, remove film where any two surfaces will be in permanent contact.
8. Verify that all dimensions on the plan are the same as the ones of the unit.
9. All installations must conform to local and national plumbing, building and fire codes.
10. Inspect this product to assure you have all parts required for proper installation.
Attention
DO NOT USE IN-TANK BOWLCLEANERS.
The use of high concentration of chlorine or chlorine-related products can seriously damage fittings in the tank.
This damage can cause leakage and property damage. Blu shall not be responsible or liable for any tank fitting
failure or damage caused by the use of in-tank bowl cleaners.
Operation (Note to Owner)
You have chosen a Blu product that is superior in quality and craftsmanship. Our toilet flushing systems are the
best in the industry. To ensure that your toilet is performing correctly, always flush the toilet with a full stroke of the
trip lever to activate the flushing cycle. A full stroke will guarantee that you are flushing with the power of a Blu.
Cleaners for Fittings and Accessories
To avoid damaging the surface and working components of the fittings, certain precautions
must be taken in terms of usage and subsequent cleaning as many cleaning agents contain
acids for general cleaning and removing calcium deposits. When caring for your fittings and
accessories, please note the following:
- Only apply cleaners which are expressly intended for the use
- Never use any cleaner containing hydrochloric acid, formic acid or acetic acid on or near the fitting, as they can
cause considerable damage even with just one application
- Do not use cleaners containing phosphoric acid
- Do not use cleaners containing chlorine bleach solutions
- Never mix or combine cleaning agents
- Abrasive cleaners and unsuitable scouring agents such as scouring pads.

3
Installation Notes
Important! The rough-in must be a minimum of 12” (305mm) or more from the base of the wall or baseboard.
The toilet will not fit correctly if there is less than 12” (305mm) of clear space between the base of the wall or
baseboard and the centerline ofthe outlet. Install or relocate the supply and outlet as necessary to conform to
rough-in dimensions. If a baseboard causes the rough-in to be less than 12” (305mm), it must be cut or removed
to allow space for the toilet. Install this product according to the installation guide. Our products must be installed
by certified professionals only and according to our installation guide as well as federal, provincial / state and local
building codes and regulations.
Technical Support Assistance
If further assistance is required, please contact:
North America
Blu Bathworks Inc.
3614 East 1st Ave,Vancouver, BC, Canada, V5M 1C3
T +1.604.299.0122 F +1.604.299.0125

4
LF1062, LF1235, LF1269, LF8004—Before Installation
TOOLS NEEDED:
– 12” Pipe Wrench
– 10” Adjustable Wrench
– Carpenter’s Level
– Tape Measure
– Pliers
– Screwdriver
– Putty Knife
– Drill
– 11⁄64” drill bit for wood floor installation
– 5⁄16” drill bit for concrete/tile installationv
MATERIALS REQUIRED:
– Flexible Supply Tube / Connector
– Supply Stop Valve
– Mounting (T) Bolts & Nuts (2pc)
– Wax Ring / Seal
PACKAGE CONTENTS:
Item Description Quantity
1 Bowl w/ lid (vitreous china) 1
2 Toilet Seat Set 1
3 Cover Plate 1
4 Top Mount Bold Set (for seat) 1
5 UniFit Rough-In
a. Toilet Mounting Bolt (T-Bolt) 2
b. T-Bold Washer 2
c. T-Bolt Nut 4
d. Mounting Screw w/ washer 4
e. Anchor 2
f. PVC Outlet Connection 2
Installation Procedure
1. PIPING CHECK AND ROUGH-IN
In order for your new Blu toilet to fit correctly, the distance between the finished wall to the center of the
closet flange must be at least 12 inches. This measurement is called the Rough-In. The water supply must be
approximately 8 inches or 10 inches to the left (facing the bowl) from the center line of the closet flange and
approximately 4-1/2” above the floor.
5
2. REMOVING EXISTING TOILET (IF NECESSARY)
Turn off water supply. Flush the toilet, remove any remaining water from tank and bowl. Disconnect water
connector. Remove tank and bowl. Remove old wax seal and mounting bolts.
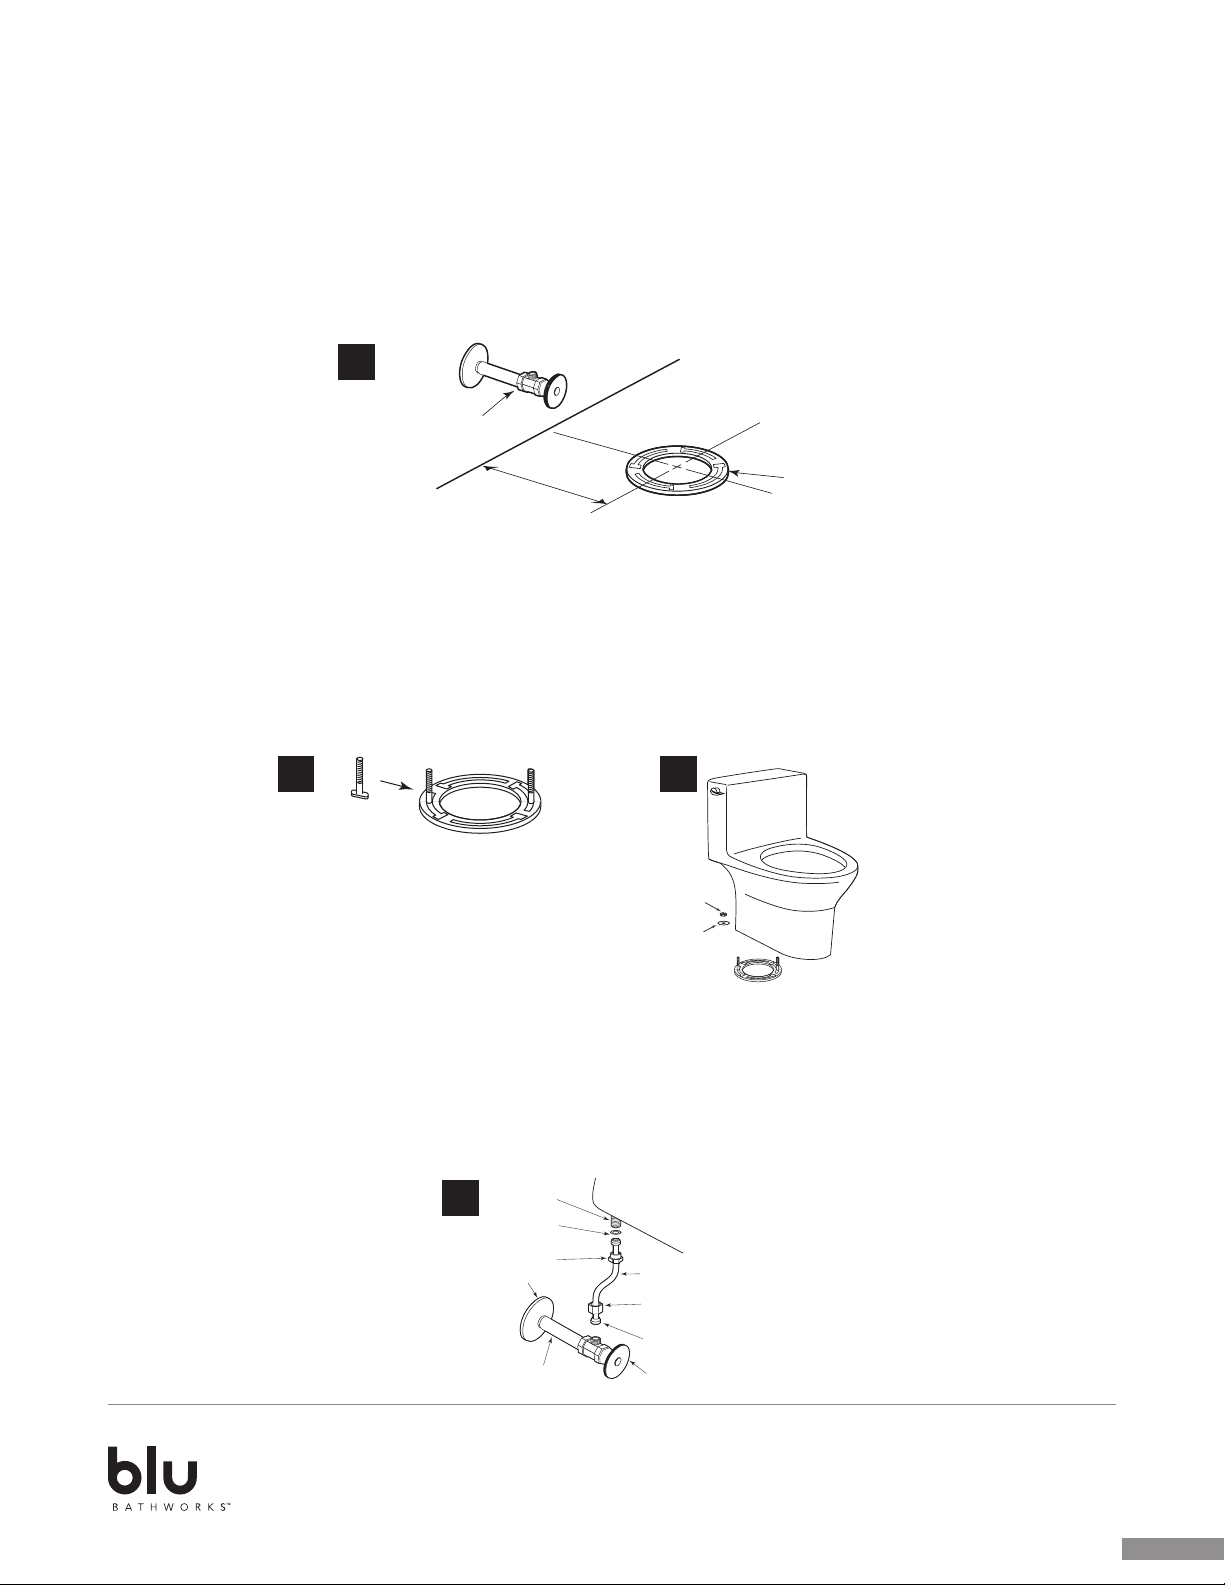
3. INSTALLING TOILET MOUNTING BOLTS
Clean any debris out of the closet flange and then install new mounting bolts (not supplied) into the slots of the
closet flange (see Fig. 1). The head of the bolt should be inserted into the slot with its threads facing upward.
4. TOILET BOWL INSTALLATION
Carefully turn the toilet upside down onto some padding. Firmly press a new bowl wax ring (not supplied) onto
the circular recess around the toilet bowl’s horn (see Fig. 3). Turn the toilet upright and gently lower into position
over the closet flange. With toilet properly aligned, press firmly on both sides of toilet rim to set the bowl wax ring.
Insert the washer and thread nuts onto the bolts and hand tighten. Then tighten the bolts an additional ½ turn.
WARNING: DO NOT OVERTIGHTEN. Overtightening may cause damage to china or plastic parts.
5. CONNECTING WATER LINE
The supply stop should be installed per the supply stop instruction at the location shown in the Before Installation
section. Flush the water line briefly to ensure removal of debris. Connect flexible supply hose to supply stop.
CAUTION: HAND-TIGHTEN ONLY. Open the supply stop, checking for leakage. Slightly re-tighten if necessary. The
water supply pressure should be 20 to 80 psi static.
Nut
Washer
Water Inlet
Washer
Coupling Nut
Trim Plate
Nipple
Valve
Compression
Valve Nut
Flexible Supply
Hose (not supplied)
2 3
4
Finished Wall
C/L
‘RI’
Closet
Flange
Supply
Valve
1
6
Seat Bolt
Rubber Brushing
Nut
5
6. INSTALL THE TOILET
Install the toilet tank lid onto the toilet tank top.
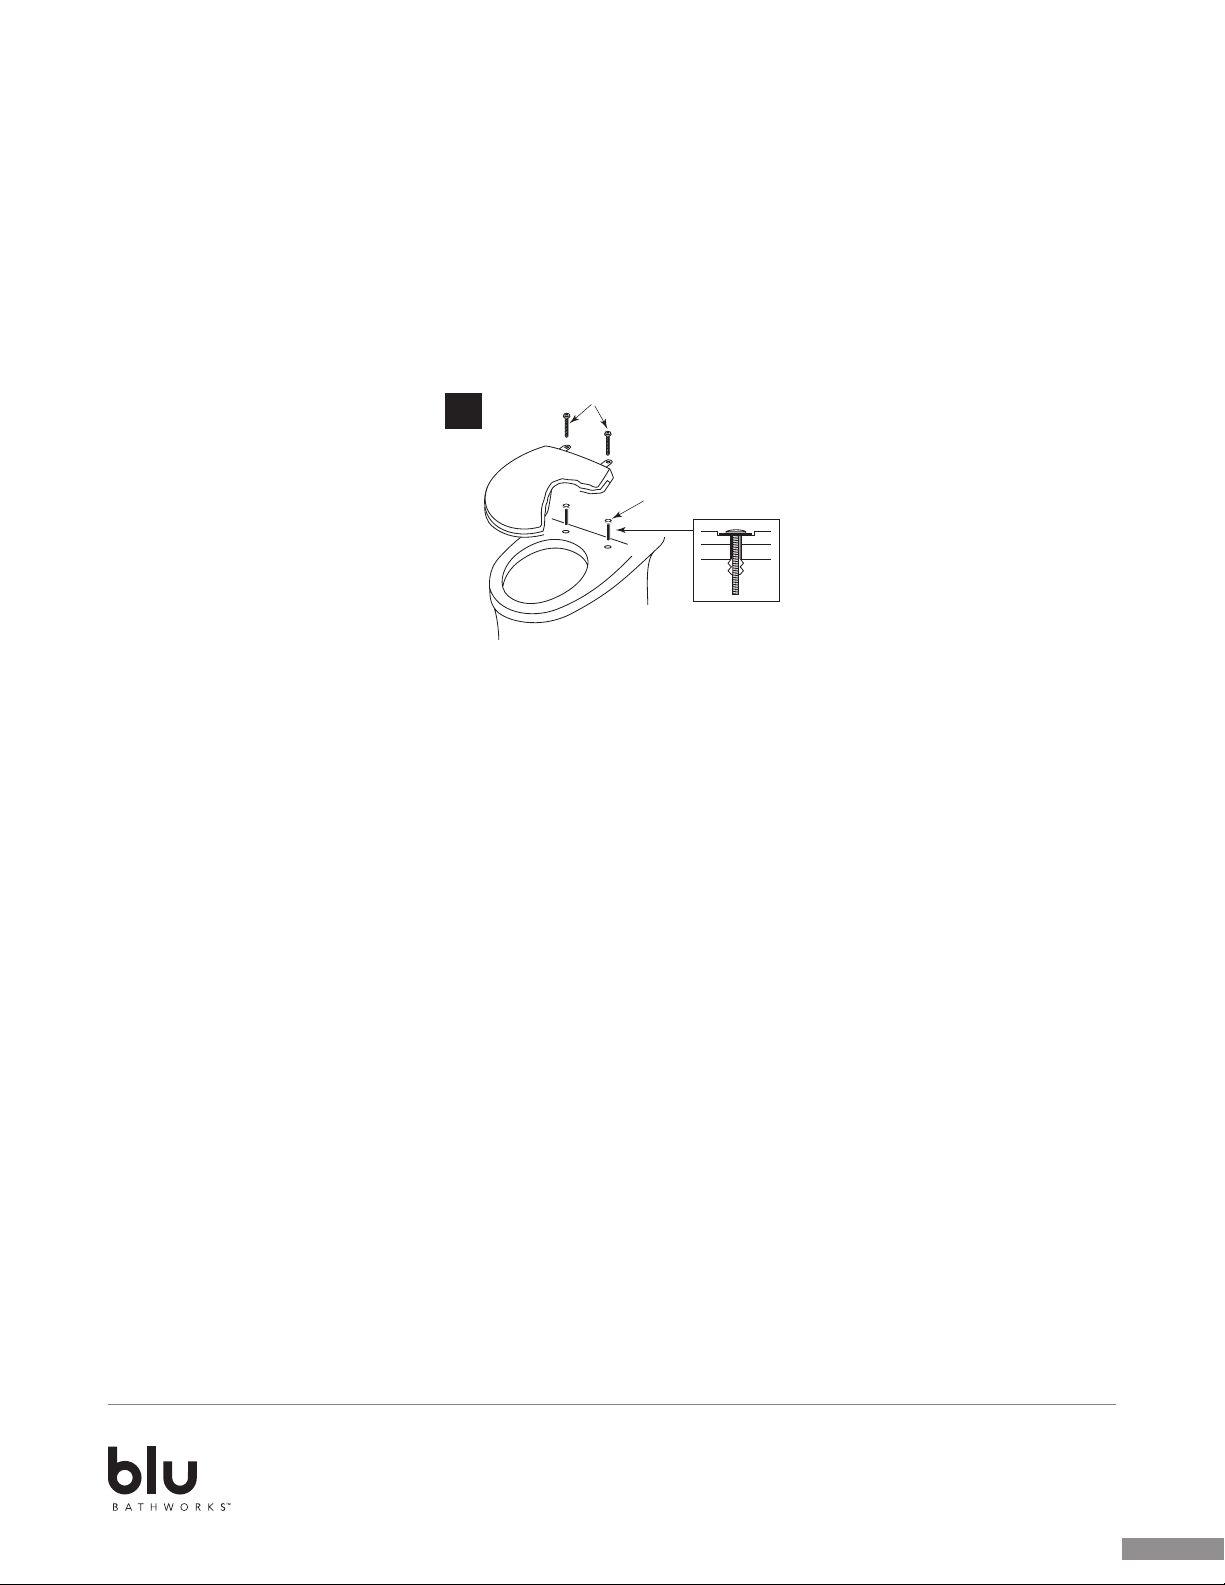
7. INSTALL THE TOILET SEAT
Install the toilet seat onto the toilet bowl (see Fig 5). (Top Mount Bolt Set is included with the bowl). Insert the
rubber bushing nuts into the bowl seat holes.
Note: Remove the existing seat if necessary. Place the seat on the bowl and rotate the hinge unit into place while
holding seat down on the bowl. Fasten and tighten the bolt from the top with a screwdriver. Replace the bolt cap
and the lower lid (if necessary).
Toilet Tank Fill Valve Instruction
Note: Fill Valve Height has been preset at the factory and DOES NOT require any height adjustment
INSTALLATION
1. Shut off the water supply to the toilet.
2. Flush toilet and remove remaining water from tank with a sponge.
3. Remove the water supply connection at the fill valve.
4. Remove old fill valve and use damp sponge to clean hole in tank.
5. Place new fill valve inside tank hole.
6. Thread mounting nut onto fill valve shank and tighten the nut.
Note: Do not over-tighten. Be sure to install fill valve in a position that does not interfere with the trip lever
operation.
7. Connect water supply to fill valve shank and hand-tighten only.
Note: Do not overtighten. These are plastic parts. Never use pipe dope on any water supply connection.
8. Attach refill tube to fill valve nipple and clip other end of refill tube to the overflow pipe.
9. Turn water supply ON and check for leaks outside the tank.
Note: As water fills the tank, water is also directed into the overflow tube via the refill tube. This additional flow
of water is critical to refilling your toilet’s bowl. Once the water stops filling the tank, some residual drops of
water may drip from the fill valve. This is NORMAL as these drops will subside.

7
Lid Installation (LF8004 & LF1235)
– Carefully place lid on top of tank making sure that the push rod colours match the flush valve buttons (blue to
blue and white to white).
– To replace or readjust the push rod height, push down on one button while pulling the opposite button up with
your finger to remove.
– Use the provided longer push rod, and insert them through push button housing.
– Cut the push rod at the shown location.
– Install the rods into the push buttons and insert the buttons in the housing until they click into place.
– When inserting the buttons make sure that the rod colours match with the flush valve button colours (blue to blue
and white to white).
Installation Instructions of Toilet Seat
BEFORE INSTALLATION
– Please read the instructions carefully, get to know our seats and get prepared with the required tool in advance.
Follow the instructions to install the seat correctly. This will help avoiding harming you, your family and your property.
– Please keep the instructions available after reading them carefully.
– Please subject to the real products when the instructions are different from the real products. If there is any new
update to products and its accessories, we will give no further notice.
MAINTENANCE
– Regular Maintenance
– Wipe the toilet seat with soft wet cloth
– Clean the toilet seat with neutral cleanser, and then dry it with clean cloth
– Eradicator
– Don’t clean the toilet seat with lapping powder
– Don’t use any disinfector, eradicator or spraying cleanser
– Keep toilet seat away from chemicals and cosmetics
CAUTIONS
– Please do not close the seat or cover forcibly to extend the soft-close function lifespan.
– Please do not clean the seat or cover with strong chemical cleansers or rigid brushes. (To avoid harming the seat
& cover)
– Please do not place heavy objects on the cover. Please avoid sitting forcefully and suddenly on the seat or cover.
(To avoid making the seat & cover break)
– Please do not expose the seat or cover to direct sunlight for too long. Avoid any direct strong light or high
temperature. (To avoid making seat & cover fade)

8
Installation Instructions of Different Hinges
(PLEASE CHOOSE THE CORRECT ILLUSTRATION)
HS01
1
2
3
4
5
5
4
3
2
1
HS05
3
4
6
5
1
2
5
6
4
3
2
1

9
Trouble Shooting Guide
1. PROBLEM: Fill valve turns on/off without toilet being flushed
CAUSE: Flush valve seal gasket is dirty
SOLUTION: Inspect and clean flush valve seal gasket
2. PROBLEM: Fill valve continuously running
CAUSE: Dirty fill valve seal
SOLUTION: Shut off water supply. Open fill valve cap and clean valve seal
CAUSE: Flush valve seal gasket is dirty
SOLUTION: Inspect and clean flush valve seal gasket
3. PROBLEM: Poor flush
CAUSE: Water supply valve is not fully open
SOLUTION: Open water supply valve
CAUSE: Water supply pressure is too low
SOLUTION: The minimum required supply pressure is 20psi. Consult your plumber.
CAUSE: Trapway is obstructed
SOLUTION: Unclog trapway
CAUSE: Venting is obstructed
SOLUTION:Clean venting pipes
4. PROBLEM: Toilet is not flushing
CAUSE: Water supply valve is closed
SOLUTION: Open water supply valve
5. PROBLEM: Push button is stuck
CAUSE: Tank lid is misaligned
SOLUTION: Align the tank lid

10
Warranty
Blu Bathworks prides itself on excellence in technology, design and
quality control. Every effort has gone into making each Blu Bathworks
product perform to the highest standards possible and to satisfy the
Customer. Blu Bathworks provides the following limited warranties on
its products:
Limited Ceramics Residential Warranty
Blu Bathworks (“Blu”) ceramic products are warranted to the original purchaser to be free from defects in all material and workmanship
during normal residential use for a period of one (1) year from the date of purchase. Blu will, at its election, repair, provide a
replacement part or product, or make appropriate adjustment, subject to the terms and conditions set forth in this warranty.
Limited blu•stone™Residential Warranty
Blu Bathworks (“Blu”) blu·stone products are warranted to the original purchaser to be free from defects in all material and
workmanship during normal residential use for a period of five (5) years from the date of purchase. Blu will, at its election, repair,
provide a replacement part or product, or make appropriate adjustment, subject to the terms and conditions set forth in this warranty.
Blu Bathworks does not recommend exceeding US/Canada maximum hot water temperature regulations of 120°F/50°C, respectively.
Exceeding stated temperatures could result in damage to blu.stone basins and bathtubs.
Limited Acrylic Bathtubs Residential Warranty
Blu Bathworks (“Blu”) acrylic bathtubs are warranted to the original purchaser to be free from defects in all material and workmanship
during normal residential use for a period of five (5) years from the date of purchase. Blu will, at its election, repair, provide a
replacement part or product, or make appropriate adjustment, subject to the terms and conditions set forth in this warranty.
Limited Tapware Residential Warranty
Blu Bathworks (“Blu”) tapware products are warranted to the original purchaser to be free from defects in all mechanical parts and
polished chrome finishes during normal residential use for as long as the original purchaser owns his or her home. Blu will, at its
election, repair, provide a replacement part or product, or make appropriate adjustment, subject to the terms and conditions set forth
in this warranty.
Limited Commercial Warranty
Blu Bathworks (“Blu”) products are warranted to the original purchaser to be free from defects in all material and workmanship during
normal usage for a period of one (1) year from the date of purchase. Blu will, at its election, repair, provide a replacement part or
product, or make appropriate adjustment, subject to the terms and conditions set forth in this warranty..
Warranty Terms and Conditions
• This warranty applies only to Blu Bathworks products distributed in North America.
• This warranty is non-transferable and is for the exclusive benet of the original purchaser of a Blu product. This warranty may be
exercised by the original purchaser of a unit in a new residential development. Blu recommends using a professional plumber for all
installation and repair. This warranty does not apply to products that have been installed in any manner other than as set out in Blu’s
printed instructions, or to products that have been altered in any way.
• For further clarity, the above stated warranty does not cover or apply to damage attributable to:
1. Neglect, misuse, abuse, accident or negligence;
2. Normal wear and tear;
3. Proximity to salt water, dirt or lime scale, the use plumbers’ putty or inappropriate cleaners (such as those containing
abrasives, ammonia, acids, waxes, bleaches, solvents, alcohol, or any product not recommended for chrome); and
4. Damage caused by transportation, or improper storage.
• This is the only warranty of Blu, which makes no other warranty of any kind. Blu disclaims any liability for charges due to installation,
removal, shipping, or any special, incidental or consequential damages whatsoever. In no event shall the liability of Blu under this
warranty exceed the purchase price of the product.
Procedure for Warranty Service
Refer to blubathworks.com for policy and procedures relating to requests for service under the terms of this warranty. Original proof
of purchase is required. Blu is not responsible for removal or installation costs, or the costs of shipping and handling associated with
any service. Repaired or replaced products or parts are warranted only for the period remaining under the initial warranty.
This manual suits for next models
3
Table of contents
Popular Toilet manuals by other brands

Bradley
Bradley WC7690 installation instructions

Swiss Madison
Swiss Madison Concorde SM-1T107 installation instructions

clivus multrum
clivus multrum CM8 installation manual

Laufen
Laufen Pro A installation instructions

Franke
Franke VR99-036 Installation and operating instructions

Kohler
Kohler K-2590 installation guide

Villeroy & Boch
Villeroy & Boch Start ProDetect 2 9190B1 installation instructions

clivus multrum
clivus multrum M100 installation guide

Kohler
Kohler C3-520 Homeowner's guide

Ferguson Enterprises
Ferguson Enterprises PROFLO PF9002SWH installation instructions

Inax
Inax RS Series Installation and use manual

Timago
Timago KING-15-20 user manual


