Blue Gold JUST WATER Series User manual

just
water
Modular
watermaker
Do It Yourself Guide
Do It Yourself-Anleitung
Guida per il Montaggio Fai da Te
User’s Manual
Bedienungsanleitung
Manuale Istruzioni
Ver. 2020 rev.06
English
Deutsch
Italiano Reverse osmosis made easy

blank page
leere Seite
pagina bianca

Blue Gold JUST WATER Series
Reverse Osmosis Watermakers
Umkehrosmose-Wassermacher
Dissalatore ad Osmosi Inversa
Models covered by this manual:
In diesem Handbuch behandelte Modelle:
Modelli trattati in questo manuale:
All the JUST WATER series
User Manual Version 20.06
Handbuch Version 20.06
Manuale Versione 20.06
Installation –Operation - Maintenance
Installation - Betrieb - Wartung
Installazione - Funzionamento - Manutenzione
This manual is an integral part of your machine. It should remain on board
and be available for consultations by the staff at any time.
Dieses Handbuch ist ein integraler Bestandteil Ihrer Maschine.
Es soll an Bord bleiben und dem Personal jederzeit zur Einsicht zur Verfügung stehen.
Il manuale è parte integrante della vostra macchina. Deve rimanere a bordo
ed essere disponibile per consultazione del personale in qualsiasi momento.
Manufactured by
BLUE GOLD –Seawater Technologies
Stuwerstrasse 33/6 –1020 Vienna - Austria
www.bluegold-watermakers.com –info@bluegold-watermakers.com

blank page
leere Seite
pagina bianca

Summary
Übersicht
Indice
7 Prefilter assembly
Vorfilter-Assembly
Gruppo prefiltri
15 Membranes assembly
Membranen Assembly
Gruppo membrane
21 High and low pressure pumps assembly
Hochdruckpumpe und Vorpumpe Assembly
Gruppo pompa alta pressione e prepompa
28 Magnetic clutch
Magnetkupplung
Frizione elettromagnetica
29 Switch box
Schaltkasten
Quadro elettrico
33 Installation
Installation
Installazione
39 Operation
Betrieb
Operazione
47 Maintenance
Wartung
Manutenzione
53 Technical features
Technische Merkmale
Caratteristiche tecniche
66 Warranty
Garantie
Garanzia
67 EC declaration
CE-Erklärung
Dichiarazione CE

blank page
leere Seite
pagina bianca
7
Prefilter assembly Vorfilter-Assembly Gruppo prefiltri
Prefilter assembly
Vorfilter-Assembly
Gruppo prefiltri
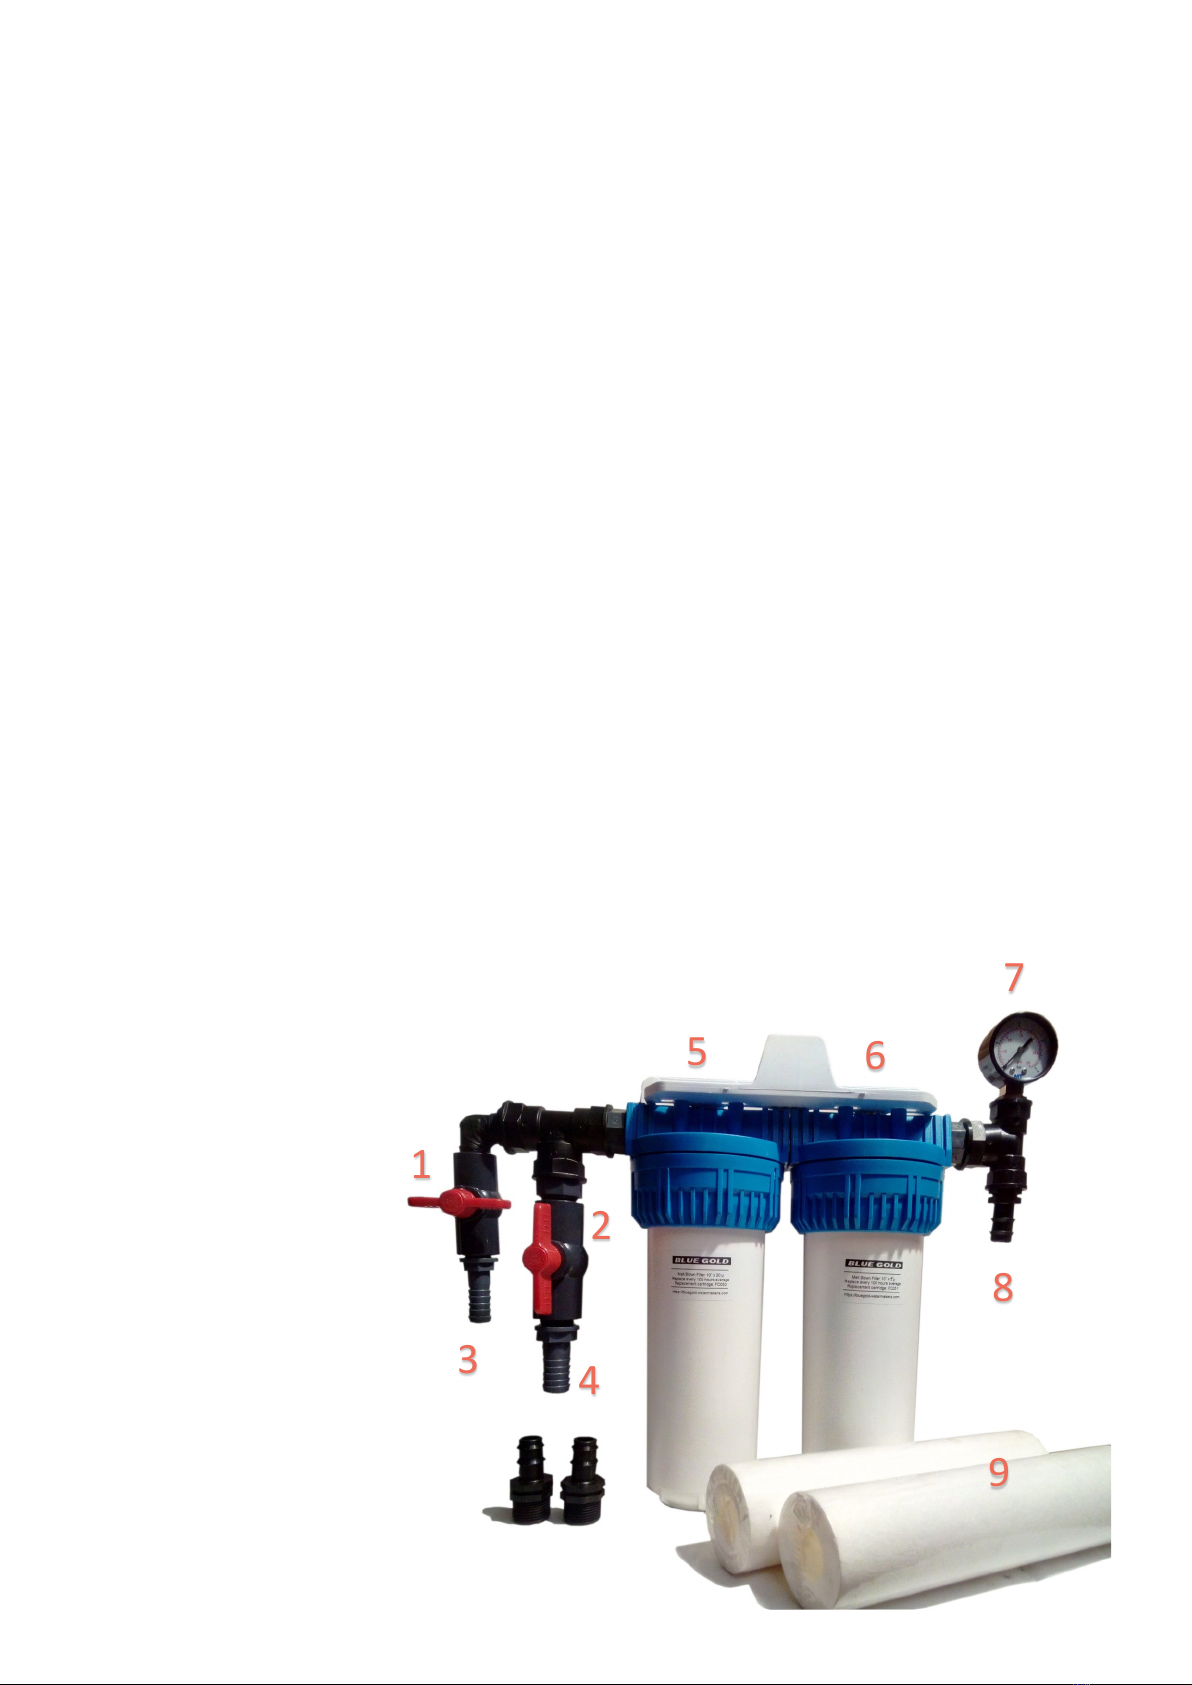
In this image is shown a complete prefilter assembly:
In diesem Bild wird eine komplette Vorfilterbaugruppe angezeigt:
In questa immagine è mostrato il gruppo prefiltri completo:
1 Flushing valve 1/2” for flushing the plant
Ventil 1/2" zum Spülen der Anlage
Valvola da 1/2” per flussaggio
2 Sewater valve 3/4”
Seewasserventil 3/4"
Valvola acqua mare 3/4”
3 Flush water inlet (from the activated carbon filter)
Spülwasser-Eingang (aus dem Aktivkohle-Filter)
Ingresso acqua flussaggio (dal filtro carboni attivi)
4 Sea water inlet
Meerwasser-Eingang
Ingresso acqua mare
5 Housing for 20 micron melt blown cartridge
Gehäuse für 20-Mikron-Patrone
Contenitore per filtro 20 micron
6 Housing for 5 micron melt blown cartridge
Gehäuse für 5-Mikron-Patrone
Contenitore per filtro 5 micron
7 Gauge 0-4 BAR
Manometer 0-4 BAR
Manometro 0-4 BAR
8 Sea water outlet
to the high pressure pump
Meerwasserauslass
zur Hochdruckpumpe
Uscita acqua mare verso
la pompa alta pressione
9 Cartridges and wrench
Patronen und Schlüssel
Cartucce e chiave
1
2
3
56
7
8
4
9

8
Prefilter assembly Vorfilter-Assembly Gruppo prefiltri
Mounting
Montage
Montaggio
►The components are sold disassembled and they need to be assembled using Teflon tape or
liquid Teflon to seal the joints between the fittings.
Die Komponenten werden zerlegt verkauft und müssen mit Teflonband oder flüssigem Teflon
zusammengebaut werden, um die Verbindungen zwischen den Fittings zu dichten.
I componenti vengono venduti smontati e devono essere assemblati utilizzando nastro di tef-
lon o teflon liquido per sigillare le giunzioni tra i raccordi.
►Remove the cups from the heads, insert the cartridges, screw again the cups under their
heads . Lubricate the o-rings of the bowls with a few silicon grease before to screw them up
again. Avoid to use the wrench for tightening the cups.
Entfernen Sie die Becher von den Köpfen, setzen Sie die Patronen ein und schrauben Sie die
Becher wieder unter die Köpfe. Schmieren Sie die O-Ringe der Becher vorher mit etwas Sili-
konfett, bevor Sie sie wieder zusammenschrauben. Vermeiden Sie es, den Schraubenschlüssel
zum Festziehen der Becher zu verwenden.
Togliere le tazze dalle teste, inserire le cartucce, riavvitare le tazze sotto le loro teste. Lubrifi-
care gli o-ring delle tazze con un po' di grasso siliconico prima di avvitarle nuovamente. Evi-
tare di usare la chiave per serrare le tazze
Activated Carbon Filter
Aktivkohle-Filter
filtro carboni attivi
11
10
3
12
From pressure pump
Von Susswasser Druck-
pumpe
To the prefilters (3)
Zu Vorfiltern (3)
Verso i prefiltri (3)

9
Prefilter assembly Vorfilter-Assembly Gruppo prefiltri
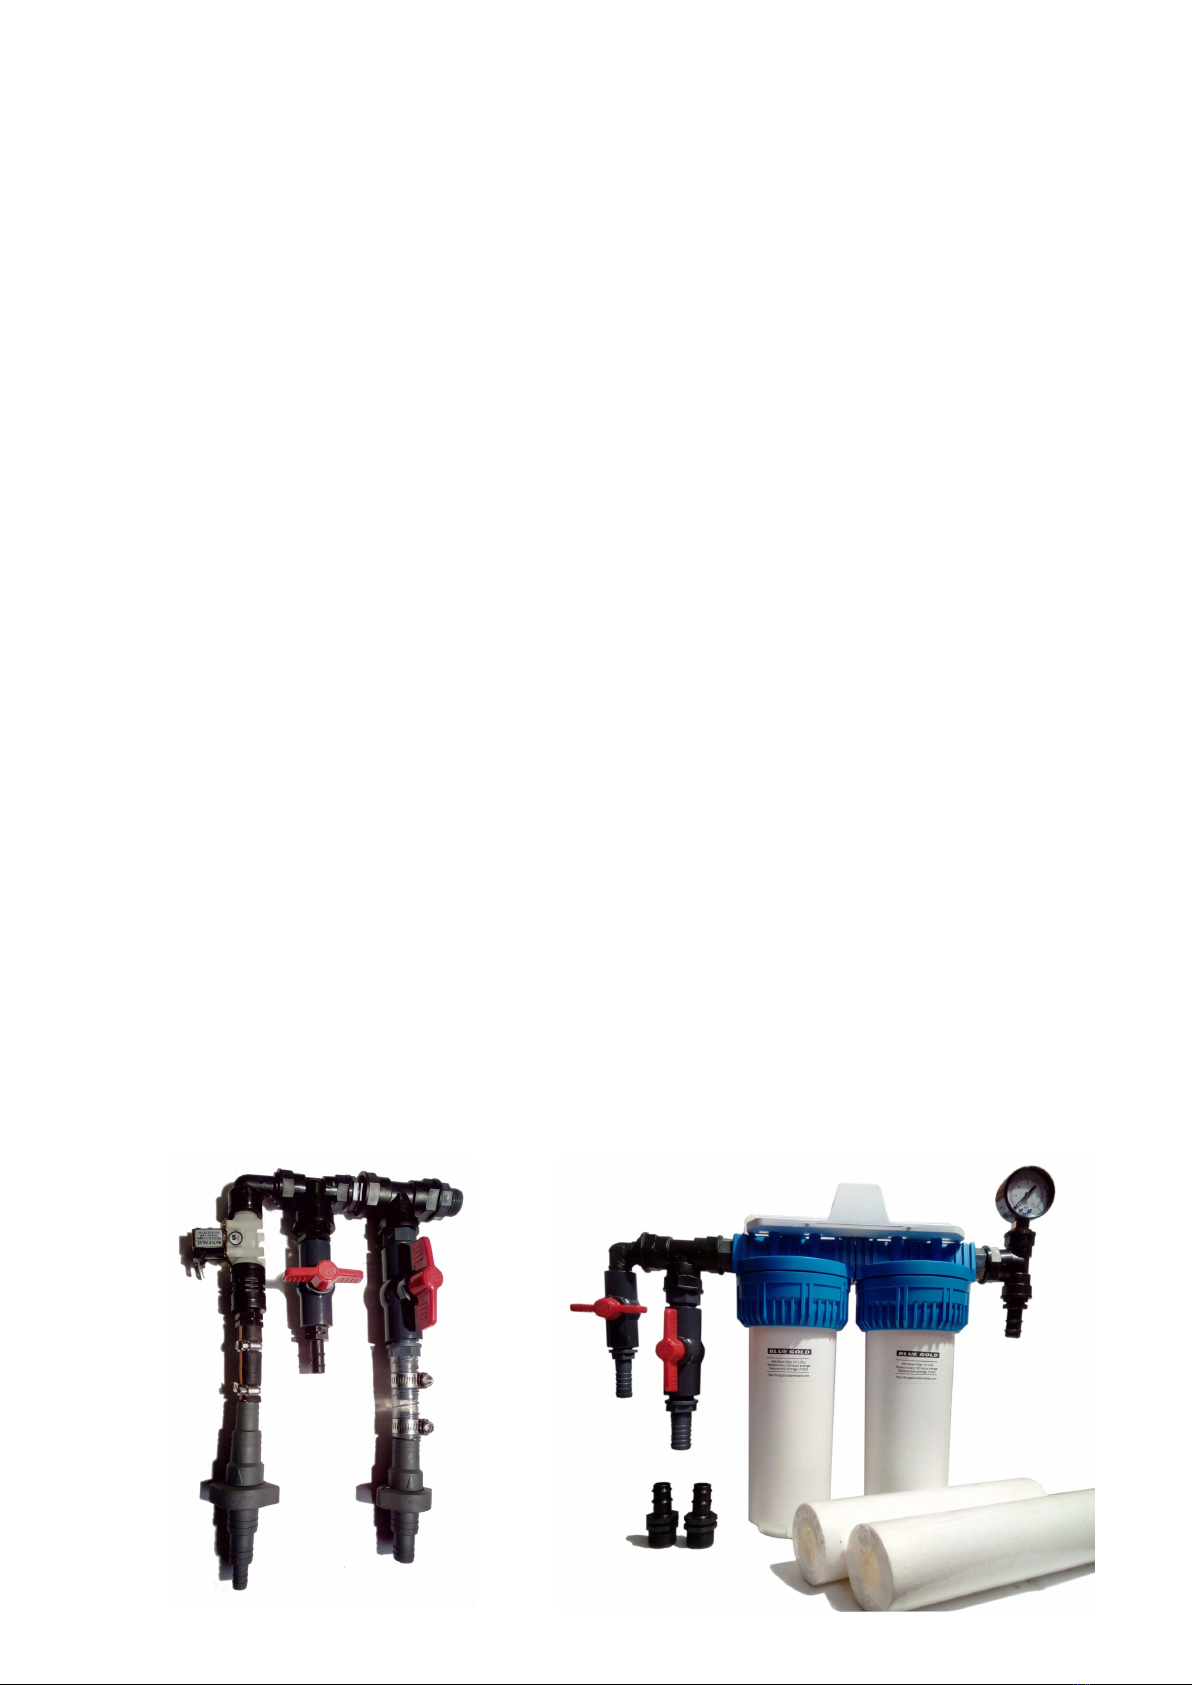
►Screw the unit to the wall. Leave at least 4 or 5 cm of free space under the bowls in order to
allow an easy removal when the cartridges need to get replaced. Try to keep the hoses be-
tween feed pump ad prefilter, and between prefilter and H.P. pump as short as possible!
Schrauben Sie das Gerät an die Wand. Lassen Sie unter den Bechern mindestens 4 oder 5 cm
Freiraum, um eine einfache Entnahme zu ermöglichen, wenn die Patronen ausgewechselt
werden müssen. Versuchen Sie, die Schläuche zwischen Förderpumpe und Vorfilter sowie
zwischen Vorfilter und HD-Pumpe so kurz wie möglich zu halten!
Avvitare il gruppo alla parete. Lasciare almeno 4 o 5 cm di spazio libero sotto le tazze per
consentire una facile rimozione quando le cartucce devono essere sostituite. Cercate di
mantenere i tubi flessibili tra la pompa di alimentazione e il prefiltro e tra il prefiltro e la pompa
H.P. il più corti possibile!
►The bowl of the activated carbon filter can be separated and placed away.
Der Becher des Aktivkohlefilters kann abgetrennt und weggestellt werden.
Il contenitore del filtro a carbone attivo può essere separato e piazzato anche distante.
►Connect the hose adapter (12) to the freshwater pressure pump of the boat. The factory di-
ameter is 16 mm, but the hose adapter can be replaced to comply with the fittings/hoses di-
ameters of the pressure system of the boat
Verbinden Sie den Schlauchadapter (12) mit dem Frischwasser-Druckpumpenkreislauf des
Bootes. Der Fabrikdurchmesser beträgt 16 mm, aber der Schlauchadapter kann ausge-
tauscht werden, um den Durchmessern der Armaturen/Schläuche des Drucksystems des
Bootes zu entsprechen.
Collegare il portagomma (12) all’autoclave dell'acqua dolce della barca. Il diametro di fab-
brica è di 16 mm, ma il portagomma può essere sostituito per combaciare con i diametri dei
raccordi/tubi flessibili dell’impianto dell'imbarcazione.
►Connect the hose adapter (4) to the outlet of the feed pump of the plant. The factory diam-
eter is 20 mm. and is not allowed to use small hoses.
Verbinden Sie den Schlauchadapter (4) mit dem Auslass der Förderpumpe der Anlage. Der
Fabrikdurchmesser beträgt 20 mm und die Verwendung von kleinen Schläuchen ist nicht er-
laubt.
Collegare il portagomma (4) all'uscita della pre pompa dell'impianto. Il diametro di fabbrica
è di 20 mm. e non è consentito l'uso di tubi flessibili di diametric inferiori
►Connect the hose adapter (8) to the inlet of the high pressure pump. The factory diameter is
20 mm. and is not allowed the use of hoses with a smaller diameter
Verbinden Sie den Schlauchadapter (8) mit dem Einlass der Hochdruckpumpe. Der Fabrik-
durchmesser beträgt 20 mm und es ist nicht erlaubt, Schläuche mit einem kleineren Durch-
messer zu verwenden.
Collegare il portagomma (8) all'ingresso della pompa ad alta pressione. Il diametro di fabbri-
ca è di 20 mm. e non è consentito l'uso di tubi flessibili di diametro inferiore.
10
Prefilter assembly Vorfilter-Assembly Gruppo prefiltri
Optional “Easy Flushing” system
Optionales "Easy Flushing"-System
Sistema di flussaggio "Easy Flushing"
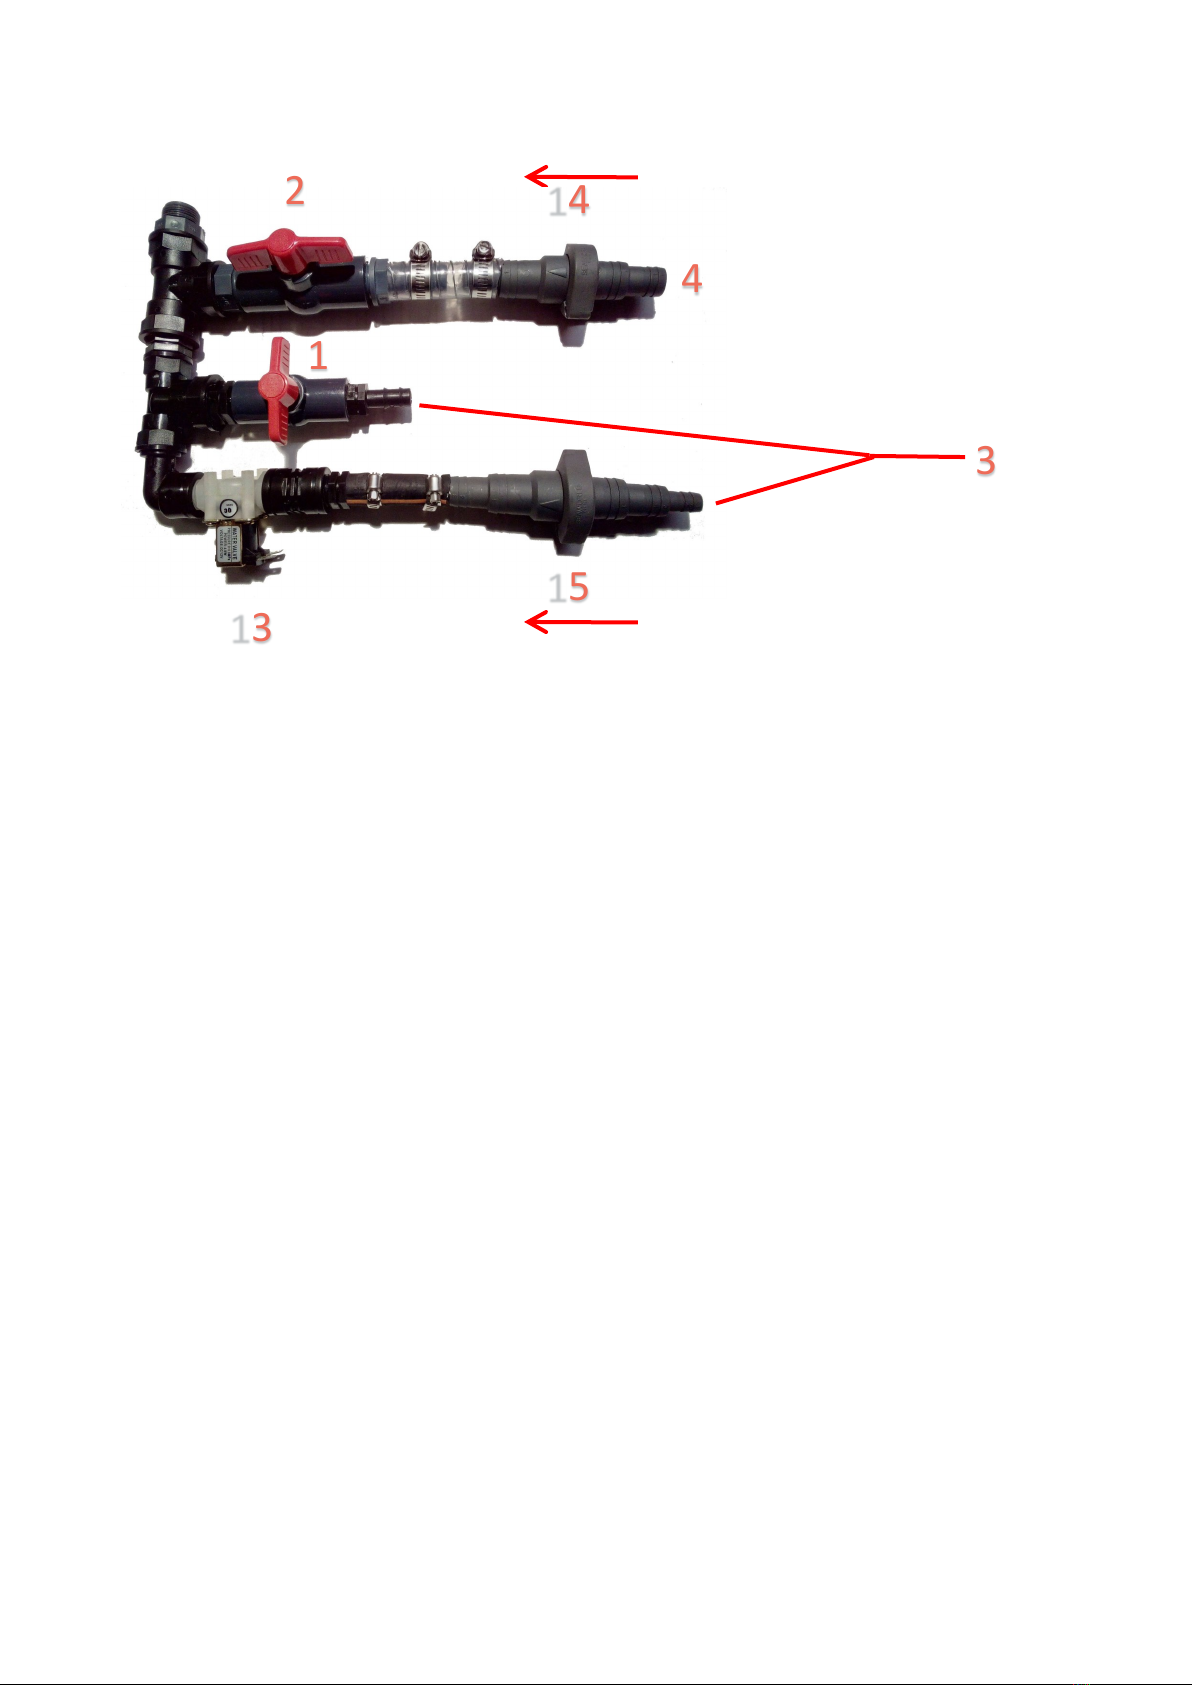
►The “Easy Flushing” is a simple system which can be fit into the standard prefilter assembly, in
order to let operate the flushing through a solenoid valve, driven from a switch in the control
panel of the watermaker. This system is optional and can also be purchased later and easily
installed in minutes in existing plants.
Das "Easy Flushing" ist ein einfaches System, das in die Standardvorfilterbaugruppe eingebaut
werden kann, um die Spülung durch ein Magnetventil zu ermöglichen, das von einem Schal-
ter im Bedienungspaneel des Watermakers gesteuert wird. Dieses System ist optional und
kann auch später gekauft und in bestehenden Anlagen in wenigen Minuten einfach installiert
werden.
"Easy Flushing" è un sistema semplice che può essere inserito nel gruppo prefiltro standard, in
modo da permettere l'azionamento del lavaggio attraverso un'elettrovalvola, azionata da
un interruttore nel pannello di controllo del dissalatore. Questo sistema è opzionale e può es-
sere acquistato anche in un secondo momento e facilmente installato in pochi minuti in im-
pianti esistenti.
►The valves 1 and 2 operates the flushing of the plant:
Valve 1 CLOSED and Valve 2 OPEN = Normal operation, production of freshwater
Valve 1 OPEN and Valve 2 CLOSED = Flushing of the plant
Die Ventile 1 und 2 steuern die Spülung der Anlage:
Ventil 1 GESCHLOSSEN und Ventil 2 GEÖFFNET = Normalbetrieb, Produktion von Frischwasser
Ventil 1 GEÖFFNET und Ventil 2 GESCHLOSSEN = Spülen der Anlage
Le valvole 1 e 2 azionano il lavaggio dell'impianto:
Valvola 1 CHIUSA e valvola 2 APERTA = Funzionamento normale, produzione di acqua dolce
Valvola 1 APERTA e valvola 2 CHIUSA = lavaggio dell'impianto
11
Prefilter assembly Vorfilter-Assembly Gruppo prefiltri
1
2
3
15
13
4
1 Flushing valve 1/2” for flushing the plant
Ventil 1/2" zum Spülen der Anlage
Valvola da 1/2” per flussaggio
2 Sewater valve 3/4”
Seewasserventil 3/4"
Valvola acqua mare 3/4”
3 Flush water inlet (from the activated carbon filter)
Spülwasser-Eingang (aus dem Aktivkohle-Filter)
Ingresso acqua flussaggio (dal filtro carboni attivi)
4 Sea water inlet
Meerwasser-Eingang
Ingresso acqua mare
13 Solenoid valve for flushing
Magnetventil zum Spülen
Elettrovalvola flussaggio
14
15
Check Valves
Rückschlagventile
Valvole non ritorno
14

12
►Once installed and wired to the switch on the panel, the seawater valve 2must remain
OPEN, to allow the flow of the seawater, and the flushing valve 1must remain CLOSED.
In this way the seawater can flow freely, the flushwater is stopped by the solenoid valve and
its check valve 15 stops any possible backflow through the solenoid valve 13.
When the watermaker is stopped and the solenoid valve is powered, it opens and allow the
freshwater from the pressure system to flow and flush the plant. The check valve 14 stops the
flow towards the feed pump.
Once flushed, switch off again the power to the solenoid valve.
Nach der Installation und Verdrahtung mit dem Schalter auf der Schalttafel muss das See-
wasserventil 2OFFEN bleiben, damit das Seewasser fließen kann, und das Spülventil 1 muss ZU
bleiben.
Auf diese Weise kann das Seewasser frei fließen, und das Spülwasser wird durch das Mag-
netventil gestoppt, und sein Rückschlagventil 15 stoppt einen möglichen Rückfluss durch das
Magnetventil 13. Wenn der Wassermacher angehalten und das Magnetventil mit Strom ver-
sorgt wird, öffnet es und lässt das Frischwasser aus dem Drucksystem fließen und die Anlage
spülen. Das Rückschlagventil 14 stoppt den Fluss zur Förderpumpe.
Nach dem Spülen schalten Sie den Strom zum Magnetventil wieder ab.
Una volta installata e cablata all'interruttore sul pannello, la valvola dell'acqua di mare 2
deve rimanere APERTA, per consentire il flusso dell'acqua di mare, e la valvola di risciacquo 1
deve rimanere CHIUSA.
In questo modo l'acqua di mare può scorrere liberamente e l'acqua di risciacquo viene fer-
mata dall'elettrovalvola e la sua valvola di ritegno 15 blocca ogni possibile riflusso attraverso
l'elettrovalvola 13.
Quando il dissalatore è fermo e l'elettrovalvola è alimentata, si apre e permette all'acqua
dolce del sistema a pressione di fluire e di risciacquare l'impianto. La valvola di non ritorno 14
arresta il flusso verso la pompa di alimentazione.
Una volta eseguito il flussaggio, disinserire nuovamente l'alimentazione dell'elettrovalvola.
►In case of fault of the solenoid valve (it does not open), the operator can manually flush the
system:
1 - Close the seawater valve 2and open the flushwater valve 1.
2 - Close the flushwater 1valve after once the system is flushed .
Im Falle eines Defekt des Magnetventils (es öffnet nicht), kann der Operator das System auch
manuell spülen:
1 - Schließen Sie das Seewasserventil 2und öffnen Sie das Spülwasserventil 1.
2 - Schließen Sie das Spülwasserventil 1, nachdem das System gespült wurde.
In caso di guasto dell'elettrovalvola (non si apre), l'operatore può eseguire il lavaggio man-
uale del sistema:
1 - Chiudere la valvola dell'acqua di mare 2 e aprire la valvola di risciacquo 1.
2 - Chiudere la valvola di risciacquo 1dopo aver lavato l'impianto. .
Prefilter assembly Vorfilter-Assembly Gruppo prefiltri

13
Prefilter assembly Vorfilter-Assembly Gruppo prefiltri
Cartridges Patronen Filtri
►The two cartridges of the prefilter should be replaced approximately every 100 hours or if you
see that the pressure shown on the gauge drops under 0.5 bar.
A bad and/or reduced flow of water creates problem in the fine running of the high pressure
pump: the high pressure pump makes a strange noise or the operating pressure does not sta-
bilize. If you stop to operate the watermaker for a few months, the cartridges must be re-
placed before running it again
The activated carbon filter must be replaced at least once a year.
Die beiden Patronen des Vorfilters sollten etwa alle 100 Stunden ausgetauscht werden oder
wenn Sie sehen, dass der auf dem Manometer angezeigte Druck unter 0,5 bar fällt.
Ein schlechter und/oder reduzierter Wasserdurchfluss führt zu Problemen im Feinlauf der Hoch-
druckpumpe: Die Hochdruckpumpe macht ein seltsames Geräusch oder der Betriebsdruck
stabilisiert sich nicht. Wenn Sie den Wassermacher einige Monate lang nicht in Betrieb neh-
men, müssen die Patronen ersetzt werden, bevor der Wassermacher wieder in Betrieb ge-
nommen wird.
Der Aktivkohlefilter muss mindestens einmal pro Jahr gewechselt werden.
Le due cartucce del prefiltro devono essere sostituite ogni 100 ore circa o se si vede che la
pressione indicata sul manometro scende sotto 0,5 bar.
Un cattivo e/o ridotto flusso d'acqua crea un problema nel funzionamento della pompa ad
alta pressione: la pompa ad alta pressione fa uno strano rumore o la pressione di esercizio
non si stabilizza. Se si smette di far funzionare il dissalatore per qualche mese, le cartucce
devono essere sostituite prima di farla funzionare di nuovo
Il filtro a carbone attivo deve essere sostituito almeno una volta all'anno.

14
►Use the plastic wrench to unscrew the cups on their respective heads.
The label positioned on the heads and on the cups will help you in finding the right replace-
ment.
The device uses standard melt blown DOE cartridge size 10” in the prefilter section. DO NOT
USE spiral wound cartridges.
Use only carbon block type cartridges as replacement in the chlorine removal section of the
assembly.
Verwenden Sie den Kunststoffschlüssel, um die Becher an ihren jeweiligen Köpfen ab-
zuschrauben.
Das Etikett, das sich auf den Köpfen und auf den Bechern befindet, hilft Ihnen, den richtigen
Ersatz zu finden.
Das Gerät verwendet eine “melt blown” Standard-DOE-Patrone der Größe 10" in der Vorfil-
tersektion. VERWENDEN SIE KEINE spiralgewickelten Patronen.
Verwenden Sie nur Patronen vom Typ “Carbonblock” als Ersatz in der Chlorentfernungssektion
der Baugruppe.
Utilizzare la chiave di plastica per svitare le tazze sulle rispettive teste.
L'etichetta posizionata sulle teste e sulle tazze vi aiuterà a trovare il giusto sostituto.
L'apparecchio utilizza una cartuccia DOE standard tipo “melt blown” da 10" nella sezione del
prefiltro. NON UTILIZZARE cartucce con avvolgimento a spirale.
Utilizzare solo cartucce del tipo a “Carbonblock” come sostituzione nella sezione di rimozione
del cloro del gruppo.
Prefilter assembly Vorfilter-Assembly Gruppo prefiltri
15
Membranes assembly Membranen Assembly Gruppo membrane
Membranes assembly
Membranen Assembly
Gruppo membrane
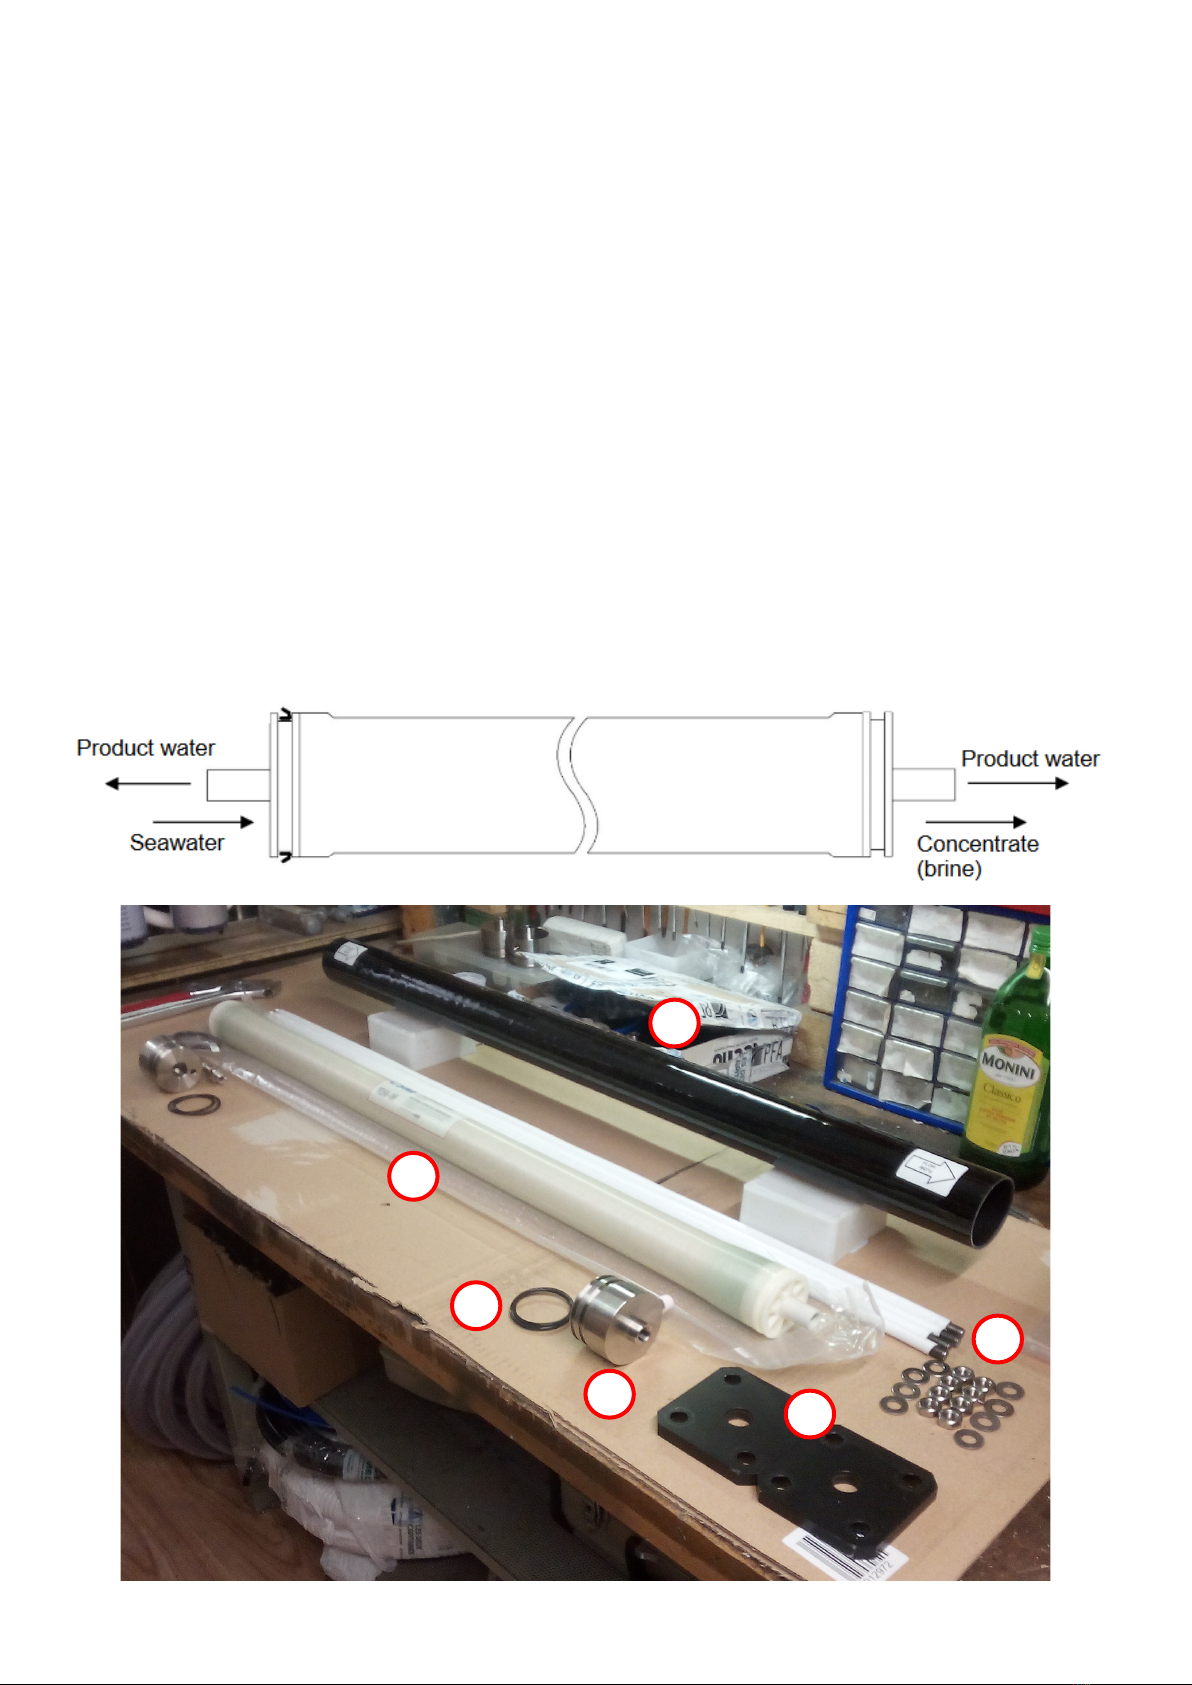
1 Vessel - Vessel - Vessel
2 Heads - Köpfe - Teste
3 Plates - Platten - Piastre
4 O-ring of the heads - O-Ring der Köpfe - O-ring delle teste
5 Threaded bars and screws - Gewindestangen und Schrauben - Barre filettate e dadi
6 Reverse osmosis membrane - Umkehrosmose-Membran - Membrana osmotica
45
3
2
1
6
16
Membranes assembly Membranen Assembly Gruppo membrane
Mounting
Montage
Montaggio
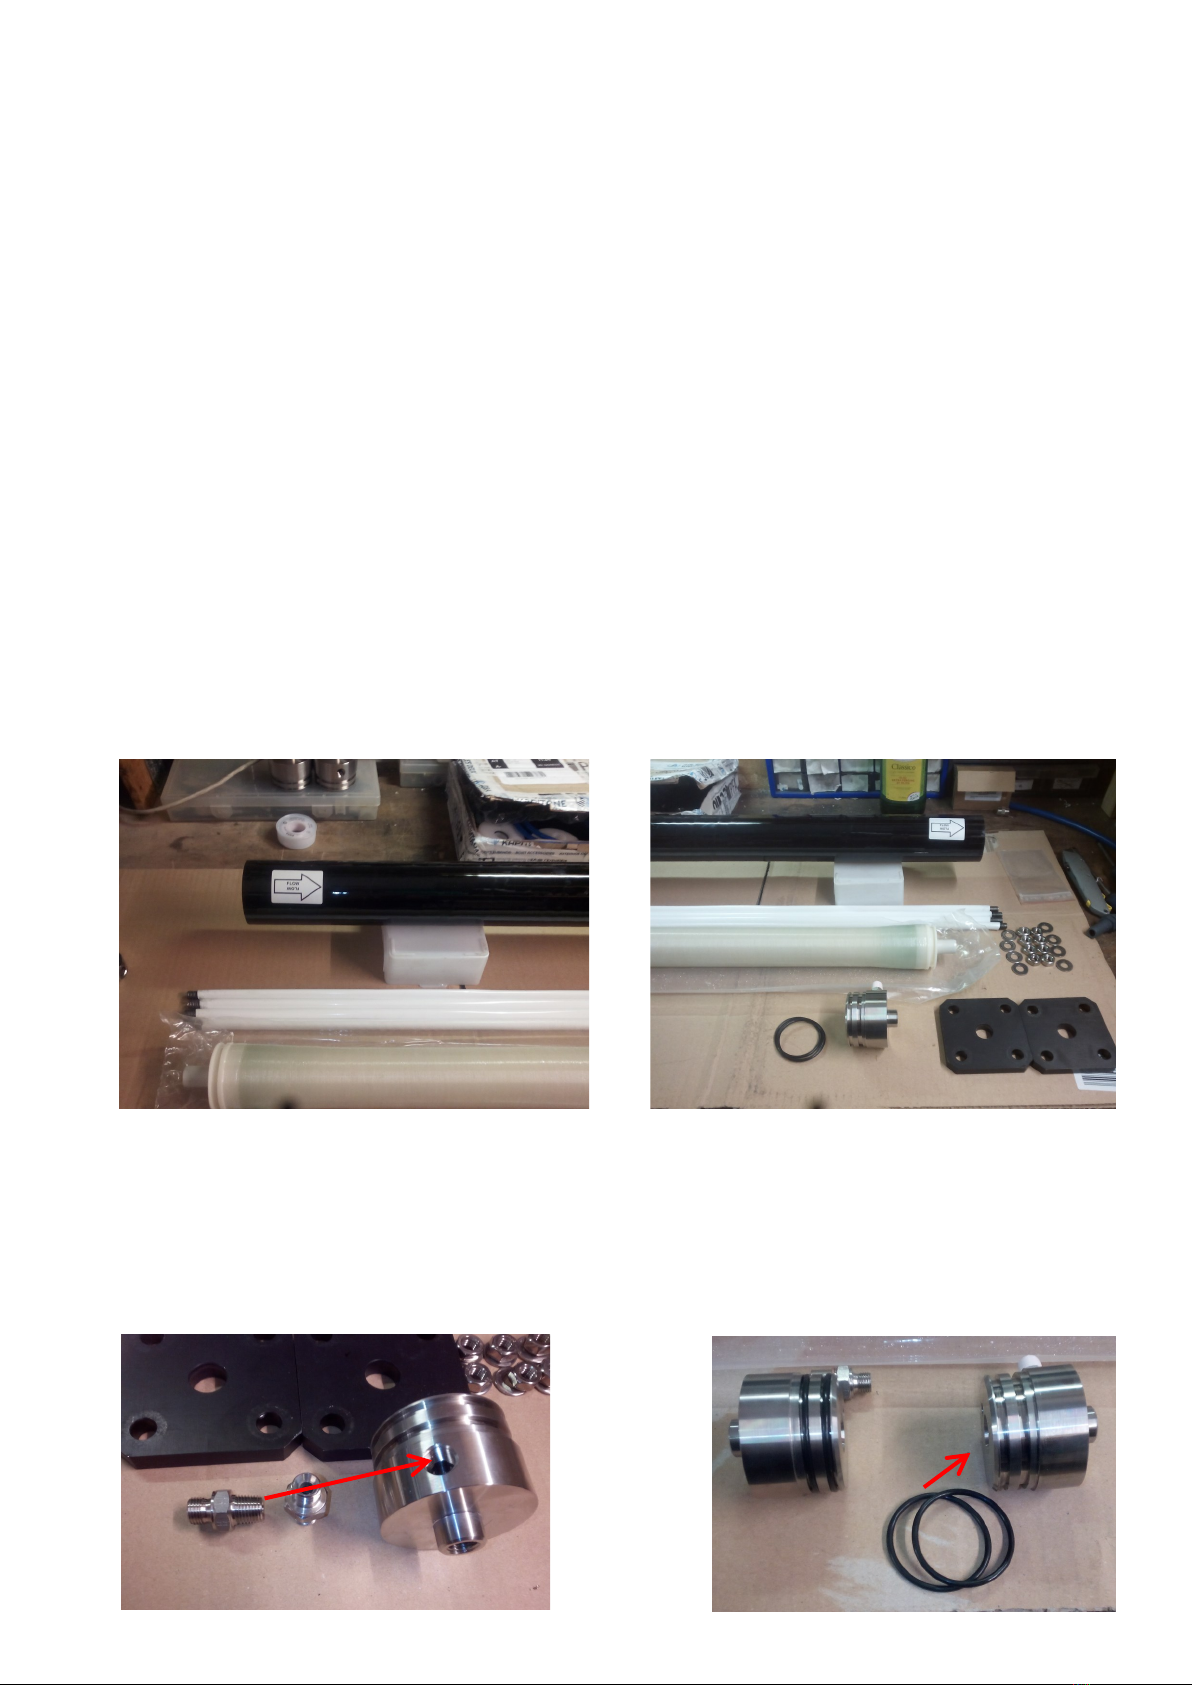
►Open the carton box of the vessel, extract the vessel and put it on a table. You can see the
arrows showing the flow direction on the body of the vessels. Then unscrew the plates which
hold the heads and remove the heads from the body of the vessel.
Öffnen Sie den Karton des Vessels, entnehmen Sie den Vessel und stellen Sie ihn auf einen
Tisch. Sie können die Pfeile mit der Flussrichtung auf dem Körper der Vessels sehen. Schrauben
Sie dann die Platten, die die Köpfe halten, ab und nehmen Sie die Köpfe aus dem Ves-
selkörper heraus.
Aprire la scatola di cartone del vessel, estrarre il vessele metterlo su un tavolo. Si possono ve-
dere le frecce che indicano la direzione del flusso sul corpo del vessel. Poi svitate le piastre
che tengono le teste e togliete le teste dal corpo del vessel.
►Mount the high pressure fittings on the heads as per your needs using Teflon tape or liquid Tef-
lon to seal the joints. Mount the O-rings on the head.
Montieren Sie die Hochdruckfittings je nach Bedarf mit Teflonband oder flüssigem Teflon zur
Abdichtung der Verbindung an den Köpfen. Montieren Sie die O-Ringe auf dem Kopf.
Montare i raccordi ad alta pressione sulle teste secondo le proprie esigenze utilizzando nastro
di teflon o teflon liquido per sigillare i giunti. Montare gli O-ring sulla testa.
17
Membranes assembly Membranen Assembly Gruppo membrane
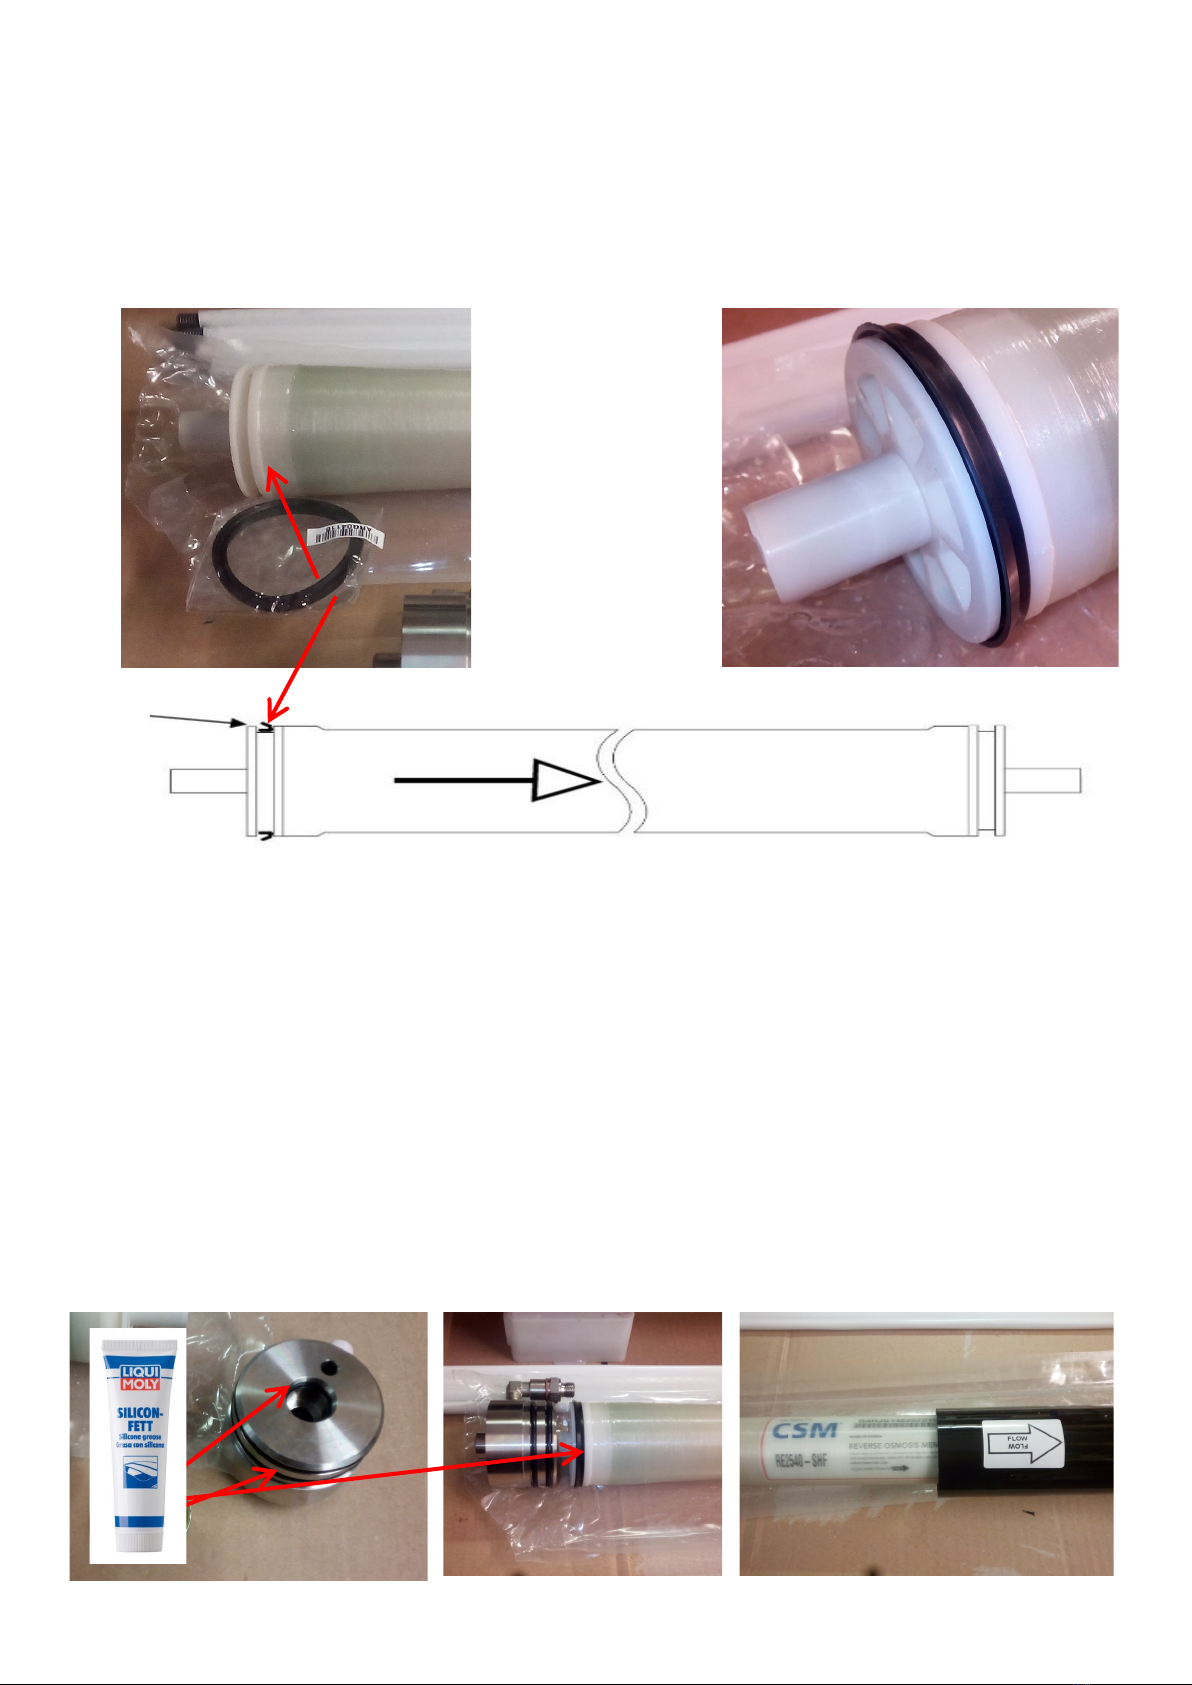
►Mount the single O-ring of the membrane on the feed side of the membrane
Montieren Sie den O-Ring der Membran auf der Einlassseite (feed side) der Membran
Montare l’O-ring della membrana sul lato di alimentazione della membrana (feed side)
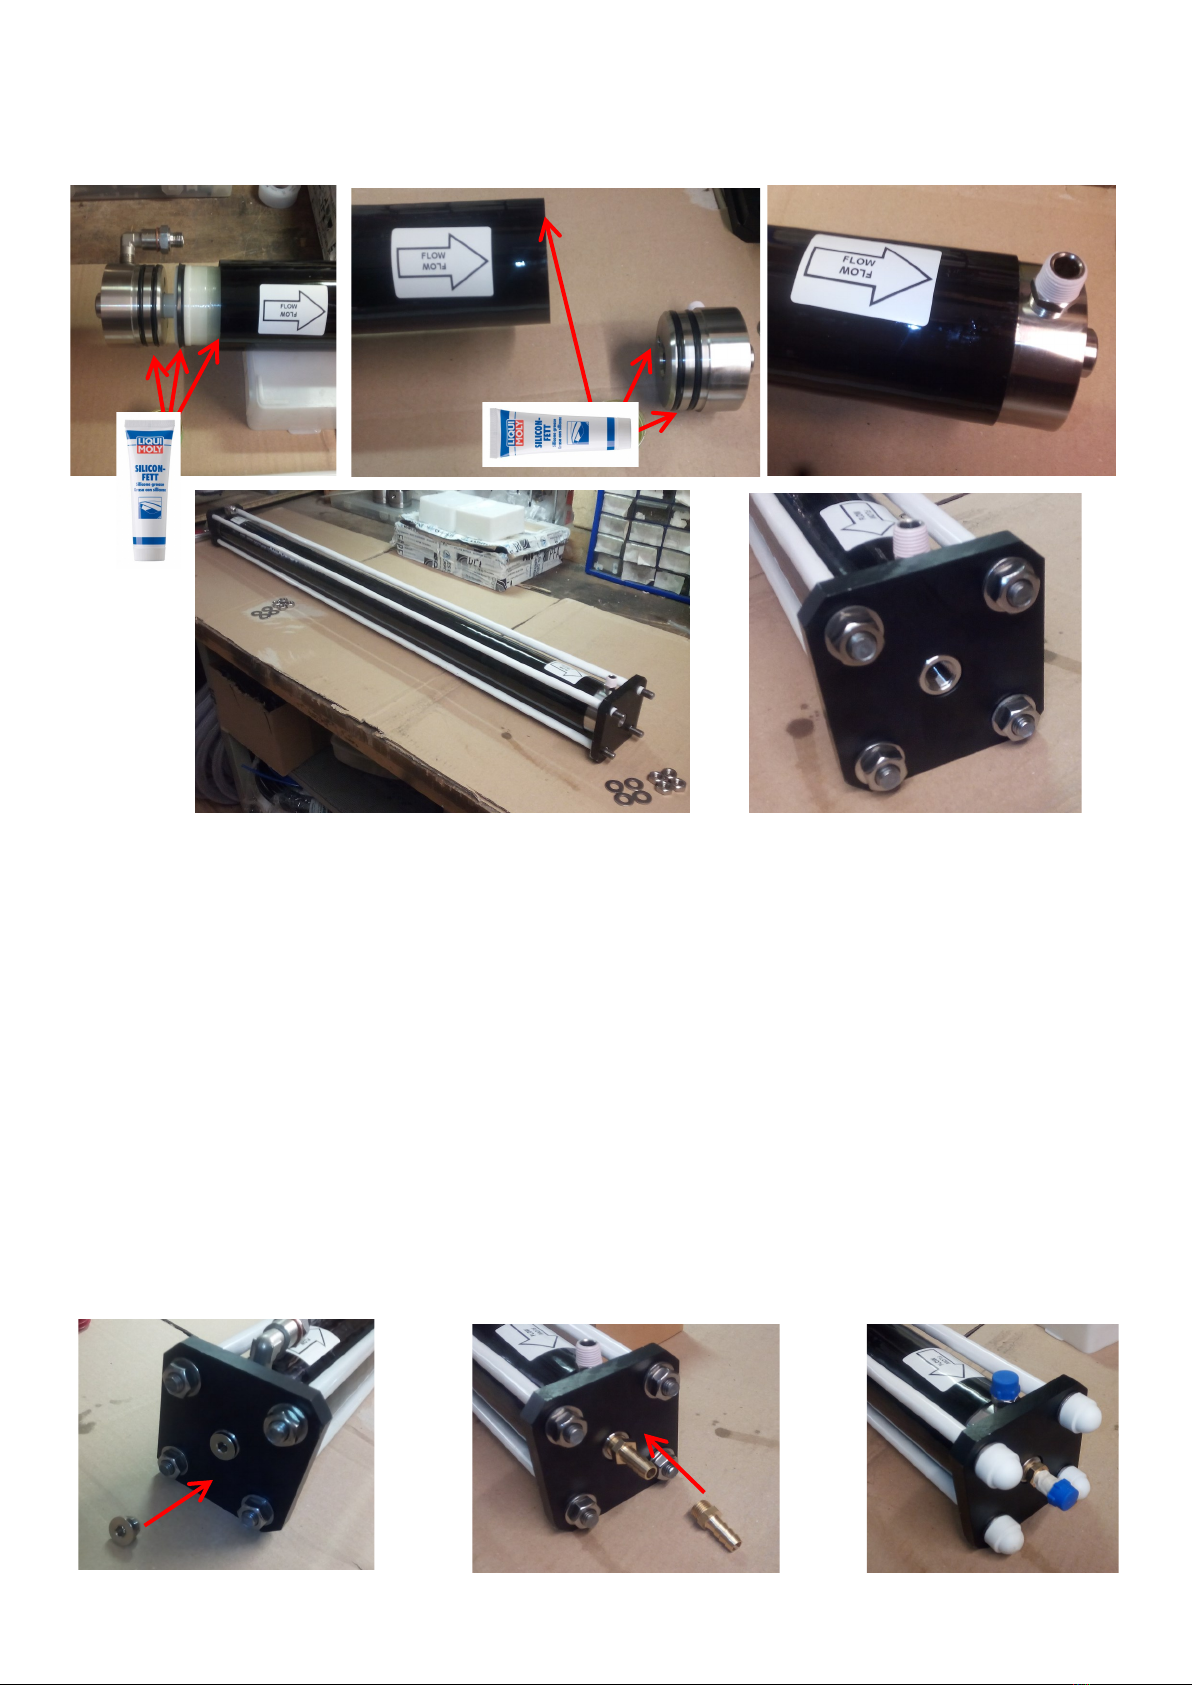
►Lubricate the plastic ends of the membrane and its O-ring. Lubricate the O-rings of the
heads, internal and external. Use some silicone grease. Then couple the head of the feed
side to the membrane and insert the membrane in the vessel, taking care to EVER follow the
flow direction. Once inserted place the opposite head and close the vessel.
Die Kunststoffenden der Membran und ihren O-Ring schmieren. Schmieren Sie die O-Ringe
der Köpfe, innen und außen. Verwenden Sie Silicon-Fett. Koppeln Sie dann den Kopf der Ein-
laufseite an die Membran und führen Sie die Membran in das Vessel ein, wobei darauf zu
achten ist, dass Sie immer der Flussrichtung folgen. Nach dem Einsetzen den gegenüber-
liegenden Kopf aufsetzen und das Vessel verschliessen.
Lubrificare le estremità in plastica della membrana e il suo O-ring. Lubrificare gli O-ring delle
teste, interni ed esterni. Utilizzare un po' di grasso al silicone. Quindi accoppiare la testa del
lato di alimentazione alla membrana e inserire la membrana nel vessel, avendo cura di se-
guire sempre la direzione del flusso. Una volta inserita, posizionare la testa opposta e
chiudere il vessel.
18
Membranes assembly Membranen Assembly Gruppo membrane
►Once the vessel is closed, place the plates and fasten them with the bolts and the provided
bars. Put the plug at one side of the freshwater outlet and the hose adapter at the opposite
side.
In the next page is shown how to mount the gauge/valve assembly directly on the head
Sobald das Vessel geschlossen ist, legen Sie die Platten auf und befestigen sie mit den Bolzen
und den mitgelieferten Stangen. Setzen Sie den Stopfen auf der einen Seite des Frischwas-
serauslasses und den Schlauchadapter auf der gegenüberliegenden Seite an.
Auf der nächsten Seite wird gezeigt, wie die Manometer-/Ventilbaugruppe direkt auf dem
Kopf montiert wird
Una volta chiuso il vessel, posizionare le piastre e fissarle con i bulloni e le barre in dotazione.
Mettete il tappo su un lato dell'uscita dell'acqua dolce e il portagomma sul lato opposto.
Nella pagina successiva viene mostrato come montare il gruppo manometro/valvola diretta-
mente sulla testa

19
►If you purchased the model without panel, with the gauge and the valve connected to the
outlet of the last vessel, you have now to assemble it as per your wishes. This part can also be
supplied preassembled. Use Teflon tape to seal the components. You can as well fasten the
flowmeter directly at the outlet of the freshwater. The following images show some kinds of
solutions
Wenn Sie das Modell ohne Panel gekauft haben, bei dem das Manometer und das Ventil an
den Auslass des letzten Vessels angeschlossen sind, müssen Sie es nun nach Ihren Wünschen
zusammenbauen. Dieses Teil kann auch vormontiert geliefert werden. Verwenden Sie zum
Abdichten der Komponenten Teflonband. Sie können den Durchflussmesser auch direkt am
Auslass des Frischwassers befestigen. Die folgenden Bilder zeigen einige Lösungen
Se avete acquistato il modello senza pannello, con il manometro e la valvola collegati all'us-
cita dell'ultimo vessel, dovete ora assemblarlo come desiderate. Questo pezzo può essere
fornito anche premontato. Usare del nastro di teflon per sigillare i componenti. Potete anche
fissare il flussimetro direttamente all'uscita dell'acqua dolce. Le seguenti immagini mostrano
alcuni tipi di soluzioni
Membranes assembly Membranen Assembly Gruppo membrane

blank page
leere Seite
pagina bianca
This manual suits for next models
8
Table of contents
Popular Water Filtration System manuals by other brands


Aquatlantis
Aquatlantis tecatlantis BIOBOX operating manual

AlkaWay
AlkaWay AlkaLina alkaline user manual

Zero B
Zero B UV GRANDE user manual

ARJAY ENGINEERING
ARJAY ENGINEERING 2852-OWS user manual

Davey
Davey STERIFLO SF1000S mkII Installation and operating instructions

Filtech
Filtech DP 200 Use and maintenance manual