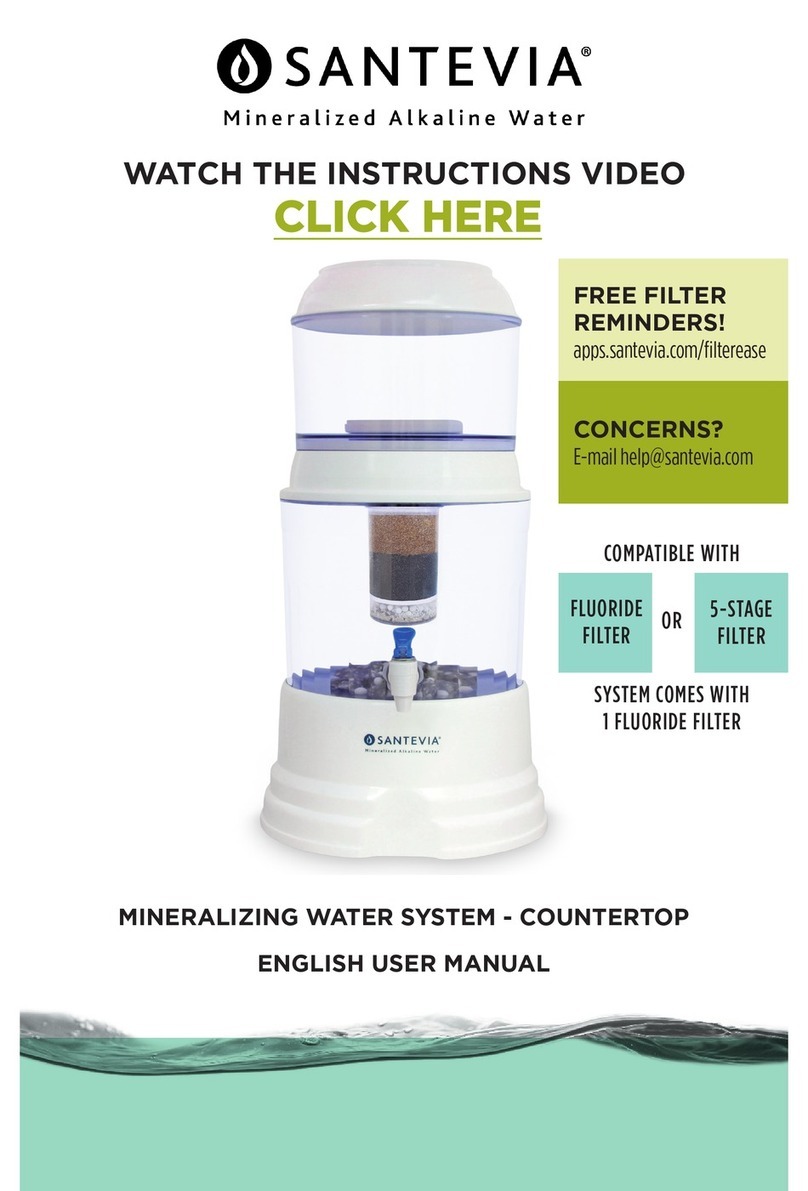
Santevia Gravity Water System User manual

www.santevia.com
GRAVITY WATER SYSTEM
Countertop Model
ASSEMBLY & CARE MANUAL
FREE
Customer Support
Missing parts, problems?
Contact Santevia™at
warranty@santevia.ca or 1-866-943-9220
DO NOT RETURN TO YOUR RETAILER!
We can resolve most issues the same day!

Santevia™Gravity Water System Countertop Model
The Santevia™Water System revolutionizes tap
water, creating pure, fresh tasting water that is
healthier for you and more cost effective than
bottled water. Using an eight stage filtration and
re-mineralization system, the Santevia™Water
System cleans, mineralizes and invigorates your
water while adjusting the pH level to mildly alkaline.
Your Santevia™Water System is based on the principles
of long contact filtration. It is designed to produce about
20 litres (5 US gal) of clean, alkaline, mineralized water
per day. It will take between 3 and 5 hours for the upper
tank to flow through to the lower tank to produce each 5
litre batch of Santevia™water. Based on an average water
consumption of 2 litres (0.5 US gal) per person per day,
the Santevia™Water System should adequately supply the
daily needs of a family of five for drinking and cooking.
Your Santevia™System is designed for use with potable,
biologically safe water.
IF THE DESIGN OF THIS SYSTEM IS NOT SUITABLE
FOR YOUR FAMILY NEEDS, PLEASE RETURN THE
SYSTEM TO YOUR RETAILER BEFORE ASSEMBLY AND
USE. NO RETURNS ARE PERMITTED AFTER 3O DAYS
OR IF THE FILTERS ARE WET OR THE SYSTEM IS FOR
ANY REASON RETURNED UN-SALEABLE.
READ THIS FIRST
Healthier Humans – One drop at a time!
CONGRATULATIONS
ON PURCHASING
YOUR SANTEVIA™
WATER SYSTEM

Assembly & Care Manual 1
Product Return Policy .................................. 1
Warranty Policy ......................................... 1
Parts List and Diagram ................................. 2
Assembly Instructions .................................. 3
Preparations.......................................... 3
Assembly ............................................. 3
Care and Cleaning Instructions......................... 5
General Tips.......................................... 5
Weekly Maintenance ................................. 5
Quarterly Maintenance ............................... 5
Filter Replacement ................................... 5
Holiday Storage ...................................... 6
FilterEase Program ................................... 6
Troubleshooting......................................... 7
1 Slow system........................................ 7
2 Leaking system .................................... 7
3 Broken parts ....................................... 8
4 Tank not completely draining ...................... 8
5 Algae questions .................................... 8
6 Filter changing ..................................... 9
Santevia
™
Water Systems (a division of Wellness Warehouse
Inc.) warrants your Santevia™Water System to be free of
defects in workmanship for a period of one year from the
date of purchase.
Please examine all parts prior to assembly. If any part is
defective or damaged in transit, or if a defect is found in the
first year, please DO NOT RETURN THE SYSTEM TO YOUR
RETAILER. Contact us by email at warranty@santevia.ca
or call 1-866-943-9220 and we will resolve the issue.
We are usually able to ship replacement parts within
twenty four hours, quickly getting you back on track to
great Santevia™water.
We cannot accept the return of systems that have been
used or where the filters are wet. If, upon examination of
your Santevia™Water System, you are not satisfied with
the product, please return it in resalable condition in the
original packaging to your retail outlet within 30 days of
purchase.
TABLE OF CONTENTS
SANTEVIA™WARRANTY &
RETURN POLICY
Page
Activate your Warranty!
Go to:
www.santevia.com
and click on
Filterease/Warranty
to register.

10
8
7
6
4
3
3
5
1
2
9
12
11
BB
A C
2 Santevia™Gravity Water System Countertop Model
Unpack all components, being especially
careful with the Ceramic Pre-Filter (2).
Before beginning assembly, please check the
contents to insure that all of the following
components are present:
PARTS LIST
Item Description Quantity
1 Lid............................... 1
2 Ceramic Pre-Filter................ 1
3 Silicone Washer, Pre-Filter ....... 2
4 Upper Tank, Clear................ 1
5 Nut, Pre-Filter.................... 1
6 Cartridge Connector.............. 1
7 Five Stage Ultrasonic Filter ...... 1
8 Middle Ring ...................... 1
9 Mineral Stone Basket ............ 1
10 Lower Tank, Clear ................ 1
11 Magnetic Spout Assembly ....... 1
(A) Tap ........................... 1
(B) Silicone Washers, Tap........ 2
(C) Magnetic Nut................. 1
12 Base.............................. 1
NOTICE
There may be an extra nut that comes with
the tap assembly. You can choose to use
either the Magnetic Nut (C) or the regular
nut. Most people choose to use the Magnetic
Nut (C) and then discard and recycle the
regular nut.

Assembly & Care Manual 3
• Soak the Ceramic Pre-Filter (2) in cool water for 1 hour.
Then under cool running water, clean both sides of the
ceramic pre-filter with a new Scotch-Brite scrub sponge
(the one with a yellow sponge on one side and a green
scrubbing pad on the other, or something similar). Use
the green side to scrub with. Do not use soap.
• RinsetheFiveStageUltrasonicFilter(7)inanupright
position under cool water for 2 – 3 minutes until the
water coming out the bottom is clear.
• OpentheMineralStonePost-Filter(9)packaging(basket
or bag), place the contents in a pot and boil for 20
minutes. Allow the stones to cool on a paper towel
before re-assembling. If you have a mineral basket,
open by inserting a thin flat screwdriver in the space
between the lid and the sides of the container. If you
choose to place the stones back in the basket, wash the
plastic with a mild, natural cleaner and dry thoroughly.
Most customers choose to place the mineral stones
directly on the bottom of the lower tank (see photo on
front of manual).
•
Wash the Upper Tank (4) and Lower Tank (10) using a soft,
clean dishcloth and warm water. A mild, natural cleaner
may be used. Rinse tanks thoroughly and dry completely.
1Assemble the Magnetic Spout (11):
•PlaceoneSiliconeWasher(B)ontotheTapstem(A).
•Fromtheoutside,slidethestemoftheTap(A)through
the hole in the Lower Tank (10).
•FrominsidetheLowerTank(10),placethesecond
Silicone Washer (B) onto the Tap stem (A).
•Ensurethatasiliconewasherisoneithersideofthe
bucket before placing the nut on the Tap stem (A).
•
Carefully thread the Magnetic Nut (C) onto the Tap stem (A).
•Snuglyhand-tightentheMagneticNut(C)untilagood
seal is obtained between the Silicone Washers (B) and
the Lower Tank (10). DO NOT TIGHTEN USING TOOLS.
2Place the Lower Tank assembly (10) onto the Base (12),
making sure that the Tap (A) aligns with the Santevia™
label and indentation in the Base (12).
3Place the boiled Mineral Stones (9) with or without the
basket in the bottom of the Lower Tank (10).
ASSEMBLY INSTRUCTIONS
ASSEMBLY
PREPARATIONS
Please watch the assembly video at www.santevia.com

4 Santevia™Gravity Water System Countertop Model
4
Place the Middle Ring (8) onto the top of the Lower Tank (10).
5
Screw the Five Stage Ultrasonic Filter (7) into the bottom of
the Cartridge Connector (6) and set into the Middle Ring (8).
6Remove one of the Silicone Washers (3) from the stem
of the Ceramic Pre-Filter (2). Place the stem through
the hole in the bottom of the Upper Tank (4) and add
the second Silicone Washer (3). Place the Nut (5), onto
the stem and hand-tighten until a good seal is obtained.
7Place the Upper Tank assembly (4) onto the Lower
Tank assembly (10). Fill the Upper Tank (4) with cool
water. The water should drip through slowly. If water
runs too quickly out of the Upper Tank (4), carefully
tighten the Ceramic Pre-Filter Nut (5) a little more.
It will initially take approximately 3 to 5 hours for the
water contents of the upper tank to filter through to the
lower tank.
Allow two full upper tanks to cycle through the system
prior to drinking. Discard the first two tanks of water or
use on your plants.
NOTICE

Assembly & Care Manual 5
CARE AND CLEANING INSTRUCTIONS
GENERAL TIPS
Please watch the maintenance video at www.santevia.com
WEEKLY MAINTENANCE
QUARTERLY MAINTENANCE
• DonotplaceyourSantevia™Water System in direct
sunlight.
• Onlyproducetheamountofwateryouneed–keep
water flowing through the system on a daily basis.
Cleaning of Ceramic Pre-Filter
• Removetheceramicpre-lterfromtheupperbucket.
• Usingcoolwater,cleanbothsideswithaScotch-Brite
scrub sponge (the one with a yellow sponge on one side
and a green scrubbing pad on the other, or something
similar). Use the green scrubbing side.
• Donotusesoap.
• Re-assembleensuringthatasiliconewasherison
either side of the bucket before placing the nut on the
ceramic pre-filter stem.
• Morefrequentcleaningmayberequirediftapwater
has heavy sediment and water flow is restricted.
Cleaning of Upper and Lower Buckets
• Disassembleandcleanboththeupperandlowertanks.
• Useasoft,cleandishclothandwarmwater.
• Amild,naturalcleanermaybeused.
• Rinsetanksthoroughlyanddrycompletelybefore
re-assembling.
• Removere-mineralizationrocksfrombasket,boil3–5
minutes, let cool before re-assembling (option: place
the rocks directly on the bottom of the tank (see photo
on front) and recycle the plastic basket).
Ceramic Pre-Filter (replace approximately every 12 months
depending on the water quality)
• Soaktheceramicpre-lterincoolwaterfor1hour.
• Usingcoolwater,cleanbothsideswithaScotch-Brite
scrub sponge (the one with a yellow sponge on one
side and a green scrubbing pad on the other, or
something similar). Use the green scrubbing side.
• Donotusesoap.
FILTER REPLACEMENT

6 Santevia™Gravity Water System Countertop Model
• Assemble ensuring that a silicone washer is on either side
of the bucket before placing the nut on the pre-filter stem.
• Notethatitiscommonfortheceramicpre-lterto
change from the brilliant white when purchased to a
beige colour. Frequent cleaning will keep your ceramic
in good working condition regardless of the colour.
5 Stage Ultrasonic Filter (replace every 4 – 6 months
depending on water usage)
• Rinsethe5stageultrasoniclterundercoolwateruntil
the water coming out the bottom is clear. Do not use
hot water!
• Standlteruprightwhenrinsing–youareclearingthe
carbon dust from the filter.
• Screwthelterintothecartridgeconnector.
• Run2fulluppertankofwaterthroughthesystem
before drinking.
• Usethediscardedwaterforyourplants!
Mineral Stone Post Filter (replace every 4 – 5 years)
•
The mineral stones gradually deplete in size – when you
notice the stones getting smaller it’s time to replace them.
Away for more than 1 week
• DrainyourSantevia™Water System (give the water to
your plants – they will love it!)
• Placeyour5stageultrasoniclterinaZip-locbagin
the refrigerator.
• Completeaquarterlymaintenance(seeabove)when
you return from holidays.
• Ifyouareawaylongerthan6weeks,replaceyour5
stage ultrasonic filter.
• ORtakeyourSantevia™with you – it’s very portable!
Keep life easy – with FilterEase!
Would you like an email reminding you when it is time to
change your filter?
Register online today for FREE support using our FilterEase
Program, then just relax and let us keep track for you. We
will also provide you with cleaning tips and other helpful
hints, as well as information on where to purchase your
replacement filters.
Register today at: www.santevia.com and leave the
thinking to us!
GOING ON HOLIDAYS
FILTEREASE PROGRAM

Assembly & Care Manual 7
1 My Santevia™System seems slow.
Slow is good! The Santevia™Water System is based on
long contact filtration. Gravity, rather than water
pressure, maximizes filtration time and allows water to
move naturally through the multiple levels of filtering and
re-mineralization elements. It is designed to produce up
to 20 litres (5 US gal) of water per day, which, based on
optimal water consumption, should be adequate for a
family of five for drinking and cooking.
Initially it may take as long as five hours for the upper tank
to flow into the lower tank. However after a few tanks of
water have flowed through, and the system is fully wetted,
the time required should end up around 4 hours.
You can
insure maximum flow through by soaking the ceramic
pre-filter for one hour prior to assembly (see assembly
video) and by cleaning the ceramic pre-filter regularly
(see maintenance video). Because the water flow slows
as the upper tank empties, topping up the upper tank
also helps. Fill the tank at night before you go to bed and
just before you leave for work. It’s worth the wait! As our
slogan says, “Healthy Humans – One drop at a time”
2 My Santevia™is leaking – can you help?
i Most leaks occur where the tap attaches to the lower
tank. Please view the assembly video to see how to test
and correct for leaking here. The steps are as follows:
• Checkrsttoinsureonesiliconewasherisonthe
tap stem on both sides of the lower tank.
• Emptythelowertank,reachinside,andtightenthe
magnetic nut until it is snug.
• Fillthelowertankwithtapwateruntilthetapis
submerged, then watch for leaks.
• Iftheleakpersists,tightenthemagneticnutanother
quarter turn and test again until no more leaking.
• Drainthetapwaterandreassembleyoursystem.
ii If the tap itself is leaking it is usually because the
connection where the two tap pieces screw together
needs to be tightened. The connection is located
where the gold band joins the white spout.
Hold the white spout in one hand and turn the gold band
clockwise until it is tight. Usually finger tight is good
enough, then test the tap to insure the leak has stopped
iii The system leaks where the upper and lower tanks
join. If you fill the upper tank when the lower tank is
mostly full it will overflow, leaking where the white
connector joins the upper and lower tank together.
TROUBLESHOOTING

8 Santevia™Gravity Water System Countertop Model
It is also possible that the nut holding the ceramic
pre-filter is not tightened sufficiently or a silicone washer
has not been placed on both sides of the upper tank
prior to the nut being tightened (both silicone washers
come on the pre-filter stem). Some people assume that
it is just one thick washer, but they are to be separated –
one left on the pre-filter stem, and the other re-installed
after the stem is inserted into the hole in the upper tank.
We have a great assembly video on our website.
3 Something is broken – what should I do?
Contact us by email at warranty@santevia.ca or call
1-866-943-9220 and we will resolve the issue. Santevia™
Water Systems (a division of Wellness Warehouse Inc.)
warrants you Santevia™Water system to be free of defects
in workmanship for a period of one year. We are usually
able to ship replacement parts within twenty four hours,
quickly getting you back on track to great Santevia™water.
4 My upper tank does not completely drain. Is this normal?
The upper tank will not completely drain – it hasn’t been
designed to. You will notice that the ceramic pre-filter
sits up from the bottom of the upper tank. You should
have approximately 1 – 2 cm (1 inch) of water left in the
upper tank to keep your filters moist until you add more
water to the upper bucket. The remaining water should
be level with either the top or bottom of the pre-filter.
5 I have green in my system.
Don’t panic!
Green algae isn’t harmful to you. Many health food stores
sell dried algae! Algae can grow in your lower Santevia™
tank because you have no chlorine or chlorine by-products
to kill it. Algae formation rarely happens if you are cleaning
your Santevia™ regularly.
How does Algae get into the lower tank?
You introduce algae into the lower tank during the cleaning
process by not thoroughly drying your mineral rocks, lower
tank, 5 stage filter and tap assembly before reassembling.
All tap water has algae in it and you inadvertently introduced
algae spores into your lower tank of purified, non-chlorinated
water. This environment is a perfect breeding ground for
algae, especially when summer temperatures and natural
light increases. The algae seems to occur primarily in
systems where purified water sits in the lower tank for
extended periods, or when the Santevia™is in direct
sunshine or a high light area. We have had an independent
laboratory test each of the various Santevia™filtering and
re-mineralizing media; all have tested negative for algae
before tap water is introduced.

Assembly & Care Manual 9
How do I fix this?
Perform a quarterly maintenance as outlined in your
Assembly & Care Manual.
Watch the Maintenance Video at www.santevia.com
•disassemblethesystem
•washthelowertankinanaturalcleaningsolution
•
flow some of the natural cleaning solution through the tap
•rinseeverythingthoroughly
•Removethemineralsfromtheplasticmineralbasket
and boil them for 5 – 7 minutes
•Cleanyourceramicpre-lter(usingthegreensideofa
Scotch-Brite scrub sponge)
•Rinseyour5stageultrasoniclterinanupright
position under cool water for 5 – 7 minutes
•Dry all components that are in the lower tank
thoroughly (don’t reintroduce the algae)
•IfStage3(silicasand-whitelayer)orStage4(zeolite
granules) of your ultrasonic filter are green, you must
replace the filter
•Themorethoroughlyyoucleananddryyoursystem,
the less likely it is that the algae will reappear
We are encouraging users to “release their minerals” by
placing them directly into the lower tank; this removes one
piece of unnecessary plastic and makes the periodic
cleaning and regeneration of the stones simpler. If you wish
to continue to use the mineral basket, scrub it thoroughly,
rinse and dry well. Reassemble your Santevia™and refill.
6 How will I know when it’s time to change the filter?
Your 5 stage central filter should be replaced every 6 months
and might need to be replaced earlier than that depending
on the amount of water you use and the quality of your
source water. If you look at the top of the 5 stage filter and
notice that the top layer of silica sand has become yellow,
it is time to change the filter. We recommend that if there
are 3 or more people in a household using the system, that
you replace the 5 stage filter every 4 months.
Your ceramic pre-filter should be replaced approximately
every 12 months depending on how well you maintain it
and the cleanliness of your source water.
Check out more Frequently Asked Questions
under the Customer Support Section of our
website www.santevia.com

www.santevia.com
© 2008 Wellness Warehouse Inc.
Other manuals for Gravity Water System
2
Table of contents
Other Santevia Water Filtration System manuals
Popular Water Filtration System manuals by other brands

GE
GE Smart Water PNRV18ZWH01 installation instructions

GE
GE SmartWater GXWH04F installation instructions

SpectraPure
SpectraPure MAXCAP RO Installation and operating manual

Hanish water
Hanish water WaterCrest owner's manual

Antunes
Antunes UF-216CC owner's manual

Oase
Oase FiltoClear 20000 operating instructions

Oase
Oase ProfiClear Premium XL operating instructions

WMF
WMF AromaOne operating manual

Pentair
Pentair PRF-RO Installation and maintenance manual

Excalibur Water Systems
Excalibur Water Systems SMART PURIFIER BP-500G manual

Polygroup
Polygroup SFX Series instructions

Eureka Forbes
Eureka Forbes Aquaguard Blaze user manual