Blue Hawk 7343 User manual
1
Lowes.com
ITEM #0595410
11 AMP ROUTER WITH
ROUTER TABLE
M O D E L # 7 3 4 3
Questions, problems, missing parts? B ef or e r et u r n i n g t o y ou r r et a i l er , ca l l ou r cu st omer
ser v i ce d ep a r t men t a t 1 - 8 7 7 - 8 8 8 - 8 2 2 5 , 8 a .m. - 8 p .m., E S T , M on d a y - F r i d a y .
ATTACH YOUR RECEIPT HERE
Serial Number Purchase Date
E sp a ñ ol p . 7 0
F r a n ç a i s p . 3 5
AB14507

2
Lowes.com
TABLE OF CONTENTS
Product Specications ............................................................2
S a f et y I n f or ma t i on ...............................................................3
P a cka g e C on t en t s ..............................................................1 0
T ool s N eed ed ..................................................................1 1
P r ep a r a t i on . . . . . . . . . . . . . . . . . . . . . . . . . . . . . . . . . . . . . . . . . . . . . . . . . . . . . . . . . . . . . . . . . . . . 1 2
O p er a t i n g I n st r u ct i on s f or t h e R ou t er ................................................1 4
A d j u st i n g t h e C u t t i n g D ep t h .......................................................1 6
F eed i n g t h e R ou t er .............................................................1 8
P l a ci n g t h e R ou t er on t o t h e W or k P i ece a n d S t a r t i n g t h e C u t .............................2 0
I n st a l l i n g t h e R ou t er T a b l e A ssemb l y ................................................2 3
O p er a t i n g I n st r u ct i on s f or t h e R ou t er T a b l e ...........................................2 8
S wi t ch B ox O p er a t i on . . . . . . . . . . . . . . . . . . . . . . . . . . . . . . . . . . . . . . . . . . . . . . . . . . . . . . . . . . . . 2 8
A b ove - T a b l e D ep t h A d j u st men t ....................................................2 9
G en er a l R ou t i n g O p er a t i on s wi t h t h e R ou t er T a b l e .....................................2 9
C a r e a n d M a i n t en a n ce...........................................................3 2
T r ou b l esh oot i n g ................................................................3 3
W a r r a n t y ......................................................................3 4
PRODUCT SPECIFICATIONS
COMPONENT SPECIFICATIONS
ROUTER
M ot or 1 2 0 V ~ , 6 0 H z , 1 1 A
N o- l oa d sp eed 2 5 , 0 0 0 R P M
C ol l et ca p a ci t y 1 / 4 i n . & 1 / 2 i n .
B a se d i men si on 6 i n . ( 1 5 .2 cm)
S u b - b a se op en i n g d i a met er 2 i n . ( 5 cm)
ROUTER TABLE
T a b l e swi t ch r a t i n g 1 2 0 V ~ , 6 0 H z , 1 5 A
T a b l e si z e ( a p p r ox i ma t e) 2 3 - 1 / 2 i n . x 1 4 - 1 / 8 i n .
T a b l e h ei g h t 1 1 - 1 / 4 i n .
M a x . l oa d ca p a ci t y 5 0 l b s.

3
Lowes.com
SAFETY INFORMATION
P l ea se r ea d a n d u n d er st a n d t h i s en t i r e ma n u a l b ef or e a t t emp t i n g t o a ssemb l e, op er a t e or i n st a l l
t h e p r od u ct . I f y ou h a v e a n y q u est i on s r eg a r d i n g t h e p r od u ct , p l ea se ca l l cu st omer ser v i ce a t
1 - 8 7 7 - 8 8 8 - 8 2 2 5 , 8 a .m. - 8 p .m., E S T , M on d a y - F r i d a y .
KNOW THE TOOL
To operate this tool, carefully read this manual and all labels afxed to the router and router table
b ef or e u si n g t h em. K eep t h i s ma n u a l a v a i l a b l e f or f u t u r e r ef er en ce.
IMPORTANT
This tool should only be serviced by a qualied service technician.
READ ALL INSTRUCTIONS THOROUGHLY
S ome of t h e f ol l owi n g sy mb ol s ma y b e u sed on t h i s t ool . P l ea se st u d y t h em a n d t h ei r mea n i n g .
P r op er i n t er p r et a t i on of t h ese sy mb ol s wi l l a l l ow y ou t o op er a t e t h e t ool b et t er a n d mor e sa f el y .
V. . . . . . . . . . . . . . . . . . . . . . . . . . . . . . . V ol t s
A. . . . . . . . . . . . . . . . . . . . . . . . . . . . . . . A mp
H z . . . . . . . . . . . . . . . . . . . . . . . . . . . . . . . H er t z
W. . . . . . . . . . . . . . . . . . . . . . . . . . . . . . . W a t t s
mi n . . . . . . . . . . . . . . . . . . . . . . . . . . . . . . . M i n u t es
. . . . . . . . . . . . . . . . . . . . . . . . . . . . . . . A l t er n a t i n g C u r r en t
. . . . . . . . . . . . . . . . . . . . . . . . . . . . . . . D i r ect C u r r en t
no. . . . . . . . . . . . . . . . . . . . . . . . . . . . . . . N o- l oa d S p eed
. . . . . . . . . . . . . . . . . . . . . . . . . . . . . . . C l a ss I I C on st r u ct i on
.../ mi n . . . . . . . . . . . . . . . . . . . . . . . . . . . . . . . R ev ol u t i on s or S t r ok es P er M i n u t e
. . . . . . . . . . . . . . . . . . . . . . . . . . . . . . . I n d i ca t es d a n g er , wa r n i n g , ca u t i on .
I t mea n s a t t en t i on ! Y ou r sa f et y i s i n v ol v ed .

4
Lowes.com
SAFETY INFORMATION
GENERAL POWER TOOL SAFETY WARNINGS
WARNING: Read all safety warnings and all instructions. F a i l u r e t o f ol l ow t h e wa r n i n g s a n d
instructions may result in electric shock, re and/or serious injury.
Save all warnings and instructions for future reference
T h e t er m “ p ower t ool ” i n t h e wa r n i n g s r ef er s t o y ou r ma i n s- op er a t ed ( cor d ed ) p ower t ool or b a t t er y -
op er a t ed ( cor d l ess) p ower t ool .
WORK AREA SAFETY
•Keep work area clean and well lit. C l u t t er ed a n d d a r k a r ea s i n v i t e a cci d en t s.
•Do not operate power tools in explosive atmospheres, such as in the presence of
ammable liquids, gases or dust. P ower t ool s cr ea t e sp a r k s wh i ch ma y i g n i t e t h e d u st or
f u mes.
•Keep children and bystanders away while operating a power tool. D i st r a ct i on s ca n ca u se
y ou t o l ose con t r ol .
ELECTRICAL SAFETY
•Power tool plugs must match the outlet. Never modify the plug in any way. Do not use
any adapter plugs with earthed (grounded) power tools. Unmodied plugs and matching
ou t l et s wi l l r ed u ce r i sk of el ect r i c sh ock .
•Avoid body contact with earthed or grounded surfaces, such as pipes, radiators, ranges
and refrigerators. T h er e i s a n i n cr ea sed r i sk of el ect r i c sh ock i f y ou r b od y i s ea r t h ed or
grounded.
•Do not expose power tools to rain or wet conditions. W a t er en t er i n g a p ower t ool wi l l
i n cr ea se t h e r i sk of el ect r i c sh ock .
•Do not abuse the cord. Never use the cord for carrying, pulling or unplugging the power
tool. Keep cord away from heat, oil, sharp edges or moving parts. D a ma g ed or en t a n g l ed
cor d s i n cr ea se t h e r i sk of el ect r i c sh ock .
•When operating a power tool outdoors, use an extension cord suitable for outdoor use.
U se of a cor d su i t a b l e f or ou t d oor u se r ed u ces t h e r i sk of el ect r i c sh ock .
•If operating a power tool in a damp location is unavoidable, use a residual current device
(RCD) protected supply. U se of a n R C D r ed u ces t h e r i sk of el ect r i c sh ock .
PERSONAL SAFETY
•Stay alert, watch what you are doing and use common sense when operating a power
tool. Do not use a power tool while you are tired or under the inuence of drugs, alcohol
or medication. A momen t of i n a t t en t i on wh i l e op er a t i n g p ower t ool s ma y r esu l t i n ser i ou s
p er son a l i n j u r y .
• Use personal protective equipment. Always wear eye protection. P r ot ect i v e eq u i p men t
su ch a s a d u st ma sk , n on - sk i d sa f et y sh oes, a h a r d h a t , or h ea r i n g p r ot ect i on u sed f or
a p p r op r i a t e con d i t i on s wi l l r ed u ce p er son a l i n j u r i es.
•Prevent unintentional starting. E n su r e t h e swi t ch i s i n t h e of f - p osi t i on b ef or e con n ect i n g t o
p ower sou r ce a n d / or b a t t er y p a ck , p i ck i n g u p or ca r r y i n g t h e t ool .C a r r y i n g p ower t ool s wi t h y ou r
nger on the switch or energizing power tools that have the switch on
i n v i t es a cci d en t s.

5
Lowes.com
•Remove any adjusting key or wrench before turning the power tool on. A wr en ch or a k ey
l ef t a t t a ch ed t o a r ot a t i n g p a r t of t h e p ower t ool ma y r esu l t i n p er son a l i n j u r y .
•Do not overreach. Keep proper footing and balance at all times. T h i s en a b l es b et t er con t r ol
of t h e p ower t ool i n u n ex p ect ed si t u a t i on s.
•Dress properly. Do not wear loose clothing or jewelry. Keep your hair, clothing and
gloves away from moving parts. Loose cl ot h es, j ewel r y or l on g h a i r ca n b e ca u g h t i n mov i n g
p a r t s.
•If devices are provided for the connection of dust extraction and collection facilities,
ensure these are connected and properly used.U se of d u st d ev i ces ca n r ed u ce d u st - r el a t ed
h a z a r d s.
POWER TOOL USE AND CARE
•Do not force the power tool. Use the correct power tool for your application. T h e cor r ect
p ower t ool wi l l d o t h e j ob b et t er a n d sa f er a t t h e r a t e f or wh i ch i t wa s d esi g n ed .
•Do not use the power tool if the switch does not turn it on and off. A n y p ower t ool t h a t
ca n n ot b e con t r ol l ed wi t h t h e swi t ch i s d a n g er ou s a n d mu st b e r ep a i r ed .
•Disconnect the plug from the power source and/or the battery pack from the power
tool before making any adjustments, changing accessories, or storing power tools. S u ch
p r ev en t i v e sa f et y mea su r es r ed u ce t h e r i sk of st a r t i n g t h e p ower t ool a cci d en t a l l y .
•Store idle power tools out of the reach of children and do not allow persons unfamiliar
with the power tool or these instructions to operate the power tool. P ower t ool s a r e
d a n g er ou s i n t h e h a n d s of u n t r a i n ed u ser s.
•Maintain power tools. Check for mislignment or binding of moving parts, breakage of
parts and any other condition that may affect the power tool operation. If damaged, have
the power tool repaired before use. M a n y a cci d en t s a r e ca u sed b y p oor l y ma i n t a i n ed p ower
t ool s
•Keep cutting tools sharp and clean. P r op er l y ma i n t a i n ed cu t t i n g t ool s wi t h sh a r p cu t t i n g
ed g es a r e l ess l i k el y t o b i n d a n d a r e ea si er t o con t r ol ;
•Use the power tool, accessories and tool bits etc. in accordance with these instructions,
taking into account the working conditions and the work to be performed. U se of t h e
p ower t ool f or op er a t i on s d i f f er en t f r om t h ose i n t en d ed cou l d r esu l t i n a h a z a r d ou s si t u a t i on .
SERVICE
• Have your power tool serviced by a qualied repair person using only identical
replacement parts. T h i s wi l l en su r e t h a t t h e sa f et y of t h e p ower t ool i s ma i n t a i n ed .
SPECIFIC SAFETY WARNINGS FOR ELECTRIC ROUTER
•Hold a power tool by insulated gripping surfaces, because the cutter may contact its own
cord. C u t t i n g a " l i v e" wi r e ma y ma k e ex p osed met a l p a r t s of t h e p ower t ool " l i v e" a n d sh ock t h e
op er a t or .
•Use clamps or another practical way to secure and support the workpiece to a stable
platform. H ol d i n g t h e wor k b y yo u r h a n d or a g a i n st t h e b od y l ea ve s i t u n st a b l e a n d ma y l ea d
t o l oss of con t r ol .
•Only use router bits suitable for the no-load speed of the tool.
• Never use router bits with a diameter exceeding the maximum diameter specied in the
technical data section.
•Do not use the tool in an inverted position unless it is properly
and securely installed to a router table.

6
Lowes.com
• Wear a dust mask specically designed for protection against lead paint dust and fumes
and ensure that persons within or entering the work area are also protected.
•Wear ear protection. Exposure to noise can cause hearing loss.
•Always switch the machine off and wait until it has come to a standstill before placing it
down.
•Use only sharp cutter bits t h a t a r e n ot ch i p p ed or cr a cke d . B l u n t cu t t er b i t s wi l l ca u se st a l l i n g
a n d b u r n t h e wor kp i ece.
•Never u se t h i s r ou t er mot or wi t h a cu t t er b i t l a r g er t h a n 1 - 1 / 4 i n ch i n d i a met er .
•Always use cutter bits that are designed for this router. N eve r u se cu t t er b i t s wh i ch a r e
l a r g er i n d i a met er t h a n t h e op en i n g , wh i ch cou l d ca u se p ossi b l e l oss of con t r ol or cr ea t e ot h er
h a za r d ou s con d i t i on s t h a t cou l d ca u se ser i ou s p er son a l i n j u r y .
GENERAL SAFETY WARNING FOR BENCH TOOLS
•Keep guards in place and in working order.
•Remove adjusting keys and wrenches. F or m a h a b i t of ch ecki n g t o see t h a t ke ys a n d
a d j u st i n g wr en ch es a r e r emove d f r om t h e t ool b ef or e t u r n i n g i t on .
•Keep the work area clean. C l u t t er ed a r ea s a n d b en ch es i n vi t e a cci d en t s.
•Don’t use in a dangerous environment. D on ’ t u se p ower t ool s i n d a mp or wet l oca t i on s or
exp ose t h em t o r a i n . K eep t h e wor k a r ea wel l l i t .
•Keep children away. A l l vi si t or s sh ou l d b e ke p t a sa f e d i st a n ce f r om t h e wor k a r ea .
•Make workshop childproof with padlocks and master switches, or by removing starter
keys.
•Don’t force tool. I t wi l l d o t h e j ob b et t er a n d sa f er a t t h e r a t e f or wh i ch i t wa s d esi g n ed .
•Use the right tool. D on ’ t f or ce t ool or a t t a ch men t t o d o a j ob f or wh i ch i t wa s n ot d esi g n ed .
•Use proper extension cord. M a ke su r e yo u r ext en si on cor d i s i n g ood con d i t i on . W h en
u si n g a n ext en si on cor d , b e su r e t o u se on e h ea vy en ou g h t o ca r r y t h e cu r r en t t h a t yo u r
p r od u ct wi l l d r a w. A n u n d er si ze d cor d wi l l ca u se a d r op i n l i n e vo l t a g e r esu l t i n g i n l oss of
p ower a n d ove r h ea t i n g . T a b l e 1 sh ows t h e cor r ect si ze t o u se d ep en d i n g on cor d l en g t h a n d
n a mep l a t e a mp er e r a t i n g . I f i n d ou b t , u se t h e n ext h ea vi er g a u g e. T h e sma l l er t h e g a u g e
n u mb er , t h e h ea vi er t h e cor d .

7
Lowes.com
Table 1: Recommended size of extension cords
AMPERE
RATING
VOLTS TOTAL LENGTH OF CORD IN FEET
1 2 0 V ~
2 5 f t . 5 0 f t . 1 0 0 f t . 1 2 5 f t .
A . W . G .
0 ~ 6 1 8 1 6 1 6 1 4
6 ~ 1 0 1 8 1 6 1 4 1 2
10~12 16 16 14 12
12~16 14 1 1 2 N ot R ecommen d ed
•Wear proper apparel. D o n ot wea r l oose cl ot h i n g , g l ov es, n eck t i es, r i n g s, b r a cel et s, or ot h er
j ewel r y wh i ch ma y g et ca u g h t i n mov i n g p a r t s. N on sl i p f oot wea r i s r ecommen d ed .
W ea r p r ot ect i v e h a i r cov er i n g t o con t a i n l on g h a i r .
•Always use safety glasses. A l so u se a f a ce or d u st ma sk i f t h e cu t t i n g op er a t i on i s d u st y .
E v er y d a y ey eg l a sses on l y h a v e i mp a ct r esi st a n t l en ses. T h ey a r e N O T sa f et y g l a sses.
•Secure work. U se cl a mp s or a v i se t o h ol d wor k wh en p r a ct i ca l . I t ’ s sa f er t h a n u si n g y ou r h a n d
a n d i t f r ees b ot h h a n d s t o op er a t e t h e t ool .
•Don’t overreach. K eep p r op er f oot i n g a n d b a l a n ce a t a l l t i mes.
•Maintain tools with care. K eep t ool s sh a r p a n d cl ea n f or t h e b est a n d sa f est p er f or ma n ce.
F ol l ow i n st r u ct i on s f or l u b r i ca t i n g a n d ch a n g i n g a ccessor i es.
•Disconnect tools b ef or e ser v i ci n g ; wh en ch a n g i n g a ccessor i es, su ch a s b l a d es, b i t s, cu t t er s,
a n d t h e l i k e.
•Reduce the risk of unintentional starting. M a k e su r e swi t ch i s i n t h e of f p osi t i on b ef or e
p l u g g i n g i n .
•Use recommended accessories. C on su l t t h e own er ’ s ma n u a l f or r ecommen d ed a ccessor i es.
T h e u se of i mp r op er a ccessor i es ma y ca u se r i sk of i n j u r y t o p er son s.
•Never stand on the tool. S er i ou s i n j u r y cou l d occu r i f t h e t ool i s t i p p ed or i f t h e cu t t i n g t ool i s
u n i n t en t i on a l l y con t a ct ed .
•Check damaged parts. B ef or e f u r t h er u se of t h e t ool , a g u a r d or ot h er p a r t t h a t i s d a ma g ed
sh ou l d b e ca r ef u l l y ch eck ed t o d et er mi n e wh et h er i t wi l l op er a t e p r op er l y a n d p er f or m i t s
i n t en d ed f u n ct i on - ch eck f or a l i g n men t of mov i n g p a r t s, b l i n d i n g of mov i n g p a r t , b r a k ea g e of
p a r t s, mou n t i n g s, a n d a n y ot h er con d i t i on t h a t ma y a f f ect i t s op er a t i on . A g u a r d or ot h er p a r t t h a t
i s d a ma g ed sh ou l d b e p r op er l y r ep a i r ed or r ep l a ced .
•Direction of feed. F eed wor k i n t o a b l a d e or cu t t er a g a i n st t h e d i r ect i on of r ot a t i on of t h e b l a d e
or cu t t er on l y .
•Never leave a tool running unattended. Turn power off. D on ’ t l ea v e t ool u n t i l i t comes t o a
comp l et e st op .
Lowes.com
8
GROUNDING INSTRUCTIONS
•I n t h e ev en t of a ma l f u n ct i on or b r ea k d own , g r ou n d i n g
p r ov i d es a p a t h of l ea st r esi st a n ce f or el ect r i c
cu r r en t t o r ed u ce t h e r i sk of el ect r i c sh ock . T h i s
t ool i s eq u i p p ed wi t h a n el ect r i ca l cor d t h a t h a s a n
eq u i p men t - g r ou n d i n g con d u ct or a n d a g r ou n d i n g p l u g .
T h e p l u g mu st b e p l u g g ed i n t o a ma t ch i n g ou t l et t h a t
i s p r op er l y i n st a l l ed a n d g r ou n d ed i n a ccor d a n ce wi t h
a l l l oca l cod es a n d or d i n a n ces.
• Do not modify the plug provided. if it will not t into the
outlet, have the proper outlet installed by a qualied
el ect r i ci a n .
•I mp r op er con n ect i on of t h e eq u i p men t - g r ou n d i n g
con d u ct or ca n r esu l t i n a r i sk of el ect r i c sh ock .
T h e con d u ct or wi t h i n su l a t i on t h a t h a s a n ou t er
su r f a ce t h a t i s g r een wi t h or wi t h ou t y el l ow st r i p es
i s t h e eq u i p men t - g r ou n d i n g con d u ct or . I f r ep a i r or
r ep l a cemen t i s n ecessa r y , d o n ot con n ect t h e eq u i p men t - g r ou n d i n g con d u ct or t o a l i v e t er mi n a l .
• Check with a qualied electrician or service personnel if the grounding instructions are not
comp l et el y u n d er st ood , or i f i n d ou b t a s t o wh et h er t h e t ool i s p r op er l y g r ou n d ed .
•U se on l y 3 - wi r e ex t en si on cor d s t h a t h a v e 3 - p r on g g r ou n d i n g p l u g s a n d 3 - p ol e r ecep t a cl es t h a t
a ccep t t h e t ool ’ s p l u g .
•R ep a i r or r ep l a ce d a ma g ed or wor n cor d i mmed i a t el y .
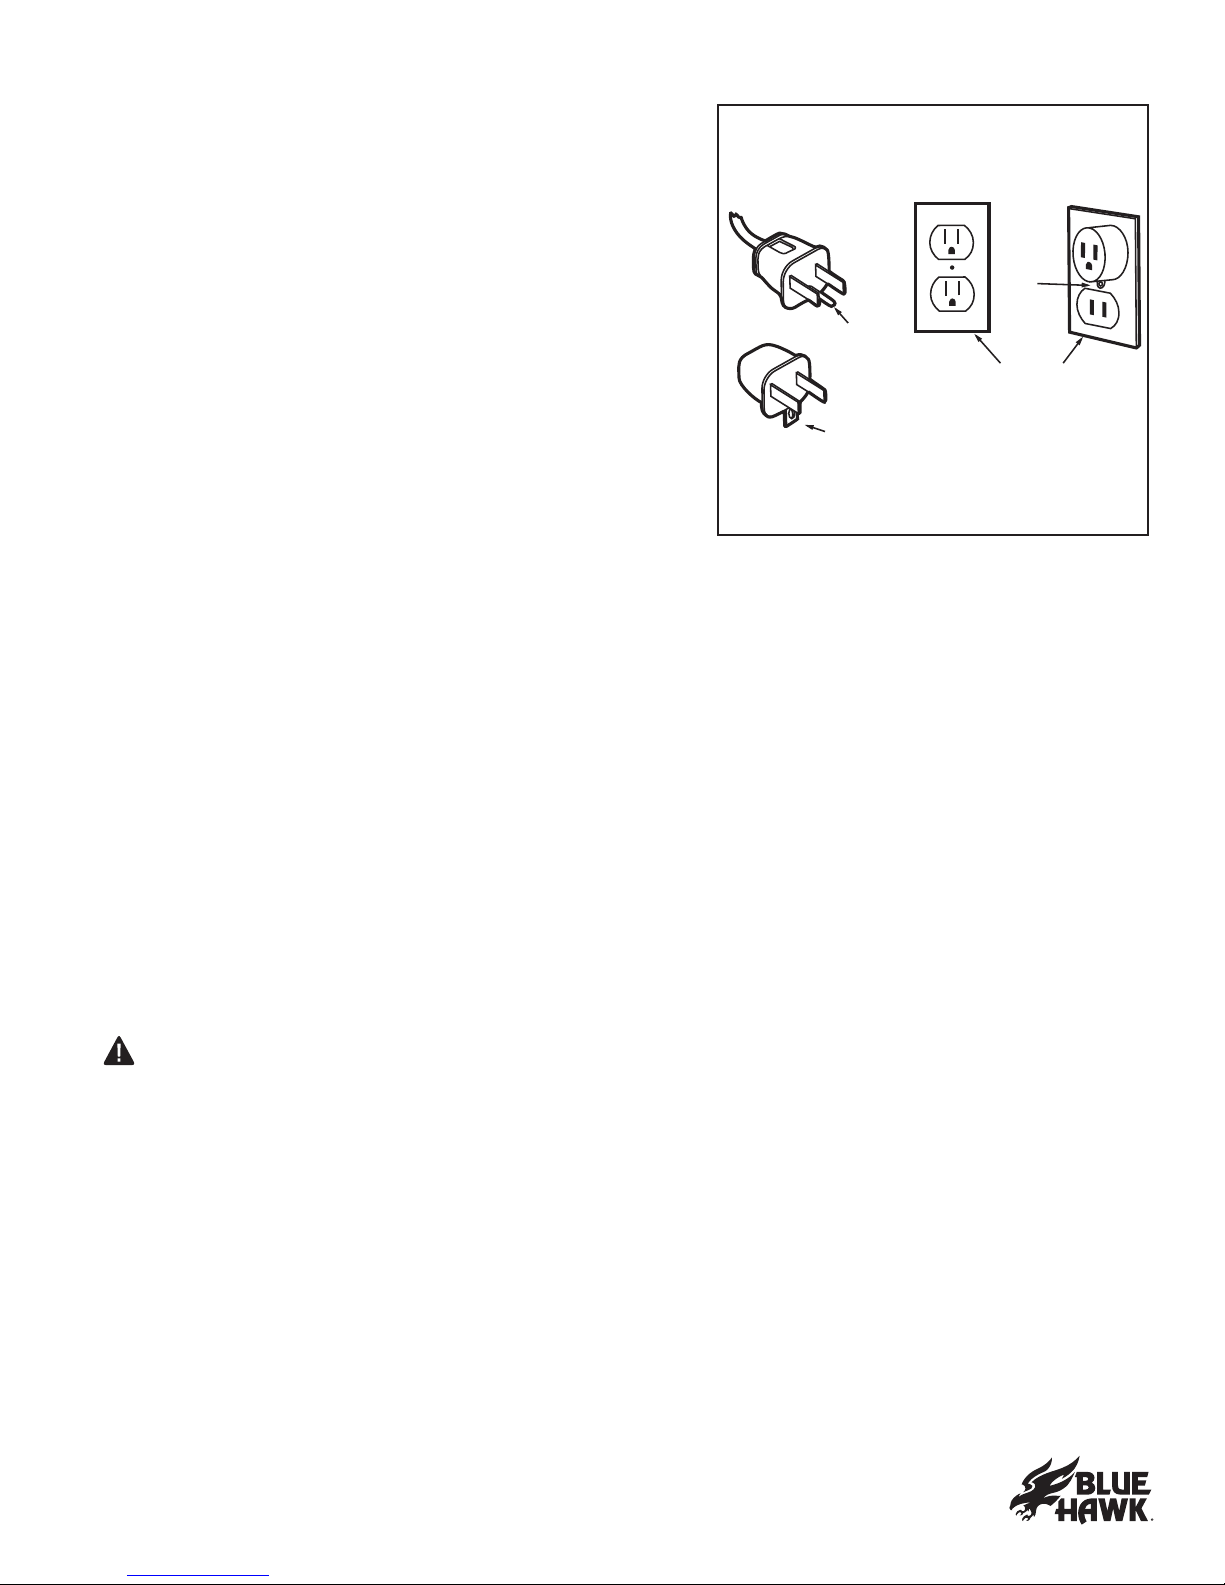
•T h i s t ool i s i n t en d ed f or u se on a ci r cu i t t h a t h a s a n ou t l et t h a t l ook s l i k e t h e on e i l l u st r a t ed i n
sketch A in the gure above. The tool has a grounding plug that looks like the plug illustrated
in sketch A in the gure above. A temporary adapter, which looks like the adapter illustrated in
sk et ch es B a n d C , ma y b e u sed t o con n ect t h i s p l u g t o a 2 - p ol e r ecep t a cl e a s sh own i n sk et ch
B if a properly grounded outlet is not installed by a qualied electrician. The green-colored rigid
ea r , l u g , a n d t h e l i k e, ex t en d i n g f r om t h e a d a p t er mu st b e con n ect ed t o a p er ma n en t g r ou n d ,
su ch a s a p r op er l y g r ou n d ed ou t l et b ox .
SPECIFIC SAFETY WARNINGS FOR THE ROUTER TABLE
WARNING: For your own safety, read owner’s manual before using Router or Router Table.
•Always wear eye protection.
•Feed workpiece against router bit rotation.
•Do not use awkward hand positions.
• Keep ngers away from revolving cutter. Use xtures when necessary.
•Use overhead guard when adjustable fence is not in place.
•Do not expose to rain or use in damp location.
• Risk of re or electric shock. Total circuit load for the two outlets must not exceed 15A.
• Risk of re or injury.
A.
B.
C.
GROUNDING
P I N
C O V E R O F G R O U N D E D
O U T LE T B O X
G R O U N D E D M E A N S
M E T A L
S C R E W

9
Lowes.com
WARNING: Some dust created by power sanding, sawing, grinding, drilling and other
construction activities contains chemicals known to the state of California to cause cancer,
birth defects or other reproductive harm.
S ome ex a mp l es of t h ese ch emi ca l s a r e:
• Lead from lead-based paints.
• Crystalline silica from bricks, cement, and other masonry products.
• Arsenic and chromium from chemically-treated lumber.
Your risk from these exposures varies depending upon how often do this type of work.
To reduce your exposure to these chemicals:
• Work in a well-ventilated area.
• Work with approved safety equipment, such as dust masks that are specially designed to lter
ou t mi cr oscop i c p a r t i cl es.
• Avoid prolonged contact with dust from power-sanding, sawing, grinding, drilling, and other
con st r u ct i on a ct i v i t i es. W ea r p r ot ect i v e cl ot h i n g a n d wa sh ex p osed a r ea s wi t h soa p a n d wa t er .
Allowing dust to get into your mouth or eyes or to lie on the skin may promote absorption of
harmful chemicals.
1 0
Lowes.com
PACKAGE CONTENTS
NOTICE: T o si mp l i f y h a n d l i n g a n d t o mi n i mi ze a n y d a ma g e t h a t ma y occu r d u r i n g sh i p p i n g , t h e
r ou t er t a b l e comes p a r t i a l l y a ssemb l ed . S ep a r a t e a l l t h e p a r t s f r om t h e p a cka g i n g ma t er i a l s a n d
ch eck ea ch p a r t a g a i n st t h e p a cka g e con t en t s l i st i n or d er t o en su r e t h a t a l l p a r t s h a ve b een
i n cl u d ed . D o t h i s b ef or e d i sca r d i n g a n y of t h e p a cka g i n g ma t er i a l .
C a r ef u l l y i n sp ect t h e i t ems t o en su r e t h a t n o b r ea ka g e or d a ma g e h a s occu r r ed d u r i n g sh i p p i n g .
I f a n y of t h e i t ems i n t h e p a r t s l i st i s mi ssi n g , ca l l cu st omer ser vi ce a t 1 - 8 7 7 - 8 8 8 - 8 2 2 5 .
WARNING: I f a n y p a r t s a r e mi ssi n g , D O N O T a t t emp t t o a ssemb l e, i n st a l l , or u se t h e r ou t er
t a b l e u n t i l t h e mi ssi n g p a r t s h a v e b een f ou n d or r ep l a ced a n d t h e r ou t er t a b l e h a s b een p r op er l y
a n d cor r ect l y a ssemb l ed a ccor d i n g t o t h i s own er ’ s ma n u a l .
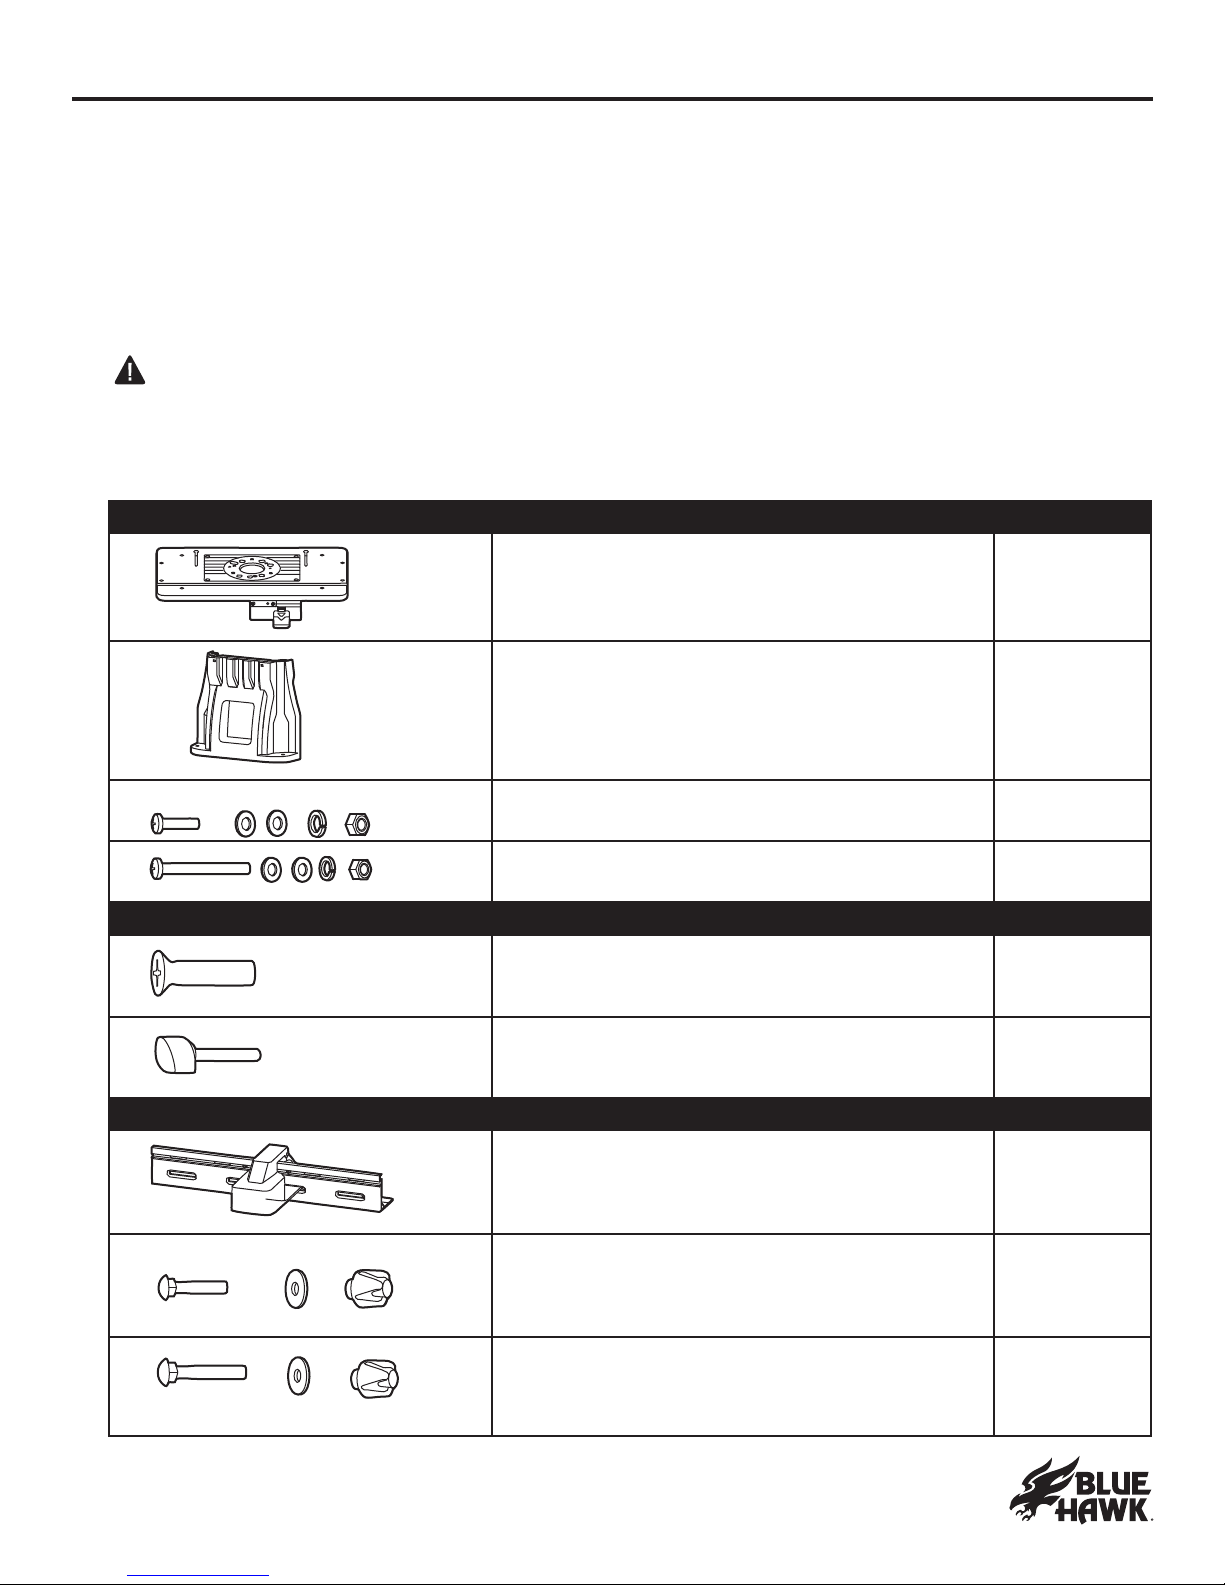
Part list for the router table
PARTS FOR ROUTER TABLE DESCRIPTION QUANTITY
R ou t er t a b l e su r f a ce a ssemb l y 1
T a b l e l eg 2
S h or t p a n - h ea d scr ew, 3 wa sh er s
a n d n u t f or i n st a l l i n g t h e l eg t o t h e t a b l e. 4
Lon g p a n - h ea d scr ew, 3 wa sh er s
a n d n u t f or i n st a l l i n g t h e l eg t o t h e t a b l e. 4
PARTS FOR MOUNTING ROUTER DESCRIPTION QUANTITY
F l a t - h ea d scr ew f or a t t a ch i n g t h e r ou t er
t o t h e mou n t i n g p l a t e of t h e t a b l e. 3
Leve l scr ew 4
PARTS FOR FENCE DESCRIPTION QUANTITY
F en ce a ssemb l y 1
M 6 x2 6 b ol t , wa sh er a n d cl a mp i n g kn ob f or l ocki n g
t h e f en ce t o t h e t a b l e ( p r e- i n st a l l ed on t h e f en ce) 1
M 6 x4 0 b ol t , wa sh er a n d cl a mp i n g kn ob f or l ocki n g
t h e f en ce t o t h e t a b l e ( p r e- i n st a l l ed on t h e f en ce) 1
1 1
Lowes.com
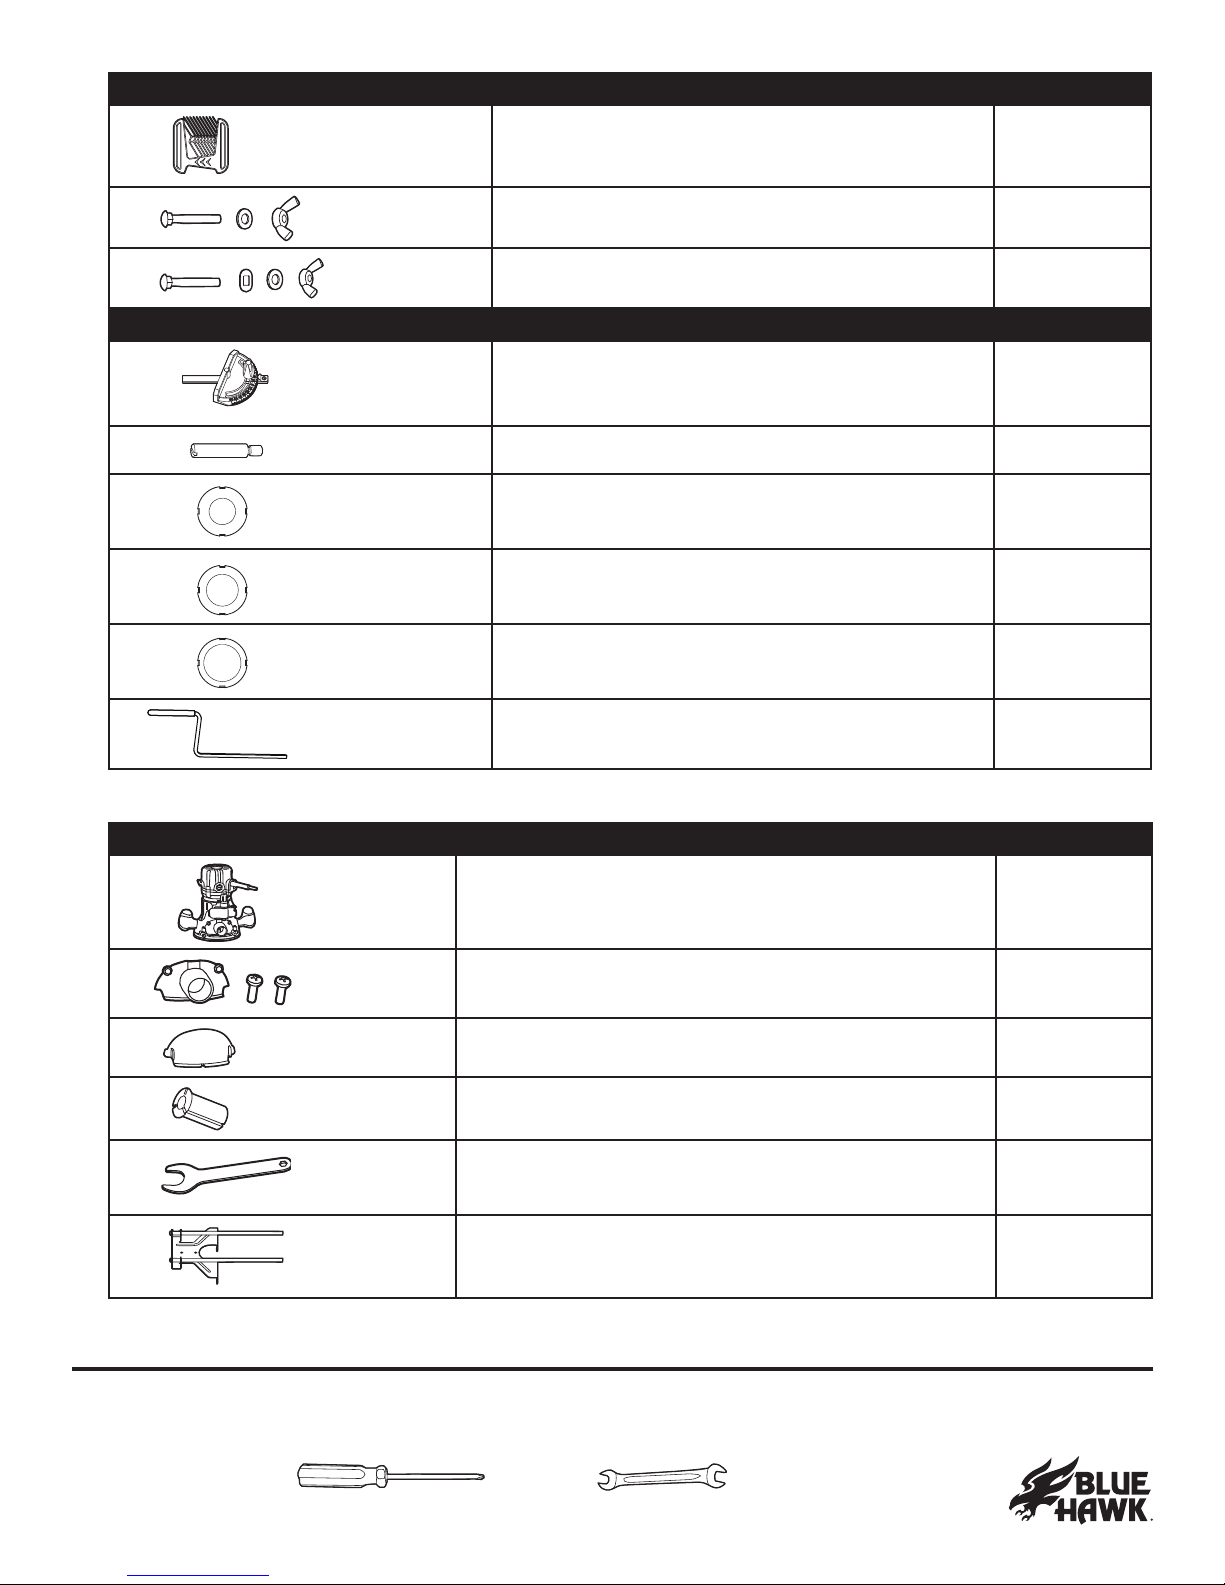
PARTS FOR FEATHER BOARD DESCRIPTION QUANTITY
F ea t h er b oa r d 3
M 6 x3 5 b ol t , wa sh er a n d wi n g n u t f or a t t a ch i n g
t h e f ea t h er s t o t h e f en ce 4
M 6 x3 5 b ol t , 2 wa sh er s a n d wi n g n u t f or a t t a ch i n g
t h e f ea t h er t o t h e t a b l e t op 2
OTHER PARTS FOR ASSEMBLY DESCRIPTION QUANTITY
M i t er - g a u g e a ssemb l y 1
S t a r t er p i n 1
T a b l et op i n ser t wi t h 1 - 1 / 4 i n . D i a met er H ol e 1
T a b l et op i n ser t wi t h 1 - 7 / 8 i n . D i a met er H ol e 1
T a b l et op i n ser t wi t h 2 - 1 / 8 i n . D i a met er H ol e 1
‘ Z ’ W r en ch 1
Part list for the router
PARTS FOR ROUTER DESCRIPTION QUANTITY
R ou t er 1
D u st col l ect i on wi t h va cu u m a d a p t or a n d 2 scr ews 1
C h i p g u a r d ( a ssemb l ed t o t h e r ou t er ) 1
1 / 4 i n . C ol l et sl eeve 1
O p en - en d wr en ch 1
H ea vy- d u t y ed g e g u i d e 1
TOOLS NEEDED
T h e f ol l owi n g t ool s ( n ot i n cl u d ed ) a r e n eed ed f or a ssemb l y or ma k i n g a d j u st men t s.
Phillips Screwdriver
8 Open-end Wrench
Phillips Screwdriver
8 Open-end Wrench

1 2
Lowes.com
PREPARATION
KNOW YOUR ROUTER AND ROUTER TABLE
The xed base router is designed to be used only for straight and grooved milling and the forming
of ed g es i n wood or si mi l a r ma t er i a l s. A n y ot h er u ses of t h e r ou t er n ot d escr i b ed i n t h i s ma n u a l
cou l d d a ma g e t h e t ool or ser i ou sl y i n j u r e t h e op er a t or a n d a r e, t h er ef or e, ex p r essl y ex cl u d ed f r om
a p p r ov ed a p p l i ca t i on s.
T h e r ou t er t a b l e h a s a p r eci si on - b u i l t el ect r i c swi t ch b ox a n d i t sh ou l d on l y b e con n ect ed t o a
1 2 0 V ~ 6 0 H z p ower su p p l y ( n or ma l h ou seh ol d cu r r en t ) . D O N O T op er a t e on d i r ect cu r r en t . T h e
l a r g e v ol t a g e d r op wou l d ca u se a l oss of p ower a n d t h e mot or wou l d ov er h ea t . I f t h e r ou t er t a b l e
d oes n ot op er a t e wh en p l u g g ed i n t o a cor r ect ou t l et , ch eck t h e p ower su p p l y . T h e r ou t er t a b l e
comes wi t h a 6 f t . ( 1 .8 m) p ower cor d wi t h 3 - p r on g , g r ou n d ed p l u g .
WARNING: T o r ed u ce t h e r i sk of i n j u r y , d o n ot ov er l oa d t h e t ool . Let i t wor k a t i t s own p a ce.
G u i d e t h e cor d ca r ef u l l y t o a v oi d a cci d en t a l l y cu t t i n g i t .
PART DESCRIPTION PART DESCRIPTION
A Li ve - t ool i n d i ca t or P M ot or cl a mp
B O N / O F F t og g l e swi t ch Q D u st col l ect i on
C H a n d l e R E d g e- g u i d e mou n t i n g sl ot
D F i xe d b a se S E d g e- g u i d e l ocki n g kn ob s
E M ot or h ou si n g T E d g e g u i d e
F S u b - b a se U S wi t ch b ox
G S p i n d l e l ock b u t t on V I n t eg r a t ed sa f et y swi t ch
H C ol l et / n u t W I n - f eed f en ce
I C h i p g u a r d X O u t - f eed f en ce
J R ep l a cea b l e b r u sh ca p Y F ea t h er b oa r d
KMicro-ne adjustment dial Z D u st col l ect i on a n d g u a r d
L A b ove - t a b l e d ep t h a d j u st men t n u t A 1 V a cu u m a d a p t or
M D ep t h - i n d i ca t or r i n g B 1 M i t er g a u g e
N M ot or - h ou si n g ke y st r i p C 1 F a st en i n g h ol es
O C oa r se- a d j u st men t kn ob D 1 U n i ve r sa l mou n t i n g p l a t e
O
N
T
W
Y
V
U
X
Z
YA1
B1
C1
D1
HG
D
B
A
D
C
E
R
S
M
J
K
F
Q
P
I
L
1 3
Lowes.com
WARNING: T h e sa f e u se of t h i s p r od u ct r eq u i r es a n
u n d er st a n d i n g of t h e i n f or ma t i on on t h e t ool a n d i n t h i s
op er a t or ’ s ma n u a l , a s wel l a s k n owl ed g e of t h e p r oj ect
y ou a r e a t t emp t i n g . B ef or e a t t emp t i n g t o u se a n y t ool , b e
su r e t o b ecome f a mi l i a r wi t h a l l of t h e op er a t i n g f ea t u r es
a n d sa f et y r u l es. D o n ot a l l ow f a mi l i a r i t y wi t h t h e t ool
t o ca u se ca r el essn ess. R ememb er t h a t on e ca r el ess
momen t i s en ou g h t o ca u se sev er e i n j u r y .
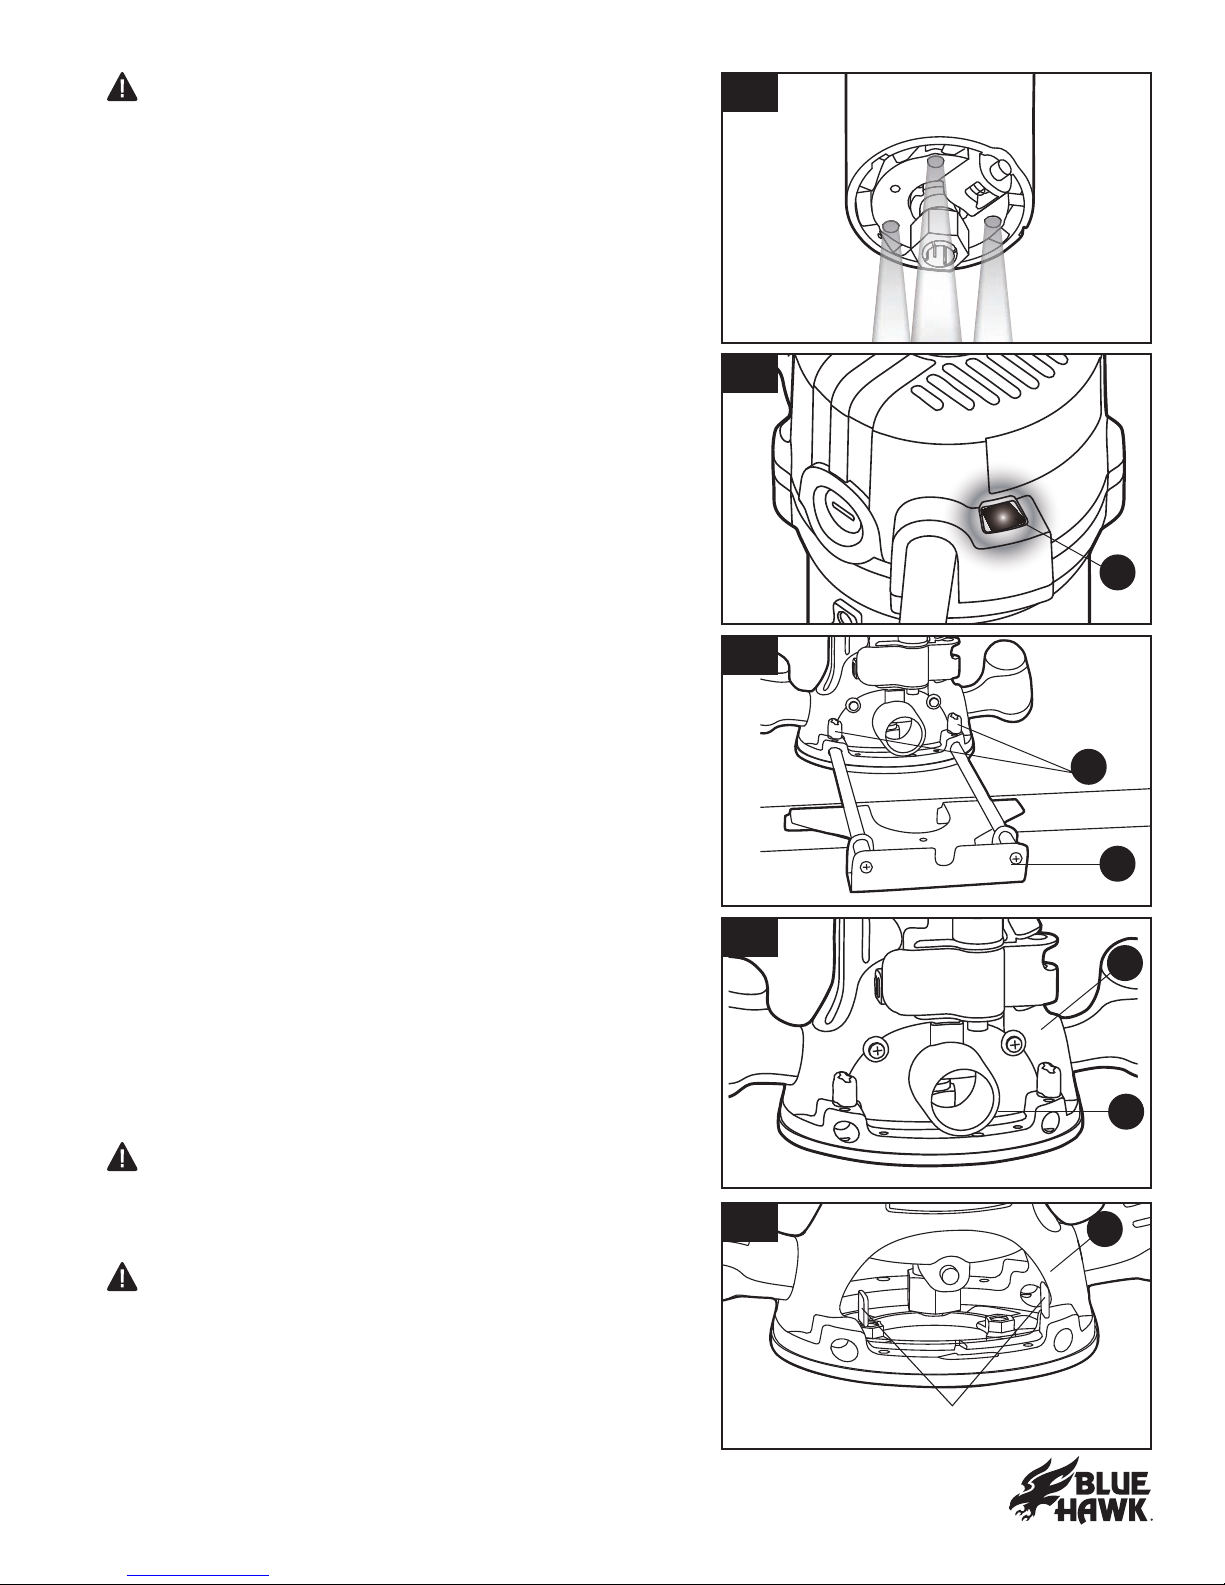
1. LED worklights
T h e r ou t er mot or h a s 3 b u i l t - i n wor k l i g h t s, l oca t ed a r ou n d
t h e col l et ; t h ese p r ov i d e h i g h v i si b i l i t y of t h e wor k p i ece
wh en cu t t i n g . T h ese l i g h t s a r e a l wa y s “ on ” wh en t h e
t og g l e swi t ch i s i n t h e “ O N ” p osi t i on .
2. “Live-tool indicator” light
T h e l i v e- t ool i n d i ca t or l i g h t ( A ) i s l oca t ed on t h e mot or
h ou si n g t op ca p wh er e t h e p ower cor d en t er s t h e mot or
h ou si n g . T h i s g r een l i g h t i s a l wa y s on wh en t h e r ou t er
mot or i s p l u g g ed i n t o a p ower sou r ce.
3. Heavy-duty edge guide
T h e ed g e g u i d e ( T ) ca n b e u sed a s a n a i d i n r ou t i n g
a p p l i ca t i on s su ch a s d ecor a t i v e ed g i n g , st r a i g h t - ed g e
p l a n i n g a n d t r i mmi n g , g r oov i n g , d a d oi n g , a n d sl ot t i n g .
To assemble the edge guide onto xed base, simply
i n ser t t h e ed g e- g u i d e r od s i n t o t h e ed g e- g u i d e mou n t i n g
sl ot s ( R ) , a d j u st t o t h e d esi r ed p osi t i on , a n d l ock t h em i n
p l a ce wi t h t h e ed g e- g u i d e l ock i n g k n ob s ( S ) .
4. Dust collection with a vacuum adaptor
T h e v a cu u m a d a p t or ( A 1 ) i s si z ed t o a ccep t
a 1 - 1 / 4 i n . ( 3 .2 cm) v a cu u m h ose a d a p t or ( n ot i n cl u d ed ) .
To attach the adaptor onto the xed base (D),
p osi t i on a n d secu r e i t t o t h e b a ck of t h e b a se u si n g t h e
t wo scr ews ( i n cl u d ed ) .
5. Chip Guard
WARNING: T h e ch i p g u a r d h el p s k eep d u st a n d ch i p s
a wa y f r om t h e op er a t or . I t wi l l n ot st op ob j ect s l a r g er t h a n
wood ch i p s t h a t a r e f r om t h e b i t . T h e ch i p g u a r d i s n ot
i n t en d ed a s a sa f et y g u a r d . A LW A Y S wea r ey e p r ot ect i on .
CAUTION: A LW A Y S h a v e t h e ch i p g u a r d i n p l a ce on
t h e b a se wh en op er a t i n g t h e r ou t er .
To remove the chip guard (I) from the xed base (D),
p r ess i n wa r d on i t s t a b s u n t i l t h e ch i p g u a r d r el ea ses f r om
the xed base, and then remove it. To attach the chip
guard, place it back in position, and ex the sides while
p u sh i n g i t i n u n t i l i t sn a p s b a ck i n t o p l a ce.
1
2
3
4
Tabs
5
A
S
T
D
A1
D

1 4
Lowes.com
OPERATING INSTRUCTIONS FOR ROUTER
INSTALLING THE ROUTER ASSEMBLY
WARNING: A LW A Y S t u r n t h e mot or of f a n d u n p l u g t h e r ou t er f r om t h e p ower sou r ce b ef or e
ma ki n g a n y a d j u st men t s or i n st a l l i n g a ccessor i es. F a i l u r e t o t u r n t h e mot or of f a n d u n p l u g t h e
r ou t er cou l d r esu l t i n a cci d en t a l st a r t i n g , wh i ch ca n ca u se ser i ou s p er son a l i n j u r y .
Selecting a cutter bit (available separately)
T h i s r ou t er comes wi t h 1 / 4 i n . a n d 1 / 2 i n . col l et s t h a t a ccep t cu t t er b i t s wi t h 1 / 4 i n . a n d 1 / 2 i n .
d i a met er sh a n k s, r esp ect i v el y .
WARNING: D o n ot u se r ou t er cu t t er b i t s t h a t h a v e a cu t t er b i t d i a met er l a r g er t h a n 1 - 1 / 4 " ,
because they will not t through the sub-base opening, could cause damage to the sub-base and
t h e mot or , a n d cou l d ca u se ser i ou s p er son a l i n j u r y t o t h e op er a t or .
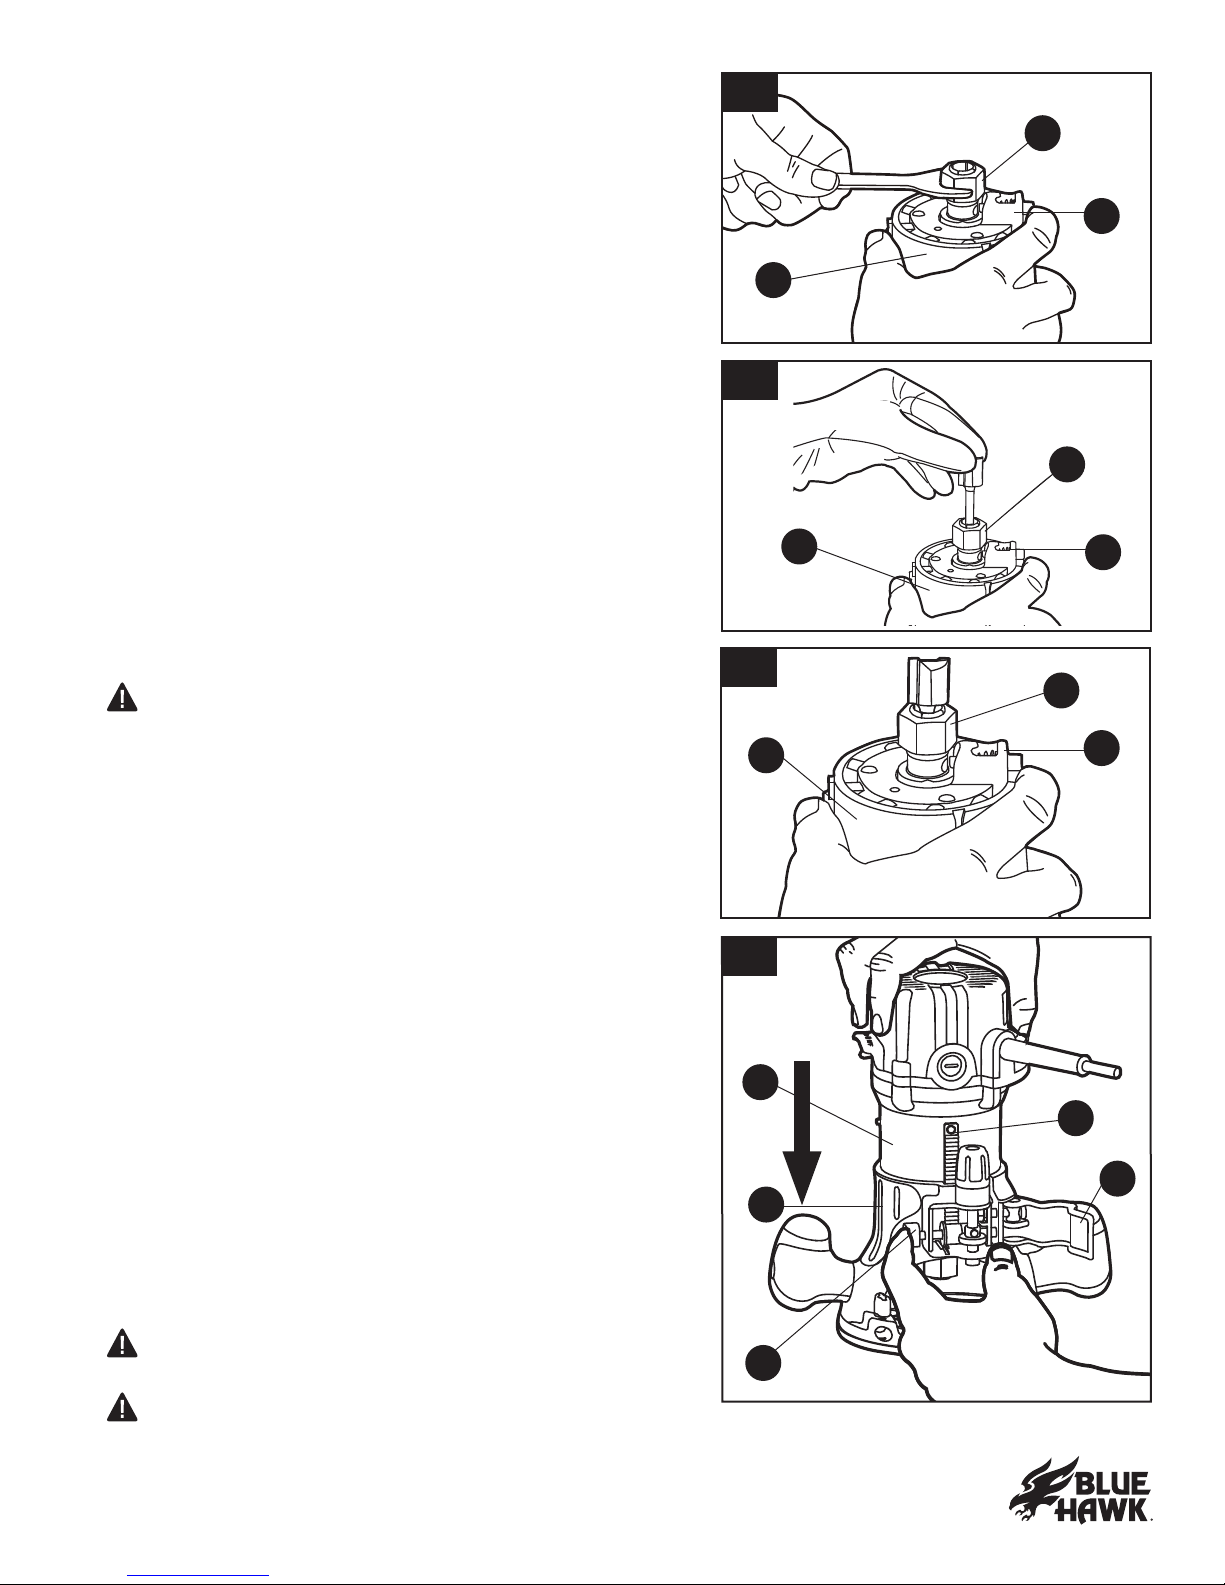
6. Removing the motor from the base
B ef or e a r ou t er b i t ca n b e i n ser t ed , t h e mot or a n d
housing must rst be removed from the xed base.
a . U se t h e O N / O F F t og g l e swi t ch ( B ) t o t u r n t h e mot or
of f . U n p l u g t h e t ool f r om t h e p ower t h e sou r ce.
b. Place the router (xed base (D) and motor housing
(E) on a at surface.
c. W i t h t h e b a ck of t h e r ou t er f a ci n g t h e op er a t or ,
l oosen t h e mot or cl a mp ( P ) .
d . P r ess t h e coa r se- a d j u st men t k n ob ( O ) t o r el ea se t h e
mot or h ou si n g k ey st r i p ( L) f r om t h e g ea r i n t h e b a se,
wh i l e l i f t i n g t h e mot or h ou si n g f r ee of t h e b a se.
6
B
L
O
E
D
1 5
Lowes.com
7. Installing the cutter bit
a . I n st a l l t h e ¼ i n . col l et , i f n ecessa r y : I f t h e sma l l er col l et
i s n ecessa r y t o b est a ccommod a t e t h e ch osen b i t ,
si mp l y i n ser t t h e ¼ i n . col l et i n t o t h e ½ i n . col l et / n u t ( H )
a s i f i t wer e a b i t .
b . S et t h e mot or h ou si n g ( E ) u p si d e d own on i t s t op ca p ,
wi t h t h e col l et p oi n t i n g u p .
c. P r ess t h e sp i n d l e- l ock b u t t on ( G ) t o en g a g e a n d l ock
t h e sp i n d l e sh a f t a n d col l et / n u t .
d . P l a ce t h e op en - en d wr en ch on t h e col l et / n u t , t u r n
t h e col l et / n u t cou n t er cl ock wi se wi t h t h e wr en ch , a n d
l oosen t h e col l et sl i g h t l y so t h a t i t ca n a ccep t t h e
cu t t er b i t sh a n k .
e. I n ser t t h e cu t t er b i t sh a n k i n t o t h e col l et / n u t so t h a t
t h e cu t t i n g su r f a ces a r e a p p r ox i ma t el y 1 / 8 i n . t o 1 / 4 i n .
a wa y f r om t h e f a ce of t h e col l et / n u t .
f . W i t h t h e cu t t er b i t i n ser t ed a n d t h e sp i n d l e- l ock b u t t on
p r essed i n t o en g a g e t h e sh a f t , p l a ce t h e wr en ch on
t h e col l et / n u t a n d t u r n i t cl ock wi se u n t i l t h e col l et i s
rmly tightened around the cutter bit.
WARNING: T i g h t en t h e col l et / n u t secu r el y t o p r ev en t
t h e cu t t er b i t f r om sl i p p i n g . I f t h e col l et / n u t i s n ot t i g h t en ed
secu r el y , t h e cu t t er b i t ma y d et a ch d u r i n g u se, ca u si n g
ser i ou s p er son a l i n j u r y .
NOTICE: T o p r ev en t d a ma g e t o t ool , d o n ot t i g h t en t h e
col l et wi t h ou t a cu t t er b i t i n st a l l ed .
NOTICE: T o en su r e p r op er g r i p p i n g of t h e cu t t er b i t
sh a n k a n d mi n i mi z e r u n - ou t , t h e sh a n k of t h e cu t t er b i t
mu st b e i n ser t ed a t l ea st 5 / 8 i n .( 1 6 mm) i n t o t h e col l et .
8. Installing the router motor in the base
a. With the back of the xed base (D) facing the
op er a t or , l oosen t h e mot or cl a mp ( P ) . P r ess t h e
coa r se- a d j u st men t k n ob ( O ) t o d i sen g a g e t h e g ea r s.
A l i g n i n g t h e mot or h ou si n g k ey st r i p ( N ) wi t h t h e k ey
strip slot in the xed base. Slide the motor housing (E)
down into the xed base.
b . T h e mot or h ou si n g wi l l sl i d e u p or d own wh en t h e
coa r se- a d j u st men t k n ob i s p r essed i n , p er mi t t i n g
coa r se a d j u st men t s.
c. A f t er a l l a d j u st men t s a r e ma d e, t i g h t en t h e mot or
cl a mp secu r el y .
WARNING: B i t s, sock et s, a n d t ool s g et h ot d u r i n g
op er a t i on . W ea r g l ov es wh en t ou ch i n g t h em.
WARNING: A LW A Y S r emov e cu t t er b i t s f r om t h e
col l et wh en t h e r ou t er i s n ot b ei n g u sed . Lea v i n g b i t s
i n st a l l ed cou l d r esu l t i n a n a cci d en t ca u si n g ser i ou s p er son a l i n j u r y .
7c
8
7a
7b
H
G
E
E
H
G
H
G
E
E
D
O
N
P
1 6
Lowes.com
ADJUSTING THE CUTTING DEPTH
WARNING: A LW A Y S t u r n t h e mot or of f wi t h t h e O N / O F F t og g l e swi t ch ( B ) a n d u n p l u g t h e
r ou t er f r om t h e p ower sou r ce b ef or e a n y a ssemb l y , a d j u st i n g or i n st a l l i n g a ccessor i es, or wh en i t
i s n ot i n u se. F a i l u r e t o t u r n t h e mot or of f a n d u n p l u g t h e r ou t er cou l d r esu l t i n a cci d en t a l st a r t i n g ,
wh i ch ca n ca u se ser i ou s p er son a l i n j u r y .
The xed base (D) is designed with a micro-ne adjustment worm-gear system. When the bit is
l ower ed t o t h e a p p r ox i ma t e d esi r ed p osi t i on ( coa r se a d j u st men t ) , t h e sy st em ca n t h en b e mi cr o-
a d j u st ed t o t h e p r eci se d ep t h .
NOTICE: All depth adjustments on the xed base must be made with the motor clamp loosened.
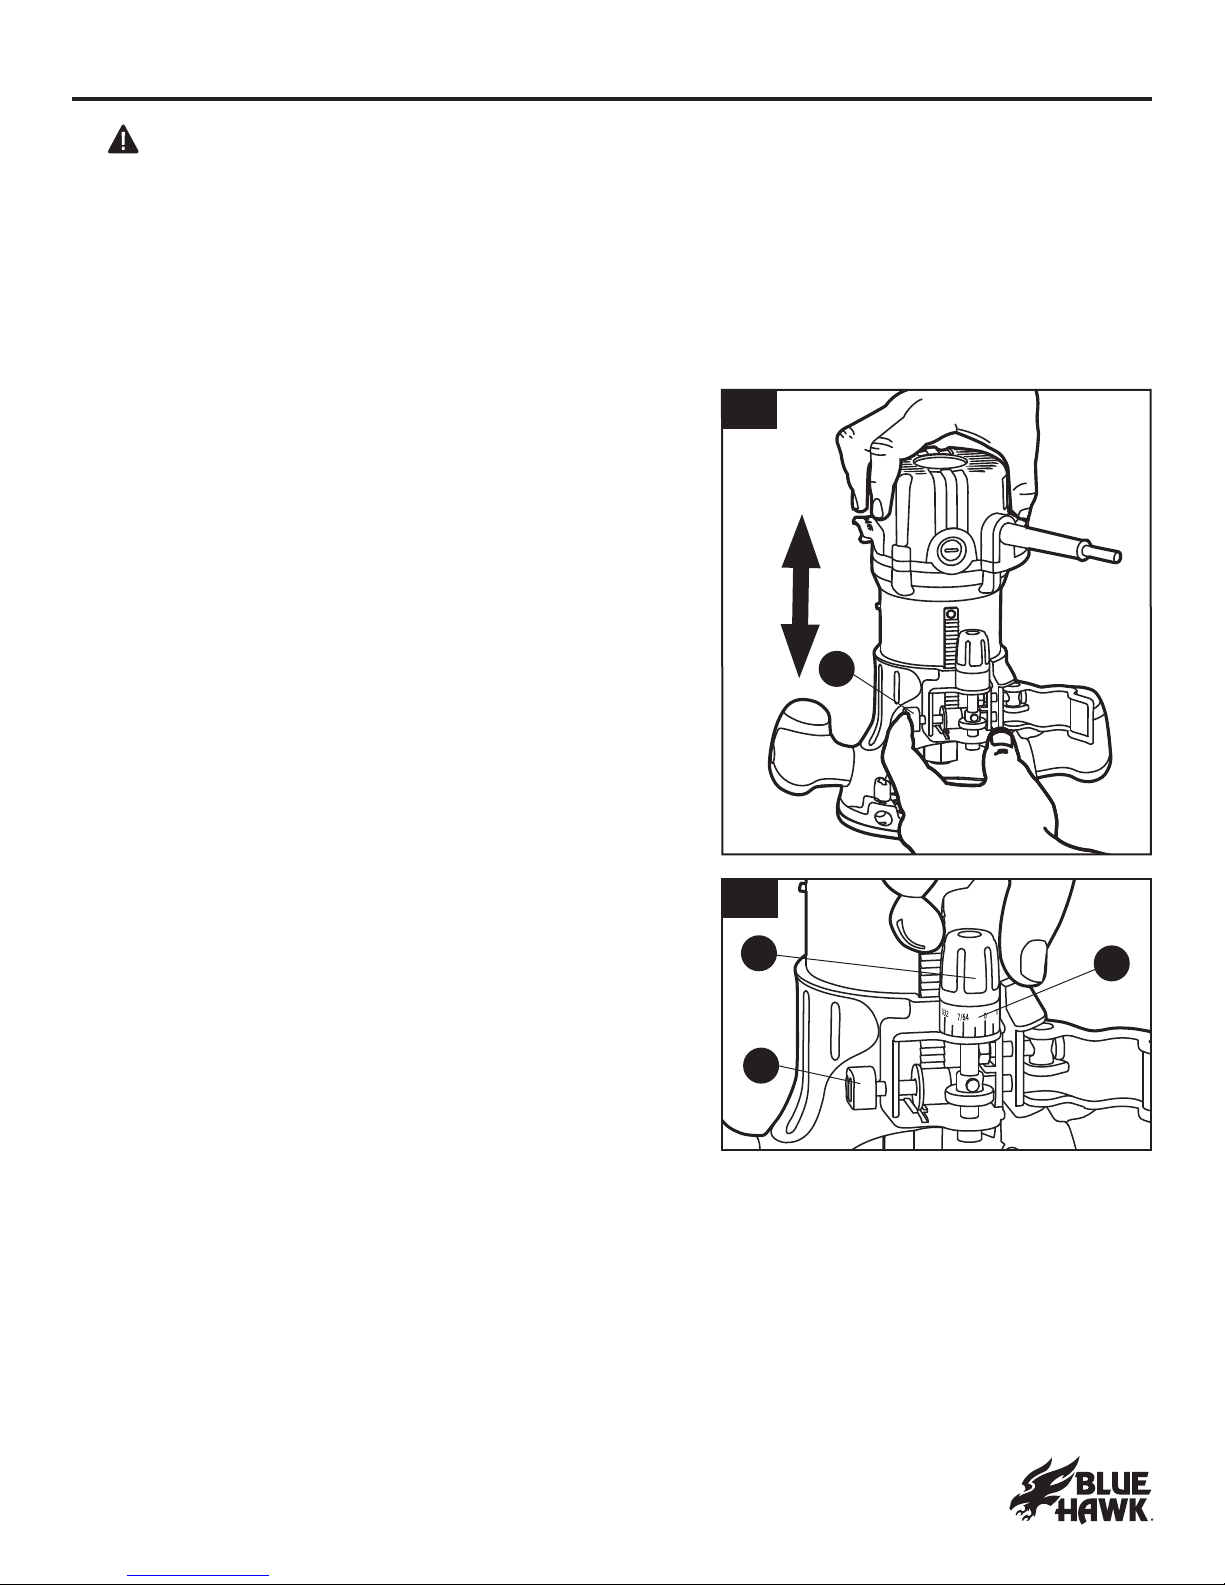
9. Coarse Adjustment:
D ep r ess t h e coa r se- a d j u st men t k n ob ( M ) t o q u i ck l y l ower
or r a i se t h e cu t t er b i t t o a n a p p r ox i ma t e d ep t h set t i n g .
10. Micro-ne Adjustments:
B e su r e t h a t t h e wor m- g ea r sy st em i s en g a g ed b ef or e
making ne adjustments. Test it by turning the micro-
ne adjustment dial (K) clockwise and counterclockwise
t o see i f t h e b i t l ower s a n d r i ses. I f i t d oes n ot , p r ess
the coarse-adjustment knob (O) and turn the micro-ne
a d j u st men t d i a l u n t i l t h e g ea r s en g a g e, a n d t h en r eset
z er o “ 0 ” on d ep t h - i n d i ca t or r i n g ( M ) .
T h e d ep t h - i n d i ca t or r i n g i s ma r k ed i n 1 / 6 4 i n . i n cr emen t s.
Turning the micro-ne adjustment dial one full turn
cl ock wi se ( 3 6 0 ° ) – z er o “ 0 ” t o z er o “ 0 ” – l ower s t h e
b i t 1 / 8 i n .
T h e sy st em a l l ows a ma x i mu m of 7 f u l l 3 6 0 ° cl ock wi se
r ev ol u t i on s i n or d er t o l ower t h e cu t t er b i t 7 / 8 i n . ( 2 2 .3 mm) .
T h e d ep t h - i n d i ca t or r i n g ca n b e r eset t o z er o “ 0 ” wi t h ou t
moving the micro-ne adjustment dial. This allows the user
t o b eg i n a d j u st men t s f r om a n y d esi r ed r ef er en ce p oi n t .
9
10
M
K
O
M

1 7
Lowes.com
11a
11. Depth-of-Cut Adjustment
a. Place the router assembly on a at, level surface, with
the back of the xed base (D) facing the operator.
b . Loosen t h e mot or cl a mp ( P ) .
c. W i t h t h e cu t t er b i t a l r ea d y i n st a l l ed , p r ess t h e coa r se-
a d j u st men t k n ob ( O ) a n d l ower t h e mot or i n t o t h e
base until the cutter bit is very close to the at surface
on which the base is sitting. Turn the micro-ne
a d j u st men t d i a l ( K ) u n t i l t h e cu t t er b i t “ j u st ” t ou ch es
the at surface on which the base is sitting.
d . P l a ce t h e r ou t er a ssemb l y su ch t h a t t h e su b - b a se ( F )
r est s on t wo l ev el scr a p wor k p i eces, p osi t i on ed so
t h a t t h e cu t t er b i t ca n b e l ower ed b et ween t h e scr a p
wor k p i eces a n d b el ow t h e su b - b a se.
e. T u r n t h e d ep t h - i n d i ca t or r i n g ( K ) u n t i l t h e z er o “ 0 ” i s
l i n ed u p wi t h t h e “ I ” ma r k ed on t h e b a se.
f. Turn the micro-ne adjustment dial clockwise to lower
t h e b i t t o t h e d esi r ed cu t t i n g d ep t h .
g . O n ce t h e cu t t i n g d ep t h i s set , t i g h t en t h e mot or cl a mp
secu r el y .
NOTICE: M a k i n g a si n g l e d eep cu t i s n ev er a d v i sa b l e.
S ma l l er d i a met er cu t t er b i t s a r e ea si l y b r ok en b y t oo
mu ch l a t er a l t h r u st a n d t or q u e. La r g er cu t t er b i t s wi l l
cause a rough cut, and will be difcult to guide and
con t r ol . F or t h ese r ea son s, d o n ot ex ceed 1 / 8 i n . cu t t i n g
d ep t h i n a si n g l e p a ss.
Deep cuts
a . D et er mi n i n g t h e p r op er cu t t i n g d ep t h ( f or ea ch p a ss) sh ou l d a l wa y s b e b a sed on t h e ma t er i a l ,
t h e si z e a n d t y p e of cu t t er b i t , a n d t h e p ower of t h e mot or .
b . A l wa y s ma k e sev er a l p r og r essi v el y d eep er cu t s, st a r t i n g a t on e d ep t h a n d t h en ma k i n g sev er a l
p a sses, i n cr ea si n g t h e cu t t i n g d ep t h ea ch t i me, u n t i l t h e d esi r ed d ep t h i s r ea ch ed .
c. M a k i n g a cu t t h a t i s t oo d eep wi l l p u t st r ess on t h e mot or a n d t h e cu t t er b i t , a n d i t ma y b u r n t h e
wor k p i ece a n d d u l l t h e cu t t er b i t . I t cou l d a l so “ g r a b ” t oo mu ch of t h e wor k p i ece a n d r esu l t i n
l oss of con t r ol of t h e r ou t er , ca u si n g a ser i ou s a cci d en t .
d . T o b e cer t a i n t h a t t h e d ep t h set t i n g s a r e a s d esi r ed , a l wa y s ma k e t est cu t s i n scr a p ma t er i a l
similar to the workpiece before beginning the nal cut.
e. R ememb er , k n owi n g t h e r i g h t d ep t h f or ea ch cu t comes wi t h r ou t i n g ex p er i en ce.
11b
D
O
K
P
F
K
1 8
Lowes.com
FEEDING THE ROUTER
T h e secr et t o p r of essi on a l r ou t i n g i s t o set - u p f or t h e cu t ca r ef u l l y , sel ect i n g t h e p r op er cu t t i n g
d ep t h , k n owi n g h ow t h e cu t t er b i t r ea ct s i n t h e wor k p i ece, a n d sel ect i n g t h e a p p r op r i a t e r a t e a n d
d i r ect i on of f eed f or t h e r ou t er .
12. Direction of feed for external cuts
T h e cu t t er b i t r ot a t es cl ock wi se. T h i s mea n s t h a t f eed i n g
t h e b i t f r om l ef t t o r i g h t wi l l ca u se t h e b i t t o p u l l t h e r ou t er
t owa r d t h e wor k p i ece.
I f t h e r ou t er i s f ed i n t h e op p osi t e d i r ect i on ( r i g h t t o l ef t ) ,
t h e r ot a t i n g f or ce of t h e cu t t er b i t wi l l t en d t o p u sh t h e b i t
a wa y f r om t h e wor k p i ece. T h i s i s ca l l ed “ C l i mb - cu t t i n g ” .
“ C l i mb - cu t t i n g ” ma y ca u se l oss of con t r ol , r esu l t i n g i n
p ossi b l e p er son a l i n j u r y . W h en “ cl i mb - cu t t i n g ” i s r eq u i r ed
( e.g ., b a ck i n g a r ou n d a cor n er ) , ex er ci se ex t r eme ca u t i on
t o ma i n t a i n con t r ol of t h e r ou t er .
T h e h i g h sp eed of t h e cu t t er b i t d u r i n g a p r op er f eed i n g
op er a t i on ( l ef t t o r i g h t ) r esu l t s i n v er y l i t t l e k i ck b a ck u n d er n or ma l con d i t i on s. H owev er , i f t h e cu t t er
b i t st r i k es a k n ot , a n a r ea of h a r d g r a i n i n t h e wood en wor k p i ece, or a f or ei g n ob j ect , “ k i ck b a ck ”
ma y r esu l t .
K i ck b a ck ma y d a ma g e t h e wor k p i ece a n d cou l d r esu l t i n l osi n g con t r ol of t h e r ou t er , ca u si n g
p ossi b l e p er son a l i n j u r y . K i ck b a ck i s a l wa y s i n t h e op p osi t e d i r ect i on of t h e cl ock wi se cu t t er b i t
r ot a t i on , or cou n t er cl ock wi se. Y ou ’ r e a l wa y s k eep i n g t h e sh a r p ed g es of t h e cu t t er b i t b i t i n g st r a i g h t
i n t o u n cu t wood .
T o g u a r d a g a i n st a n d h el p p r ev en t k i ck b a ck , p l a n t h e set - u p a n d d i r ect i on of f eed so t h a t t h e
sh a r p ed g es of t h e cu t t er b i t con t i n u ou sl y b i t e st r a i g h t i n t o u n cu t wood . A l so, a l wa y s i n sp ect t h e
wor k p i ece f or k n ot s, h a r d g r a i n , a n d f or ei g n ob j ect s t h a t cou l d ca u se a k i ck b a ck p r ob l em.
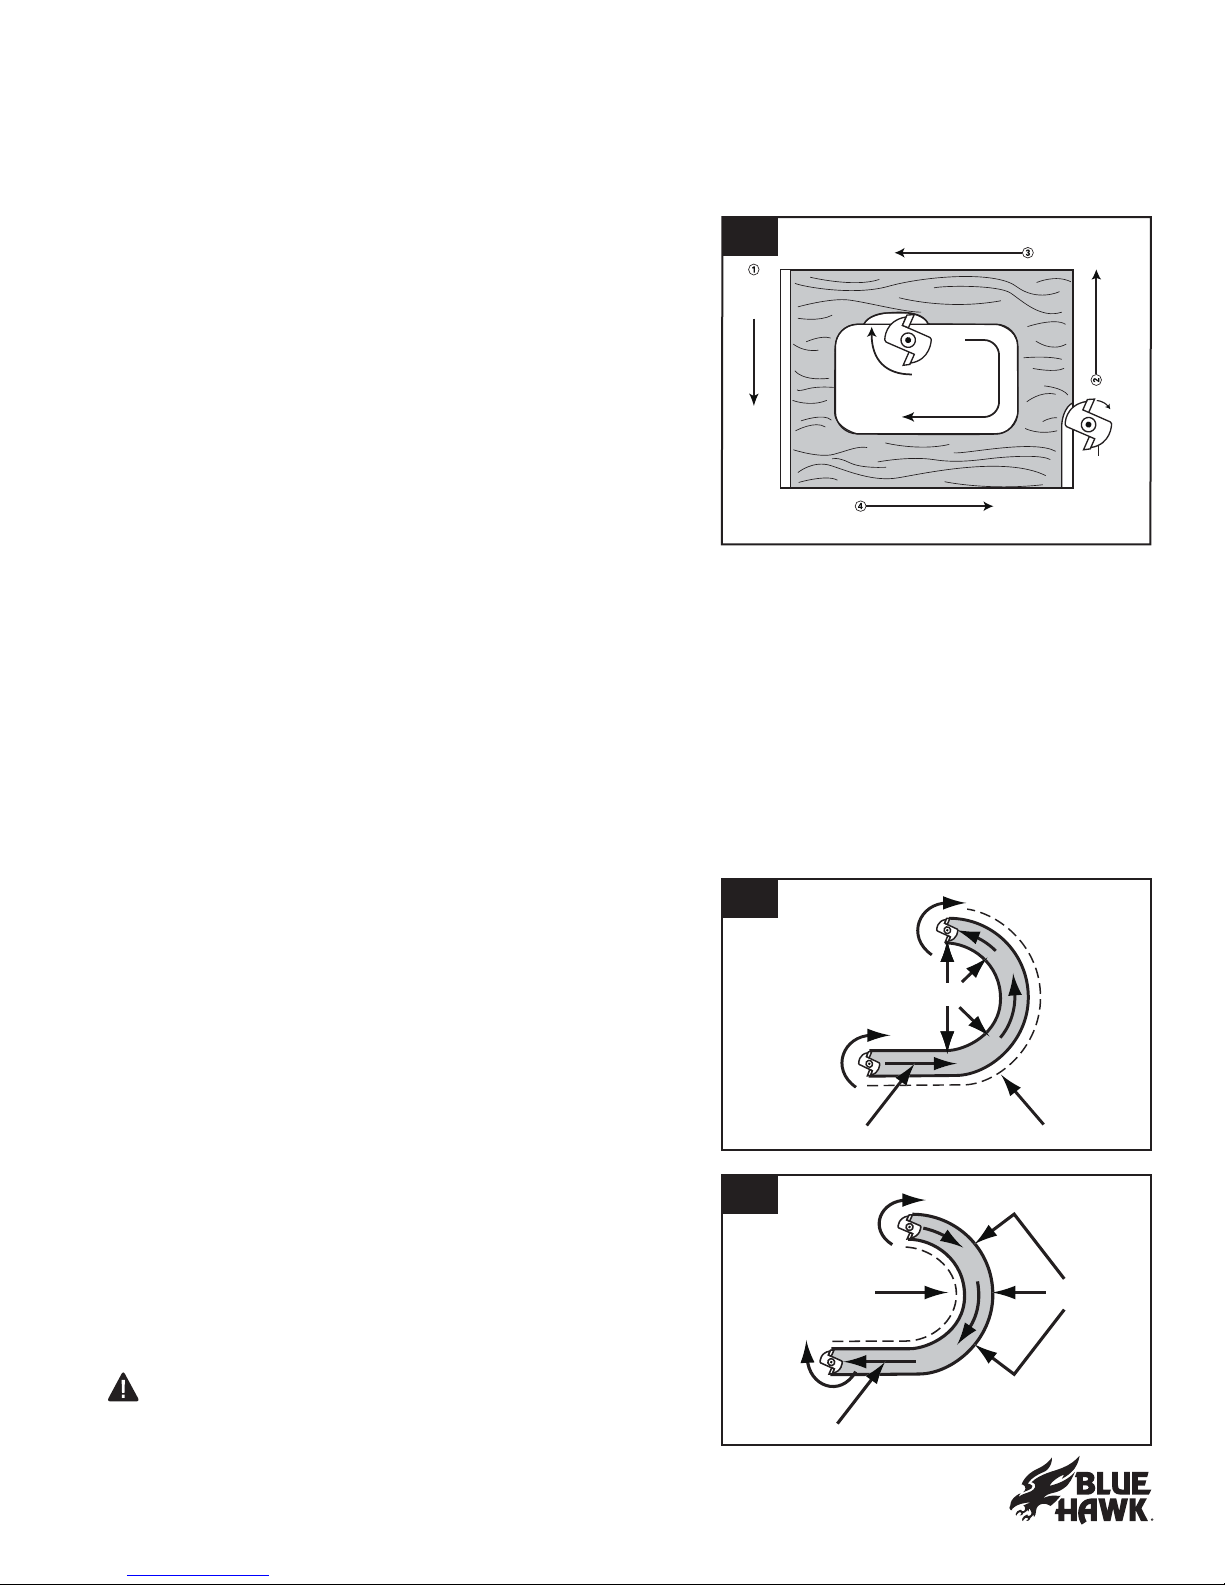
13. Direction of feed for internal cuts
W h en ma k i n g a n i n t er n a l cu t , su ch a s a g r oov e, d a d o or
sl ot , a l wa y s p osi t i on t h e g u i d e ( ed g e g u i d e, st r a i g h t ed g e,
or b oa r d g u i d e) on t h e r i g h t - h a n d si d e of t h e r ou t er a s t h e
cu t i s ma d e.
W h en t h e g u i d e i s p osi t i on ed on t h e r i g h t - h a n d si d e of t h e
r ou t er , t h e r ou t er t r a v el i s f r om l ef t t o r i g h t , a n d “ cou n t er -
cl ock wi se” a r ou n d cu r v es.
T h i s a ct i on a r ou n d t h e cu r v e cou l d ca u se “ cl i mb - cu t t i n g ” .
A l wa y s b e a l er t a n d ex er ci se ex t r eme ca u t i on i n or d er t o
ma i n t a i n con t r ol of t h e r ou t er wh en ma k i n g t h i s t y p e of cu t
a r ou n d cu r v es.
W h en t h e g u i d e i s p osi t i on ed a s sh own , t h e r ou t er t r a v el
sh ou l d b e f r om l ef t t o r i g h t , a n d cl ock wi se a r ou n d cu r v es.
I n ei t h er ca se, t h e l a t er a l t h r u st of t h e r ou t er cu t t i n g i s
a l wa y s a g a i n st t h e g u i d e, a s i s p r op er .
WARNING: A l wa y s cl a mp t h e wor k p i ece secu r el y
and keep a rm grip on the router base with both hands
a t a l l t i mes. F a i l u r e t o d o so cou l d r esu l t i n l oss of con t r ol ,
ca u si n g p ossi b l e ser i ou s p er son a l i n j u r y .
13a
GUIDE
FEED
BIT
ROTATION THRUST
13b
BIT
ROTATION
GUIDE THRUST
FEED
12
BIT
ROTATION
ROUTER FEED DIRECTION
N ROUTER
DIRECTION
FEED BIT
ROTATION
N

1 9
Lowes.com
14
Rate of feed
T h e p r op er r a t e of f eed d ep en d s on sev er a l f a ct or s: t h e h a r d n ess a n d moi st u r e con t en t of t h e
wor k p i ece, t h e cu t t i n g d ep t h , a n d t h e cu t t i n g d i a met er of t h e b i t . U se a f a st er r a t e of f eed wh en
cu t t i n g sh a l l ow g r oov es i n sof t wood s, su ch a s p i n e. U se a sl ower r a t e of f eed wh en ma k i n g d eep
cu t s i n h a r d wood s, su ch a s oa k .
14. Feeding too quickly
Clean and smooth nished cuts can only be achieved
wh en t h e cu t t er b i t i s r ot a t i n g a t a r el a t i v el y h i g h sp eed ,
t a k i n g v er y sma l l b i t es a n d p r od u ci n g t i n y , cl ea n - cu t
ch i p s.
F or ci n g t h e f eed of t h e cu t t er b i t f or wa r d t oo q u i ck l y sl ows
t h e R P M of t h e cu t t er b i t a n d t h e b i t t a k es l a r g er b i t es a s
i t r ot a t es. La r g er b i t es mea n l a r g er ch i p s a n d a r ou g h er
nish. This forcing action can also cause the router motor
t o ov er h ea t .
U n d er ex t r eme f or ce- f eed i n g con d i t i on s, t h e r ot a t i on ca n
b ecome so sl ow a n d t h e b i t es so l a r g e t h a t ch i p s a r e on l y
p a r t i a l l y cu t of f , ca u si n g sp l i n t er i n g a n d g ou g i n g of t h e
wor k p i ece.
T h e r ou t er wi l l ma k e cl ea n , smoot h cu t s i f i t i s a l l owed t o r u n f r eel y , wi t h ou t t h e ov er l oa d of f or ced
f eed i n g . F or ced f eed i n g ca n b e d et ect ed b y t h e sou n d of t h e mot or . T h e u su a l h i g h - p i t ch ed wh i n e
wi l l sou n d l ower a n d st r on g er a s i t l oses sp eed . H ol d i n g t h e r ou t er a g a i n st t h e wor k p i ece wi l l a l so
become more difcult.
15. Feeding too slowly
W h en t h e cu t t er b i t i s f ed t oo sl owl y , t h e r ot a t i n g cu t t er
b i t d oes n ot cu t i n t o n ew wood f a st en ou g h t o t a k e a
b i t e. I n st ea d , i t scr a p es a wa y sa wd u st - l i k e p a r t i cl es. T h i s
scr a p i n g p r od u ces h ea t , wh i ch ca n g l a z e, b u r n , a n d ma r
t h e cu t i n t h e wor k p i ece, a n d i n ex t r eme ca ses, ov er h ea t
t h e cu t t er b i t .
W h en t h e cu t t er b i t i s scr a p i n g i n st ea d of cu t t i n g , t h e
router is more difcult to control.
W i t h a l most n o l oa d on t h e mot or , t h e cu t t er b i t h a s
a t en d en cy t o b ou n ce of f t h e si d es of t h e cu t i n t h e
workpiece, producing a cut that has a rippled nish
i n st ea d of cl ea n , st r a i g h t si d es.
15
TOOL SLOW
TOOL FAST

2 0
Lowes.com
OPERATING INSTRUCTIONS FOR ROUTER
PLACING THE ROUTER ONTO THE WORKPIECE AND STARTING THE CUT
WARNING: B ef or e op er a t i n g t h e r ou t er , f ol l ow a l l sa f et y i n st r u ct i on s i n t h i s ma n u a l . F a i l u r e t o
d o so cou l d r esu l t i n ser i ou s p er son a l i n j u r y .
NOTICE: M a k i n g t est cu t s i s essen t i a l wi t h most r ou t i n g a p p l i ca t i on s. A t est cu t y i el d s i n f or ma t i on
a b ou t t h e set - u p , t h e sp eed of t h e r ou t er , t h e cu t t i n g d ep t h a n d h ow t h e cu t t er b i t r ea ct s t o t h e
wor k p i ece.
M u ch of r ou t i n g i s a t r i a l - a n d - er r or p r ocess of ma k i n g v a r i ou s a d j u st men t s, f ol l owed b y t est cu t s,
wh i l e l ea r n i n g a l l of t h e r ou t er ’ s op er a t i on a l a b i l i t i es. T o a v oi d r u i n i n g g ood ma t er i a l , ma k e t h e t est
cu t s on scr a p ma t er i a l .
F or ea se of op er a t i on , a n d t o ma i n t a i n p r op er con t r ol , t h e r ou t er h a s t wo h a n d l es, l oca t ed on ei t h er
side of the router base. When operating the router, always hold it rmly with both hands.
WARNING: A l wa y s b e a l er t a n d p a y a t t en t i on t o t h e op er a t i on . N ev er op er a t e t h e r ou t er wh i l e
f a t i g u ed .
16. Toggle “ON/OFF” Toggle Switch
T o t u r n t h e mot or O N , p u sh t h e O N / O F F t og g l e swi t ch ( B )
t o t h e “ I ” f or “ O N ” .
T o t u r n i t O F F , p u sh t h e O N / O F F t og g l e swi t ch ( B )
t o t h e “ O ” f or “ O F F ” .
A l wa y s h ol d t h e r ou t er a n d cu t t er b i t a wa y f r om t h e
wor k p i ece wh en t u r n i n g t h e t og g l e swi t ch “ O N ” .
WARNING: O n l y a l l ow t h e r ou t er a n d cu t t er b i t t o
come i n t o con t r a ct wi t h t h e wor k p i ece a f t er t h e r ou t er h a s
r ea ch ed f u l l sp eed .
WARNING: O n l y r emov e t h e r ou t er a n d cu t t er
b i t f r om t h e wor k p i ece a f t er t u r n i n g t h e r ou t er mot or
“ O F F , ” a n d a f t er t h e cu t t er b i t comes t o a comp l et e st op .
R emov i n g t h e cu t t er b i t f r om t h e wor k p i ece wh i l e i t i s st i l l
r ot a t i n g cou l d d a ma g e t h e wor k p i ece a n d r esu l t i n l oss of
con t r ol , ca u si n g ser i ou s p er son a l i n j u r y .
17. Edge routing
a . W i t h t h e cu t t i n g d ep t h set , p l a ce t h e r ou t er on t h e
ed g e of t h e wor k p i ece, ma k i n g su r e t h a t t h e cu t t er
d oes n ot con t a ct t h e wor k p i ece.
b . H a v e a n ed g e g u i d e ( b oa r d or met a l st r a i g h t ed g e)
cl a mp ed i n p l a ce t o h el p g u i d e t h e r ou t er ’ s b a se wh en
ma k i n g a n ed g e cu t .
c. T u r n t h e r ou t er O N a n d l et t h e mot or a t t a i n f u l l sp eed .
d . T o b eg i n t h e cu t , g r a d u a l l y f eed t h e cu t t er b i t i n t o t h e
ed g e of t h e wor k p i ece.
e. W h en t h e cu t i s comp l et e, t u r n t h e mot or “ O F F ” a n d
a l l ow t h e cu t t er b i t t o come t o a comp l et e st op b ef or e r emov i n g i t f r om t h e wor k p i ece.
f . U n p l u g t h e r ou t er f r om t h e p ower sou r ce, p l a ce t h e r ou t er on t h e wor k t a b l e, a n d i n sp ect t h e
nished cut.
WARNING: Always clamp the workpiece securely and keep a rm grip on the router base with
b ot h h a n d s a t a l l t i mes. F a i l u r e t o d o so cou l d r esu l t i n l oss of con t r ol , ca u si n g p ossi b l e ser i ou s
p er son a l i n j u r y .
WARNING: R emov i n g t h e cu t t er b i t f r om t h e wor k p i ece wh i l e i t i s st i l l r ot a t i n g cou l d d a ma g e t h e
wor k p i ece a n d r esu l t i n l oss of con t r ol , ca u si n g ser i ou s p er son a l i n j u r y .
16
17
GUIDE
B
Table of contents


