Blue Robotics Ping User manual

2/7/2019 Ping Installation Guide for the BlueROV2 - Blue Robotics
https://www.bluerobotics.com/learn/ping-installation-guide-for-the-bluerov2/ 1/21
Home (https://www.bluerobotics.com)/Guide (https://www.bluerobotics.com/learn/)/Ping Installation Guide for the BlueROV2
Ping
Installation Guide for the
BlueROV2
Introduction
The
Ping (https://www.bluerobotics.com/store/sensors-sonars-cameras/sonar/ping-r1/)
sonar is a a multipurpose single-beam echosounder
with a 30m sonar range and 300m depth rating. When mounted on a
BlueROV2
and, connected to a
BLUART
(https://www.bluerobotics.com/store/comm-control-power/tether-interface/bluart-r1-rp/) USB to Serial and RS485 Adapter and the
Ping-
Viewer
software application, a
Ping
can be used as an altimeter to see how high the
BlueROV2
is above the seaoor.
Parts and Tools
You Will Need
Ping
Sonar Altimeter and Echosounder
$279.00
(https://www.bluerobotics.com/store/sensors-sonars-
cameras/sonar/ping-sonar-r2-rp/)
Add to Cart (/learn/ping-installation-guide-for-
the-bluerov2/?add-to-cart=13223)
6″ Straight Micro-USB to USB-A
Cable
$8.00
(https://www.bluerobotics.com/store/comm-
control-power/tether-
interface/misc-cab-usb-micro-
BLUART
USB to Serial and
RS485 Adapter
$29.00
(https://www.bluerobotics.com/store/comm-
control-power/tether-
Ping
Sonar Altimeter and
Echosounder
$279.00
(https://www.bluerobotics.com/store/sensors-
sonars-cameras/sonar/ping-
BlueROV2
$2,784.00 – $4,563.00
(https://www.bluerobotics.com/store/rov/blu
Add to Cart
(https://www.bluerobotics.com/store/rov
NEW
Beta
NEW
NEW
NEW
Beta

2/7/2019 Ping Installation Guide for the BlueROV2 - Blue Robotics
https://www.bluerobotics.com/learn/ping-installation-guide-for-the-bluerov2/ 2/21
You will also need:
1 x #1 Phillips head screwdriver (
BlueROV2
kit)
1 x Sharpie or other type of marking pen (not included)
1 x 5.50mm (or 7/32”) drill bit (not included)
1 x Battery Powered Hand Drill (not included)
1 x Bottle of Threadlocker (not included)
Removing a Blank Penetrator
To remove a blank penetrator from your
BlueROV2
, you will need the following tools:
1 x 2.5 mm hex driver
1 x #1 Phillips head screwdriver
1 x Penetrator wrench
1. To ensure your ROV is completely powered o, please remove the battery completely from the 3” enclosure and place to the side.
straight-6in-r1/)
Add to Cart (/learn/ping-
installation-guide-for-the-
bluerov2/?add-to-
cart=112513)
interface/bluart-r1-rp/)
Add to Cart (/learn/ping-
installation-guide-for-the-
bluerov2/?add-to-
cart=23073)
sonar-r2-rp/)
Add to Cart (/learn/ping-
installation-guide-for-the-
bluerov2/?add-to-
cart=13223)
Hex Key Set
$6.00
(https://www.bluerobotics.com/store/watertight-
enclosures/enclosure-tools-
supplies/tool-hex-set-r1/)
Add to Cart (/learn/ping-
installation-guide-for-the-
bluerov2/?add-to-
cart=1098)
Penetrator Wrench
$12.00
(https://www.bluerobotics.com/store/cables-
connectors/tools/tool-
penetrator-wrench-r1/)
Add to Cart (/learn/ping-
installation-guide-for-the-
bluerov2/?add-to-
cart=9971)

2/7/2019 Ping Installation Guide for the BlueROV2 - Blue Robotics
https://www.bluerobotics.com/learn/ping-installation-guide-for-the-bluerov2/ 3/21
(/wp-content/uploads/2019/01/ping-remove-battery.jpg?x68454)
2. Remove the fairings and buoyancy blocks by removing the self-tapping screws that hold the fairings to the frame.

2/7/2019 Ping Installation Guide for the BlueROV2 - Blue Robotics
https://www.bluerobotics.com/learn/ping-installation-guide-for-the-bluerov2/ 4/21
(/wp-content/uploads/2019/01/ping-remove-fairings.png?x68454)
3. Remove the 4” electronics enclosure from the ROV by removing the M3x16 screws that mount the enclosure to the ROV cradle.

2/7/2019 Ping Installation Guide for the BlueROV2 - Blue Robotics
https://www.bluerobotics.com/learn/ping-installation-guide-for-the-bluerov2/ 5/21
(/wp-content/uploads/2019/01/ping-clip-installation.png?x68454)
4. Remove the Vent Plug from the Vent Penetrator Bolt on the electronics enclosure. Remove the 4″ tube and forward dome assembly from
the rear end cap.

2/7/2019 Ping Installation Guide for the BlueROV2 - Blue Robotics
https://www.bluerobotics.com/learn/ping-installation-guide-for-the-bluerov2/ 6/21
(/wp-content/uploads/2019/01/ping-tutorial-remove-vent.jpg?x68454)
5. Remove the blank penetrator as pictured from the 4” End Cap with the penetrator wrench that came with the BlueROV2 kit.

2/7/2019 Ping Installation Guide for the BlueROV2 - Blue Robotics
https://www.bluerobotics.com/learn/ping-installation-guide-for-the-bluerov2/ 7/21
(/wp-content/uploads/2019/01/ping-end-cap-remove.jpg?x68454)
Install Ping Penetrator
To install
Ping
into the end cap, you will need the following parts and tools:
1 x
Ping
Echosounder
1 x Penetrator Nut (Red)
1 x Penetrator O-ring
1 x Silicone Grease – 10g Tube
1 x Isopropyl Alcohol Wipe
1 x Penetrator wrench
1. Wipe the exterior surface of the electronics enclosure endcap clean with isopropyl alcohol or isopropyl alcohol wipes, and make sure it is
free of any particles in the areas where the penetrator O-ring will sit.
2. Remove the O-ring from the bag and apply silicone grease to it.

2/7/2019 Ping Installation Guide for the BlueROV2 - Blue Robotics
https://www.bluerobotics.com/learn/ping-installation-guide-for-the-bluerov2/ 8/21
(/wp-content/uploads/2019/01/ping-grease-o-ring.png?x68454)
3. Install the O-ring onto the
Ping
cable penetrator.
4. Install the Ping cable penetrator on to the end cap in the hole you previously removed the blank penetrator from. Tighten to nger tight,
then use the provided wrench to tighten it an additional ~1/16 of a turn. If you can’t loosen it with your ngers, it is tight enough.
(/wp-content/uploads/2019/01/ping-end-cap.png?x68454)

2/7/2019 Ping Installation Guide for the BlueROV2 - Blue Robotics
https://www.bluerobotics.com/learn/ping-installation-guide-for-the-bluerov2/ 9/21
(/wp-content/uploads/2019/01/IMG_3721.png?x68454)
Wiring Connections
To install the Ping wires into your
BlueROV2
, you will need the following components:
1 x
BLUART
USB to Serial and RS485 Adapter
1 x Header pin to JST-GH Cable Adapter
1 x 6″ Straight Micro USB to USB-A Cable
1. Plug the Header pin to JST-GH Cable Adapter into the male header pins coming from the Ping so that the same color wires match up
when plugged in (red-red, black-black, white-white, green-green).
2. Plug the 6-position JST-GH plug into the serial JST-GH receptacle on the
BLUART
serial adapter.
3. Plug the
BLUART
into one of the open USB ports on the Raspberry Pi using the 6″ Straight Micro USB to USB-A Cable.

2/7/2019 Ping Installation Guide for the BlueROV2 - Blue Robotics
https://www.bluerobotics.com/learn/ping-installation-guide-for-the-bluerov2/ 10/21
(/wp-content/uploads/2019/01/IMG_3722.png?x68454)
Reassemble
BlueROV2
Electronics Enclosure
To reassemble your
BlueROV2
Electronics Enclosure, you will need the following parts and tools:
4 x M3x16 screws that were placed o to the side during disassembly
1 x Silicone Grease – 10g Tube
1 x 2.5 mm hex driver
Reinstall 4” Watertight Enclosure onto ROV with the following steps:
1. Apply silicone grease to the two radial O-rings on the O-Ring Flange (4” Series) that is attached to the Electronics Tray then install the
Watertight Enclosure (4” Series) with installed Dome End Cap to the O-Ring Flange (4” Series).
2. Mount the Electronics Enclosure to the frame using the M3x16 screws so that the dome is on the same side as the front center panels
(the center panels without the 3 large holes). Install the M3x16 screws through the clips and into the Enclosure Cradle (4” Series). It is easier
to install these screws if the clips are not fully tightened until all screws are through the clips and threading into the Enclosure Cradle (4”
Series). This allows to clips to rotate so you can nd the threaded hole in the Enclosure Cradle (4” Series) easily.

2/7/2019 Ping Installation Guide for the BlueROV2 - Blue Robotics
https://www.bluerobotics.com/learn/ping-installation-guide-for-the-bluerov2/ 11/21
(/wp-content/uploads/2019/01/ping-clip-installation.png?x68454)
Mounting the Ping to the
BlueROV2
Frame
To mount the Ping to the
BlueROV2
frame, you will need the following parts and tools:
1 x
Ping
Mounting Bracket
4 x M3x5 button head cap screws
2 x M5x16 button head cap screws
1 x Marking pen
1 x 5.50mm (or 7/32″) drill bit (not included)
1 x Battery Powered Hand Drill (not included)
1 x 3 mm hex driver
1 x Bottle of Threadlocker
1. Remove the rear end cap from the 3″ battery enclosure.
2. Remove the bottom frame panel from the
BlueROV2
by removing the four M5x16 Screws.

2/7/2019 Ping Installation Guide for the BlueROV2 - Blue Robotics
https://www.bluerobotics.com/learn/ping-installation-guide-for-the-bluerov2/ 12/21
(/wp-content/uploads/2019/01/ping-tutorial-remove-frame-bottom.jpg?x68454)
3. Remove the 3″ battery enclosure by removing the M4x14 Screws from the bottom of the frame.
(/wp-content/uploads/2019/01/ping-remove-battery-enclosure.png?x68454)
4. Place the
Ping
mounting bracket on top of the bottom frame plate in a location so that it will not come in contact with the 3″ tube or any
other component of the ROV when installed. There is enough clearance so that it will not contact the underside of a thruster. Make sure
there is enough clearance so that the transducer head is unobstructed. The nal placement is up to the user, there is no template for where
the mounting plate *must* be installed.


2/7/2019 Ping Installation Guide for the BlueROV2 - Blue Robotics
https://www.bluerobotics.com/learn/ping-installation-guide-for-the-bluerov2/ 14/21
(/wp-content/uploads/2019/01/IMG_3724.png?x68454)
6. With a battery powered hand drill and 5.50mm drill bit, drill straight holes in the position markings.
7. Re-attach the 3″ battery enclosure to the frame with the M4x14 Screws.
8. Re-attach the bottom frame panel to the
BlueROV2
with the four M5x16 Screws.
9. Using the 4 x M3x5 button head cap screws, secure the
Ping
to the mounting bracket.

2/7/2019 Ping Installation Guide for the BlueROV2 - Blue Robotics
https://www.bluerobotics.com/learn/ping-installation-guide-for-the-bluerov2/ 15/21
(/wp-content/uploads/2019/01/IMG_3725.png?x68454)
10. Coming from the aft end of the
BlueROV2
, weave the
Ping
assembly into its mounting location, apply a drop of threadlocker to the
included M5x16 Screws and secure to the frame.

2/7/2019 Ping Installation Guide for the BlueROV2 - Blue Robotics
https://www.bluerobotics.com/learn/ping-installation-guide-for-the-bluerov2/ 16/21
(/wp-content/uploads/2019/01/IMG_3726.png?x68454)
Cable Management
To clean up the external
Ping
cable, you will need at least one zip tie and your scissors/wire cutters.
The primary goal of cable management is to prevent the wires from getting cut by the propellers. Make sure to check that no wires can
reach the propellers after you have nished routing the
Ping
cable.

2/7/2019 Ping Installation Guide for the BlueROV2 - Blue Robotics
https://www.bluerobotics.com/learn/ping-installation-guide-for-the-bluerov2/ 17/21
(/wp-content/uploads/2019/01/IMG_3727.png?x68454)
Reinstall Buoyancy Blocks and Fairings
To install the new buoyancy blocks and fairings, you will need the following parts and tools:
16 x Fairing screws that were placed o to the side during disassembly
4 x Fairings with buoyancy installed that were placed o to the side during disassembly
1 x #1 Phillips head screwdriver
1. Reinstall Original Fairing Blocks onto ROV by installing the screws through the center panels and into the fairings.

2/7/2019 Ping Installation Guide for the BlueROV2 - Blue Robotics
https://www.bluerobotics.com/learn/ping-installation-guide-for-the-bluerov2/ 18/21
(/wp-content/uploads/2019/01/ping-remove-fairings.png?x68454)
Adjusting Ballast on the Frame
To adjust the amount or position of ballast on the frame you need the following parts and tools:
7 x 200g Ballast weights (from original BlueROV2 Kit)
7 x 8-16 Thread, 5/8” Long, Thread-Forming Screws
1 x #2 Phillips head screwdriver
To get the longest battery life and the best driving experience, it is important to have the ROV close to balanced from front to back in water
and close to neutrally buoyant.
Ping
is 48g negatively buoyant in water, so depending on placement, the ROV will need to be re-trimmed
based on your operating conditions. Trimming the ballast may involve a bit of trial and error.
Software Update
Ping
requires ArduSub Companion image version 0.0.16 (https://raw.githubusercontent.com/bluerobotics/companion/master/release-notes.txt)
or higher. If your Companion image is out of date, please follow the BlueROV2 Software Update (http://docs.bluerobotics.com/brov2/software-
setup/#update-software) procedures.

2/7/2019 Ping Installation Guide for the BlueROV2 - Blue Robotics
https://www.bluerobotics.com/learn/ping-installation-guide-for-the-bluerov2/ 19/21
(/wp-content/uploads/2019/01/Companion-0.0.16.png?x68454)
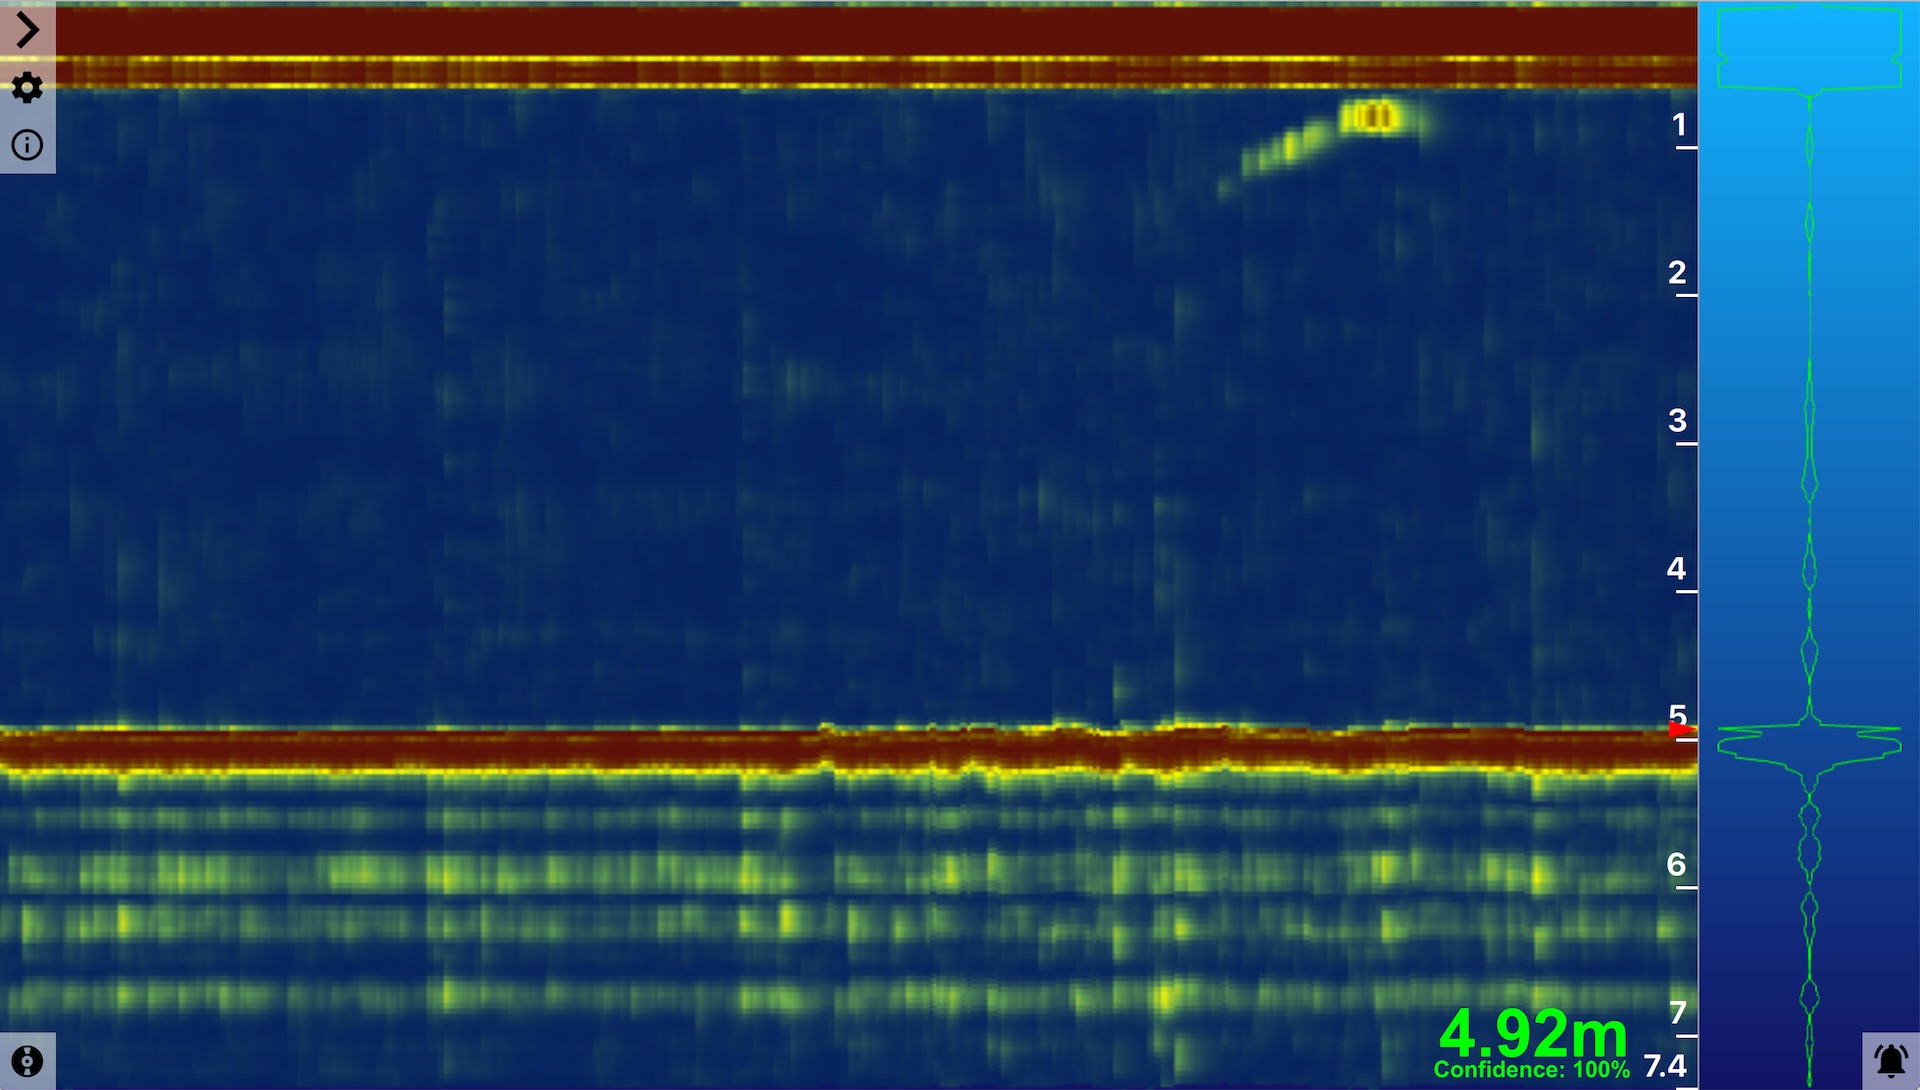
Use With Ping-Viewer Software
Follow the Ping-Viewer Quick Start (https://github.com/bluerobotics/ping-viewer/wiki#quick-start) for installing the latest version of Ping-
Viewer and learning about its features.
(/wp-content/uploads/2019/01/ping-viewer-1.jpg?x68454)
Main Ping-Viewer Interface Window
Troubleshooting
Ping-Viewer does not connect to the onboard Ping
1. Recheck the Ping wiring harness going to the BLUART. The wire colors should match
2. Check which version of ArduSub Companion is installed on your BlueROV2. The version number should either be displayed in the main
Header Bar (https://www.ardusub.com/operators-manual/companion-web.html#companion-header) or the Companion Software Status
(https://www.ardusub.com/operators-manual/companion-web.html#system) section. Ping will need version 0.0.16 or higher to run on a
BlueROV2.
3. Try a dierent Micro-USB cable. Sometimes USB cables are faulty. Contact [email protected] (http://[email protected])
if you discover you have a faulty Micro-USB cable purchased from the Blue Robotics store.
Navigation

2/7/2019 Ping Installation Guide for the BlueROV2 - Blue Robotics
https://www.bluerobotics.com/learn/ping-installation-guide-for-the-bluerov2/ 20/21
Introduction
Parts and Tools
Removing a Blank Penetrator
Install Ping Penetrator
Wiring Connections
Reassemble Enclosure
Mounting Ping
Cable Management
Reinstall Buoyancy Blocks and Fairings
Adjusting Ballast on the Frame
Software Update
Use With Ping-Viewer Software
Troubleshooting
Forum
(https://discuss.bluerobotics.com/c/product-
support/sensors)
Print
Tags
BlueROV2 (https://www.bluerobotics.com/guide-tag/bluerov2/)
Ping (https://www.bluerobotics.com/guide-tag/ping/)
Posted 29 Jan 2019
Last updated on 6 Feb 2019
Sign up for the latest updates!
Subscribe
(https://github.com/bluerobotics) (https://twitter.com/bluerobotics) (http://www.facebook.com/bluerobotics)
(http://www.instagram.com/bluerobotics) (https://www.linkedin.com/company/blue-robotics-inc-)
Email Address
Table of contents
Popular Sonar manuals by other brands


Eagle
Eagle FISHEASY 245DS - ADDITIONAL Installation and operation instructions

Wassp
Wassp WMB-160F installation manual

Lowrance
Lowrance X-65 Installation and operation instructions

Lowrance
Lowrance Elite-5x HDI Operation manual

Eagle
Eagle Ultra Classic Installation and operation instructions

Furuno
Furuno CH-300 installation manual


