BLUE STONE GSB-3941 User manual

Áp dụng cho các model:
GSB-3941
GSB-3951
Bàn ủi hơi nước đứng
Hướng dẫn sử dụng
TIẾNG VIỆT TIẾNG VIỆT
Các sản phẩm và các linh kiện sản phẩm BlueStone đều được
sản xuất dựa trên quy trình chuyên nghiệp theo tiêu chuẩn
Châu Âu CE (The European Conformity), tiêu chuẩn RoHS
(Restriction of Hazardous Substances) về chất lượng và an
toàn sản phẩm.
Bên cạnh đó, các sản phẩm BlueStone đều được kiểm tra
chặt chẽ về mẫu mã, dây chuyền sản xuất và kiểm định
lô hàng.
Sản phẩm BlueStone được công ty đối tác Mỹ Great
American Appliance (GAA Corp) tư vấn về quản lý và quy
trình. GAA là công ty được thành lập và hoạt động theo luật
pháp Mỹ theo Giấy chứng nhận thành lập số 3089043 do
văn phòng thư ký bang California cấp có trụ sở chính tại
7809 Michigan Ave Oakland, CA 94605, Hoa Kỳ.
Sản phẩm BlueStone được thiết kế theo kiểu dáng công
nghiệp với màu sắc đa dạng. Dưới sự nghiên cứu và thiết
kế của các chuyên viên thiết kế và kỹ thuật viên chuyên
nghiệp, các sản phẩm BlueStone được thiết kế theo tiêu
chuẩn quốc tế nghiêm ngặt nhằm đáp ứng được nhu cầu
ngày càng cao của người tiêu dùng.
BlueStone luôn coi trọng việc chăm sóc khách hàng. Các
sản phẩm BlueStone đều được bảo hành 2 năm.
Tiêu chuẩn kỹ thuật nhà sản xuất có thể thay đổi mà không cần báo trước.
Manufacturer has right to replace technical standard or specification
without any notice.
MỤC LỤC:
CONTENTS:
LƯU Ý:
ĐẶC TÍNH SẢN PHẨM 04
MÔ TẢ TỔNG QUÁT 06
CHÚ Ý AN TOÀN 08
HƯỚNG DẪN LẮP ĐẶT VÀ CHUẨN BỊ SỬ DỤNG 10
HƯỚNG DẪN ỦI BẰNG HƠI NƯỚC 15
CHỨC NĂNG ĐẶC BIỆT 16
VỆ SINH VÀ LƯU TRỮ LÂU DÀI 16
XỬ LÝ SỰ CỐ 17
CHÚ Ý 18
CHUNG TAY BẢO VỆ MÔI TRƯỜNG 18
IDENTIFICATION 21
GENERAL DESCRIPTION 23
SAFETY NOTICE 25
PREPARING FOR USE 27
STEAMING-IRONING 32
SPECIAL FUNCTION 33
CLEANING AND LONG-TERM STORAGE 33
TROUBLES SHOOTING 34
NOTICE 35
ENVIRONMENT FRIENDLY DISPOSAL 35
3
TIẾNG VIỆT TIẾNG VIỆT
Model: GSB-3941
Model: GSB-3951
ĐẶC TÍNH SẢN PHẨM
MODEL GSB-3941
Điện thế 220V~50Hz
Công suất 1800W
Thể tích bình chứa 1L
MODEL GSB-3951
Điện thế 220V~50Hz
Công suất 1900W
Thể tích bình chứa 1L
4 5

TIẾNG VIỆT TIẾNG VIỆT
Model: GSB-3941
Model: GSB-3951
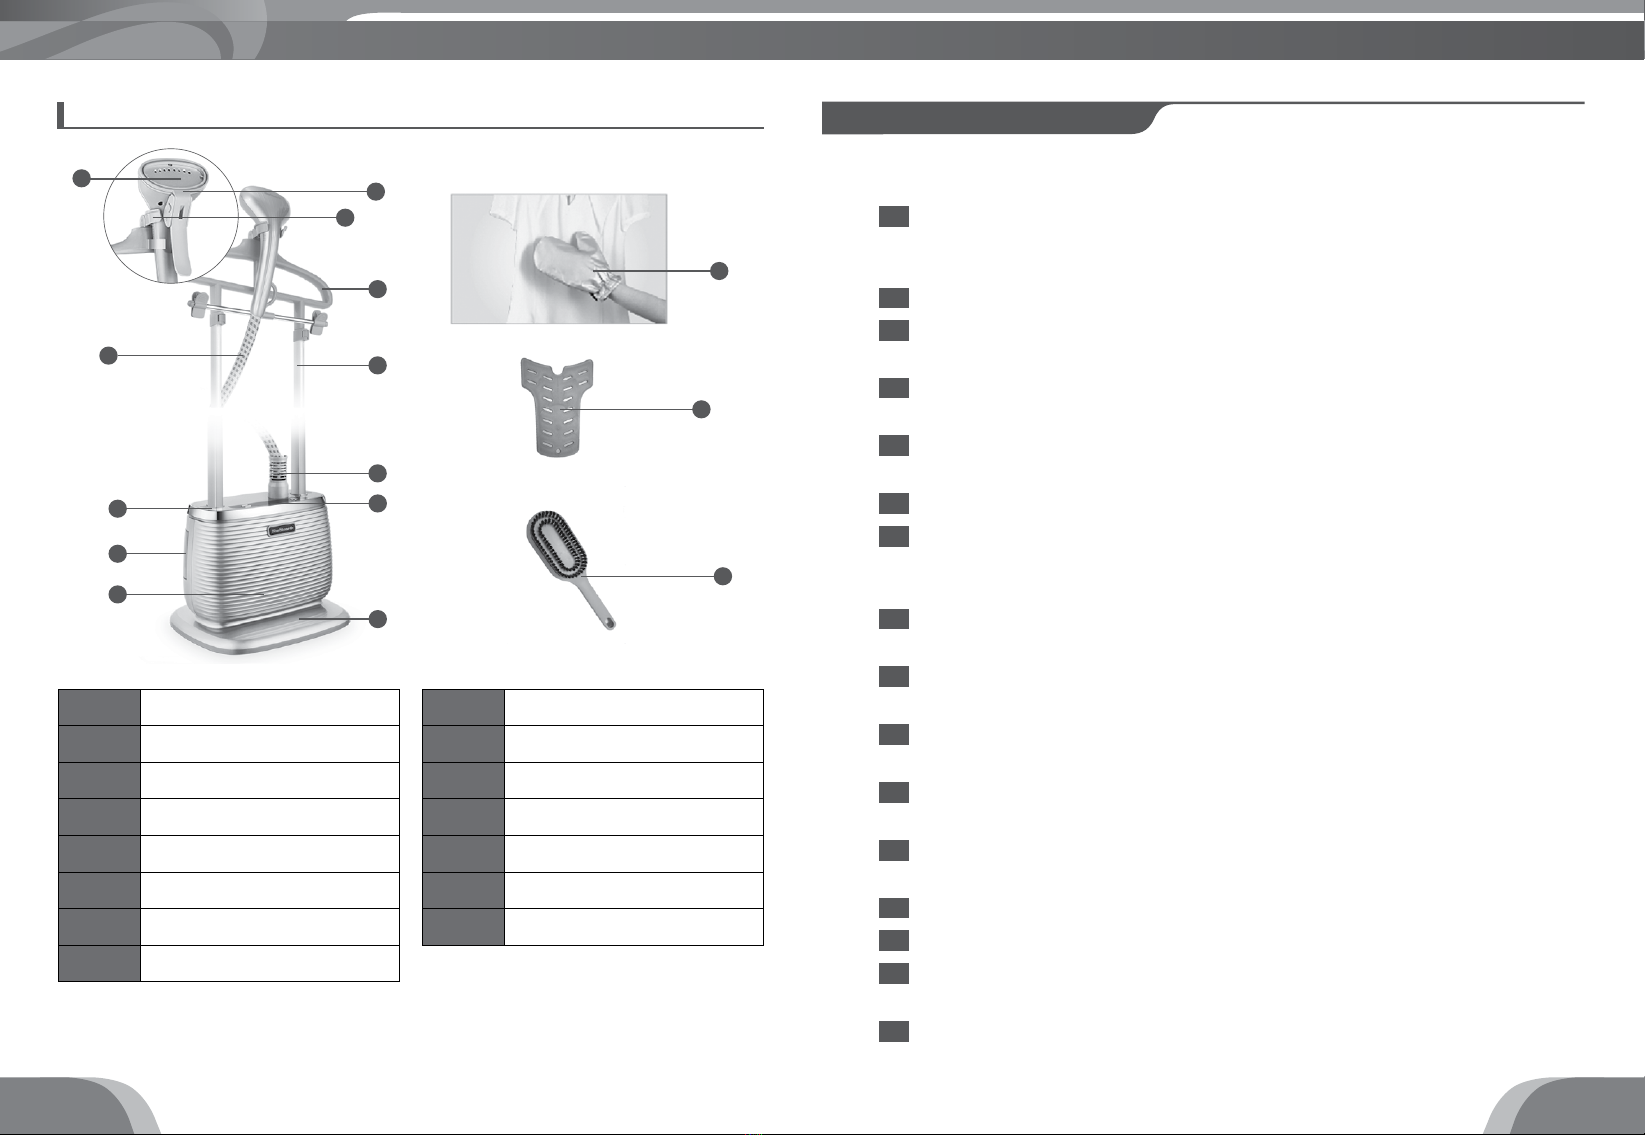
MÔ TẢ SẢN PHẨM
1Đầu ủi hơi nước
2Ống hơi
3Chốt khóa giá đỡ
4Bình chứa nước
5Thân máy
6Đầu ủi ly
7Móc treo đầu ủi
1Đầu ủi hơi nước
2Ống hơi
3Chốt khóa giá đỡ
4Bình chứa nước
5Thân máy
6Đầu ủi ly
7Móc treo đầu ủi
8Móc treo
8Móc treo
9Giá đỡ
10 Khớp nối ống hơi
11 Bảng điều khiển
12 Chân đế bàn ủi
13 Găng tay cách nhiệt
14 Đệm ủi cổ áo
9Giá đỡ
10 Khớp nối ống hơi
11 Bảng điều khiển
12 Chân đế bàn ủi
13 Găng tay cách nhiệt
14 Đệm ủi cổ áo
15 Bàn chải
7
9
10
13
13
14
14
15
11
12
8
1
2
2
3
3
4
4
5
5
6
16
7
8
9
10
11
12
6 7

TIẾNG VIỆT TIẾNG VIỆT
Vui lòng đọc kỹ hướng dẫn trước khi sử dụng và cất giữ để tham khảo
về sau.
Vui lòng kiểm tra điện thế trên bàn ủi có phù hợp điện thế nguồn tại nhà bạn
không. Việc điện áp không đủ theo thông số kĩ thuật mà bàn ủi yêu cầu có
thể dẫn đến hiện tượng hơi ra bị yếu.
Giữ cho dây điện không tiếp xúc bề mặt bàn ủi nóng.
Chọn nhiệt độ ở mức OFF trước khi cắm điện và khi tháo phích cắm.
Không được cầm dây điện để kéo phích cắm ra khỏi ổ cắm, thay vào đó hãy
cầm phích cắm và kéo ra.
Không được ngâm bàn ủi trong nước hay chất lỏng khác để tránh bị điện giật.
Để xa tầm tay trẻ em.
Luôn đặt bàn ủi trên một bề mặt bằng phẳng khi ngưng ủi và sau khi
sử dụng.
Sau khi rút phích cắm, phần tử gia nhiệt vẫn còn nóng nên không được chạm
vào hoặc đặt lên các bề mặt dễ cháy.
Nếu dây điện nguồn của bàn ủi bị hỏng thì phải luôn được thay thế bởi nhà sản
xuất bằng một bộ dây nguồn khác.
Nếu dây dẫn nguồn bị hỏng thì phải do nhà chế tạo, đại lý dịch vụ hoặc
những người có trình độ tương đương thay thế nhằm tránh xảy ra sự cố.
Người sử dụng tuyệt đối không được để bàn ủi hơi nước đứng hoạt động mà
không được giám sát.
Lưu ý rút phích cắm ra khỏi ổ cắm trước khi đổ nước vào bình chứa nước, đổ
nước sau khi đã sử dụng đi để tránh đóng cặn.
Không được mở nắp bình chứa nước để đổ nước trong quá trình ủi.
Bàn ủi hơi nước đứng phải được đặt trên bề mặt vững chắc trong lúc sử dụng.
Lưu ý cầm đầu ủi hơi nước theo chiều dọc và không cầm theo chiều ngang, nếu
không sẽ có hiện tượng nước bị nhỏ giọt từ đầu bàn ủi.
Không sử dụng nước nóng đổ vào bình chứa nước, vì có thể làm bình chứa
nước bị biến dạng.
Trong thời gian chờ mặt đế ủi nóng lên, hiện tương nước bị nhỏ giọt từ các lỗ
thoát hơi là điều hoàn toàn bình thường. Chờ một vài giây trước khi bắt đầu ủi.
1
2
3
4
5
6
7
8
9
10
11
12
13
14
15
16
17
18
19
20
21
CHÚ Ý AN TOÀN
DÀNH CHO BÀN ỦI HƠI NƯỚC ĐỨNG:
LƯU Ý:
Khi di chuyển bàn ủi cần phải giữ vững thân máy. Không kéo máy bằng dây nguồn.
Khi sử dụng bàn ủi hơi nước, bạn nên sử dụng nước sạch.
Tuyệt đối không chạm vào đầu ủi hơi nước nóng, nước nóng hoặc hơi nước.
Hãy chú ý khi sử dụng đầu ủi hơi nước.
Không sử dụng hóa chất, chất gây bào mòn hoặc chất tẩy rửa để vệ sinh vì
có thể dẫn đến những hư hại cho sản phẩm. Việc sử dụng sai hướng dẫn sử
dụng, dẫn đến hư hỏng thiết bị không nằm trong chính sách bảo hành của
chúng tôi.
Khi sử dụng bàn ủi, bạn sẽ thấy hơi nước bốc lên và nghe thấy âm thanh
do nước sôi. Điều này hoàn toàn bình thường. Nên ủi qua miếng vải để
kiểm tra trước khi sử dụng bàn ủi lần đầu tiên.
Khi ủi, vui lòng giữ cho tư thế ủi và vòi hơi nước được thẳng đứng khi thao tác.
Nếu ống dẫn hơi bị xoắn, gấp khúc, bị trùng,..sẽ dẫn đến việc nghe thấy tiếng
nước sôi bên trong nhưng lại không có hơi nước thoát ra.
Khi sử dụng, việc hơi nước không thoát ra được có thể là do ống dẫn hơi,
buồng gia nhiệt, hay đường ống dẫn nước bị tắc nghẹt do dị vật. Khi đó, hãy
thực hiện thao tác làm sạch như chỉ dẫn bên dưới.
Chỉ sử dụng nước sạch để đổ vào bình chứa nước. Sử dụng nước khoáng,
nước có cặn sẽ làm giảm tuổi thọ của thiết bị, khiến cho buồng gia nhiệt bị
đóng cặn nhanh hơn.
Sau khi sử dụng, hãy để bàn ủi nguội trước khi cất giữ.
8 9
TIẾNG VIỆT TIẾNG VIỆT
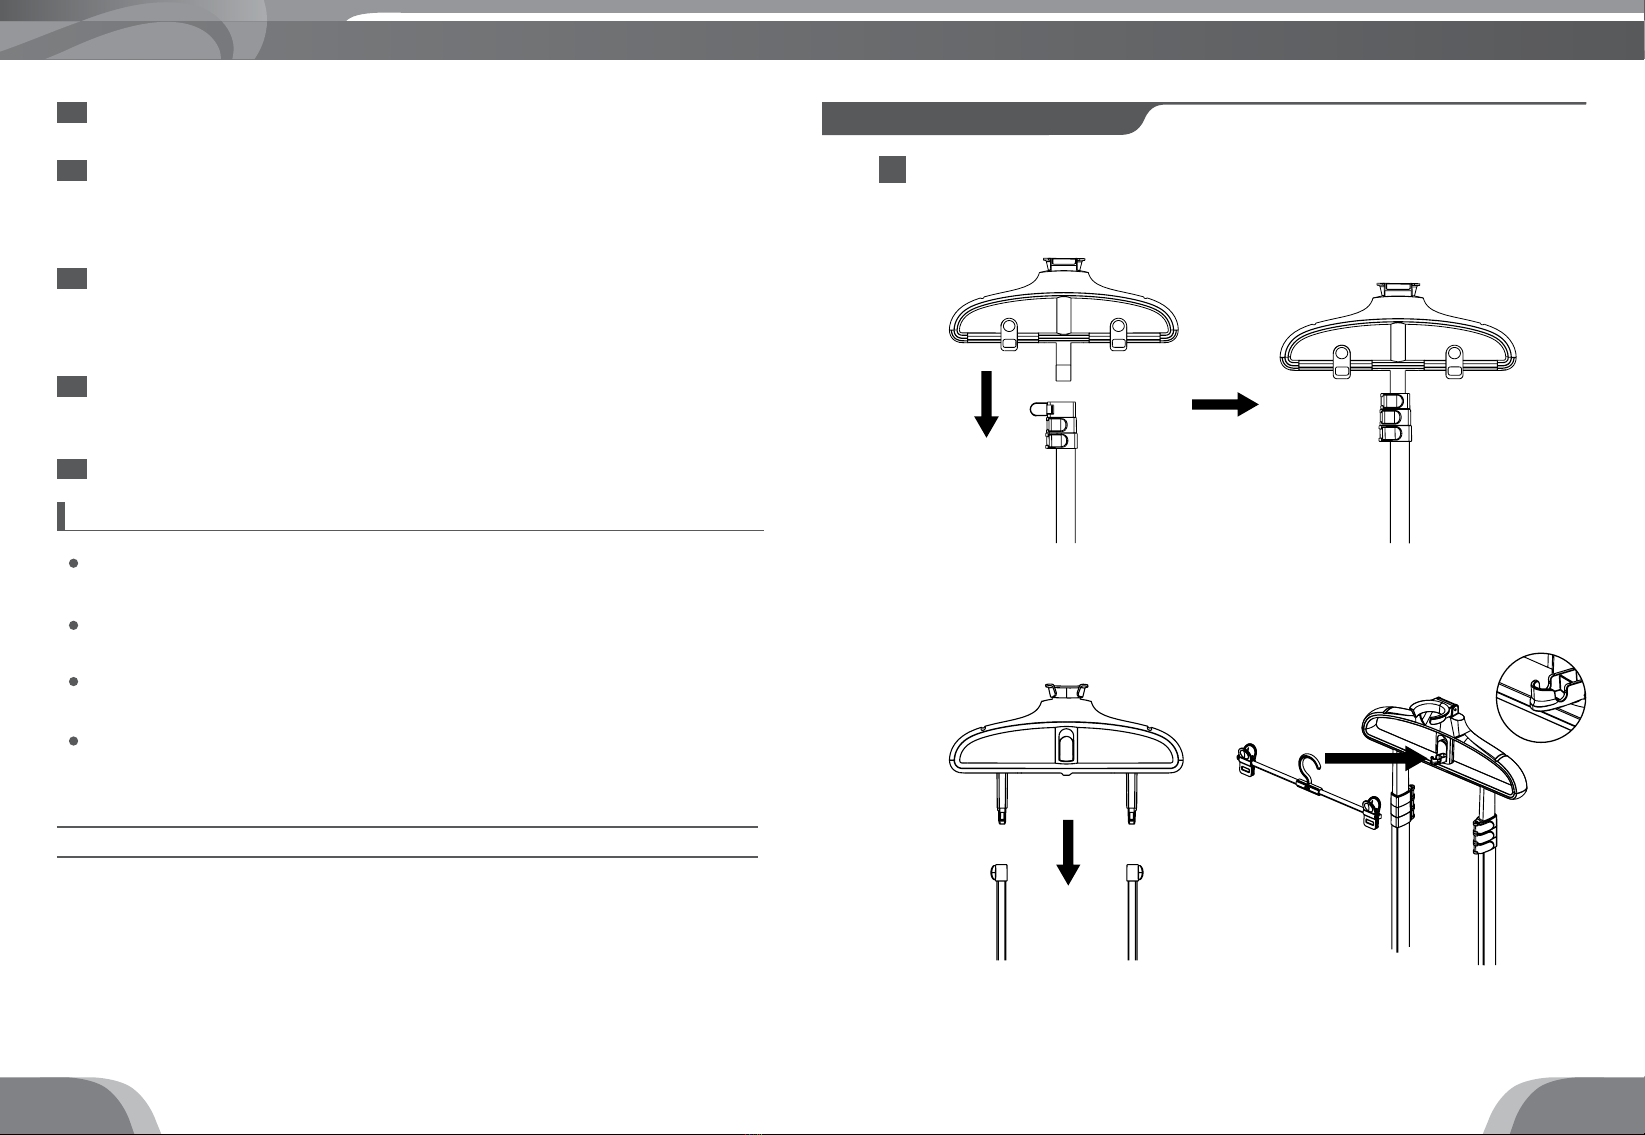
Lắp đặt móc treo và kẹp quần áo vào giá đỡ.
Lắp đặt giá đỡ vào thân máy và cố định bằng khớp nối.
Model GSB-3941
Model GSB-3941
Model GSB-3951
Model GSB-3951
1
HƯỚNG DẪN LẮP ĐẶT VÀ CHUẨN BỊ SỬ DỤNG 2
10 11

TIẾNG VIỆT TIẾNG VIỆT
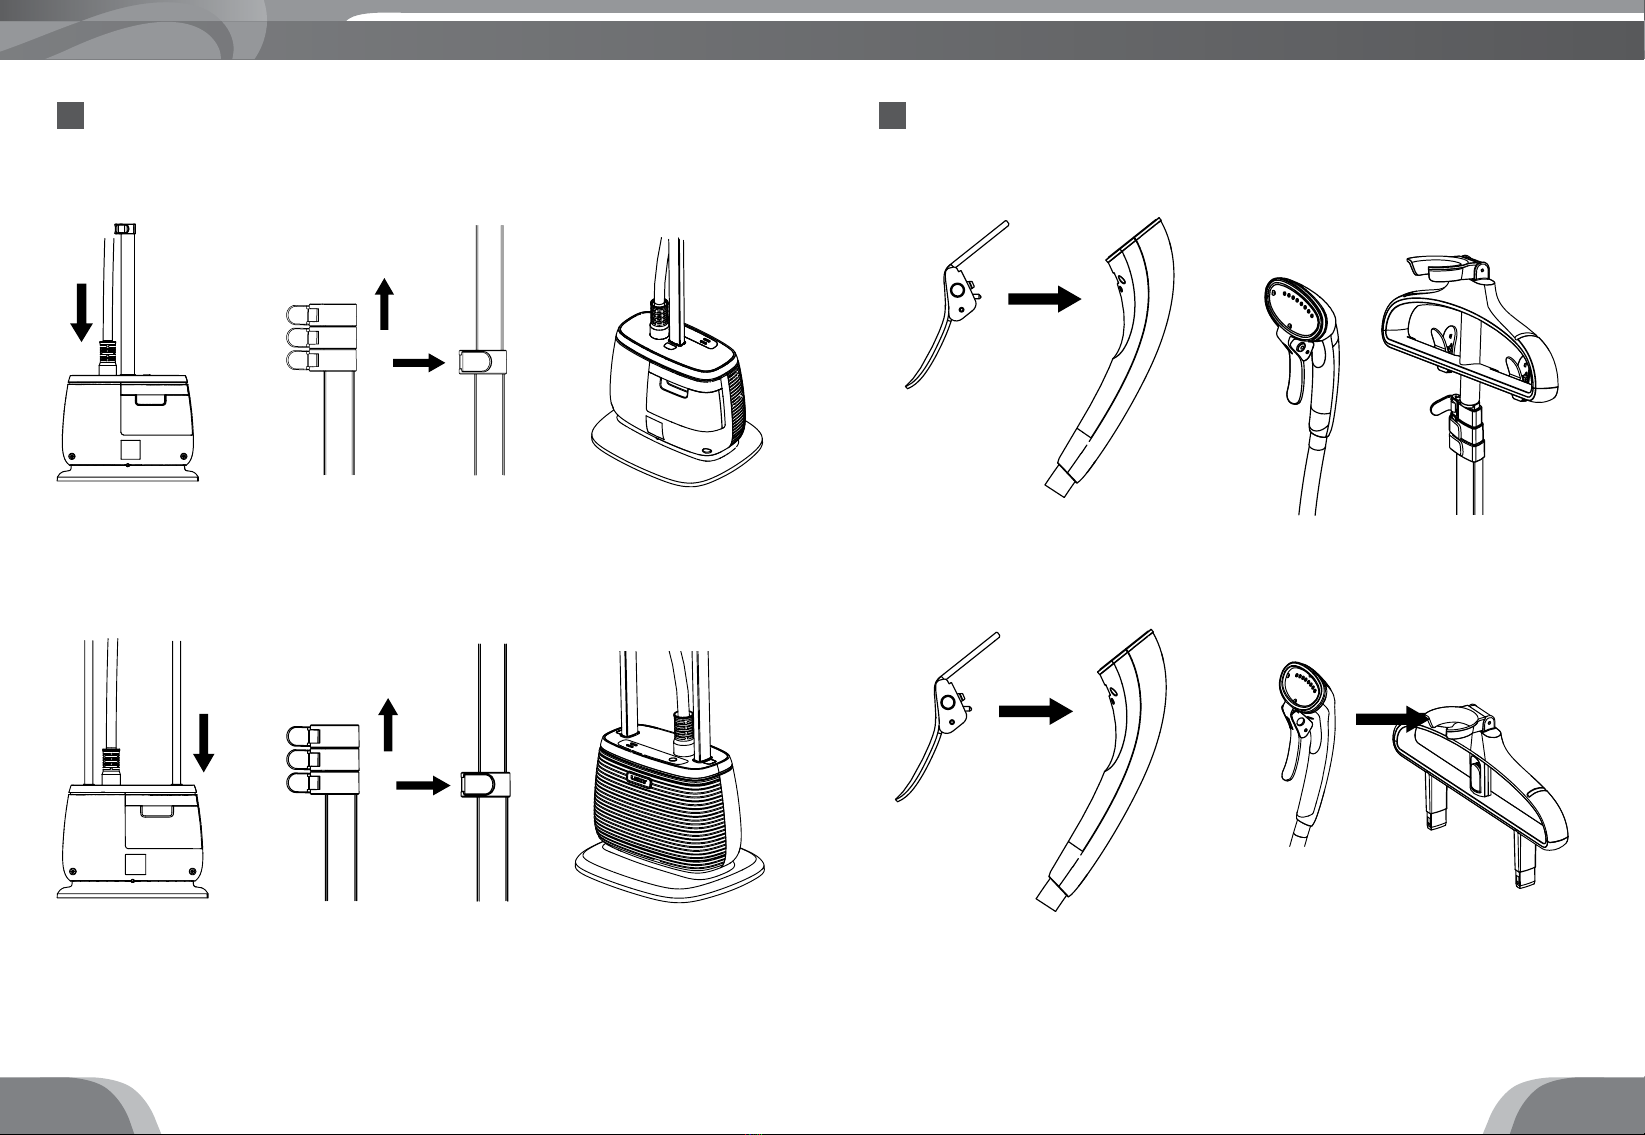
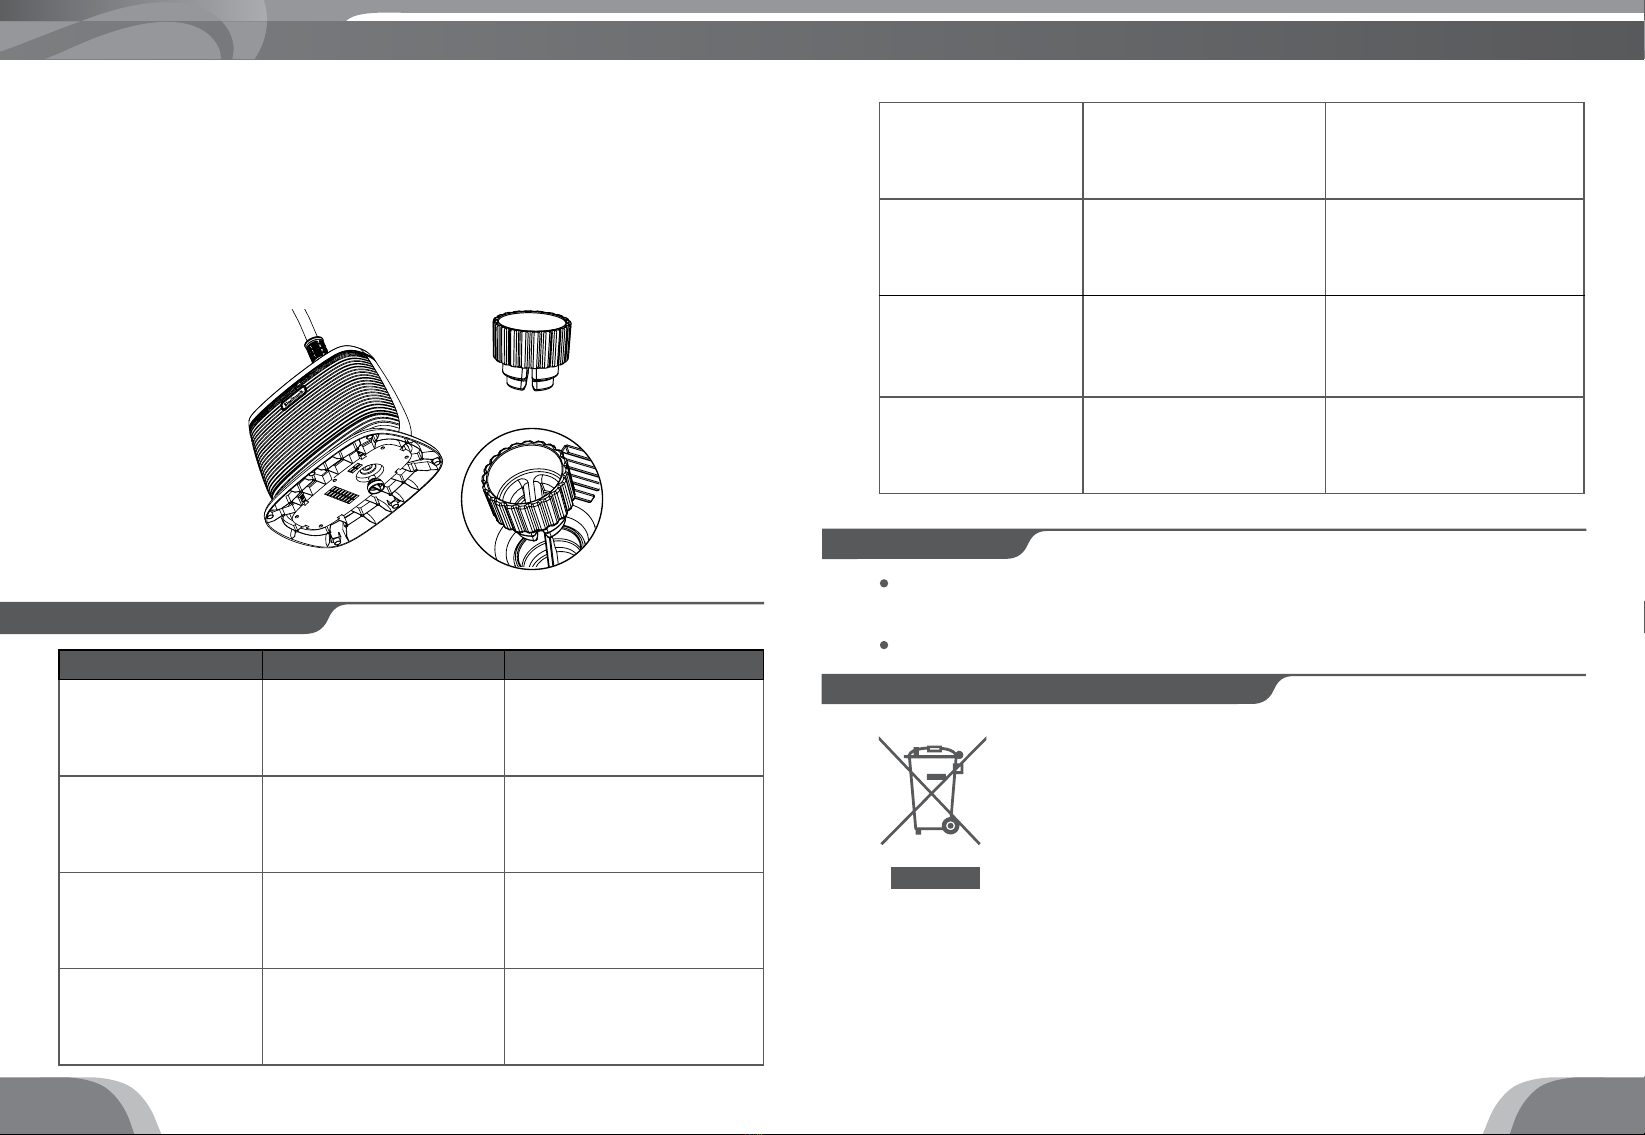
Lắp đầu ủi ly vào đầu ủi hơi nước, sau đó, đặt đầu ủi hơi nước vào giá đỡ đầu ủi. Vặn nút xả vào dưới chân đế thân máy.
Tháo bình chứa nước khỏi thân máy, vặn nắp và đổ nước sạch vào và vặn chặt
nắp lại.
Lắp bình chứa nước vào thân máy.
34
5
6
Model GSB-3941
Model GSB-3951
12 13

TIẾNG VIỆT TIẾNG VIỆT
GSB-3941
GSB-3951
Trung bình Cao
Chọn chế độ nhiệt mong muốn theo 3 cấp độ hơi trên màn hình điều khiển, hơi
nước sẽ bắt đầu thoát ra sau 40 giây.
Bàn ủi hơi nước đứng có chế độ cảnh báo xả cặn trong buồng gia nhiệt sau một
thời gian sử dụng. Để cài đặt lại chế độ báo xả cặn, ấn nút“Cảnh báo xả cặn”để lập
lại quy trình nhận diện.
Chọn chế độ nhiệt mong muốn theo 5 chương trình cài đặt sẵn theo chất liệu vải
trên màn hình điều khiển, hơi nước sẽ bắt đầu thoát ra sau 40 giây.
Bàn ủi hơi nước đứng có chế độ cảnh báo xả cặn trong buồng gia nhiệt sau một
thời gian sử dụng. Để cài đặt lại chế độ báo xả cặn, ấn nút“Cảnh báo xả cặn”để lập
lại quy trình nhận diện.
Cắm điện và khởi động thiết bị.
Tắt mở bàn ủi bằng cách nhất nút Bật/Mở.
7
8
HƯỚNG DẪN ỦI BẰNG HƠI NƯỚC
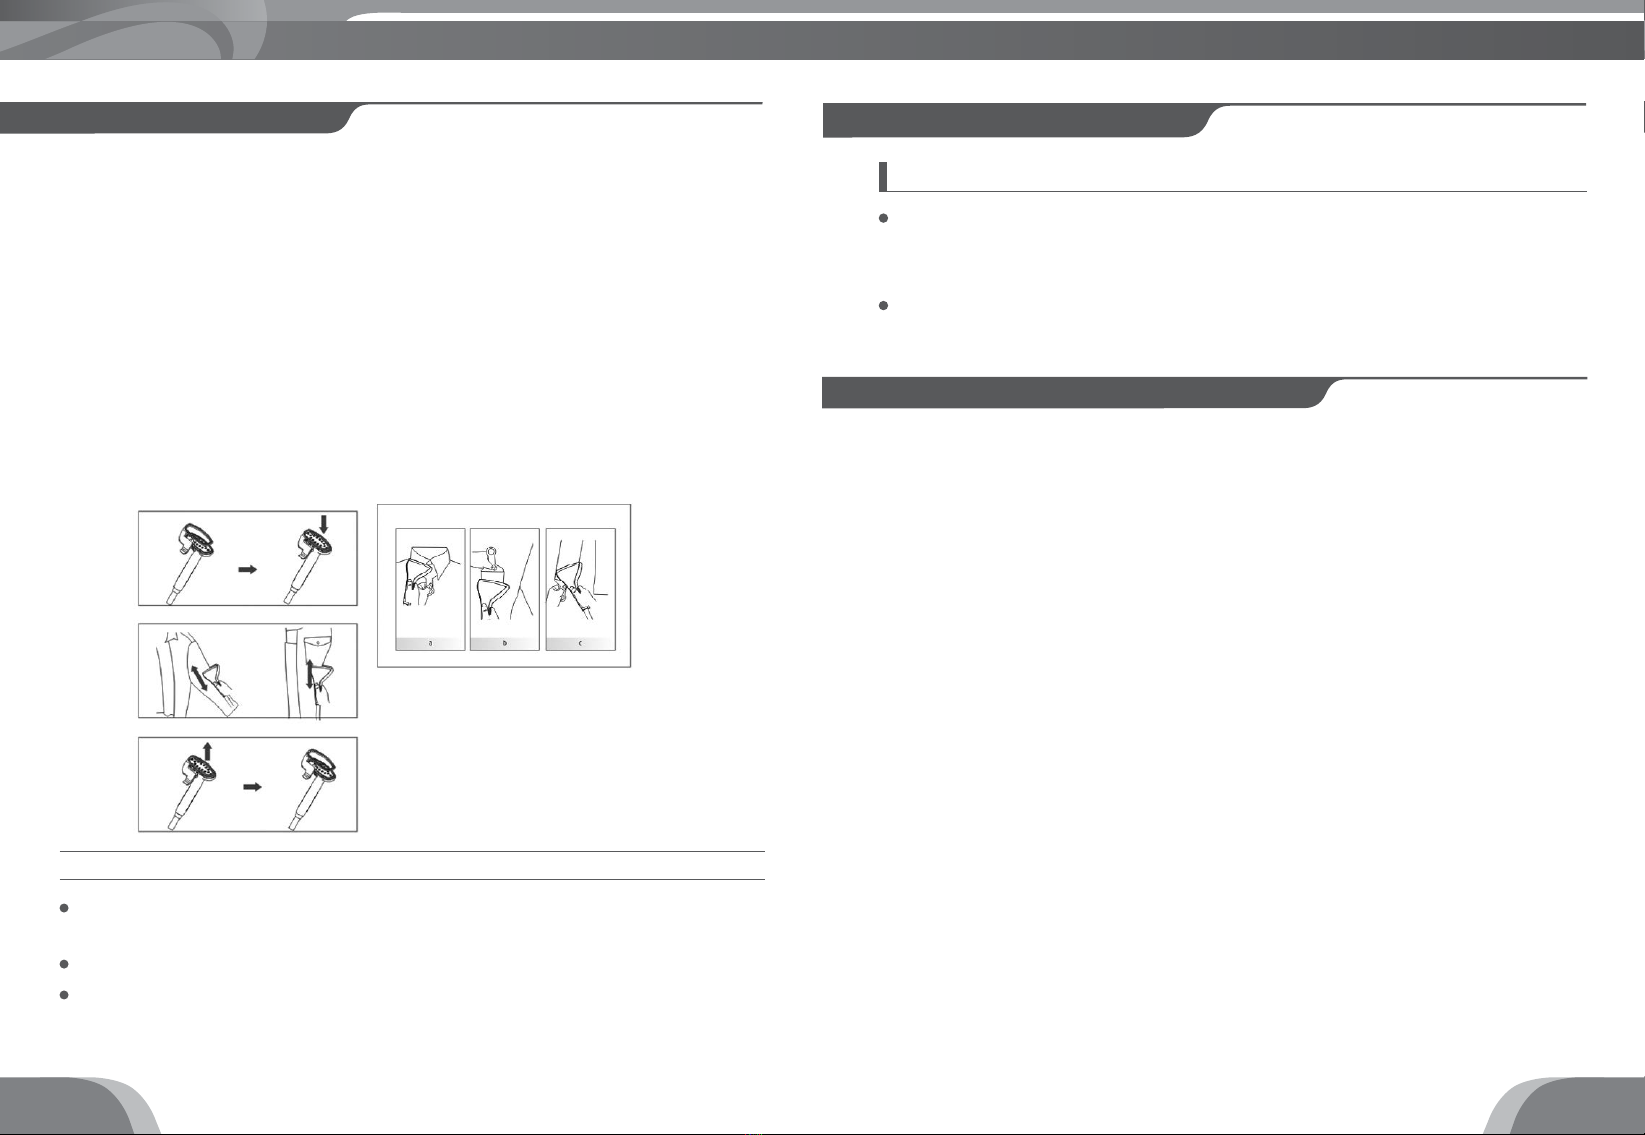
1. Treo quần áo lên móc treo hoặc bề mặt phẳng.
2. Đeo găng tay hoặc dụng cụ bao tay để tránh bị bỏng.
3. Nắm nhẹ phía dưới vạt quần áo để kéo thẳng bề mặt và đưa đầu bàn ủi theo
chiều từ trên xuống hoặc sang phải hoặc sang trái.
4. Ấn nhẹ đầu ủi hơi nước gần bề mặt vải khi ủi cổ áo.
*LƯU Ý: Nếu muốn ủi tay áo, hãy giữ thẳng tay áo để đạt hiệu quả khi ủi.
5. Rút phích cắm điện sau khi sử dụng.
LƯU Ý:
Để duy trì tuổi thọ của bàn ủi hơi nước đứng, chúng tôi khuyên bạn sử dụng
nước cất hoặc nước khử khoáng.
Không sử dụng bình chứa nước loại khác thay cho thiết kế có sẵn.
Không bỏ các loại hóa chất, dầu thơm hoặc chất tẩy rửa để ủi quần áo.
* CẢNH BÁO: Không để bình chứa nước khô trong lúc sử dụng vì điều này có thể
làm hư hỏng bàn ủi.
14 15
TIẾNG VIỆT TIẾNG VIỆT
CHỨC NĂNG ĐẶC BIỆT
VỆ SINH VÀ LƯU TRỮ
Khi lượng hơi nước nhìn thấy được bằng mắt thoát ra ít hơn bình thường, hoặc
khi hơi phun ra mạnh nhưng chỉ kéo dài trong chốc lát và “Cảnh báo xả cặn”
được kích hoạt để nhắc nhở, chúng tôi khuyên người sử dụng nên chủ động
thao tác sục rửa mảng bám trong bình chứa nước & buồng gia nhiệt. Các bước
thao tác như sau:
1. Ấn nút tắt bàn ủi hơi nước đứng, rút dây điện ra khỏi ổ cắm, đợi một khoảng
thời gian sau khi sử dụng để thiết bị nguội xuống bằng nhiệt độ phòng, thực
hiện tháo giá đỡ bằng cách nhấn nút mở khóa và nắm kéo lên, tháo bình chứa
nước ra và vặn nắp để đổ hết nước còn sót lại bên trong bình. Sau đó, nâng
bàn ủi lên để xoay tháo nắp đậy buồng gia nhiệt phía dưới chân máy để loại
bỏ lượng nước còn sót lại.
2. Hòa một lượng dấm với nước theo tỷ lệ 1:1 (tỷ lệ dấm so với nước có thể tăng
lên tùy thuộc vào khoảng thời gian lâu hơn so với lần vệ sinh gần nhất, có
nhiều mảng bám tích tụ lâu ngày hơn).
3. Đậy và khóa nắp đậy buồng gia nhiệt dưới chân máy. Đổ dung dịch dấm và
nước đã hòa tan như trên vào trong bình chứa nước. Sau đó, lắp bình vào với
thân máy như bình thường. Thao tác này sẽ điều lượng dung dịch chảy qua
hệ thống nước chảy vào buồng gia nhiệt để loại bỏ các mảng bám tích tụ
lâu ngày.
4. Chờ khoảng từ 1 đến 2 tiếng, nhưng không được để dung dịch ngâm bên
trong máy quá 8 tiếng.
5. Sau khi xong, tháo bình chứa nước ra khỏi thân máy và đổ đi dung dịch. Kế
đến, tháo nắp vặn dưới đáy của chân máy để loại bỏ lượng dung dịch còn
đọng lại bên trong. Cẩn thận khi thao tác để tránh nước bị tràn ra quá nhanh.
Bộ cảm biến nhiệt: Khi phát hiện nhiệt độ bất thường, bộ phận cảm biến nhiệt
sẽ phát ra tín hiệu để ngắt bộ phận gia nhiệt. Điều này giúp duy trì mức nhiệt
độ đã cài đặt trong quá trình ủi.
Cầu chì bảo vệ: Khi sản phẩm bị quá nhiệt và bộ cảm biến nhiệt bị lỗi, cầu chì
nhiệt sẽ tự động ngắt để tránh gây ra rủi ro nguy hiểm.
BẢO VỆ QUÁ NHIỆT KÉP
XỬ LÝ SỰ CỐ
SỰ CỐ NGUYÊN NHÂN XỬ LÝ
Thiết bị không hoạt động
Một trong các mạch có lỗi,
phích cắm bị lỏng, cầu chì bị
đứt, đèn LED của nguồn cung
cấp bị hỏng.
Kiểm tra lại phích cắm hoặc
đem đến trung tâm bảo
hành.
Tiếng ồn bắt nguồn từ
đường ống hơi nước nhưng
hơi nước sinh ra yếu
Ống hơi bị xoắn phía dưới.
Nâng ống hơi nước (để nước
dư chảy ngược lại vào bình
chứa).
Đầu phun hơi bị nhỏ giọt Đầu phun hơi bị hỏng hoặc đầu
ủi được đặt thẳng đứng.
Thay thế đầu phun hơi, điều
chỉnh lại tư thế ủi theo đúng
như hướng dẫn sử dụng.
6. Đổ đầy nước sạch vào trong bình chứa nước, lắp vào thân máy. Sau đó, xoay
tháo nút hóa dưới chân máy để thải nước ra. Lặp lại thao tác này vài lần để sục
rửa các mảng bám đã được dung dịch hòa tan còn sót lại.
7. Lắp ráp các bộ phận lại với nhau và sử dụng bàn ủi hơi nước đứng như
bình thường.
8. Chúng tôi khuyên bạn nên thực hiện thao tác như trên thường xuyên ít nhất 1
tuần 1 lần nếu sử dụng thường xuyên để kéo dài tuổi thọ của bàn ủi.
16 17

TIẾNG VIỆT
CHÚ Ý
Nếu đã thực hiện thao tác như trên mà sự cố vẫn không được khắc phục, hãy
liên lạc đến trung tâm bảo hành gần nhất để được nhận hỗ trợ.
Không được tự ý chỉnh sửa sản phẩm.
CHUNG TAY BẢO VỆ MÔI TRƯỜNG
Không nên vứt bỏ máy chung với rác thải gia đình. Để phòng
ngừa những tác hại đối với môi trường cũng như đối với sức khỏe
từ việc loại bỏ không được kiểm soát, hãy tái chế chúng một cách
hợp lý nhằm thúc đẩy khả năng kéo dài việc tái sử dụng các nguồn
nguyên vật liệu trong tương lai. Hãy đưa thiết bị cần bỏ tới những
nơi thu gom hoặc cửa hàng có bán thiết bị này.
Garment Steamer
User Manual
Vị trí khớp nối ống hơi bị rò rỉ
Khớp nối có thể bị mòn sau thời
gian dài sử dụng hoặc khớp nối
chưa vặn chặt hoàn toàn.
Thay thế khớp nối. Xoay khớp
nối thật chặt.
Nước tràn ra khỏi bình chứa
nước
Bình chứa nước bị bể hoặc có
lỗ. Thay bình chứa nước.
Hơi nước yếu
Điện áp thấp hơn mức yêu cầu
hoặc bị đóng cặn ở ống dẫn
hơi, đầu ủi.
Thêm bộ ổn áp/Vệ sinh thiết
bị.
Bình chứa nước bị biến dạng Đổ nước nóng vào bình chứa
hoặc sử dụng chất hóa học.
Tiếp tục sử dụng nếu không
nghiêm trọng hoặc thay thế
bình chứa nước.
Không có hơi nước nhưng
đèn hiển thị vẫn sáng
Bình chứa nước không đặt
đúng vị trí.
Bộ phận tạo hơi nước bị hỏng
hoặc bộ phận điện bên trong
bị hỏng.
Kiểm tra lại vị trí đặt bình
chứa nước.
Gọi kỹ thuật viên hoặc đem
đến trung tâm bảo hành.
Apply for models:
GSB-3941
GSB-3951
18
Always keep manual for your safety

ENGLISH ENGLISH
21
Standard Compliance
BlueStone products are manufactured under the Standards
and the technical rules for product safety design and testing.
BlueStone products and associated accessories intended
for professional, industrial-process under CE (The European
Conformity), RoHS (Restriction of Hazardous Substances)
assembling test and lot test.
Trademark
BlueStonemanufacturedproductsarebasedontheconsultation
by Great American Appliance (GAA Corp) a company
incorporated and existing under the laws of United States of
America under Certicate of Incorporation No. 3089043 in the
secretary oce located in the state of California in Michigan,
Ave Oakland, CA 94605, USA.
Industrial design
Bluestone provides products with industrial design and color
variations oering a broad range of possibilities for customers.
Through the experienced designers and technicians, Bluestone
design has highly reliable solutions so the customers are assured
of quality designed systems that meet stringent industry and
international compliance regulations.
After sales service
After sales service is considered by BlueStone as a major
concern for our customers.With such, we provide our BlueStone
products with a 2 years guaranteed warranty that help our end
user feel at ease.
Model: GSB-3941
IDENTIFICATION
MODEL GSB-3941
Power supply 220V~50Hz
Power consume 1800W
Capacity water tank 1L

ENGLISH ENGLISH
22 23
GENERAL DESCRIPTION
Model: GSB-3951
MODEL GSB-3951
Power supply 220V~50Hz
Power consume 1900W
Capacity water tank 1L
Model: GSB-3941
1Steam nozzle
2Steam hose
3Telescopic pole lock
4Water tank
5Main body
6Line clamp
7Steam nozzle holder
8Cloth Hanger
9Telescopic pole
10 Steam hose joint
11 Control panel
12 Steamer base
13 Heat-proof glove
14 Collar pad
7
9
10
13
14
11
12
8
1
2
3
4
5
6
ENGLISH ENGLISH
24 25
Model: GSB-3951
1Steam nozzle
2Steam hose
3Telescopic pole lock
4Water tank
5Main body
6Line clamp
7Steam nozzle holder
8Cloth Hanger
9Telescopic pole
10 Steam hose joint
11 Control panel
12 Steamer base
13 Heat-proof glove
14 Collar pad
15 Brush
13
14
15
2
3
4
5
16
7
8
9
10
11
12
Please read these instructions for use before using the appliance and
save them for future reference.
Please check the product voltage if it is the same with the one in your home.
The mismatch in voltage provided for the garment steamer can cause
insucient steam to occur.
Keep the cord away from the hot soleplate.
The garment steamer should always be turned o before plugging or
unplugging from outlet.
Grasp plug and pull to disconnect instead of yanking the cord from
socket-outlet.
Never immerse the garment steamer into water or other liquids to protect
against risk of electrical shock.
Keep away from the children when using the garment steamer.
Always place the garment steamer with its back on a rm at surface while
using and after use. When unattended even only for a short while, unplug
the garment steamer from the electrical outlet.
After plugging out, the soleplate is still hot. Do not touch or place on
inammable surfaces.
If the main cord of this appliance is damaged, it must be replaced by the
corresponding substitution cord.
If the supply cord is damaged, it must be replaced by the manufacturer, its
service agent or similarly qualied person in order to avoid hazards.
The garment steamer must never be left unattended while being us. Full
attention is required while using the steamer at all times.
The plug must be removed from the socket-outlet before the water tank is
lled with water.
The water tank cover must be closed at all times during use.
The garment steamer must be rested on a stable and at surface at all times.
Handle the steam nozzle vertically during use. If the steam nozzle is
maneuvered horizontally, signs of water leakage may happen.
Do not pour any hot water in the water tank. Hot water will cause the water
tank to deform.
1
2
3
4
5
6
7
8
9
10
11
12
13
14
15
16
SAFETY NOTICE
ENGLISH ENGLISH
26 27
FOR GARMENT STEAMER:
NOTE:
When moving the appliance, hold rmly onto the main body for relocating.
Never drag the appliance by pulling the power cord.
When using the garment steamer, it is strongly recommend to use distilled
water as input for the water tank.
Do not touch or make direct skin contact with the steam nozzle, hot water
within the heater chamber and the steam coming out.
Do not use chemical additive, scented substances or decalcify to clean &
interact with the steamer. Failure to comply with the above-mentioned
regulations leads to the loss of warranty service.
When using the appliance for the rst time, you may notice a slight emission
of steam and hear signicant boiling sounds. This is quite normal and it stops
after a short while we also recommend using the appliance over an ordinary
cloth before using it for the rst time.
Install the clothes hanger and rack onto the rod.
1
PREPARING FOR USE
During heat-uptime,some waterleakagemaybe observed.Thisis completely
normal as water is being steamed. Wait for a while before using.
While steaming, always keep the positioning of the hose and the
maneuvering vertical. If the hose happen to be twisted or bended in anyway,
it will interrupt the steaming while sounds can be heard from steamer and
no steam will be produced.
If steam is not being produced, this can potentially be the cause of blockage
found inside the hose, the heater chamber, or that the internal waterway
inside the main body. If this happen, please follow the cleaning instruction
below.
Only use clean water to put inside the water tank. Using mineral water, water
with residue can decrease the life span of the steamer, causing the heater
chamber to accumulate residue.
After using, let the appliance cool down before storage.
17
18
19
20
21
Model GSB-3941
Model GSB-3951
ENGLISH ENGLISH
28 29
Insert the steam hose into the body with the buckle and clamp rmly to x
into position.
Model GSB-3941
Model GSB-3951
2Install the line clip by the splint. Then, place the steam nozzle on the holder.
3
Model GSB-3941
Model GSB-3951

ENGLISH ENGLISH
30 31
Screw the plug at the bottom of the machine.
Remove the water tank from the main body & unscrew the cap to ll with clean
water. Screw down the cap rmly.
Install the water tank back into the slot.
4
5
6
GSB-3941
GSB-3951
Trung bình Cao
Set the operational mode by choosing between 3 levels of steam output as displayed
on the control panel, wait for 40 seconds before steam starting to come out.
The garment steamer will automatically detect scaling after using for a while. To
reset the detection function, push on the“Cảnh báo xả cặn”button to be constantly
remind of keeping the steamer scale-free.
Set the operational mode by choosing between 5 program for fabric type of
steam output as displayed on the control panel, wait for 40 seconds before steam
starting to come out.
The garment steamer will automatically detect scaling after using for a while. To
reset the detection function, push on the“Cảnh báo xả cặn”button to be constantly
remind of keeping the steamer scale-free.
Plug into the outlet and turn on the garment steamer.
Turn on or o by pushing the Bật/Tắt button.
7
8
ENGLISH ENGLISH
32 33
STEAMING-IRONING SPECIAL FUNCTION
NOTE:
To prolong the lifetime of your steamer, we recommend using distilled or
demineralized water.
Do not use any chemicals, perfumes or detergents to put insde the water tank.
Do not replace the water tank with another tank other than the one designed
for this garment steamer.
Temperature sensor: When the appliance is detecting abnormal temperature
conditions, the sensor will disconnect the heating element.This helps to maintain
the chosen temperature level during use.
Thermalfuseprotection: When the applianceis overheatingand its temperature
sensor gets overheated, it will immediately power o to avoid potential hazards.
* CAUTION: Do not let the steamer operate with a dry or damaged water tank.
DOUBLE OVERHEATING PROTECTION
CLEANING AND LONG-TERM STORAGE
When the steam output become signicantly less visible than before or the
steaming only last for a few seconds or as the “Descaling Indicator” has been lit
up, we recommend to perform the descale function manually to clean up the clog
accumulated within the heater chamber. Steps to do so are as followed:
1. Power o the garment steamer and unplug from electrical outlet, release the
pole by pressing theTelescopic rod lock button, pull it upwards away from the
main body.
2. Wait until the garment steamer cool down to room temperature, remove the
water tank from the main body, unscrew the cap and pour out any residual
water inside. Also, unscrew the water drain valve at the bottom of the main
body to get rid of any leftover water still within the pipe.
3. Mix white vinegar with water at the ratio of 1:1 (increase the proportion of
white vinegar accordingly depending on how much descaling is needed).
4. Tighten the water drain valve at the bottom of the main body. Pour the
aforementioned vinegar/water mixed solution into the water tank and then
install the water tank accordingly. This will articulate the mixture to ow into
the heating chamber right above the water drain valve, where the descaling
will take place.
5. Let the mixture soak for about one or two hours at normal temperature (in
case there’s more residue, allow to soak for a longer duration, but never soak
for more than 8 hours).
6. Once done, remove the water tank to pour out the mixture, then unscrew
the water drain valve to release any remaining mixture. Be careful of water
overowing when remove the valve.
1. Hang the cloth onto the rack or corresponding accessories.
2. Wear gloves or glove boards to prevent from being scalded.
3. Hold rmly onto the bottoms end of the cloth, slightly pull it to straighten
the surface. Proceed to using the steaming surface to touch the cloth slightly
at a downward angle. Move the steam nozzle in a downward motions, left to
right while keeping it vertical.
4. Press the steam nozzle directly touching the collar if you wish to iron it
straight.
*NOTE: If you want to iron the sleeves, please pull the sleeve straight to help
make the process more eective.
5. Turn o the steamer and unplug when nish/not in use anymore.
ENGLISH ENGLISH
34 35
TROUBLES SHOOTING
PROBLEM CAUSE SOLUTION
The garment steamer
could not be turned on.
One of the circuits has fault,
the plug is loose, the fuse is
burned, the LED supply source
is extinguished.
Check and maintain by
specialized technician.
Boiling noise can be
heard from the hose but
no steam is coming out.
The hose is twisted, bended or
being pressed onto by weight.
Raise the steam hose up to
straighten it (This will help water
to ow back into the system to
be heated).
Water leaking from the
steam nozzle.
The steam nozzle is broken or
it’s being placed hrizontally.
Seek spare part replacement.
Attempt to maneuver the steam
nozzle as instructed.
The joints of the steamer
is leaking water.
Parts of the joint is damaged,
wear down or it is not installed
correctly.
Replaced the joint. Re-install
the hose.
NOTICE
If you can not solve the problem by above method, please contact with a quali-
ed technician or after sales service center for repair.
Do not try to adjust or repair this appliance by yourself.
This mark indicates that this product should not be disposed with
other household wastes throughout the EU. To prevent possible
harm to the environment or human health from uncontrolled
waste disposal, recycle it responsibly to promote the sustainable
reuse of material resources. To return your used device, please
use the return and collection systems or contact the retailer
where the product was purchased. They can take this product for
environmental safe recycling.
ENVIRONMENT FRIENDLY DISPOSAL
7. Fill clean water into the water tank, then pour out clear water from the water outlet
at the bottom of the steamer. Repeat this step several times to cleanse the tanks &
chamber.
8. Reassembly all accessories and continue using as normal.
9. We strongly recommend to perform the above steps as maintenance regularly
by a weekly basis to prolong the lifespan of the garment steamer.
Water tank is leaking. Water tank is broken, signs of
damage is visible. Replace the water tank.
Steam is weak.
The power supply is lower than
demanded for the steamer.
Clogging is found within the
hose.
Install a power source stabilizer/
Performing cleaning maintenance
to remove clogging.
Water tank is deformed.
Extremely hot water was
poured inside or chemical/
strong acidic solution is used.
Only continue to use if the
deformation is still acceptable.
Otherwise, seek immediate
replacement.
No steam but the LED
indicator is visible.
Water tank is not installed
correctly.
The heater chamber is broken
or parts of the circuit are fried.
Properly install the water tank
once again. Seek for technical
maintenance from a specialized
agent.

This manual suits for next models
1
Table of contents
Languages:
Other BLUE STONE Steam Cleaner manuals


