BlueChimney BlueChimney User manual
Version 3
EN 16475-2:2017
bluechimney.dk
User Manual and Installation Guide

Index
1.0 Product information........................................................................................................................ 1
1.1 Contents........................................................................................................................................... 1
1.2 Use.................................................................................................................................................... 1
1.3 Function ........................................................................................................................................... 1
1.4 Chimney Sweeping.......................................................................................................................... 2
1.5 Warranty........................................................................................................................................... 2
1.6 Specifications and dimensions...................................................................................................... 2
1.7 Installation........................................................................................................................................ 3
1.8 Electrical connection ...................................................................................................................... 3
1.9 BlueChimney with remote control................................................................................................. 3
1.10 BlueChimney with manual speed controller .............................................................................. 5
1.11 Maintenance and Troubleshooting.............................................................................................. 6
1.12 EU Declaration of Conformity ...................................................................................................... 8

1
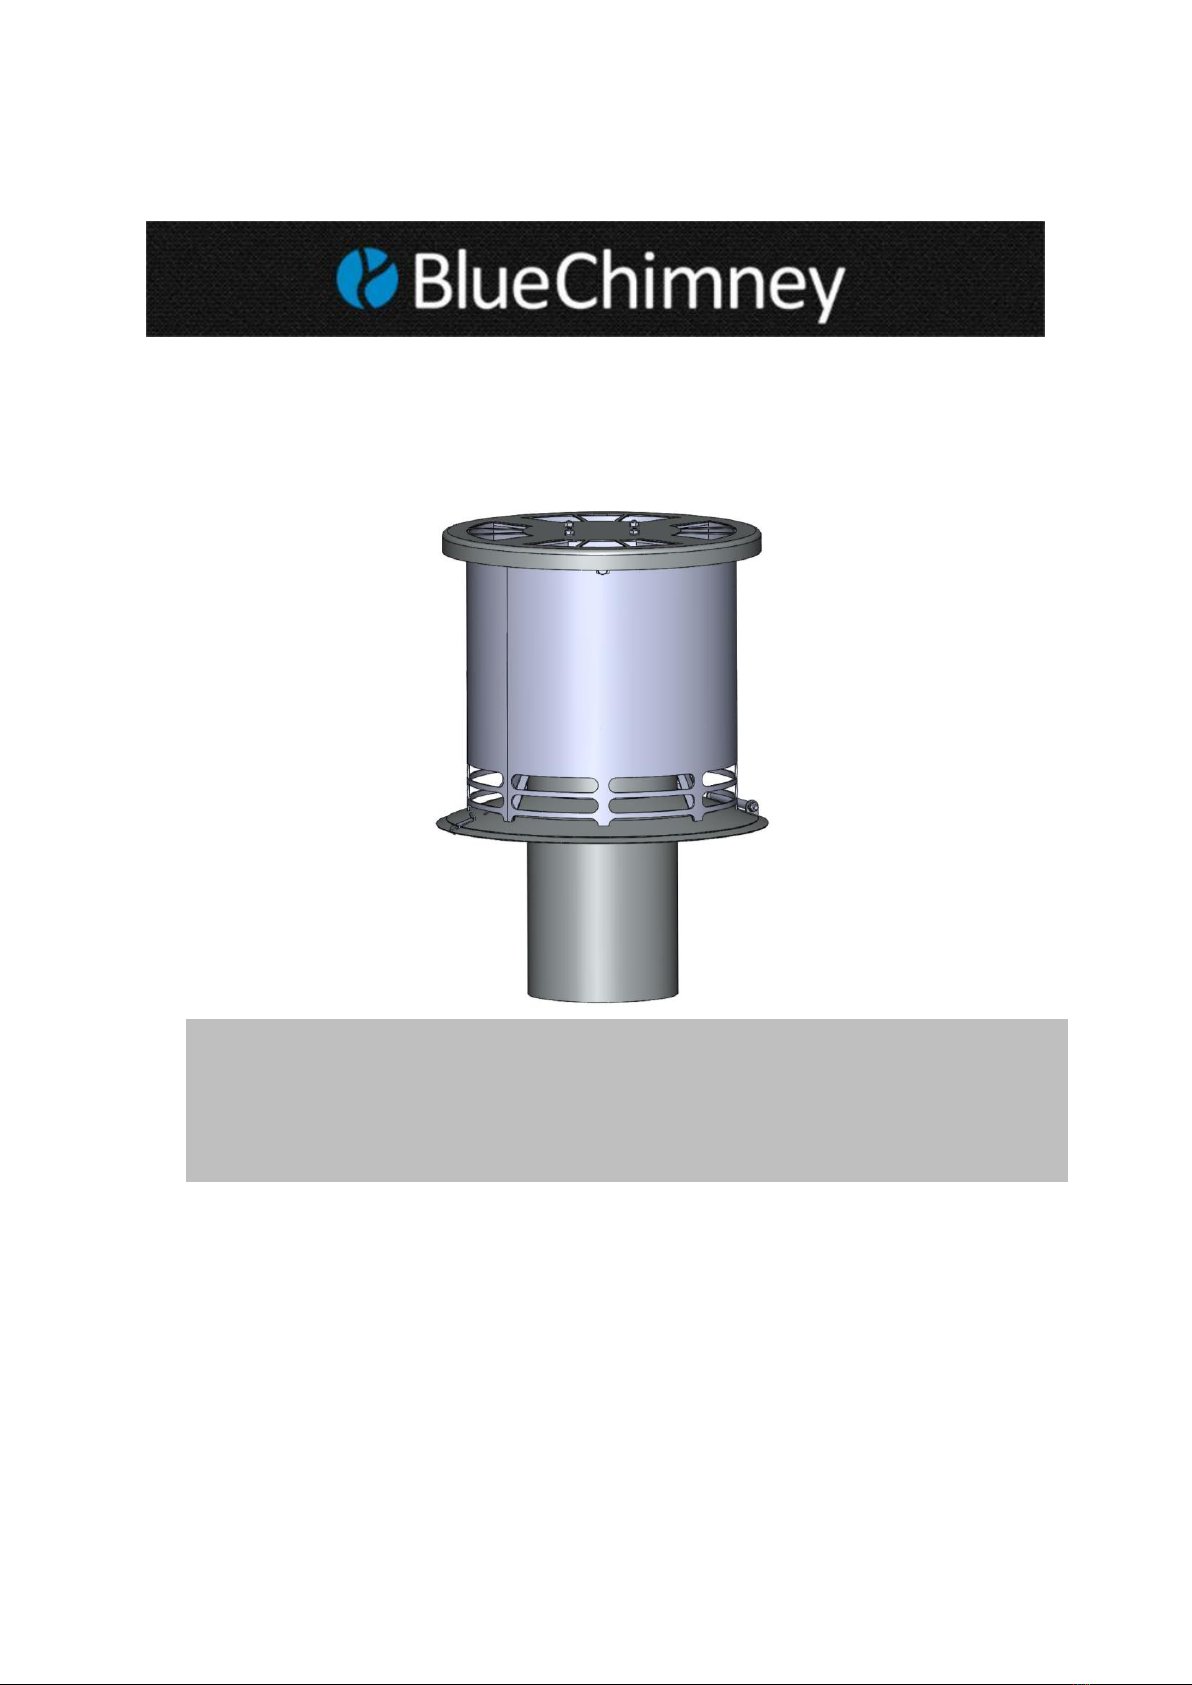
1.0 Product information
BlueChimney is a unique smoke exhauster/chimney fan and smoke diluter for wood-burning stoves
and fireplace inserts with a total output of up to 15 kW.
BlueChimney creates natural draught in the chimney by raising the smoke in the chimney and then
diluting it. This ensures proper chimney draught irrespective of weather conditions, resulting in better
combustion, easier lighting and less smoke in the room during lighting. The smell and the smoke
outside are reduced, as the smoke is diluted up to 25 times.
The smoke exhauster is extremely quiet and is powered by a 24 VDC high-quality low-voltage EC
motor. Since the smoke exhauster does not require an earth terminal, installing BlueChimney by
yourself is permitted. Simply connect it to an existing power socket. BlueChimney can be fitted to all
round exhaust sockets with an internal diameter of Ø146 to Ø200 mm. A square flange is available as
an accessory for square brick sockets of up to 240x240 mm.
1.1 Contents
1. BlueChimney, 8-metre black cable
Flange for round sockets (Ø146 –200 mm)
2. Power supply w/ mains cable
3. Control box
4. 5-metre long control cable (manual control only)
5. Manual control or remote control
6. User Manual and Installation Guide
1.2 Use
BlueChimney is used in chimneys where stable, natural draught is required.
Switch on BlueChimney at full speed before lighting the fire in the fireplace. Once the firewood is
properly ablaze, regulate BlueChimney’s air supply and speed until there are clear and steady flames
in the fireplace.
The natural draught in the chimney is not hindered when BlueChimney is closed. However, it is
recommended always to let BlueChimney operate at the lowest speed when a fire is lit in the fireplace.
This ensures that smoke, if any, is always eliminated through the ventilation system rather than
penetrates into the house.
1.3 Function
BlueChimney is designed for a long service life and can withstand very high temperatures (up to
500°C). The temperature of the smoke often exceeds 350°C during wood-burning.
BlueChimney lifts the draught by 16 pascal instead of providing exhaust in the traditional manner. This
method resembles the natural draught in a good chimney. The speed adjustment ensures that it is
always possible to achieve good combustion.
BlueChimney dilutes the smoke up to 25 times and then spreads the diluted smoke in the shape of a
fan. This produces a unique dilution and spreading effect that reduces the smell of smoke as well as
the consequent nuisance in neighbouring areas.
BlueChimney is an open unit and given proper lighting, gives no risk of asphyxiation in case of
stoppage or clogging.
English
2
BlueChimney has automated safety protection and maintenance functions that turn on the ventilator in
the event the temperature exceeds 35°C. This protects the motor if one forgets to turn BlueChimney
on. On warm summer days, BlueChimney can start automatically in order to maintain the bearings and
cool the motor (maintenance function).
IMPORTANT: BlueChimney does not remedy problems of poor lighting that are owing to poorly
functioning and incorrectly designed fireplaces, inappropriate or wet firewood and poor lighting
practices. Damage to BlueChimney caused by such circumstances is not covered by the warranty
provisions.
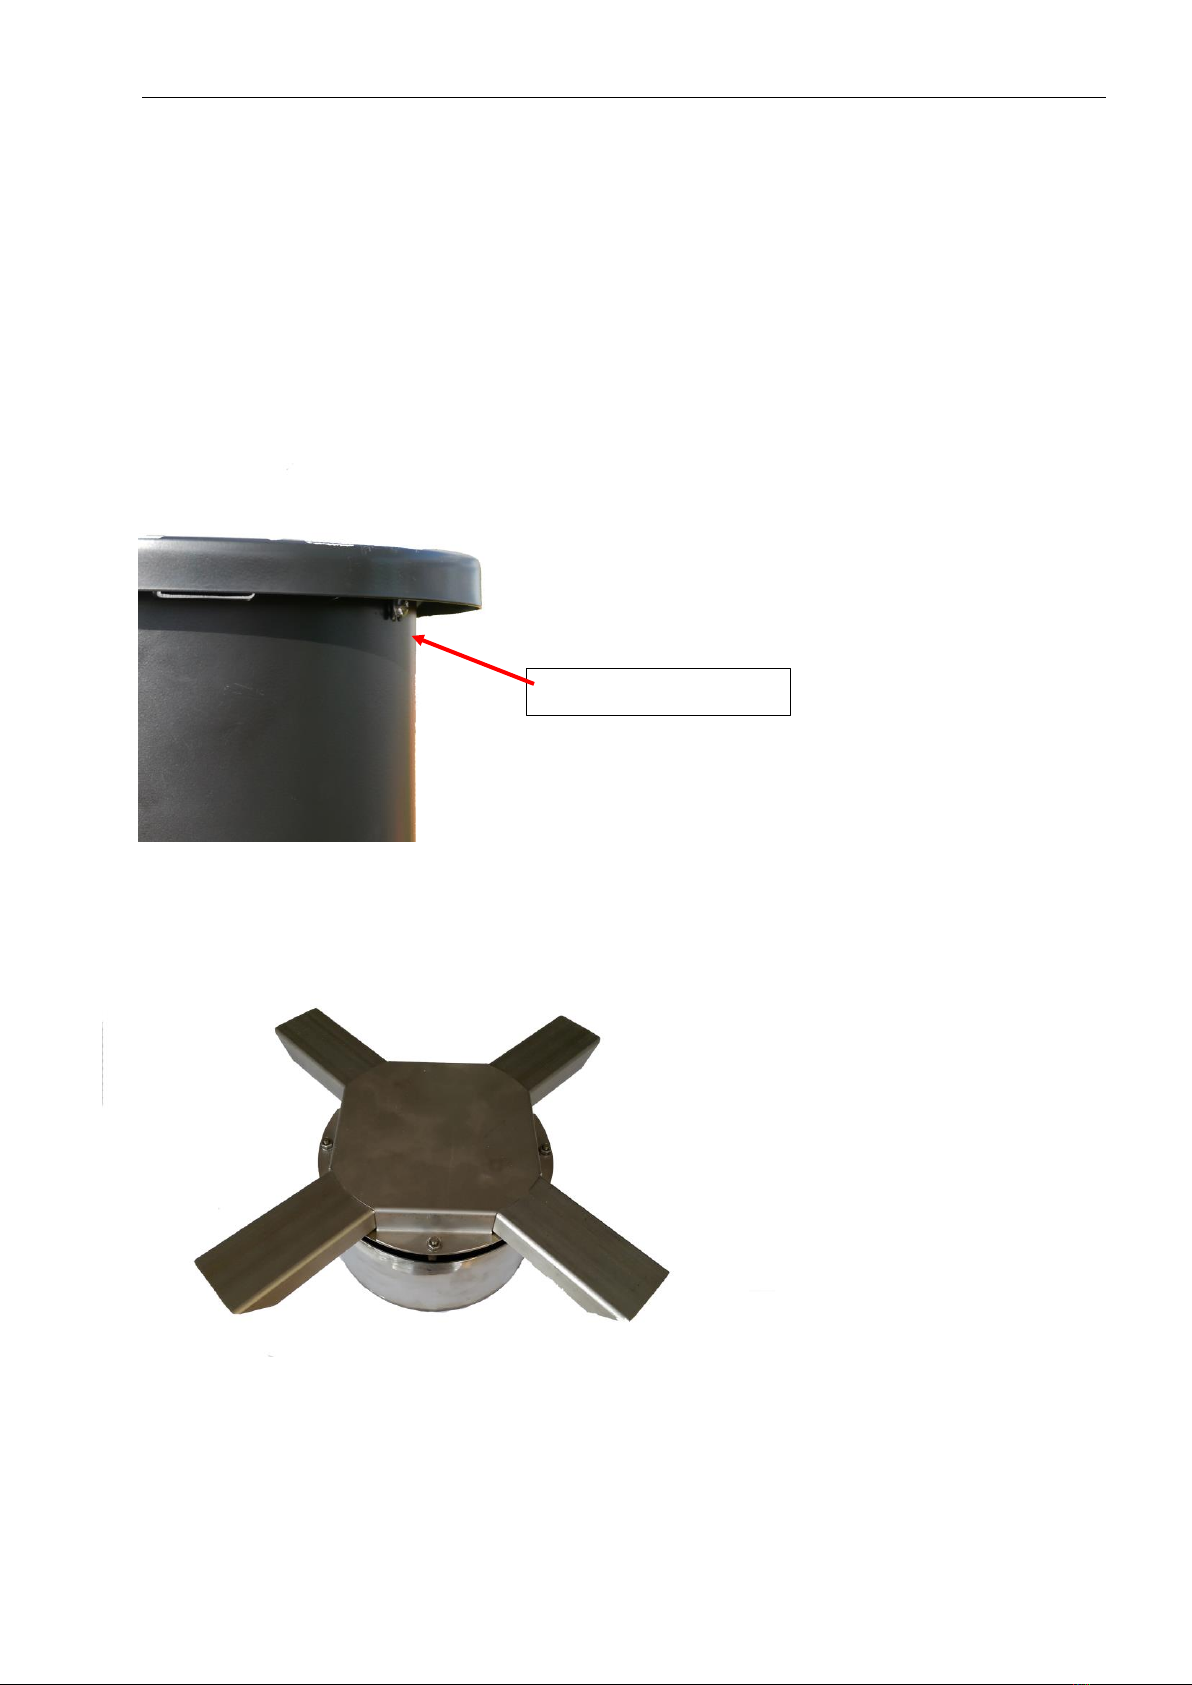
1.4 Chimney Sweeping
The chimney can be swept while BlueChimney is in operation.
When the chimney is cleaned from the top down, BlueChimney’s opening is operated with one
hand. Turn the fastener to one side, and BlueChimney will tilt slightly back until the chain tightens.
There will now be easy and unrestricted access to cleaning the chimney.
When the chimney is cleaned from the bottom up, guide the cleaning brush all the way up until it
hits the hot plate, which can withstand the mechanical impact of the chimney sweep’s cleaning tools.
This way the chimney sweep ensures that the chimney is always clean all the way up to the very top.
1.5 Warranty
BlueChimney falls within the scope of the national rules for warranty and right to claim compensation
from the date of purchase. In the event any problems arise, or the need to file a warranty claim, send
the following information to BlueChimney ApS, via info@bluechimney.dk: a description of the problem,
including pictures, if any, production number, and purchase receipt. The production number can be
noted down here for future reference:________________________________
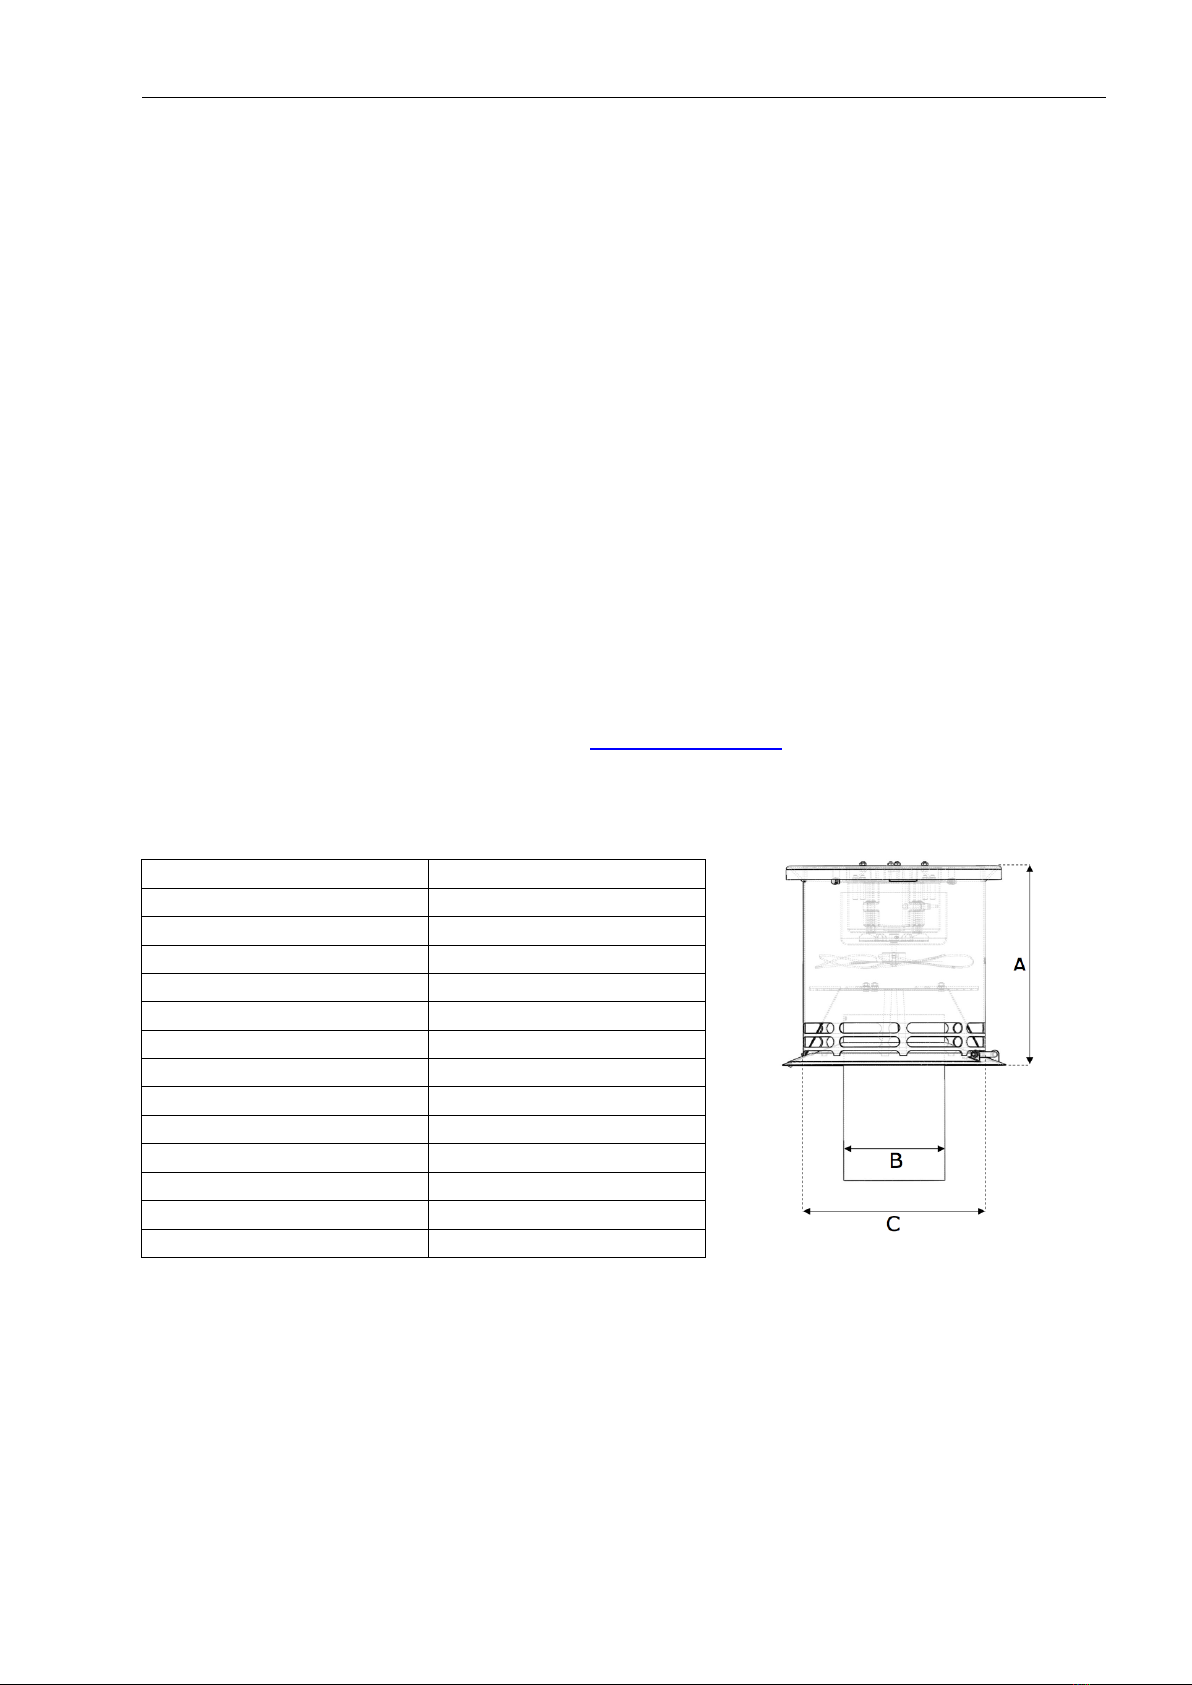
1.6 Specifications and dimensions
Model
BlueChimney
Motor type
EC - IQ2 3620 GreenTech
Voltage
24 VDC
RPM
400 - 1,300 RPM
Current
1.6 A
Power consumption
2 –20 W
Weight
6.6 kg
Dimensions
A: 280 mm
L: Ø 146 mm
C: Ø 265 mm
Max. operating temperature
500ºC
Automatic motor fuse for
shut-down
35ºC
Material
Stainless steel AISI 304
Pro
3
1.7 Installation
Place BlueChimney in the middle of the outlet at the top of the chimney. Remove the chimney cowl, if
any, since the smoke exhauster itself acts as a rain hood. Follow the national safety rules for roof-
walking.
Attach BlueChimney in the following manner:
Round vent hole:
If the vent hole is round (Ø146-200 mm), lower the round flange down into the hole. To ensure that the
flange is wedged, bend the 6 chips on the immersion pipe outwards. Bend them so much outwards
that they fit the inner dimension in the chimney and are securely wedged.
Square vent hole up to 240x240 mm (bricked
chimney):
If the vent hole is square, it is necessary to swap the
accompanying round flange with a square flange
designed for a bricked chimney (purchased
separately).
Installation of square flange on a bricked chimney:
First dismantle the round flange that is at the top of BlueChimney by loosening the black motor cable
free from the cable holder. Then turn the fastener and open the unit by tilting BlueChimney backwards.
Open the lowermost link of the safety chain and release the chain link from the hole in the pipe. Close
the unit without turning the fastener to position “locked”. Loosen the hinge bolts by unscrewing the lock
nut and pull the hinge bolts out of the hinge eyes.
The BlueChimney unit can now be lifted out of the round flange and placed onto the flange for bricked
chimneys. Mount the hinge bolts into the hinge eyes and screw the lock nuts to the end of the bolts.
Place the distance chain securely into the flange pipe and close the link.
Close the BlueChimney unit and turn the fastener so that the BlueChimney unit is locked in position on
the flange. Place the sealing mat over the hole on the chimney. Screw the flange onto the concrete
cover.
1.8 Electrical connection
IMPORTANT: THE BLUECHIMNEY POWER SUPPLY MUST ALWAYS BE CONNECTED TO THE POWER
SOCKET.
BlueChimney is powered by a 24 VDC low-voltage EC motor and does not need an earth terminal. It is
permitted to install BlueChimney yourself by connecting it to an existing power socket without earth.
Follow the national safety rules for roof-walking.
Guide the motor cable down along the chimney through the flashing or through the roof and down to
the ceiling or wherever there is access to power. Attach the cable to the chimney. IMPORTANT:
Check that at least 0.5 m of the cable can be pulled freely so that the unit can be lifted from the
chimney for service.
If the control box and the power supply are installed outside in the open, the parts must be placed in a
watertight installation box with protection class of at least IP 54.
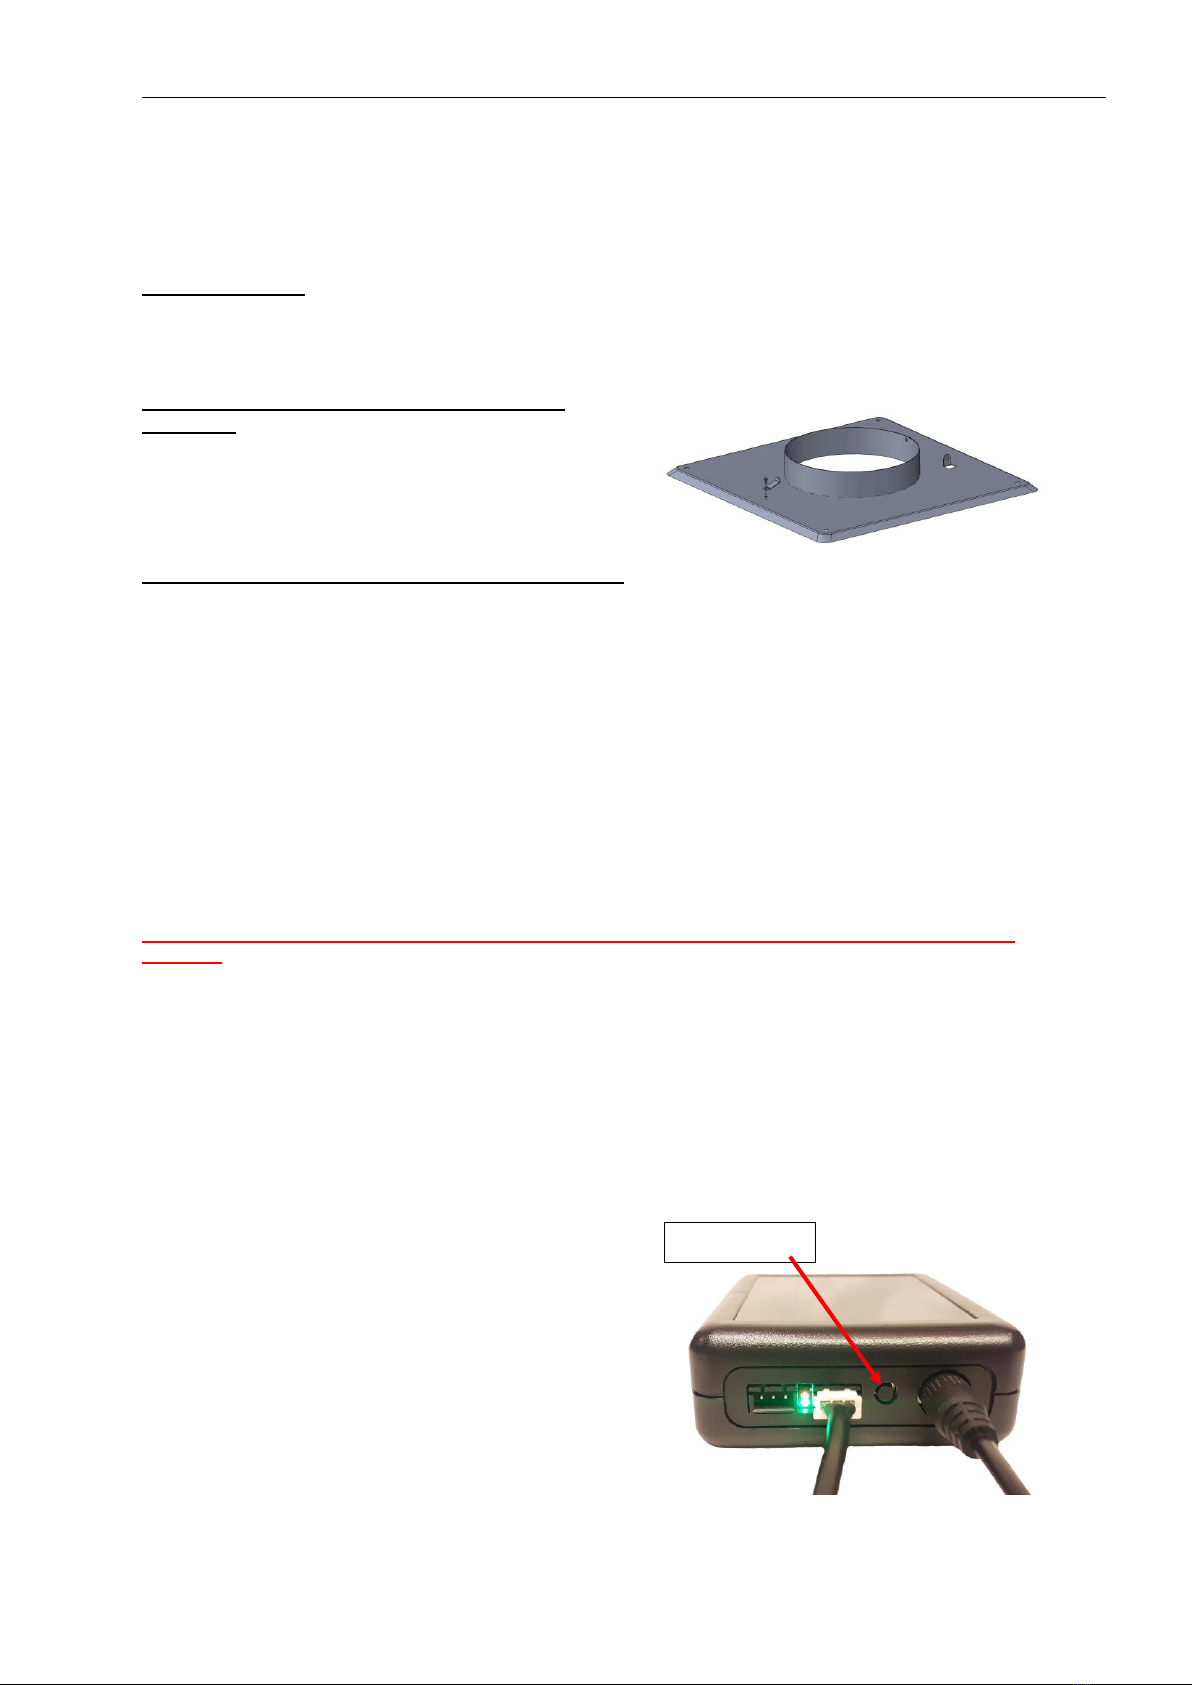
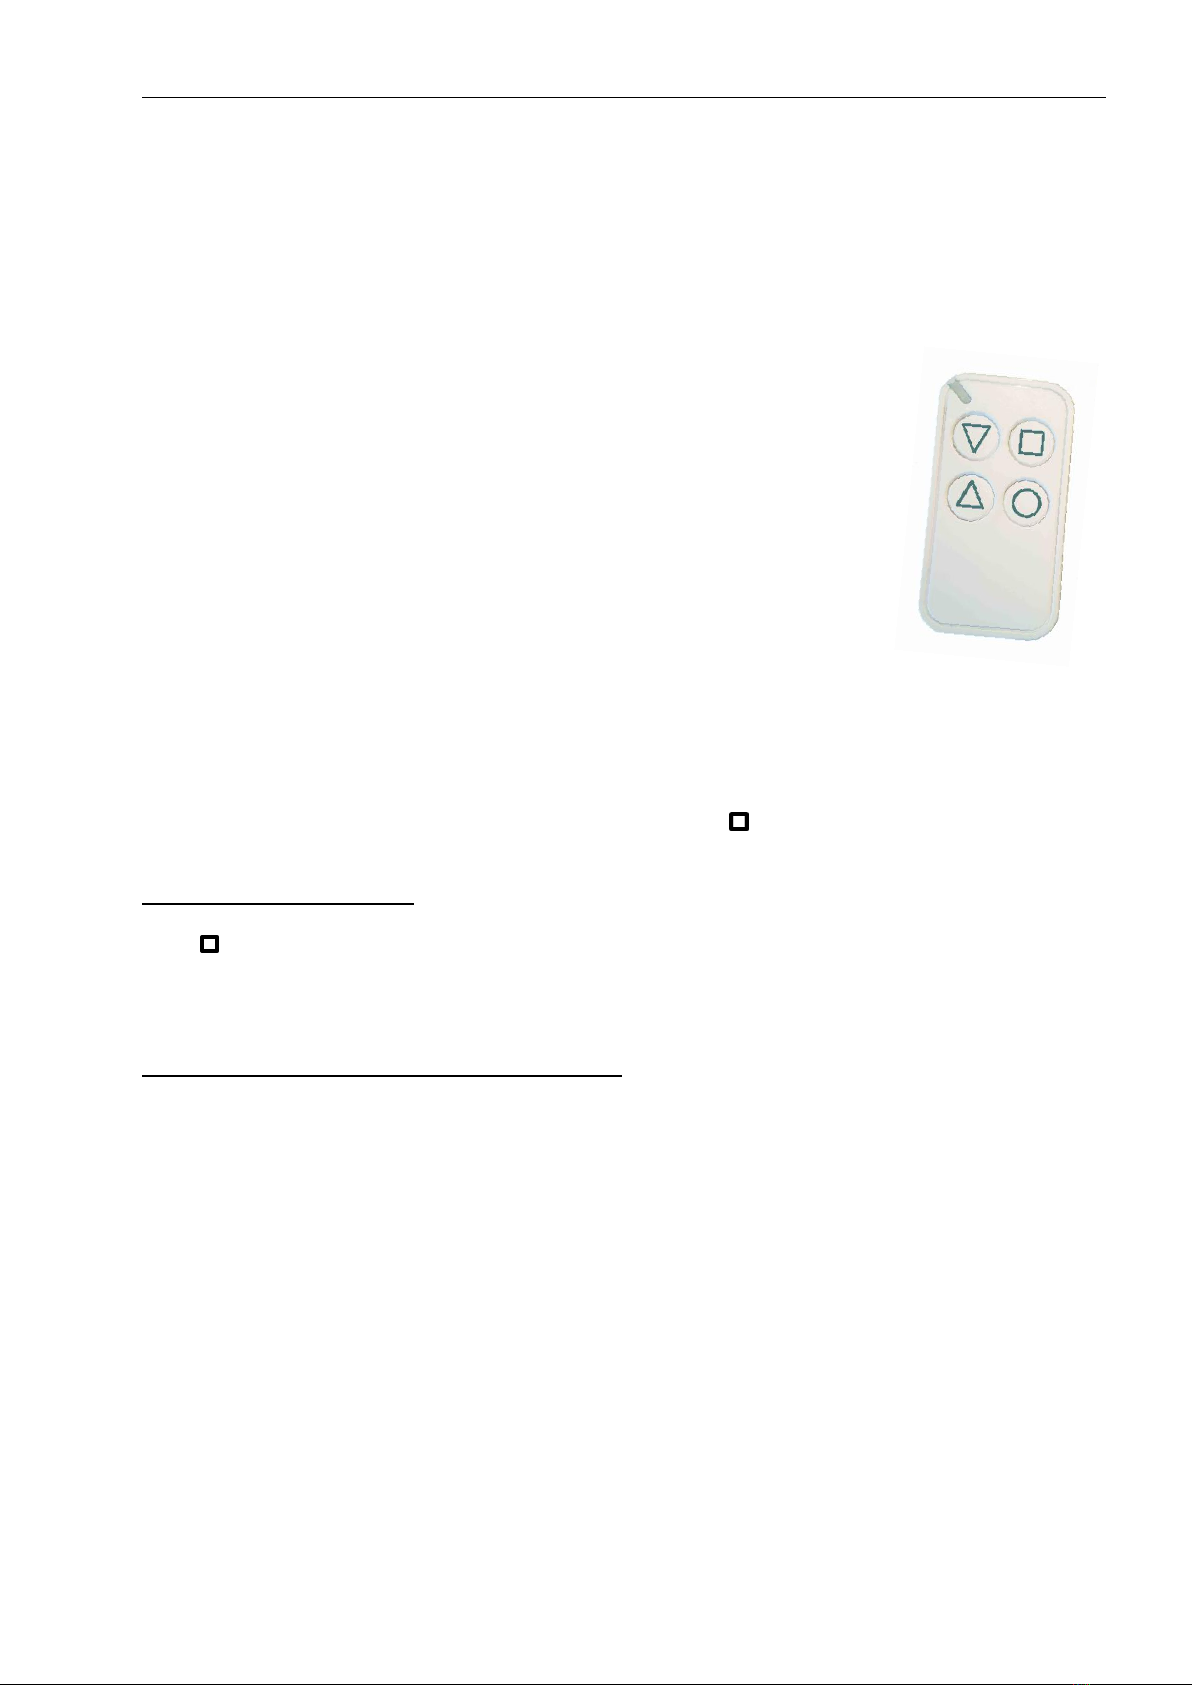
1.9 BlueChimney with remote control
Pairing
button
Step 1: Insert the black motor cable into the right square
socket.
Step 2: Insert the round plug from the power supply into
the round socket positioned all the way to the right.
The LED lamp between the square sockets will now flash.
green and then light red. Your BlueChimney unit is ready
for use.
4
If BlueChimney is delivered with a remote control, the package will not include a cabled speed
controller.
The transmission signal is encrypted and encoded to prevent other electronic devices from being
affected by the transmitter. The draught in the chimney is regulated either automatically with the built-
in program or manually, if needed. The device will switch off automatically approximately 4 hours after
the last push of a button.
The transmitter and receiver are paired at the factory.
The remote control works both with a fully automated program and with manual
control.
Fully automated transmitter operation:
On start-up/relighting, activate the Start/Boost Obutton with one push before
lighting the fire in the fireplace.
First 20 minutes:
BlueChimney starts by boosting the draught for 20 minutes, in order to prevent
smoke from going into the room during ignition/initial lighting. The speed is
subsequently automatically reduced by one-half.
Next 100 minutes (1 hour and 40 minutes):
BlueChimney runs at half speed, in order to ensure the most economical
combustion and as little pollution as possible from the wood-burning stove.
After an additional 2 hours:
BlueChimney switches off automatically.
Relighting the fire/adding wood:
Push the “Start/Boost” Obutton again before relighting the fire/adding wood to avoid smoke. This way
the automatic system will start a new burning sequence of a total of 4 hours.
Manual operation: Automatic operation can be cancelled at all times, and exhaust can be regulated
by pushing “more draught” , “less draught” or the “Off” button . The BlueChimney switches off
automatically 4 hours after you last pushed a button.
Extended program functions
BlueChimney can run the entire time –15 seconds after the most recent keystroke –if you push the
button and press the “more draught” 2 to 8 seconds later . Then, BlueChimney will starts
“off”
at the highest speed. Use the same buttons to subsequently adjust it to your desired draught. Press
the “Off” button to switch off BlueChimney, which will then go back to normal program the next time
BlueChimney is started.
Pairing with the transmitter or several transmitters (up to 7 transmitters) to govern the same
BlueChimney can be done in the following way: Press the pairing button. The green LED will now flash
quickly (approx. 3 times a second). There are 15 seconds to activate the pairing with a manual
transmitter, whereupon the pairing function will be deactivated, and the LED lamp will flash slowly
again (once a second).
Press the start button of the first manual transmitter once, and it will be paired. The second manual
transmitter can be paired within 15 seconds after the pairing of the first manual transmitter. The third
manual transmitter can be paired within 15 seconds after the pairing of the second manual transmitter.
The sequence is similar with any number of subsequent transmitters. When the green LED stops
flashing 3 times a second and reverts to flashing once a second, the pairing function is complete and
the transmitters can be put into service.
Replacing battery in the remote control:
Use a pointed object to press in the small hole on the back side of the remote control to loosen the
control panel. Pull the black plastic holder out and then insert 2 new batteries –CR 2016 –and press
the control panel back in place.
Note: The transmitter’s range is up to 70 metres. Walls, metal screens, radio signals, etc. can reduce
or disrupt the transmitter’s range.

5
Specifications of Remote Control BC/RC
Model
BlueChimney BC/RC
Transmitter
433 Mhz
Battery
3 VDC
Range
Up to 70 m.
1.10 BlueChimney with manual speed controller
NOTE: Do NOT connect a cabled speed controller and a remote control to your BlueChimney at
the same time.
Fit the white control cable to the speed controller by removing the back of the speed controller and
fitting the wires in the manner, as described below:
-Red wire to screw terminal no. 1 (24V+);
-Yellow wire to screw terminal no. 2 (CTRL);
-Blue wire to screw terminal no. 3 (GND).
Insert the cable into the cable slot and then click the
back into place. The speed controller can subsequently
be mounted to the wall with self-adhesive tape or
screws.
Note: The speed controller is not designed for
outdoor installation
Guide the cable down through the ceiling and storey
partition, if any, to the position where the speed
controller is required to be in the room.
You can possibly go through the chimney’s ceiling collar
and down along the wall to the wood-burning stove.
Power supply:
Important: The power supply must always be connected to a source of constant electrical
power. Do not place it in environments where it is exposed to water, splashes, moisture or
temperatures above 50°C. Ensure proper ventilation. In the event of outdoor installation, the power
supply and the control box must be placed in a shaded location, in a watertight installation box with
protection class of at least IP 54.
Step 1: Insert the white control cable into the left square
socket.
Step 2: Insert the black motor cable into the right square
socket.
Step 3: Insert the round plug from the power supply into the
round socket positioned all the way to the right.
The LED lamp between the sockets will now flash green and
then light red.
Your BlueChimney unit is ready for use.
6
1.11 Maintenance and Troubleshooting
Assuming normal use, BlueChimney requires maintenance intervals that correspond to the periodic
visits of the chimney sweep. However, BlueChimney should be cleaned thoroughly by a professional
at least once a year.
IMPORTANT: Disconnect the device from the power source before commencing cleaning.
During cleaning, dismantle the top ring and clean BlueChimney thoroughly internally. Replace or
carefully clean the axial blade from soot deposits. Clean the safety net of any soot and dirt.
Tools: Size 2 cross-point screwdriver and 7-mm socket wrench.
1. Dismantling of top ring:
Dismantle the top by removing the two cross-head
screws that are underneath the top ring on each side of
the device.
2. Dismantling of the cooling device:
Pull the black motor cable free of the cable holder down
on the side of the smoke exhauster and lift the entire
cooling device carefully up and free of the device.
IMPORTANT: Be very careful to prevent the blades from bending.
Cross-head screw PZ 2

7
Troubleshooting Guide
Problem
Cause
Check
BlueChimney does not run.
There is no electrical power
It is hindered from rotating
I don’t know
Is it plugged in the socket and
turned on?
Is the plug properly inserted into
the socket?
Is there electrical power to the
power supply?
Is the power supply intact (is
the diode light up green)?
Are all wires installed correctly?
Are any cables defective?
Is there too much soot in the
device?
Are there any foreign items
(birds, branches) causing a
jam?
Contact the dealer
BlueChimney runs but does not
vacuum in enough smoke.
The exhaust system is not
airtight
There is under-pressure in the
hous
The fireplace is too big
Are the flue ducts, connections,
chimney and clean-out doors
airtight?
Is there any air extraction in the
house? (Cooker hood,
bathroom exhaust fan, forced
air change?)
Does the fireplace output
exceed 15 kW?
Is the fireplace open?
BlueChimney is defective
Defective parts must be
replaced
Parts that can easily be
replaced:
Cooling housing with motor
Control box
Speed controller

8
1.12 EU Declaration of Conformity
The following producer/manufacturer
Manufacturer:
BlueChimney ApS
Address:
Snerlevej 14, DK-4180 Sorø
Hereby declares that the following product(s)
Product name:
BlueChimney
Product type:
BC1GL01
Is also in accordance with the following EU directive(s)
Directive reference
Directive
2006/42/EC
The Machinery Directive
2004/108/EC
The EMC Directive
2011/65/EC
The RoHS Directive
The following standards are applied to ensure compliance with the directive(s)
Standard reference
Standard
DS/EN ISO 12100:2011
Machine Safety - General principles for design - Risk Assessment and risk reduction
DS/ISO/TR 14121-2:2012
Safety of machinery –Risk assessment –Part 2: Practical guidance and examples of methods
DS/EN 60204-1:2006
Safety of machinery –Electrical equipment of machines –Part 1: General requirements
DS/EN ISO 13857:2008
Safety of machinery - Safety distances to prevent hazard zones being reached by upper and lower limbs
Date:
12 August 2018
City: Sorø
Name:
Morten A.N. Bjørklund, Managing Director
Other manuals for BlueChimney
1
Table of contents
Other BlueChimney Fan manuals

Popular Fan manuals by other brands

Ellington
Ellington CEN54BCH5 installation guide

Helios
Helios MiniVent M1/100 Installation and operating instructions

NuAire
NuAire XBOXER T1-TWB Series Installation, Operating and Maintenance Instruction

Breeze
Breeze CPD 160 user manual

Termozeta
Termozeta AIRZETA TRICICLO instruction manual

Bimar
Bimar VM43 Instruction booklet


