BLUEFIN Fitness KICK 2.5 User manual

For use with BLUEFIN FITNESS KICK 2.5 Treadmill

Dear customer,
We are pleased that you have chosen a device from the BLUEFIN
FITNESS product range. BLUEFIN FITNESS sports equipment offers
you the highest quality and latest technology.
In order to take full advantage of the device‘s performance, and to
have many years of pleasure in your device, please read this manual
carefully before commissioning and starting the training and use
the device according to the instructions. The operational safety and
function of the device can only be guaranteed if the general safety and
accident prevention regulations of the legislator as well as the safety
instructions in this user manual are observed. We assume no liability
for damages caused by improper use or incorrect operation.
Please make sure that all persons using the device
have read and understood the user manual.

SAFETY PRECAUTIONS SAFETY PRECAUTIONS (cont.)
9. Do not place the treadmill in rooms or areas that are exposed to high levels of
moisture i.e. outside, near heated indoor pools/spas, non-insulated garages or
rooms.
10. It is strongly recommended you wear appropriate clothing and footwear when
using your Treadmill for your own personal comfort.
11. The equipment is not suitable for use as a medical device.
This general safety information must be observed when using this
product. Read all instructions before using the product. Keep the user
manual in a safe place to be able to access it at any time if necessary.
Please keep this manual for future reference.
1. Before commencing assembly and use of your new Treadmill, carefully read
the instruction manual to understand the information provided. The correct
installation, maintenance and use of your Treadmill is important to ensure you get
the safest and most effective fitness workout.
2. Please ensure the equipment has been assembled according to the assembly
manual.
3. If you are over 45 years old, have health or medical problems and/or this is
your first time exercising in over 12 months, please consult your local Doctor or
Medical Professional before use.
4. The maximum user weight is 110Kg.
5. Should you experience any of the following symptoms including: headache, chest
tightness, irregular heartbeat, shortness of breath, dizziness, nausea or any
sharp muscle or joint pain, immediately stop training and consult your Doctor or
Medical Professional.
6. Ensure that young children and pets are kept away from the equipment to prevent
injury, the equipment is for adult use only.
7. The equipment should be placed on a hard, flat surface and at least 0.5 meters
away from any obstacles.
8. Before using the equipment, please check all nuts and bolts of the Treadmill are
tightened securely.
BEFORE BEGINNING ANY EXERCISE PROGRAM, CONSULT YOUR
PHYSICIAN. THIS IS ESPECIALLY IMPORTANT FOR INDIVIDUALS
OVER THE AGE OF 45 OR PERSONS WITH PRE-EXISTING HEALTH
PROBLEMS. READ ALL INSTRUCTIONS BEFORE USING ANY FITNESS
EQUIPMENT. WE ASSUMES NO RESPONSIBILITY FOR PERSONAL
INJURY OR PROPERTY DAMAGE SUSTAINED BY OR THROUGH THE
USE OF THIS PRODUCT.
SAVE THESE INSTRUCTIONS.
WARNING

DIRECTIONS FOR USE DIRECTIONS FOR USE (cont.)
In order to avoid an accident, please ensure you
have the treadmill safety key securely attached to
your clothing. In the event, that you accidently trip
or slip whilst walking or running on the treadmill,
removing the safety key from the console will ensure
the power is paused to the motor bringing the belt
to a stop. Re-attach the safety key to commence
your workout.
1. Position the treadmill on a clean and level surface, close to a dedicated
wall socket power point. A rubber floor mat is recommended to assist with
maintenance and protection of your floor.
2. For your safety, never start the treadmill while you are standing on the running
belt. Place your feet on either side of the running belt side rails and press the
start button. Increase the speed gradually to the desired speed level before
standing on the belt surface.
3. Wear appropriate clothing and footwear when exercising on the treadmill. Do not
wear long, loose fitting clothing that could become caught in any of the moving
parts of the treadmill.
4. Always wear the safety key attachment.
5. The motor cover should never be removed while in use. A qualified electrical
technician must be in attendance should any maintenance work need to be
carried out. Always unplug the power cord should the cover ever need to be
removed for maintenance reasons.
6. Young children should be kept away from the treadmill whilst it is in use to avoid
injury and safety concerns.
When exercising on the treadmill concentrate on looking straight
ahead and not at your feet, to avoid any risk of tripping or falling.
Increase the speed gradually allowing yourself to adapt to the speed
setting before making any further speed adjustments.
To pause or stop your treadmill use the emergency stop button or
safety key when necessary. Once you have completed installation of
the treadmill and the motor cover is securely on, you may plug in the
power cord. It is recommended you use a good quality surge protector
device.

ASSEMBLY INSTRUCTION (cont.)ASSEMBLY INSTRUCTION
We recommend 2 people assist in assembling this
unit. Place all parts of the Treadmill in a cleared
area and remove the packing materials. Do not
dispose of the packing materials until assembly is
completed. Before you start installation inspect
and prepare all parts and screws featured in this
manual. When you open the carton, you will find
the following parts.
Step 1.
Step 2.
(SI) #5 #6 Allen Wrench
each 1 PC
(S4) Hex Bolt
M8x16mm
8 PCS
(S7) Safety Key
1 PC
(S9) Treadmill Main Body
1 PC
(S8) Covers
2 PCS
(S9) Power Cable
2 PCS
(S5) Philips Head Screw
M5x25mm
4 PCS
(S6) Multi Hex Tool with
Philips Screwdriver
1 PC
(S2) Hex Bolt
M8x50mm teeth 12 mm
2 PCS
(S3) Spring Washer
2 PCS

ASSEMBLY INSTRUCTION (cont.) OPERATION INSTRUCTIONS
Step 3.
EMERGENCY STOP
Before beginning a workout session
ensure that the Safety Tether Key is
properly placed onto the Computer
Console and the Safety Clip is securely
attached to an article of your clothing. If
you fall the clip will pull out the SAFETY
KEY from the Computer Console and
the running belt will stop immediately for
emergency stop, helping to prevent injury.
Replace the Safety Tether Key onto the Computer Console. Press the START button to
begin exercise again.
TIME
SPEED
CALORIES
DISTANCE
PULSE
No Set Target Time - TIME will count up from 00:00 to maximum
99:00 with each increments is one minute.
Using Set Target Time - TIME will count down from Preset Value.
Each preset Increment is one minute between 5:00 to 99:00
minutes.
Display current training speed from 1.0 to a maximum of 20.0 km/h.
No Set Target Distance - DISTANCE will count up from 0.00 to a
maximum of 99.5km with each increment 0.1 KM.
Using Set Target Distance - DISTANCE will count down from preset
Value. Each preset increment is 0.5 KM between 0.5 to 99.5.
No Set Target Calories - CALORIES will count up from zero to
maximum
995 with each increment 1 cal.
Using Set Target Calories - CALORIES will count down from preset
value. Each preset increment is 5 cal from 10 to 995 cal.
Hold the hand sensor tight and the console will detect your pulse
signal. When monitor is reading your heart tare signal, the HEART
SYMBOL will flash on the console.
OPERATION INSTRUCTIONS (cont.) OPERATION INSTRUCTIONS (cont.)
Function Buttons
MODE To confirm all settings and to enter exercise modes.
Speed + To select training mode and adjust the function value up.
Speed - To select training mode and adjust the function value down.
START/STOP To start or stop your workout.
Power On:
Plug the main power cord in a grounded wall outlet, please make sure the power
matched. Ensure the ‘Safety Key’ is in the correct position and inserted properly in
the console.
Quick Workout:
User can start a workout by pressing the ‘Quick Select’ button for either Speed or
incline.
There are 3 ‘Quick Select’ buttons for both Speed and Incline –
4km/h to 12km/h for speed options and 3% to 9% for Incline options.
You can use Quick Workout (the speed and incline) during your workout, press
‘START’ to beginning your workout.
If you need to stop the treadmill during your workout, press ‘STOP’ or pull out the
Safety Key.
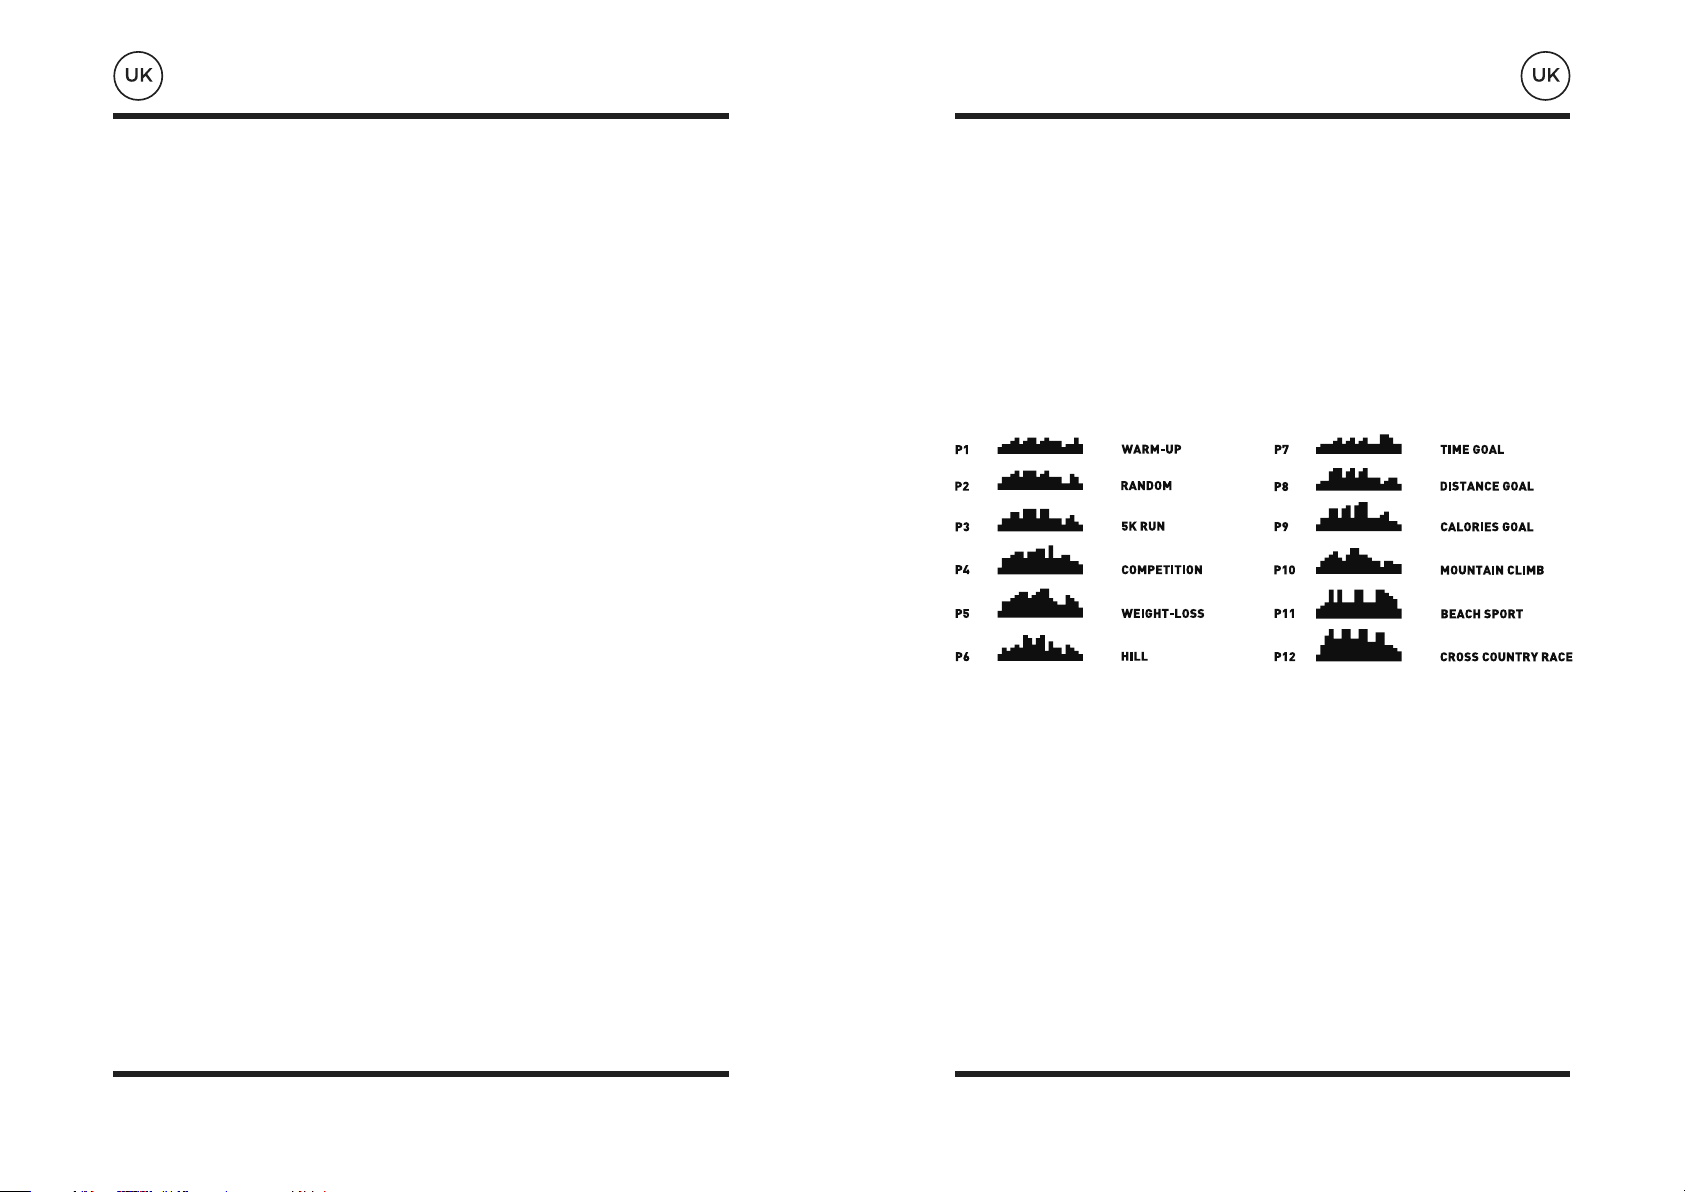
Program Mode:
This treadmill console has 12 Preset Workout Programs to choose from (see below
for breakdown of each Program). When in PROGRAM mode, use PROGRAM button
to select your chosen workout – P1 TO P12. Press START button to confirm and start
your workout.

CARE & MAINTENANCE
TO PREVENT ELECTRICAL SHOCK, PLEASE TURN OFF AND UNPLUG THE TREADMILL
BEFORE CLEANING OR PERFORMING ROUTINE MAINTENANCE.
ALWAYS CHECK THE WEAR AND TEAR COMPONENTS LIKE FOOT LOCK LATCH TUBE
AND RUNNING BELT TO PREVENT INJURY.
Cleaning:
After each exercise, ensure that the unit is wiped down and any sweat is removed
from the unit.
The treadmill can be cleaned with a soft cloth and mild detergent. Do not use abrasives
or solvents. Be careful not to get excessive moisture on the display panel as this might
damage the unit and create an electrical hazard.
Please keep the treadmill, especially the computer console, out of direct sunlight to
prevent damage to the screen.
Storage:
Store the treadmill in a clean and dry indoor environment. Never leave or use the unit
outdoors. Ensure the master power switch is off and the power cord is un-plugged
from wall outlet.
WARNING
TROUBLESHOOTING
PROBLEM POTENTIAL CAUSES CORRECTIONS
Treadmill will not
start.
Belt slips.
Belt hesitates
when stepped on.
Belt is not
centered.
Treadmill not plugged in.
Safety Tether Key is not correctly
installed.
Circuit breaker (home) has been
tripped.
Treadmill circuit breaker has been
tripped.
Belt not tight enough.
Not enough lubrication applied onto
the running belt.
Belt is too tight.
Running belt tension not even
across the rear roller.
Plug the power cord into
a wall outlet.
Reinstall the Safety
Tether Key.
Reset the circuit breaker,
or call an electrician
to replace the circuit
breaker.
Wait 5 minutes and
then try to restart the
treadmill.
Adjust belt tension.
Apply lubricant.
Adjust belt tension.
Centre the belt.

BELT ADJUSTMENT BELT ADJUSTMENT (cont.)
The running belt is pre-adjusted to the running deck at the factory, but after prolonged
use it can stretch and require readjustment. To adjust the belt, turn on the main power
switch of the treadmill and let the belt run at a speed of 8-10 KPH. Use the 6 mm Allen
Wrench provided to turn the rear roller adjustment bolts in order to centre the belt. If the
running belt is shifting to the left, turn the left adjustment bolt 1/4 turn clockwise, and
the running belt should start to correct itself.
If the running belt is slipping during use, turn off and unplug the treadmill. Using the 6
mm Allen Wrench provided, turn both left and right rear roller adjustment bolts 1/4 turn
clockwise, then turn the main power switch back on and run the treadmill at a speed of
8-10 KPH. Run on to the running belt to determine if the belt is still slipping. Repeat this
procedure until the belt no longer slips.
If the running belt is shifting to the right, then turn the right adjustment bolt 1/4 turn
clockwise, and the belt should start to correct itself. Keep turning the adjustment bolts
until the running belt is properly centered.
6mm Allen Wrench

LUBRICATION
Lubricating under the running belt will ensure superior performance and extend its life
expectancy. After the first 25 hours of use (or 2-3 months) apply some lubricant, and
repeat for every following 50 hours of use (or 5-8 months).
How to check running belt for proper lubrication:
Lift one side of the running belt and feel the top surface of the running deck.
If the surface is slick to the touch, then no further lubrication is required.
If the surface is dry to the touch, apply some lubricant.
How to apply lubricant:
Lift one side of running belt.
Pour some lubricant under the centre of the running belt on the top surface of the
running deck.
Run on the treadmill at a slow speed for 3 to 5 minutes to evenly distribute lubricant.
NOTE: DO NOT OVER LUBRICATE RUNNING DECK. ANY EXCESS LUBRICANT THAT
COMES OUT SHOULD BE WIPED OFF.
WARM UP & COOL DOWN!
To prevent injuries you should start with warm-up, cool-down and
stretching exercises before and after each workout.
No matter how you do sports, please do some stretch at first. The warm muscle will
extend easily. This reduces the risk of a spasm, or muscle injury, during exercise. To
warm up yourself we suggest the following stretch exercise as shown in the graphic:
Do not overstretch or pull your muscles.
IF IT HURTS, STOP IT!
Side bends
Pass the arm over your head and bend the upper body in the
same direction. Hold this position for 10 to 15 seconds and slowly
straighten up yourself. Repeat this 3 times for each side. (picture 1).
Toe Touch
Slow bend forward from your waist, letting your back and shoulders
relax as you stretch toward your toes, Reach down as far as you can
and hold for 15 counts. And then relax, repeat 3 times. (picture 2)
Calf-Achilles Stretch
Lean against a wall with your left leg in front of the right and your
arms forward, Keep your right leg straight and the left foot on the
floor, then bend the left leg and lean forward by moving your hips
toward the wall, Hold, then repeat on the other side for 15 counts.
Then relax and repeat 3 times for each leg. (picture 3)
Quadriceps stretch
With one hand against a wall for balance, reach behind you and pull
your right foot up .Bring your heel as close to your buttocks. hold for
10-15counts,relax.Repeat three times for each foot. (picture 4)
Inner Thigh Stretch
Sit with the soles of your feet together with your knees pointing
outward. Pull your feet as close into your groin as possible. Gently
push your knees towards the floor. Hold for 15 counts.Then relax
and repeat 3 times. (picture 5)
1
2
3
5
4
Lubricant
1 PC

Zur Verwendung mit BLUEFIN FITNESS KICK
2.5 Laufband
BEDIENUNG
SHANDBUCH


Sehr geehrter Kunde,
Wir freuen uns, dass Sie sich für ein Gerät aus der BLUEFIN FITNESS-
Produktreihe entschieden haben. BLUEFIN FITNESS Sportgeräte
bieten Ihnen höchste Qualität und modernste Technik.
Um die Leistungsfähigkeit des Gerätes voll auszuschöpfen und
um jahrelang Freude an Ihrem Gerät zu haben, lesen Sie bitte
diese Anleitung vor der Inbetriebnahme und dem Beginn der
Schulung sorgfältig durch und verwenden Sie das Gerät gemäß den
Anweisungen. Die Betriebssicherheit und Funktion des Gerätes
kann nur gewährleistet werden, wenn die allgemeinen Sicherheits-
und Unfallverhütungsvorschriften des Gesetzgebers sowie die
Sicherheitshinweise in dieser Betriebsanleitung beachtet werden. Für
Schäden, die durch unsachgemäßen Gebrauch oder Fehlbedienung
entstehen, übernehmen wir keine Haftung.
Bitte stellen Sie sicher, dass alle Personen, die
das Gerät benutzen, die Bedienungsanleitung
gelesen und verstanden haben.
SICHERHEITSVORKEHRUNGEN
Diese allgemeinen Sicherheitshinweise sind bei der Verwendung dieses
Produkts zu beachten. Lesen Sie alle Anweisungen, bevor Sie das
Produkt verwenden. Bewahren Sie die Bedienungsanleitung an einem
sicheren Ort auf, um bei Bedarf jederzeit darauf zugreifen zu können.
Bitte bewahren Sie dieses Handbuch zum späteren Nachschlagen auf.
1. Bevor Sie mit der Montage und dem Gebrauch Ihres neuen Laufbandes beginnen,
lesen Sie bitte die Bedienungsanleitung sorgfältig durch, um die bereitgestellten
Informationen zu verstehen. Die richtige Installation, Wartung und Nutzung Ihres
Laufbandes ist wichtig, um sicherzustellen, dass Sie das sicherste und effektivste
Fitnesstraining erhalten.
2. Bitte stellen Sie sicher, dass das Gerät gemäß der Montageanleitung montiert
wurde.
3. Wenn Sie über 45 Jahre alt sind, gesundheitliche oder medizinische Probleme
haben und/oder zum ersten Mal seit über 12 Monaten Sport treiben, konsultieren
Sie bitte vor der Anwendung Ihren Arzt oder Ihre Ärztin.
4. Das maximale Benutzergewicht beträgt 110 kg.
5. Sollten Sie eines der folgenden Symptome verspüren: Kopfschmerzen,
Engegefühl in der Brust und unregelmäßiger Herzschlag, Kurzatmigkeit,
Schwindel, Übelkeit oder irgendwelche scharfen Muskel- oder Gelenkschmerzen,
stoppen Sie sofort das Training und konsultieren Sie Ihren Arzt oder
medizinischen Fachmann.
6. Stellen Sie sicher, dass kleine Kinder und Haustiere von der Ausrüstung
ferngehalten werden, um Verletzungen zu vermeiden, die Ausrüstung ist nur für
Erwachsene bestimmt.
7. Das Gerät sollte auf einer harten, ebenen Fläche und mindestens 0,5 Meter von
Hindernissen entfernt aufgestellt werden
8. Bevor Sie das Gerät benutzen, überprüfen Sie bitte, ob alle Schrauben und
Muttern des Laufbandes fest angezogen sind.
9. Stellen Sie das Laufband nicht in Räumen oder Bereichen auf, die hoher
Feuchtigkeit ausgesetzt sind, z.B. im Freien, in der Nähe von beheizten
Hallenbädern, nicht isolierten Garagen oder Räumen
10. Es wird dringend empfohlen, angemessene Kleidung und Schuhe zu tragen, wenn
Sie Ihr Laufband für Ihren persönlichen Komfort benutzen.
11. Das Gerät ist nicht für den Einsatz als Medizinprodukt geeignet.
VOR BEGINN EINES TRAININGSPROGRAMMS SOLLTEN SIE
IHREN ARZT KONSULTIEREN. DIES IST BESONDERS WICHTIG
FÜR MENSCHEN ÜBER 45 JAHRE ODER PERSONEN MIT BEREITS
BESTEHENDEN GESUNDHEITLICHEN PROBLEMEN. LESEN SIE
ALLE ANWEISUNGEN, BEVOR SIE EIN GERÄT BENUTZEN. WIR
ÜBERNEHMEN KEINE VERANTWORTUNG FÜR PERSONEN- ODER
SACHSCHÄDEN, DIE DURCH ODER DURCH DIE VERWENDUNG
DIESES PRODUKTS ENTSTEHEN.
BEWAHREN SIE DIESE ANLEITUNG AUF
WARNUNG
SICHERHEITSVORKEHRUNGEN
(Forts.) GEBRAUCHSANWEISUNG
Um einen Unfall zu vermeiden, stellen Sie bitte
sicher, dass Sie den Sicherheitsschlüssel des
Laufbandes sicher an Ihrer Kleidung befestigt
haben. Für den Fall, dass Sie versehentlich
stolpern oder rutschen, während Sie gehen oder
auf dem Laufband laufen, wird das Entfernen des
SicherheitsschlüsselsvonderKonsolesicherstellen,
dass die Stromversorgung unterbrochen wird und
der Motor den Riemen zum Stillstand bringt. Setzen
Sie den Sicherheitsschlüssel wieder ein, um mit
dem Training zu beginnen.
Konzentrieren Sie sich beim Training auf das Laufband auf den Blick
nach vorne und nicht auf die Füße, um Stolperfallen oder Stürze zu
vermeiden. Erhöhen Sie die Geschwindigkeit schrittweise, so dass
Sie sich an die Geschwindigkeitseinstellung anpassen können, bevor
Sie weitere Geschwindigkeitseinstellungen vornehmen.
Um Ihr Laufband anzuhalten oder zu stoppen, verwenden Sie
bei Bedarf den Not-Aus-Schalter oder den Sicherheitsschlüssel.
Sobald Sie die Installation des Laufbandes abgeschlossen haben
und die Motorabdeckung sicher aufgesetzt ist, können Sie das
Netzkabel anschließen. Es wird empfohlen, ein hochwertiges
Überspannungsschutzgerät zu verwenden.
GEBRAUCHSANWEISUNG (Forts.)
1. Positionieren Sie das Laufband auf einer sauberen und ebenen Fläche, in der
Nähe einer speziellen Steckdose. Eine Gummifußmatte wird empfohlen, um die
Pflege und den Schutz Ihres Bodens zu unterstützen.
2. Zu Ihrer Sicherheit sollten Sie das Laufband niemals starten, während
Sie auf dem Laufband stehen. Stellen Sie Ihre Füße auf beide Seiten der
Laufbandseitenschienen und drücken Sie die Starttaste. Erhöhen Sie die
Geschwindigkeit schrittweise auf die gewünschte Geschwindigkeit, bevor Sie auf
der Bandoberfläche stehen.
3. Tragen Sie beim Training auf dem Laufband geeignete Kleidung und Schuhe.
Tragen Sie keine lange, lose sitzende Kleidung, die sich in einem der beweglichen
Teile des Laufbandes verfangen könnte.
4. Tragen Sie immer die Befestigung des Sicherheitsschlüssels.
5. Die Motorabdeckung darf während des Betriebs niemals entfernt werden. Bei
Wartungsarbeiten muss ein qualifizierter Elektrotechniker anwesend sein. Ziehen
Sie immer den Netzstecker, falls die Abdeckung aus Wartungsgründen entfernt
werden muss.
6. Kleine Kinder sollten während des Gebrauchs vom Laufband ferngehalten
werden, um Verletzungen und Sicherheitsrisiken zu vermeiden.
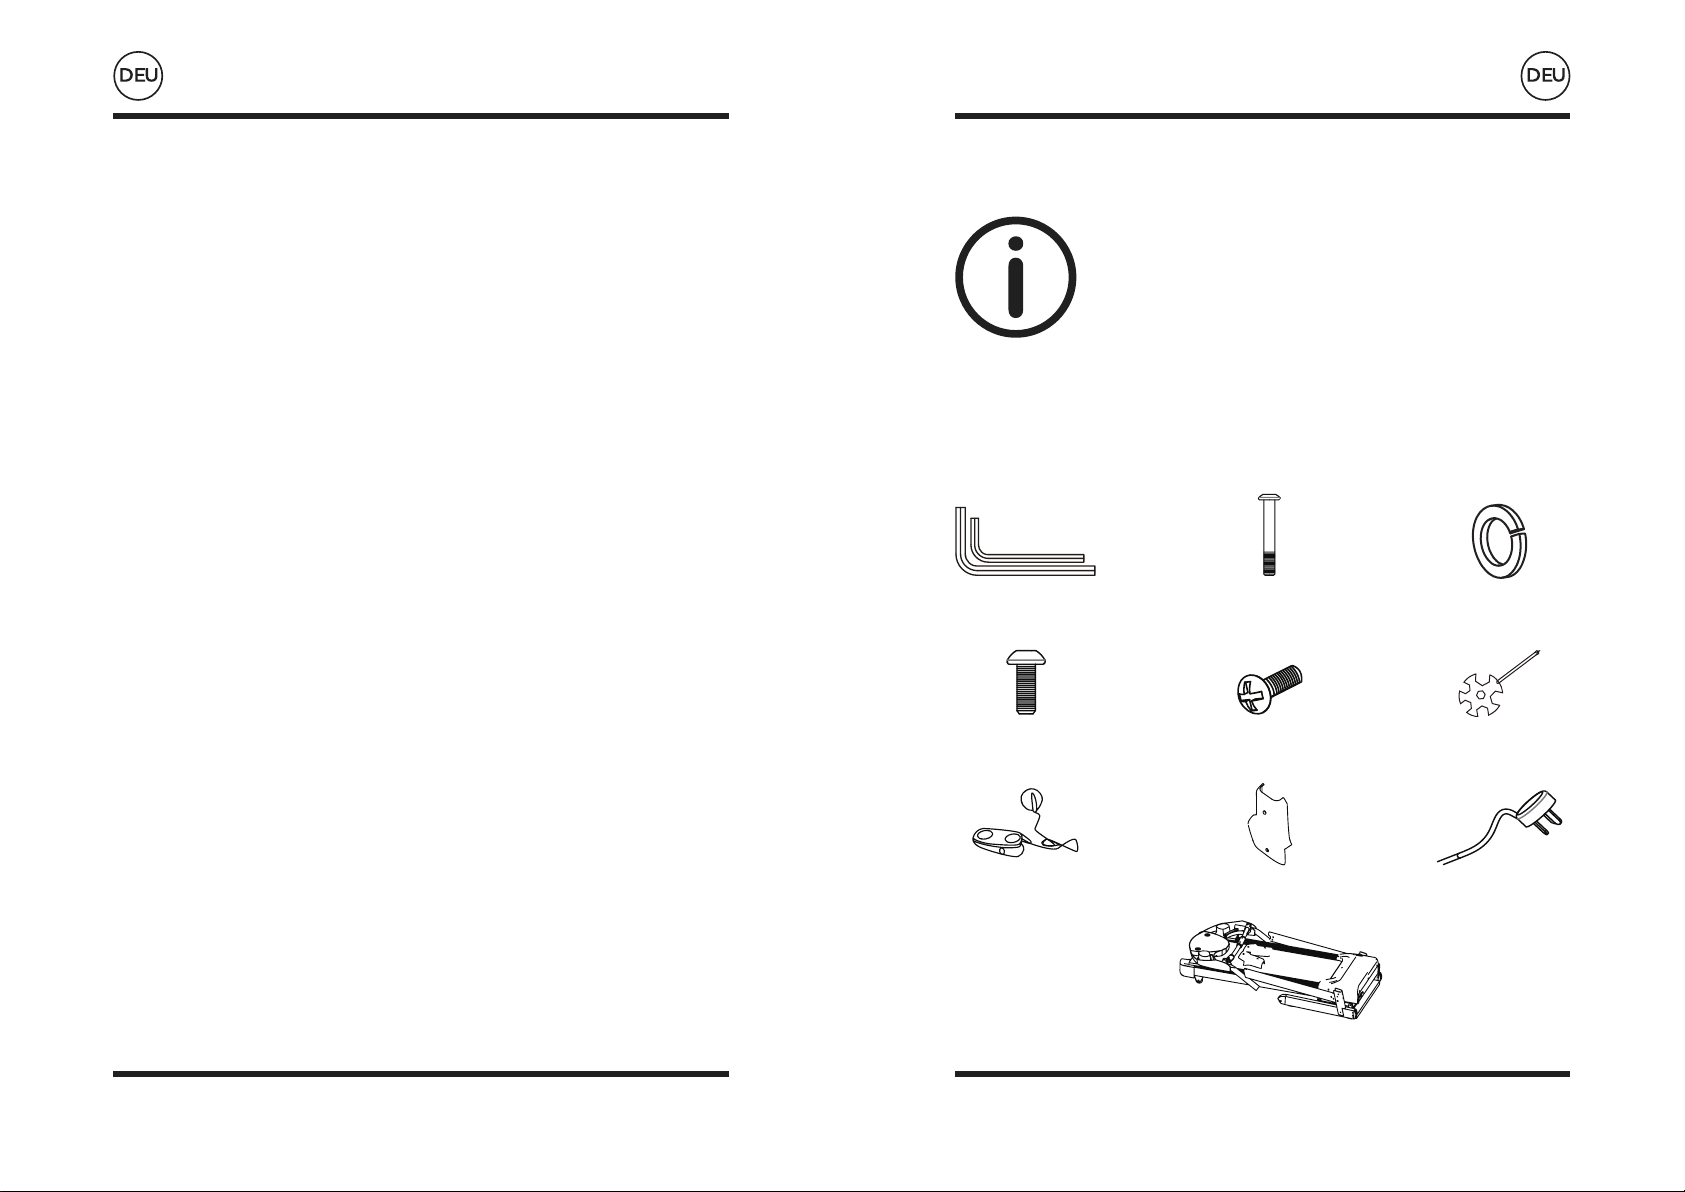
MONTAGEANLEITUNG
Wir empfehlen, dass 2 Personen bei der Montage
dieses Gerätes mithelfen. Legen Sie alle Teile des
Laufbandes in einen freien Bereich und entfernen
Sie die Verpackungsmaterialien. Entsorgen Sie
die Verpackungsmaterialien erst nach Abschluss
der Montage. Bevor Sie mit der Montage
beginnen, prüfen und vorbereiten Sie alle Teile
und Schrauben, die in dieser Anleitung aufgeführt
sind. Wenn Sie den Karton öffnen, finden Sie die
folgenden Teile.
(SI) #5 #6 Sechskant-
Stiftschlüssel
je 1 Stück
(S4) Sechskantschraube
M8x16mm
8 STÜCK
(S7) Sicherheitsschlüssel
1 PC
(S9) Laufband
Hauptkörper 1 PC
(S8) Bedeckt
2 PCS
(S9) Netzkabel
2 PCS
(S5) Philips Kopfschraube
M5x25mm
4 STÜCK
(S6) Multi Hexschlüssel
mit Kreuzschlitz-
Schraubendreher 1 PC
(S2) Sechskantschraube
M8x50mm Zähne 12 mm
2 Stück
(S3) Federscheibe
2 PCS

MONTAGEANLEITUNG (Forts.)
Schritt 1.
Schritt 2.
MONTAGEANLEITUNG (Forts.)
Schritt 3.
NOT-HALTUNG
Vergewissern Sie sich vor Beginn eines
Trainings, dass der Sicherheitsseilschlüssel
richtig auf der Computerkonsole platziert
ist und der Sicherheitsclip sicher an einem
Kleidungsstück befestigt ist. Wenn Sie fallen,
zieht der Clip den Sicherheitsschlüssel
aus der Computerkonsole heraus und der
Laufgurt stoppt sofort für den Notstopp, um
Verletzungen zu vermeiden.
Setzen Sie den Sicherheitsseilschlüssel wieder an der Computerkonsole ein.
Drücken Sie die START-Taste, um mit dem Training erneut zu beginnen.

GESCHWINDIGKEIT
Keine eingestellte Sollzeit - Die Zeit wird von 00:00 bis maximal 99:00
Uhr mit jeder Schrittweite aufwärts gezählt und beträgt eine Minute.
Verwendung der eingestellten Sollzeit - Die Zeit wird vom
voreingestellten Wert abwärts gezählt. Jede voreingestellte Schrittweite
beträgt eine Minute zwischen 5:00 und 99:00 Minuten.
Anzeige der aktuellen Trainingsgeschwindigkeit von 1,0 bis maximal 20,0 km/h.
Keine eingestellte Soll-Distanz - Die Entfernung wird von 0,00 bis
maximal 99,5 km mit jeder Schrittweite von 0,1 km berechnet.
Verwendung von Set Target Distance - DISTANCE zählt vom
voreingestellten Wert abwärts. Jede voreingestellte Schrittweite beträgt
0,5 KM zwischen 0,5 und 99,5.
Keine Sollkalorien einstellen - KALORIEN werden von Null auf Maximum
hochgezählt.
995 mit jeder Schrittweite 1 Kal.
Verwendung von Set Target Calories - CALORIES zählt vom voreingestellten
Wert abwärts. Jede voreingestellte Schrittweite beträgt 5 cal von 10 bis 995 cal.
Halten Sie den Handsensor fest und die Konsole erkennt Ihr Pulssignal. Wenn
der Monitor Ihr Herztara-Signal liest, blinkt das Herzsymbol auf der Konsole.
BEDIENUNGSANLEITUNGEN
ZEIT
KALORIEN
ABSTAND
IMPULS
BEDIENUNGSANLEITUNGEN (Forts.)
Funktionstasten
MODUS Zur Bestätigung aller Einstellungen und zum Aufrufen der
Trainingsmodi.
Geschwindigkeit + Auswahl des Trainingsmodus und Einstellung des
Funktionswertes nach oben.
Geschwindigkeit - Zur Auswahl des Trainingsmodus und zur Einstellung des
Funktionswertes nach unten.
START/STOP Zum Starten oder Stoppen des Trainings.
Einschalten:
Schließen Sie das Netzkabel an eine geerdete Wandsteckdose an, stellen
Sie sicher, dass das Netz übereinstimmt. Vergewissern Sie sich, dass sich
der’Sicherheitsschlüssel’ in der richtigen Position befindet und richtig in die Konsole
eingesetzt ist.
Schnelles Training:
Der Benutzer kann ein Training starten, indem er die Taste “Schnellauswahl” drückt,
entweder für Geschwindigkeit oder Steigung.
Es gibt 3 Schnellwahltasten für Geschwindigkeit und Steigung - 4km/h bis 12km/h für
Geschwindigkeitsoptionen und 3% bis 9% für Steigungsoptionen.
Sie können das Schnelltraining (Geschwindigkeit und Steigung) während des Trainings
verwenden, drücken Sie “START”, um das Training zu beginnen.
Wenn Sie das Laufband während des Trainings anhalten müssen, drücken Sie “STOP”
oder ziehen Sie den Sicherheitsschlüssel heraus.

BEDIENUNGSANLEITUNGEN (Forts.)
Programm-Modus:
Diese Laufband-Konsole verfügt über 12 voreingestellte Trainingsprogramme zur
Auswahl (siehe unten für die Aufteilung der einzelnen Programme). Verwenden Sie im
PROGRAMM-Modus die PROGRAMM-Taste, um das gewünschte Training auszuwählen
- P1 bis P12. Drücken Sie die START-Taste, um das Training zu bestätigen und zu
starten.
AUFWÄRMEN ZEITZIEL
DISTANZ ZIEL
KALORIENZIEL
BERGSTEIGEN
STRANDSPORTARTEN
GELÄNDERENNEN
ZUFÄLLIG
5K LAUF
WETTBEWERB
GEWICHTSABNAHME
HILL
PFLEGE & WARTUNG
UM EINEN ELEKTRISCHEN SCHLAG ZU VERMEIDEN, SCHALTEN SIE BITTE DAS
LAUFBAND AUS UND ZIEHEN SIE DEN STECKER.
VOR DER REINIGUNG ODER DURCHFÜHRUNG VON ROUTINEWARTUNGEN.
ÜBERPRÜFEN SIE IMMER DIE VERSCHLEIßKOMPONENTEN WIE
FUßVERRIEGELUNGSROHR UND LAUFBAND, UM VERLETZUNGEN ZU VERMEIDEN.
Reinigung:
Stellen Sie nach jeder Übung sicher, dass das Gerät abgewischt und Schweiß vom
Gerät entfernt wird.
Das Laufband kann mit einem weichen Tuch und einem milden Reinigungsmittel
gereinigt werden. Verwenden Sie keine Scheuermittel oder Lösungsmittel. Achten Sie
darauf, dass keine übermäßige Feuchtigkeit auf die Anzeigetafel gelangt, da dies das
Gerät beschädigen und eine elektrische Gefährdung darstellen kann.
Bitte halten Sie das Laufband, insbesondere die Computerkonsole, vor direkter
Sonneneinstrahlung geschützt, um Schäden am Bildschirm zu vermeiden.
Lagerung:
Lagern Sie das Laufband in einem sauberen und trockenen Raum. Lassen Sie das
Gerät niemals im Freien stehen oder verwenden Sie es nicht. Vergewissern Sie sich,
dass der Hauptnetzschalter ausgeschaltet ist und das Netzkabel aus der Steckdose
gezogen ist.
WARNUNG

Das Laufband
startet nicht.
Der Gürtel
rutscht.
Der Gürtel zögert,
wenn er auftritt.
Der Gurt ist nicht
zentriert.
Laufband nicht eingesteckt.
Der Sicherheits-Tether-Key ist
nicht korrekt installiert.
Der Leistungsschalter (Home)
wurde ausgelöst.
Der Leistungsschalter des
Laufbandes wurde ausgelöst.
Der Gürtel ist nicht fest genug.
Nicht genügend Schmierung auf
dem laufenden Band.
Der Gürtel ist zu eng.
Laufende Riemenspannung nicht
einmal über die Hinterwalze.
Schließen Sie das
Netzkabel an eine
Steckdose an.
Der Sicherheits-Tether-
Key ist nicht korrekt
installiert.
Setzen Sie den
Leistungsschalter
zurück oder rufen Sie
einen Elektriker an, um
den Leistungsschalter
auszutauschen.
Warten Sie 5 Minuten
und versuchen Sie dann,
das Laufband neu zu
starten.
Riemenspannung
einstellen.
Schmiermittel auftragen.
Riemenspannung
einstellen.
Zentrieren Sie den
Riemen.
FEHLERBEHEBUNG
PROBLEM MÖGLICHE URSACHEN KORREKTIONEN
BANDVERSTELLUNG
Das Laufband ist werkseitig auf das Laufdeck voreingestellt, kann sich aber nach
längerem Gebrauch dehnen und muss neu eingestellt werden. Um den Riemen
einzustellen, schalten Sie den Hauptschalter des Laufbandes ein und lassen Sie
den Riemen mit einer Geschwindigkeit von 8-10 KPH laufen. Verwenden Sie den
mitgelieferten 6 mm Inbusschlüssel, um die Einstellschrauben der Hinterräder zu
drehen und den Riemen zu zentrieren. Wenn sich der laufende Riemen nach links
verschiebt, drehen Sie die linke Einstellschraube 1/4 im Uhrzeigersinn, und der laufende
Riemen sollte beginnen, sich selbst zu korrigieren.
Wenn sich der laufende Riemen nach rechts verschiebt, drehen Sie die rechte
Einstellschraube 1/4 im Uhrzeigersinn, und der Riemen sollte beginnen, sich selbst zu
korrigieren. Drehen Sie die Einstellschrauben weiter, bis der laufende Riemen richtig
zentriert ist.
6mm Inbusschlüssel

BANDVERSTELLUNG (Forts.)
Wenn der Laufgurt während der Benutzung rutscht, schalten Sie das Laufband aus und
ziehen Sie den Netzstecker. Drehen Sie mit dem mitgelieferten 6 mm Inbusschlüssel
sowohl die linken als auch die rechten hinteren Rolleneinstellschrauben 1/4 im
Uhrzeigersinn, schalten Sie dann den Hauptschalter wieder ein und betreiben Sie das
Laufband mit einer Geschwindigkeit von 8-10 KPH. Auf das laufende Band laufen lassen,
um festzustellen, ob das Band noch rutscht. Wiederholen Sie diesen Vorgang, bis der
Riemen nicht mehr rutscht.
SCHMIERUNG
Die Schmierung unter dem laufenden Band gewährleistet eine hervorragende
Leistung und verlängert die Lebensdauer. Nach den ersten 25 Betriebsstunden (oder
2-3Monaten) etwas Gleitmittel auftragen und alle folgenden 50 Betriebsstunden (oder
5-8 Monate) wiederholen.
So überprüfen Sie den laufenden Riemen auf korrekte Schmierung:
Heben Sie eine Seite des Laufbandes an und spüren Sie die Oberseite des Laufdecks.
Wenn sich die Oberfläche bei Berührung glatt anfühlt, ist keine weitere Schmierung
erforderlich.
Wenn die Oberfläche bei Berührung trocken ist, tragen Sie etwas Gleitmittel auf.
Wie man Schmiermittel aufträgt:
Heben Sie eine Seite des laufenden Bandes an.
Gießen Sie etwas Schmiermittel unter die Mitte des Laufbandes auf die Oberseite des
Laufdecks.
Laufen Sie 3 bis 5 Minuten lang mit langsamer Geschwindigkeit auf dem Laufband, um
das Gleitmittel gleichmäßig zu verteilen.
HINWEIS: SCHMIEREN SIE DAS LAUFDECK NICHT ZU STARK. ÜBERSCHÜSSIGES
SCHMIERMITTEL, DAS AUSTRITT, SOLLTE ABGEWISCHT WERDEN.
Schmiermittel
1 PC
Table of contents
Languages:
Other BLUEFIN Fitness Treadmill manuals


