BLUEFIN Fitness TASK 2.0 User manual
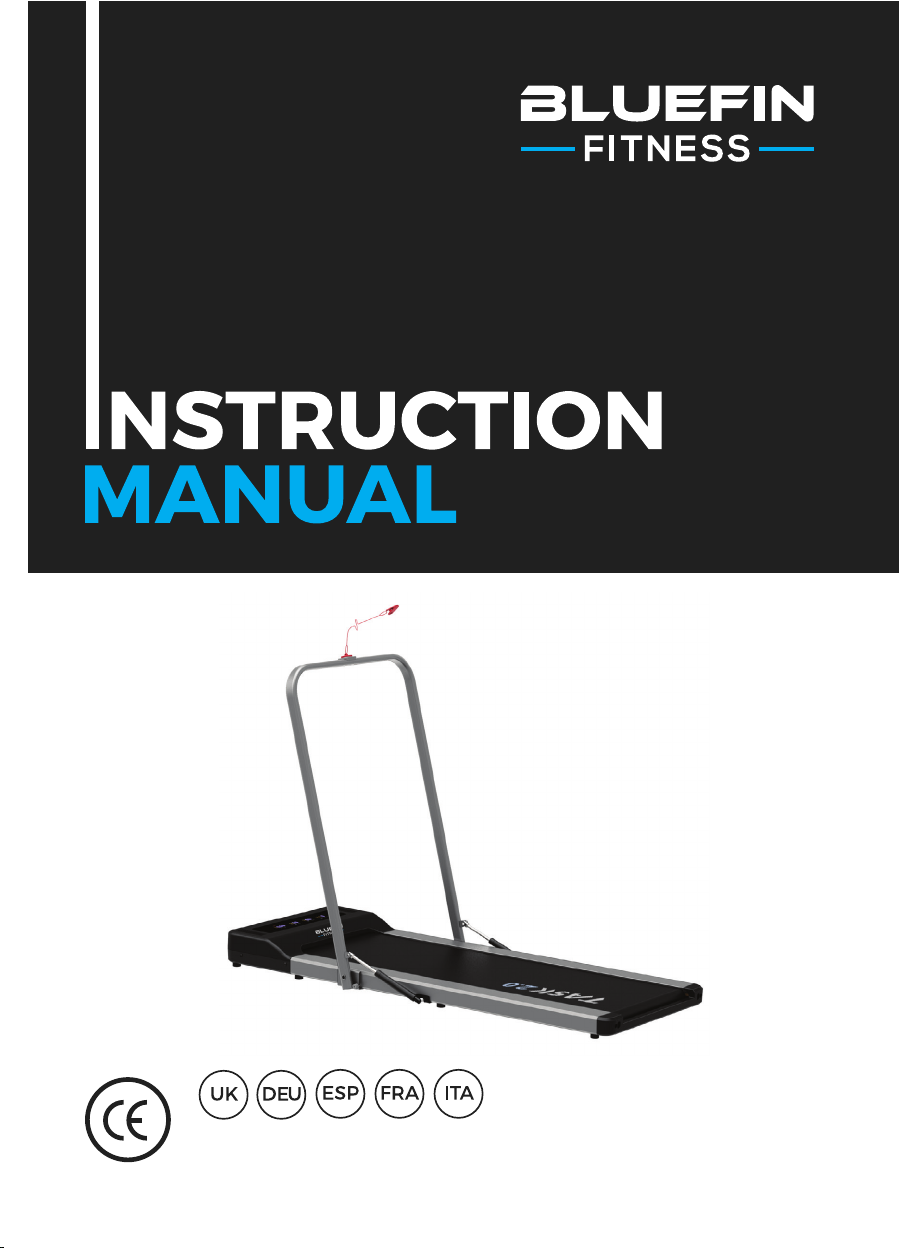
For use with BLUEFIN FITNESS TASK 2.0 Treadmill


Dear customer,
We are pleased that you have chosen a device from the BLUEFIN
FITNESS product range. BLUEFIN FITNESS sports equipment offers
you the highest quality and latest technology.
In order to take full advantage of the device‘s performance, and to
have many years of pleasure in your device, please read this manual
carefully before commissioning and starting the training and use
the device according to the instructions. The operational safety and
function of the device can only be guaranteed if the general safety and
accident prevention regulations of the legislator as well as the safety
instructions in this user manual are observed. We assume no liability
for damages caused by improper use or incorrect operation.
Please make sure that all persons using the device
have read and understood the user manual.

SAFETY PRECAUTIONS
This general safety information must be observed when using this
product. Read all instructions before using the product. Keep the user
manual in a safe place to be able to access it at any time if necessary.
Please keep this manual for future reference.
1. Before commencing assembly and use of your new Treadmill, carefully read
the instruction manual to understand the information provided. The correct
installation, maintenance and use of your Treadmill is important to ensure you get
the safest and most effective fitness workout.
2. Please ensure the equipment has been assembled according to the assembly
manual.
3. If you are over 45 years old, have health or medical problems and/or this is
your first time exercising in over 12 months, please consult your local Doctor or
Medical Professional before use.
4. The maximum user weight is 120Kg.
5. Should you experience any of the following symptoms including: headache, chest
tightness, irregular heartbeat, shortness of breath, dizziness, nausea or any
sharp muscle or joint pain, immediately stop training and consult your Doctor or
Medical Professional.
6. Ensure that young children and pets are kept away from the equipment to prevent
injury, the equipment is for adult use only.
7. The equipment should be placed on a hard, flat surface and at least 0.5 meters
away from any obstacles.
8. Before using the equipment, please check all nuts and bolts of the Treadmill are
tightened securely.

SAFETY PRECAUTIONS (cont.)
9. Do not place the treadmill in rooms or areas that are exposed to high levels of
moisture i.e. outside, near heated indoor pools/spas, non-insulated garages or
rooms.
10. It is strongly recommended you wear appropriate clothing and footwear when
using your Treadmill for your own personal comfort.
11. The equipment is not suitable for use as a medical device.
BEFORE BEGINNING ANY EXERCISE PROGRAM, CONSULT YOUR
PHYSICIAN. THIS IS ESPECIALLY IMPORTANT FOR INDIVIDUALS
OVER THE AGE OF 45 OR PERSONS WITH PRE-EXISTING HEALTH
PROBLEMS. READ ALL INSTRUCTIONS BEFORE USING ANY FITNESS
EQUIPMENT. WE ASSUMES NO RESPONSIBILITY FOR PERSONAL
INJURY OR PROPERTY DAMAGE SUSTAINED BY OR THROUGH THE
USE OF THIS PRODUCT.
SAVE THESE INSTRUCTIONS.
WARNING

DIRECTIONS FOR USE
In order to avoid an accident, please ensure you
have the treadmill safety key securely attached to
your clothing. In the event, that you accidently trip
or slip whilst walking or running on the treadmill,
removing the safety key from the console will ensure
the power is paused to the motor bringing the belt
to a stop. Re-attach the safety key to commence
your workout.
When exercising on the treadmill concentrate on looking straight
ahead and not at your feet, to avoid any risk of tripping or falling.
Increase the speed gradually allowing yourself to adapt to the speed
setting before making any further speed adjustments.
To pause or stop your treadmill use the emergency stop button or
safety key when necessary. Once you have completed installation of
the treadmill and the motor cover is securely on, you may plug in the
power cord. It is recommended you use a good quality surge protector
device.

DIRECTIONS FOR USE (cont.)
1. Position the treadmill on a clean and level surface, close to a dedicated
wall socket power point. A rubber floor mat is recommended to assist with
maintenance and protection of your floor.
2. For your safety, never start the treadmill while you are standing on the running
belt. Place your feet on either side of the running belt side rails and press the
start button. Increase the speed gradually to the desired speed level before
standing on the belt surface.
3. Wear appropriate clothing and footwear when exercising on the treadmill. Do not
wear long, loose fitting clothing that could become caught in any of the moving
parts of the treadmill.
4. The motor cover should never be removed while in use. A qualified electrical
technician must be in attendance should any maintenance work need to be
carried out. Always unplug the power cord should the cover ever need to be
removed for maintenance reasons.
5. Young children should be kept away from the treadmill whilst it is in use to avoid
injury and safety concerns.
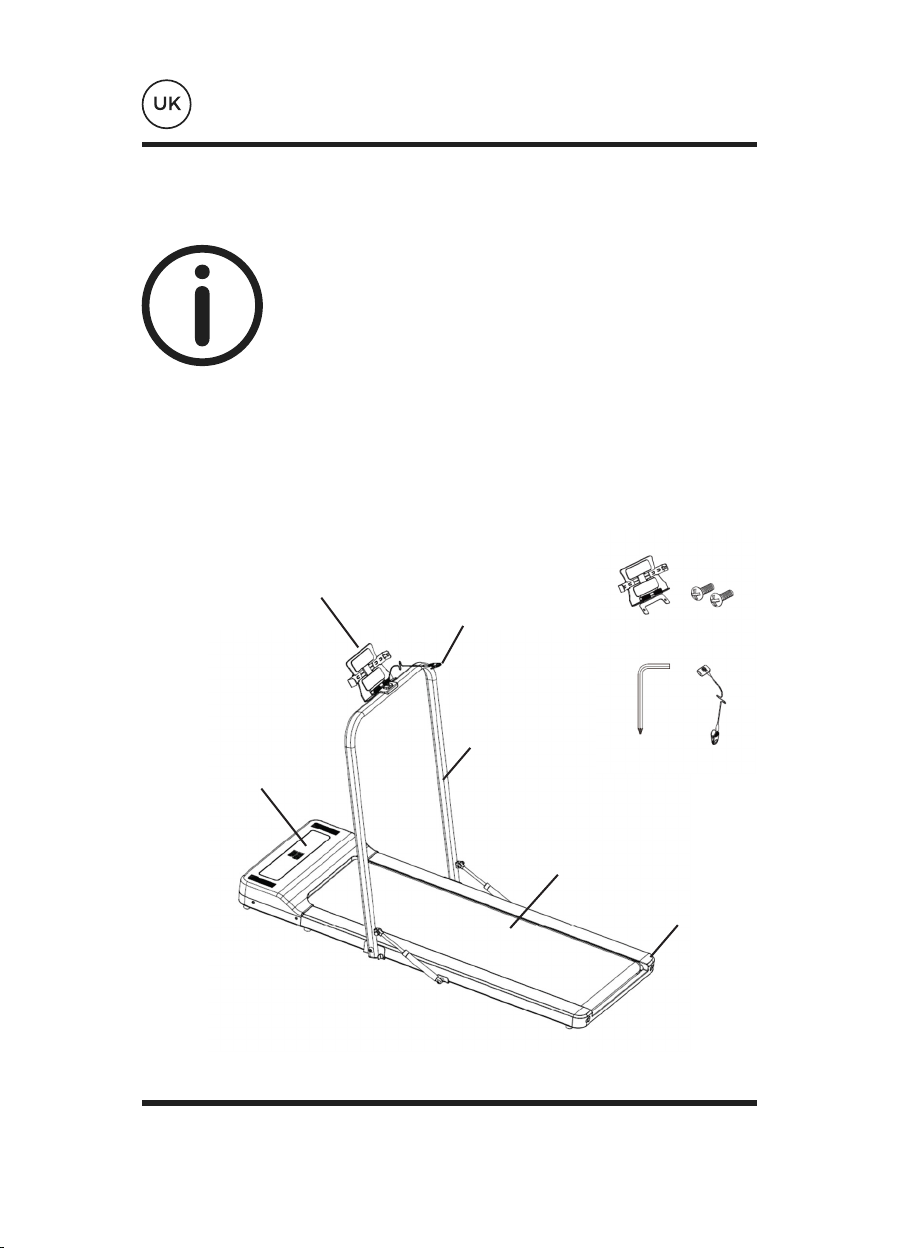
ASSEMBLY INSTRUCTION
Place all parts of the Treadmill in a cleared
area and remove the packing materials. Do not
dispose of the packing materials until assembly is
completed. Before you start installation inspect
and prepare all parts and screws featured in this
manual. When you open the carton, you will find
the following parts.
Tablet Holder
Tablet Holder
Allen Key Safety Key
Screw
Control Panel
Running Belt
Toe Cap
Hand Rail
Safety Key

ASSEMBLY INSTRUCTION (cont.)
Attach the Tablet Holder onto the Hand Rail. Secure with 2 x Screws.
Tighten with Allen Key provided.

OPERATION INSTRUCTIONS
Function Buttons
START/STOP ( ) Press the POWER button to start/stop training.
SCAN (S) Press the S button to show other functions (Calories, Time,
Distance etc.)
PROGRAM (P) Press the P button to select pre-set training program (P01-P06)
before training.
MODE (M) Press the M button to select different functions (Calories, Time,
Distance) for setting exercise goals in manual program mode
before training.
SPEED UP (+) Press the + button to increase speed, calories, time or distance.
SPEED DOWN (-) Press the - button to decrease
NB/ If you need to stop the treadmill during your workout, press ‘STOP’ or pull out the
Safety Key.

OPERATION INSTRUCTIONS (cont.)
TIME
Display Functions
SPEED
CALORIES
DISTANCE
Displays your elapsed workout time in minutes and seconds.
Press the START button on the remote to begin exercising, the LED
window will countdown 3 seconds with the LED showing “3-2-1”
before the running belt starts moving. The running belt starts
moving with an initial speed of 0.8 KPH. You may press the SPEED
+ or SPEED - button on the remote to increase or decrease the
running speed during exercise. Time starts counting up from 0:00 to
99:59 per 1 second increment.
Displays the current speed from the minimum 1.0 KPH to the
maximum 8.0 KPH. You may increase or decrease the speed by
pressing the SPEED + or SPEED - button on the remote.
Displays the accumulative distance travelled during workout.
Press the START button on the remote to begin exercising, the LED
window will countdown 3 seconds with the LED showing “3-2-1”
before the running belt starts moving. The running belt starts
moving with an initial speed of 1.0 KPH. You may press the SPEED
+ or SPEED - button on the remote to increase or decrease the
running speed during exercise. Distance starts counting up.
Displays the total calories burned during your workout. Press the
START button on the remote to begin exercising, the LED window
will countdown 3 seconds with the LED showing “3-2-1” before the
running belt starts moving. The running belt starts moving with
an initial speed of 1.0 KPH. You may press the SPEED + or SPEED
- button on the remote to increase or decrease the running speed
during exercise. Calorie starts counting up. (This data is a rough
guide for comparison of different exercise sessions and should not
be used in medical treatment).

OPERATION INSTRUCTIONS (cont.)
Manual Program Mode
You may pre-set target TIME, DISTANCE, or CALORIES in STOP mode before training.
Only one of the functions can be pre-set.
To set TIME press the MODE button on the remote until you see the split window of
TIME begin blinking. Press the SPEED + or SPEED - button on the remote to change
the setting. Each increment is 1 minute. The pre-set target time range is from 5:00 to
99:00 minutes. Once you pre-set target time, press the START button on the computer
to begin exercising.
To set DISTANCE press the MODE button on the remote until you see the split window
of DISTANCE begin blinking. Press the SPEED + or SPEED - button on the remote to
change the setting. The pre-set target distance range is from 0.50 to 65.0 kilometers,
the default distance is 1 kilometer. Once you pre-set target distance, press the START
button on the computer to begin exercising.
To set CALORIES press the MODE button on the remote until you see the split window
of CALORIES begin blinking. Press the SPEED + or SPEED - button on the remote
to change the setting. The pre-set target calorie range is from 10 to 995 calories.
Once you pre-set target calories, press the START button on the computer to begin
exercising.

OPERATION INSTRUCTIONS (cont.)
Pre-Set Program training Mode:
The computer offers 6 pre-set programs (P01-P6). You may select one of the pre-set
training programs in STOP mode before training. Press the P (PROGRAM) button on the
remote to select one of the training programs, press the START button on the computer
to begin exercising.

CARE & MAINTENANCE
TO PREVENT ELECTRICAL SHOCK, PLEASE TURN OFF AND UNPLUG THE TREADMILL
BEFORE CLEANING OR PERFORMING ROUTINE MAINTENANCE.
ALWAYS CHECK THE WEAR AND TEAR COMPONENTS LIKE FOOT LOCK LATCH TUBE
AND RUNNING BELT TO PREVENT INJURY.
Cleaning:
After each exercise, ensure that the unit is wiped down and any sweat is removed
from the unit.
The treadmill can be cleaned with a soft cloth and mild detergent. Do not use abrasives
or solvents. Be careful not to get excessive moisture on the display panel as this might
damage the unit and create an electrical hazard.
Please keep the treadmill, especially the computer console, out of direct sunlight to
prevent damage to the screen.
Storage:
Store the treadmill in a clean and dry indoor environment. Never leave or use the unit
outdoors. Ensure the master power switch is off and the power cord is un-plugged
from wall outlet.
WARNING

TROUBLESHOOTING
PROBLEM POTENTIAL CAUSES CORRECTIONS
Treadmill will not
start.
Belt slips.
Belt hesitates
when stepped on.
Belt is not
centered.
Treadmill not plugged in.
Safety Tether Key is not correctly
installed.
Circuit breaker (home) has been
tripped.
Treadmill circuit breaker has been
tripped.
Belt not tight enough.
Not enough lubrication applied onto
the running belt.
Belt is too tight.
Running belt tension not even
across the rear roller.
Plug the power cord into
a wall outlet.
Reinstall the Safety
Tether Key.
Reset the circuit breaker,
or call an electrician
to replace the circuit
breaker.
Wait 5 minutes and
then try to restart the
treadmill.
Adjust belt tension.
Apply lubricant.
Adjust belt tension.
Centre the belt.
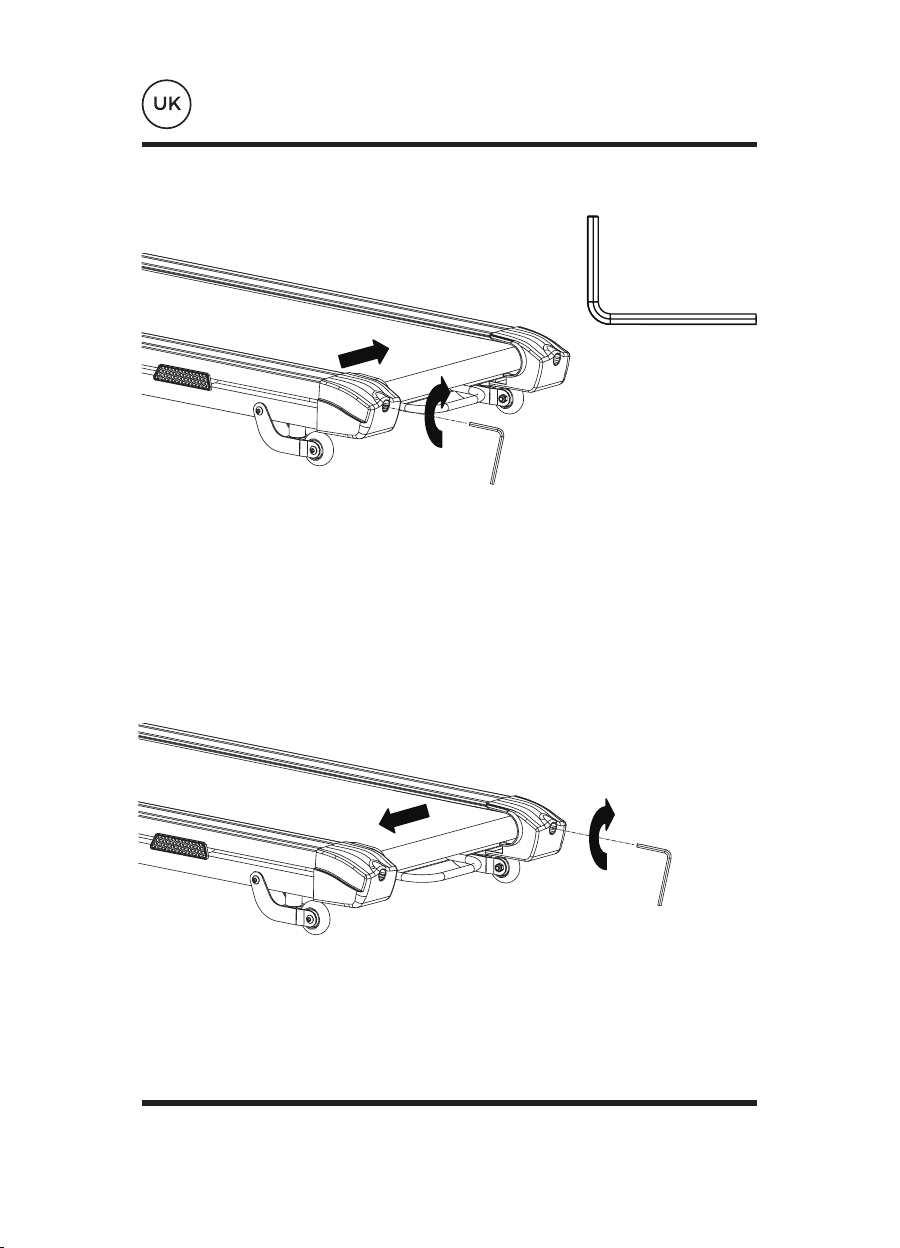
BELT ADJUSTMENT
The running belt is pre-adjusted to the running deck at the factory, but after prolonged
use it can stretch and require readjustment. To adjust the belt, turn on the main power
switch of the treadmill and let the belt run at a speed of 4.0-6.0 KPH. Use the Allen
Wrench provided to turn the rear roller adjustment bolts in order to centre the belt. If
the running belt is shifting to the left, turn the left adjustment bolt 1/4 turn clockwise,
and the running belt should start to correct itself.
If the running belt is shifting to the right, then turn the right adjustment bolt 1/4 turn
clockwise, and the belt should start to correct itself. Keep turning the adjustment bolts
until the running belt is properly centered.
6mm Allen Wrench
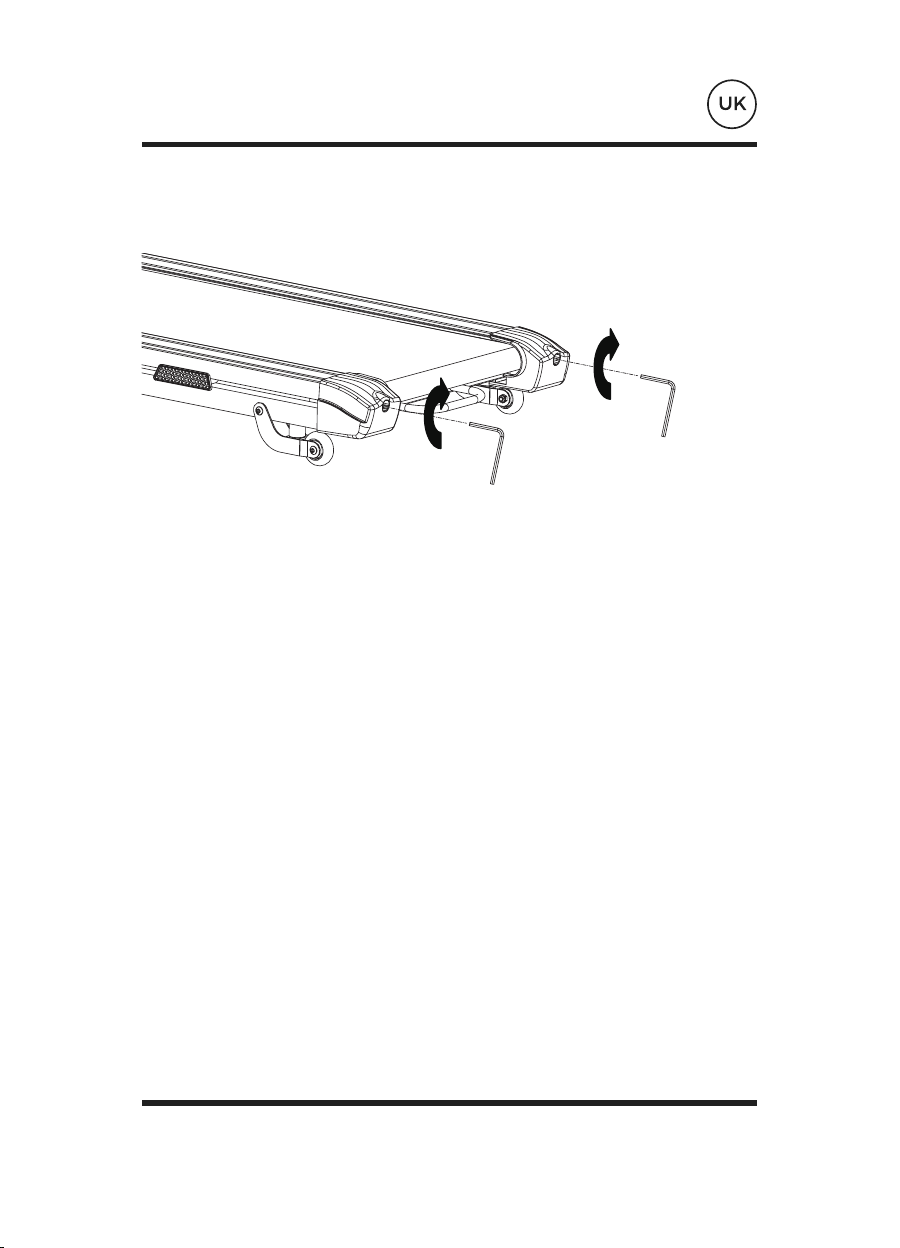
BELT ADJUSTMENT (cont.)
If the running belt is slipping during use, turn off and unplug the treadmill. Using the 6
mm Allen Wrench provided, turn both left and right rear roller adjustment bolts 1/4 turn
clockwise, then turn the main power switch back on and run the treadmill at a speed of
4.0-6.0 KPH. Run on to the running belt to determine if the belt is still slipping. Repeat
this procedure until the belt no longer slips.
LUBRICATION
Lubricating under the running belt will ensure superior performance and extend its life
expectancy. After the first 25 hours of use (or 2-3 months) apply some lubricant, and
repeat for every following 50 hours of use (or 5-8 months).
How to check running belt for proper lubrication:
Lift one side of the running belt and feel the top surface of the running deck.
If the surface is slick to the touch, then no further lubrication is required.
If the surface is dry to the touch, apply some lubricant.
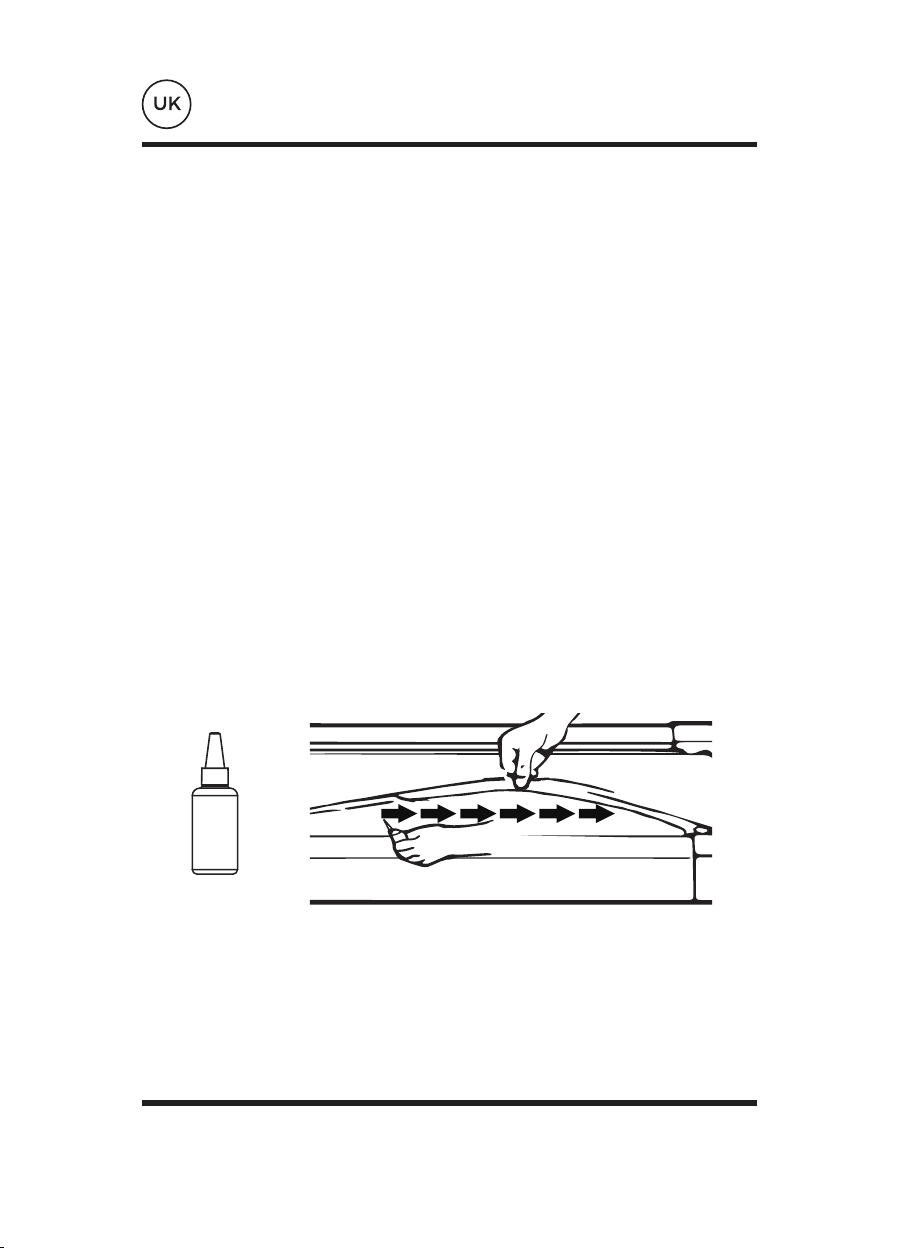
How to apply lubricant:
Lift one side of running belt.
Pour some lubricant under the centre of the running belt on the top surface of the
running deck.
Run on the treadmill at a slow speed for 3 to 5 minutes to evenly distribute lubricant.
NOTE: DO NOT OVER LUBRICATE RUNNING DECK. ANY EXCESS LUBRICANT THAT
COMES OUT SHOULD BE WIPED OFF.
Lubricant
1 PC

WARM UP & COOL DOWN!
To prevent injuries you should start with warm-up, cool-down and
stretching exercises before and after each workout.
No matter how you do sports, please do some stretch at first. The warm muscle will
extend easily. This reduces the risk of a spasm, or muscle injury, during exercise. To
warm up yourself we suggest the following stretch exercise as shown in the graphic:
Do not overstretch or pull your muscles.
IF IT HURTS, STOP IT!
Side bends
Pass the arm over your head and bend the upper body in the
same direction. Hold this position for 10 to 15 seconds and slowly
straighten up yourself. Repeat this 3 times for each side. (picture 1).
Toe Touch
Slow bend forward from your waist, letting your back and shoulders
relax as you stretch toward your toes, Reach down as far as you can
and hold for 15 counts. And then relax, repeat 3 times. (picture 2)
Calf-Achilles Stretch
Lean against a wall with your left leg in front of the right and your
arms forward, Keep your right leg straight and the left foot on the
floor, then bend the left leg and lean forward by moving your hips
toward the wall, Hold, then repeat on the other side for 15 counts.
Then relax and repeat 3 times for each leg. (picture 3)
Quadriceps stretch
With one hand against a wall for balance, reach behind you and pull
your right foot up .Bring your heel as close to your buttocks. hold for
10-15counts,relax.Repeat three times for each foot. (picture 4)
Inner Thigh Stretch
Sit with the soles of your feet together with your knees pointing
outward. Pull your feet as close into your groin as possible. Gently
push your knees towards the floor. Hold for 15 counts.Then relax
and repeat 3 times. (picture 5)
1
2
3
5
4

Zur Verwendung mit BLUEFIN FITNESS TASK
2.0 Laufband
BEDIENUNG
SHANDBUCH
Table of contents
Languages:
Other BLUEFIN Fitness Treadmill manuals


Popular Treadmill manuals by other brands


NordicTrack
NordicTrack C2400 30703.0 user manual

Weslo
Weslo Easy compact 2 treadmill Manuel de l'utilisateur

Landice
Landice Pro Trainer owner's manual

HealthTrainer
HealthTrainer Health Trainer CLASSIC Treadmill HT-CLASSIC owner's manual

NordicTrack
NordicTrack EXP 2000i NTTL11902 user manual

HEALTH RIDER
HEALTH RIDER HRTL19913 user manual


