BLUEFIN Fitness KICK FIT User manual

TREADMILL
INSTRUCTION MANUAL
DE BEDIENUNGSANLEITUNG
ES MANUAL DE INSTRUCCIONES
FR GUIDE D’UTILISATION
IT MANUALEDELLE ISTRUZIONI
NL HANDLEIDING
SE BRUKSANVISNING

0 2 //

004
024
044
064
084
104
124
KICK FIT // 03
// E N

WEL C O M E T O T H E
B L U EFI N F ITNESS C O MMUNITY
DEAR CUSTOMER
TREADMILL. TO ENSURE YOU GET THE MOST OUT OF YOUR
NEW TREADMILL, PLEASE ENSURE THAT ALL PERSONS USING THE
EQUIPMENT READ AND UNDERSTAND THE FOLLOWING MANUAL
CAREFULLY BEFORE USE.
BLUEFIN FITNESS ASSUMES NOLIABILITY FOR DAMAGES CAUSED
BY IMPROPER USE OR INCORRECT OPERATION.
SHOULD YOU BE INTERESTED IN KEEPING UP WITH OUR
WEBSITE BLUEFINFITNESS.COM AND FOLLOW US ON OUR SOCIALS:
FACEBOOKFACEBOOK.COM/BLUEFINFITNESS
INSTAGRAM
TWITTER
LINKEDIN
THE BLUEFIN FITNESS TEAM
04 //
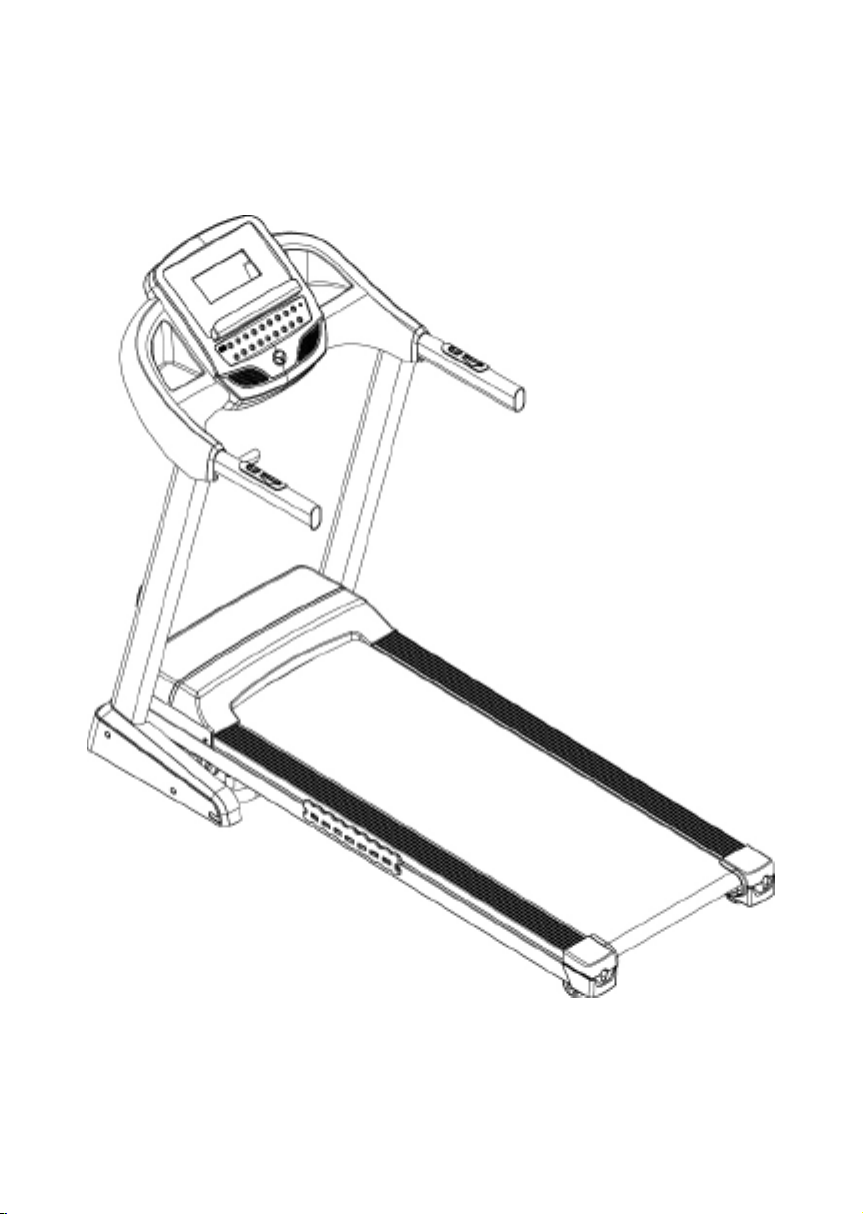
KICK FIT
KICK FIT TREADMILL.

WARNING:
This product can expose you to chemical including [lead], which is known to the State of California to cause cancer, and
[Bisphenol A], which is known to the State of California to cause birth defects or other reproductive harm. For more
information go to www.P65Warnings.ca.gov.
PLEASE READ THIS USER GUIDE BEFORE FIRST USING YOUR KICK FIT.
IT IS IMPORTANT TO KEEP THESE INSTRUCTIONS FOR FUTURE REFERENCE.
- This appliance can be used by children aged from 8 years and above and person with reduced physical or sensory or
mental capabilities or lack of knowledge if they have been given supervision or instruction concerning use of the appliance
in a safe way and understand the hazards involved.
- Children should not play with the appliance.
- Cleaning and user maintenance shall not be made by children without supervision.
- If the supply cord is damaged, it must be replaced by the manufacturer, its service agent or similarly qualified persons in
order to avoid a hazard.
- Only use accessory items recommended by the manufacturer.
- CAUTION the instructions must be followed carefully in the assembly, use and maintenance of the equipment.
- Keep hair, fingers and loose clothing away from moving parts to avoid serious injury.
- This product is intended for home use only.
- Always consult your SP before undertaking any exercise programme.
- This product is not suitable for therapeutic purposes.
- Do not use the product in humid or dusty environments to avoid any risk of electric shock.
- Do not use the product if temperature exceeds 40°C/104°F.
- Ensure the product is on a flat and dry surface before use.
- Only use accessory items recommended by the manufacturer.
Home use only. This equipment should not be stored outdoors, in a garage or an outbuilding.
Keep the equipment in a dry place with as little temperature variation as possible.
SAFETYINFORMATION
KICK FIT // 05
// E N
06 //
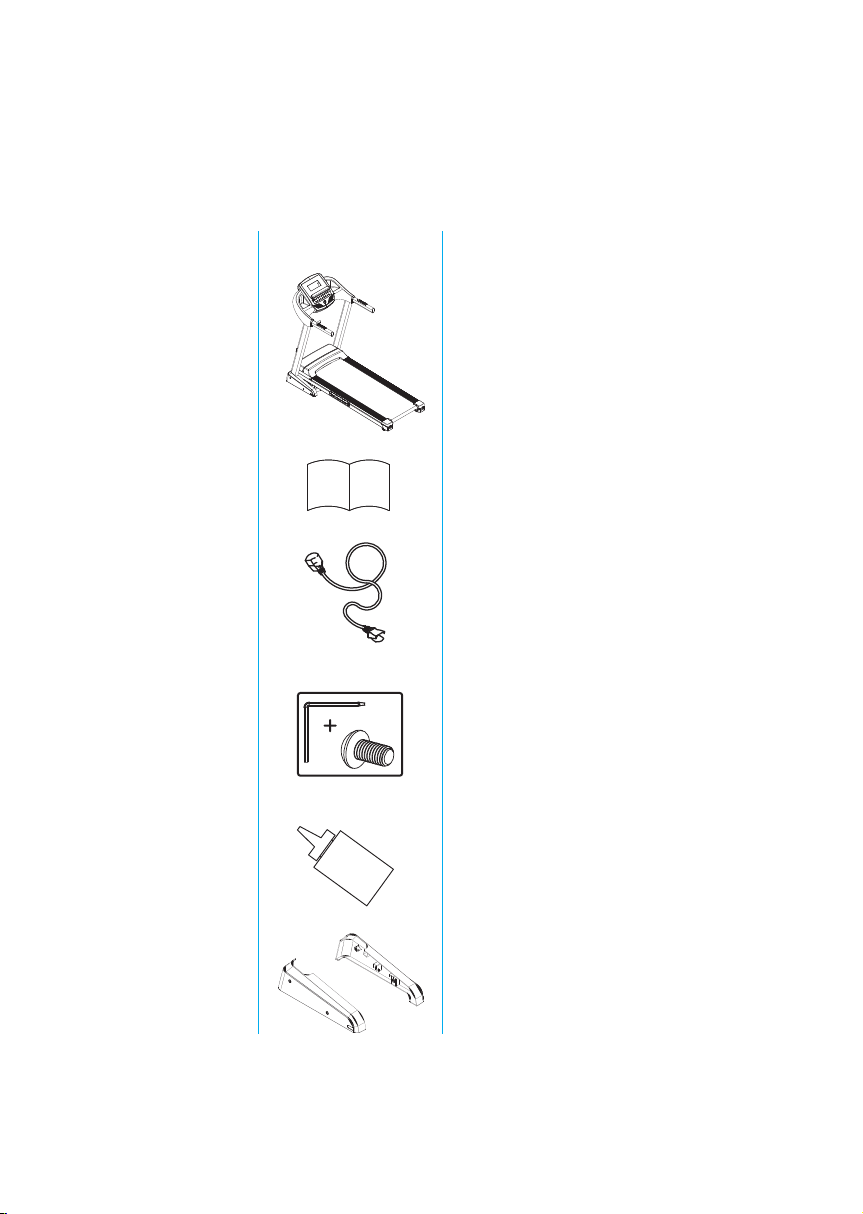
COMPONENT LIST
1
1
1
1
2
2
QuantityPictureName
Complete machine
Instruction manual
Safety key
Tool Kit
Silicone oil
Side cover
KICK FIT // 07
// E N
08 //
ASSEMBLY INSTRUCTIONS
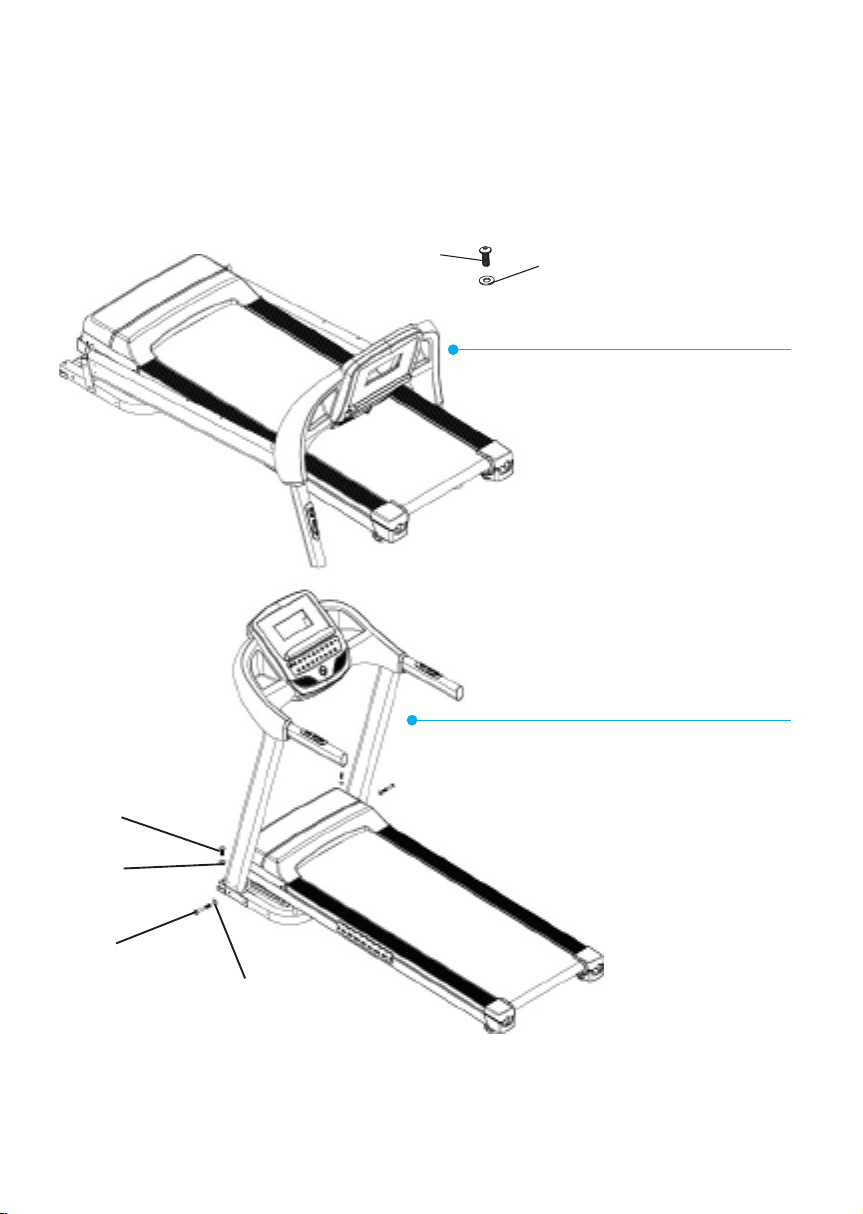
Assembly of the treadmill
Take it out of the box; hold the
display housing and slowly lift it
to fixed screw hole; fix M8*20
screw and M8 flat gasket on left
and right columns.
1.
Lift the display housing; Fix the
upper treadmill stand column
onto the base at the rear with
M8*20 screw and M8 flat gasket;
Fix the column onto the base
support with M8*55 screw and
M8 flat gasket;
2.
M8*20 SCREW
M8*20 SCREW
M8*55 SCREW
M8*20 FLAT GASKET
M8 FLAT GASKET
M8 FLAT GASKET

KICK FIT // 09
// E N
ASSEMBLY INSTRUCTIONS
Fix left and right side covers on
both sides of columns.
3.
4.2*16
SCREW
4.2*16
SCREW
LEFT SIDE COVER
RIGHT SIDE COVER
10 //
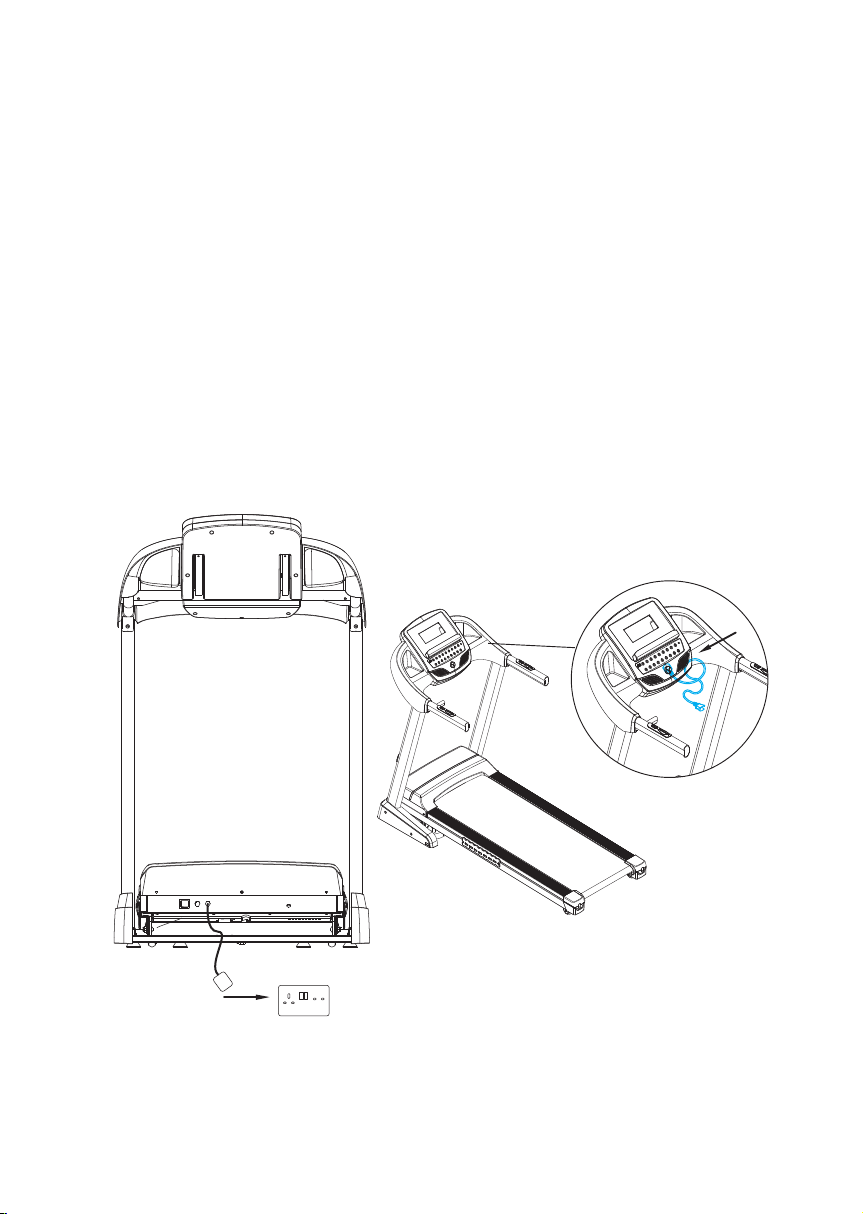
1.1.Place the treadmill on a level open ground.
1.2. Insert power plug into the wall socket and turn on power switch a (light turns red). You will hear a “beep” and the
display will tunr on; Fig 1.
1.3.Check whether the data displayed on the screen is abnormal,and stand on the anti-slip side rail before clicking start
to prevent accidental falls.
1.4.Place the safety key at yellow position on the upper console housing and clamp the emergency key onto your
clothes, (Note:The position where the emergency key clamped should not be easily touched when running) then start
the treadmill. Fig 2.
1.5. “START” button: Press this button to start the treadmill.
1.6. “STOP” button: Press this button to stop the machine and then the machine will stop smoothly. The speed will
decrease from your current maximum speed to stop.
1.7. “SPEED” button: Adjust the speed. Press the speed plus button to increase the speed and press the speed minus
button to reduce the speed.
OPERATING INSTRUCTION
Fig1.
Fig2.

KICK FIT // 11KICK FIT //
// E N
OPERATING INSTRUCTION
LCD WINDOW DISPLAY
SPEED: Display the speed
INCLINE: Display the incline
TIME: Display the time
DIS.: Display the distance
CAL.: Display the calories
PULSE: Display the heart rates
MP3 FUNCTION
When connected to an external MP3 or
other audio device, music can be played. The
volume adjustment of playing
music should be carried out on external MP3
or other audio equipment. Please pay
attention to volume and avoid damaging the
speakers by turning up the volume too high.
USB FUNCTION
When the USB flash disk is
plugged into the console, music
can be played in MP3 format
through the speakers.
BUTTON FUNCTION
“PROG.” button: Press this button to choose a program from manual mode—P1--P12--U1--U3--FAT;
“MODE” button: When the machine is in standby mode, press this button to choose the mode: mode-time count down,
mode-distance count down, mode-calories count down;
“START” button: Press this button to start the machine, the machine will run at the lowest speed or at the speed of
default program after 3 seconds time count down;
“STOP” button: Press this button to stop the machine, the machine will stop smoothly;
“SPEED+” ,“ SPEED-” : Adjust the speed. Press the button to adjust the speed when running.
“INCLINE+” ,“ INCLINE-” : Adjust the incline. Press the button to adjust the incline when running, and adjust the data when
stop;

12 //
1. When the console is in standby state, press this key to enter time reversal mode
2. Under the setting "body fat test", press this key to enter the next parameter setting
3. Operation process in standby mode: time backward meter - distance backward meter - calorie backward meter - return
4. Operating procedure under body fat test setting: set gender - set age - set height - set weight - Set body fat test
A. MANUAL MODE FUNCTION
Enter manual mode: after the console is fully displayed, enter the initial standby mode. At this point, press
the Start button to enter the operation of manual mode.
Operation description: the initial operation speed is 1.0km /H, time, distance, calorie window is counted from zero,
according to the speed Adjust key you can adjust the size of the running speed value, press the rise and fall adjust key to adjust
the size of the running slope value.
If the exercise time exceeds 99:59 minutes, the system does not stop, the time starts from zero time again.
B. FUNCTION OF TIME REVERSAL MODE
1. Enter the time reversal mode: In the initial standby state, press the mode key to select the time inversion mode.
The time window will display 30:00 minutes and flash the display to set the required running time through
the speed +/- key.
Run: the initial speed of 1.0 KM/H is set according to the running time of the display, distance and starting from scratch is
countied in the calories window, press speed adjustment to adjust the speed value. The lift adjustment can be changed using
the Lift key.
2. Enter the distance backward mode: in standby mode, press the mode key to select the chosen distance
The distance window will display 1.0km and will flash.
Run: the initial speed of 1.0 KM/H, set according to the distance from the window begins to count down, calories
and time window will begin counting from scratch, press speed adjustment to adjust the speed value, The lift adjustment can
be changed using the Lift key.
3. Enter calorie counting mode: In the initial standby mpde, press the mode button to select calorie counting mode,
then the calorie window displays 50 and flashes (the required operating calories can be set through the speed +/-
button, and the range is 20-990). Press the Start button to enter the operation of calorie counting mode.
Run: the initial speed of 1.0 KM/H is set according to the calories count window, window of time and
distance begin counting from scratch.
C. AUTOMATIC PROGRAM FUNCTION
Enter automatic program: In the initial standby mode, press program key to enter automatic program selection. At this time,
the time window displays 30:00 minutes and flashes (the required running time can be set through the speed +/- key, and the
setting range is from 8:00 to 99.00 minutes). Press start key to enter the operation of automatic program.
MODES

KICK FIT // 13
// E N
PROGRAMMES
BODY FAT TEST MODE
1. When the console is in standby mode, press this key to enter automatic program mode.
2. After entering the program settings, continue to operate this key to enter the "body fat test" mode
The heartbeat window displays: parameter function (-x -)
The calorie window displays set value. Press speed +/- to adjust the set value, and
press mode to enter the next setting.
The first item is gender (-1-) setting: initial value 1 (set range 1~ 2,1 means male; 2 for women)
The second item is the age (-2-) setting: the initial value is 25 (the setting range is 10-99 years old)
The third item is height (-3-) Setting: initial value 170 (setting range 100~220CM)
The fourth item is weight (-4-) Setting: initial value 70 (setting range: 20~150KG)
The fifth item is the body fat (-5-) test: show --
Body fat test: When the setup is completed, enter the 5th body fat test, and the initial display is ""--"".
Hold the heart beat test steel sheet with both hands for about 5 seconds, and the body fat test index will be displayed.
The body fat index is a measure of a person's height and weight, suitable for any men and women, together with other
health indicators, the ideal body fat index must be between 20 ~ 25, if it is less than 19, the weight is tincorrectt, if it is
between 26 ~ 29, it means overweight, and if more than 30, it means obesity (note: the data is for reference only, not
medical data).
1 8 //
.
W A R M UP AND COOLD O W N
EACH WORKOUT.
WE RECOMMEND THE FOLLOWING STRETCHES, WHICH WILL REDUCE
NEVER OVERSTRETCH OR PULL YOUR MUSCLES.
SIDE BENDS
Pass one arm up and over your head,bending your upper body in the same
direcon. Hold this posion for 10 to 15 seconds and slowlystraighten
yourself back up. Repeat this 3 mes for eachside.
TOE TOUCH
Slowlybend forward from your waist,leng yourback and shoulders relax
as you stretch towards your toes. Reach down as far as you can go and hold
for 15 seconds. Then relaxand repeat 3 mes

KICK FIT // 19
// E N
Lean against a wall with your leleg in front of the right and your arms on
the wall. Keep your right leg straight and yourlefoot on the floor, bend the
leleg and lean forward by moving your hips toward the wall. Hold, then
repeat on the other leg for 15 seconds. Repeat 3 mes for eachleg.
QUADRICEPS STRETCH
With one hand against a wall for balance, reach behind you and pull
your right foot up. Bring your heel as close to yourbuocks. Hold for
10-15 seconds. Repeat three mes for each foot.
INNER THIGH STRETCH
Sit with the soles of your feet together and your knees poinng outwards.
Pull your feet as close to your groin as possible. Gently push your knees
towards the floor. Hold for 15 seconds. Then relaxand repeat 3 mes.
// E N

20 //
TROUBLESHOOTING
Er01: indicates abnormal communication between electronic watch and electronic control
The console wire is not connected properly
Er02: indicates abnormal indication of voltage no. between the down control and motor
The motor wire is not connected properly
Er03: indicates the indication of speed anomaly detected by down-control
PWM drive circuit on the down control board failure
Er04: indicates the overvoltage protection information of the down control.
The input voltage of the treadmill exceeds the rated operating voltage of the motor.
E05: indicates that the driving power voltage is too high and an abnormal phenomenon is indicated
The input voltage of the treadmill exceeds the rated operating voltage of the motor.
E06: indicates that the driving power voltage of the lower control no. is too low and an abnormal
phenomenon is indicated
The supply voltage is too low
E07 : indication that the console security lock is not connected properly
The magnetic safety key is not attached properly.

TECHNICAL SPECIFICATION
KICK FIT
Model: KICK FIT
Rated Voltage: 220~240v
Rated Power: 800W
Frequency: 50-60hz
Standard: EN ISO 20957-1:2013 & EN957-6:2010+A1:2014
Class: HC
Max User Weight: 110kg
Bluetooth Type: Bluetooth V4.2
Bluetooth Frequency: 2400-2483.5MHz
Maximum Radio-frequency Power: ≤20dBm
ETSI EN 300 328 V2.2.2 (2019-07)
Wideband transmission systems;
Data transmission equipment operating in 2.4GHz ISM band and using wide band modulation techniques;
Hamonised Standard covering the essetial requirments of article 3.2 of Directive 2014/53/EU
KICK FIT // 21
// E N

William Vaughan, CEO
Bluefin Trading Ltd.
MAN U F A CTURER W ARRANTY
THE BLUEFIN WARRANTY COVERS ANY TECHNICAL FAULTS WITH
YOUR ITEM. IF YOU NEED TO MAKE A WARRANTY CLAIM CONTACT US
VIA EMAIL AT: SUPPORT@BLUEFINTRADING.CO.UK
YOUR WARRANTY DOES NOT COVER THE FOLLOWING:
• General wear and marks from use.
• Water damage.
• Damage due to improper use.
• Chassis damage & scratching due to improper use or dropping.
• Electronic damage due to improper use or dropping.
• Your warranty begins on receipt of delivery
• Technical faults are covered for 12 months.
If you have any quesons regarding your warranty please email us at:
support@bluefintrading.co.uk
22 //

KICK FIT // 23
EU DELCLA R ATION O F C ONF O R MIT Y
For the latest & up-to-date EU declaraon of conformity for this product,
please visit: www.bluefinfitness.com/manuals/Kickfit_DoC.pdf
UK Importer Address:
Bluefin Trading Ltd
Keelham Farm
Hebden Bridge
UK
HX7 8TG
USA Importer Address:
Bluefin Trading
Internaonal LLC
Wilmington
Delaware
DE19806
EU Importer Address:
Comply Express Unipessoal Limitada
StartUp Madeira
EV141, Campus da Penteada
9020 105 Funchal
Portugal
WASTE ELECTRICAL AND ELECTRONIC EQUIPMENT
Do not dispose of this device with domesc waste.
The components of the device must be separately recycled
or disposed of according to local regulaons. The system
operator may also return any waste electrical and electronic
equipment to the manufacturer at the end of theirlifeme.
Charges incurred for transport to the manufacturer will
be at the expense of the owner of the waste electrical and
electronicequipment.
RECYCLING OF PACKAGING MATERIALS
Do not dispose of packaging with domesc waste.
All packaging materials can be safely recycled according to
local regulaons.
// E N

WLL K O MMEN BEI DER B L U EFI N
FITNESS C O MMUNITY!
LIEBE KUNDIN,LIEBER KUNDE,
VIELEN DANK, DASS DU DICH FÜR DAS BLUEFIN FITNESS KICK FIT
LAUFBANDES
KICK FIT
SOLLTEST DU DARAUF ACHTEN, DASS ALLE PERSONEN, DIE DAS
ENTSTEHEN.
LAUFENDEN ZU BLEIBEN, DANN SCHAUE DOCH EINFACH AUF UNSERER
WEBSITE VORBEI: BLUEFINFITNESS.COM UND FOLGE UNS AUF UNSEREN
FACEBOOK FACEBOOK.COM/BLUEFINFITNESS
INSTAGRAM
TWITTER
LINKEDIN
DEIN BLUEFIN FITNESS TEAM
24 //
Laufbandes
LAUFBANDES
Table of contents
Languages:
Other BLUEFIN Fitness Treadmill manuals


