BlueLocar RAY User manual

BlueLocar Ray Manual |EN 1
Kapitel
EN
MANUAL


BlueLocar Ray Manual |EN 3
Chapters
1 | Warnings and notices
2 | The BlueLocar RAY
2.1 | Abstract
2.2 | Start-up
3 | Display
3.1 | Key symbols and functions
3.2 | Menu navigation
3.3 | Keylock in main menu and returning from Standby mode
3.4 | Status symbols
3.5 | Battery
4 | Compass
4.1 | Compass display
4.2 | Calibrating the compass
5 | Operating modes
5.1 | Standard mode
5.2 | Dive mode
5.3 | Standby mode
5.4 | PC mode
5.5 | Off-state
6 | SOS and HOME-signals
6.1 | SOS signals
6.2 | HOME signals
6.3 | Sending HOME/SOS signals
6.4 | Receipt and locating
6.5 | SOS and HOME inbox
6.6 | Behavior while sending a SOS or HOME signal
6.7 | Behavior while locating a SOS or HOME signal
7 | Managing groups
7.1 | Setting up a new group
7.2 | Join a group
7.3 | Group members
7.4 | Leave a group
8 | Text messages
8.1 | Receiving messages
8.2 | Inbox and sending a message
9 | Dive mode
9.1 | Start and quit the dive mode
9.2 | Dive mode display
10 | Divelog
10.1 | Display the divelog on your BlueLocar RAY
10.2 | Export the divelog

Chapters
11 | Settings
11.1 | Backlight
11.2 | Key tones
11.3 | Compass
11.4 | Diving
11.5 | Time
11.6 | Language
11.7 | Units
11.8 | Shutdown
10.9 | Restart
12 | RAY Communicator software
13 | Service and cleaning
14 | Technical data
15 | Declaration of conformity
16 | BlueLocar limited warranty
16.1 | Warranty period
16.2 | Exclusions from liability and liability restrictions
17 | Disposal of the device

BlueLocar Ray Manual |EN 5
Warnings and notices
1 | Warnings and notices
ATTENTION:
The electronic locating system BlueLocar RAY serves the purpose of supporting
the tracking of divers at the surface. It increases the safety when diving, but it is
no replacement for other rescue and signal systems.It is only a reasonable addition
to those systems.
The BlueLocar RAY system supports navigation, but can neither replace proper
orientation nor expertise. Therefore do not rely on a single tool for location and navi-
gation during a rescue operation
It is strongly recommended to agree on common procedures and behavioural rules
in case of SOS or HOME signal reception.
CAUTION:
The displayed distance and direction to another device on a BlueLocar RAY is al-
ways a representation of the shortest and direct route. The system does not consi-
der any shoals, vessels, rocks, reefs or other obstacles.You should therefore always
perform an additional examination of the displayed path, since it can contain barriers
and risks.
IMPORTANT:
The electronic locating system BlueLocar RAY should only be operated by persons
that are familiar with the proper handling and operation of this system.The company
BlueLocar advises all Users to read the manual carefully and to contact other expert
persons or the manufacturer in case of any questions .
The BlueLocar Basestation is operating on a radio frequency that complies with
the radio regulations of the FCC (USA), IC Canada (Canada). The operation of the
system in these countries is license-free and does not have to be reported.
Using a BlueLocar Basestation outside of the mentioned countries is not licen-
se-free and the operation of the device has to be reported to the responsible autho-
rities of the respective country. The relevant departments of different countries can
be obtained from the manufacturer.
ATTENTION:
The electronic locating system BlueLocar RAY is solely to be used for the intended
purpose for which it was designed and manufactured. The Manufacturer distances
himself from any misuse and other purposes that do not comply with the intended
regulations.
To ensure the proper and safe operation of the electronic emergency and location
system BlueLocar RAY it is not allowed to make any modifications. Only unaltered
and original parts that are intact can provide a reliable operation of the system.
The electronic emergency and location system BlueLocar RAY is using the Global
Positioning System (GPS) that is operated and maintained by the governement of
the United States. Solely this government is responsible for function, accurancy and
service of the GPS system.
Take into account that the position determination based on GPS, which is the foun-
dation for the system‘s locating service, can be affected by weather conditions
and the position of the GPS receiver of the BlueLocar R AY . The GPS signals are
transmitted by satellites with high frequencies. These signals can only be received,
if there is visual contact with the satellite. Therefore being under water, below deck
on a boat or being inside a building it is not possible to receive the satellite signals.
Thus the location service cannot operate. So the GPS antenna, located in the upper
left corner of the BlueLocar RAY case, should not be covered and should be positi-
oned towards the sky, if possible (upright position of the device).
!
!
!
!

BlueLocar Ray Manual |EN 6
2 | The BlueLocar RAY - Range of functions
• Locating other BlueLocar RAYs via GPS (direction and distance)
• License-free and free of charge radio network
• SOS function: emergency signal
• HOME function: pickup signal
• Reception and location of emergency and pickup signals
• Digital compass
• Precise position determination via GPS
• Sunlight-readable display
• Acoustic signal under water
• Communication via messages
• Dive depth gauge with integrated dive log functionality
• Transmission range up to 10 km
• Water proof housing up to 100 m dive depth
• Compatible with base station for boats
• Up to 15 hours of transmission in emergency mode
2.1 | Abstract
Congratulations for buying your new BlueLocar RAY!
The BlueLocar RAY is a compact system for communication and location of divers.
The R AY automatically establishes a communication network with all other RAYs in
range. Thus you can locate all surrounding devices, if they call for help by sending
a SOS signal. Additionally it is possible to create groups of devices (e.g. for diving
classes).Inside a group you can locate each other at any time without previous setup
and you can send predefined text messages to group members. Within a group it is
also possible to send a pickup (HOME) signal (e. g.: A diver aborts the dive early and
wants to be picked up by the boat).
The dive mode of the R AY provides divelog functionality, which records all the im-
portant data of the dive. The log data can be transfered to a computer ( Windows,
MAC, Linux ) to be analysed afterwards. An additional digital compass provides
orientation guidance for above and under water use cases.
The transmission range of the BlueLocar RAY depends on environmental condi-
tions. The radio signals can be disrupted by high waves, ships, reefs and other sur-
rounding objects. As a basis rule: the higher two communicating devices are above
water, the better they can receive signals from each other. But the system was de-
signed that messages can be routed through the network from any device. So even
if two devices are out of range to each other it is possible that other devices in bet-
ween forward their messages to establish a communication for these two nodes.
2.2 | Start-up
When the BlueLocar RAY is completely switched off, it can only be activated by
attaching an external power supply. On this occasion it is nessecary to connect the
external power supply for at least 10 seconds ( until the boot screen is displayed).
Thus when using the device on a regular basis, it should not be switched off, but
instead be put into standby mode ( see chapter 5.3).
The R AY was designed in the way that solely the user is able to shut down the de-
vice completely ( unless the batteries are empty ). So even after a system crash the
device will reboot and continue operation!
The BlueLocar RAY - Range of functions

BlueLocar Ray Manual |EN 7
3 | Display
The 2,7 inch display of the BlueLocar RAY remains readable even in strong direct
sunlight. The additional backlight enables utilization in dark environments and can
be activated within the settings menu (see chapter „11.1 | Settings – Backlight“).
3.1 | Key symbols and functions
The BlueLocar RAY has six pressure sensitive keys. These keys are used to select
different device functions. Operating the device with gloves works also very well.
The following list describes the individual keys and their functions:
„ ✓ “ - OK key/selection key
To select or verify the current menu entry.
„ x “ - Back key/deselect key
To leave the current submenu or to deselect the current menu entry.
„ + “ - Continue key
To switch from the current to the next menu entry.
„ - “ - Back key
To switch from the current selection to the previous menu selection.
„ SOS “ – Emergency key
To send an emergency to all surrounding devices.
„ HOME “ – HOME key
To send a pickup signal to all devices of your group.
3.2 | Navigation within the menu
The main menu of the BlueLocar RAY is displayed as symbols on a tile-shaped
background.
By using the „Continue“ key („+“) or the „Back“ key („-“) the selected area can
be changed. In this case, the currently selected area will have a black background,
while all other areas will be bright.
By activating the „Selection“ key („ ✓ “), the current selection from the menu,
and all functions associated with it, will be activated. With the „Back“ key („ x“)
you can then switch back to the previous menu.
By pressing the „SOS“ key („SOS“) followed by a confirmation the R AY starts
sending a SOS signal to all surrounding devices. By pressing the „HOME“ key
(„HOME“) followed by a confirmation the R AY starts sending a HOME signal to all
devices inside your group. When activating the „SOS“ or „HOME“ key the R AY is
set into SOS or HOME mode (see chapter „6 | SOS and HOME signals).
1
1
2
3
4
5
6
2
3
4
6
5
Display

BlueLocar Ray Manual |EN 8
3.3 | Keylock in main menu and returning from the Standby mode
Inside the main menu you can activate a keylock by double pressing the „Back“
key („ x“). When performing a double press of the „Back“ key („x“) with active
keylock it can be deactivated again.
This double press of the „Back“ key („ x“) also applies to return from an activated
Standby mode.
3.4 | Status symbols
The BlueLocar RAY provides all nessecary device status information by displaying
symbols in the top of the Display.
Battery
Displays the battery life indicator (see chapter 3.4.).
Message
The message symbol is diplayed when there is at least one unread message
inside the inbox.
Radio signal strength
This symbol is displaying the signal strength of the current radio connection to
the closest R AY .
GPS
The GPS symbol is displayed when the device has received an updated posi-
tion in the last 40 seconds from the GPS module. Please take into account that a
proper GPS signal requires a direct visual contact with the satellites. Inside closed
spaces or beneath covered areas it is very difficult to receive an accurate position
or even not possible.
Time
In the main menu the R AY is displaying the current time. As soon as a GPS
signal is present the time will be synchronized with the GPS satellite accurate time
informations. Therefore it does not has to be adjusted by the user. Only adjusting
the time zone and activating the summertime can be done by the user (see chap-
ter 11.5).
3.5 | Battery
Your BlueLocar RAY is equipped with a rechargeable battery, which can be rechar-
ged with the provided power supply unit or on any USB connection. The battery
charge indicator is on the upper left corner of your BlueLocar RAY‘s display
screen.
NOTE: review the battery charge of your BlueLocar Ray before every use to ensure that
you have enough power for emergencies.
CAUTION: Only the provided power supply unit or a USB charger with 5V and
1A/1000mA specifications is to be used as an external charger
!
Battery is being charged
Battery charge 100%
Battery charge 85%
Battery charge 65%
Battery charge 35%
Battery charge < 5%
1 2 3 4
5
1
2
3
4
5
Display

BlueLocar Ray Manual |EN 9
Compass
4 | Compass
The BlueLocar RAY has a digital compass for navigation and bearing. The Compass
is displayed while in dive mode and can be selected from the compass icon in the
main menu while on the surface.
4.1 | Compass display
Depending on the orientation
of the R AY , information will be
displayed in a compass rose
format or in azimuth.
If the R AY is lying down with an
upward facing display the com-
pass is displayed in rose for-
mat. When the device is held
upright, the display will switch
to a scale view. Below the com-
pass view, the current direction
will be displayed numerically by
degrees. This displayed values
depend upon the orientation of the device.The given direction is represented by the
antenna when lying down and by the backside of the device in the upright position.
For the best results, hold the device either horizontal-
ly or vertically. If you hold the device at an angle, the
angle indicator will display an exclamation mark „!“.
This indicates that the shown direction is only a close
approximation.
4.2 | Calibrating the compass
To ensure accuracy, the digital compass must be calibrated. This has to be done
after every change of location (earth magnetic field is location based). The compass
calibration can be started inside the compass‘s settings menu (Main menu --> Set-
tings --> Compass --> Compass calibration). Choosing “compass calibration“ activa-
tes the calibration process. This procedure is divided into three steps.
A counter at the beginning of every calibration step is
displaying the time to prepare until the actual calibration
process starts. During step 2 and step 3 the angle of the
device is observed to ensure a more accurate calibrati-
on. The more you hold the device at an angle, the more
the black circle moves away from the white circle.Thus the goal is to hold the device
during the calibration in the way shown on the screen and that the black circle is per-
fectly placed inside the white circle. Individual steps for calibration of the compass
are described in detail below:
Movement in all possible directions:
During this step, you will rotate the device
randomly in different directions for 15 se-
conds. A timer displayed on the screen will
track the time, and a tone will indicate when
the process is complete.
Compass rose Compass scale
Compass rose
GPS information
GPS position
Current course
good bad

BlueLocar Ray Manual |EN 10
Compass
Movement around the Z-Axis: Hold the-
device in a horizontal position with the
display facing up. Rotate the device in a
circular motion (so the backside of the de-
vice is always facing the ground) until the
counter has run out after 15 seconds. You
may also place the device on a horizontal,
flat and non metal surface for higher preci-
sion. A tone will indicate when the process
is complete.
Movement around the X-Axis: Hold the-
device in a vertical position with the USB
connector facing the ground (the antenna
is pointing upwards). Then rotate the de-
vice in a circular motion until the counter
has run out after 15 seconds (the USB
connector is constantly facing the ground).
You may also place the device on a hori-
zontal, flat and non metal surface for higher
precision. A tone will indicate when the
process is complete.
As soon as the calibration data has been collected, the calibration will be cal-
culated and saved in the device.
If an error should occur during the
calibration process, an error tone will
sound accompanied by a message on
the display of your BlueLocar RAY.
IIf this should occur, please repeat the
calibration process.
Make sure that the magnetic field is
not disturbed by any metal parts or
other magnetic components during the calibration process. During operation, the
digital compass can also be affected by scuba tanks and other magnetic materials.
NOTE: The compass will remain calibrated even after a period of inactivity or a restart.
NOTE: The compass will need to be recalibrated when your location changes. This will
balance any interference or location-dependent idiosyncrasies.

BlueLocar Ray Manual |EN 11
Operating modes
5 | Operating modes
The BlueLocar RAY has five different modes of operation.Those modes differ espe-
cially in available functionalities and in energy consumption.
5.1 | Standard mode
When in standard mode the R AY is able to send and receive SOS and HOME sig-
nals. In addition to that you can change settings, manage groups, send messages,
switch to the digital compass and browse the divelog.
5.2 | Dive mode
The dive mode is displaying the digital compass for orientation, the temperature, the
dive depth and the duration of the dive. Additionally you can set up a divelog for all
dives.The dive mode is started fully automatically when the device is below the water
surface at least 2 seconds and more than 1,2m deep. A dive is terminated after 4
minutes at the surface.
The USB connection to charge and update the device is deactivated during the dive
mode. Furthermore the radio connection and the GPS for the location service are
deactivated, since these services can not be provided under water.
The USB connector of the device should be covered by the provided protection cap
during each dive.
Additional information regarding the dive mode can be found in chapter „9 | Dive
mode“.
5.3 | Standby mode
With the Standby mode the device is able to save power and prolong the battery life
of the system. Therefore the radio communication, the position determination with
GPS and all other funtions of the BlueLocar RAY‘s will be disabled. In Addition, a key
lock will be activated, so all keys are deactivated, except the „Back“ key( „x“ ).
You can activate the Standby mode by using the „Standby“ icon inside the main
menu. As a result the Standby screen will be displayed. By shortly double press the
„Back“ key ( „x“ ) the R AY will return from the Standby mode.
By Default, the BlueLocar RAY will switch from the Standby mode to the dive mode,
as soon as you reach a dive depth of at least 1,2m. To save more battery life you can
deactivate this behaviour inside the menu „Settings --> Diving --> Dive mode“.
Moreover, it is possible to charge the battery of the R AY while in Standby mode by
connecting the USB cable to an external power source.This is displayed by the battery
indicator on the Standby screen.

BlueLocar Ray Manual |EN 12
Operating modes
5.4 | PC mode
As soon as you connect the BlueLocar RAY with a computer and the „BlueRay
Communicator“ software is running, the device will switch to the update PC mode.
This will deactivate all functions at the device. The BlueLocar Ray must never be
unplugged until the connection to the computer was disabled!
5.5 | Off-state
In case of a longer storage period of the BlueLocar RAY without usage or connected
power supply, it is recommended to switch off the device.This will prevent the battery
from any low charge state and eliminates the possibility of any hardware damage to
the device. By selecting the „Shutdown“ icon inside the menu „Settings“ you can
switch off your R AY .
CAUTION: When the BlueLocar RAY is shut down, it can only be reactivated by connec-
ting an external power supply. Therefore, the device has to be connected to a power
supply or a computer for at least 10 seconds.
!

BlueLocar Ray Manual |EN 13
SOS and HOME signals
6 | SOS and HOME signals
The main feature of the BlueLocar RAY is the transmission of your current GPS
position using SOS and HOME signals. This enables all devices, which received the
signal, to locate your position that has been sent. These SOS and HOME signals
will be sent constantly until the transmission is cancelled ( this should only be done
upon successful pick up ). The current GPS position is updated and transmitted
constantly.
6.1 | SOS signal
The SOS signal is sent with the highest priority to all surrounding RAY‘s in range.
It is recommended to use this signal type only in exceptional cases, because every
available device will receive a popup window along with an acoustic alert.
6.2 | HOME signal
The HOME signal is only sent to the devices assigned to the same group (for more
information see chapter 7 ). All group members will receive a popup window, same
as the SOS signal window. A HOME signal serves the purpose of a pick up notifica-
tion. For example, a diver of the group wants to be fetched early by the boat.
6.3 | Sending SOS/HOME signals
The SOS and HOME signals are triggered by pressing the keys on the side of the
device. Afterwards, the transmission of the signals has to be additionally confirmed
with the „OK“ key („ ✓“). The intended broadcast can be cancelled by using the
„Back“ key („ x“). The HOME signal can only be transmitted, if the device is assi-
gned to a group ( see chapter „7 | Managing groups“ ). While sending one of these
signals, information regarding the current signal status is displayed. There are three
different information status screens.
• The signal is being sent, but no other device has received it yet.
• The signal was received by another R AY device, but the user has not yet
confirmed the request.
• The signal was received by a R AY device and the request was confirmed by
the other user with the OK key.
To cancel the transmission of a SOS or HOME signal, the „Back“ key („ x“) has to
be pressed, followed by a confirmation with a press on the „OK“ key („ ✓“).
send SOS
send HOME
BlueLocar Ray Manual |EN 14
SOS and HOME signals
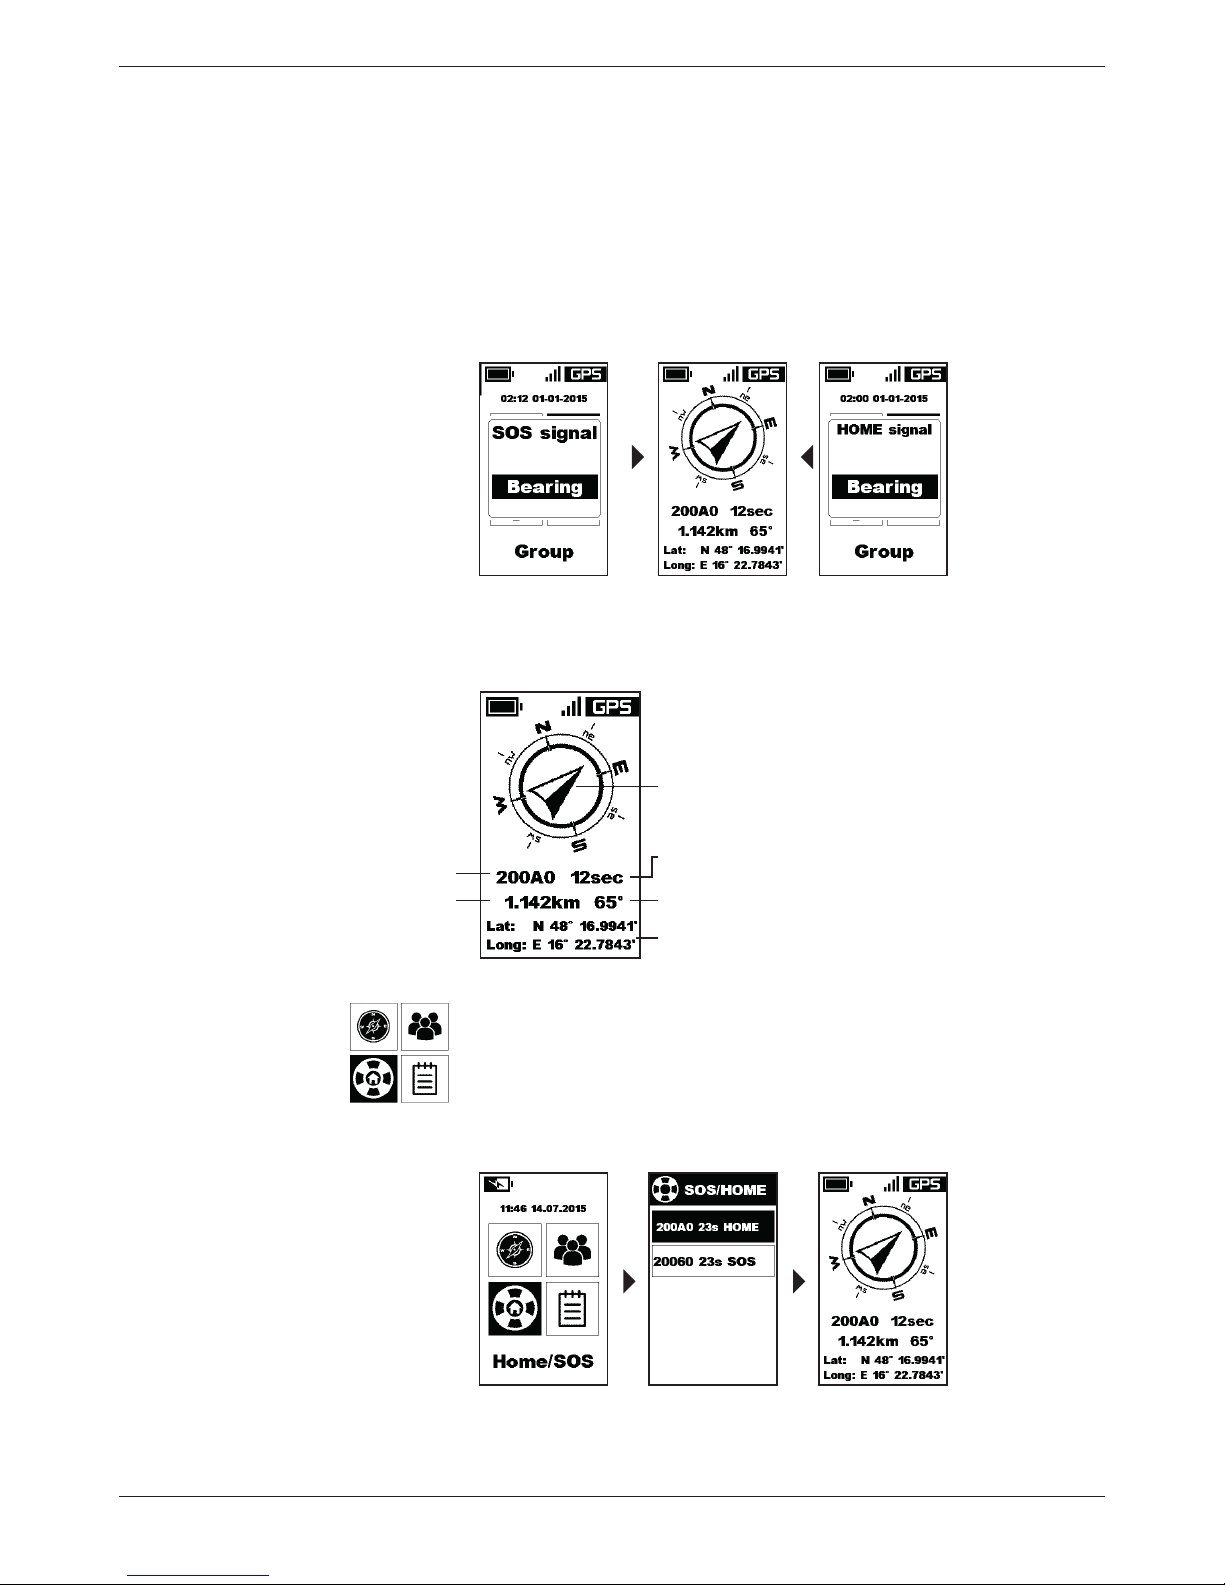
6.4 | Receipt and locating
Upon the receipt of a SOS or HOME signal, the R AY displays a popup windows
along with generating an acoustic alert. When pressing the „OK“ key („ ✓“), the
SOS or HOME signal will be confirmed. Anybody who is confirming an emergen-
cy signal is obligated to ensure localization and rescue immediatly. Along with
the transmission of the confirmation of a SOS or HOME signal, a locating screen
is displayed. This screen shows the course of the device in degrees, its distance
(linear distance) in meters or miles, its GPS coordinates and the time since the last
radio contact to this device.
An additional arrow indicates the direction to the device that is requesting support.
By pressing the „Back“ key („ x“),
the received SOS or HOME signal
will be ignored. Nevertheless, the
incoming SOS or home information
will be stored inside the SOS and-
HOME inbox. So the emergency
or pick up request will be catalo-
gued and can be confirmed later
by selecting the signal inside the
inbox menu to start locating the
other device (see chapter 6.5 ).
6.5 | SOS and HOME inbox
The SOS and HOME inbox is listing all surrounding devices that have recently sent a
SOS or HOME signal and need assistance. Each device inside this list can be selec-
ted and located seperately. Keep in mind, when selecting a list entry to locate the di-
stant device, that you transmit a confirmation and are thereby obligated to support.
Direction to target
Time since last
radio contact
Course to target
GPS position of
the target
Distance to target
ID of target

BlueLocar Ray Manual |EN 15
SOS and HOME signals
6.6 | Behaviour while sending a SOS or HOME signal
While sending a SOS or HOME signals, it is recommended to follow some import-
ant rules to ensure the optimal operation of the BlueLocar RAY.
• To enhence the transmission range of the BlueLocar RAY, it is necessary to
hold the device as high as possible above the water surface. Thereby pointing
the antenna of the device in an upward direction. This should be done at least
until the receipt of the signal was confirmed.
• To prevent all interference by surrounding objects, it is recommended to po-
sition the device, if possible, at a stable place with an unobstracted view to
potential receiver.
• To prolong the battery life, it is recommended to limit the use of the display
backlight of the BlueLocar RAY while transmitting a SOS or HOME signal.
• The transmission of a SOS or HOME signal should not be cancelled to use
other features of the R AY , like the digital compass. This can lead to misunder-
standing by the users of the receiving devices. As long as the device is in SOS
or HOME signal mode, the emergency and pickup signals will be sent cons-
tantly. So it is not required to cancel and reactivate the SOS or Home signal
mode to ensure correct transmission and receipt.
6.7 | Behaviour while locating a SOS or HOME signal
Also while locating a SOS or HOME signals, it is recommended to follow some
important rules:
• The guidelines from the above chapter 6.6 „Behaviour while sending a SOS
or HOME signal“ also apply for to the locating of devices. To ensure an optimal
radio signal strength for receipt, the BlueLocar RAY should be held as high as
possible and should be operated in an ubobstracted area. In addition to that,
it is recommended to use an external light source instead of the internal back
lighting to prolong the battery life.
• The BlueLocar RAY is a locating system that will always display the direct
course to the target. This course can contain obstacles and other dangerous or
disruptive objects along the way. It is important and recommended to always
perform an additional examination of the route to prevent unexpected difficul-
ties.
• In case of an emergency rescue situation it is recommended to co-ordinate
with other surrounding ships in your area.

BlueLocar Ray Manual |EN 16
Managing groups
7 | Managing groups
All BlueLocar RAY devices connect to each other automatically and form a network
to share their position and SOS signals.
In addition, it is possible to create device groups ( e.g. devices of a diving center, of
a boat or the dive buddy team) or to join available groups. Being assigned to a group
enables the feature of HOME signals. These signals can be sent by the diver, if he
wants to be picked up by the boat, but it is no emergency. Therefore it is nessecary
to press the HOME key on the side of the BlueLocar RAY and to confirm the trans-
mission of the signal, afterwards.
Furthermore, can group members send text messages to each other. These messa-
ges will be signed with the members nickname (defined with the PC software) or
the device ID (see chapter „12 | RAY Communicator software“). It is also possible
to locate other group members even without a previously received SOS or HOME
signal.
The „Group“ icon in the main menu is providing the service to join available groups
or to create a new group.
7.1 | Create a new group
When selecing the „Create group“ menu, a new group will be generated. The ID
of the group and the number of already joined group members will be displayed
afterwards. The created group can be found by other devices with the given ID, if
they want to join.
7.2 | Join a group
When selecting the „Join Group“ menu, the R AY enter an available group. After-
wards, a list of all surrounding groups within reach is displayed and the preferred
group can be selected. The list of available groups will be constantly refreshed until
a group is selected or the menu is left. Due to a higher number of active devices, it
may take a bit longer to display a newly opened group.

BlueLocar Ray Manual |EN 17
Managing groups
7.3 | Group members
Each member of a group can access a list of all other devices of the same group
within reach by entering the „Group member“ menu. Each list entry contains the
nickname of the device (only if defined, otherwise device ID) on the left and the
time since the last radio contact to the device on the right. Due to a higher number
of active devices, it may take a bit longer to display a newly joined group member.
By selecting a group member with the „OK“ key („ ✓ “), you are able to locate the
other device, if a valid GPS position of the other and your own device is available.
7.4 | Leave a group
If the R AY is currently assigned to a group, instead of the „Create group“ and the
„Join group“ buttons, the device will display the „Leave group“ button. By activa-
ting this operation you will remove your device from the current group and you are
able to create a new group or join another group again.
NOTE: If you leave the current group, all stored information of the other group members
will be deleted..

BlueLocar Ray Manual |EN 18
Text messages
8 | Text messages
Your BlueLocar RAY provides a text message functionality to send short predefined
text messages inside the current group. (This feature is not available, if your device
is not connected to a group, since then, there are no receiving devices present.)
The different texts for the messages can be defined by using the „RAY Commu-
nicator“ software (see chapter „12 | RAY Communicator software“). The receipt of
a message is not guaranteed, since the effort to generate receipt comfirmation is
reserved for SOS and HOME signals.
8.1 | Receiving a message
A received text message will be automatically display with a pop-up on the screen
of the receiving device. By pressing the „OK“ key („ ✓“) you can read the received
message. When pressing the „Back“ key(„ x“), the message will be ignored for
now and can be read later inside the message inbox.
8.2 | Inbox and sending a message
The message inbox can be accessed with the „Messages“ icon inside the main
menu. Inside this submenu you find a list of all available group members. The num-
ber of received messages from a listed group member is displayed right next to his
nickname.
In this context, the first number is representing the unread messages received by
this group member and the second number is displaying all received text messages
from this other device. Only the last 5 text messages of a partner will be stored.
By selecting the group member with the „OK“ key („ ✓“), the content information
of the text message will be displayed. In addition to that you can send a message
to the selected group member, by choosing the „Send message“ icon. Followed
by picking the preferred message, also done with the „OK“ key („ ✓“), the text will
be sent.
NOTE: For text messages you will not get any notification, if the message was success-
fully received. Because only SOS and HOME signals are handled with high priority and
notify upon successful receival. In case of a poor radio connection it is possible that text
messages will get lost. .

BlueLocar Ray Manual |EN 19
Dive mode
9 | Dive mode
The dive mode of the BlueLocar RAY provides a digitale compass for navigation
under water, a display of current and maximum dive depth. It also features a bottom
timer functionality and is able to record the entire progress of the dive.
9.1 | Start and quit the dive mode
The dive mode will be activated automatically as soon as the device is lower than
1,2m under water for at least 2 seconds. The dive timer will be stopped when
emerging to a depth higher than 1,2m. If the diver starts descending again within
4 minutes, the current dive will be continued. When the diver stays longer than 4
minutes at the surface, the device will leave the dive mode automatically and the
dive data will be stored to the divelog.
It is possible to quit the dive mode at any time by pressing the „Back“ key („ x“) as
long as the device is not lower than 1,2m unter water. In this case again, will the
data collection and the entry into the divelog not be finished until the device is at
least 4 minutes at the surface!
Within the menu „Settings --> Diving --> Dive mode“ you can configure the Blue-
Locar RAY to switch from the Standby mode to the dive mode automatically by
selecting the „Autostart“ setting. As long as the dive mode is not quit after the
dive by using the „Back“ key („ x“), the R AY will return to the Standby mode after
at least 4 minutes at the surface.
9.2 | Dive mode display
The dive mode is displaying the digital compass for orientation, the temperature, the
maximum dive depth and the duration of the dive.
At the upper area of the screen you
can see the compass rose, which is
displaying the current orientation of
the device. Directly beneath the com-
pass, the time duration under water
is displayed. In the lower area of the
screen you can see the current dive
depth as well as the maximum dive
depth of the dive.
Compass rose
Course
max. dive depth
Dive depth
Dive time

BlueLocar Ray Manual |EN 20
Divelog
10 | Divelog
The dive mode of the BlueLocar RAY provides the option to generate divelogs from
the measurement data collected during dives. This data can be stored and expor-
ted for later analysis. There are three different data collection modes, which differ
in forms of information detail and storage consumption. Your preferred collection
mode can be selected within „Settings --> Diving --> Divelog“.
The „Summary only“ storage mode will only save data in the following format
without any temporal progress:
• Surface pause of the dive
• Date & time of the dive start
• Duration of the dive
• Maximum dive depth
• Average dive depth
• Minimal temperature
This mode is recommended, if you want to save storage space to collect a maxi-
mum number of dives.
With the „Log everything“ storage mode, the device will save the temporal pro-
gress (10 second interval) of dive depth and temperature along with the data of the
„Summary only“ mode. In addition to that, the last valid GPS position of the device
will be stored. This mode is using more space, but it provides a detailed survey of
the dive. Each dive with up to 5 hours of duration can be stored.
With the „Log nothing“ storage mode, no data will be stored in the divelog!
10.1 | Display the divelog on your BlueLocar RAY
The data of the stored dives can be accessed and displayed directly at your Blue-
Locar RAY. The list of available dives can be found inside the „Divelog“ menu
and is sorted by date and time. Keep in mind that displayed data will always be a
summary of the logged information regardless of the configured detail within the
divelog settings. Furthermore, the UTC time of the data will be adjusted to fit the
configured timezone settings. Within the title of the divelog you can see how much
storage is already used by the dive data represented in %.
10.2 | Export the divelog to a computer
To export the data and access the dive profil of the stored dives, it is nessecary to
connect your RAY to a computer, running the „RAY Communicator“ software(see
chapter 12 | RAY Communicator software ).
Table of contents


