Blueprint Subsea ArtemisPRO User manual
CONSOLE FEATURES
GETTING STARTED Before using the ArtemisPRO system for the first time,
please read the full User Manual as this contains important
safety and operational information.
lDo not rely on this product or its sensors as a primary
means of life-support during or after a dive. Artemis is
designed as a survey tool, and not as an alternative or
replacement for dive-computers or similar apparatus.
lDo not submerge the console, unless the USB Blanking Plug
is fitted and the battery pressure valve has been checked.
lDo not use this product if any of the cabling, or housings of
its component parts appear to be damaged or
compromised for the ingress of water (where required to be
watertight).
When you have finished using your ArtemisPRO system, you
should:
lRemove any weed, or other detritus, that may have been
collected during its operation.
lWash the system in fresh water, if it has been used in salt-
water, to prevent corrosion and damage to rubber
mouldings.
lStore in a well ventilated location after use, to allow any
moisture on system components to evaporate before
closing the case.
For long-term storage (more than a couple of weeks):
lRemove the Battery Pod
lCharge batteries and store in a fully charged state
lEvery 6-12 months inspect system parts and recharge
batteries.
« if specified at the time of ordering
‰
ˆ
‡
‡
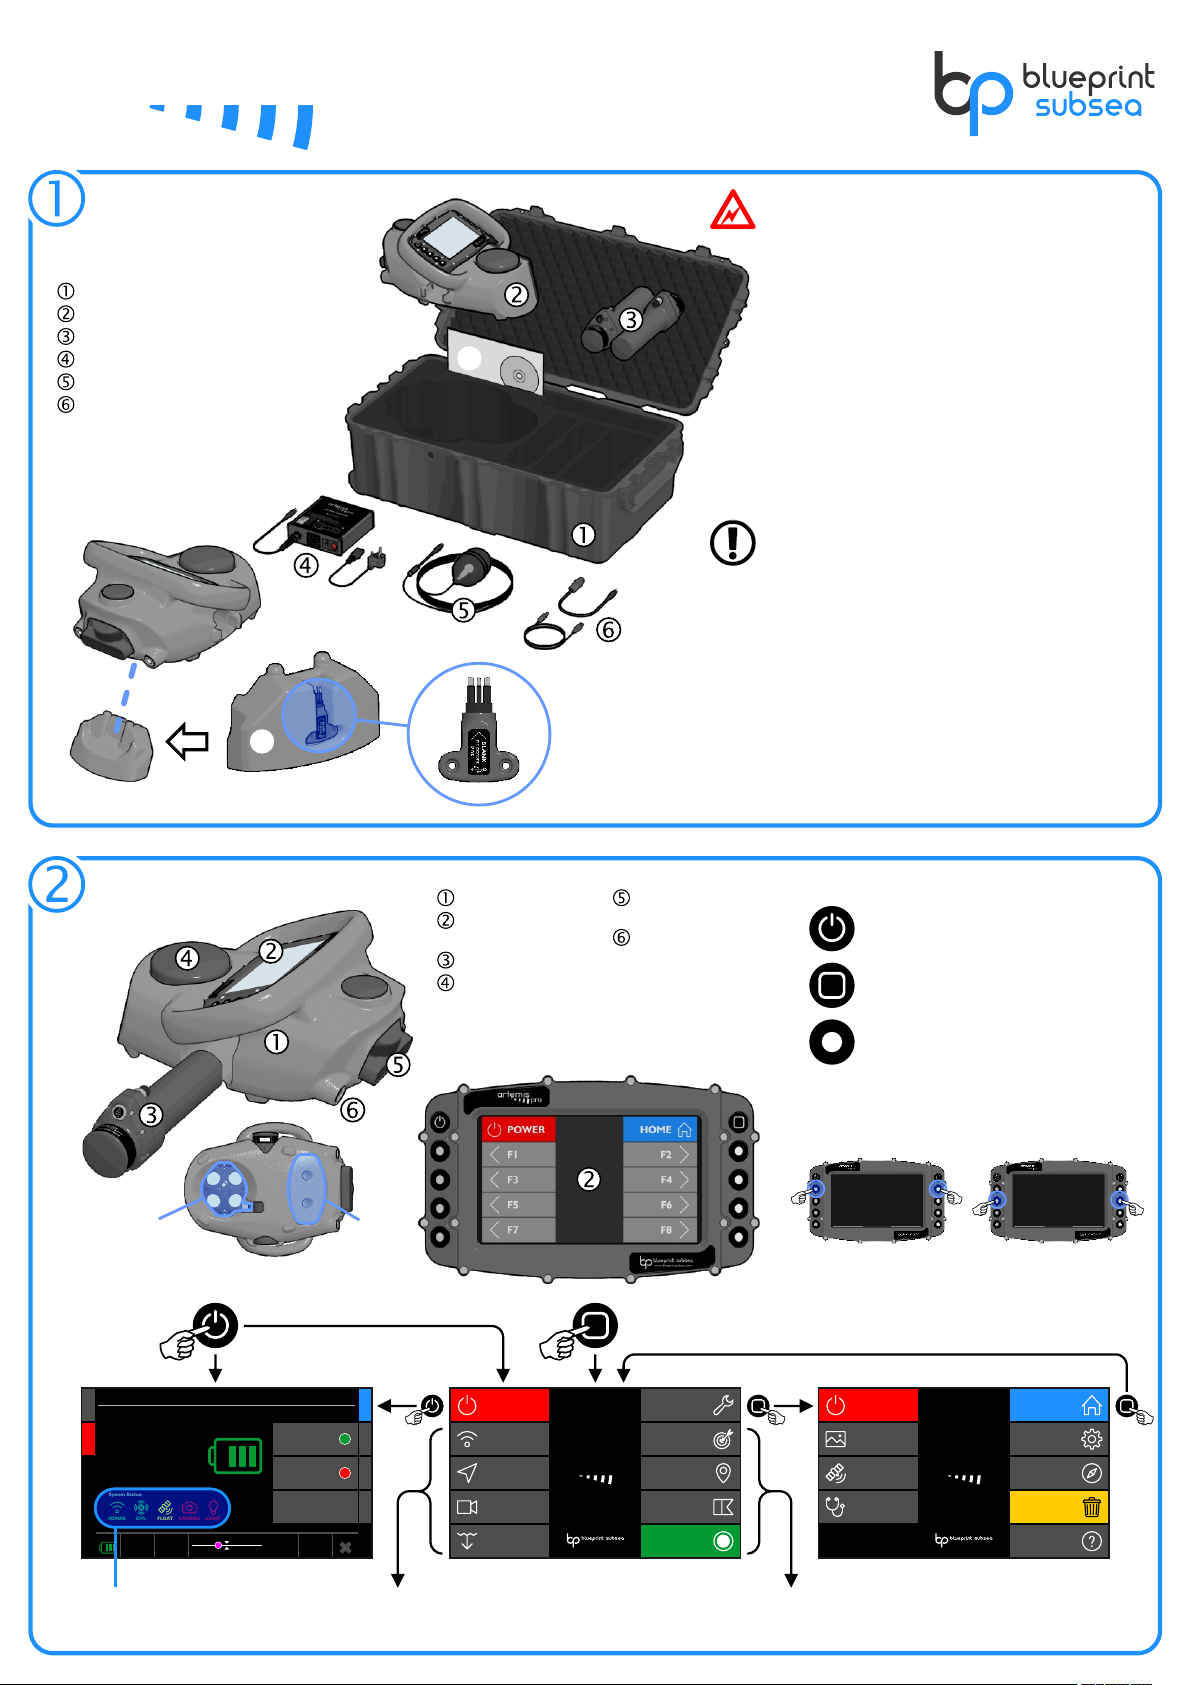
Transit and storage case
ArtemisPRO
Battery Pods (x2)
Battery Charger & Mains Lead
Satellite Receiver Float
USB Adapter & USB Lead
User Manuals, Software Media
(CD or USB stick) and
ENC S-57/S-63 Dongle«
Check that your ArtemisPRO system contains
the following items...
ˆ
‰
Chassis Rear Cover
USB Blanking Plug
Settings
Compass
Calibration
Help
Scuttle
Snapshots
Satellites
Diagnostics
23/04/2016
15:45:01
Power
artemispro
Home
www.blue print subsea .com
v2.0. 1234
Missions
Markers
Start Dive
Dive Logs
Sonar
Navigation
Diver
Vision
23/04/2016
15:45:01
Power
artemispro
Tools
www.blue print subsea .com
v2.0. 1234
Power: DiveLog:
Target 2
8.4m
Depth:
374m
Distance:
217°
Heading:
32.7m
Altitude:
Selected Marker:
Power
73%
Charge: Estimated Life:
04:18
Voltage:
14.5V
Power Drain:
26.1W
Sonar System:
ON
Power Mode:
LOW POWER
Vision System:
OFF
OFF
POWER
SONAR
MODE HOMEVISION
System Status:
FLOATDVLSONAR CAMERA LIGHT
Power Management Display Home Screen Tools Screen
Function Buttons
(F1 to F8 - function depends on display)
Home Button
(Home Screen / Tools Screen)
Power Button
(Power On / Power Management Display)
Button Functions
Combined Button Functions
F1+F2
SNAPSHOT
F3+F4
BRIGHTNESS
Main Information
Displays
Mission & Dive-Log
Management Display
Turn On
Display Navigation
(Press both buttons at the same time)
‡
Chassis
Console
(Display and Keypad)
Battery Pod
Navigation Pod
(DVL, AHRS, GNSS)
Forward-looking
Multibeam Sonar
Dive-Light«
Video Camera «
‡
ˆ
‰
DVL Transducers
Chassis Cover &
USB Blanking Plug
‰
ˆ
Sensor Status
Indicators
« if specified at the time of ordering
Maintenance & Storage
Quick Reference
Guide
artemispro
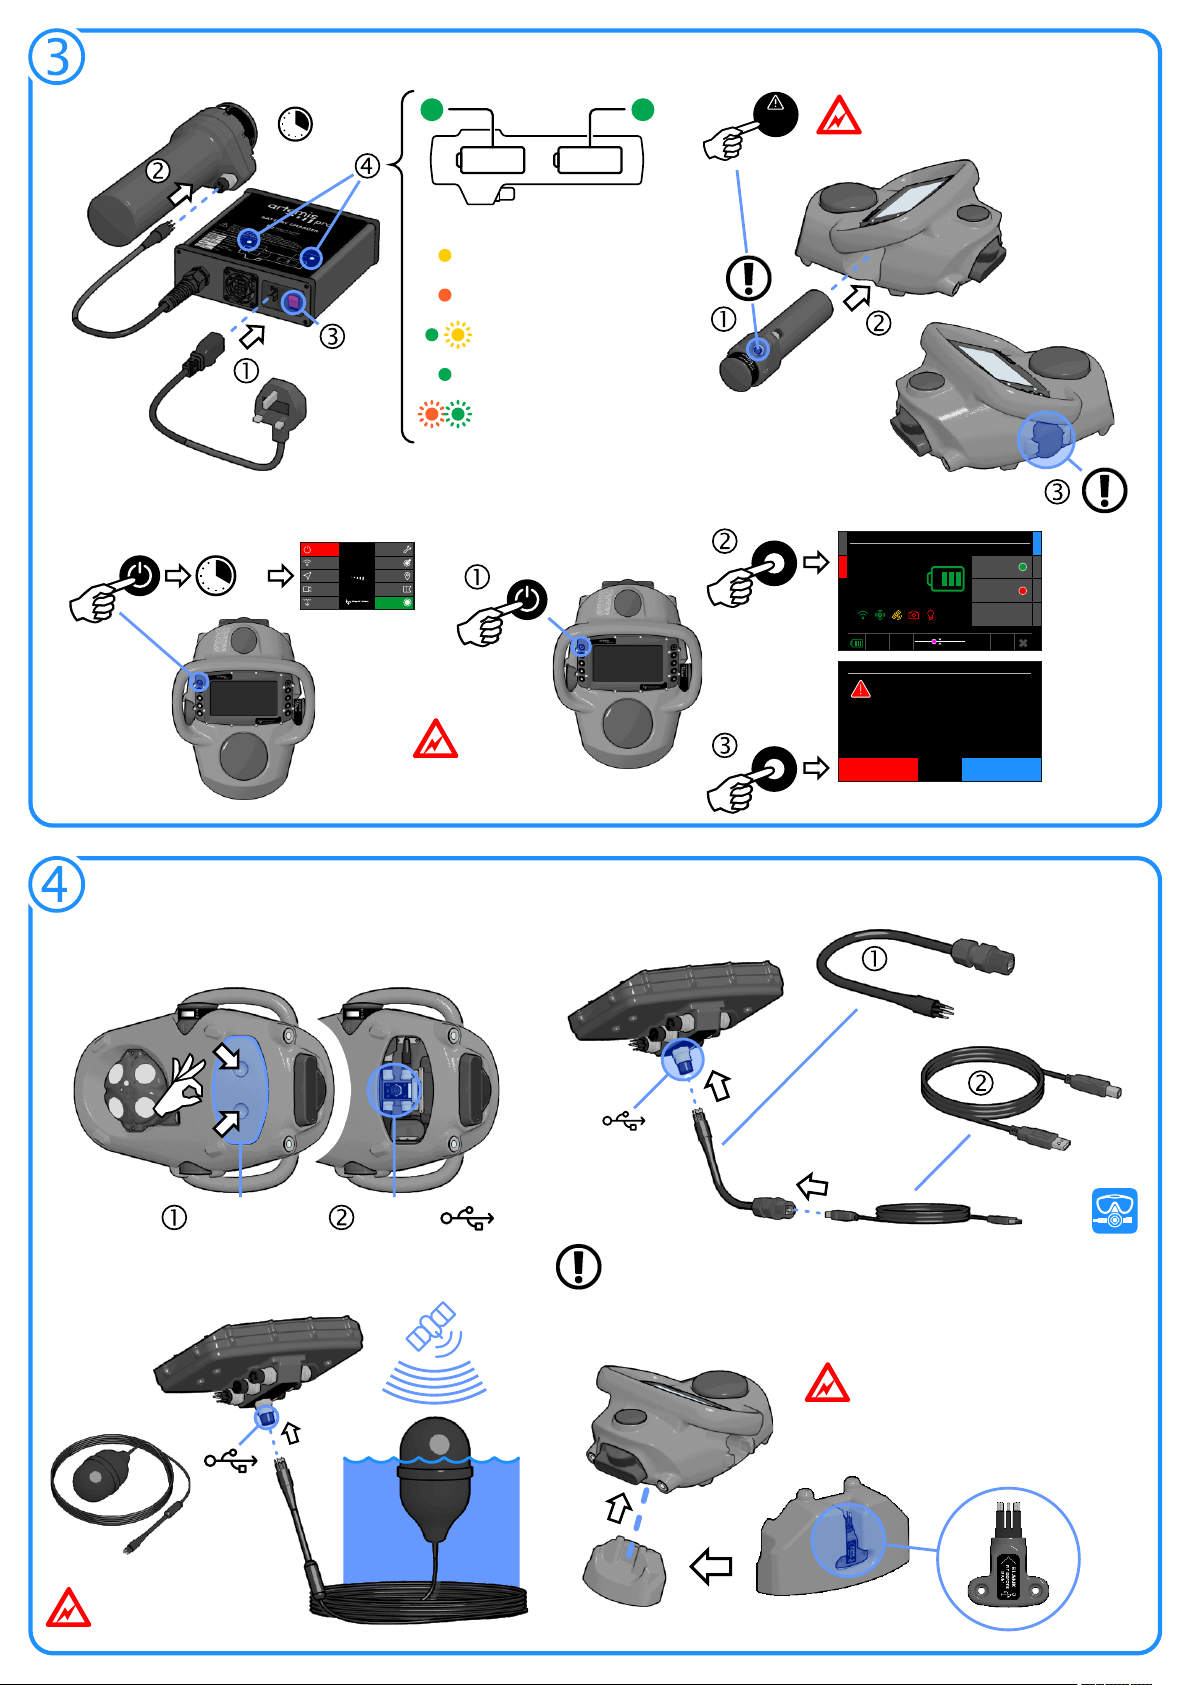
BATTERY PODS & POWER
20s
“OFF”
USB PORT
USB
Connector
USB Cover &
Blanking-Plug
USB Connector
:
To Turn Power ON To Turn Power OFF
Charging
Batteries
Connecting Batteries
Not Connected or Initialising
Yellow
Fast Charge
Orange
Top-off Charge
Green with Yellow Pulse
Complete (Trickle Charge)
Green
Error (Charging Stopped)
(turn off and leave Battery Pod
to cool for one hour minimum)
Orange and Green Flashing
approx 4h
2
1
Charge Status Indicators
PRESS
BEFORE
USE
Press Pressure Relief Valve firmly
before use to check it is sealed.
Insert Battery Pod
fully into the chassis.
Ensure connectors
align and mate fully.
Battery groove
clicks into place
to secure.
Power: DiveLog:
Target 2
8.4m
Depth:
374m
Distance:
217°
Heading:
32.7m
Altitude:
Selected Marker:
Power
73%
Charge: Estimated Life:
04:18
Voltage:
14.5V
Power Drain:
26.1W
Sonar System:
ON
Power Mode:
LOW POWER
Vision System:
OFF
OFFPOWER
SONARMODE HOMEVISION
System Status:
FLOATDVLSONAR CAMERA LIGHT
CANCELPOWER OFF
Turn Power Off
Are you sure you want to turn the power off?
This will stop any logging any may loose your
position until a new fix is obtained.
Missions
Markers
Start Dive
Dive Logs
Sonar
Navigation
Diver
Vision
23/04/2016
15:45:01
Power
artemispro
Tools
www.blueprintsubsea.com
v2.0.1234
Refer to manual for full Battery
safety and usage instructions
Batteries will
self-discharge
in storage.
Charge Battery Pod
before use.
Accessing The USB Port
Connecting The USB Cable
Replacing The Chassis Cover & Blanking Plug
Connecting the Satellite (GNSS) Float
Pull rear chassis cover outwards to access the USB connector.
USB Adapter Lead
USB Cable
Use the USB Adapter Lead and USB Cable
to connect ArtemisPRO to a PC.
PC with NavPoint software
Navigate to “\\ARTEMISPRO”
You will need to install RNDIS drivers when
connecting a PC to ArtemisPRO for the first time.
See the manual for further details.
USB
Connector
Ensure the float cable is secured
to the diver or chassis and no
strain is placed on the connector.
Always replace the Chassis Cover and
USB Blanking Plug after use!
This stops the connector pins from getting
wet, preventing damage and corrosion.
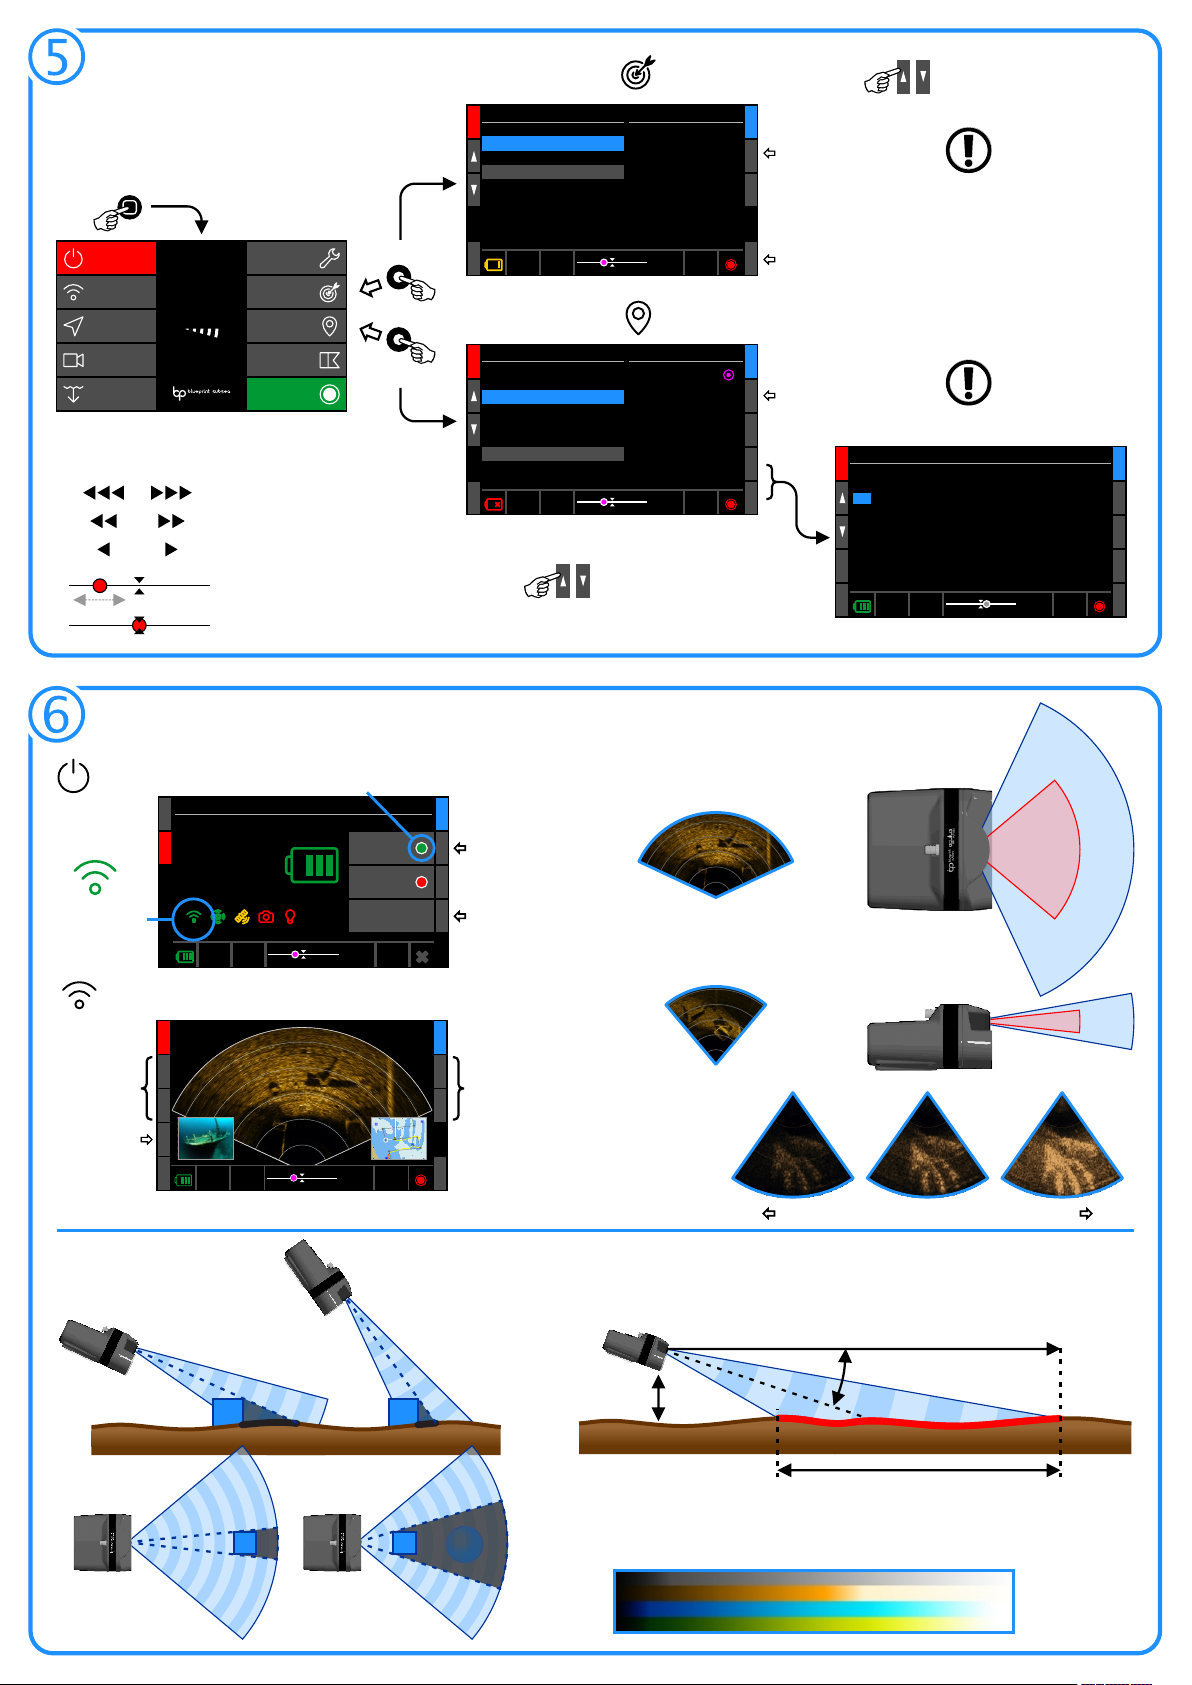
Less Gain More Gain
MISSION FILES & MARKERS
USING THE SONAR
Gain
Frequency
Acoustic Shadows
130°
80°
up to
40m
up to
120m
High Frequency
Low Frequency
Horizontal
Range &
Beam Pattern
12° 20°
Vertical
Sonar Power
Power: DiveLog:
Target 2
8.4m
Depth:
374m
Distance:
217°
Heading:
32.7m
Altitude:
Selected Marker:
Power
73%
Charge: Estimated Life:
04:18
Voltage:
14.5V
Power Drain:
26.1W
Sonar System:
ON
Power Mode:
LOW POWER
Vision System:
OFF
OFF
POWER
SONAR
MODE HOMEVISION
System Status:
FLOATDVLSONAR CAMERA LIGHT
Power Control
(On/Off)
Power Saving Mode
(Low, Normal, High)
Operating State
(Green = Working)
Power State (Red = Off)
20%
Gain:
50m
Range:
750kHz
Frequency:
WAYPOINT 8
MARKER 3
WAYPOINT 7
WAYPOINT 6
WAYPOINT 9
WAYPOINT 10
WAYPOINT 12
MARKER 4
MARKER 2
Power: DiveLog:
Target 3
27.9m
Depth:
374m
Distance:
217°
Heading:
2.3m
Altitude:
Selected Marker:
GAIN +GAIN -DISPLAY HOME
RANGE + RANGE - MARKERSPOWER FREQ
Range
Gain
Image
Brightness
Frequency
Low/High
Sonar Display
Short
Acoustic
Shadow
Steep
Seabed
Angle
T
Long Acoustic
Shadow
Shallow Seabed
Angle
T
Missions
Markers
Start Dive
Dive Logs
Sonar
Navigation
Diver
Vision
23/04/2016
15:45:01
Power
artemispro
Tools
www.blue print subsea .com
v2.0. 1234
“HOME”
“MISSIONS”
“MARKERS”
or
Markers
4.
Current Marker
Name:
Target 2
Position
54° 13' 54.273" N
-3° 2' 37.178" E
Type:
Target Marker
Waypoint 4
5. Waypoint 5
6. Waypoint 6
7. Waypoint 7
8. Waypoint 8
9. Target 1
11. Slipway
12. Lock Gate
Distane To Marker:
374m
Bearing To Marker:
124°
Power: DiveLog:
Target 3
8.4m
Depth:
374m
Distance:
217°
Heading:
32.7m
Altitude:
Selected Marker:
MISSIONSPOWER
SELECTDELETEADD HOMEEDIT
Target 210.
Depth:
3m
Edit Marker
Power: DiveLog:
Diver Added 2
3.1m
Depth:
58m
Distance:
23°
Heading:
4.9m
Altitude:
Selected Marker:
DONEPOWER
-10-1+10 HOME+1
Name:
Diver Added 2
Latitude:
54°
Type:
Diver Added Marker
Colour
Gold
Depth:
3.0m
13' 53. N27"
003° 02' 31. W18"
Latitude:
Power: DiveLog:
Target 3
8.4m
Depth:
374m
Distance:
217°
Heading:
32.7m
Altitude:
Selected Marker:
MARKERSPOWER
SELECTDELETENEW HOME
Missions
Diver Training Area
Lake Investigation
Shallow Water Survey
Harbour Inspection
Artemis01234 2016-02-21 14:54:13
Artemis01234 2016-03-04 11:28:47
Current Mission
Filename:
Harbour Inspection
Created:
2016-01-18, 13:45:07
Markers:
14
Markers are geographic locations such as waypoints (defining a swim
route), targets, hazards or other points of interest.
Mission Files contains lists of markers that are relevant to a dive.
Mission Files can be created on a PC using NavPoint or on the console.
Use the highlighted
Mission File
The Marker Manager will
show markers from this
file.
Create a new
Mission File
Move the list selection
up and down
Use the highlighted
Marker as the navigation
destination
The Navigation Bubble provides guidance.
Navigation Bubble
Marker Manager
Mission Manager
Marker Editor
Use up and down arrows to highlight
the field to edit and +10, +1, -1 and
-10 buttons to adjust the value.
The marker to the le or right
of the current heading.
> 90°
> 30°
> 60° The diver should turn in the
direction shown.
The diver is on course for the
selected marker.
Rotate to align the ‘bubble’ in
the centre of the bar.
< 30°
Provides guidance to the selected marker in the Status Bar:
Seabed Coverage
approx 15°
Range (R)
Altitude approx
10% of Range
70% Seabed Coverage
Controls the
brightness of the
sonar image
750kHz Low Frequency Mode
Shows targets up to 120m range
Horizontal 130° field-of-view
Used for searching avtivities.
1200kHz High Frequency Mode
Shows targets up to 40m range
Horizontal 80° field-of-view
Used for high detail inspection.
Narrow
Acoustic
Shadow
Distant
Target
Wide
Acoustic
Shadow
Nearby
Target
Obscured
Target
Sonar Palettes
Use the shadows cast by sound to
help identify targets:
A rule-of-thumb for 70% seabed coverage on the display is to maintain an altitude of 10% of
the sonar range above the seabed:
The colour scheme of the display image can be selected using the
Palettes option in the Sonar Settings menu:
Grey
Copper
Blue
Green

ˆ
CANCEL
Start Dive
Where are you starting the dive from:
A MARKER position or a SATELLITE position?
MARKER SATELLITE
CANCEL
Start Dive
Which MARKER are you starting from?
PREVIOUS NEXT
SELECT
-3° 2' 37.178" E
Longitude:
54° 13' 54.273" N
Latitude:
Waypoint 2
Name:
2 / 8
Marker:
CANCEL
Start Dive
Are you towing the float on the surface?
(and need continuous SATELLITE positions)
YES
(Towing Float)
NO
(Use Dead Reckoning)
CANCEL
Start Dive
Check sensor readings are good, then choose
START DIVE to begin recording the Dive-Log.
START DIVE
GOOD (37)
Quality:
RUNNING
Status:
POOR (3.5)
Quality:
Internal
Receiver:
Satellite PositionDVL
Has a
MISSION FILE
been selected
?
“START DIVE”
YES NO
“HOME”
MARKER
SELECT
SATELLITE
START DIVE
Data is recorded in the Dive-Log
and Navigation starts.
“STOP DIVE”
YES or NO
Power: DiveLog:
Waypoint 2
8.4m
Depth:
374m
Distance:
217°
Heading:
32.7m
Altitude:
Selected Marker:
P/N: BP01077.1A.5 UM-150-P01077-1A-05
Copyright © 2017 - www.blueprintsubsea.com
USING NAVIGATION
Compass Calibration
DIVING & DIVE-LOGS
Starting A Dive
Reducing Errors
Navigation Display
Chart Scale
(Zoom in/out)
Select Navigation Marker
(from selected Mission File)
Marker Manager
(Add, Select, Delete)
Set/Reset Position Clear Diver Track
WAYPOINT 3
WAYPOINT 5
MARKER 3
WAYPOINT 6
WAYPOINT 8
WAYPOINT 1
WAYPOINT 2 MARKER 4
MARKER 2
54° 13' 54.273" N
-3° 2' 37.178" E
Position:
10m
Grid:
DVL
Nav Mode:
Power: DiveLog:
Waypoint 8
3.1m
Depth:
58m
Distance:
23°
Heading:
4.9m
Altitude:
Selected Marker:
ZOOM + ZOOM - MARKERSPOWER POSITION
PREVNEXTDISPLAY HOMECLEAR
TARGET 3
TARGET 2
Level
(less than ±20°)
Not Level
(more than ±20°)
Good Altitude Reading
Poor Altitude Reading
Stable
(no Pitch or Roll)
Avoid Large or
or Quick Movement
(Pitch and Roll)
Calibrating Z-axis
(up and down)
Calibrating X-axis
(front and back)
Calibrating Y-axis
(le and right)
Measured Field and
Spherical Coverage
Ideal Result
CANCEL
Set Diver Position
Where do you want to set your position to?
MARKER SATELLITE
GOOD (0.3)
Quality:
Internal
Receiver:
Satellite Position
-3° 2' 37.178" E
54° 13' 54.273" N
Latitude:
Waypoint 2
Name:
Marker Position
Choose “Calibrate Compass” from the Tools Screen - Press START to begin:
Hold ArtemisPRO in the six orientations
for each face of a cube.
For each orientation, rotate slowly on the
same spot in both directions.
Press PROCESS and ACCEPT
when complete.
Hold ArtemisPRO level:
Hold ArtemisPRO still:
Specify the Water Salinity in the Sensors menu of the Settings display
Calibrate the Compass before each dive to remove any magnetic errors
To reset the divers
dead-reckoning
position choose a
MARKER or use a
SATELLITE fix (from
the float, or return
to the surface).
Chart backgrounds are shown
if included in a NavPoint created
Mission File.
Replaying Dive-Logs
Ensure the internal Satellite receiver has a good fix
and a Mission File is selected if required.
Steps ƒ and „ allow the diver to choose the
starting location for dead-reckoning to track from.
At step … choose NO to use dead-reckoning.
Connect the external GNSS float (using the internal
GNSS receiver for continuous satellite navigation is
not recommended as larger position errors can
occur as the receiver is submerged)
At step … choose YES to allow satellite fixes to be
processed during the dive (even if a float isn't
connected).
Dead-Reckoning Dive Continuous Satellite Fix Dive
20%
Gain:
50m
Range:
750kHz
Frequency:
DIVE-LOGS RESETPOWER PLAY
HOME
Depth: 5.7m
Altitude: 6.2m
Diver:
Sat Nov 11 13:29:18
Mission:
WAYPOINT 3
WAYPOINT 5
MARKER 3
WAYPOINT 6
WAYPOINT 8
WAYPOINT 1
WAYPOINT 2 MARKER 4
MARKER 2
TARGET 3
TARGET 2
54° 13' 54.273" N
-3° 2' 37.178" E
Position:
10m
Grid:
DVL
Nav Mode:
Dive-Logs
1.
Current Dive-Log
Filename:
ArtemisPRO_20161105_093712
Mission File Used:
ArtemisPRO_20161018_114627
2. ArtemisPRO_20161021_130852
3. ArtemisPRO_20161103_092817
4. ArtemisPRO_20161105_093712
5. ArtemisPRO_20171108_144905
Power: DiveLog:
Waypoint 8
3.1m
Depth:
58m
Distance:
23°
Heading:
4.9m
Altitude:
Selected Marker:
SNAPSHOTSPOWER
SELECTDELETE HOME
Diver Training Area
Created:
2016-11-05, 09:37:12
Markers:
14
36%
Duration:
28m 15s
Size:
358Mb
Storage Used:
Move the list selection
up and down
Play/Pause Skip
±10%
Select Dive-Logs to replay in the Dive-Log Manager display:
Other manuals for ArtemisPRO
3
Other Blueprint Subsea Diving Instrument manuals


Popular Diving Instrument manuals by other brands


Spasciani
Spasciani M 900 ABEK 15 Instructions for use

Aqua Lung
Aqua Lung SEA LV2 Technical manual

Aquabotix Technology Corporation
Aquabotix Technology Corporation HYDROVIEW PRO SERIES manual

IST
IST Dolphin Tech JT-30D Owner's manual and reference guide

Cressi
Cressi AQUAWING Directions for use

Outland Technology
Outland Technology ROV 1000 quick start guide


