bluemango BMH-G365 User manual

INSTRUCTION MANUAL
GLOBAL SHUTTER
FULL HD MEGA PIXEL ZOOM CAMERA
Before installing and using the camera, please read this instructions thoroughly and
keep for reference.
1

2
TABLE OF CONTENTS
Precautions ---------------------------------------------
Features -------------------------------------------------
Package Components ------------------------------
Dimensions ---------------------------------------------
Part Names And Functions ------------------------
Connections --------------------------------------------
External Device Connections ----------------------
Video Out ------------------------------------------------
Menu Operation ---------------------------------------
Main Menu ----------------------------------------------
Trigger Mode -------------------------------------------
Zoom/Focus --------------------------------------------
Exposure ------------------------------------------------
White Balance -----------------------------------------
Image ----------------------------------------------------
Intelligent ------------------------------------------------
Special Function --------------------------------------
Display ---------------------------------------------------
Specifications ------------------------------------------
3
5
6
7
8
9
10
12
13
14
15
20
21
25
26
28
30
32
33

3
PRECAUTIONS
■Avoid prolonged use in high temperature and high humidity environment
Use the product within the operating range specified in the specifications.
Avoid locations where heat is generated, and Install in a well-ventilated place.
■Do not install the camera in an unstable place
Confirm that the camera is firmly fixed after installation.
Dropping the product due to poor installation may cause injury.
■Install the camera away from dusty places
This may cause product malfunction, poor image quality, fire or electric shock.
■Do not install the camera under unstable lighting conditions
It is possible to output an inappropriate image due to severe illumination change or lighting
flickering.
■Do not install the camera near gas or oil leaks
Use in a place with flammable materials may cause fire.
Also, keep distance from power line cables or use separate metal piping.
■Do not disassemble the camera or insert foreign objects
There is no warranty liability for products that user disassembled.

4
PRECAUTIONS
■Do not drop the camera or shock it
It may cause malfunction.
■Never keep the camera directly face to strong light.
Exposure to strong light such as sunlight may cause light spreading or light blurring. In addition,
direct sunlight can damage the image sensor.
■Prepare for malfunction due to natural disasters
The grounding work or the installation of the surge protector can minimize damage to the
product due to lightning, etc.
■Be sure to check the specifications of the power supply
Before connecting the power to the product, make sure that the power supply meets the
recommended specifications.

5
FEATURES
•1/2.3" Sony Global shutter CMOS sensor
•36x Optical Zoom
•Full HD Resolution
1920x1080p 60/50/30/25fps, 1280x720p 60/50/30/25fps
•Day & Night(ICR)
•DWDR(Digital Wide Dynamic Range)
•DNR(Digital Noise Reduction, 2D+3D)
•DIS(Digital Image Stabilization)
•EX-SDI(Long Reach)
•Privacy Mask Function
•On Screen Display
•Intelligent Motion Detection
•Multi-Protocol(VISCA, Pelco-D, Pelco-P)
•Supports External trigger input and Strobe output

6
PACKAGE COMPONENTS
CAMERA
CABLE MANUAL
Optional Remote Controller
Not used
Tele/Up
Far/Right
Menu/Set
Wide/Down
Near/Left

7
DIMENSIONS
Unit : mm
8
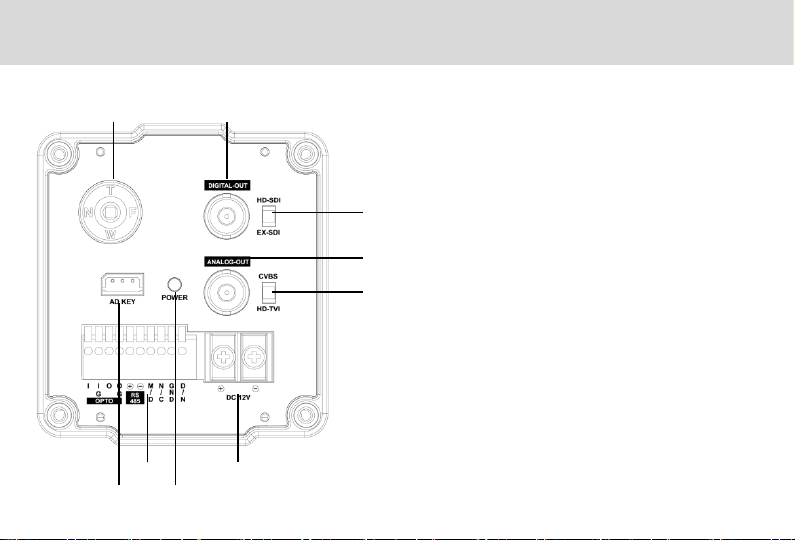
PART NAMES AND FUNCTIONS
1. OSD / Zoom / Focus control
2. DIGITAL OUT
3. HD-SDI
4. EX-SDI
5. ANALOG OUT
6. CVBS
7. HD-SDI
8. AD KEY
1) GND
2) AD-KEY
3) GND
9. Power LED
10. Control Terminal
1) OPTO –I : Trigger Input
2) OPTO –IG : Isolated Ground(Trigger)
3) OPTO –O : Strobe Output
4) OPTP –OG : Isolated Ground(Strobe)
5) RS-485 (+)
6) RS-485 (-)
7) Motion Detection Out
8) No Connection
9) Ground
10) Day&Night Input (Low : Night, High : Day)
11. Power : DC12V
5
10 11
1
3, 4
9
2
6, 7
8

9
CONNECTIONS
Basic connection
The peripheral devices (DVR, monitor, lens, etc), DC adaptor
and cables are not supplied.
1. Connecting the monitor.
Make the video signal connection between the camera and
the monitor or time lapse monitor or DVR.
2. Use a commercially available DC12V adaptor.
Connect an DC 12V power source to the DC 12V input
terminal on the back of the camera.
3. Insert the plug of this power cord into a wall outlet.
The POWER indicator will light. Adjust the picture on
the monitor using the Brightness and Contrast controls etc.
To monitor’s Video Input or Camera Input

10
EXTERNAL DEVICE CONNECTIONS
RS-485 COMMUNICATION
Connect to an external controller of RS-485 format.
Motion Detection Out
When the motion detection function is working.
DC3.3V is outputed to OUT pin and GND pin.
Day & Night input
Day/Night mode of the camera can be switched by
signal from an external device.
To use this function, <DAY&NIGHT> setting of the
camera should be set to the <EXT>.
Note : Use a relay unit if the voltage or current of the
connected device exceeds the ratings.

11
EXTERNAL DEVICE CONNECTIONS
PIN
Signal Name
Description
Remark
I
TriggerInput
Anode of opto coupler(*)
IG
TriggerReturn
Cathode of opto coupler
Isolatedground
O
StrobeOutput
Open Collector of opto coupler
OG
StrobeReturn
Emitterof opto coupler
Isolatedground
OPTD : External trigger input and stobe output.
(*) Serial resistors 375Ω inside camera
※ The recommanded termination circuitry is drawn below
- A current of 2.5mA is recommanded for the strobe output.
- For the trigger input a current of 10mA is recommanded.

12
VIDEO OUT
ANALOG OUT
Select CVBS and HD-TVI video out
by switch setting.
DIGITAL OUT
Select HD-SDI and EX-SDI video out
by switch setting.

13
MENU OPERATION
Tele(Up) button : Zoom in, Tele (Moves the cursor
upwards. Use this button to select an item or
adjust the parameters.)
Wide(Down) button : Zoom out, Wide (Moves the
cursor downwards. Use this button to select an
item or adjust the parameters.)
Far(Right) button : Adjust focus in Manual Mode
(Moves the cursor to the right. Use this button to
select or adjust the parameters of the selected
item. The parameter changes each time this
button is pressed.)
Near(Left) button : Adjust focus in Manual Mode
Moves the cursor to the left. Use this button to
select or adjust the parameters of the selected
item. The parameter changes each time this
button is pressed.)
Set button : Executes selections and displays a
submenu for an item with the ↵mark.
This camera utilizes an on-screen user MENU. To set items on the menu, use the following buttons
on the side panel.

14
MAIN MENU
Camera menu is subject to change without prior notice to upgrade and quality
increase and we may use slip sheet for the change.
Please check the camera version and the slip sheet if the camera menu and this
manual menu is not matched.
Functions can be setup using “Menu Key Command” of
Visca protocol.
The menu consists of the “Main Menu” and “Sub Menu”.
The main menu is displayed where 8 camera functions can
be selected.
To the push of each main menu selection, the sub-menu is
displayed
If you want save the menu, select [SAVE].
If you want not save the menu, select [EXIT]
(After select , Power off -> on)
If you want default the menu, select [DFLT]
MENU
TRIGGER MODE FREE RUN
ZOOM/FOCUS
EXPOSURE
WHITE BAL
IMAGE
INTELLIGENCE
SPECIAL FUNC
DISPLAY
[EXIT] [SAVE] [DFLT]
↲
↲
↲
↲
↲
↲
↲
↲

15
TRIGGER MODE
◈TRIGGER MODE : Select trigger mode
▷FREE RUN : Continuous image output mode
▷EXT-TRIGGER : External trigger synchronous image
output mode.
※ When Ext-trigger mode is selected, focus mode and exposure
mode are forced into manual mode.
◈TRIGGER : Select the polarity of the external trigger signal.
►ACTIVE LOW / ACTIVE HIGH
◈TRIGGER DELAY
: Sets the delay time from the external trigger input to
the image capture start.
►0 ~ 255.9ms
◈STROBE POL : Select the polarity of the strobe output signal.
►ACTIVE LOW / ACTIVE HIGH
TRIGGER/STROBE
TRIGGER POL
TRIGGER DELAY
STROBE POL
STROBE DELAY
STROBE WIDTH
SHUT SPEED
AGC
IRIS
DAY&NIGHT
[BACK] [SAVE] [DFLT]
ACTIVE LOW
0.0ms
ACTIVE HIGH
0.0ms
1.0ms
1/500sec
■■■ 0
F2.8
NIGHT

16
TRIGGER MODE
◈STROBE DELAY : Sets the delay time from the trigger signal to the strobe on signal output.
►0 ~ 255.9ms (※ Ext-trigger mode)
►0 ~ (33.3 –width)ms @30fps, 0 ~ (16.6 –width)ms @60fps,
0 ~ (40 –width)ms @25fps, 0 ~ (20 –width)ms @50fps (※ Free run mode)
◈STROBE WIDTH : Sets the length of the strobe on signal.
►1 ~ 255.9ms (※ Ext-trigger mode)
►1 ~ (33.3 –delay)ms @30fps, 1 ~ (16.6 –delay)ms @60fps,
1 ~ (40 –delay)ms @25fps, 1 ~ (20 –delay)ms @50fps (※ Free run mode)
◈SHUT SPEED : Set the shutter speed used only in Ext-Trigger mode.
►1/30(25), 1/60(50), 1/100, 1/120, 1/250, 1/500, 1/1000, 1/2000, 1/5000, 1/10000,
1/20000sec (※ 30 or 25fps mode)
►1/60(50), 1/100, 1/120, 1/250, 1/500, 1/1000, 1/2000, 1/5000, 1/10000, 1/20000sec
(※ 60 or 50fps mode)
◈AGC : Set the Manual Gain used only in Ext-Trigger mode.
►0 ~ 10 steps

17
TRIGGER MODE
◈IRIS : Set the Manual Iris used only in Ext-Trigger mode.
►CLOSE / F1.5 / F1.8 / F2.0 / F2.4 / F2.8 / F3.4 / F4.0 / F4.8 / F5.6 / F6.8 / F8.0 / F9.6 / F11
/ F14 / F16
◈DAY&NIGHT : Select whether to use Day or Night when in Ext-Trigger mode.
►DAY / NIGHT
※ If you don’t change exposure settings in the TRIGGER menu, exposure state is automatically set
just before switching to the Ext-trigger mode.

18
TRIGGER MODE
※ Timing Chart : FREERUN mode

19
TRIGGER MODE
※ Timing Chart : EXT-TRIGGER mode

20
ZOOM/FOCUS
ZOOM/FOCUS
FOCUS MODE
DISTANCE
ZOOM SPEED
LENS REFRESH
D.ZOOM
ZOOM PRESET
[BACK] [SAVE] [DFLT]
AUTO
1.5m
■■■■7
ONE PUSH↲
OFF
↲
◈FOCUS MODE : Select auto focus mode
►AUTO, ONE PUSH, MANUAL
※ In Ext-Trigger Mode, it is fixed to Manual mode.
◈DISTANCE : Select minimum distance in focus between
camera and object.
►0.1m / 1.5m / 3.0m / 5.0m / 10.0 m
◈ZOOM SPEED : Select Zoom Speed
►0 (Slow) ~ 7 (Fast) steps
◈LENS REFRESH : Lens origin calibrated automatically.
►ONE PUSH↵/ ON (1 day ~ 10 days)
◈D.ZOOM : Select maximum digital zoom magnification.
►OFF / ON (max x2 ~ x19, x21, x23, x25, x28, x32)
※ The Digital Zoom can not be used with the DIS function.
◈ZOOM PRESET : Select zoom preset
►PRESET # : Select Zoom preset number (1 ~ 5)
►MODE : OFF / ON↵(Adjust the Zoom Position)
Table of contents
Other bluemango Digital Camera manuals


 instruction manual")