Cressi AQUAWING Manual

AQUAWING &
AQUAWING PLUS
MANUALE D’USO
EQUILIBRATORI
IT
MANUEL D’INSTRUCTIONS
GILETS STABILISATEURS
FR
MANUAL DE ISTRUCCIONES
CHALECOS HIDROSTÁTICOS
ES
DIRECTION FOR USE
B.C.’S JACKETS
EN
BEDIENUNGSANLEITUNG
TARIERJACKETS
DE
MANUAL DO USÁRIO
BCDS
PT
平衡器 用户手册
CN
QUALITY PRODUCTS SINCE 1946 www.cressi.com
Cressi Sub S.p.A.
Headquarters:
Via G. Adamoli, 501
16165 Genova, Italy
www.cressi.com
Rev_03_2022
+ 39 010 830791

INDICE
IT
EQUILIBRATORI CRESSI
Introduzione.......................................................... 5
Avvertenze generali.......................................... 5
Certicazione CE ................................................ 5
Caratteristiche..................................................... 6
Sacco pneumatico............................................. 6
• Sacco pneumatico Standard................. 6
• Sacco pneumatico
posteriore Back Cell........................................6
Schienalino ..............................................................6
• Schienalino rigido a doppia fascia.......6
• Fissaggio della bombola
con schienalino rigido .................................6
Bombole compatibili ........................................ 8
Sistema di zavorra integrato....................... 8
Borselli posteriori (bombola)...................... 8
Accessori disponibili......................................... 8
Regolazioni imbracatura................................ 8
Regolazione D-Ring ..........................................10
Regolazione bbia addominale
sgancio rapido......................................................11
Tasca per pedagno ............................................11
Gruppo Comando ...............................................11
• Tubo corrugato .............................................12
• Valvola di scarico.........................................12
Funzioni del gruppo di comando.............13
Gruppo comando at......................................13
Valvole......................................................................14
• Valvola interna sinistra .............................14
Indossamento del Jacket..............................14
Svestizione di emergenza............................14
Modalità di controllo
prima dell’immersione...................................15
In immersione......................................................15
Limiti di impiego e di durata.......................16
Manutenzione......................................................16
Stoccaggio..............................................................16
Taglie.........................................................................16
Nitrox.........................................................................16
Marcatura...............................................................17
Garanzia Europea Cressi...............................17
Caratteristiche Jackets Cressi....................18
TABLE OF CONTENTS
EN
CRESSI BCDS
Introduction......................................................... 19
General Warnings .............................................19
CE Certication.................................................. 19
Features ............................................................... 20
Air Cell................................................................... 20
• Standard Cell............................................... 20
• Back Air
Cell...........................................................................20
Backplate.............................................................. 20
• Double strap rigid backplate............... 20
• Securing the cylinder with the rigid
backplate......................................................... 20
Compatible cylinders.....................................22
Integrated weight pockets..........................22
Rear pouches (cylinders).............................22
Available accessories.....................................23
Harness adjustments.....................................23
D-Ring adjustment...........................................24
Quick-relase abdominal buckle
adjustment ...........................................................25
Smb pocket (surface marker buoy)......25
Control Unit..........................................................25
• Corrugated Hose.........................................26
• Dump Valve....................................................26
Control unit functions....................................27
Flat control unit.................................................27
Valves ..................................................................... 28
• Lower left internal valve ........................ 28
Putting the bcd on .......................................... 28
Emergency relase........................................... 28
Pre-dive
checks......................................................................29
Diving .......................................................................29
Use and duration limits............................... 30
Maintenance ....................................................... 30
Storage................................................................... 30
Sizes......................................................................... 30
Nitrox....................................................................... 30
Marking....................................................................31
Cressi European guarantee.........................31
Cressi Jackets features.................................32
SOMMAIRE
FR
STABILISATEURS CRESSI
Introduction........................................................ 33
Avvertissements généraux........................33
Certication CE................................................. 33
Caractéristiques............................................... 34
Sac pneumatique............................................ 34
• Sac pneumatique standard................ 34
• Sac pneumatique
postérieur Back Cell..................................... 34
Back pack...............................................................34
• Back pack rigide à double bande.......34
• Fixage de la bouteille
avec back pack rigide................................34
Bouteilles compatibles .................................36
Système de lestage intégré.......................36
Sacoches arrière (bouteille) .....................36
Accessoires disponibles...............................36
Réglage du harnais..........................................37
Réglage de l’anneau en D ...........................38
Réglage de la boucle abdominale à
dégagement rapide.........................................39
Poche pour poteau..........................................39
Groupe de commande ..................................39
• Tuyau plissé.................................................. 40
• Soupape de décharge ............................. 40
Fonctions du groupe commande............41
Groupe commande at.................................41
Soupapes...............................................................42
• Valve inférieure gauche...........................42
Porter la veste....................................................42
Enlèvement d’urgence..................................42
Que vérier
avant la plongée ...............................................43
Plongée...................................................................43
Limites d’utilisation et durée.....................44
Entretien ................................................................44
Stockage.................................................................44
Tailles.......................................................................44
Nitrox........................................................................44
Marquage...............................................................45
Garantie Européenne Cressi .....................45
Caractéristiques Jackets Cressi...............46

INHALTSŰBERSICHT ÍNDICE ÍNDICE 索引
DE ES PT CN
CRESSI TARIERJACKETS
Einleitung...............................................................47
Allgemeine Warnhinweise..........................47
CE-Zertizierung ..............................................47
Eigenschaften.................................................... 48
Auftriebskörper................................................ 48
• Standard-Auftriebskörper.................... 48
• Auftriebskörper hinten
“Back Cell”........................................................ 48
Rückenteil............................................................. 48
• Starres Rückenteil mit Doppelgurt...48
• Befestigung der asche............................48
Kompatible Flaschen .................................... 50
Integriertes Bleisystem ............................... 50
Hintere Taschen (Flaschengurt) ............ 50
Verfügbares Zubehör....................................50
Einstellung der vergutung...........................51
D-Ring einstellung............................................52
Schnellverstellung
der Bauchgurtschnalle..................................53
Tasche für eine signalboje..........................53
Steuereinheit.......................................................53
• Faltenschlauch.............................................54
• Abassventil.............................................54
• Funktionen der Steuereinheit .............54
Schnellablassventil ........................................ 55
Ventile..................................................................... 56
• Linkes inneres unteres ventil .............. 56
Anziehen des Jackets.................................... 56
Ablegen im Notfall ......................................... 56
Kontrollen vor dem Tauchgang .............57
Tauchen ..................................................................57
Grenzen der Nutzung und Dauer .........58
Wartung ................................................................58
Lagerung .............................................................58
Grössen................................................................. 58
Nitrox....................................................................... 58
Kennzeichnung.................................................. 59
Europäische Garantie Cressi..................... 59
Eigenschaften des Cressi-Jackets.........60
CHALECOS HIDROSTÁTICOS CRESSI
Introducción..........................................................61
Advertencias generales.................................61
Certicación CE...................................................61
Características....................................................62
Saco neumático.................................................62
• Saco neumático estándar......................62
• Saco neumático trasero Back Cell...62
Respaldo.................................................................62
• Respaldo rígido de doble banda........62
• Fijacion rígido del cilindro
con respaldo rigido....................................62
Cilindros compatibles....................................64
Sistema de lastre integrado......................64
Bolsas traseras (botella) .............................64
Accesorios disponibles .................................64
Ajustes del arnés............................................. 65
Ajuste de la anilla en D................................ 66
Ajuste de hebilla abdominal
de liberación rápida.........................................67
Bolsillo de pedal................................................67
Grupo de mando............................................. 67
• Tubo corrugado .......................................... 68
• Válvula de escape .................................... 68
Funciones del grupo de mando ............ 69
Grupo de mando plano............................... 69
Válvulas..................................................................70
• Válvula inferior izquierda........................70
Uso de la chaqueta..........................................70
Desvestido de emergencia .........................70
Como comprobar antes de bucear........71
Buceo........................................................................ 71
Límites de uso y duración...........................72
Mantenimiento...................................................72
Almacenamiento..............................................72
Tallas .......................................................................72
Nitrox........................................................................72
Calicacion........................................................... 73
Garantía Europea Cressi .............................73
Características Chaqueta Cressi ............74
CRESSI BCDS
Introdução.............................................................75
Aviso geral............................................................75
Certicado CE......................................................75
Características....................................................76
Câmara de ar.......................................................76
- Câmara de ar Standard...........................76
- Câmara de ar posterior Back Cell.....76
Backpack................................................................76
- Backpack rígido de correia dupla......76
- Fixação da garrafas com
backpack rígido.............................................76
Garrafas compatíveis.....................................78
Sistema de lastro integrado......................78
Bolsos traseiros (garrafa)...........................78
Acessórios disponíveis..................................78
Regulação do Arnês........................................79
Regulação D-Ring ............................................80
Regulação vela abdominal
de engate rápido................................................81
Bolso para boia...................................................81
Unidade de Controlo...................................... 81
- Tubo corrugado.......................................... 82
- Válvula de descarga ................................ 82
Funções da unidade de controlo............83
Unidade de controlo at..............................83
Válvulas................................................................. 84
- Válvula inferior esquerda interna... 84
Como vestir o Colete Estabilizador...... 84
Retirada em caso de emergência.......... 84
Inspeção antes do mergulho................... 85
Durante o mergulho...................................... 85
Limites de utilização e duração.............. 86
Manutenção........................................................ 86
Armazenamento.............................................. 86
Tamanhos ............................................................ 86
Nitrox....................................................................... 86
Marcação ...............................................................87
Garantia Europeia da Cressi ......................87
Características do
Colete Estabilizador Cressi.........................87
科越思平衡器
简介 .............................................89
一般警告 ......................................89
CE认证 .........................................89
特点 ..............................................90
气囊 ..............................................90
• 标准气囊 ...................................90
• 后单元后气囊 ............................90
背甲气囊 .......................................90
• 刚性双带背甲 ............................90
• 刚性背甲固定气缸 .....................90
兼容气缸 ......................................92
集成配重系统 ................................92
后袋(气缸) ................................92
可用配件 ......................................92
安全带调整 ...................................93
D环调节 ........................................94
腹部快拆扣调整 ............................95
快速释放 .......................................95
浮标袋(辅助信号球) .................95
命令单元 ......................................95
• 波纹管 .......................................96
• 排气阀 .......................................96
命令单元功能 ................................97
平面命令单元 ................................97
阀门 ..............................................98
• 左内下阀 ....................................96
穿戴夹克 .......................................98
紧急撤离 .......................................98
潜水前如何检查 ............................99
潜水 ..............................................99
使用限制和持续时间 ...................100
维护 ............................................100
储存 ............................................100
尺寸 ............................................100
高氧 ............................................100
标记 ............................................101
第二个标签 .................................101
科越思的欧洲质量保修 ...............101
科越思夹克的特点 .......................102

Cressi Jacket Aquawing + Aquawing Plus
www.cressi.com
Rev. 03/2022
19
IT ITEN
CRESSI BCDS
Congratulations on your purchase of a CRESSI product. You have selected
an excellent product. Its design is the result of continuous research and
development and it has been carefully constructed in compliance with CRESSI
quality standard, thus ensuring pleasant and absolutely safe diving for a long
time.
INTRODUCTION
BCDs are of utmost importance for underwater diving activities due to the fact
that they make dives with diving regulators more comfortable, more practical
and safer. In fact, they can be used to transport cylinders and to control the
position, when diving and on the surface, through the inlet or release of air
into/out of the cell. In this way, the diver’s specic weight will vary, making
him/her lighter and more dynamic. Its function accounts for the abbreviation
“BCD”, i.e. Buoyancy Control Device, the name that is given to these jackets.
GENERAL WARNINGS
i WARNING!
FAILURE TO COMPLY WITH THE PRECAUTIONS LISTED BELOW
COULD CAUSE SERIOUS DAMAGE OR EVEN DEATH.
In order to properly use the diving equipment described in this manual, you
must be properly trained (theory and practice), which can only be achieved by
obtaining a diver certication from a recognised certication agency. The use
of this device by people without a certication is highly dangerous and may
cause serious injuries or even death. It is also essential to have fully read and
understood this manual.
i WARNING!
THIS MANUAL DOES NOT REPLACE THE TRAINING FORESEEN
BY THE SUITABLE DIVING COURSES GIVEN BY RECOGNISED
SCHOOLS IN ANY WAY.
CE CERTIFICATION
Products with the CE marking must adhere to specic conditions in order to be
placed on the market, as well as mandatory Personal Protective Equipment
health and safety requirements. The marking is therefore only found on legal,
safe and high-quality products, which are required to comply with these
regulations.
As Personal Protective Equipment, CRESSI BCDs are compliant with the
provisions of Regulation (EU) 2016/425 and with the national standards that
implement the harmonised standard EN 1809:2014+A1:2016 (and all previous
editions).
The EU declaration of conformity for this PPE can be consulted on our website:
www.cressi.com in the “DOWNLOADS” area.
The appropriate marking can be found on the product. As prescribed by the
CE standards, CRESSI BCDs are certied for use at a maximum depth of 50
metres.
i WARNING!
THE BC IS NOT A LIFE VEST AND ON THE SURFACE DOES NOT
GUARANTEE IT WILL KEEP THE HEAD OUT OF THE WATER.
THE BC IS NOT A BREATHING SYSTEM. NEVER INHALE THE GAS
IN THE BUOYANCY BAG, BECAUSE THIS COULD CAUSE SERIOUS
PHYSICAL HARM.
THE BC MUST NEVER BE USED TO LIFT THINGS OR PEOPLE TO
CARRY THEM TO THE SURFACE, BECAUSE THIS COULD CAUSE
SERIOUS PHYSICAL HARM.

Cressi Jacket Aquawing + Aquawing Plus
Rev. 03/2022
20
EN EN
FEATURES
In order to meet the varied needs of divers, Cressi BCDs have dierent
features depending on the various models oered in the catalogue. We will
explain each of such features below so that they can be properly used.
AIR CELL
The air cell is the watertight part of a BCD that is inated and deated in order
to vary the diver’s position.
A harness, or part of it, is added to the air cell so that it can be worn and the
cylinder can be positioned on it. There are dierent types of cells according to
their shape, the type of containing cell and the ascending buoyancy that they
are able to exert.
STANDARD AIR CELL
The Standard air cell is the most traditional and comfortable one. Its shape
is similar to a gilet; therefore, the air contained in it is distributed both at the
back and to the sides and front of the diver. Its main feature is that it wraps
the diver and makes him/her keep in vertical position.
BACK AIR CELL
These types of BCDs are characterised by an air cell located in the rear part
of the diver so as to release the front part and make the BCD lighter and
less voluminous. In addition, when it is inated, it does not tighten the body,
while it is kept independent from the straps, thus giving you a sensation of
complete freedom of movement.
i WARNING!
IN THE BCDS WITH BACK AIR CELL, WHILE BEING ON THE
SURFACE, THE AIR MASS TENDS TO POSITION THE DIVER
HORIZONTALLY WITH HIS/HER DOWN. IN CASE OF LOSS OF
CONSCIOUSNESS, THE HEAD REMAINS IMMERSED. THEREFORE,
THEY ARE TO BE USED BY EXPERT DIVERS WHO HAVE TAKEN
SPECIALISATION COURSES.
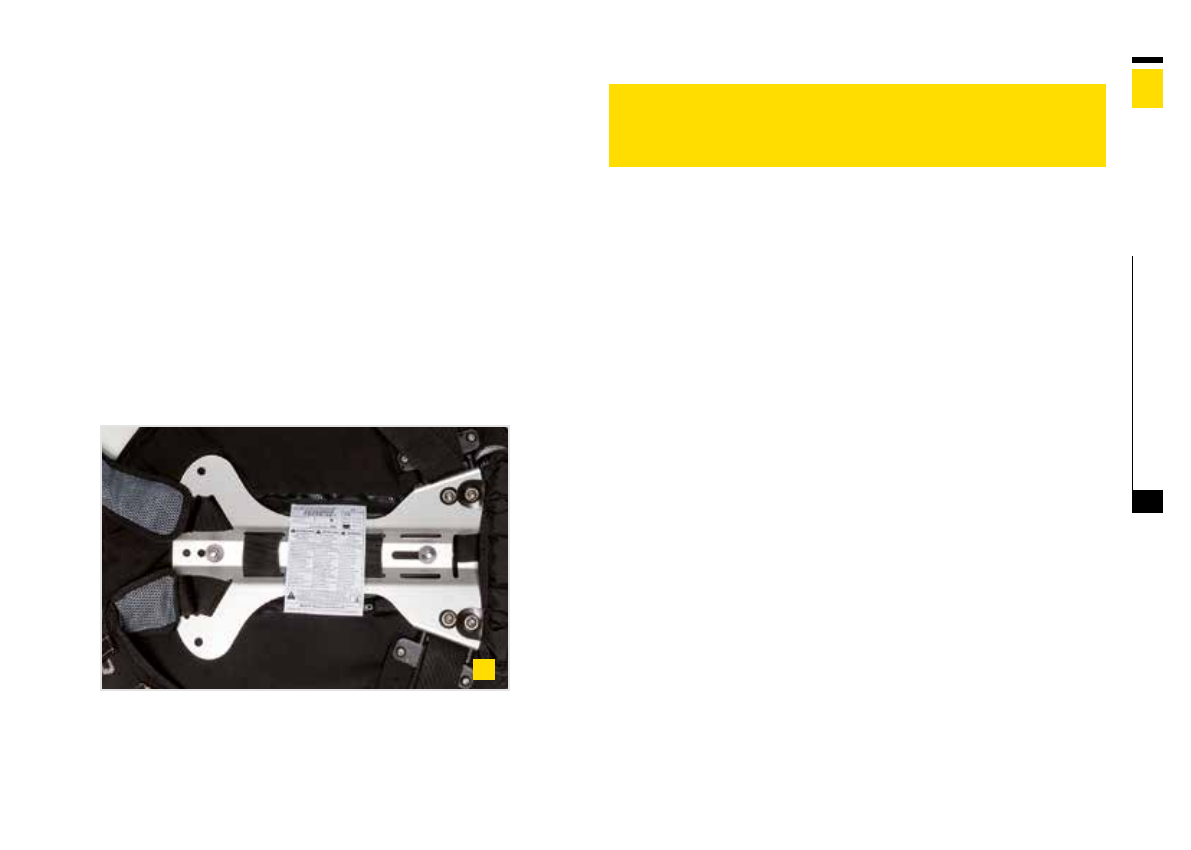
BACKPLATE
The backplate of a BCD is the rear part that enables a correct assembly
among the cylinder, the harness and the air cell, so between the BCD and
the diver. It is a very important part because it bears the entire weight of the
diving regulator (g. 11-12).
DOUBLE STRAP RIGID BACKPLATE
The Cressi rigid backplate is made from a lightweight aluminium alloy. It is
set apart by its ability to securely hold the tank using two straps. It features
various slots for harness adjustments.
SECURING THE CYLINDER WITH THE RIGID BACKPLATE.
The Cressi rigid backplate has two straps at the rear to x the tank. These
straps play a very important role, as they support the entire weight of the
tank. They must therefore be tightened carefully using the special locking
buckles.
The latter are already correctly assembled when they leave the factory (g.
12), but it is still important to learn how to do it correctly. To do so, see the
gure below, from illustration 1 to illustration 5, which explains the process
step by step.
Once the buckle is positioned as shown, proceed as follows to install the tank:
Release the strap from the velcro and loosen it as shown in illustration 6.
Position the tank by inserting it from the bottom, with the outlet valves facing
the BCD. Remove the strap from the rst slot of the buckle (illustration 7).
Open the buckle by rotating it until it clicks, then tighten the strap so that it
holds the tank rmly (g. 8). Partially close the buckle and reinsert the end
of the strap into the rst slot (illustration 9). Close the buckle completely and
secure the strap with the velcro (illustration 10). At this point, the tank is held
correctly (g. 13-14).

Cressi Jacket Aquawing + Aquawing Plus
www.cressi.com
Rev. 03/2022
21
EN EN
i WARNING!
ALWAYS WET THE STRAP BEFORE USING IT TO FASTEN THE
CYLINDER. THIS IS CRUCIAL FOR THE DIVER’S SAFETY- IF THE
STRAP IS DRY, IT COULD STRETCH WHEN SUBMERSED AND SO
THE CYLINDER MAY SLIP OFF.
Once the cylinder has been attached, keep the upper side of the backplate
from 5 to 10 cm below the valves (g. 14), so that the diver’s head does not
bump against the regulator.
1 32 4
6 875
9 10
11 12
13 14

Cressi Jacket Aquawing + Aquawing Plus
Rev. 03/2022
22
EN EN
COMPATIBLE CYLINDERS
All diving cylinders with 10/12/15/18 Litre capacity or with 171 to 216 mm
diameters are compatible.
INTEGRATED WEIGHT POCKETS
The Aquawing + model is equipped with a system that allows you to insert the
weights directly into special pockets. Thanks to this solution, the diver is not
required to wear all the weights in the waist belt, allowing for a smoother and
more gradual release in an emergency.
i WARNING!
FOR SAFETY REASONS, IT IS RECOMMENDED TO KEEP THE
WEIGHT BELT AT THE WAIST WITH A MINIMUM AMOUNT
OF WEIGHT IN ORDER TO MAKE THE DIVER’S POSITION
MANAGEABLE EVEN IN THOSE SITUATIONS IN WHICH THE BCD
WEIGHT POCKETS HAVE BEEN COMPLETELY RELEASED SO AS
TO AVOID DANGEROUS UNCONTROLLED ASCENTS.
INTEGRATED WEIGHT POCKETS
This system is very simple, consisting of two xed pockets located next to
the backplate. Inside the pocket, there is a special weight pouch with a velcro
fastening and a handle. To release the weight, simply open the quick-release
buckle that fastens the pocket with two ngers (g. 15-16-17) and take the
pouch by the handle if you want to keep the pouch (g. 18-19-20); otherwise,
the weight will fall away by gravity. Obviously, if you want to release the weight
by gravity, you will need to be in a vertical position with your head towards the
surface, since it is the force of gravity that will free you from the weight. The
maximum amount of weight that can be inserted is 3 kg per pocket.
REAR POUCHES (CYLINDERS)
Each pouch can hold 2.5 kg (max. 5 in total).
For more information, see gure 56 on page 28.
AVAILABLE ACCESSORIES
Two type of accessories are available that can be assembled on both the
Aquawing and Aquawing+ models of vest:
• Integrated ballast system. Two pockets, one left and one right, complete
with weight pockets, to the side of the backpack. See the “Integrated ballast
system” description in the previous chapter.
• D-ring system. Two D-ring base plates (one right, one left) to the side of the
backpack.
For correct assembly, please refer to the instructions available for download
from cressi.com in the dedicated section for support/operating manuals).
15 16
17
19
18
20
Cressi Jacket Aquawing + Aquawing Plus
www.cressi.com
Rev. 03/2022
23
EN EN
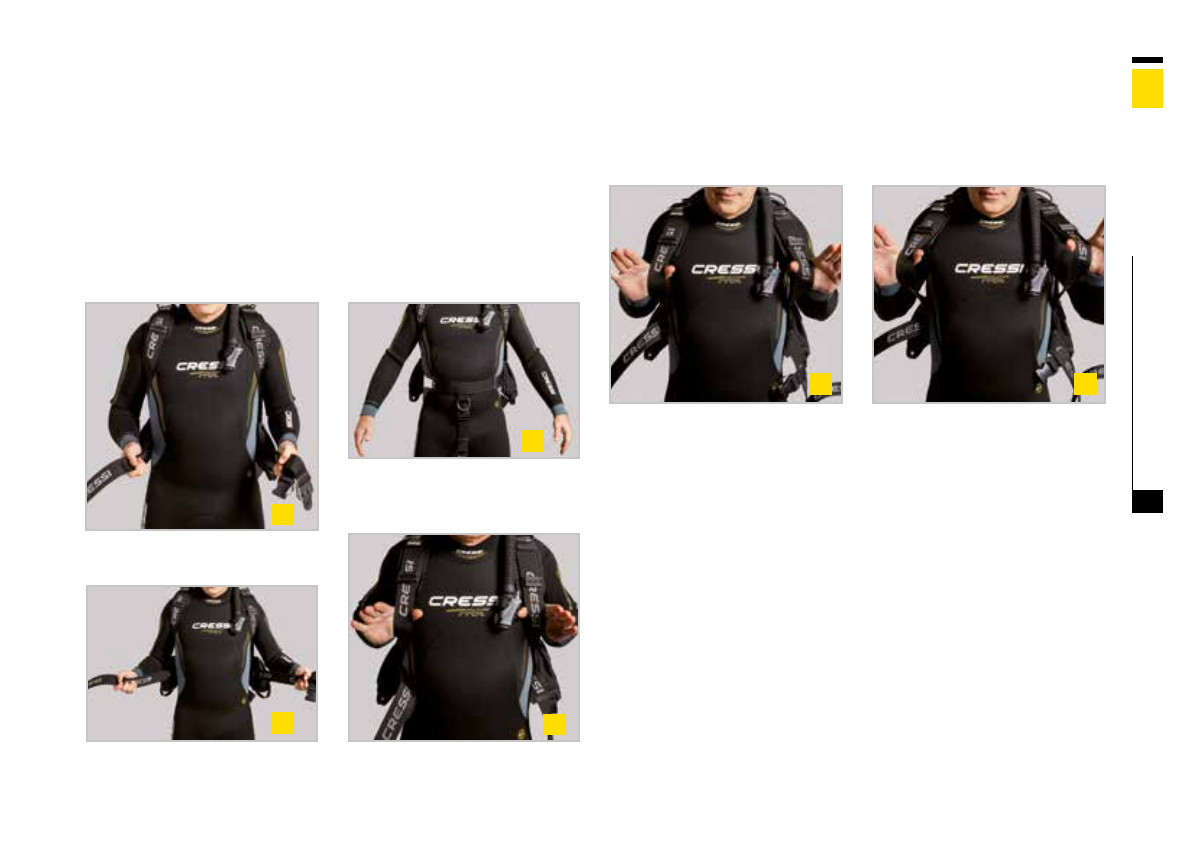
HARNESS ADJUSTMENTS
The Aquawing and Aquawing + are one-size annular BCDs designed to adapt to
all body types (male and female) using the new patented Modular Adjustment
System (MAS): in fact, you can simply pull the single 50 mm strap that wraps
around the shoulders and waist to quickly adjust it to your size.
Proceed as follows to put on the BCD (tighten the harness): using both
hands, grasp the ends of the abdominal strap (g. 21) and pull it upwards
and outwards (about 45 degrees) from the body (g. 22). Then close the two
quick-release buckles on the abdomen and the crotch (g. 23)
25 26
21
22
23
24
Proceed as follows to remove the BCD (loosen the harness): open the crotch
and abdominal buckles and make sure that the two ends of the abdominal
strap are free; grab the strap on the shoulder straps just above the waist (g.
24) and move it outwards and upwards from the waist (g. 25-26).

Cressi Jacket Aquawing + Aquawing Plus
Rev. 03/2022
24
EN EN
D-RING ADJUSTMENT
To change the position of the D-ring on the shoulder strap, proceed as shown
in the following gures (g. 27-28-29-30-31-32-33-34-35-36-37-38-39-40)
27
33
29
35
31
37
39
28
34
30
36
32
38
40

Cressi Jacket Aquawing + Aquawing Plus
www.cressi.com
Rev. 03/2022
25
EN EN
QUICK-RELEASE ABDOMINAL BUCKLE ADJUSTMENT
To adjust the position of the buckle, proceed as shown in the following gures
(g. 41-42-43-44-45-46)
SMB POCKET (SURFACE MARKER BUOY)
Use the special pocket, located under the backplate cover, to hold the surface
marker buoy (g. 47).
43
45
41 42
47 48
44
46
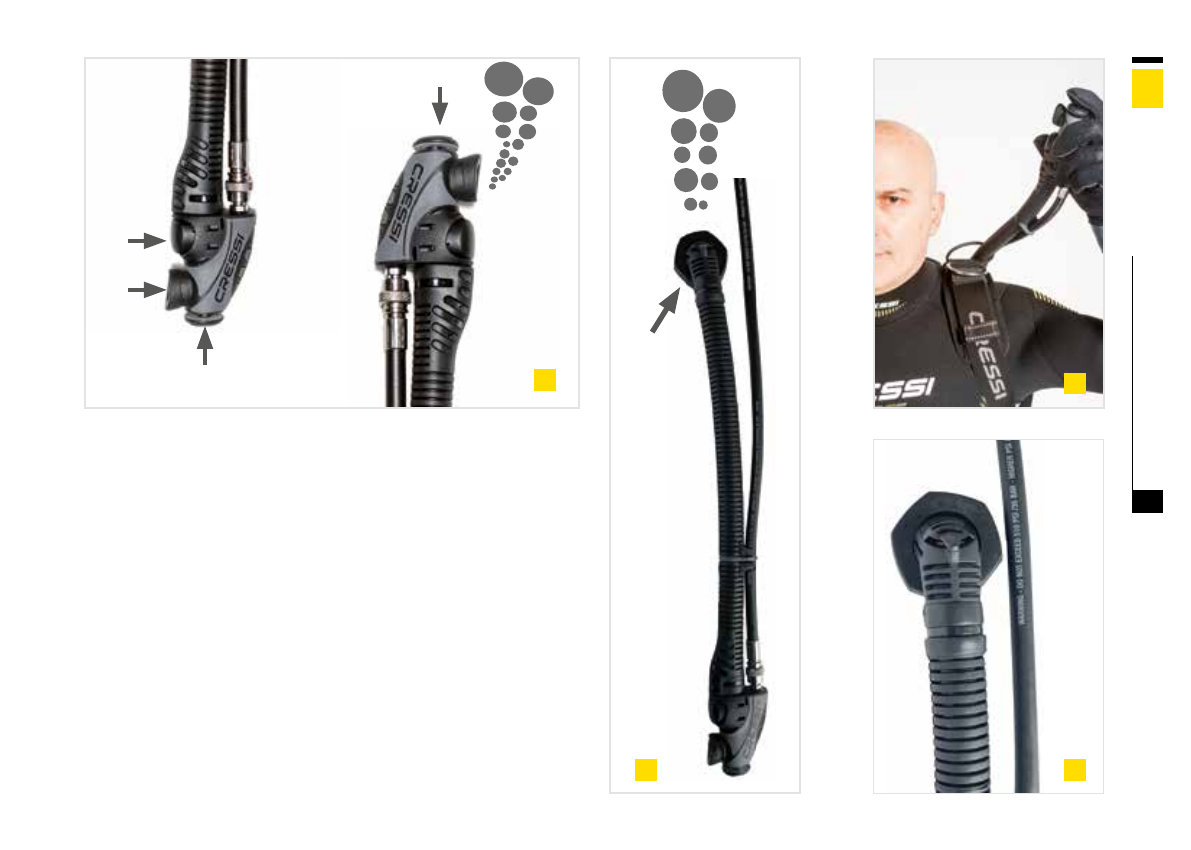
CONTROL UNIT
The control unit is the heart of each BCD, linked to the ination and deation
functions of the pneumatic bladder. It consists of the By-Pass, the Corrugated
Hose and the Dump Valve (g. 53).
BY-PASS: The By-Pass is the terminal that houses all the buttons and the
ination and deation mechanisms (g. 51); it must always be within reach, as
it controls all the BCD’s vital operations. The low-pressure hose from the 1st
stage is connected to the By-Pass by way of a quick coupling. This allows the
By-Pass valve to blow air into the tank. This valve is designed to operate with
a relative pressure of 1 to 15 bar, but we recommend using it with a relative
pressure of 8 to 12 bar.

Cressi Jacket Aquawing + Aquawing Plus
Rev. 03/2022
26
EN EN
i WARNING! We recommend replacing the medium-pressure hose in
the following cases:
- When there is air leaking from the rubber part or the joints with the
metal parts.
- When there are anomalies in terms of shape when pressurised and
at rest. The hose must always be perfectly cylindrical along its entire
length.
- If the surface has been altered due to abrasions, friction or small cuts.
- If it has been subjected to traction that goes beyond normal use, such
as lifting the self-contained breathing apparatus or becoming caught
during sudden movements.
- When it is subjected to crushing or signicant impacts, even if there is
no obvious damage. The damage may be internal.
- When the connection thread with the regulator is damaged.
To connect the hose to the By-Pass, grip the knurled bushing at the end of
the quick coupling and pull it back. At the same time, fully insert the female
coupling of the hose into the By-Pass cylinder. Release the bushing and make
sure it is properly engaged by pulling the hose gently. To disconnect, pull back
the bushing and remove the hose from the By-Pass (g. 49-50).
i WARNING! Only use the original Cressi hoses supplied. If you need to
replace them, we recommend using Cressi hoses.
CORRUGATED HOSE: The Corrugated Hose is the cylindrical rubber element
that acts as an air duct, a guide for the cable that operates the dump valve,
and a housing for the hose (g. 52).
DUMP VALVE: Finally, the quick dump valve is the plastic end part that
connects to the pneumatic bladder in order to empty it of air (g. 54).
i WARNING! The low-pressure hose must be screwed to the rst
stage of the regulator by way of the appropriate LP or MP (LOW/MEDIUM
PRESSURE) outlet with 3/8 inch 24 UNF or 1/2 inch 20 UNF thread using
an adapter. The other outlets of the regulator are HP (HIGH PRESSURE)
and have a female 7/16 inch 20 UNF thread. NEVER connect the BCD’s
low-pressure hose to the HP (HIGH PRESSURE) outlet, even with the help
of reducers. This represents a serious risk to personal safety.
49 50
Cressi Jacket Aquawing + Aquawing Plus
www.cressi.com
Rev. 03/2022
27
EN EN
IN
A
C
B
OUT
C
51
CONTROL UNIT FUNCTIONS:
As laid out above, the control unit allows you to control a wide range of
functions. They are as follows:
1 - Ination using button A (g. 51). Press the button to let in air.
2 - Ination by mouth: Place your mouth over mouthpiece B (g. 51). Blow
in a small amount of air to eliminate any residual water from the duct.
Continue blowing while fully pressing button C. As soon as button C is
pressed, the air will start entering the bladder. To stop, release the button.
Repeat if necessary.
3 - Deation by way of quick dump valve D, which can be operated by pulling
the corrugated hose downwards (g. 52). The diver must be in a vertical
position.
4 - Traditional deation: with the body in a vertical position, raise the
corrugated hose towards the surface and press button C (g. 53).
FLAT CONTROL UNIT
The quick dump valve has a considerably smaller footprint and lower weight.
It is not equipped with a pressure relief valve (g. 54).
D
FLAT
52
53
54

Cressi Jacket Aquawing + Aquawing Plus
Rev. 03/2022
28
EN EN
VALVES
To allow the air to escape from the bladder, each Cressi BCD has a control
unit with two valves, as laid out above. The Aquawing and Aquawing +
models are equipped with an additional quick dump valve and pressure relief
valve located on the inside in the lower left. The diver can therefore enjoy
complete safety should they encounter emergency circumstances during
a dive. This type of valve is operated manually by pulling a knob and must
be easily accessible to allow the diver to empty the pneumatic bladder in
most positions. Furthermore, as mentioned above, it is also a pressure relief
valve, i.e. a valve that releases the air from the bladder when the pressure is
excessive.
LOWER LEFT INTERNAL VALVE:
It is located in the lower left internal area, and the knob that activates it is
located immediately under the valve itself near the edge of the bladder (g.
55). It is used to release air when the diver is upside down or in a horizontal
position and, if necessary, at the end of the dive, to drain any water that has
entered the bladder.
i WARNING! When storing weight in these rear pouches, it cannot be
released in an emergency situation, and must be supplemented by a
main weight system. It must also have a low enough weight that the
diver establishes positive buoyancy when they release the main weight
(g. 56).
55
PUTTING THE BCD ON:
Using both hands, grasp the ends of the abdominal strap and pull it upwards
and outwards (about 45 degrees) from the body. Then close the two quick
release buckles on the abdomen and the crotch (see the previous chapter,
entitled “Harness Adjustments”). To support the heavy tank, we recommend
placing it on a raised surface with respect to the ground in order to perform
the manoeuvre as comfortably as possible. We do not recommend putting
the BCD on in the water.
EMERGENCY RELEASE:
If you need to get out of the BCD quickly, simply loosen the harness as follows:
open the crotch and abdominal buckles and make sure that the two ends of
the abdominal strap are free; grab the strap on the shoulder straps just above
the waist and move it outwards and upwards from the waist (see the previous
chapter, entitled “Harness Adjustments”).
56

Cressi Jacket Aquawing + Aquawing Plus
www.cressi.com
Rev. 03/2022
29
EN EN
PRE-DIVE CHECKS:
1 - Check that the low-pressure hose is correctly engaged.
2 - Check that the valve xing nuts are well tightened.
3 - Make sure the tank is held perfectly in place.
4 - Inate the BCD and check the eciency of the pneumatic bladder.
5 - Try out all the functions of the Control Unit several times.
6 - Check the operation of the pressure relief and quick dump valves.
DIVING:
Every dive must begin with a preparatory stop on the surface, during which
you must inate the BCD. This action facilitates oating and swimming and
makes the preliminary operations safer. Once you are ready, you will need
to deate fully in order to carry out the descent. During the descent, we
recommend inating the bladder a little at a time so that your buoyancy is
not excessively negative and your speed does not increase excessively. When
you reach your maximum depth or your rst stop, inate the bladder until a
neutral position is obtained. This position makes swimming very easy. Be very
careful not to overdo it, and ideally keep yourself slightly negative. A deep
inhale or an upward kick with your ippers could be enough to change your
buoyancy from neutral to positive and, if distracted, to put you in an extremely
dangerous situation. It could even trigger a very risky and rapid uncontrolled
ascent. To avoid this situation, you need to be able to quickly recognise such a
buoyancy change and to immediately deate the BCD using the valves. Once
your run time is up, you must ascend, taking care to release the air on a partial
basis, proportional to your ascent altitude. For every diver, ASCENDING must
be inextricably linked to DEFLATING the BCD (and the dry suit). The deation
must be adjusted to ensure that it is never aected by the positive thrust that
the BCD gives to your body. Once on the surface, reinate the BCD.
As previously mentioned in the “Control Unit” paragraph, ination manoeuvres
are carried out using the By-Pass button or by mouth using the mouthpiece
and button. We recommend practising both methods extensively, even if the
rst proves quicker and easier. The position of the diver is not relevant to the
eects of the manoeuvre. Deation manoeuvres are carried out by way of
the control unit, either by pulling it downwards or by lifting the end towards
the surface and pressing the appropriate button, and by way of the quick
dump valves located in the rear part, by pulling the appropriate knobs. During
deation operations, the position of the diver is very relevant to the eects of
the manoeuvre. They must be vertical with respect to the surface to deate
using the control unit or the upper rear valve, while they must have their head
down and more precisely the lower part of the BCD upwards to deate using
the lower rear valve. When deating, care must be taken to close the relevant
elements as soon as the air has nished owing out. Otherwise, the water will
begin to enter the bladder, as it is no longer blocked by the air, altering the
buoyancy capacity.
i WARNING! In BCD models with a rear bladder, when on the surface,
the air mass tends to position the diver horizontally upside down, and the
head may remain submerged in case of loss of consciousness. Their use
is therefore intended for expert divers with an in-depth understanding
of their features.
u WARNINGS:
As mentioned in the previous paragraph, incorrect control of the BCD
can lead to very dangerous, rapid and uncontrolled ascents, which are
almost always responsible for serious or fatal decompression accidents.
In order to prevent these situations, we always recommend gradually
deating the BCD during ascents to maintain a slightly negative
buoyancy. If you are in a vertical position, this operation must be carried
out using the upper valves; more unusually, if your body is positioned
upside down, you must use the lower valve. As a general rule, you
should always use the valve closest to the surface to deate.

Cressi Jacket Aquawing + Aquawing Plus
Rev. 03/2022
30
EN EN
USE AND DURATION LIMITS
1 - This BCD must not be used beyond the rst 50 metres of depth.
2 - This BCD must only be used with SCUBA diving breathing apparatus
bearing the CE mark.
3 - This BC can be used in water temperatures ranging from -2°C to + 40 °C.
It can withstand external (ambient) temperatures from –20 °C to + 50 °C.
Diving in extreme conditions, with water temperatures below 10 °C,
is risky for the human body, and you should therefore have taken and
passed specic courses before diving in such conditions.
4 - A buoyancy control device is not a life jacket and may not keep your head
out of water.
5 - If the buoyancy control device described in this manual is used with
Nitrox mixtures containing up to 40% O2, it will require more frequent
and thorough maintenance than with breathable air.
6 - No alterations, even minor ones, can be made to this BCD. Alterations are
prohibited for the purposes of personal health and safety.
7 - For the purposes of personal health and safety, use is prohibited in
polluted water, water with a high level of suspended solids, and in any
liquid with dierent chemical/physical characteristics to water.
8 - Use of the BCD in chlorinated waters will cause the materials to
deteriorate. It is therefore not recommended for use in water with a high
concentration of chlorine.
MAINTENANCE
To maintain your BCD properly, be sure to follow these instructions:
1 - Always carry it in a protective bag.
2 - Avoid contact with sharp or pointed objects, or objects that may cause
abrasions.
3 - Avoid prolonged exposure to sunlight.
4 - At the end of each dive in the sea, lake or pool, always rinse the interior
and exterior with fresh water. For the interior, ll the bladder about 1/3
full through the mouthpiece of the control unit (keeping the drain button
pressed), and then partially inate and shake it. Empty it by opening the
lower quick dump valve.
5 - Every 4 or 5 dives, clean and lubricate the quick coupling for the hose and
the By-Pass coupling with silicone grease.
6 - Replace the hose seals annually at an authorised Cressi centre.
7 - We recommend getting your BCD inspected annually at an authorised
Cressi centre. In case of intense use (diving centres, rental use, professional
use, or other), we recommend having the BCD serviced every three/six
months at an authorised Cressi centre.
8 - If you need to replace a hose, the new one must be the same type as the
hose supplied at the time of purchase. If you have any doubts about its
characteristics, contact the manufacturer or an authorised retailer.
STORAGE
1 - We recommend storing your BCD in a perfectly dry and partially inated
state and in a cool and dry place. Ideally, it should be hanging.
2 - The storage location must be removed from sources of heat or direct
sunlight.
3 - Avoid locations where the BCD could come into contact with chemical
products or corrosive agents that could aect its safety features.
4 - Avoid placing other objects on top of it.
5 - Leave the control unit in an extended position. The corrugated hose must
not be bent or crushed.
SIZES
For sizes, see the Fit column of the nal table.
NITROX
Do not use this BCD with Nitrox mixtures containing more than 40% oxygen.
The use of mixtures with higher percentages of oxygen, or that contain helium
or other gases (Trimix), could cause corrosion, deterioration or premature
ageing of the BCD or its components, causing them to break. This could result
in a loss of buoyancy control or the BCD losing its seal, leading to serious
physical harm. Mixtures with a high oxygen content can also increase the risk
of ignition and explosion. In order to use Nitrox or Trimix mixtures, you must
obtain, in addition to the diving certication, specic certication, issued by an
internationally recognised educational organisation.
Cressi Jacket Aquawing + Aquawing Plus
www.cressi.com
Rev. 03/2022
31
EN EN
MARKING
A Buoyancy Control Device for diving is a personal protective device that must
meet the European regulations on personal health and safety.
The CE marking found on the product signies its compliance with the
essential health and safety requirements laid out in Annex II of Regulation
(EU) 2016/425;
The EU declaration of conformity for this PPE can be consulted on our website:
www.cressi.com in the “DOWNLOADS” area.
EN 1809:2014+A1:2016 European Standard regarding the regulation of
buoyancy control devices for the purposes of personal protection. Products
bearing this marking must meet the requirements of this standard.
The labels axed to the product (under the backplate cover) (g. 57) display
the following data:
rst label:
• the BCD serial number
second label:
i WARNING!
THIS IS NOT A LIFE JACKET AND MAY NOT KEEP YOUR HEAD OUT OF
WATER
- The use of this BCD requires a specic course with a qualied instructor.
- In an emergency, the ability to oat on your back on the surface is not
guaranteed for all users and in all conditions.
- Before use, check the condition of the BCD, its proper functioning, and that
there are no holes or other damage.
- See the instructions provided in the Manual.
- Do not inhale the gas inside the bladder.
- Do not remove from the BCD.
Model:_______ Production year: _______
Table indicating the buoyancy values (expressed in Newtons) for each BCD
size.
Pictogram indicating the max. tank capacity in litres and the maximum
diameter.
CRESSI EUROPEAN GUARANTEE
In accordance with the 1999/44 EC directive, Cressi guarantees its products
against non-conformity and defects aecting proper functioning. To oer
better service to its customers and consumers and to highlight the eciency
and quality of its production processes, it has decided to extend the terms of
the aforementioned guarantee as follows: the BCDs are guaranteed for two
(2) years from the date of purchase (for rental or educational use: 12 months
for proper functioning and 24 months for non-conformity). Exceptions:
consumable parts; damage due to scratches, punctures, abrasions, or
chemicals (including chlorine); damage due to sun exposure; damage due to
neglect, impacts, or normal wear and tear.
57

Cressi Jacket Aquawing + Aquawing Plus
Rev. 03/2022
32
EN
CRESSI JACKETS FEATURES
MODEL:
u TYPE OF
AIR CELL - MATERIAL
u TYPE OF BACKPLATE/
CYLINDER FIXING
u COMPATIBLE CYLINDERS /
LITRES - DIAMETER (mm)
u INTEGRATED WEIGHT POCKETS /
MAX KG POCKET
u ABDOMINAL ADJUSTMENT
u STERNAL ADJUSTMENT
u SHOULDER STRAP ADJUSTMENT
u N. QUICK DUMP AND
OVER-PRESSURE VALVES -
DISCHARGE KNOB
u TOTAL DUMP VALVES
u NO. CHARGE VALVES
u TYPE OF CONTROL UNIT
u NO. OF POCKETS
u NO. OF BACK POCKETS
u NO. OF “D” RINGS
u THRUST IN NEWTONS
u BCD WEIGHT -
TOTAL BALLAST THAT CAN BE USED (kg)
u WEARABILITY:
CHEST (cm) - WAIST (cm) - WEIGHT (kg)
BACK CELL NYLON 210 D CORDURA 1000 D
RIGIDO /
DOPPIA FASCIA
MONO 10/12/15/18/ -
171/203/216
NO
FIBBIA
NO
MAS (Modular Adjustment System)
1
- Posteriormente
zona inferiore sinistra
3
2
FLAT
NO
2
2
BACK CELL NYLON 210 D CORDURA 1000 D
RIGIDO /
DOPPIA FASCIA
MONO 10/12/15/18/ -
171/203/216
FIXED GRAVITY POCKET -
3+3 KG
FIBBIA
NO
MAS (Modular Adjustment System)
1
- Posteriormente
zona inferiore sinistra
3
2
FLAT
NO
2
4
120 120
2.9
5
80/130
75/130
55/125
3.75
11
80/130
75/130
55/125
AQUAWING AQUAWING +
XS S M L XL XXL
XS S M L XL XXL
XS S M L XL XXL
XS S M L XL XXL XS S M L XL XXL
XS S M L XL XXL

AQUAWING &
AQUAWING PLUS
MANUALE D’USO
EQUILIBRATORI
IT
MANUEL D’INSTRUCTIONS
GILETS STABILISATEURS
FR
MANUAL DE ISTRUCCIONES
CHALECOS HIDROSTÁTICOS
ES
DIRECTION FOR USE
B.C.’S JACKETS
EN
BEDIENUNGSANLEITUNG
TARIERJACKETS
DE
MANUAL DO USÁRIO
BCDS
PT
平衡器 用户手册
CN
QUALITY PRODUCTS SINCE 1946 www.cressi.com
Cressi Sub S.p.A.
Headquarters:
Via G. Adamoli, 501
16165 Genova, Italy
www.cressi.com
Rev_03_2022
+ 39 010 830791
This manual suits for next models
2
Table of contents
Other Cressi Diving Instrument manuals

Cressi
Cressi IZ750094 User manual

Cressi
Cressi Michelangelo User manual

Cressi
Cressi PORTER User manual

Cressi
Cressi CARTESIO GOA User manual

Cressi
Cressi DONATELLO User manual

Cressi
Cressi CARTESIO User manual

Cressi
Cressi NEWTON Reference guide

Cressi
Cressi Archimede User manual

Cressi
Cressi GIOTTO User manual

Cressi
Cressi EDY User manual

Cressi
Cressi MC9 S.C. Manual

Cressi
Cressi Scorpion Manual

Cressi
Cressi Leonardo Manual

Cressi
Cressi Leonardo Manual

Cressi
Cressi DIGI 2 User manual

Cressi
Cressi Bluetooth Interface User manual

Cressi
Cressi Aquapro Manual

Cressi
Cressi NEPTO User manual

Cressi
Cressi Archimede II User manual

Cressi
Cressi DIGI 2 User manual


