4
DE
SICHERHEITSHINWEISE
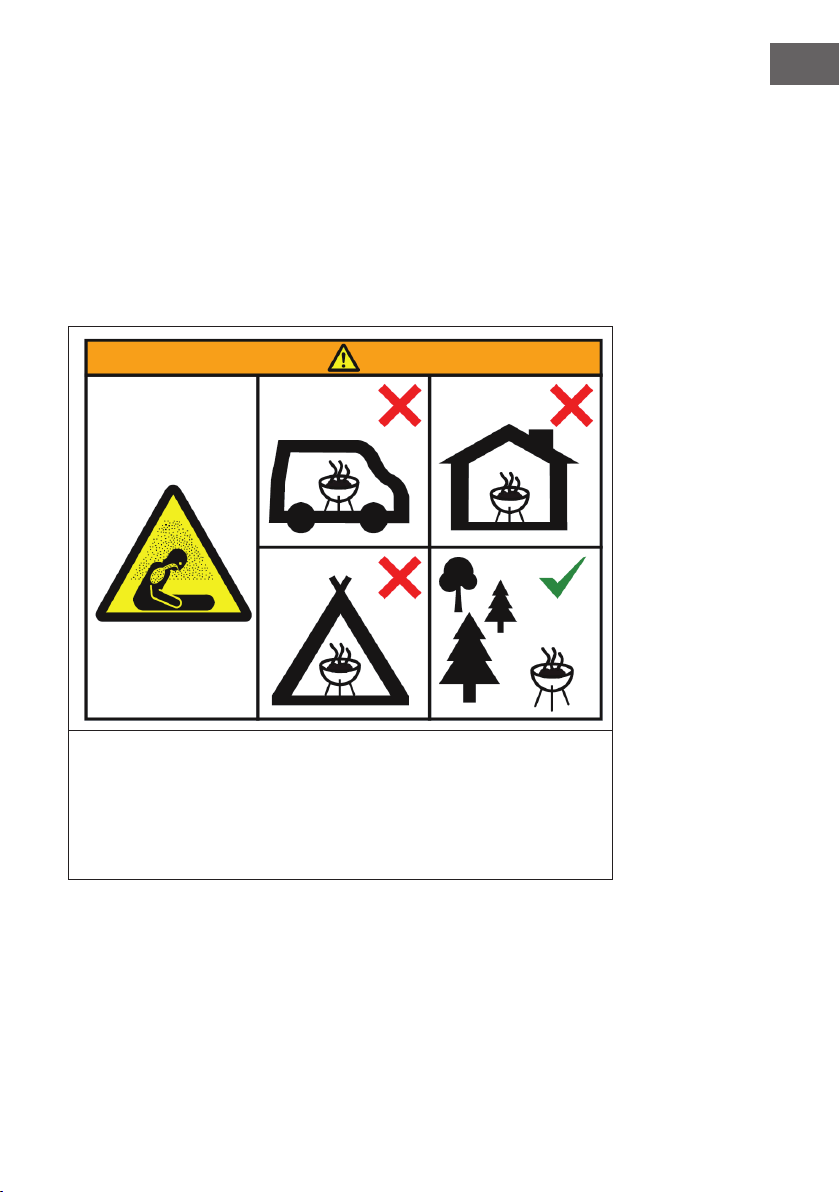
WARNUNG
Erstickungsgefahr! Die Feuerstelle ist nur zur Nutzung im Freien
bestimmt. Sie darf nicht in Gebäuden, Garagen oder anderen
geschlossenen Bereichen verwendet werden. Es können sich
giftige Dämpfe bilden, die zum Ersticken führen.
• Die Feuerstelle ist nicht für gewerbliche Zwecke geeignet.
• Die Feuerstelle darf nur von Erwachsenen verwendet werden. Kinder und
Haustiere müssen einen sicheren Abstand einhalten.
• Verwenden Sie zum Anzünden kein Benzin, Brennspiritus,
Feuerzeugbenzin oder Alkohol.
• Benutzen Sie die Feuerstelle nicht, bevor sie nicht vollständig
zusammengebaut wurde und alle Teile fest sitzen.
• Verwenden Sie die Feuerstelle nicht auf Untergründen aus Holz oder
anderen brennbaren Materialien.
• Leeren Sie die Feuerstelle nach jeder Verwendung. Lassen Sie eine dünne
Ascheschicht darin, um den Boden zu schützen. Nehmen Sie die Asche erst
heraus, wenn die Kohle komplett abgebrannt und die Asche abgekühlt ist.
• Fassen Sie die Feuerstelle erst an, wenn sie komplett abgekühlt ist. Tragen
Sie während des Betriebs hitzebeständige Handschuhe.
• Verstauen Sie die Feuerstelle erst, wenn sie komplett abgekühlt ist und die
Asche entsorgt wurde.
• Verwenden Sie immer Werkzeuge und hitzebeständige Handschuhe,
wenn Sie Brennmaterial hinzufügen oder die Feuerstelle bewegen.
• Lassen Sie die Feuerstelle während der Benutzung nicht unbeaufsichtigt.
• Während der Benutzung kann heiße Glut aus der Feuerstelle fallen.
• Überladen Sie die Feuerstelle nicht mit Brennmaterial. Fügen Sie erst dann
neues Brennmaterial hinzu, wenn das Feuer heruntergebrannt ist. Wenn
ein Teil der Feuerstelle rot glüht, ist sie überladen.
• Halten Sie den Brennstoff von Wand der Feuerstelle fern, da die Wand von
hohen Temperaturen beschädigt werden kann.
• Atmen Sie den Rauch nicht ein und lassen Sie ihn nicht in die Ihre Augen kommen.
• Untersuchen Sie die Feuerstelle vor der Benutzung auf Beschädigungen.
• Durch die Benutzung kann sich die Metallober äche leicht verfärben.