BM2 BIEMMEDUE DUSTY User manual
Dichiarazione diconformità -Declaration of conformity - Déclaration de conformité - Konformitätserklärung
Declaración deconformidad
Allegato / Annex / Pièce jointe / Anhang / Anexo: II –2006/42/CE
La sottoscritta ditta - The company - La Société - Der Hersteller - La empresa suscrita:
Biemmedue S.p.a.
Via Industria 12 –12062 CHERASCO (CUNEO) ITALIA
Phone +39 0172-486111 Fax +39-0172-488270
www.biemmedue.com
dichiara sotto la propria responsabilità che la macchina nuova - declares that the new machine - déclare sous sa propre responsabilité
que la nouvelle machine - erklärt hiermit auf eigene Verantwortung, dass die - declara bajo su responsabilidad que la máquina nueva :
Modello
Model
Modéle
Modell
Modelo
Numero di serie
Serial number
Numéro de série
Seriennummer
Número de serie
di seguito descritta - described below - décrite ci-dessous - nachfolgend beschriebene neue maschine - a continuación descrita,
SPAZZATRICE PROFESSIONALE –PROFESSIONAL SWEEPER –BALAYEUS PROFESIONAL –PROFESSIONELL
KHERMASCHINEN –BARREDORA PROFESSIONAL
è conforme ai requisiti essenziali di sicurezza indicati dalle Direttive:
to wich this declaratiuon relates, conforms to the provision of Directives:
est conformes aux exigences essentielles de sécurité dans le Directives:
auf die sich Erklärung bezieht, die Anforderungen des Richtlinie:
es conforme con la Directiva:
2006/42/CE - 2006/95/CE –2002/96/CE –2002/95/CE - 2004/108/CE - 2000/14/CE (Annex V) - 85/374/CE
Per la verifica della conformità, sono state consultate le seguenti Norme:
For the check of conformity, reference to the following Standard has been made:
Pour le contrôle del la conformité, les Normes suivantes ont été consultées:
Zur Űberpűfung der Konformitȁt sind die folgenden Vorschriften hinzugezogen worden:
Para la verificaciòn de la conformidad, se han consultado la Normas a continuaciòn:
EN 60335.1–EN 55014.1 - EN61000-3.2 –EN 61000.3.3 –EN 61000.3.11
EN 62233 –EN ISO 3744 –EN 60704.1 –EN 20643 –D.Lgs. 262/2002
Persona autorizzata a costituire il fascicolo tecnico: Persona autorizzata a redigere la dichiarazione:
Person authorized to compile the technical file: Person empowered to draw up the declaration:
Personne autorisée a costituer le dossier technique: Personne ayant reçu pouvoir rédiger la déclaration:
Bevollmȁchtigte Person zur Zusammenstellung: Bevollmȁchtigte Person zur Astellung der Erklȁrung:
der technischen Unterlagen: Persona adoperada para redactar la declaration:
Persona facultada para elaborar el expediente técnico:
Nome Name Nom Name Nombre: ……………………… Andrea Cancian Amministratore Delegato –Managing Director
Indirizzo Address Adresse Anschrift Direccion: ………… BIEMMEDUE spa Administrateur Délégué –Geschȁftsfűhrendes
Cleaning Division Verwaltungsratsmitgliend –Consejero Delegado
Via A. Adelbero 19 Ing. Marco Costamagna
30026 Portogruaro (VE)
Italy
Data / date / datum / fecha: 18/09/2014 Firma Signature Unterschrift
Uso del manuale
Utilizzo del manuale
Questo manuale è stato redatto dal Costruttore e costituisce parte
integrante del corredo della macchina. Il manuale della spazzatrice
è destinato al Cliente utilizzatore; è finalizzato alla descrizione
dell’uso della spazzatrice stessa ed alla conoscenza delle sue
caratteristiche tecniche. Questa serie d’informazioni deve essere
obbligatoriamente conosciuta dal Cliente, e consente di poter
utilizzare la spazzatrice in condizioni di sicurezza conoscendo i suoi
principi di funzionamento ed i suoi limiti. Contiene, inoltre,
informazioni sulle modalità di trasporto, spostamento, messa in
funzione, regolazione, assemblaggio, manutenzione ed infine
smantellamento della spazzatrice stessa.
Conservazione del manuale
Il presente manuale va conservato con cura per tutta la vita della
spazzatrice, compresa la fase di smantellamento. Il manuale va
conservato in un luogo asciutto nei pressi della spazzatrice e deve
essere, in ogni caso, sempre a disposizione del personale
qualificato e dell’utilizzatore. Il Costruttore rende noto che il
manuale riflette la situazione tecnica nel momento in cui la
spazzatrice è stata commercializzata e non può essere considerato
disadatto nel caso di aggiornamenti. Il Costruttore si riserva il diritto
di apportare aggiornamenti alla produzione ed al manuale in
qualsiasi momento senza essere obbligato ad aggiornare
produzione e manuali precedenti salvo il caso di modifiche che
riguardino l’incolumità e la salute di persone o cose.
Avvertenze generali
Lavorare in tutta sicurezza
Le istruzioni di sicurezza contenute nel manuale d’uso e
manutenzione si riferiscono alle operazioni che possono essere
svolte sulla spazzatrice. I simboli di sicurezza sono inseriti nel testo
nei punti che richiedono particolare attenzione. E' molto importante
che queste istruzioni di sicurezza siano seguite sempre. La non
osservanza potrebbe provocare lesioni alla persona e/o danni
all'unità o ad altre attrezzature. Tenendo presente tutto ciò, ecco
alcune istruzioni di sicurezza fondamentali:
Leggere, e fare propria, questa sezione delle istruzioni di
sicurezza prima dell'installazione, dell'uso, della manutenzione
o della riparazione della spazzatrice. Leggere e seguire le
segnalazioni di sicurezza contenute nel testo che si riferiscono
ad operazioni specifiche. Conoscere ed attenersi alle istruzioni
di sicurezza scritte nel manuale, alle norme generali per la
prevenzione degli infortuni ed alle norme di legge in materia di
sicurezza.
Segnaletica di sicurezza
I simboli illustrati di seguito sono utilizzati nel manuale d’uso e
manutenzione e applicati nel punto in cui devono segnalare
l’informazione corrispondente all’operatore. Questi simboli sono stati
inseriti per mettere in guardia il personale rispetto ai pericoli o le
possibili fonti di pericolo. Fateli propri. La mancanza d’attenzione ai
simboli potrebbe provocare lesioni personali, morte e/o danni alla
spazzatrice od alle attrezzature. In linea di massima i segnali
possono essere di tre tipi come descritto nella tabella che segue:
Segnali di pericolo
Forma triangolare incorniciata
Indicano delle prescrizioni relative a
pericoli presenti o possibili.
Segnali di divieto
Cornice circolare, sbarrata
Indicano prescrizioni relative ad azioni che
devono essere evitate.
Segnali di obbligo
Cerchio pieno
Indicano informazioni che è importante
leggere e rispettare.
In funzione dell’informazione che si vuole trasmettere, all’interno dei
segnali possono essere contenuti dei simboli che, per associazione
di idee, aiutino a capire il tipo di pericolo, divieto od obbligo.
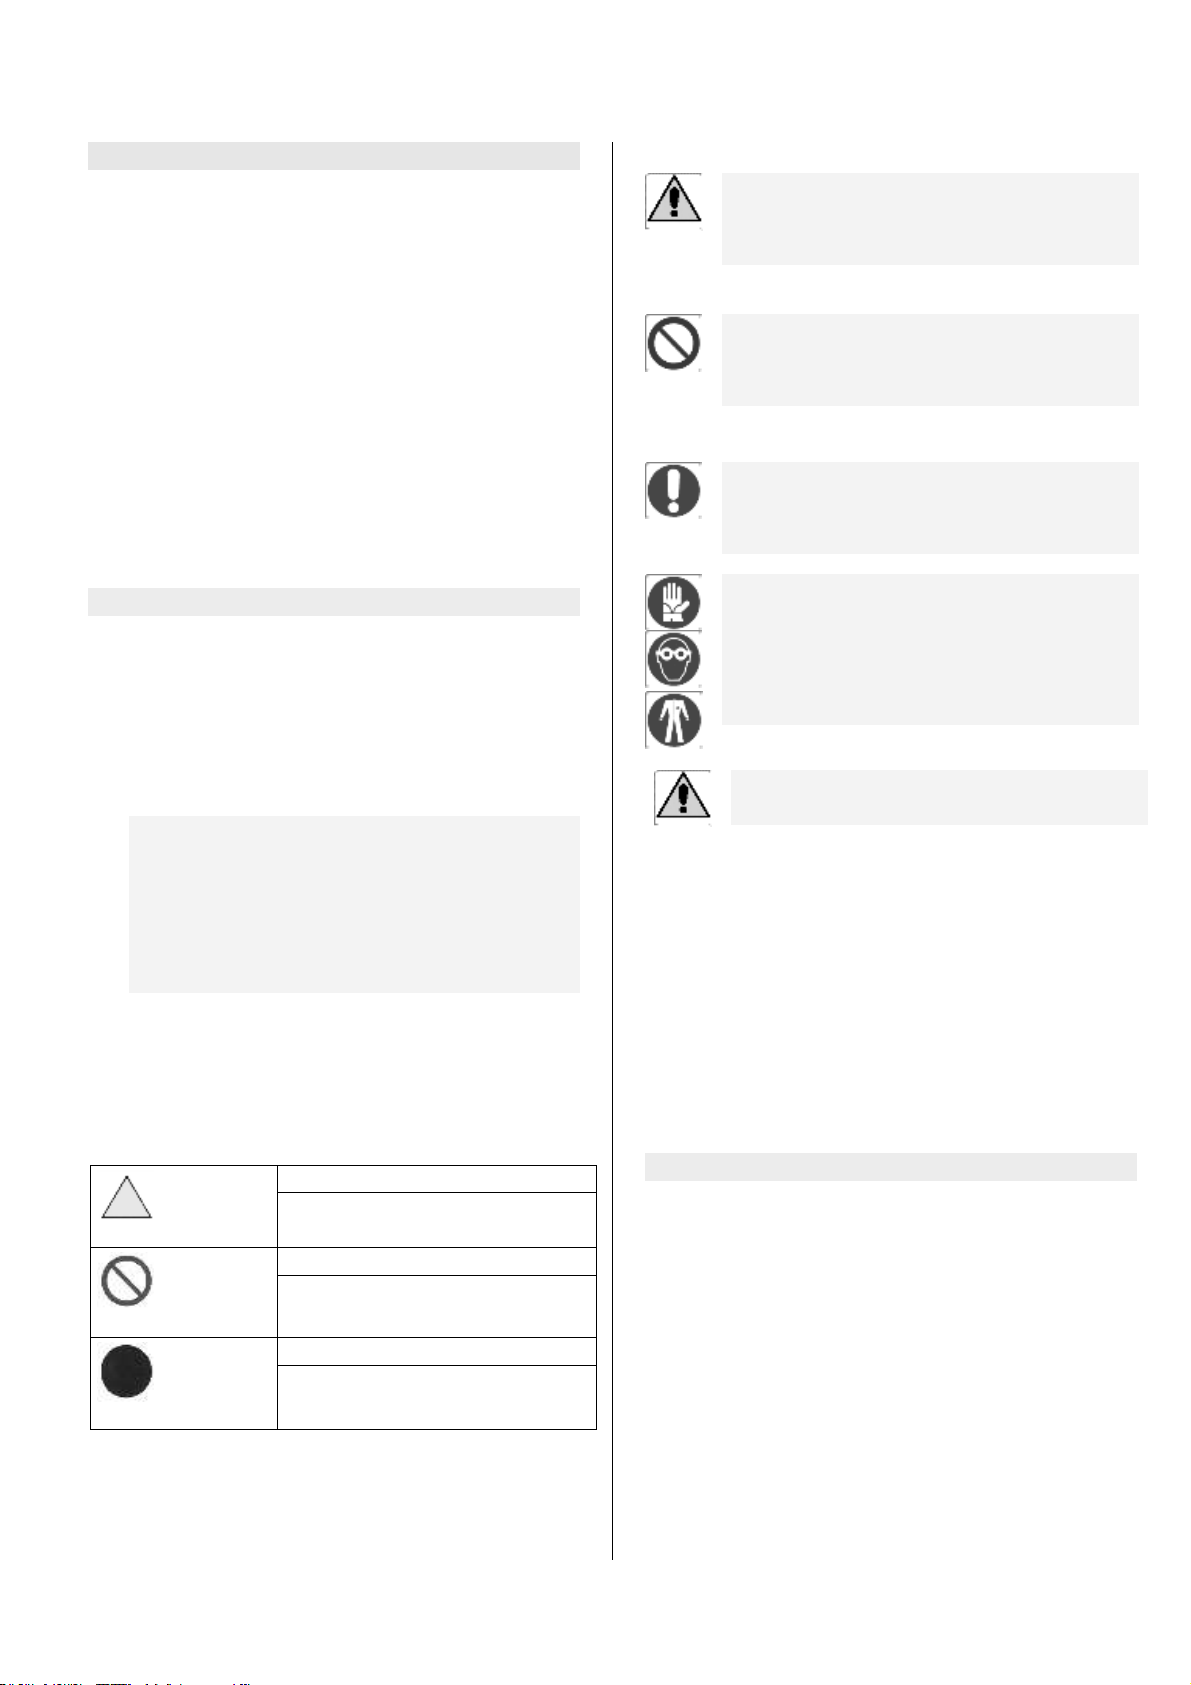
Segnali di pericolo
Pericolo generico. Questo segnale è utilizzato per
evidenziare situazioni di pericolo che possono creare
danni alle persone, agli animali ed alle cose. Il mancato
rispetto delle prescrizioni associate al segnale, può
causare pericoli.
Segnali di divieto
Divieto generico. Questo segnale è utilizzato per
evidenziare il divieto di eseguire determinate manovre,
operazioni o il divieto di mantenere particolari
comportamenti. Il mancato rispetto dei divieti associati al
segnale, può causare danni alle cose, agli animali, alle
persone.
Segnali di obbligo
Obbligo generico. Questo segnale è utilizzato per
evidenziare l’obbligo da parte dell’operatore di rispettare
le prescrizioni. Il mancato rispetto delle prescrizioni
associate al segnale, può causare danni alle cose, agli
animali, alle persone.
Obbligo di utilizzare particolari D.P.I. Questo segnale è
utilizzato per evidenziare l’obbligo di utilizzare particolari
dispositivi di protezione individuale durante lo svolgimento
delle operazioni. Il mancato rispetto delle prescrizioni
associate al segnale, può causare gravi danni o la morte
dell’operatore.
Obbligo di usare, in ordine protezioni per occhi, mani
e abbigliamento idoneo.
ATTENZIONE - La non conoscenza o mancanza
d’attenzione ai segnali ed agli avvertimenti potrebbe
provocare lesioni personali, morte e/o danni alla
spazzatrice o ad alle attrezzature.
Requisiti fisici ed intellettuali dell’utilizzatore
L’operatore non ha bisogno di alcuna licenza specifica per utilizzare
la spazzatrice: ha solo bisogno di leggere questo manuale.
L’operatore deve possedere le capacità psichiche per capire ed
applicare correttamente le istruzioni e le normative per la sicurezza
scritte su questo manuale e sulla spazzatrice sotto forma di scritte e
simboli; deve essere in grado, anche fisicamente, di effettuare le
operazioni necessarie sulla spazzatrice ed essere in grado di
utilizzare e mantenere in condizioni di sicurezza la spazzatrice.
Uso improprio
La spazzatrice è progettata per essere utilizzata solo per gli scopi e
negli spazi descritti nell’apposita sezione del manuale. Utilizzi diversi
da quelli descritti su questo manuale sono da considerarsi impropri
e quindi non conformi alle normative di sicurezza.
Uso e dati tecnici
Uso della spazzatrice
La spazzatrice è destinata alla pulizia di pavimenti industriali asciutti o
superfici asfaltate asciutte (magazzini, parcheggi all'aperto e multipiano,
laboratori in genere, stazioni di servizio, impianti sportivi, campeggi e
villaggi turistici, hotel supermercati, officine meccaniche) per la rimozione
solo di materiale solido come polvere, terriccio, carta o simile per mezzo
di una spazzola inserita nel telaio della spazzatrice e di una spazzola
laterale esterna che può essere messa in funzione dell’operatore a
seconda della necessità. La spazzatrice è provvista di un capiente
contenitore dei rifiuti. La spazzatrice è composta dai seguenti
elementi:
Telaio in acciaio piegato e saldato;
Sistema di spazzole esterne ed interna;
Contenitore rifiuti.
D’ora innanzi parleremo della spazzatrice definendo i suoi lati
destro, sinistro, anteriore e posteriore, rispetto all’operatore che
impugna il manubrio direzionale con i comandi.
Condizioni d’uso previste
La spazzatrice è stata progettata per eseguire esclusivamente le
funzioni descritte nel paragrafo del manuale.
Massa e dimensioni
Nelle tabelle seguenti sono indicate la massa le misure di ingombro
della spazzatrice.
Massa
Massa)
28
Dimensioni
Lu min. (Lunghezza massima)
870
La min. (Larghezza massima)
960
H min. (Altezza massima)
410
Parametri di lavoro
Per parametri di lavoro si intende l’insieme di dati necessari per
valutare la scelta della spazzatrice più idonea alle proprie necessità.
Parametri
Produttività massima teorica
(m2/h)
1500
Larghezza di pulizia mm
650
Capacità raccolta contenitore
rifiuti Lt.
30
Lunghezza spazzola centrale
(mm)
390
Diametro spazzola centrale
(mm)
260
Diametro spazzole laterali (mm)
400
Materiale spazzole
PPL
Parametridi sicurezza
Rischi residui
La spazzatrice, nella normale condizione di lavoro, non presenta
rischi residui. Sono in ogni caso sempre presenti, nella normale
condizione di lavoro, rischi residui, solo all’interno delle zone
pericolose il cui accesso è impedito, per mezzo d’apposite protezioni
fisse. Tali protezioni non devono essere in nessun caso rimosse
durante il funzionamento. E’ previsto che le protezioni degli organi
che concorrono alla trasmissione possano essere rimosse
temporaneamente per consentire l’esecuzione d’alcune regolazioni
o manutenzioni ordinarie, o manutenzioni straordinarie queste ultime
sono in ogni caso demandate ai centri di assistenza qualificati. Il
rischio residuo che viene a generarsi in tale condizione, può essere
eliminato attraverso opportune modalità operative. L’operatore,
quando utilizza la spazzatrice, deve impugnare il manubrio
direzionale in modo da avere una visione adeguata della traiettoria
della spazzatrice per evitare di urtare ostacoli (pericolo di
ribaltamento) e persone (lesione alle persone). Le polveri contenute
nel contenitore dei rifiuti o catturate dal filtro dell’aria possono
essere dannose per le persone affette da malattie croniche alle vie
respiratorie. Queste persone devono utilizzare opportuni D.P.I. delle
vie respiratorie.
Protezioni
Tutte le zone pericolose sono chiuse da carter e protezioni fisse al
telaio con viti che rendono inaccessibile qualsiasi parte pericolosa
da parte dell’operatore.
Trasporto ed installazione
Sollevamento e movimentazione
ATTENZIONE - Osservare le prescrizioni che seguono.
1.
2.
3.
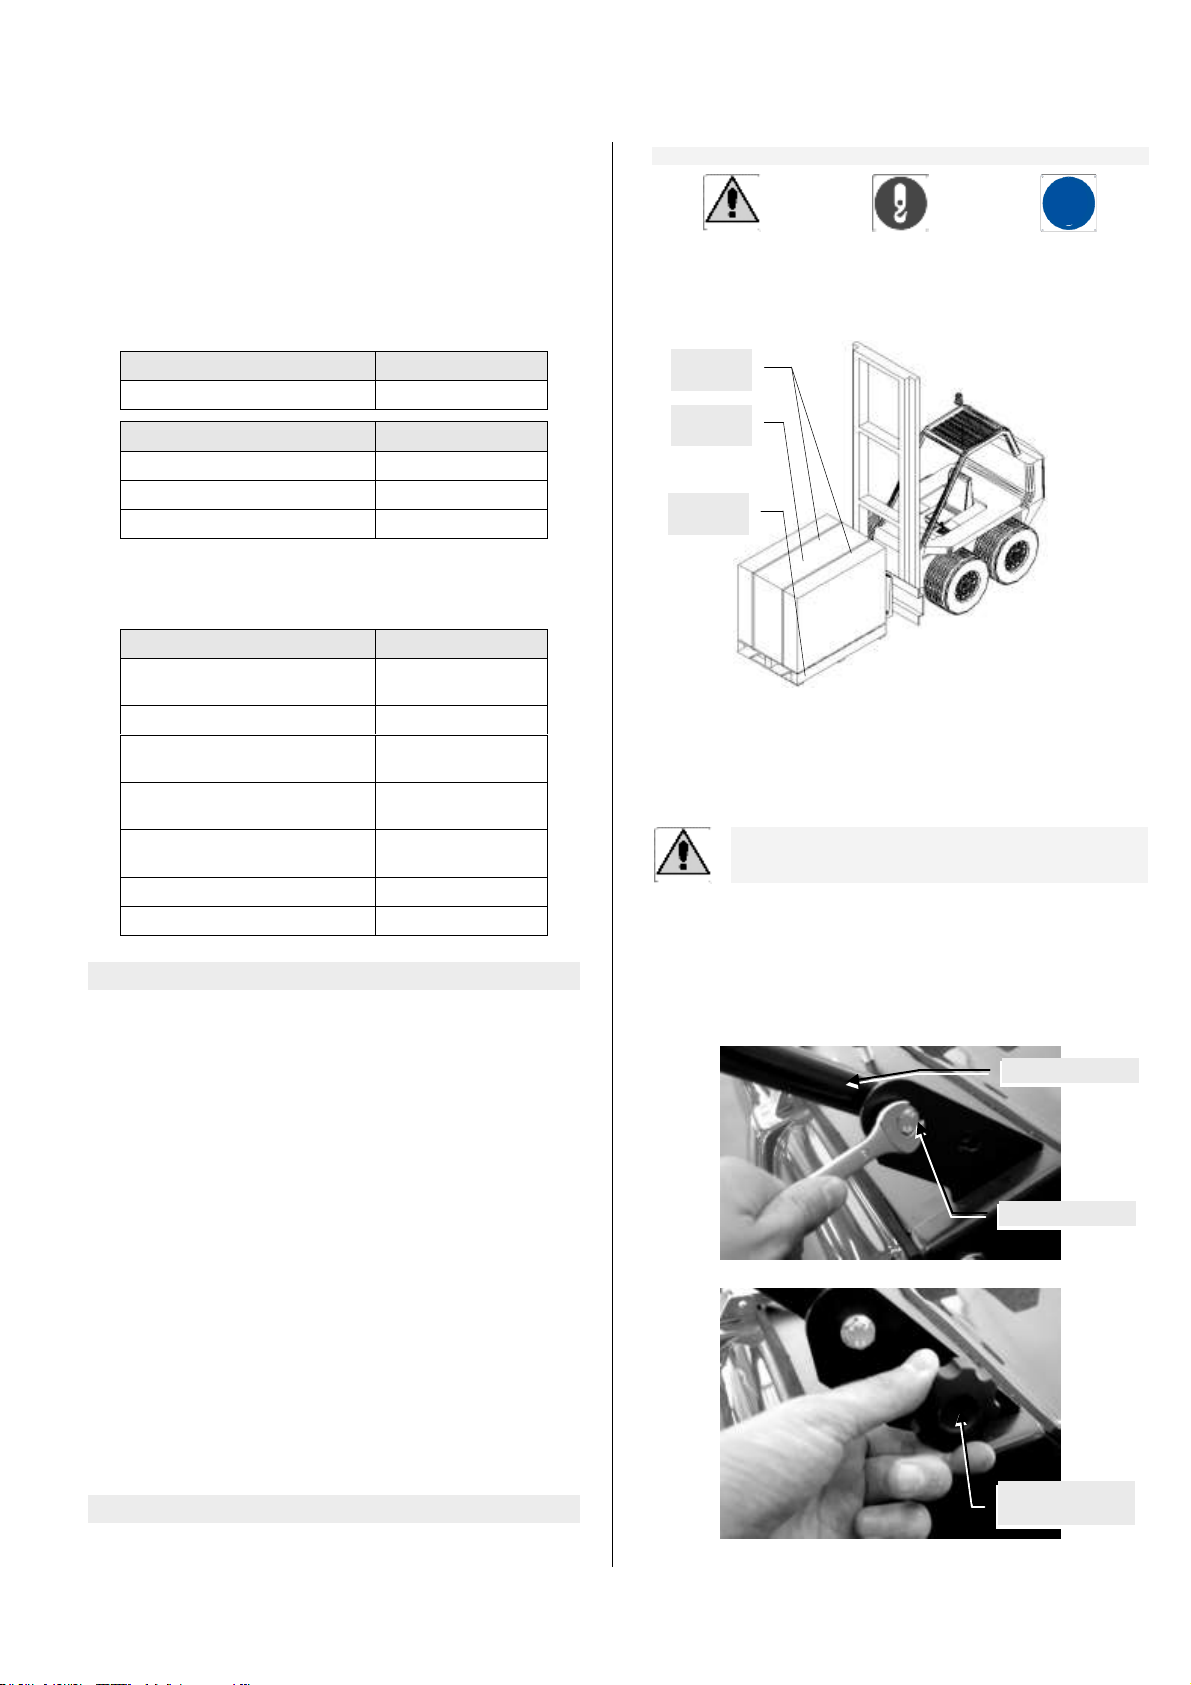
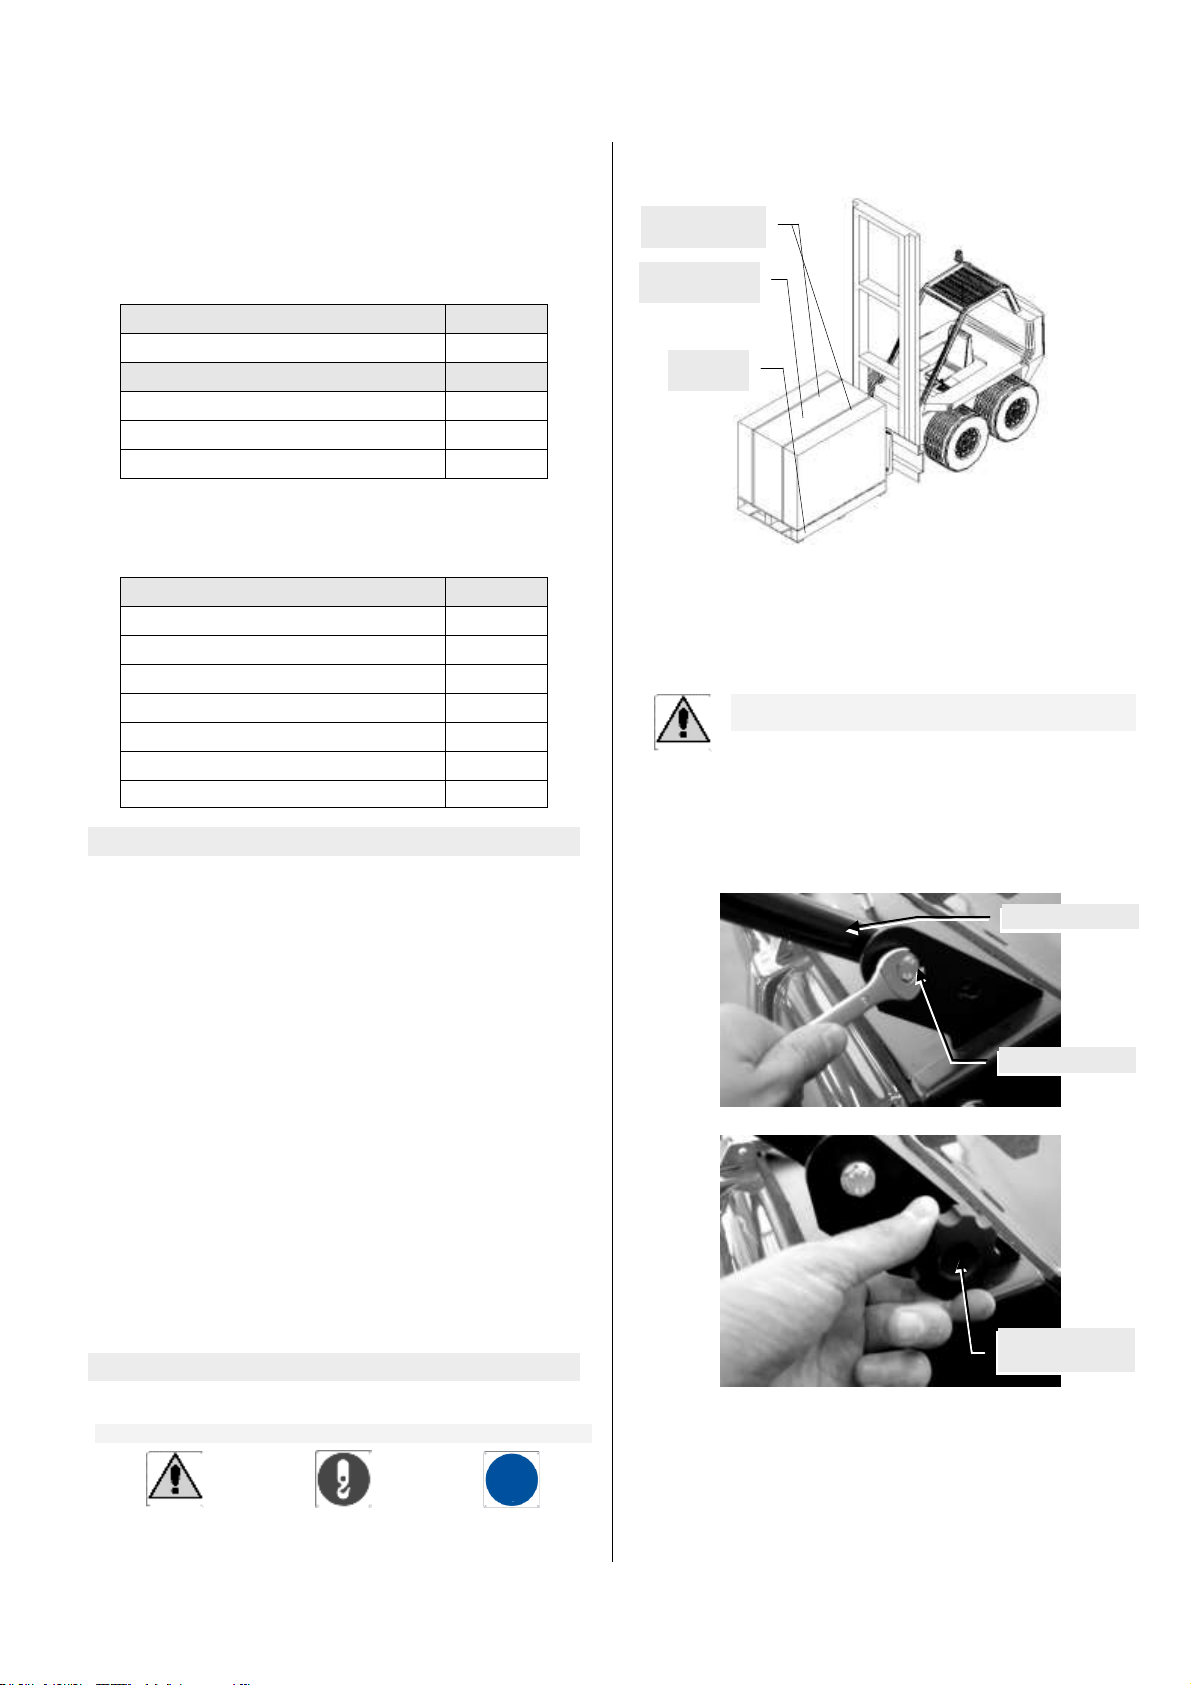
La spazzatrice viene consegnata dal Costruttore su pallet ed
imballata con un apposita scatola di cartone. Prima del disimballo, il
trasporto e la movimentazione può avvenire con carrello elevatore
con portata maggiore di 200 kg.
Per disimballare la spazzatrice, tagliare le regge che bloccano la
scatola di cartone al pallet e rimuovere la scatola. Una volta
disimballata la spazzatrice può venire agevolmente sollevata da due
persone. Di seguito sono riportate alcune istruzioni di sicurezza
relative alle operazioni di trasporto.
Installazione
ATTENZIONE - Prima di procedere all’installazione
leggere attentamente le avvertenze riportate di
seguito.
La spazzatrice viene consegnata con spazzola laterale
disassemblata e manubrio ripiegato su se stesso per motivi di
imballaggio. Le prime operazioni da eseguire prima di procedere
all’utilizzo sono il fissaggio della spazzola laterale e dell’asta
manubrio.
Raddrizzare l’asta manubrio;
Fissare la vite di bloccaggio rotazione;
Bloccare la manopola di bloccaggio;
Regge
Imballo
Pallet
Asta manubrio
Vite di bloccaggio
Manopola di
bloccaggio
Inclinare il supporto spazzola laterale e fissarla serrando
le viti fornite.
Descrizione della fornitura
Di seguito è riportato l’elenco del contenuto dell’imballo consegnato
al cliente.
Nel caso in cui venga riscontrata la mancanza di
qualche particolare sottoelencato si prega di
rivolgersi subito al rivenditore.
N° 1 spazzatrice;
N° 1 spazzola laterale;
N° 3 viti TCEI per fissaggio spazzola laterale;
N° 1 libretto d’uso e manutenzione della
spazzatrice;
Istruzioni per l’Operatore
Addestramento
Tutti i conducenti dovrebbero ricevere una formazione professionale
e fare pratica sulla spazzatrice. Tale formazione dovrebbe mettere
in risalto:
Il divieto di utilizzo in strade pubbliche;
La necessità di prestare attenzione e di essere
concentrati quando si lavora;
Non utilizzare la spazzatrice su pendenze
superiori a quella raccomandata di 12%;
Non utilizzare mai la spazzatrice munita di
ripari difettosi, oppure senza avere montato i
dispositivi di protezione di sicurezza.
Comandi
L’operatore governa la spazzatrice attraverso il manubrio
direzionale. Lo spostamento della spazzatrice provoca la rotazione
delle ruote che tramite un ingranaggio ed opportune cinghie e
pulegge mettono in rotazione la spazzola centrale e la laterale.
Operazione a fine operazione
A fine pulitura svuotare il contenitore dei rifiuti
anteriore e posteriore;
Per il contenitore posteriore abbassare la leva
di bloccaggio gancio che fissa il contenitore
alla spazzatrice;
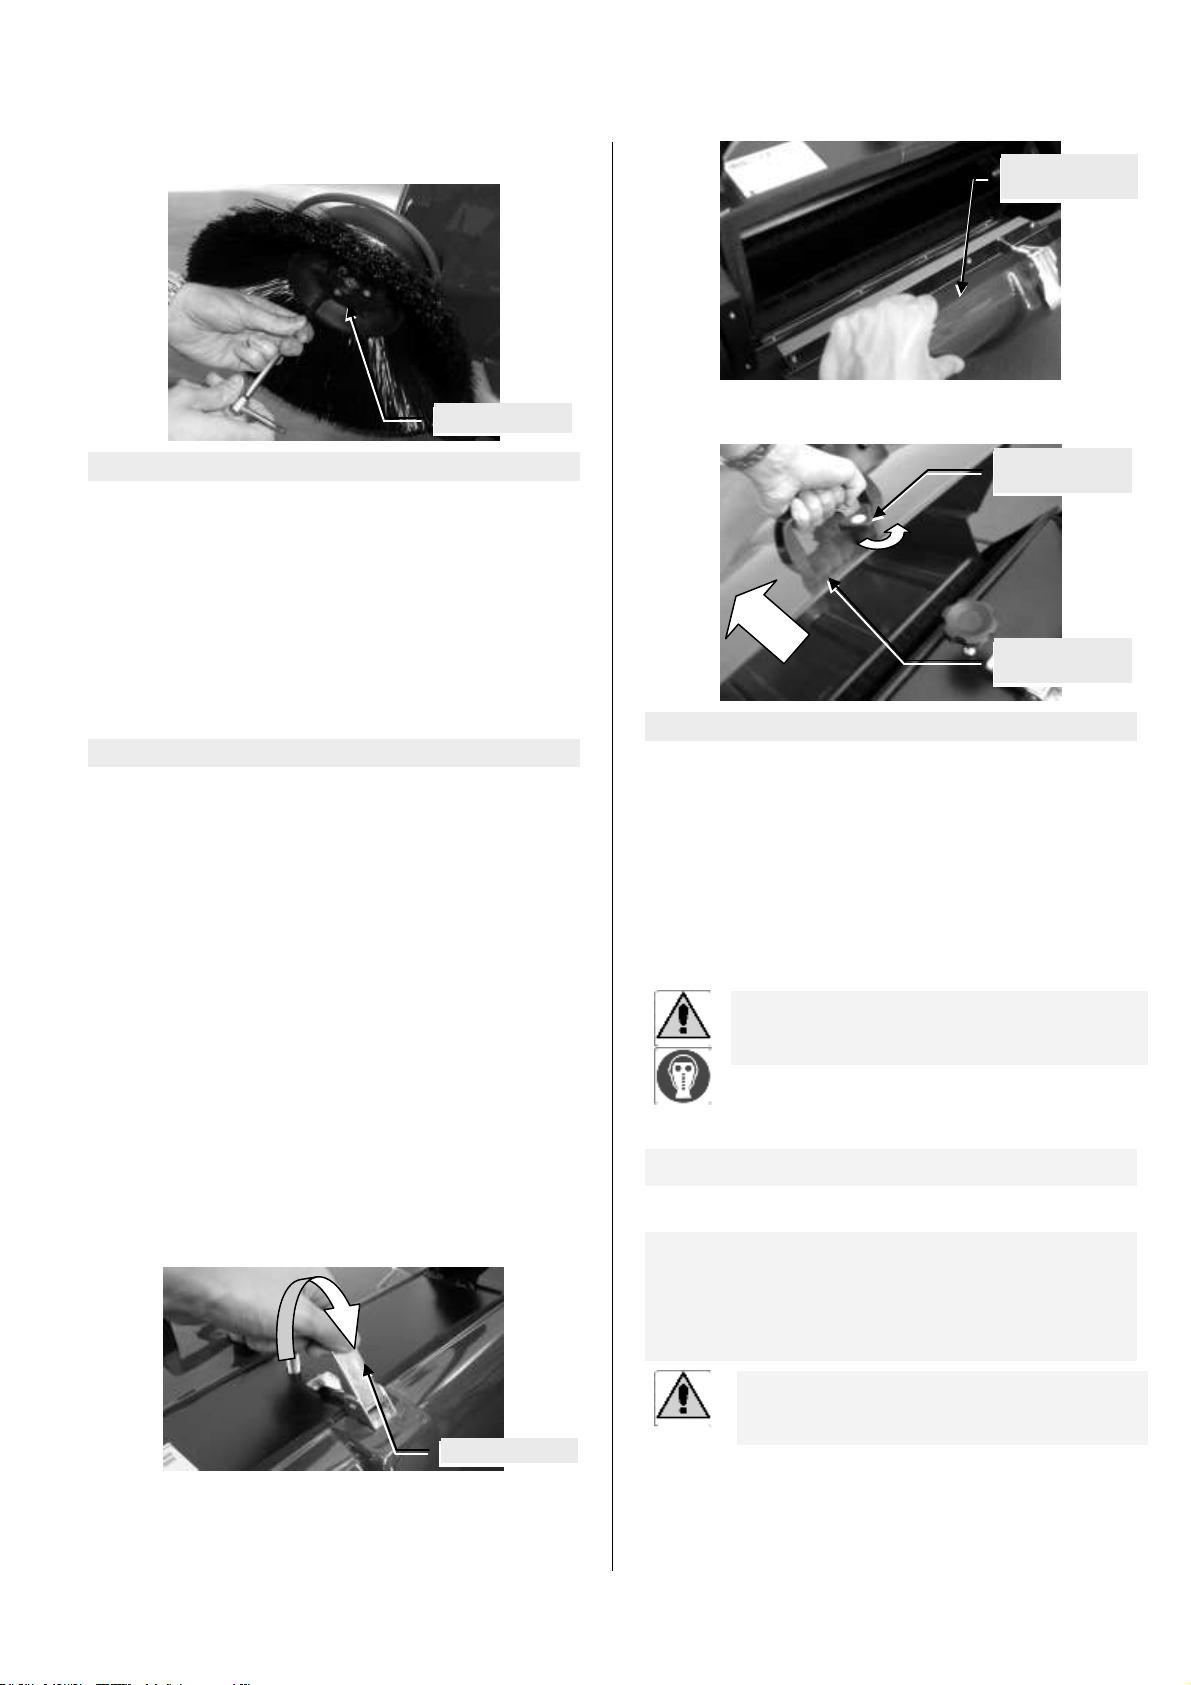
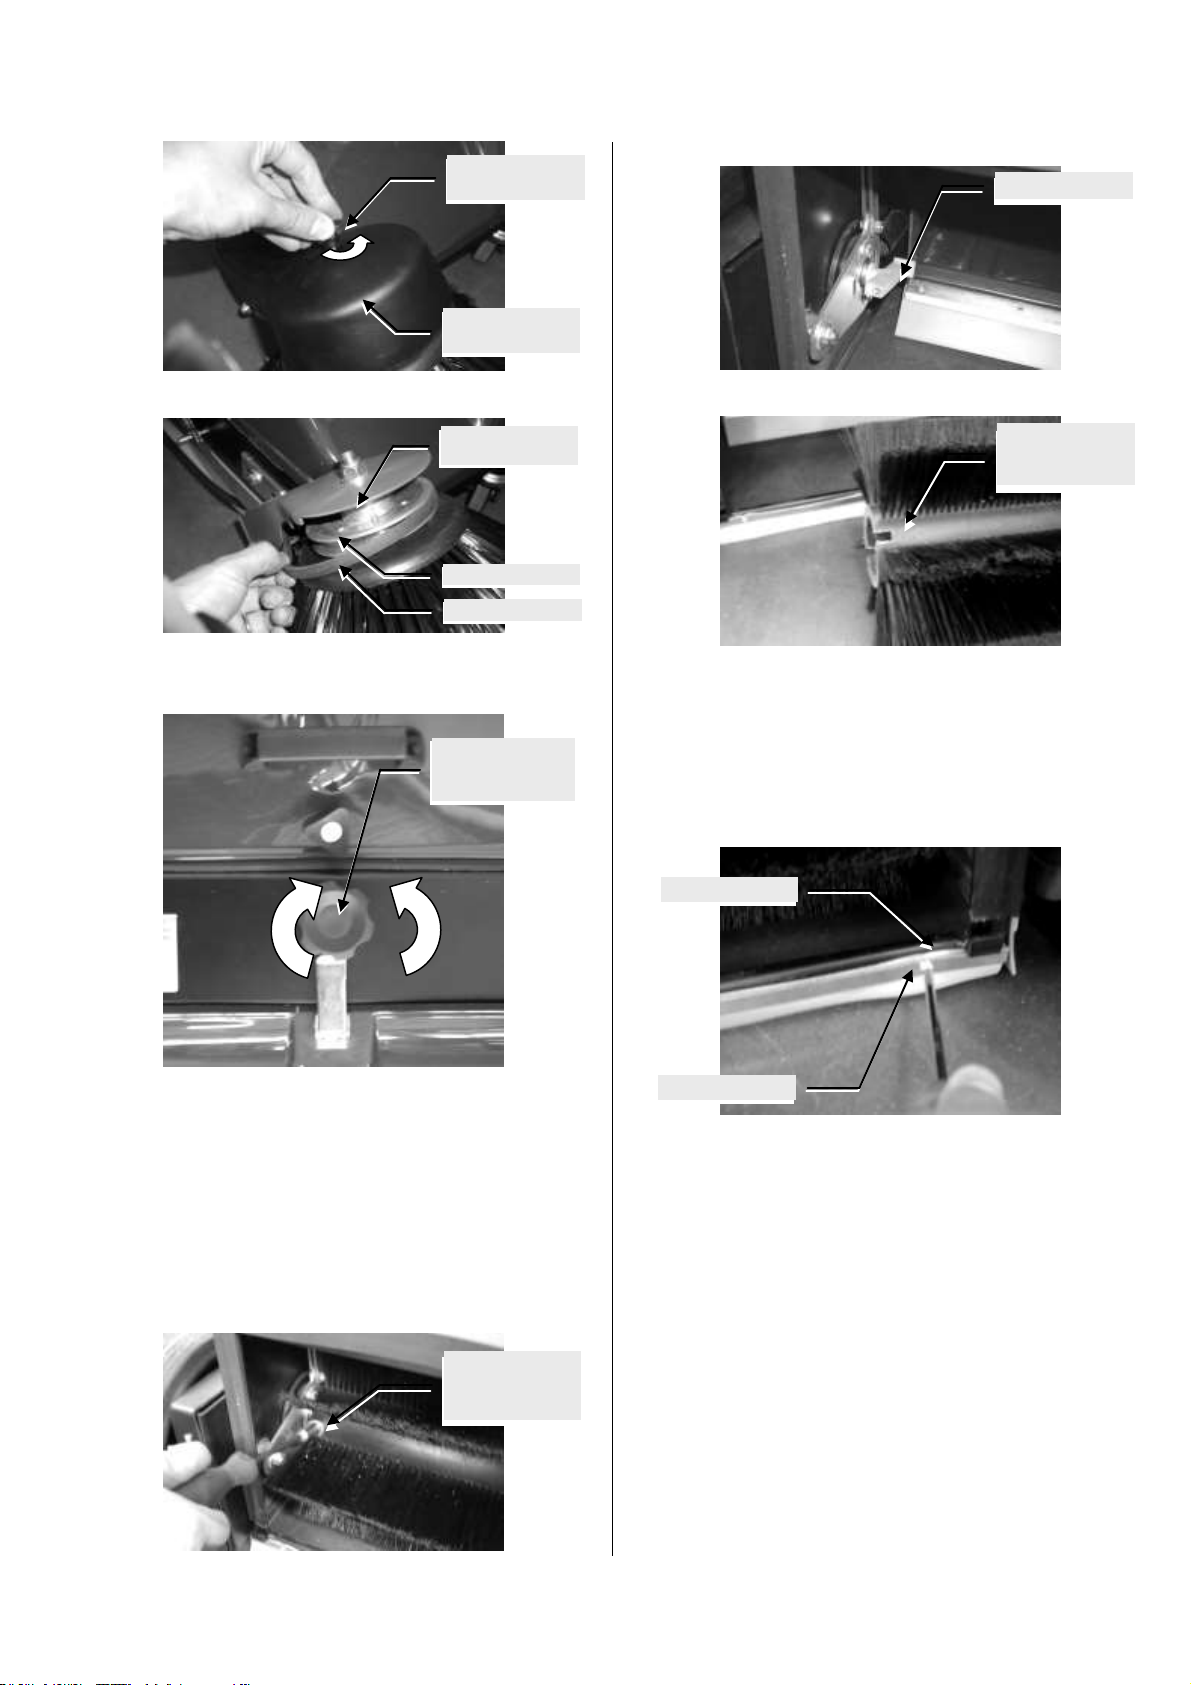
Sganciare il gancio e sfilare il contenitore.
Per il contenitore anteriore, ruotata la
manopola di bloccaggio, sfilarlo tramite la
maniglia.
Manutenzione ordinaria
Norme di sicurezza per la manutenzione ordinaria
La manutenzione ordinaria consiste in una serie di semplici
operazioni da eseguire ad intervalli regolari e seguendo le
prescrizioni fornite dal costruttore. Il Costruttore ha ridotto il numero
e la complessità delle operazioni di manutenzione ordinaria in modo
tale da consentirne l'effettuazione anche da chi non è in possesso di
notevoli competenze tecniche e non dispone di complesse
attrezzature. Si tratta soprattutto di:
Registrazione e sostituzione cinghie;
Sostituzione parti soggette ad usura;
Pulizia superfici esterne e parti interne.
Le polveri contenute nel contenitore dei rifiuti o
catturate dal filtro dell’aria possono essere dannose
per le persone affette da malattie croniche alle vie
respiratorie: proteggerle con opportuni D.P.I.
Norme di sicurezza per la pulizia della spazzatrice
Ogni operazione di pulizia deve essere effettuata a spazzatrice
operatrice ferma.
Per la pulizia della spazzatrice o di alcune sue parti devono essere
osservate le seguenti avvertenze:
Non pulire le superfici plastiche con alcool, detergenti o
solventi. Smaltire i materiali di pulizia osservando le norme
vigenti in materia. Non disperdere nell’ambiente i materiali
utilizzati o i residui di pulizia. Per la pulizia utilizzare acqua o
aria compressa e panni morbidi. ATTENZIONE - Durante le
operazioni di pulizia è obbligatorio indossare i mezzi di
protezione personale.
ATTENZIONE –Non utilizzare solventi per pulire la
spazzatrice in quanto è presente un pericolo di
incendio a causa di cariche elettrostatiche provocate
dalla rotazione della spazzola.
Norme di sicurezza per la riparazione e la
manutenzione straordinaria
Il Costruttore consiglia di rivolgersi alle officine di riparazione
autorizzate, per qualsiasi intervento che non riguardi le normali
ordinarie manutenzioni.
Vite di fissaggio
Leva di bloccaggio
Contenitore
posteriore
Contenitore
anteriore
Manopola di
bloccaggio

Le operazioni devono essere eseguite da persone
qualificate, che abbiano tutte le competenze tecniche
per eseguire tali operazioni in condizioni di massima
sicurezza e nel pieno rispetto delle norme di legge
vigenti in materia.
E’ opportuno evidenziare che il diritto alla garanzia offerta dalla ditta
costruttrice decade se:
Non vengono scrupolosamente rispettate le indicazioni
riportate sul libretto "uso e manutenzione";
Vengono eseguite riparazioni o manutenzioni da
personale non abilitato;
Si utilizzano ricambi non originali;
Si utilizzano attrezzature di lavoro non idonee.
ATTENZIONE - Sarà cura del Cliente verificare che
per le riparazioni siano utilizzate esclusivamente parti
di ricambio originali, le uniche in grado di non
compromettere la sicurezza della spazzatrice.
Manutenzione ordinaria
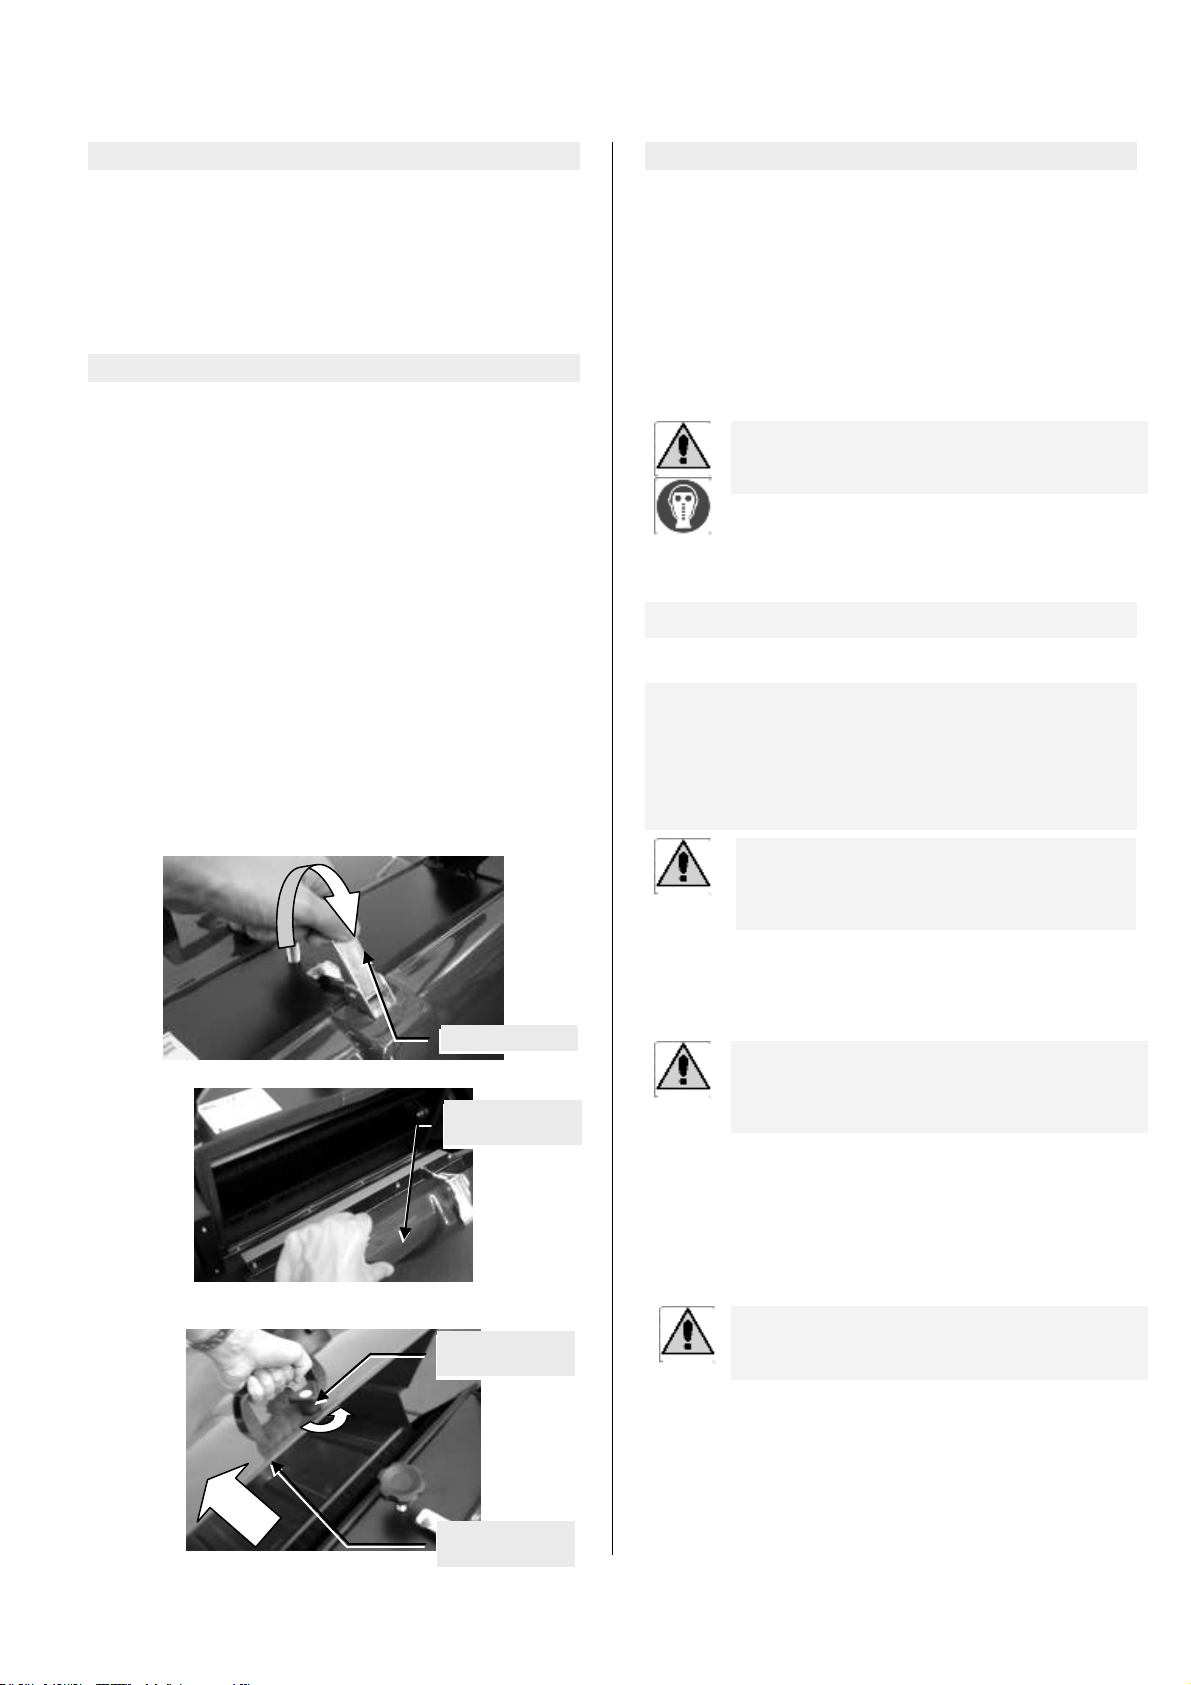
Sostituzione cinghia spazzola laterale
La trasmissione del movimento alla spazzola laterale avviene
tramite una cinghia da una puleggia solidale con la ruota destra
della spazzatrice. Per sostituirla in caso di usura:
Rimuovere la protezione della puleggia
svitando la manopola di fissaggio;
Inclinato il supporto della spazzola laterale
sfilare la cinghia dalle due pulegge.
Regolazione altezza spazzola centrale
Per regolare l’altezza della spazzola centrale, agire sulla manopola
posta sulla parte superiore della spazzatrice.
Sostituzione spazzola laterale
Quando la spazzola laterale è usurata la si sostituisce seguendo la
procedura del paragrafo in cui si descrive il primo montaggio della
spazzola laterale.
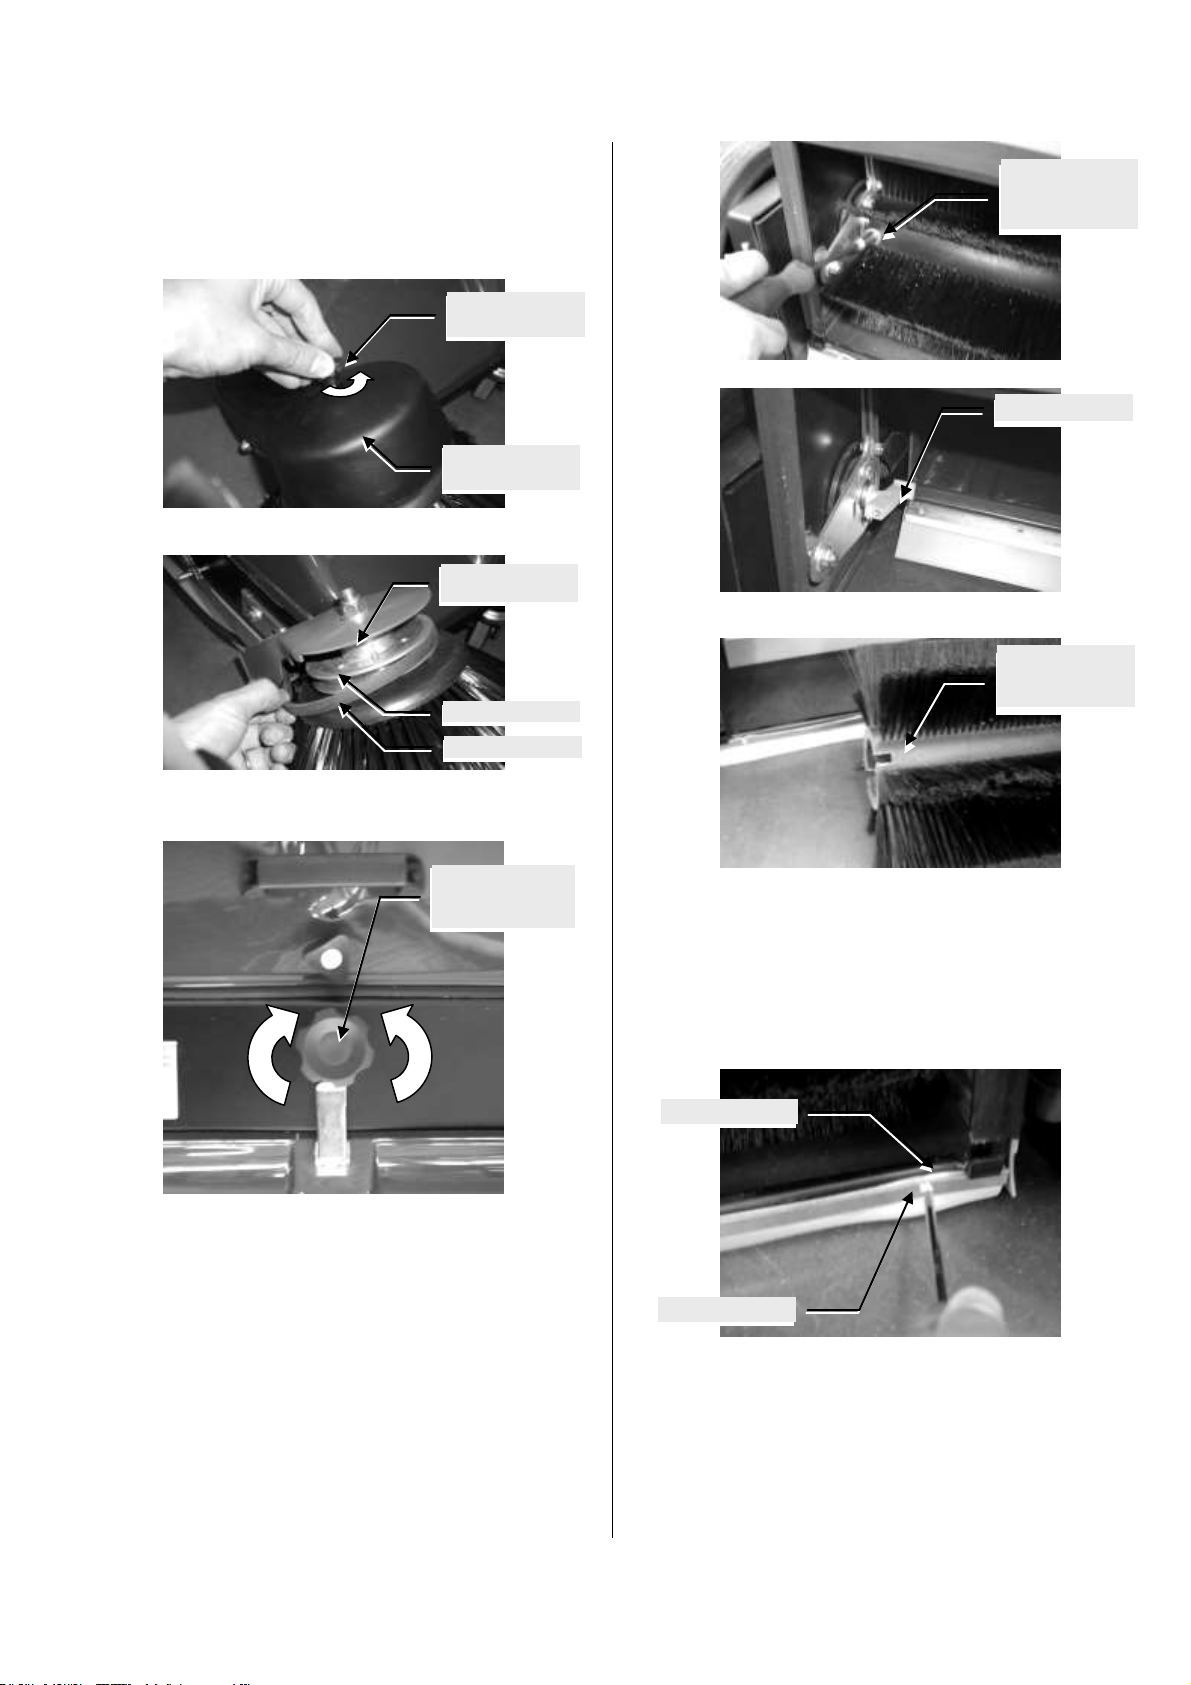
Sostituzione spazzola centrale
Per sostituire la spazzola centrale seguire questa procedura:
Togliere il contenitore posteriore raccogli rifiuti;
Inclinare la spazzatrice;
Ruotare la spazzola fino a vedere la due viti a
testa esagonale che la bloccano ai trascinatori;
Svitare le viti;
Sfilare la spazzola;
Inserire la nuova spazzola calzandola sui
trascinatori e serrando le viti di bloccaggio.
Manopola di
fissaggio
Protezione
puleggia
Cinghia
Puleggia
Supporto spazzola
laterale
Manopola di
regolazione altezza
spazzola centrale
Viti fissaggio
spazzola a
trascinatori
Trascinatori
Sede dei
trascinatori su
spazzola

Flap
Dopo aver tolto il contenitore raccogli rifiuti inclinare la spazzatrice.
Procedere quindi alla sostituzione dei flap:
Svitare le viti che fissano il ferma flap al telaio
della della spazzatrice;
Togliere il ferma flap;
Sostituire il flap usurato con quello nuovo;
Riposizionare il ferma flap riboccando con le viti tolte
in precedenza.
Togliere le viti di fissaggio;
Sostituire il flap usurato con quello nuovo;
Riposizionare il ferma flap bloccando le viti;
Rimontare il cavo alza flap.
Ricambi consigliati
Per garantire una manutenzione efficiente della spazzatrice, il
Costruttore consiglia ai propri Clienti di utilizzare solo i ricambi
originali elencati nel l’allegato libretto parti di ricambio.
In caso di ordine di parti di ricambio specificare al Costruttore il
modello della spazzatrice, la matricola, il numero di riferimento del
particolare su libretto ricambi e la quantità.
Condizioni di immagazzinamento
Messa fuori servizio della spazzatrice
Se la spazzatrice non verrà utilizzata per parecchi giorni sarà
sufficiente e proteggere le parti grezze (non protette da vernici,
trattamenti superficiali o plastiche) con oli protettivi antiruggine. Nel
caso in cui si preveda che la messa fuori servizio sia
particolarmente prolungata è inoltre consigliabile eseguire una
pulizia accurata della spazzatrice. Ultimate queste operazioni,
sigillare la spazzatrice all’interno di un sacco in nylon pluristrato
opaco (nero) all’interno del quale è stato preventivamente inserito
dell’apposito disseccante (gel di silice).
Smaltimento
Al termine della vita operativa, questo prodotto deve essere
rottamato e smaltito consegnandolo al sistema di raccolta
differenziata locale secondo le disposizioni di legge in vigore, che
devono quindi essere scrupolosamente seguite.
Prima della rottamazione, controllare l’etichetta matricola della
macchina: se riporta il simbolo significa che lo smaltimento è
regolamentato dal D.L. 151 del 25/07/2005 e dalla direttiva
2003/96/EC in materia di apparecchi elettrici ed elettronici (Waste
Electrical and Electronic Equipment, WAEE). Ci si deve quindi
informare in merito al sistema locale di raccolta di prodotti elettrici ed
elettronici e seguirne le prescrizioni. Smaltire abusivamente questo
prodotto fra i normali rifiuti domestici può creare gravi danni
all’ambiente e alla salute umana ed è soggetto a sanzioni da parte
dell’autorità amministrativa locale.
Tabella per la manutenzione periodica
INTERVENTO
ALLA
CONSEGNA
ALLA FINE
DELL’UTILIZ
ZO
OGNI 10 ORE
OGNI 50 ORE
OGNI 100
ORE
ALTRO
Sostituzione delle
cinghie
X
Verifica il
tensionamento delle
cinghie
X
Controllo del
serraggio di viti e
dadi
X
Controllo dello stato
delle spazzole
X
Controllo dello stato
dei flap
X
Difetti,cause e rimedi
Nella tabella che segue sono elencati i difetti che maggiormente
vengono riscontrati nel normale utilizzo della spazzatrice. Le cause
di questi difetti di funzionamento sono facilmente risolvibili con
operazioni che rientrano nel campo della manutenzione ordinaria.
Nel caso il difetto non dovesse essere presente nella tabella
seguente o non potesse essere eliminato seguendo i consigli qui
riportati si consiglia di rivolgersi ad un centro di assistenza
qualificato ed autorizzato.
DIFETTO
CAUSA
RIMEDIO
La spazzola
centrale non gira
Cinghia rotta
Sostituzione della
cinghia
La spazzatrice non
pulisce bene
Spazzole usurate
Controllare lo stato di
usura delle spazzole
ed eventualmente
sostituirle
Tipo di spazzole
non adatte a pulire
il tipo di pavimento
e di sporcizia
presenti
Cambiare tipo di
spazzole rispetto a
quelle montate di
serie (OPZIONALE)
La spazzola laterale
non gira
Cinghia rotta
Sostituzione della
cinghia
Uscita della polvere
dalla ventola
Usura delle
guarnizioni
Sostituzione delle
guarnizioni
Consumo troppo
veloce delle
spazzole
Spazzole troppo
premute
Regolazione delle
spazzole
Uscita della polvere
durante il lavoro
Gomma dei flap
consumata
Sostituzione flap
Viti di fissaggio
Ferma flap
Using the manual
Using the manual
This manual has been written by the Manufacturer and is an integral
part of the machine. The manual is intended for the end user. It
includes a description of how to use the sweeper and its technical
specification. The user must be aware of this information as it
enables the sweeper to be used safely, with knowledge of its
operating principles and limits. It also contains information on
transport, handling, starting up, adjustment, assembly, maintenance
and, finally, dismantling of the sweeper.
Keeping the manual
The manual must be kept carefully throughout the useful life of the
sweeper, including during disposal. The manual must be kept in a
dry location near the sweeper and must always be available for
qualified personnel and the operator. Please note that the manual
reflects the technical situation at the moment in which the sweeper
is put on sale and may not be considered inappropriate in the case
of updating. The Manufacturer reserves the right to modify products
and the manual at any moment without being obliged to update
previous products and manuals, unless the modifications concern a
risk to the health and safety of people or damage to things.
General safeguards
Working in complete safety
The safety instructions contained in this use and maintenance
manual cover the various operations which may be performed on
the sweeper. Safety symbols are included in the text at points which
require particular attention. It is extremely important to follow these
safety instructions at all times. Failure to do so could cause injury to
persons and/or damage to the machine or other equipment. In
consideration of this, a number of fundamental safety instructions
are given below:
Please read and make sure you understand this
section of safety instructions before installing,
operating, carrying out maintenance on or repairing
the sweeper.
Read and follow the safety instructions contained in
the text with reference to specific operations.
Be aware of and respect the safety instructions in this
manual, general accident prevention rules and safety
regulations
Safety signs
The symbols given below are adopted in the use and maintenance
manual to draw the operator’s attention to the corresponding
information. The symbols are used to warn personnel of danger or
possible sources of danger. Make sure you understand them.
Failure to pay attention to the symbols could result in personal
injury, death and/or damage to the sweeper or equipment. The
warnings may be of three types as described in the table below:
Danger signs
A triangle with a border
Indicates instructions relating to actual or
possible dangers
Prohibition signs
A circle with a diagonal bar
Indicates instructions relating to prohibited
actions.
Obligation signs
Solid circle
Indicates information which must be read and
respected.
Depending on the information to be communicated, the warnings
may contain symbols which, through an association of ideas, help
understand the type of danger, prohibition or obligation.
Danger signs
Generic danger. This sign is used to draw attention to
dangerous situations which could result in damage to
persons, animals and things. Failure to respect the
instructions associated with the warning may represent a
danger
Prohibition signs
Generic prohibition. This sign is used to draw attention
to certain manoeuvres, operations or behaviours which
are prohibited. Failure to respect the prohibitions
associated with this sign could result in damage to things,
animals and people.
Obligation signs
Generic obligation. This sign is used to draw attention to
instructions which must be respected by the operator.
Failure to respect the instructions associated with this
sign could result in damage to things, animals and
people.
Obligation to use particular P.P.D.. This warning is
used to draw attention to the obligation to use particular
personal protection devices while carrying out the
operations. Failure to respect the instructions associated
with this signal could result in serious damage or the
death of the operator.
Obligation to use suitable eye protection, hand
protection and garments.
IMPORTANT - Failure to know and respect the signs
and warnings could result in personal injury or
damage to the sweeper or equipment.
Physical and intellectual requisites of the operator
No special qualification is required to use this sweeper. The operator
needs to read this manual only. The operator must be intellectually
capable of understanding and correctly applying the instructions and
safety regulations contained in this manual and on the sweeper itself
in written and symbolic form. He must be capable, including
physically, of performing the required operations on the sweeper
and of using it and performing maintenance in safety. The sweeper
must be used by authorised operators only, instructed in its use and
having read the manual.
Incorrect or improper use
The sweeper is designed for use exclusively for the purposes and in
the areas described in the relevant section of the manual. Use other
than those described in this manual is considered incorrect or
improper and therefore not in conformity with safety regulations.
Operation and technical specification
Using the sweeper
This SWEEPER is a professional appliance designed to clean dry
industrial floors or dry asphalted surfaces (warehouses, outdoor and
multi-storey car parks, laboratories in general, service stations, sports
centres, camp sites and holiday villages, hotels, supermarkets,
workshops) to remove solid material only, such as dust, soil, paper or
similar by means of a brush in the frame of the sweeper and an external
side brush which can be activated by the operator as required. The
sweeper has a large debris collection bin.
The sweeper consists of the following elements:
Welded folded steel chassis;
System of external and internal brushes;
Bin
In the manual, the right, left, front and back of the sweeper will be
referred to from the point of view of the operator holding the
handlebar with controls.

Conditions of use
The SWEEPER has been designed to perform the functions
described in section of this manual only.
Weight and size
The weights and sizes of the sweeper are given in the following
tables.
Weight
Weight
28
Dimensions
Max. Le (Maximum length)
870
Max. Wdth. (Maximum width)
960
Max. H (Maximum height)
410
Work parameters
The work parameters provide the information necessary to choose
the most suitable sweeper for the specific needs.
Parameters
Maximum theoretical productivity
(m2/h)
1500
Cleaning width mm
650
Capacity of debris collection bin
(l)
30
Length of centre brush (mm)
390
Diameter of centre brush (mm)
260
Diameter of side brushes (mm)
400
Brush material
PPL
Safetyparameters
Residual risks
In normal working conditions, there are no residual risks. There are,
however, residual risks always present during normal working
conditions exclusively in danger zones where access is prevented
by means of fixed guards. These guards must under no
circumstances be removed while the machine is in operation.
Guards on transmission components may be temporarily removed in
order to carry out adjustments or routine or extraordinary
maintenance (for extraordinary maintenance, always contact a
professional service centre). The residual risks arising under these
conditions may be eliminated by adopting certain procedures. When
using the sweeper, the operator must hold the handlebar in such a
way as to have an adequate view of the path of the sweeper in order
to avoid impact with obstacles (danger of tipping over) and people
(injury to persons). The dust contained in the debris collection bin or
captured by the air filter may be damaging to persons affected by
chronic respiratory diseases. These persons must use suitable
respiratory P.P.D..
Guards
All dangerous areas are closed with guards and protective devices
fixed to the chassis with screws making all hazardous areas
inaccessible to the operator.
Transport andinstallation
Lifting and handling
IMPORTANT - Follow the instructions below.
1.
2.
3.
The sweeper is delivered from the Manufacturer on a pallet and
packed in a special cardboard box. Before unpacking, the machine
can be transported and handled by means of a lift truck with a
capacity of at least 200 kg.
To unpack the sweeper, remove the straps holding the cardboard
box to the pallet and remove the box. Once the sweeper has been
unpacked, it can be easily lifted by two people. A number of safety
instructions relating to transport are given below.
1.1 Installation
IMPORTANT - Before proceeding with installation
read the following warnings carefully.
For packaging reasons, the sweeper is delivered with the side brush
removed and the handlebar folded down. Before use, mount the
side brush and handlebar.
Straighten the handlebar;
Tighten the rotation block screw;
Tighten the fixing knob;
Tilt the side brush support and fix it by tightening the
screws.
Straps
Box
Pallet
Handlebar
Block screw
Fixing knob

Description
Below is a list of the contents of the package delivered to the
customer. If one of the parts listed below is missing, contact the
dealer immediately.
1 x sweeper;
1 x side brush;
3 x hex socket screws for fixing the side brush;
1 x sweeper use and maintenance manual;
Operatorinstructions
Training
All operators must be suitably trained, including with hands-on
experience. This training should emphasise:
That the machine may not be used on public roads;
The need for attention and concentration while working;
Do not use the sweeper on slopes of greater than 12%.
Never use the sweeper with defective guards or without
the safety devices.
Controls
The operator controls the sweeper by means of the handlebar.
Moving the sweeper causes rotation of the wheels which transmit
the motion by means of a gear, belts and pulleys to turn the centre
and side brushes.
Operations at the end of the session
After sweeping, empty the front and back bins;
For the rear bin, lower the lever locking the clip fixing the
bin to the sweeper;
Release the clip and remove the bin;
For the front bin, turn the fixing knob and remove it by the
handle.
Routine maintenance
Safety rules for routine maintenance
Routine maintenance involves a series of simple operations to be
performed at regular intervals and according to the manufacturer's
instructions. The Manufacturer has reduced the number and
complexity of routine maintenance operations to enable them to be
performed by personnel without technical expertise or complex
equipment. It involves above all:
Adjusting and replacing belts;
Replacing parts subject to wear;
Cleaning external surfaces and internal parts.
The dust contained in the debris collection bin or
captured by the air filter may be harmful to persons
affected by chronic respiratory diseases. They should
wear suitable P.P.D.
Safety regulations for cleaning the sweeper
All cleaning operations must be performed with the sweeper
stationary.
When cleaning the sweeper or its components, the following
precautions must be observed:
Do not clean plastic surfaces with alcohol, detergent or
solvents. Dispose of cleaning materials in respect of current
legislation. Do not dispose of the materials used or cleaning
residues in the environment. To clean, use water or
compressed air and soft cloths.
IMPORTANT - During cleaning, personnel protection devices
must be worn
IMPORTANT –- Do not use solvents to clean the
sweeper as there is a risk of fire due to electrostatic
discharges caused by rotation of the brushes.
Safety regulations for repairs and extraordinary
maintenance
The Manufacturer recommends contacting authorised service
centres for all operations over and above normal routine
maintenance.
All operations must be performed by qualified
personnel with the necessary technical skills to
perform the operations in the maximum safety and in
respect of current legislation.
It should be noted that the warranty offered by the manufacturer is
invalidated if:
The instructions given in the "use and maintenance"
manual are not scrupulously respected;
Repairs or maintenance are performed by unqualified
personnel;
Non-original spare parts are used;
Unsuitable tools are used.
IMPORTANT - The customer is responsible for
verifying that original parts only are used when
carrying out repairs. The use of non-original spare
parts could jeopardise the safety of the sweeper.
Fixing screw
Lock lever
Rear bin
Front bin
Fixing knob
Routine maintenance
Replacing the side brush belt
The movement is transmitted to the side brush by means of a belt
from a pulley attached to the right wheel of the sweeper. To replace
in the event of wear:
Remove the pulley guard by unscrewing the fixing knob.
Tilt the side brush support and remove the belt from the
two pulleys.
Adjusting the height of the centre brush
To adjust the height of the centre brush, use the knob on the top of
the sweeper.
Replacing the side brush
When the side brush is worn, it can be replaced following the
procedure in paragraph "Installation" describing mounting of the side
brush.
Replacing the centre brush
To replace the centre brush, follow this procedure:
Remove the rear debris collection bin;
Tilt the sweeper;
Rotate the brush until you can see the two hex head
screws fixing it to the drive mechanisms;
Unscrew the screws;
Remove the brush;
Insert the new brush, making sure it fits on the drive
mechanisms and tightening the lock screws.
Flaps
After removing the debris collection bin, tilt the sweeper. Replace
the flaps:
Unscrew the screws fixing the flap retainer to the chassis
of the sweeper;
Remove the flap retainer;
Replace the worn flap with the new one;
Replace the flap retainer and fasten in place with the
screws removed previously.
Remove the fixing screws;
Replace the worn flap with the new one;
Replace the flap retainer and fasten with the screws;
Replace the flap raising cable.
Recommended spare parts
To guarantee efficient maintenance, the Manufacturer recommends
that only the original spare parts listed in the annexed spare parts
booklet should be used.
Fixing screws
Flap retainer
Fixing knob
Pulley guard
Belt
Pulley
Side brush support
Centre brush height
adjustment knob
Brush fixing
screws
Drive mechanisms
Slot for the drive
mechanisms on
the brush

When ordering spare parts, specify the model of the sweeper,
registration number, reference number of the component in the
spare parts book and quantity.
Storing the sweeper
If the sweeper is not used for a number of days, protect exposed
parts (not protected by paint, surface treatment or plastic) with
protective rust prevention oils. If the sweeper is not to be used for
particularly long periods, you should also clean it thoroughly. After
performing these operations, seal the sweeper inside an opaque
black multilayer nylon bag together with a suitable drying agent
(silica gel).
Disposal
At the end of its useful life, you have to scrap and dispose of this
product by taking it to a local differentiated waste collection center in
conformity to law. Before scrapping, check the serial number plate
on the machine: if it has the symbol , it means that disposal is
regulated by EU Directive 2003/96 (Waste Electrical and Electronic
Equipment, WAEE). The user must inquire about the local electrical
and electronic waste collection system and follow its instructions.
Illegal disposal of this product with normal domestic waste can
seriously harm the environment and health and is subject to
administrative penalties.
Table ofregularmaintenance
OPERATION
ON
DELIVERY
AFTER USE
EVERY 10
HOURS
EVERY 50
HOURS
EVERY 100
HOURS
OTHER
Replace the belts
X
Check belt
tension
X
Check the
tightness of
screws and nuts
X
Check the
condition of the
brushes
X
Check the
condition of the
flaps
X
Troubleshooting
The table below gives the most common problems which may arise
during normal use of the SWEEPER. These problems are easy to
resolve with operations classified as routine maintenance If the
problem is not present in the following table or cannot be eliminated
following the instructions here, contact an authorised service centre.
PROBLEM
CAUSE
SOLUTION
The centre brush
does not turn
Broken belt
Replace the belt
The sweeper does
not clean well
Brushes worn
Check the state of wear
of the brushes and if
necessary replace
Type of brushes
not suitable for
cleaning the type
of floor and dirt
present
Change type of brush
with respect to those
mounted as standard
(OPTIONAL)
The side brush does
not turn
Broken belt
Replace the belt
Dust comes out of
the fan
Gas
ket wear
Replace the gaskets
Brushes wear out
too fast
Brush pressure too
high
Adjust brushes
Dust is discharged
during work
Flap rubber worn
Replace flaps

Utilisation dumanuel
Utilisation du manuel
Ce manuel a été rédigé par le Constructeur et fait partie intégrante
de la machine. Le manuel de la BALAYEUSE est destiné au Client-
utilisateur; il a pour but de décrire l'utilisation de la machine et ses
caractéristiques techniques. Le client doit impérativement prendre
connaissance de ces informations afin de pouvoir utiliser la
balayeuse en tout sécurité et en connaissant ses principes de
fonctionnement et ses limites. Il contient également des informations
sur les modalités de transport, déplacement, mise en service,
réglage, assemblage, entretien et enfin mise au rebut de la
balayeuse.
Conservation du manuel
Le manuel doit être soigneusement conservé pendant toute la durée
de vie de la balayeuse, y compris lors de la mise au rebut. Le
manuel doit être conservé dans un endroit sec à proximité de la
balayeuse et doit être, dans tous les cas, toujours à disposition du
personnel qualifié et de l'utilisateur. Le Constructeur rappelle que le
manuel reflète l'état de la technique au moment où la balayeuse a
été commercialisée et ne peut être considéré comme inadapté en
cas de modernisation. Le Constructeur se réserve le droit de
modifier ses machines et d'actualiser le manuel à tout moment sans
obligation de modifier les machines et de mettre à jour les manuels
précédents sauf en cas de modifications concernant l'intégrité
physique et la santé des personnes ou les dommages matériels.
Recommandations générales
Travailler en toute sécurité
Les instructions de sécurité contenues dans le manuel d'utilisation et
d'entretien concernent les opérations qui peuvent être effectuées sur
la balayeuse. Les pictogrammes de sécurité sont insérés dans le
texte aux points qui exigent une attention particulière. Il est très
important que ces instructions de sécurité soient toujours
respectées. Leur non-respect pourrait provoquer des lésions aux
personnes et/ou des dommages à la machine ou à d'autres
appareils. Voici quelques instructions de sécurité fondamentales:
Lire, et assimiler, cette section des instructions de sécurité
avant l'installation, l'utilisation ou la réparation de la balayeuse.
Lire et respecter les signalisations de sécurité contenues dans
le texte et concernant des opérations spécifiques. Connaître et
se conformer aux instructions de sécurité indiquées dans le
manuel, aux normes générales de prévention des accidents et à
la réglementation en matière de sécurité.
Signalisation de sécurité
Les symboles ci-dessous sont placés, dans le manuel d'utilisation et
d'entretien, en regard de l'information qu'ils veulent signaler à
l'opérateur. Ces symboles ont été insérés pour mettre en garde le
personnel contre les dangers ou sources possibles de danger.
Assimiler leur signification. Ne pas tenir compte des symboles
pourrait provoquer des lésions personnelles, voire la mort et/ou des
dommages à la balayeuse ou aux équipements. En général les
signaux sont de trois types, comme décrit dans le tableau suivant :
Signaux de danger
Triangle avec bordure
Indiquent des prescriptions relatives à des
dangers présents ou possibles.
Signaux d'interdiction
Cercle, barré
Indiquent des prescriptions relatives à des
actions qui doivent être évitées.
Signaux d'obligation
Cercle plein
Indiquent des informations qu'il est important
de lire et de respecter.
En fonction de l'information qu'on veut transmettre, ces signaux
peuvent contenir des pictogrammes qui, par association d'idée,
aident à comprendre le type de danger, interdiction ou obligation.
Signaux de danger
Danger général. Ce signal est utilisé pour mettre en
garde contre des situations de danger qui peuvent
provoquer des dommages aux personnes, aux animaux
et aux choses. Le non-respect des prescriptions
associées au signal peut causer des dangers.
Signaux d'interdiction
Interdiction générale. Ce signal est utilisé pour signaler
l'interdiction d'effectuer certaines manœuvres et
opérations ou l'interdiction de certains comportements.
Le non-respect des interdictions associées au signal
peut causer des dommages aux choses, aux animaux et
aux personnes.
Signaux d'obligation
Obligation générale. Ce signal est utilisé pour signaler
l'obligation par l'opérateur de respecter les prescriptions.
Le non-respect des prescriptions associées au signal
peut causer des dommages aux choses, aux animaux et
aux personnes .
Obligation d'utiliser des E.P.I particuliers. Ce signal
est utilisé pour signaler l'obligation d'utiliser des
équipements de protection individuelle particuliers
pendant les opérations. Le non-respect des prescriptions
associées au signal peut causer de graves dommages et
même entraîner la mort de l'opérateur.
Obligation d'utiliser, dans l'ordre, des protections
pour les yeux, les mains et des vêtements adaptés.
Aptitude physique et intellectuelle de l'utilisateur
L'opérateur n'a besoin d'aucun permis spécial pour utiliser la
balayeuse: il doit seulement lire ce manuel. L'opérateur doit
posséder les capacités psychiques lui permettant de comprendre et
d'appliquer correctement les instructions et les normes de sécurité
contenues dans ce manuel et sur la balayeuse sous forme
d'inscriptions et de pictogrammes; il doit également être en mesure,
physiquement, d'effectuer les opérations nécessaires sur la
balayeuse et être en mesure d'utiliser et de maintenir la balayeuse
en parfaites conditions de sécurité.
Utilisation non conforme
La balayeuse est conçue pour être utilisée uniquement pour l'usage
et dans les espaces décrits dans le paragraphe correspondant du
manuel. Des utilisations différentes de celles décrites dans ce
manuel doivent être considérées comme incorrectes et donc non
conformes aux normes de sécurité.
Utilisation etcaractéristiquestechniques
Utilisation de la balayeuse
La BALAYEUSE est une machine professionnelle destinée au
nettoyage de sols industriels secs ou de surfaces goudronnées sèches
(entrepôts, parkings découverts et à étages, ateliers, stations-services,
installations sportives, campings et villages de vacances, hôtels,
supermarchés, garages) pour l'élimination de déchets solides comme
poussières, terre, papier ou autres au moyen d'une brosse insérée dans
le châssis de la balayeuse et d'une brosse latérale extérieure qui peut
être mise en marche par l'opérateur selon les besoins. La balayeuse est
munie d'un bac àdéchets de grande capacité.
La balayeuse est composée des éléments suivants:
Châssis en acier plié et soudé;
Système de brosses extérieures et intérieure;
Bac à déchets.
A partir de maintenant nous définirons les côtés de la balayeuse
(droit, gauche, avant et arrière) par rapport à l'opérateur qui tient le
guidon avec les commandes.
Conditions d'utilisation prévues
La BALAYEUSE a été conçue pour être utilisée exclusivement pour
les fonctions décrites au paragraphe du manuel.

Masse et dimensions Les tableaux suivants indiquent la masse
et les cotes d'encombrement de la balayeuse.
Masse
Masse)
28
Dimensions
L. max. (Longueur maxi)
870
La max. (Largeur maxi)
960
H max. (Hauteur maxi)
410
Paramètres de travail
Par paramètres de travail on entend l'ensemble des caractéristiques
nécessaires pour choisir la balayeuse la mieux adaptée aux
besoins.
Paramètres
Productivité maximale théorique (m2/h)
1500
Largeur de nettoyage mm
650
Capacité du bac à déchets Lt.
30
Longueur brosse centrale (mm)
390
Diamètre brosse centrale (mm)
260
Diamètre brosses latérales (mm)
400
Matière brosses
PPL
Paramètres de sécurité
Risques résiduels
La balayeuse, dans les conditions normales de travail, ne présente
pas de risques résiduels.
Dans tous les cas des risques résiduels sont toujours présents,
dans les conditions normales de travail, uniquement à l'intérieur
des zones dangereuses dont l'accès est interdit au moyen de
protections fixes. Ces protections ne doivent en aucun cas être
enlevées pendant le fonctionnement. Les protections des organes
de transmission peuvent être enlevées temporairement pour
permettre les réglages ou des opérations d'entretien courant ou de
dépannage, ces dernières étant dans tous les cas réservées aux
centres d'assistance qualifiés. Le risque résiduel qui subsiste dans
ces conditions peut être éliminé grâce à des méthodes de travail
appropriées. Quand il utilise la balayeuse l'opérateur doit tenir le
guidon de façon à avoir une bonne vision de la trajectoire de la
balayeuse pour éviter de heurter des obstacles (danger de
renversement) et des personnes (risque de blesser les personnes).
Les poussières contenues dans le bac à déchets ou capturées par
le filtre à air peuvent être dangereuses pour les personnes atteintes
de maladies chroniques des voies respiratoires. Ces personnes
doivent utiliser des E.P.I protégeant les voies respiratoires.
Protections
Toutes les zones dangereuses sont fermées par des capots et des
protections fixées au châssis avec des vis qui empêchent l'opérateur
d'accéder à toutes les parties dangereuses.
Transport et installation
Levage et manutention
ATTENTION - Respecter les prescriptions qui suivent.
1.
2.
3.
La balayeuse est livrée par le Constructeur sur une palette et
emballée dans une boîte en carton. Lorsqu'elle est encore emballée
le transport et la manutention peuvent se faire avec un chariot
élévateur d'une portée supérieure à 200 kg.
Pour déballer la balayeuse, couper les feuillards qui fixent la boîte
en carton à la palette et retirer la boîte. Lorsqu'elle est déballée la
balayeuse peut facilement être soulevée par deux personnes. Voici
quelques instructions de sécurité relatives aux opérations de
transport.
Installation
ATTENTION - Avant de procéder à l'installation, lire
attentivement les recommandations ci-dessous.
La balayeuse est livrée avec la brosse latérale démontée et le
guidon replié sur lui-même pour des questions d'emballage. Avant
d'utiliser la machine il faut fixer la brosse latérale et le guidon.
Redresser le guidon;
Fixer la vis de blocage rotation;
Bloquer la molette de blocage.
Incliner le support brosse latérale et fixer la brosse en
serrant les vis fournies.
Feuillar
ds
Emball
age
Palette
Tige guidon
Vis de blocage
Molette de blocage
Vis de fixation
Contenu de l'emballage
Ceci est la liste du contenu de l'emballage livré au client. S'il
manque une des pièces mentionnées ci-dessous, s'adresser
immédiatement au revendeur.
1 balayeuse;
1 brosse latérale;
3 vis TCEI pour fixation brosse latérale;
1 notice d'utilisation et d'entretien de la
balayeuse;
Instructions pour l'Opérateur
Formation
Tous les conducteurs devraient recevoir une formation
professionnelle et faire de la pratique sur la balayeuse. Cette
formation devrait insister sur:
L'interdiction d'utiliser la machine sur la route;
La nécessité de faire attention et de rester
concentré quand on travaille;
Ne pas utiliser la balayeuse sur des pentes
supérieures à celle recommandée de 12%;
Ne jamais utiliser la balayeuse si les
protections sont défectueuses, ou sans les
dispositifs de sécurité;
Commandes
L'opérateur manœuvre la balayeuse à l'aide du guidon. Le
déplacement de la balayeuse entraîne la rotation des roues qui à
travers un engrenage et des courroies et poulies mettent en rotation
la brosse centrale et la brosse latérale.
Opérations en fin de balayage
A la fin du nettoyage vider les bac à déchets
avant et arrière;
Pour le bac arrière abaisser le cliquet du
crochet qui fixe le bac à la balayeuse;
Décrocher le crochet et retirer le bac;
Pour le bac avant, tourner le bouton de
blocage, retirer le bac à l'aide de la poignée.
Entretien courant
Normes de sécurité pour l'entretien courant
L'entretien courant consiste en une série d'opérations simples à
exécuter à intervalles réguliers et en suivant les prescriptions
fournies par le constructeur. Le Constructeur a réduit le nombre et la
complexité des opérations d'entretien courant de façon à en
permettre la réalisation sans compétences techniques particulières
et sans équipements complexes.
Il s'agit surtout de:
Réglage et remplacement des courroies;
Remplacement de pièces soumises à l'usure;
Nettoyage surfaces extérieures et parties intérieures;
Les poussières contenues dans le bac à déchets ou
capturées par le filtre à air peuvent être dangereuses
pour les personnes atteintes de maladies chroniques
des voies respiratoires. utiliser des E.P.I adaptés.
Normes de sécurité pour le nettoyage de la
balayeuse
Toutes les opérations de nettoyage doivent être effectuées
balayeuse arrêtée.
Pour le nettoyage de la balayeuse ou de certaines de ses pièces,
respecter les recommandations suivantes:
Ne pas nettoyer les surfaces plastiques avec de l'alcool,
détergents ou solvants. Éliminer les produits de nettoyage
selon la réglementation en vigueur. Ne pas jeter dans
l'environnement les produits utilisés ou les résidus de
nettoyage. Pour le nettoyage utiliser de l'eau ou de l'air
comprimé et des chiffons doux. ATTENTION - Pendant les
opérations de nettoyage il est obligatoire de porter les
équipements de protection individuelle.
ATTENTION - Ne pas utiliser de solvants pour
nettoyer la balayeuse, cela pourrait entraîner un
risque d'incendie à cause des charges
électrostatiques provoquées par la rotation des
brosses.
Normes de sécurité pour la réparation et l'entretien
correctif
Le Constructeur conseille de s'adresser aux ateliers de réparation
agréés pour toute intervention autre que l'entretien courant.
Les opérations doivent être exécutées par des
personnes qualifiées, ayant les compétences
techniques requises pour effectuer ces opérations en
toute sécurité et conformément aux réglementations
en vigueur en la matière.
Soulignons que la garantie offerte par le constructeur est annulée si:
Les consignes décrites dans le livret "utilisation et
entretien" ne sont pas scrupuleusement respectées;
Des réparations ou des entretiens sont effectués par du
personnel non qualifié;
Des pièces non d'origine sont utilisées;
Du matériel non adapté est utilisé.
ATTENTION - Le Client devra vérifier que les pièces
détachées utilisées lors des réparations sont bien
d'origine, car seules ces pièces permettent de
garantir la sécurité de la balayeuse.
Entretien courant - Remplacement courroie brosse
latérale. La transmission du mouvement à la brosse
latérale se fait par une courroie et une poulie solidaire
avec la roue droite de la balayeuse. Pour la remplacer en
cas d'usure:
Retirer le carter de protection de la poulie en
dévissant la molette de fixation.
Levier de blocage
Bac à déchets
arrière
Bac à déchets
avant
Molette de blocage
Incliner le support de la brosse latérale et
enlever la courroie des poulies.
Réglage de la hauteur de la brosse centrale
Pour régler la hauteur de la brosse centrale, agir sur la molette
placée sur le dessus de la balayeuse.
Remplacement brosse latérale
Quand la brosse latérale est usée on la remplace en suivant la
procédure indiquée au paragraphe "Installation" qui décrit le premier
montage de la brosse latérale.
Remplacement brosse centrale
Pour remplacer la brosse centrale procéder comme suit:
Retirer le bac à déchets arrière;
Incliner la balayeuse;
Tourner la brosse de façon à voir les deux vis
à tête hexagonale qui la fixent sur les
entraîneurs;
Dévisser les vis;
Retirer la brosse;
Placer la nouvelle brosse sur les entraîneurs
et serrer les vis de blocage.
Flap
Après avoir retiré le bac à déchets incliner la balayeuse. Remplacer
ensuite les flaps:
Dévisser les vis qui fixent le bloque-flap au
châssis de la machine;
Retirer le bloque-flap;
Remplacer le flap usagé par un neuf;
Remettre le bloque-flap en place en revissant
les vis retirées précédemment .
Retirer les vis de fixation;
Remplacer le flap usagé par un neuf;
Remettre le bloque-flap en bloquant les vis;
Remonter le câble relève flap.
Pièces détachées conseillées
Pour garantir un entretien efficace de la balayeuse, le Constructeur
conseille à ses Clients d'utiliser exclusivement les pièces d'origine
indiquées dans le livret des pièces détachées ci-joint. En cas de
commande de pièces détachées spécifier au Constructeur le
modèle de la balayeuse, son matricule, la référence de la pièce
indiquée sur le livret pièces détachées et la quantité.
Vis de fixation
Bloque-flap
Molette de fixation
Carter de
protection poulie
Courroie
Poulie
Support brosse
latérale
Molette de réglage
hauteur brosse
centrale
Vis de fixation
brosse sur les
entraîneurs
Entraîneurs
Logements des
entraîneurs sur
brosses

Mise hors service de la balayeuse
Si la machine n'est pas utilisée pendant plusieurs jours il est
suffisant de protéger les surfaces exposées (non protégées par des
peintures, traitements de surface ou plastiques) avec des huiles
anti-rouille. Si on prévoit que la mise hors service sera
particulièrement longue il est en outre conseillé de nettoyer
soigneusement la balayeuse. Ces opérations terminées envelopper
la balayeuse dans un sac en nylon multicouches opaque (noir) à
l'intérieur duquel on aura préalablement placé un dessicant (gel de
silice).
Élimination du produit
Au terme de sa vie fonctionnelle, ce produit doit être éliminé suivant
les règles du recyclage local, conformément aux dispositions
législatives en vigueur, que l’utilisateur est tenu de respecter à la
lettre.
Avant la mise au rebut, contrôler l’étiquette apposée sur l’appareil :
si ce symbole y figure, cela indique que l’élimination du produit
est réglementée par la directive 2003/96/EC sur les appareils
électriques et électroniques (Waste Electrical and Electronic
Equipment, WAEE). L’utilisateur est tenu de se renseigner sur le
système local de récolte des produits électriques et électroniques et
d’en suivre les prescriptions. L’élimination incontrôlée de ce produit
avec les autres déchets ménagers peut entraîner de graves
préjudices à l’environnement et à la santé humaine. Les
contrevenants sont passibles des sanctions prévues par les
autorités administratives locales.
Périodicité d'entretien
INTERVENTION
A LA
LIVRAISON
A LA FIN DE
L'UTILISATIO
N
TOUTES LES
10 HEURES
TOUTES LES
50 HEURES
TOUTES LES
100 HEURES
AUTRE
Remplacement
des courroies
X
Vérifier la tension
des courroies
X
Contrôle du
serrage des vis et
écrous
X
Contrôle de l'état
des brosses
X
Contrôle de l'état
des flaps
X
Problèmes, causes et remèdes
Le tableau qui suit énumère les problèmes rencontrés le plus
souvent lors de l'utilisation normale de la BALAYEUSE. Les causes
de ces mauvais fonctionnements peuvent être facilement résolues
avec des opérations qui rentrent dans le cadre de l'entretien
courant. Si le problème rencontré ne se trouve pas dans le tableau
suivant ou ne peut pas être éliminé en suivant les conseils donnés
ci-dessous nous vous conseillons de vous adresser à un SAV
agréé.
PROBLEME
CAUSE
REMEDE
La brosse centrale
ne tourne pas
Courroie cassée
Remplacement de la
courroie
La balayeuse ne
nettoie pas bien
Brosses usées
Contrôler l'état
d'usure des brosses
et éventuellement les
remplacer
Brosses pas
adaptées au type
de sol et de saleté
Utiliser des brosses
d'un autre type que
celles montées de
série (OPTION)
La brosse latérale
ne tourne pas
Courroie cassée
Remplacement de la
courroie
La poussière
s'échappe du
ventilateur
Garnitures usées
Remplacer les
garnitures
Usure trop rapide
des brosses
Pression des
brosses trop forte
Régler la pression
des brosses
De la poussière
s'échappe pendant
le travail
Caoutchouc des
flap usé
Remplacer le flap
Gebrauch des Handbuchs
Verwendung des Handbuchs
Dieses Handbuch wurde vom Maschinenhersteller erstellt und
gehört zum Lieferumfang der Maschine. Das Handbuch der
KEHRMASCHINE ist für den Maschinenbediener bestimmt; es
beschreibt den Gebrauch der Maschine und erläutert ihre
technischen Eigenschaften. Der Kunde muss alle diese
Informationen kennen, damit die Maschinensicherheit gewährleistet
ist und er über die Funktionsweise und Betriebsgrenzen informiert
ist. Es enthält ferner Informationen zum Transport, zur Beförderung,
Inbetriebnahme, Einstellung, Montage, Wartung und Abrüstung der
Maschine.
Aufbewahrung des Handbuchs
Dieses Handbuch muss für die gesamte Lebensdauer der
Kehrmaschine einschließlich Abrüsten, sorgfältig aufbewahrt
werden. Das Handbuch muss an einem geeigneten Ort in
Maschinennähe aufbewahrt werden und grundsätzlich immer dem
Fachpersonal und dem Maschinenbediener zur Verfügung stehen.
Der Hersteller weist darauf hin, dass das Handbuch dem
technischen Stand zum Zeitpunkt des Verkaufs der Kehrmaschine
entspricht und bei Änderungen keineswegs als überholt anzusehen
ist. Der Hersteller behält sich vor, das Produkt und das Handbuch
jederzeit zu ändern, ohne hierdurch zur Änderung früherer Produkte
und Handbücher verpflichtet zu sein; davon ausgenommen sind
Änderungen in Bezug auf die Sicherheit und Gesundheit von
Personen oder auf Sachschäden. Die fotostatische Reproduktion
(Fotokopieren) dieses Handbuchs darf nur vom Original erfolgen, da
die Reproduktion von Kopien zu undeutlichen Abbildungen und
somit missverständlichen Informationen führt.
Warnhinweise
Sicherer Maschinenbetrieb
Die Sicherheitsvorschriften in diesem Bedienungs- und
Wartungshandbuch beziehen sich auf Vorgänge, die mit der
Kehrmaschine ausgeführt werden können. Die Sicherheitssymbole
sind im Text an den Stellen eingefügt, die besondere
Aufmerksamkeit verlangen. Es ist äußerst wichtig, dass diese
Sicherheitsvorschriften strengstens befolgt werden. Die
Nichtbeachtung kann zu Personen- und/oder Maschinenschäden
bzw. zu Schäden an anderen Ausrüstungsgegenständen führen.
Hierzu einige grundlegende Sicherheitsvorschriften:
Vor der Installation, dem Gebrauch, der Wartung und der
Reparatur der Kehrmaschine den Abschnitt mit den
Sicherheitsvorschriften lesen und sich gut einprägen.
extstellen mit Sicherheitshinweisen zu besonderen
Vorgehensweisen lesen und sich gut einprägen. Die
Sicherheitsvorschriften im Handbuch, die allgemeinen
Unfallverhütungsnormen und die gesetzlichen
Sicherheitsnormen kennen und beachten.
Sicherheitskennzeichnung
Die nachfolgend abgebildeten Symbole werden im Bedienungs- und
Wartungshandbuch an den Stellen benutzt, an denen auf die
entsprechende Information für den Bediener hingewiesen wird.
Diese Symbole dienen dazu, das Personal vor Gefahren oder
möglichen Gefahrenquellen zu warnen und müssen gut einprägt
werden. Die Nichtbeachtung dieser Symbole kann
Personenschäden, Tod und/oder Schäden an der Kehrmaschine
oder den Ausrüstungen zur Folge haben. Im Allgemeinen werden
drei Arten von Zeichen verwendet, die in der nachfolgenden Tabelle
aufgeführt sind:
Warnzeichen
Eingerahmte dreieckige Form
Hinweis auf Vorschriften zu vorhandenen
oder möglichen Gefahren.
Verbotszeichen
Runder Rahmen mit Querbalken
Hinweis auf Vorschriften zu
Vorgehensweisen, die verboten sind.
Gebotszeichen
Voller Kreis
Hinweis auf Informationen, die gelesen und
befolgt werden müssen.
Je nach Information, die übermittelt werden soll, können diese
Zeichen Symbole enthalten, die mittels Gedankenverbindungen zum
besseren Verständnis der Warnung, des Verbots oder des Gebots
dienen.
Warnzeichen
Allgemeine Gefahr. Dieses Zeichen weist auf Gefahren
hin, die zu Personen-, Tier- und Sachschäden führen
können. Die Nichtbeachtung der mit diesem Zeichen
verbundenen Vorschriften kann zu Gefahren führen.
Verbotszeichen
Allgemeines Verbot. Dieses Zeichen weist auf das
Verbot zur Ausübung bestimmter Vorgänge und
Tätigkeiten bzw. bestimmter Verhaltensweisen hin. Die
Nichtbeachtung der mit diesem Zeichen verbundenen
Vorschriften kann zu Personen-, Sach- und Tierschäden
führen.
Gebotszeichen
Allgemeines Gebot. Dieses Zeichen weist auf die Pflicht
des Bedieners zur Einhaltung der Vorschriften hin. Die
Nichtbeachtung der mit diesem Zeichen verbundenen
Vorschriften kann zu Personen-, Sach- und Tierschäden
führen.
Gebot zur Verwendung spezieller PSA. Dieses
Zeichen weist auf die Pflicht zur Verwendung spezieller
persönlicher Schutzausrüstungen bei der Ausübung der
Tätigkeit hin. Die Nichtbeachtung der mit diesem Zeichen
verbundenen Vorschriften kann schwere Verletzungen
oder den Tod des Bedieners zur Folge haben.
Pflicht zum Tragen von Schutzausrüstungen in der
Reihenfolge: Schutzhandschuhe, Schutzbrille und
Schutzkleidung.
ACHTUNG –Die Unkenntnis oder Nichtbeachtung der
Zeichen und Warnhinweise kann Personenschäden,
an der Kehrmaschine oder an den Ausrüstungen zur
Folge haben.
Körperliche und geistige Voraussetzungen des Anwenders
Der Bediener benötigt zum Gebrauch der Kehrmaschine keine
besondere Befähigung: er muss nur dieses Handbuch lesen. Der
Bediener muss die geistigen Fähigkeiten besitzen, um die
Sicherheitsvorschriften und -richtlinien in diesem Handbuch und an
der Kehrmaschine in Form von Beschriftungen und Symbolen zu
verstehen und richtig anzuwenden; er muss auch körperlich in der
Lage sein, die Kehrmaschine richtig zu bedienen und die
Maschinensicherheit zu gewährleisten.
Unsachgemäßer Gebrauch
Die Kehrmaschine wurde entwickelt, um ausschließlich zu dem im
entsprechenden Abschnitt dieses Handbuchs beschriebenen Zweck
und in den dafür vorgesehenen Bereichen verwendet zu werden.
Jeder hiervon abweichende Gebrauch ist unsachgemäß und
entgegen den Bestimmungen der Sicherheitsrichtlinien.
Maschinengebrauch und technische Daten
Gebrauch der Kehrmaschine
Die KEHRMASCHINE ist eine professionelle handgeführte
Reinigungsmaschine für trockene Industrieböden oder Asphaltflächen
(Lagerräume, Stellplätze und Parkhäuser, Labore, Tankstellen,
Sportanlagen, Campingplätze und Ferienanlagen, Hotels, Supermärkte,
mechanische Werkstätten) und dient ausschließlich zur Beseitigung von
Feststoffen, wie Staub, Erde, Papier oder ähnliches mit Hilfe einer
Kehrwalze im Maschinenrahmen und einem außerhalb davon liegenden
Seitenbesen, den der Bediener erforderlichenfalls zuschalten kann. Die
Kehrmaschine ist mit einem geräumigen Kehrgutbehälter ausgerüstet.
Die Kehrmaschine besteht aus den folgenden Bauteilen:
- Rahmen aus gebogenem und verschweißtem Stahl;
- Bürstensystem mit Seitenbesen und Kehrwalze;
- Kehrgutbehälter.
Ab jetzt werden die Seiten rechts, links, vorne und hinten der
Kehrmaschine aus der Sicht des Bedieners gesehen, der den
Fahrbügel mit den Steuerungen umfasst.
Vorgesehener Gebrauch
Die KEHRMASCHINE darf ausschließlich zur Ausübung der in
Abschnitt des Handbuchs beschriebenen Funktionen verwendet
werden.
Gewicht und Abmessungen
In den folgenden Tabellen sind das Gewicht und die Außenmaße
der Kehrmaschine angegeben.
Gewicht
Gewicht
28
Abmessungen
L max. (maximale Länge)
870
B max. (maximale Breite)
960
H max. (maximale Höhe)
410
Arbeitsparameter
Unter Arbeitsparametern versteht man alle Daten, die für die
Auswahl der richtigen Kehrmaschine anhand der jeweiligen
Reinigungsanforderungen wichtig sind.
Parameter
Max. theoretische Flächenleistung (m2/h)
1500
Reinigungsbreite mm
650
Inhalt Kehrgutbehälter l
30
Länge Hauptkehrwalze (mm)
390
Durchmesser Hauptkehrwalze (mm)
260
Durchmesser Seitenbesen (mm)
400
Borstenmaterial
PPL
Sicherheitsparameter
Restrisiken
Die Kehrmaschine birgt unter normalen Arbeitsbedingungen keine
Restrisiken. Restrisiken sind bei normalen Arbeitsbedingungen in
jedem Fall nur innerhalb der Gefahrenbereiche vorhanden, zu
denen der Zugang durch fest installierte oder verriegelte
Schutzvorrichtungen verwehrt ist. Diese Schutzvorrichtungen dürfen
in keinem Fall während des Betriebs entfernt werden. Die
Schutzvorrichtungen der Übertragungsorgane können zeitweilig
entfernt werden, um Einstellungen oder planmäßige bzw.
außerplanmäßige Wartungsarbeiten durchzuführen; letztere dürfen
ausschließlich von qualifizierten Kundendienstzentren durchgeführt
werden. Das hierbei entstehende Restrisiko kann bei
entsprechender Vorgehensweise ausgeschaltet werden. Der
Bediener muss beim Maschinenbetrieb den Fahrbügel fest
umfassen, um den Fahrweg der Kehrmaschine überblicken zu
können, damit er Hindernissen (Kippgefahr) und Personen
(Personenschäden) ausweichen kann. Im Kehrgutbehälter
enthaltener oder vom Luftfilter aufgenommener Staub kann für
Personen mit chronischen Atemwegserkrankungen gefährlich sein.
Diese Personen müssen entsprechende PSA für die Atemwege
tragen.
Schutzvorrichtungen
Alle gefährlichen Bereiche sind durch Schutzabdeckungen und am
Maschinenrahmen festgeschraubte Schutzvorrichtungen gesichert,
die dem Bediener den Zugriff auf gefährliche Teile verwehren.
Transport und Installation
Anheben und Beförderung
ACHTUNG –Die folgenden Vorschriften beachten.
1.
2.
3.
Die Kehrmaschine wird vom Hersteller auf einer Palette und in
einem Karton verpackt geliefert. Vor dem Auspacken können der
Transport und die Beförderung mit einem Hubwagen mit einer
Tragkraft von mindestens 200 kg erfolgen.
Zum Auspacken der Kehrmaschine die Spannbänder
durchschneiden, mit denen der Karton an der Palette befestigt ist,
und den Karton abladen. Nach dem Auspacken kann die
Kehrmaschine leicht von zwei Personen angehoben werden. Die
folgenden Sicherheitsvorschriften müssen beim Transport beachtet
werden.
Installation
ACHTUNG –Vor der Installation die nachfolgenden
Warnhinweise aufmerksam lesen.
Die Kehrmaschine wird aus Verpackungsgründen mit abmontiertem
Seitenbesen und umgeklapptem Fahrbügel angeliefert. Vor dem
Gebrauch der Maschine müssen der Seitenbesen montiert und der
Fahrbügel aufgerichtet werden.
Den Fahrbügel aufrichten;
Mit der Arretierschraube die Drehbewegung blockieren;
Den Arretierknopf blockieren;
Die Halterung des Seitenbesens neigen und den
Seitenbesen mit den im Lieferumfang enthaltenen
Schrauben befestigen.
Spannbänder
Verpackung
Palette
Fahrbügel
Arretierschraube
Arretierknopf

Beschreibung des Lieferumfangs
Im Folgenden ist der beim Kunden angelieferte Kartoninhalt
aufgelistet. Bei unvollständigem Lieferumfang muss umgehend der
Händler benachrichtigt werden.
1 Stck. Kehrmaschine;
1 Stck. Seitenbesen;
3 Stck. Inbusschrauben zur Befestigung des
Seitenbesens;
1 Stck. Bedienungs- und Wartungshandbuch
der Kehrmaschine;
Anweisungen für denBediener
Einweisung
Alle Maschinenbediener sollten eine professionelle Ausbildung
erhalten und mit der Kehrmaschine praktische Erfahrung sammeln.
Diese Ausbildung sollte die folgenden Schwerpunkte haben:
Die Nutzung öffentlicher Straßen ist verboten;
Aufmerksames und konzentriertes Verhalten
bei der Arbeit;
Die Kehrmaschine nur auf Flächen mit einer
maximalen Steigung von 12% verwenden;
Die Kehrmaschine bei beschädigten
Abdeckungen und ohne die
sicherheitsrelevanten Schutzvorrichtungen
nicht verwenden;
Steuerungen
Der Bediener steuert die Kehrmaschine über die Steuerungen am
Fahrbügel. Beim Fortbewegen der Kehrmaschine drehen sich die
Räder, die über ein Getriebe mit Riemen und Riemenscheiben die
Hauptkehrwalze und den Seitenbesen antreiben.
Vorgehen nach der Reinigung
Nach der Reinigung den vorderen und
hinteren Kehrgutbehälter entleeren;
Beim hinteren Kehrgutbehälter den
Arretierhebel des Hakens absenken, mit dem
der Kehrgutbehälter an der Kehrmaschine
befestigt ist;
Den Haken lösen und den Kehrgutbehälter
herausziehen.
Beim vorderen Kehrgutbehälter den
Arretierknopf drehen und den Kehrgutbehälter
am Griff herausziehen.
Planmäßige Wartung
ACHTUNG –Bei den planmäßigen und
außerplanmäßigen Wartungsarbeiten, sowie bei der
Reinigung ist das Tragen der mitgelieferten
persönlichen Schutzausrüstungen vorgeschrieben.
ACHTUNG - Die Nichtbeachtung der folgenden
Sicherheitsvorschriften kann zu Verletzungen, Tod
oder Schäden an den Ausrüstungen führen.
Sicherheitsnormen für die planmäßige Wartung
Die planmäßige Wartung besteht aus einer Reihe von einfachen
Tätigkeiten, die in regelmäßigen Abständen unter Einhaltung der
Vorgaben des Herstellers auszuführen sind. Der Hersteller hat die
Anzahl und den Umfang der planmäßigen Wartungsarbeiten soweit
reduziert, dass sie auch von Personen ohne besondere technische
Fachkenntnisse und ohne aufwendige Ausrüstungen ausgeführt
werden können. Es handelt sich im Wesentlichen um:
Einstellen und Auswechseln der Riemen;
Auswechseln von Verschleißteilen;
Reinigen von Außenflächen und Innenteilen.
Im Kehrgutbehälter enthaltener oder vom Luftfilter
aufgenommener Staub kann für Personen mit
chronischen Atemwegserkrankungen gefährlich sein:
die Atemwege mit entsprechenden PSA schützen.
Sicherheitsnormen für die Reinigung der
kehrmaschine
Bei jeder Reinigung muss die Kehrmaschine stehen.
Bei der Reinigung der Kehrmaschine und ihrer Bauteile müssen die
folgenden Vorschriften beachtet werden:
Kunststoffflächen nicht mit Alkohol, Reinigungs- oder
Lösemitteln säubern. Die verwendeten Reinigungsmaterialien
unter Einhalt der einschlägigen geltenden Normen
vorschriftsmäßig entsorgen. Für die Reinigung Wasser oder
Druckluft und weiche Tücher verwenden. ACHTUNG - Bei der
Reinigung ist das Tragen von persönlichen
Schutzausrüstungen vorgeschrieben.
Befestigungsschraube
Arretierhebel
Hinterer
Kehrgutbehälter
Vorderer
Kehrgutbehälter
Arretierknopf
This manual suits for next models
1
Table of contents
Languages:


