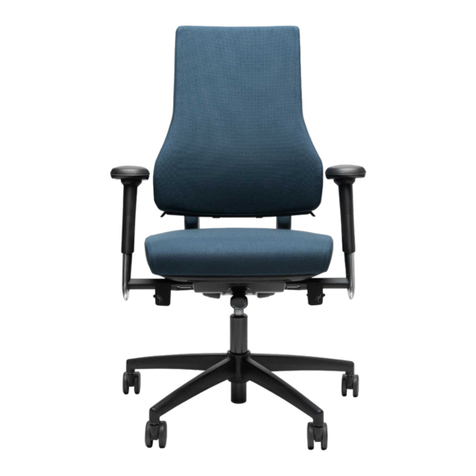
BMA Axia Profit User manual

2
3
41
8
6
The automatic back angle gives
the support required.
De automatische
rughoek zorgt voor
de juiste ondersteuning.
Die automatische Neigungs-
winkeleinstellung sorgt für die
richtige Unterstützung.
L’inclinaison automatique du
dossier assure le maintien
adéquat.
Warning: The gas springs may only be repaired or replaced by a specialist. / Waarschuwing: Reparatie en vervanging van de gasveren mag uitsluitend door deskundigen uitgevoerd worden.
Warnung: Die Gasfedern dürfen nur von Fachleuten repariert oder ersetzt werden. / Avertissement: La réparation et le remplacement des vérins à gaz doivent être effectués uniquement par des spécialistes.
Go to www.bma-ergonomics.com and click better sitting
5
a/b

10-50o
50-70 cm
90
o
1a: Inclinaison fixe du siège
Soulevez le levier. Basculez l’assise vers
l’arrière et rabaissez le levier pour fixer
la position.
2: Hauteur du siège
Soulevez le levier. Réglez le siège à la
hauteur désirée. Relâchez le levier pour
bloquer la hauteur du siège. Dans cette
position, les cuisses sont soutenues de
manière égale.
3: Profondeur d’assise
Tirez sur les boutons situés de chaque
côté. Faites glisser le siège vers l’avant ou
l’arrière pour obtenir la profondeur désirée.
La position est correcte lorsque la distance
entre le siège et le creux des genoux est à
peu près égale à une largeur de main.
4: Hauteur du dossier
Les boutons tournants situés sur le cadre
du dossier vous permettent de régler le
dossier à la hauteur désirée. La position
correcte est obtenue lorsque le bas du dos
est bien soutenu.
5: Inclinaison du dossier
Sur ce siège, l’inclinaison du dossier change
automatiquement lorsque vous inclinez le
torse vers l’arrière. Vous n’avez pas à action-
ner de bouton pour cela.
6: Hauteur des accoudoirs
Appuyez sur le bouton des accoudoirs
et réglez-les à la hauteur à laquelle les
avant-bras seront placés en position de
travail. Relâchez le bouton pour bloquer
les accoudoirs dans cette position. Réglez
la hauteur des accoudoirs indépendam-
ment de la hauteur actuelle de votre plan
de travail.
7: Hauteur du plan de travail
Réglez la partie supérieure du plan de tra-
vail ou le clavier à la même hauteur que la
partie supérieure des accoudoirs.
1b: Inclinaison dynamique du siège
Relevez le levier : l’assise bascule vers
l’avant et l’arrière (assise dynamique).
8: Résistance au poids
Vous êtes en équilibre lorsque le siège suit
tous vos mouvements sans que vous ayez
à exercer de force. Tournez le bouton pour
trouver le bon équilibre.
1a: Sitzwinkel fixieren
Ziehen Sie den Hebel hoch. Kippen Sie
den Rücken nach hinten. Lassen Sie den
Hebel wieder los, um eine bestimmte indi-
viduelle Position stufenlos zu fixieren.
2: Sitzhöhe
Ziehen Sie den Hebel hoch. Stellen Sie
den Sitz auf die richtige Höhe ein. Lassen
Sie den Hebel wieder los, um diese Stel-
lung zu fixieren. Der Sitz bietet nun beiden
Oberschenkeln eine gleichmäßige Unter-
stützung.
3: Sitztiefe
Ziehen Sie beide Griffschalen an den Sei-
ten gleichzeitig heraus. Schieben Sie den
Sitz nach vorne oder nach hinten, bis die
richtige Sitztiefe erreicht ist. Bei der rich-
tigen Sitztiefe beträgt die Entfernung zwi-
schen dem Sitz und der Kniekehle unge-
fähr eine Handbreite.
4: Höhe der Rückenlehne
Durch Betätigen der Drehknöpfe am Leh-
nenrahmen können Sie die Rückenlehne
nun auf die gewünschte Höhe einstellen.
Achten Sie darauf, dass vor allem der
Beckenbereich gut stabilisiert wird.
5: Winkel der Rückenlehne
Bei diesem Stuhl verändert sich der Winkel
der Rückenlehne automatisch, wenn Sie
den Oberkörper nach hinten bewegen. Sie
müssen hierfür keine Knöpfe bedienen.
6: Höhe der Armstützen
Drücken Sie die Taste die sich unterhalb
der Armlehnenauflage befindet ein und
bewegen Sie die Armlehnen in die Höhe, in
der sich Ihre Unterarme in Arbeitshaltung
befinden werden. Lassen Sie die Taste an-
schließend los, um die Position zu fixieren.
Stellen Sie die Höhe der Armlehnen un-
abhängig von der derzeitigen Höhe Ihrer
Schreibtischplatte ein.
7: Höhe der Schreibtischplatte
Gleichen Sie die obere Seite der Schreib-
tischplatte oder der Tastatur mit der Ober-
seite der Armstützen ab.
1b: Dynamischer Sitzwinkel
Ziehen Sie den Hebel hoch. Die Sitzfläche
kann nun frei nach vorne und hinten kippen.
8: Gewichtseinstellung
Sie befinden sich im Gleichgewicht, wenn der
Stuhl Ihnen in jeder Haltung folgt, ohne dass
Sie sich anstrengen müssen. Drehen Sie am
Knopf, um das Gleichgewicht zu finden.
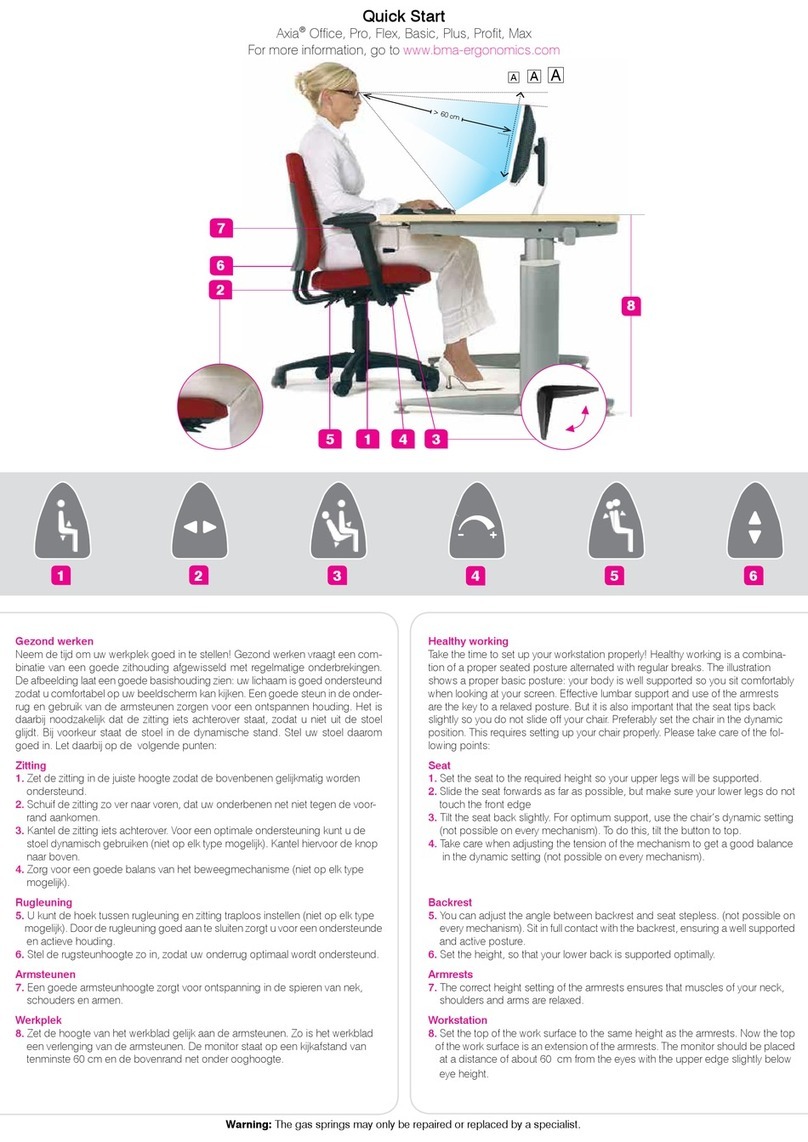
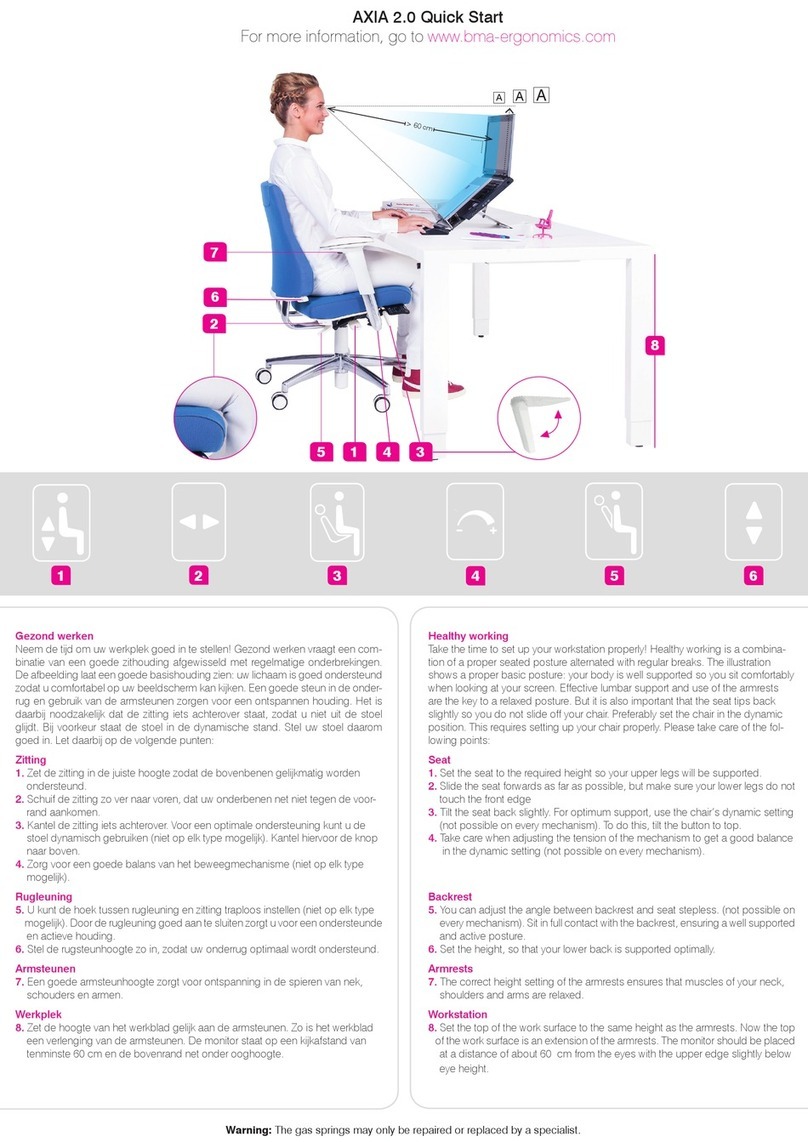
1a: Static seat angle
Raise the lever. Tilt the seat back to the de-
sired angle. Depress the lever to lock into
position.
2: Seat height
Raise the lever. Adjust the seat to the
required height. Release the lever to lock
into position. The seat should now provide
even support for the thighs.
3: Seat depth
Pull out the sliders on either side of the
chair. Slide the seat forwards or backwards
to select the required depth. The correct
seat depth allows a hands breadth between
the seat and the back of your knee.
4: Backrest height
Adjust backrest to required height using
the rotating knobs on the back frame.
Make sure the backrest comfortably
supports your lower back.
5: Backrest angle
This chair automatically adjusts the
backrest angle when you lean backwards.
There is no need to use any controls.
6: Armrest height
Depress the buttons on the armrests to
adjust them to the height required for
supporting your forearms when working.
Release the button to lock into position.
Adjust the armrests separately from the
current height of your desktop.
7: Height of desktop
Adjust the desktop or keyboard to the
same height as the top of the armrests.
1b: Dynamic seat angle
Raise the lever. The seat angle can now be
adjusted freely backwards and forwards.
8: Weight setting
You are sitting in balance when the chair
follows you in every position without having
to apply force. Rotate the knob to find the
required point of equilibrium.
1a: Zithoek vast
Til de hendel op. Kantel de zitting helemaal
achterover. Duw de hendel naar beneden
om deze stand vast te zetten.
2: Zithoogte
Til de hendel op. Breng de zitting op de
juiste hoogte. Laat de hendel weer los om
deze stand vast te zetten. De zitting onder-
steunt de bovenbenen nu gelijkmatig.
3: Zitdiepte
Trek de knop aan beide zijden uit. Ver-
schuif de zitting naar voren of naar achter
tot de juiste diepte is bereikt. Bij de juiste
zitdiepte is de afstand tussen de zitting en
uw knieholte ongeveer een handbreedte.
4: Rugsteunhoogte
Met de draaiknoppen aan het rugframe
kunt u de rugsteun op de gewenste hoogte
brengen. Zorg dat u prettige steun ervaart
in uw onderrug.
5: Rugleuninghoek
In deze stoel verandert de hoek in de rug-
leuning automatisch als u het bovenlichaam
achterwaarts beweegt. U hoeft hiervoor
geen knop te bedienen.
6: Armsteunhoogte
Knijp de knop van de armsteunen in en be-
weeg de armsteunen in de hoogte waarin
de onderarmen zich in werkpositie zullen
bevinden. Laat de knop los om deze stand
te vergrendelen. Stel de hoogte van de
armsteunen los van de huidige hoogte van
uw werkblad in.
7: Werkhoogte
Stel de bovenkant van het werkblad of het
toetsenbord gelijk aan de bovenzijde van
de armleggers.
1b: Zithoek dynamisch
Duw de hendel naar boven. De zitting kan
nu vrij naar voor en achter kantelen.
8: Gewichtsinstelling
U zit in balans als de stoel u in elke hou-
ding volgt zonder dat u kracht hoeft te zet-
ten. Draai aan de knop om de juiste balans
te vinden.
1
7
3
8
2
4
6
Other BMA Indoor Furnishing manuals
Popular Indoor Furnishing manuals by other brands

Regency
Regency LWMS3015 Assembly instructions

Furniture of America
Furniture of America CM7751C Assembly instructions

Safavieh Furniture
Safavieh Furniture Estella CNS5731 manual

PLACES OF STYLE
PLACES OF STYLE Ovalfuss Assembly instruction

Trasman
Trasman 1138 Bo1 Assembly manual

Costway
Costway JV10856 manual
