BMB e-mo-lift Series User manual
BMB
Art. 6256.065 e-mo-lift 650
Art. 6256.100 e-mo-lift 1000
ASSEMBLY INSTRUCTIONS / OPERATING MANUAL
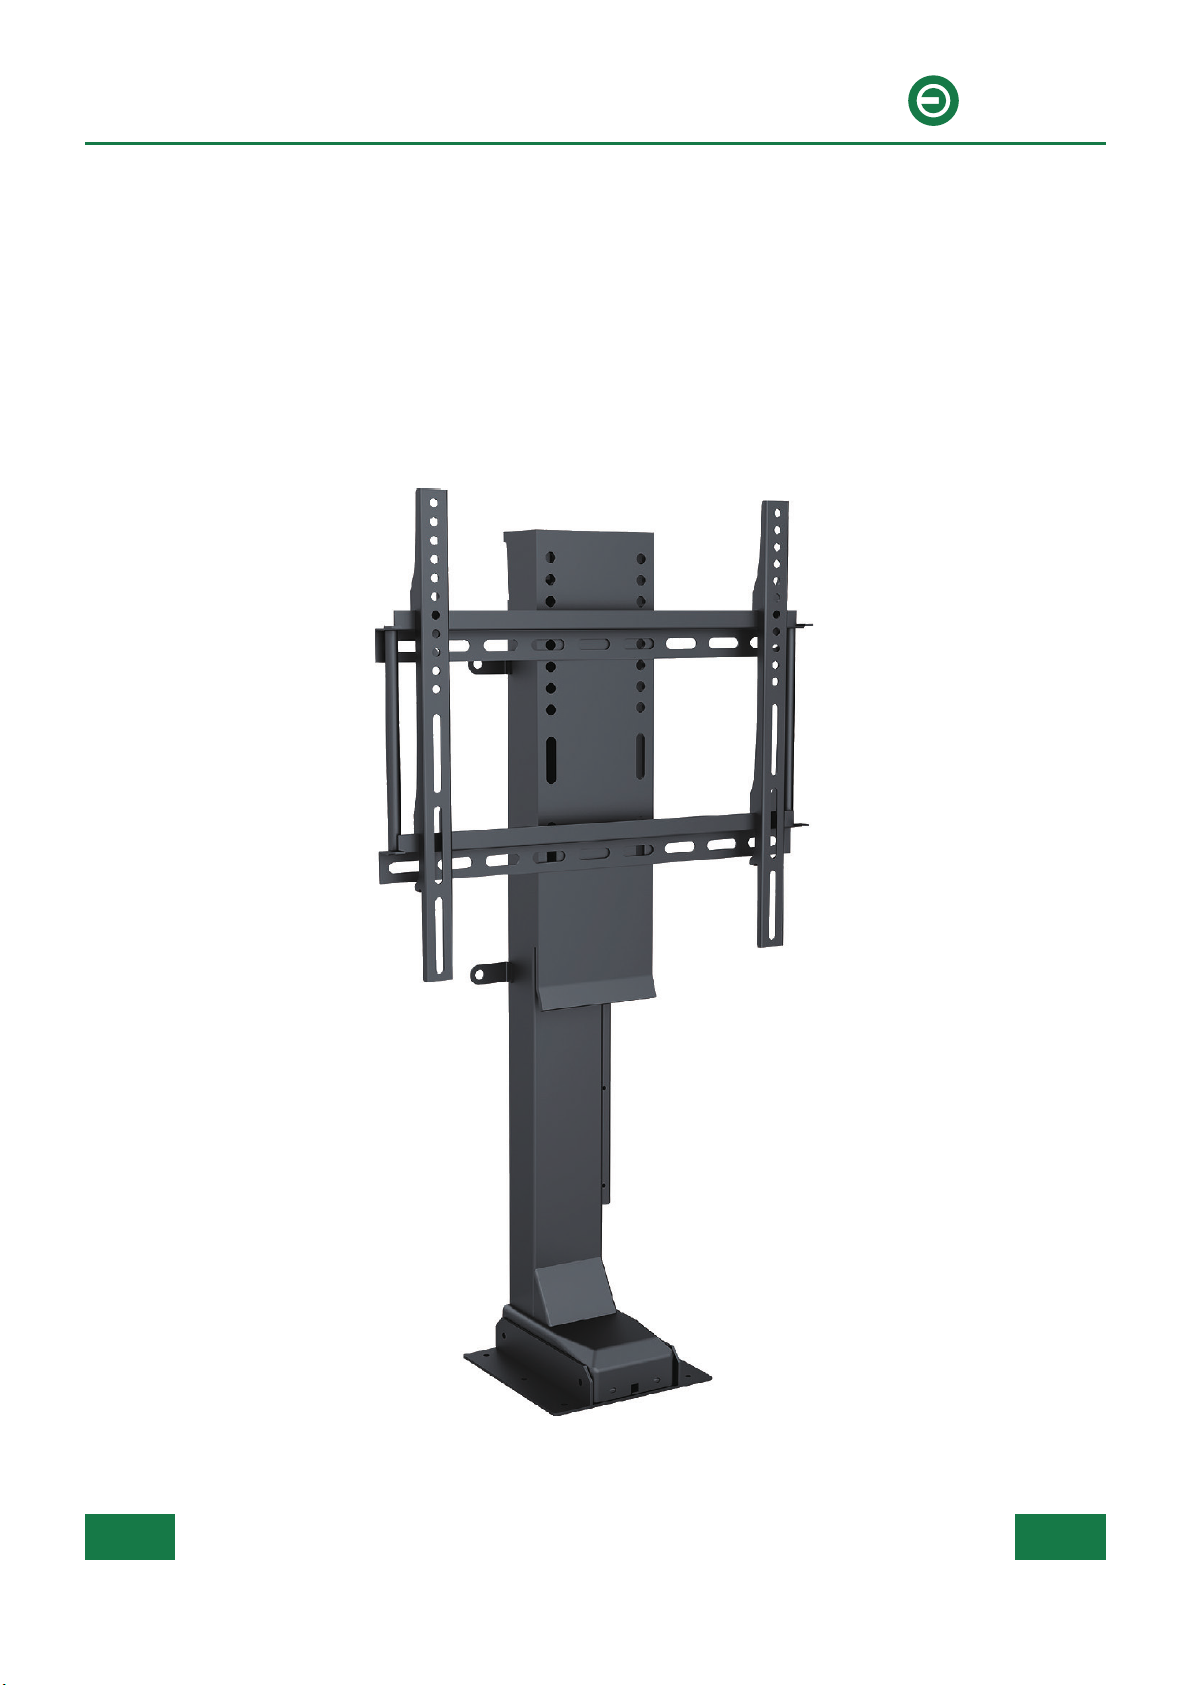
e-mo-lift
Electric height adjustable TV-lift

2/8
BMB
Art. 6256.065 e-mo-lift 650
Art. 6256.100 e-mo-lift 1000
IMPORTANT: Please read these instructions carefully. When selling the TV-lift make sure
that you provide your customer with these instructions.
WARNING / INFORMATION
USE / LIABILITY
The following safety instructions safeguard the user from accidents and help to prevent
damaging the TV-lift.
Keep the remote control away from children.
Keep children and pets away from the TV-lift.
Keep all electrical components away from liquids (including rain).
Do not put anything on top of the power adapter, power cord and control box.
Do not open any of the components. You be in danger of an electric shock.
When operating the TV-lift, make sure that all body parts and loose clothing stay clear
of the operating area of the TV-lift.
During the assembly or disassembly of the TV-lift the power must be disconnected at all times.
When put into a furniture make sure to avoid any clamping edge and pinching risk.
Please consider when doing so the guidelines of the Maschinenrichtlinie (CE-conformity)
and perform and establish a risk analysis.
It is not permitted to assemble or operate the TV-lift or the control box in areas with
extreme temperatures (e.g. heating units).
Pull the power plug immediately, in case of:
- a power cord or a power plug is damaged,
- liquids are spilled on the TV-lift or control box,
- the lifting column or the control box have come in contact with water (also rain),
- while doing repair, service or assembly work on the TV-lift.
This height adjustable TV-lift has an electrical motor and is designed exclusively fort he use within
a casing, cladding or similar inside of dry rooms. All other use is at your own risk.
The manufacturer/seller does not offer under any circumstance any warranty or accepts any liability
for damages caused by use or application not covered under this operating manual.
Please read the operating manual very carefully and keep it at a safe place.
Please be advised, that returns will only be accepted as long as shipped in the original packaging.

3/8
BMB
Art. 6256.065 e-mo-lift 650
Art. 6256.100 e-mo-lift 1000
Allen Key, No. 4
(Tools are not part of the kit)
Wrench, size 13
No. Component QTY.
1Lift column 1
2Bracket for TV holder 1
3Bracket for floor mounting 1
4a TV holder for e-mo-lift 650 1
4b TV holder for e-mo-lift 1000
5TV mounting strip 2
6Control box 1
7Cable operated pushbutton 1
8Remote control 1
No. Component QTY.
9Power cord 1
10 Connection cable 1
11 M8x16 Allen drive round head screw 4
12 M8 Lock nuts 4
13 Bracket to push the cover 1
14 Assembly and mounting material set 1
Content: A-B: dowels and screws for wall mounting;
C-F: various sizes of fasteners to attach different TV models
from different manufacturers; G-H: spacing discs rubber;
I-J: metal washers; K: leveler
TOOLS / CONTENT
5
9
8
Phillips screw driver
or power drill, Z1 to Z3
4a
4b
7
10 11
12
2
1
3
(batteries not included –
needs 2 AAA-batteries)
614
13

4/8
BMB
Art. 6256.065 e-mo-lift 650
Art. 6256.100 e-mo-lift 1000
Plug for the TV-lift
Plug for the power cord
Plug for the pushbutton
10
9
7
1. Remove the packaging and check all components for completeness according to list of content on
page 3. The TV-lift is delivered partially pre-assembled. Already mounted fasteners are not listed
again. Due to shipping reasons, one only has to attach the TV-holder.
Because of the size and then weight of the TV-lift, two people should do the assembly.
2. Check the operating functions of the TV-lift. Please proceed as follows:
- Place the TV-lift in an upright position.
- Connect the cable of the lift column with the connecting cable .
- Plug the connecting cable in the control box .
- Connect the control box with a power outlet. The control-LED shines green.
- Connect the pushbotton with the control box . Move the lift upward for a few centimeters
and then down again by pushing the „UP/DOWN“ buttons. The control-LED shines red.
3. Attach the TV-lift vertically to a floor board or a back plate using the 6 mounting holes at the sides
of the mounting plate or alternatively the 4 mounting flabs alongside the lift column .
Make sure that the lift column can be extended fully.
4. Make sure when assembling the TV-lift and the control box that there is enough room for the cables
so that they cannot get tangled up.
5. Plug the connecting cables , and into the control box .
6. Check the lift mechanism by extending the lift column all the way.
MONTAGE

5/8
BMB
Art. 6256.065 e-mo-lift 650
Art. 6256.100 e-mo-lift 1000
8. Attach the TV holder or. to the bracket .
Here for use 4 of the M8x16 round-head socket
screws and 4 of the self-locking nuts .
9. Slide the TV mounting strips with the pre-assembled TV-monitor onto the TV-holder
or and secure the mounting strips with the pre-assembled screws M5x50.
10. Extend the TV-lift to its highest position. Attach bracket .
11. Place the TV-monitor at the for you best position and move the TV-lift with the attached TV-monitor
all the way down. Make sure the TV-monitor can move freely and in case put inside a piece of furniture
fits all the way into the furniture.
12. Extend the TV-lift into its highest position once more and tighten all bolts and screws once more.
Make sure you attach the self-locking
nuts on the correct side of the bracket.
The correct side is on the outside.
USE
How to program the remote control
For you to use the remote control, you have to program it first.
Method 1: Press the and button on the
remote control and the „STUDY“ button
on the pushbotton simultaneously.
Method 2: Press the and button on the
remote control and the black button
on the side of the control box
simultaneously.
Push all button until the LED light of the remote control
flashes 3 times. Now the remote control is ready to be used.
on the side of the control box
7. Align then TV mounting strips with your TV and attach your TV centrally with the mounting strips.
Use the included mounting material and leveler .

6/8
BMB
Art. 6256.065 e-mo-lift 650
Art. 6256.100 e-mo-lift 1000
In case the TV-lift does not operate properly, make sure, that all cables are attached to the TV-lift and
disconnect the power plug for a few seconds. Plug the power back in and make certain, that the green
control lamp on the control box is on. Maybe a RESET is necessary. If yes, please follow the instructions
as outlined in „OPERATING – How to reset“.
• In case none of the buttons work when pushed, please perform a RESET.
• In case the motor acts unusual, please perform a RESET. In case the problem remains,
please contact your seller.
• Should the lifting column move constantly for more than 3 minutes, a safety mechanism is activated.
The system is put out of order, the buttons no longer work. As soon as the system changes to safety
mode, the red light of the pushbutton flashes every 3 seconds. After about 16 minutes the system
should be back fully operational.
TROUBLE SHOOTING
You can operate the TV-lift by using the remote control or the pushbutton.
The pushbutton supersedes the remote control.
You can operate the TV-lift by pushing and on the remote control
or by pushing „UP/DOWN“ on the pushbutton.
• constantly, until the desired position is reached (constant-touch-mode)
•
once, until the desired position is reached, then again to stop the TV-lift in that position
(one-touch-mode).
The pushbutton and the remote control are set in the one-touch-mode when first delivered.
IMPORTANT: Before you use the TV-lift it is important to perform a reset.
How to reset the TV-lift:
DPush the reset button on the pushbutton for 5 seconds. The red light on the pushbutton
flashes once, indicating the RESET-mode.
Then, let go of the button. After that, push the button once again until the lift column reaches
the bottom, moves up about 7mm and stops. Once the red light turns off, the reset has been
completed.
• The flash pattern during a reset (flashes every 0,5 seconds) differs from the flash pattern
during working mode (flashes every 3 seconds).
• While resetting, the constant-touch mode is activated.
• During the reset, only the RESET-button of the pushbutton is functional.
• In case the lift column was moving when initiating a RESET, the movement will be stopped.
• A RESET must be completed for the system to be fully operational again.
OPERATING

7/8
BMB
Art. 6256.065 e-mo-lift 650
Art. 6256.100 e-mo-lift 1000
PROGRAMMING
Constant-touch-mode: Constantly pushing the up/down button moves the lifting
column up or down respectively. Releasing or pushing any other button of the system
stops the movement. The movement also stops when the max extension/move
back position is reached.
One-touch-mode: The lifting column moves up or down when the „UP/DOWN“
button is pressed once. When pressed again, the movement will stop.
Switching from constant-touch to one-touch:
Pressing the „COM" button on the remote control for 10 seconds will switch
from constant-touch to one-touch and vice versa. When power is interrupted,
the set mode is retained.
This product was designed for you to have the most position options when selecting the highest or
lowest position of the lifting column. In case you do not want to utilize these, please change the settings
using the pushbutton.
To pre-select the highest position:
Starting at the lowest position push the „UP“ and the „RESET“ button simultaneously.
After 3 seconds the red LED will illuminate. The lifting column moves up slowly. Once the lifting column
has reached the desired height, release the buttons. The highest position is then set.
To pre-select the lowest position:
Starting at the highest position push the „DOWN“ and the „RESET“ button simultaneously.
After 3 seconds the red LED will illuminate. The lifting column moves down slowly. Once the lifting
column has reached the desired height, release the buttons. The lowest position is then set.
• The programmed settings for the highest and lowest position remain in place,
even after a power outage.
• The programmed settings for the highest and lowest position remain in place,
even after a RESET.
HOW TO SELECT A LIMIT FOR THE HIGHEST/LOWEST POSITION
TECHNICAL SPECIFICATIONS
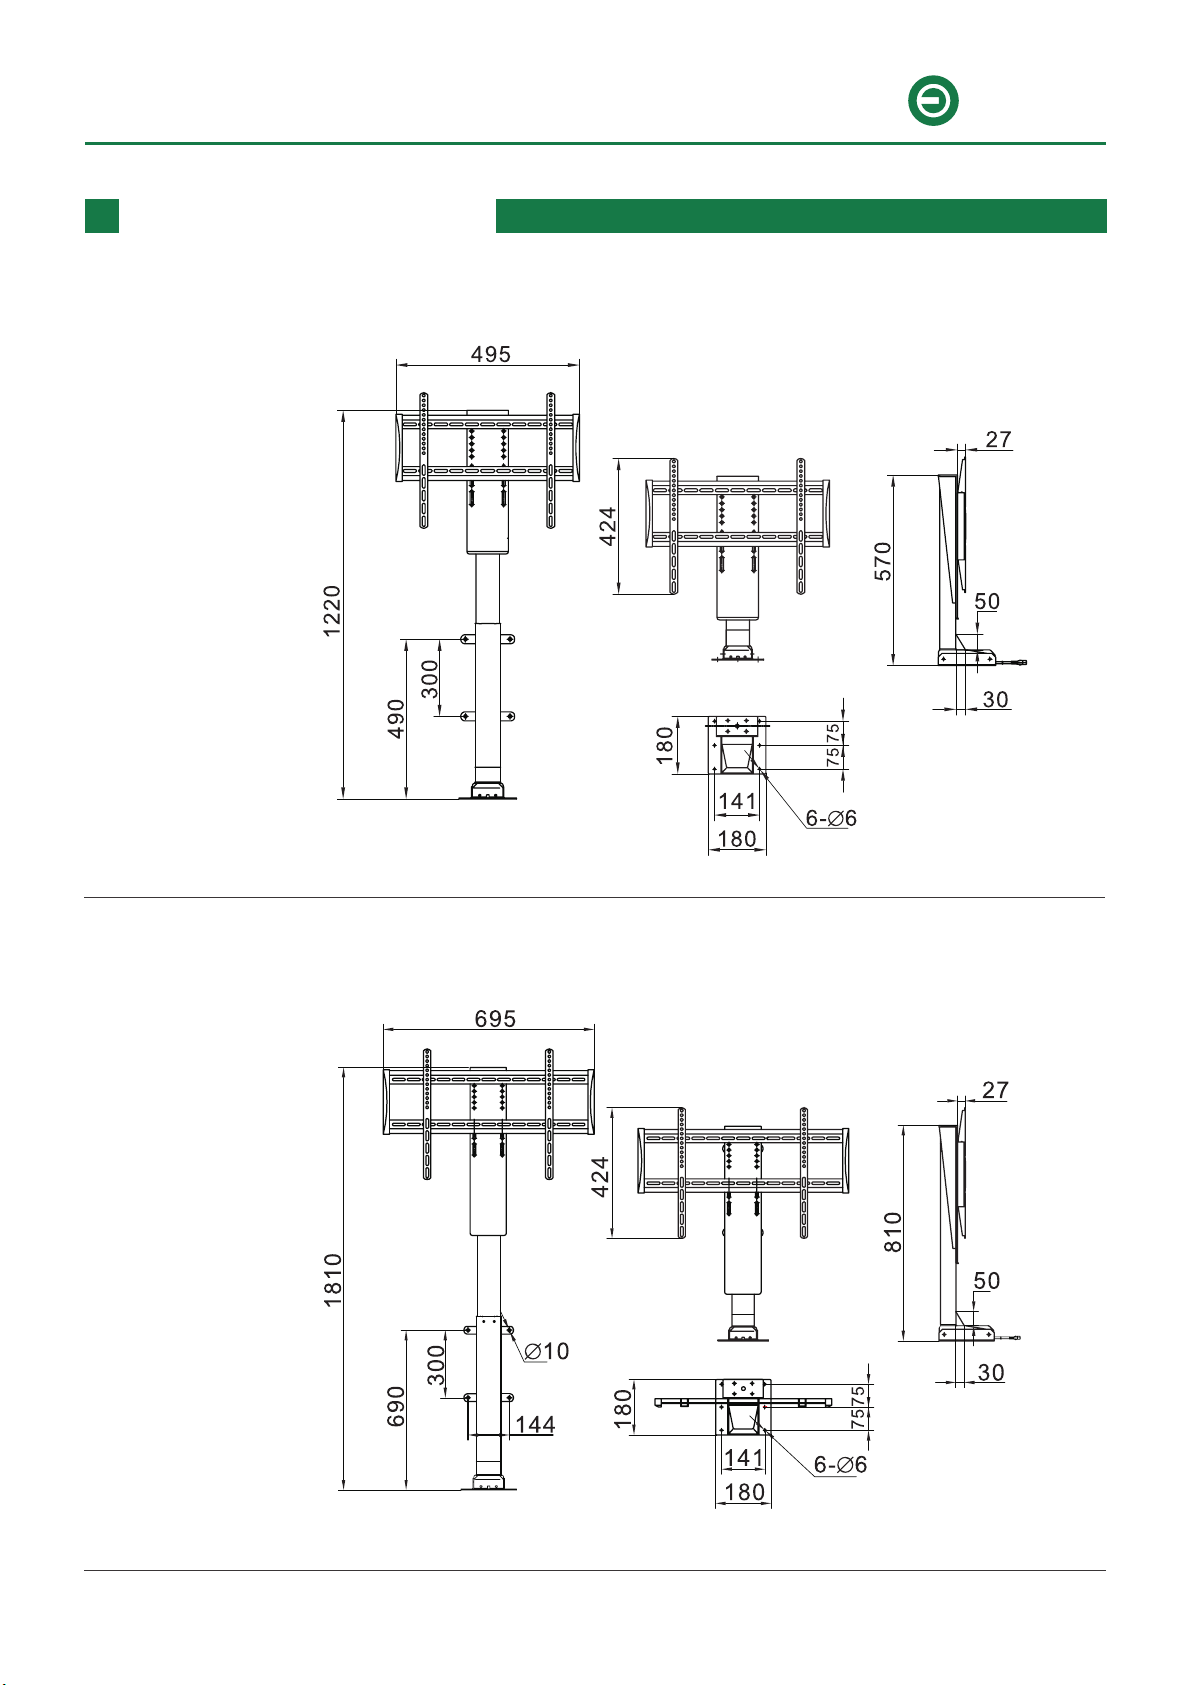
Stroke e-mo-lift 650: 650 mm / retracted 570 mm, fully extended 1.220 mm
Stroke e-mo-lift 1000: 1000 mm / retracted 810 mm, fully extended 1.810 mm
Stroke speed: 30 mm/s load-free
Duty cycle: 10 % (approx. 6 min/h or 3 min continuous) under full load
Max load capacity: 60 kg
Overload protection: 8.5 A
Voltage: 110 V / 230 V
Remote control: 2,4 GHZ
VESA: e-mo-lift 650: 400x400 mm / e-mo-lift 1000: 600x400 mm
8/8
BMB
Art. 6256.065 e-mo-lift 650
Art. 6256.100 e-mo-lift 1000
BMB Beschläge GmbH • www.bmb-beschlaege.de • Reserve technical changes • As of 07/2019-VOT
DIMENSIONAL DRAWINGS
Art. 6256.065
e-mo-lift 650
Dimensions not binding
Art. 6256.100
e-mo-lift 1000
Dimensions not binding
This manual suits for next models
4


