BN Products BNH-1145 User manual
Page | 1 BN Products-USA
www.bnproducts.com
BNH-1145-Operator-Manual.indd January 13, 2023
MODEL: BNH-1145
DEMOLITION HAMMER
OPERATOR MANUAL
Read this Operator Manual carefully
before operating this tool.
is Manual includes important Tool Safety warnings. Failure
to follow instructions may result in electrical shock, re and/or
serious personal injury. is power tool is intended for chiseling
work in concrete, brick, masonry and asphalt, as well as for driv-
ing and compacting, when using corresponding and respective
accessories. is tool should be used only for its prescribed
purpose. Any other use is deemed to be a case of misuse.
3450 N. SABIN BROWN ROAD • WICKENBURG, AZ 85390

Page | 2 BN Products-USA
www.bnproducts.com
DEMOLITION HAMMER OPERATOR MANUAL
ank you for choosing our BNH-1145 Demolition Hammer. is manual covers
the proper operation and maintenance. Before operating, please read this manual
carefully for important procedures and safety.
All technical data and drawings in this manual are consistent with manufacturing
information on this product. However, as a result of revisions and ongoing im-
provements, the contents of this manual may vary slightly from the actual product.
BN Products-USA, LLC. reserves the right to make revisions to the product and
this manual at any time, without notice.
e copyright of this instruction manual belongs to BN Products-USA, LLC. No
reproduction is allowed without the written consent of BN Products-USA, LLC.
All rights reserved.
is manual is a component of this tool
and should accompany the product if it is resold.
WORK AREA SAFETY
Keep work area clean and well lit. Cluttered or dark areas invite accidents. Do not
operate power tools in explosive environments, such as in the presence of amma-
ble liquids, gases, or dust. is tool may create sparks which may ignite the dust or
fumes.
Do not use the device in wet environment (rain, snow, or standing water). Keep
children and bystanders away while operating the machine.
ELECTRICAL SAFETY
Power tool plugs must match the outlet. Never modify the plug in any way. Do not
use any adapter plugs with grounded power tools. Modied plugs and matching
outlets will increase risk of electric shock.
Avoid bodily contact with grounded surfaces such as pipes, radiators, or similar
xtures. ere is an increased risk of electric shock.
Do not expose power tools to rain or wet conditions. Moisture entering a the motor
enclosure will increase the risk of electric shock.
Do not use a damaged power cord. Never use the cord for carrying or pulling the
power tool. Keep cord away from heat, oil, sharp edges or moving parts.
Use only extension cords designed for the power demand of this tool. Outdoor
extension cords should always be used.

Page | 3 BN Products-USA
www.bnproducts.com
PERSONAL SAFETY
Stay alert when operating a power tool. Do not use a power tool while you are tired
or under the inuence of drugs, alcohol or medication.
Avoid unintentional running of the tool. Ensure the switch is in the o-position
before connecting to power source, liing, or transporting the tool.
Remove any adjustment key or wrench before turning the power tool on. A wrench
or a key le attached to a moving part of the power tool may result in personal
injury.
Do not overreach. Keep proper footing and balance at all times. is enables better
control of the power tool in unexpected situations.
Dress properly. Do not wear loose clothing or jewelry. Keep your hair, clothing and
gloves away from moving parts. Loose clothes, jewelry or hair can be caught in
moving parts.
If devices are provided for the connection of dust extraction and collection facili-
ties, ensure these are connected and properly used. Use of these devices can reduce
dust related hazards.
Use personal protective equipment. Always wear eye protection. Protective equip-
ment such as dust mask, non-skid safety shoes, hard hat, or hearing protection used
for appropriate conditions will reduce personal injuries.
POWER TOOL USE AND CARE
Do not force the tool beyond its capabilities. Use the correct power tool for your
application. e correct power tool will do the job better and safer at the rate for
which it was designed.
Do not use the power tool if the switch does not turn it on and o. Any power tool
that cannot be controlled with the switch is dangerous and must be repaired.
Store power tools out of the reach of children and do not allow persons unfamiliar
with the tool or these instructions to operate the power tool. Power tools are dan-
gerous in the hands of untrained users.
Perform periodic maintenance for all tools. Check for misalignment or binding of
moving parts, breakage of parts and any other condition that may aect the power
tool’s operation. If damaged, have the power tool repaired before use.
Keep cutting tools sharp and clean. Properly maintained cutting tools with sharp
cutting edges are less likely to bind and are easier to control.

Page | 4 BN Products-USA
www.bnproducts.com
Use the power tool, accessories and chisels, etc., in accordance with these instruc-
tions, taking into account the working conditions and the work to be performed.
Use of the power tool for operations dierent from intended could result in a
hazardous situation.
SERVICE
Have your power tool serviced by a qualied repair person using only genuine
replacement parts. A parts guide is available for this tool at BNProducts.com.
Contact BN Products-USA™ Customer Service at (800) 992-3833 if you need assis-
tance from a qualied professional service department.
DEMOLITION HAMMER SAFETY
• Use both hands, one on each handle, at all times for proper stability and con-
trol of the demolition hammer.
• Wear a dust mask. Do not inhale particulate matter generated in demolition or
chiseling operations.
• Before beginning work, always check the working area to ensure that no con-
cealed electric cables or gas and water pipes are present.
• If the power cord is damaged, it must be replaced to avoid risk of electric
shock.
• Do not touch the chisel during or immediately aer operation. e contact
surfaces may become very hot during operation and could cause serious injury
or burns.
• Moderate operational time while using the Demolition Hammer to minimize
risks related to vibration of the tool. If you lack sensation due to vibration or
are fatigued, resume activity only aer rest.
• Only use SDS-Max chisels, which are designed for this tool.
• Ensure that this tool has come to a complete and operational stop before
touching the SDS-Max chuck, or attempting to change a chisel.
• A chisel must be rmly and correctly seated and secured in the SDS-Max
chuck before beginning operation of the Demolition Hammer.
VIBRATION SAFETY
• Constant exposure to vibration has been known to cause serious health prob-
lems such as back pain, carpal tunnel syndrome, and vascular disorders.
• Include vibration-free periods during the work day.
• Avoid excessive gripping of the tool. e demolition hammer should be
gripped as lightly as possible while still keeping full control.
• Do not “force” the tool with excessive force of your own. Let the tool do the
work!

Page | 5 BN Products-USA
www.bnproducts.com
• Wear suitable gloves to reduce vibration eects.
• Use the lowest impact rate setting that is eective for the job.
• Follow all safety and operational instructions in this manual.
SPECIFICATIONS & ACCESSORIES INCLUDED
Description 1500W Demolition Hammer
Power 120W / 60Hz
Impact Power 45Joules / 33.2 . pounds
Impact Rate 900-2100 BPM
Chuck / Bit Lock SDS Max
Unit Weight 24.3 lbs. (11 kg)
Accessories Included (1) protective Case
(1) Carbon Brush Kit
(1) Lubricant Grease Tube
(1) Ball Point Chisel (18 x 280mm)
(1) 22mm Flat Chisel (18 x 280mm)
(1) Auxiliary Handle
(1) Operator’s Manual
SETUP
Before using this tool, read the entire safety information section at the beginning of
this manual.
To prevent serious injury from accidental operation: Turn the Power Switch o,
and unplug the tool from any electrical outlet before making any adjustments to
this machine.
Page | 6 BN Products-USA
www.bnproducts.com
OPERATING INSTRUCTIONS
Use only accessories designed for this tool. Follow instructions that
accompany all accessories. ONLY use SDS Max chisels with the BNH-
1145 Demolition Hammer.
Use hearing protection and eye protection while operating this tool.
If any part is missing or damaged, do not use the demolition hammer;
contact BN Customer Service for assistance.
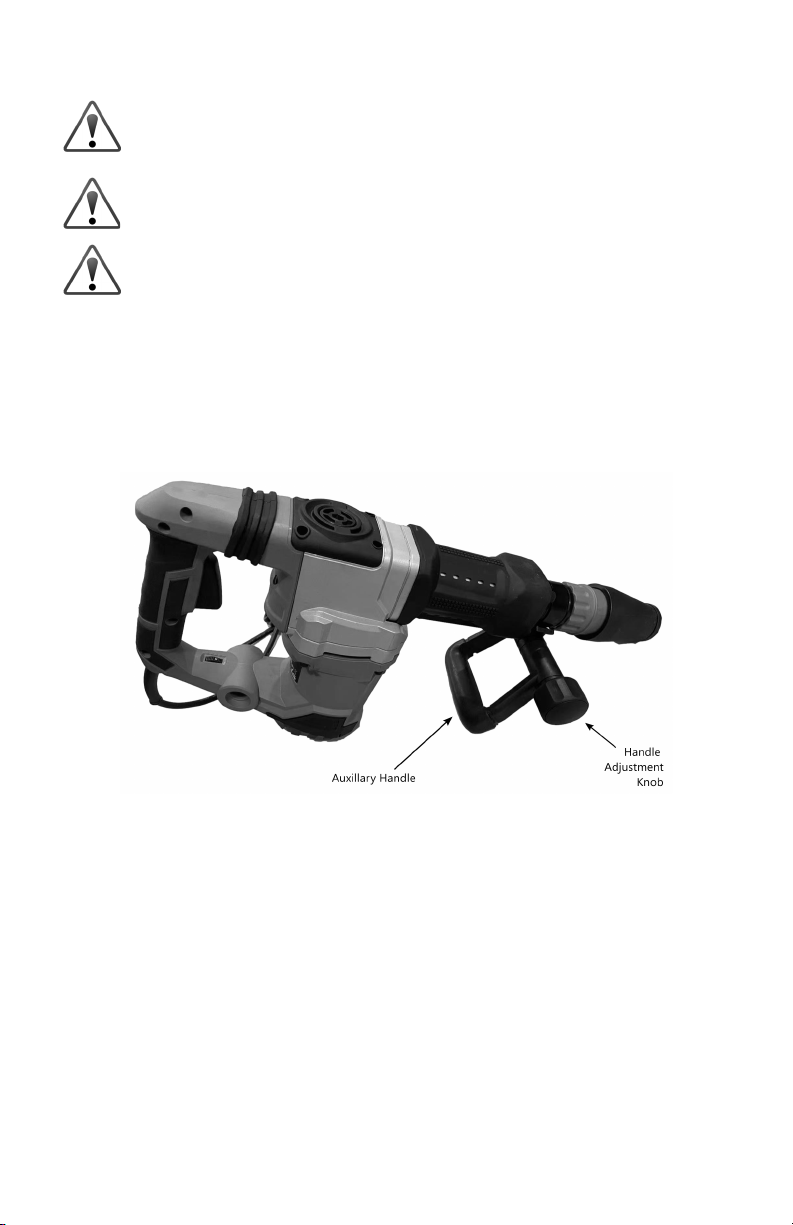
AUXILLARY (FRONT) HANDLE
e auxiliary handle may be adjusted into any position around the sha of the
demolition hammer. To adjust the auxiliary handle, turn the handle adjustment
knob counter-clockwise to loosen the handle. e handle may rotate around the
sha of the tool once it is loosened to the desired position. e adjustment knob
should be rmly tightened (clockwise) once the handle is set in its desired position.
SDS MAX Chuck: Chisel Installation & Removal
is demolition hammer is designed to use only Chisels intended for use with an
SDS Max chuck. e SDS Max chuck allows for accessories to be changed quickly
and securely.
Installation
If necessary, clean the mounting end of the chisel; a very light application of grease
my be used. Insert the bit into the SDS Max chuck housing while applying mod-
erate pressure, rotating counter-clockwise. At the same time, slide the front of the
chuck housing toward the main body of the tool. is will allow the bit to slide and
lock into place when the chuck is released.

www.bnproducts.com Page | 7 BN Products-USA
Slide the front of the chuck toward the body of the tool
to insert, lock, and release an SDS Max bit
Chisel Removal
To remove a chisel from the SDS MAX chuck, push back the chuck cover in the
direction of the main body of the tool. With the chuck pushed into the rear po-
sition, hold the chuck cover in place while sliding the chisel out of the SDS MAX
chuck.
CAUTION: e chisel may become hot during use. Wear protective gloves
when changing the chisel following use of this demolition hammer.
GENERAL OPERATING INSTRUCTIONS
Power Switch & Trigger Lock
Make sure that the trigger-style switch is in the OFF position, and that the trigger
lock is not engaged (which would lock the trigger in the ON position).
• e trigger-style switch starts the hammer;
depressing the lock button will lock the trigger
in the ON position.
• Releasing the trigger will stop the hammer; to
release, make sure that the lock button is extend-
ed outward. If the lock button is engaged in the
locked position, depress the trigger switch fully
to release the trigger lock.

Page | 8 BN Products-USA
www.bnproducts.com
SPEED ADJUSTMENT
Setting the Impact Rate
e machine is equipped with electronic speed control. You can preselect the
speed by adjusting the varaible speed dial (Figure 5):
Variable
Speed Setting
Impact Rate
(BPM)
1 900
2 1100
3 1350
4 1600
5 1800
6 2100
12-Point Rotating Head (with variable lock)
e BNH-1145 demolition hammer is equipped with a 12-point rotating head,
which allows a worker to set an optimal working angle for each application or use
of the tool.
Insert the chisel into the SDS MAX chuck. Pull the SDS MAX chuck backward to-
ward the main handle, and turn the chisel to the desired position using the rotating
head ring. Release the SDS MAX chuck, slighly rotating the chisel until it latches
into position to lock the chisel at the desired working angle.

Page | 9 BN Products-USA
www.bnproducts.com
MAINTENANCE AND INSPECTION
Inspecting the Tool
• Chisels must be in good condition and free of chips or damage. Chisels should
be sharp. Worn or dull bits will underperform and overwork the rotary
hammer motor. Replace dull chisels or damaged bits with new ones that are in
good condition.
• Inspect the tool to make sure that there are no loose parts and that all mount-
ing screws and fasteners are tight. Missing parts must always be replaced
immediately before using the tool.
• It is important to store the tool in a cool dry place when not in use. Always
keep the tool away from moisture and prevent water from entering the tool.
• Check for misalignment or binding of any moving parts when starting the tool
at each use.
• Inspect the power cord for cracks or cuts each time the tool is used.
• Ensure that the tool does not have any parts that are cracked or broken parts
prior to any use.
• Never use petroleum-based solvents, gasoline, paint thinners, or alcohol to
clean this tool. A clean damp rag is recommended.
• is tool is shipped pre-lubricated. Due to the airtight construction of the
tool, periodic lubrication is only necessary when replacing carbon brushes (see
following section, Replacing Carbon Brushes)
Carbon Brush Replacement
Carbon Brushes are subject
to wear over time. Brushes
should be inspected aer
every 100 hours of use. At
least 1/4” of the wearable
surface should remain for the
tool to perform optimally.
To inspect and replace
carbon brushes on the BNH-
1145 Demolition Hammer:
Disconnect power cord from
any connected outlet. Turn
the tool upside down.
e black fan cover at the base of the tool will need to be removed. Remove the
three (3) Phillips screws from the fan cover at the bottom of the tool.

Page | 10 BN Products-USA
www.bnproducts.com
e two brushes are secured with a spring clip (coil spring) on each side of the tool
(Figure 8). To remove, the clip should be moved using a small screwdriver. e
wire lead can be pulled away from the wire lead connector to free each of the two
carbon brushes.
Inspect the brushes to determine if they should be replaced.
To re-install the brushes or replace with a new set, the brush should be inserted
into the brush carrier subassembly, the lead wire connected, and the spring clip
(coil spring) should be repositioned to rmly hold the brush into place. e wire
lead must be reconnected to the wire lead connector.
ese steps must be repeated on the tool’s opposite side replace both carbon
brushes. One spare set of brushes are included with the tool. Contact BN Prod-
ucts-USA™ Customer Service at (800) 992-3833 if you require assistance in pur-
chasing additional replacement sets.

Page | 11 BN Products-USA
www.bnproducts.com
When the carbon brushes have been replaced, the gearbox should be lubricated.
Using the wrench included with the demolition hammer, remove the lubrication
port cap, (See page 7 of this manual).
Add lubricant to the gearbox using the lubricant provided with the tool, or use
white lithium or molybdenum grease whenever the carbon brushes are replaced.
NOTICES
is tool is subject to enhancement and ongoing development. Parts, part num-
bers, design, and specications may be changed on this product at any time,
without prior notication.
NOTES
__________________________________________________________________
__________________________________________________________________
__________________________________________________________________
__________________________________________________________________
__________________________________________________________________
__________________________________________________________________
__________________________________________________________________
__________________________________________________________________
__________________________________________________________________
__________________________________________________________________
__________________________________________________________________
__________________________________________________________________
__________________________________________________________________
__________________________________________________________________
__________________________________________________________________
__________________________________________________________________
__________________________________________________________________

Page | 12 BN Products-USA
www.bnproducts.com
BN Products-USA, LLC.
34560 North Sabin Brown Road
Wickenburg, AZ 85390
Customer Service: (800) 992-3833
Website: www.BNProducts.com
Table of contents
Popular Power Hammer manuals by other brands


Hitachi
Hitachi H 65SC Instruction manual and safety instructions

Hitachi
Hitachi H 65SB2 Handling instructions

socomec
socomec MDO 6000 TS Use & maintenance

Atlas Copco
Atlas Copco PB 6S Repair instructions

RODCRAFT
RODCRAFT RC5030 Operation manual

Pattfield Ergo Tools
Pattfield Ergo Tools PA-1700SH Translation of the original instructions


