socomec MDO 6000 TS Parts list manual

CATALOGUE
USE - MAINTENANCE
AND SPARE PARTS
Hydraulic Demolition Breaker
MDO 6000 TS
Before carrying out any operation with or on the machine, you must
read
carefully and understand each individual instruction written in this
manual
43014 Medesano (Parma) Italia - Strada Ferrari, 38
Phone +39 0525 - 420929 - Fax +39 0525 - 420375
http://www.socomecspa.com
E-mail: info@socomecspa.com
Nederland B.V.

!
!
This manual is reserved by law and it is formally forbidden to reproduce or to give to any third
part without explicit authorization by
SOCOMEC S.p.A.
The equipment can be modified so that some details can be different from those shown herein;
nevertheless this cannot be prejudicial for the texts of the following instructions.
The Instruction manual is an integral part of the machine so it must always accompany the
machine until its demolition.
For each demolition always refer to the instructions.
Follow all the instructions in this manual very carefully.
The operators with lack of knowledge of instructions must be prevented from using the
machine.
Instructions msu be kept complete and readable in accessible location for operators.
This manual is to be given to any other user or following owner of the equipment.
This equipment can’t be put in service if the carrier machine is not declared conform to the CE
no. 2006/42 directive.
MANUFACTURER
Socomec S.p.A.
Strada Ferrari, 38
43014 Medesano (PR) - Italy
Phone +39-0525-420929 Fax +39-0525-420375
Socomec S.p.A. is not responsible for any inconvenience, breaking, accident and so on, due
to lack of knowledge or to the non-observance of the information given by this manual service.
The same is valid for all those modifications, changes and/or installations of attachments not
previously authorized.
Nederland B.V.

Page
3
GENERAL WARNINGS
5
1
Avvertenze Generali
2
TECHNICAL FEATURES
8
Caratteristiche tecniche
3
TRANSPORT AND INSTALLATION
12
Trasporto e Installazione
4
USE OF THE HAMMER
14
Uso del Martello
5
CLEANING, MAINTENANCE AND CHECKS
19
Pulizia Manutenzione e Controlli
6
REGULATIONS AND GREASING SYSTEM
25
Regolazioni ed impianto ingrassaggio
7
COMPLETE HAMMER EXPLODED VIEW
29
Esploso martello completo
8
ACCUMULATOR AND INTERNAL GROUP EXPLODED VIEW
Esploso accumulatore e interno
9
SUPPORT AND BODY GROUP
33
Gruppo supporto e corpo
11
INTERNAL GROUP
36
Gruppo interno
14
ACCUMULATOR GROUP
38
Gruppo Accumulatore
31
13
DISTRIBUTOR GROUP
40
Gruppo distributore
12
BLOCK GROUP
42
Gruppo blocchetto
10
STROKE CHANGER
44
Variatore corsa
15
CASE
46
Carpenteria completa
of
50
Nederland B.V.

Page
4
GREASING SYSTEM
48
16
Impianto ingrassaggio
17
REQUEST OF SPARE PARTS
50
Richiesta parti di ricambio
of
50
Nederland B.V.

!
!
During the work, non
-
authorized people must not be allowed to stay in an area, which
operating range is less than 20 meters from the hammer. The people in charge of
the building site will prevent this from happening.
!
!
1 General warnings
1.1 Operator safety rules
While working the hammer vibrates: thus it is dangerous to touch it or leave any object on it.
The hammer must be started by the operator whose working position is in front of the control board of the
carrier.
The person in charge of the safety rules must give the operator all the instructions for the correct
use of the hammer. The operator must also know how the carrier works, enquire about its safety
measures and strictly obserre them.
The operator must be familiar with the technical characteristics of the hammer and especially with
pressures, oil flow rates, dimensions of the flexible hoses and connections.
Before using the hammer and according to the type of work, the operator must get the following
equipments: safety glasses, dust-mask, helmet, earmufes, etc.
Large and loose clothes, watches and other types of bracelets are dangerous,
The operator must not make use alcohol or drugs medicines which can produce sleepiness while
working.
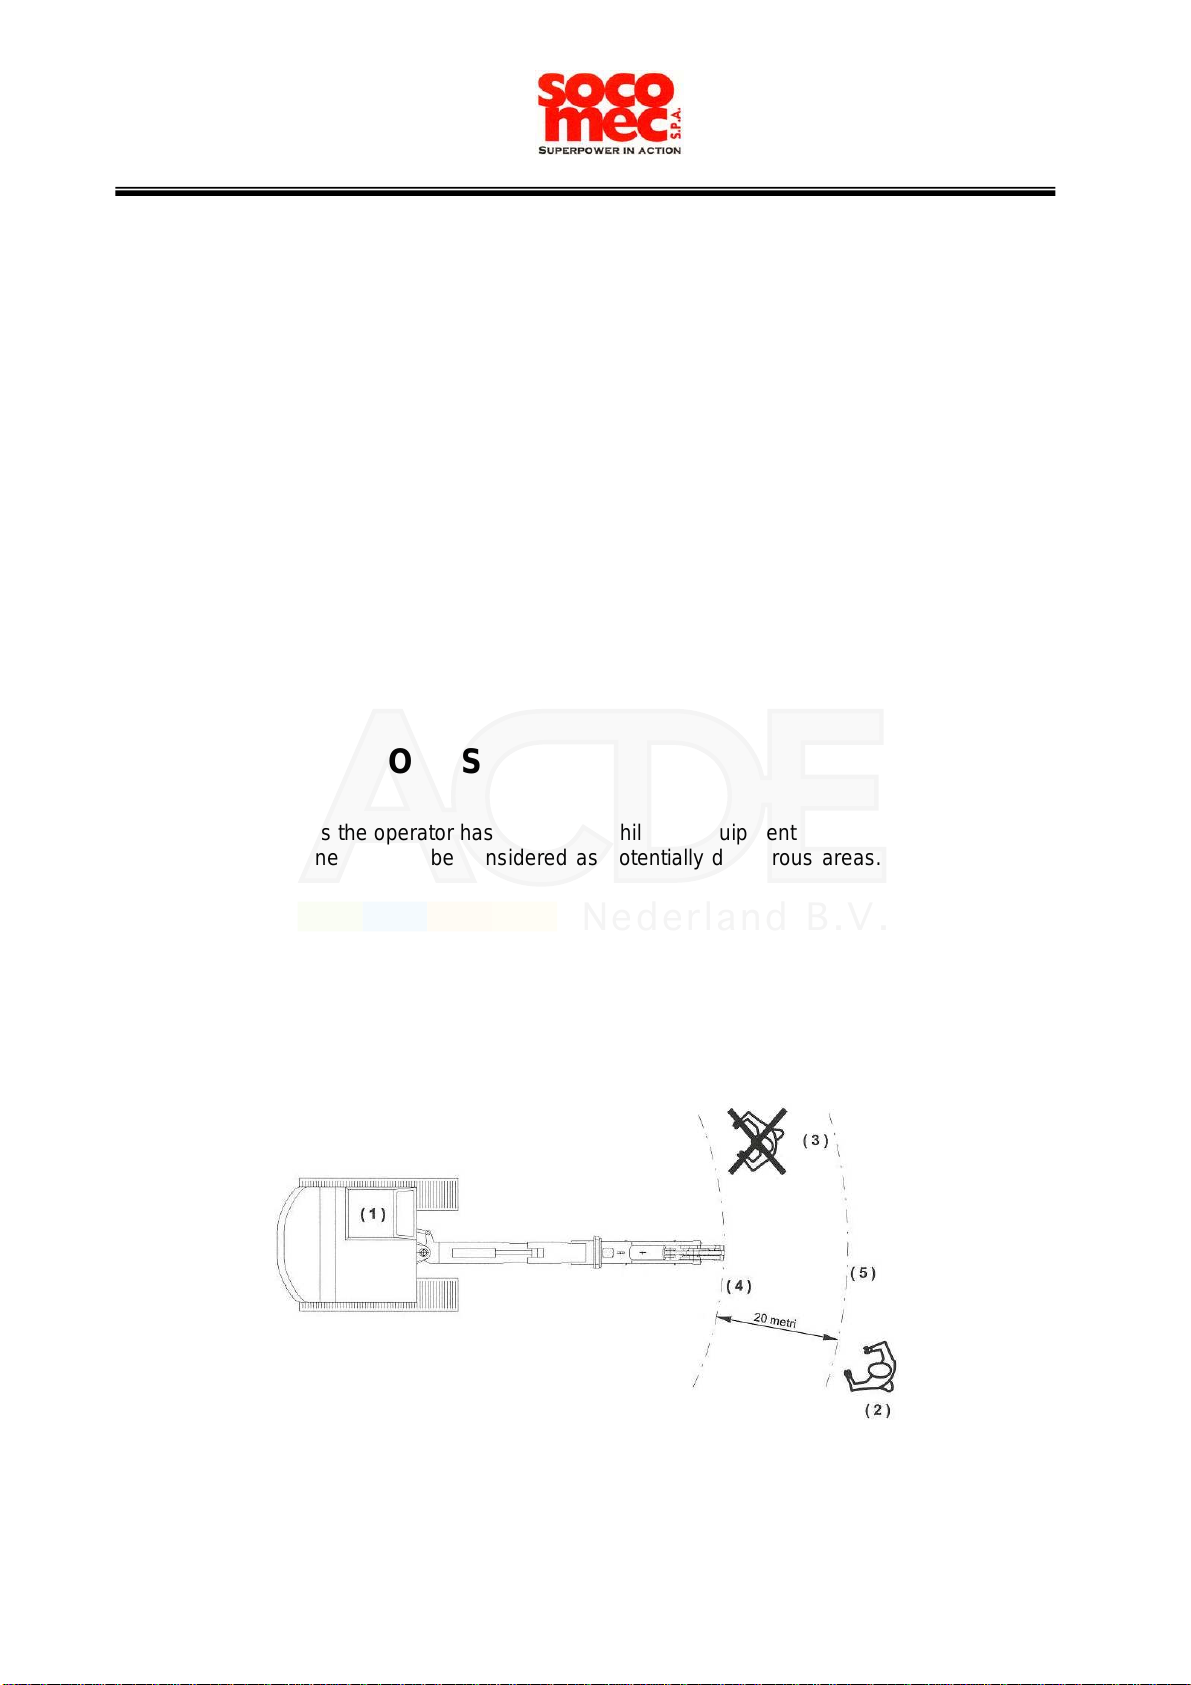
The working area must be indicated and illuminated.
The operator must follow the maintenance program proposed by the manufacturer and make sure
that the hammer is in good conditions.
After work, the temperature of the tool can be very high: so it is necessary to leave it to cool before
touching or in any case to protect hands with working gloves.
It is absolutely forbidden to temper with the safety devices and to eliminate or
modify the protections.
All actions representing a situation of potential danger for the operators are pointed out by
the sign reproduced aside.
All actions requiring a special attention are pointed out by the sign reproduced aside.
According to the CE regulation nr.
2006/42/CE
and subsequent bringing up to date we specify that
: by
“Operator” we mean the person or the people in charge of installing, operating, servicing,
cleaning, repairing and transporting the machine.
GENERAL WARNINGS
5
Page
of
50
1
Nederland B.V.

OPERATOR
The operator is to be a person that is suited to the work and physically and psychologically
able to withstand the demands connected with operating the equipment for its intended use.
The operator must not allow anyone to approach the machine while it is working, and must not
allow the use of external personnel. He is to follow the instructions given to obtain maximum
performance, minimum consumption, and maximum safety for himself and for others.
Especially in terms of safety, the operator is to scrupulously observe all the instructions given
in this manual.
OPERATOR’S POSITION
When the machine is running, the operator must pay particular attention to his own position to
prevent this being a source of danger to himself or those nearby. The area surrounding the
equipment is divided into two zones:
OPERATOR’S ZONES
These are the zones the operator has to work in, while the equipment is working normally.
The “operator’s zones” are to be considered as potentially dangerous areas. In these areas,
which are indicated in the drawing below, it is best for the safety of the operator and those
nearby to be very careful when the machine is working. It is extremely important that all the
accident prevention standards indicated are strictly applied.
DANGEROUS ZONES
These are the areas that only authorized people can approach while the machine is working.
Plan view of the operator’s position
1 = Control area
2 = Person in safety zone
3 = Person in danger zone
4 = Machine’s action radius
5 = Limit of safety zone
GENERAL WARNINGS
6
Page
of
50
1
Nederland B.V.

PERSONAL SAFETY EQUIPMENT
The operator involved in working with the equipment or in the surroundings of the equipment
must always be equipped with adequate Personal Safety Equipment, that is:
- Hardhat
- Leather working gloves
- Safety shoes
- Earmuffs (when necessary).
In using and handling the equipment bear in mind both the safety devices indicated above,
and all that has been described in greater detail in the GENERAL WARNINGS AND
RESIDUAL RISKS chapter.
In addition the user should affix the following pictograms on the equipment:
Do not repair or adjust while the engine is running.
Symbol Name
It is obligatory to use protective goggles.
It is obligatory to wear work clothing.
It is obligatory to protect your hearing.
It is obligatory to wear protective gloves.
It is obligatory to wear protective shoes.
It is obligatory to wear a hard hat.
GENERAL WARNINGS
7
Page
of
50
1
Nederland B.V.

SOCOMEC
43014 Medesano – Strada Ferrari, 38
PARMA ITALY
CE
2 Technical Features
2.1 Use
The hammer has been projected and manufactured for all types of demolitions, on any kind of
material, to drive poles, to cut and break asphalt surfaces.
The manufacture is in accordance with the European Directive 2006/42/ E and with the
Noise Directive 2000/14/ E.
Socomec S.p.A. warrants that its machines are manufactured according to the regulation
quoted up-above and puts the marking CE” on them.
SERIAL NUMBER
MODEL
YEAR OF MANUFA TURE
TECHNICAL FEATURES
8
Page
of
50
2
Nederland B.V.

2.2 Technical features MDO 6000 TS
Technical features unit of
measurement Value
Energy per stroke J 12000
Maximum Frequency s/min 400 - 550
Maximum oil flow l/min 400
Maximum working pressure bar 160
Maximum exhaust back pressure bar 10
Accumulator charging pressure bar 35
Calibration pressure of the hydraulic system maximum valve bar 220
Hammer weight in working conditions Kg 6000
Tool weight Kg 335
Pin retainer tool weight Kg 24
Pressure line pipe diameter (EN 856 - 4SP) G 1” ¼
Return line pipe diameter (EN 853 - 2SN) G 1” ½
Tool diameter mm 192
Hammer height with tool without adapting plate mm 3352
Maximum length of the tool inner guide (L) mm 772
Maximum diameter in front and back the tool bushings mm 203
Maximum oil temperature in the tank °C 80
Maximum absorbed power Kw 105
Excavator weight t 60 - 90
TECHNICAL FEATURES
9
Page
of
50
2
Nederland B.V.

Dimensions
Size
mm
A 3852
B 2591
C 761
D 895
E 980
2.2.1 Tightening values:
omponent denomination Unit of
measurement Value
Tensioning bolt nut Nm
1
3
00
+ nut rotation 60° - 65°
Accumulator cover screw Nm 1300
Accumulator screw Nm 1300
Articulation plug Nm 300
Variator screw Nm 140
Block Screw Nm 250
2.3 Optimal environmental working conditions:
DENOMINATION Unit of
Measurement
VALUE
(between)
Temperature °C [ -5 ; +45 ]
Humidity % [ 40 ; 90 ]
2.4 Overall dimensions
MDO 6000 TS
TECHNICAL FEATURES
10
Page
of
50
2
Nederland B.V.

!
2.5 The accumulator
MDO 6000 ACCUMULATOR SCREWS
V.L. = Long Screws
BLO K SIDE
It’s necessary to unscrew the long screws in order to remove the
accumulator from the monoblock.
You will find here below the accumulator details with the long screws to be
unscrewed highlighted.
TECHNICAL FEATURES
11
Page
of
50
2
Nederland B.V.

!
!
3 Transportation and installation
The personnel in charge of freighting and installing the machine must
be acquainted with the following instructions.
Pay careful attention to the weight of the hammer.
3.1 Freight
Always move with care: each inappropriate movement can be very
dangerous.
Do not pass or stop under the hammer when it is lifted up.
3.2 Hammer Hoses connection
Connect pressure line hose to the entry side IN
Connect returne line hose to the exit side OUT
Check in the technical specification
paragraph, the total weight of the hammer,
including the adapting plate and the tool
already mounted.
In order to move the hammer safely, when
it is not coupled to the excavator, it is
necessary to have a suitable and safe
lifting system (as showed in the picture on
the right).
Always use means of transport and lifting
that are suitable to the weight of the
hammer.
TRANSPORT AND INSTALLATION
12
Page
of
50
3
Nederland B.V.

!
!
3.3 Coupling on and uncoupling from the excavator
3.3.1. Coupling
1) Place the hammer horizontally with its axe parallel to the excavator boom on the ground in
a stable position.
2) Remove the clamps holding the bucket and take the bucket away.
- Stop the hydraulic system of the excavator.
- Take the caps out of the system and in case they have no taps, collect the hydraulic oil in a
container, then fix the hoses connecting the hammer to the system (see scheme “Hammer
hoses connection” par. 3.2) and open the oil taps if present.
- Stock away the caps of the flexible hoses, which will be used again during the next
uncoupling of the hammer.
3.3.2. Uncoupling
-Place the hammer horizontally on the ground in a safe area.
- Stall the hydraulic system of the excavator.
- Close the hoses' flow if possible.
- Disconnect the hoses and close up the ends of the flexible hoses in order to prevent oil
leaking and dirt intake.
- Remove the connecting rod pin.
- Remove the boom pin.
- After unblocking the hydraulic system, take the excavator boom out of the adapting plate.
Insert the boom end in the middle of the
handles of the adapting plate.
- Line up the hole of the excavator boom
with the equivalent one on the adapting
plate, insert the first pin and fix its
clamps.
- Then line up the hole of the connecting
rod with the second hole on the adapting
plate, insert the second pin and fix well
its clamp.
TRANSPORT AND INSTALLATION
13
Page
of
50
3
Nederland B.V.

!
!
!
4 Use of the hammer
The operator must follow the manufacturer’s instructions.
It is forbidden to use the hammer without the retainer pin for the tool.
Do not use tools which are not authorised by the manufacturer.
The hammer must be in an open area so that, when it begins to hit, the tool is with no doubt
pressed against the surface of the material.
Engine speed
During the inspection of the hammer, the installer determinates the exact number of revs of
the excavator engine to which corresponds the appropriate oil flow rate for the hammer.
It is absolutely necessary that the operator sticks this limit.
Working with a higher or lower number of revs can cause serious damages to the
hammer.
4.1 Instruction for use
The hammer can work in all the positions allowed by the joints of the excavator boom, as
long as it is always pressed perpendicularly against the surface of the material to be
demolished.
The operator must release the correct load pressure on the hydraulic pipe line to the
hammer: if it is too low, it retains a part of the energy which will be released to the excavator
boom that will eventually undergo dangerous vibrations and shakings.
If it is too powerful instead, it can endanger the structure of the hammer, of the metal plate
and the tool.
The correct position must be kept during the whole phase of feed of the
tool, operating on the controls of the bucket and the forearm.
USE OF THE HAMMER
14
Page
of
50
4
Nederland B.V.

The hammer cannot work into the water if its level exceeds the tool stroke (see picture
down under), unless it is specifically made for this purpose.
In case of doubt contact the manufacturer.
Moreover, while the hammer is
working, we advice to shorten the
distance between excavator and
hammer as much as possible and to
remove the cylinder piston rods only
partially (C-D strokes never completely
out).
Make sure that the tool does not slip
from the surface (see picture). If the
tool is place wrongly or holds weakly
on the material, the dangerous blank
firing can occur.
Yes
Yes
No
No
D
C
YES NO
USE OF THE HAMMER
15
Page
of
50
4
Nederland B.V.

4.2 Operations to be avoided
NO
If you insist on the same spot for a long time, the drill can swell up, the tool can seize
and the oil can become overheated.
Avoid that the hammer delivers blank firings. They
cause early weariness and chippings to the retainer
pin for tool and to the tool itself, which scraps can
provoke serious damages. Moreover, due to these
blank firings, the tool will break very soon.
The tool cannot be used as a lever to move rocks or
debris: this operation can cause the seizing or
breaking of the tool, mainly if it is carried out while the
hammer is working.
Do not remove big rocks with the help of the hammer
frame: some parts can unweld and the plate can
warp.
Do not hammer on the same spot for more than thirty
seconds. In case of a very hard surface, it is
necessary to change position very often until you find
a softer ground.
Never forget to pre-heat the oil before beginning
to work: particularly in case of low outdoor
temperatures, it is a good practice to operate the
translation control and those of the central piston
of the excavator boom to the end of the stroke,
until the oil reaches a temperature of 25-30°C.
NO
NO
USE OF THE HAMMER
16
Page
of
50
4
Nederland B.V.

!
!
!
4.3 Replacement of the tool
Coupling of a new tool
Fit the tool end (the one having the retainer flat/flats) into the guide, manually.
Two operators can be necessary if the weight is more than 30 kgs (check the weight
into the technical specifications).
Then push from the other side and fit the tool completely into the guide. Rotate it so that its
milled side sets parallel to the pin guide. Insert the retainer pin for tool.
Before replacing the tool, it is necessary to wear gloves because it overheats
during the use.
Place the hammer vertically, touching
the ground and lift it of a few
centimetres so that the boom of the
excavator supports the weight of the
hammer, but with the tool still touching
the ground.
Get off the excavator, after blocking the hydraulic system.
Check the weight of the pin in the technical
specifications.
Catch on the prominent part with your gloves
and place the pin on the ground.
Get on the excavator again and unblock the
hydraulic system.
Lift the hammer vertically until the damaged
tool slips off.
Place the hammer horizontally on the ground
and the tool lined up before it.
Grease well the part that must get into the
guide.
D
D
A
A
C
C
B
B
With a lever, press the retaining pin (A)
towards the right side to unlock the tool
retainer.
Remove the tool retainer (B).
With a lever, press the retaining pin (C)
towards the left side to unlock the tool
retainer.
Remove the tool retainer (D).
USE OF THE HAMMER
17
Page
of
50
4
Nederland B.V.

4.4 Types of tools, usage and lifetime
Tools differentiate on the basis of the different shapes of their terminal parts. There are various
types of tools capable of meeting the requirements of every kind of work.
Flat terminal tool (ref. A)
It is suitable for stoke crushing.
Normally used on small and medium hammers.
Pyramidal terminal tool (ref. C)
The use is similar to the one described up-above. To be mounted on small hammers.
Cone-shaped terminal tool (ref. D)
Suitable for the demolition of walls and non-reinforced concrete structures, for stones and
quite soft materials. To be mounted on the whole range of hammers.
Small spade terminal tool (ref. E) or asphalt-cutter tool (ref. F)
Suitable for tracing the lines marking the limits of the diggings. To be mounted only on small
and medium hammers.
Chisel terminal tool (ref. B)
Used for mining in general. It is
essential in demolitions where a high
cutting capacity is required: for
example walls, floors and reinforced
concrete buildings, fixed section,
diggings and excavations in stone.
Not suitable for stone crushing.
It covers 80% of the applications on
small and big hammers.
A B C D E F
USE OF THE HAMMER
18
Page
of
50
4
Nederland B.V.

!
5 Cleaning, maintenance and checks
5.1 Cleaning
The hammer does not require particular care. The only precaution to take consists in preventing
the dirt from entering through the hose connections, which must be rigorously plugged before any
operation of assembly or disassembly.
5.2 Maintenance and daily checks
The machine needs some important maintenance, in order to work correctly and for a long time.
Greasing
The greasing operation, if done manually, must be performed every 2 hours in order to provide a
suitable quantity of grease. In case the hammer is supplied with an automatic greasing pump, it is
necessary to pay attention to the level of the grease inside the cartridge which must be replaced
before it is empty. If the hammer is connected to the excavator general greasing system, it is
necessary to pay attention to the level of the grease inside the tank.
Remember to use a type of grease, which must be:
- resistant to high loads.
- water resistant, anti-rust, anti-corrosive.
Have:
- NLGI-2 penetration
- Dripping point = 200-220 C°
- Temperature of use until t=170-180 C°
It is recommended to use possibly only Socomec grease for a longer life of the
parts.
Other checks to be made on the hammer
- Make sure that there are no oil leakages along the tool sank.
- Make sure that no cracks are evident on the frame or on the linking bracket.
5.3 Checks to be made on the hydraulic system
Temperature of the hydraulic oil in the tank
Make sure that the temperature, during the work, does not exceed 80°C.
Higher temperature can cause an irregular working condition and also the stopping of the hammer.
Level of the hydraulic oil in the tank
It is absolutely necessary to pay attention to the hydraulic oil level of the excavator tank. In case it
is under the lowest limit, the hammer can vibrate or work irregularly.
It is important to check the rigid and flexible hoses in order to find out eventual damages, crushing
or oil leaking.
Never operate on the hammer or on the hydraulic system, when they are under
pressure or at high temperatures.
It is always essential to remove the connecting hoses between the hammer and the
excavator.
CLEANING, MAINTENANCE AND CHECKS
19
Page
of
50
5
Nederland B.V.

B
5
6
5
6
5.4 Weekly maintenance
Check on the loosening of the hammer bolts.
It is advisable to check, at regular intervals possible loosening of the bolts and particularly:
-The screws fixing the head/bracket.
-The screws fixing the flanges/pipe joints.
5.5 Machine stop
a) Take down the tool in order to determinate possible
chippings or cracks in the bush and on the surfaces of
the pin for tool.
These marks are proof of insufficient lubrication, use of
unsuitable oil or improper use of the hammer.
With the help of a sanding disk, polish the trimmings that can
be seen on the surface between the tool and the retainer pin
for tool (see points B in the picture).
b) Check the wear of the retainer pin for tool; in the case of
excessive wear, invert the assembly or change it.
c) Check the wear of the tool bushings; if the inside diameter
is bigger than the value indicated in the technical
specifications, contact the technical assistance for the
replacement of the bushes.
Stop at the end of a work with a hot hammer
During the night, drive the hammer vertically into the ground,
so that the condensed water can easily be emptied through
the prominent part of the piston, thus avoiding oxidation.
Long term stop
When the hammer is disconnected from the excavator boom
and is left at a standstill for a long time, it is necessary to:
Remove the tool, push the piston (with a tube) as higher as
possible, grease abundantly and re-install the tool.
This operation prevents the piston terminal from rusting.
Keep the hammer in a close place sheltered from bad
weather.
CLEANING, MAINTENANCE AND CHECKS
20
Page
of
50
5
Nederland B.V.
Table of contents