Body Break 16117902 User manual

Elliptical
OWNER`S
MANUAL
Model No.
16117902
Body Break
Elliptical
Trainer
Assembly
Operation
Exercise
Parts
Warranty
Retain for Future reference
CAUTION: You must read and understand this owner’s manual before operating unit.

Customer Service 1-888-707-1880
1
Manufacture’s One-Year Limited Warranty
Your Body Break Elliptical trainer is warranted for one year from the date of purchase against
defects in material when used for the purpose intended, under normal conditions and
provided it receives proper care. Any part found defective or missing will be sent at no cost
when returned in accordance with the terms of this warranty.
This warranty is not transferable and is extended only to the original owner.
The warranty shall not apply to exercise units which are (1) used for commercial or other
income producing purposes, or (2) subject to misuse, neglect, accident or unauthorized
repair and alterations.
This warranty provided herein is lieu of all other express warranties, any implied warranties,
including any implied warranties of merchantability of fitness for particular purpose, are
limited in duration to the first 12 months from date of purchase. All other obligations or
liabilities, including liability for consequential damages are hereby excluded.
REPAIR PARTS AND SERVICE
All of the parts for the elliptical shown in figure can be ordered from Maurice Pincoffs Canada
Inc. 6050 DON MURIE STREET, NIAGARA FALLS, ONTARIO L2E 6X8. When ordering
parts, the parts will be sent and billed at the current prices. Prices may be subject to change
without notice. Check or money order must accompany all orders. Standard hardware items
are available at your local hardware store.
To ensure prompt and correct handling of any errors, or to answer any questions, please call
our Toll Free number: 1-888-707-1880, or local number 1-905-353-8955 or fax 1-905-353-
from 8:30 AM to 5:00 PM Monday to Friday Eastern Standard Time.
Always include the following information when ordering parts
Model number
Name of each part
Part number of each part
TABLE OF CONTENTS
WARRANTY 1 MONITOR INSTRUCTIONS 13-17
SAFETY PRECAUTIONS 2 HOW THE ELLIPTICAL WORKS 18
PRE-ASSEMBLY CHECK LIST 3 TROUBLE SHOOTING 19
HARDWARE PACKING LIST 4 TRAINING GUIDELINES 20-22
ASSEMBLY INSTRUCTION 5-7 STRETCHING 23-24
DIAGRAM & PARTS LIST 8-12

Customer Service 1-888-707-1880
2
SAFETY PRECAUTIONS
Thank you for purchasing our product. Even though we go to great efforts to ensure the
quality of each product we produce, occasional errors and/or omissions do occur. In any
event should you find this product to have either a defective or a missing part please contact
us for a replacement.
This product has been designed for home use only. Product liability and guarantee conditions
will not be applicable to products being subjected to professional use or products being used in
a gym centre.
This exercise equipment was designed and built for optimum safety. However, certain
precautions apply whenever you operate a piece of exercise equipment. Be sure to read the
entire manual before assembly and operation of this machine. Also, please note the following
safety precautions:
1. Read the OWNER’S OPERATING MANUAL and all accompanying literature and
follow it carefully before using your elliptical.
2. If dizziness, nausea, chest pains, or any other abnormal symptoms are experienced
while using this equipment, STOP the workout at once. CONSULT A PHYSICIAN
IMMEDIATELY.
3. Inspect your exercise equipment prior to exercising to ensure that all nuts and bolts are
fully tightened before each use.
4. The elliptical must be regularly checked for signs of wear and damage. Any part found
defective, the part must be replaced with new spare part from the manufacturer.
5. Fitness equipment must always be installed on a flat surface, do not place the unit on
a loose rug or uneven surface. It is recommended to use an equipment mat to prevent
the unit from moving while it is being used, which could possibly scratch or damage
the surface of your floor.
6. No changes must be made which might compromise the safety of the equipment.
7. It is recommended to have a minimum of 2’ safe clearance around the exercise
equipment while in use.
8. Keep children and pets away from this equipment at all times while exercising.
9. Warm up 5 to 10 minutes before each workout and cool down 5 to 10 minutes
afterward.
This allows your heart rate to gradually increase and decrease and will help prevent
you from straining muscles.
10. Never hold your breath while exercising. Breathing should remain at a normal rate in
conjunction with the level of exercise being performed
11. Always wear suitable clothing and footwear while exercising. Do not wear loose fitting
clothing that could become entangled with the moving parts of your elliptical.
12. Care must be taken when lifting or moving the equipment, so as not to injure your back.
Always use proper lifting techniques
13. User weight should not exceed 270 lbs.
▲WARNING: Before beginning any exercise program consult your physician. This is
especially important for individuals over the age of 35 or persons with pre-existing
health problems. Read all instructions before using any fitness equipment. We
assume no responsibility from personal injury or property damage sustained by or
through the use of this product.
SAVE THESE INSTRUCTIONS

Customer Service 1-888-707-1880
3
PRE-ASSEMBLY CHECK LIST
PART NO. DESCRIPTION Q’TY
1 Main frame 1
9 Pedal tube L&R 1/1
10 Pedal L&R 1/1
31 Upright 1
30 bottom handlebar L&R 1/1
42 Stationary handlebar 1
2 Rear stabilizer 1
4 Front stabilizer 1
44/78 Monitor w/audio cable 1/1
41 Top handlebar L&R 1/1
Inner Box 1
Manual 1

Customer Service 1-888-707-1880
4
HARDWARE PACKING LIST
Part
NO Description Q’ty Drawings
6 Carriage Bolt M10*55 4
7 Washer Φ10*Φ22 6
8 Domed nut M10 4
11 Lock knob 4
12 Hex head bolt M8 x 45 4
13 Hinge bolt L/R 1/1
14 Wave washer 2
15 Flat Washer 2
16 Nylon Lock nut L/R 1/1
17 PVC cap 6
21 Hex head bolt M10*78 2
22 Spacer 2
23 Nylon Lock nut M10 2
28 Allen screw M8*16 6
29 Curve washer Φ8*Φ20 6
32 Hex head bolt M10*20 2
33 Spring washer Φ10 2
34 Flat washer Φ10*Φ32 2
35 D type washer 2
39 Allen screw M6*12 4
40 Carriage bolt M8*20 4
79 Allen wrench S13,17 2
80 Allen key L6 1
81 Allen key L4 1
82 Allen key L8 1

Customer Service 1-888-707-1880
5
ASSEMBLY INSTRUCTION
This manual is designed to help you easily assemble, adjust and use this machine. Please read this
manual carefully. For the sake of familiarizing yourself with the parts identified in the instruction, first
study the overview drawing.
Set all parts in a clear area on the floor and remove the packing material. Refer to the parts list for
help to identify the parts.
It will take two people to assemble your unit.
STEP 1
Attach the front stabilizer (4) to the main frame (1) securing with two carriage bolts (6), two washers
(7), and two domed nuts (8).
Attach the rear stabilizer (2) to the main frame (1) securing with two carriage bolts (6), two washers
(7), and two domed nuts (8).
STEP 2
Connect the extension sensor wire (47) from the upright (31) to the bottom sensor wire (49).
Insert the upright (31) into the main frame (1). Secure using four allen screws (28) and four curve
washers (29).

Customer Service 1-888-707-1880
6
STEP 3
Attach the left bottom handlebar (30L) to the left side axle of the upright (31). Secure using D
type washer (35), one flat washer (34), one spring washer (33), one hex head bolt (32).
Attach the PVC cap (17) onto the hex head bolt (32).
Repeat for the right bottom handlebar (30R).
Attach the left top handlebar (41L) to the left bottom handlebar (30L). Secure using two
carriage bolts (40) and two allen screw(39). Repeat for the right top handlebar (41R).
STEP 4
Attach the left pedal tube (9L) to the left bottom handlebar (30L). Slide the spacer (22) into
the left pedal tube and the left bottom handlebar. Secure using one hex head bolt (21), one
washer (7), one nylon lock nut (27) and two PVC caps (17).Repeat for the right side.
Attach the left pedal tube (9L) to the left crank arm (25L). Secure using the left hinge bolt
(13L), one wave washer (14), one flat washer (15) and one nylon lock nut (16L).
Repeat for the right side.
Attach the left pedal (10L) to the left pedal tube (9L). Secure in your desired position using
two hex head bolts (12) and two lock knobs (11). Repeat for the right side.

Customer Service 1-888-707-1880
7
STEP 5
Attach the stationary handlebar (42) to the back of the upright (31). Secure using two allen screws
(28) and two curve washers (29).
Attach the water bottle bracket (18) to the upright (31). Secure using two self-tapping screws (20).
Insert the hand pulse wires (26) through the insert cap for handpulse wire (70) and slide up through
the opening of the upright (31).
Connect the extension sensor wire (47) to the back of the monitor (44).
Connect the handpulse wire (26) to the back of the monitor (44).
Attach the monitor (44) to the bracket of the upright (31). Secure using two screws (43).
To listen to an MP3 during your workout, connect the audio wire (78) to the MP3 and the wire at the
back of the monitor (44).
STEP 6
Plug adapter into adapter jack.
NOW FIRMLY TIGHTEN ALL NUTS AND BOLTS
YOUR UNIT IS NOW FULLY ASSEMBLED
Your elliptical is equipped with adjustable end caps. If the unit is wobbly, please turn the
adjusting knob on the levelling caps on the rear stabilizer to level the unit.

Customer Service 1-888-707-1880
8
PART LIST
KEY NO. PART DESCRIPTION QTY
1 1790201 Main frame 1
2 1790202 Rear stabilizer 1
3L 1790203L Leveling end cap Left 1
3R 1790203R Leveling end cap Right 1
4 1790204 Front stabilizer 1
5L 1790205L Transportation wheel Left 1
5R 1790205R Transportation wheel Right 1
6 1790206 Carriage bolt M10x 55 4
7 1790207 Washer φ10 x φ22 6
8 1790208 Doomed nut M10 4
9L 1790209L Pedal tube Left 1
9R 1790209R Pedal tube Right 1
10L 1790210L Pedal Left 1
10R 1790210R Pedal Right 1
11 1790211 Lock knob 4
12 1790212 Hex head bolt M8 x 45 4
13L 1790213L Hinge bolt Left 1
13R 1790213R Hinge bolt Right 1
14 1790214 Wave washer 2
15 1790215 Flat washer 2
16L 1790216L Nylon Lock nut left 1
16R 1790216R Nylon Lock nut Right 1
17 1790217 PVC cap 6
18 1790218 Water bottle bracket 1
19 1790219 End cap of stationary handlebar 2
20 1790220 Self-tapping screw ST5 x 15 2
21 1790221 Hex head bolt M10 x 78 2
22 1790222 Spacer 2
23L 1790223L Chain cover Left 1
23R 1790223R Chain cover Right 1
24 1790224 Self-tapping screw ST5 x 15 4
25L 1790225L Crank Left 1
25R 1790225R Crank Right 1
26 1790226 Hand pulse wire 2
27 1790227 Nylon lock nut M10 2
28 1790228 Allen screw M8 x 16 6
29 1790229 Curve washer φ8x φ20 6

Customer Service 1-888-707-1880
9
NO. PART NO. DESCRIPTION QTY
30L 1790230L Bottom handlebar Left 1
30R 1790230R Bottom handlebar Right 1
31 1790231 Upright 1
32 1790232 Hex head bolt M10 x 20 2
33 1790233 Spring washer φ10 2
34 1790234 Flat washer φ10 x φ32 2
35 1790235 D type washer 2
36 1790236 Spring 1
37 1790237 Nut M6 2
38 1790238 Hex head bolt M6 x 25 1
39 1790239 Allen screw M6 x 12 4
40 1790240 Carriage bolt M8 x 20 4
41L 1790241L Top handlebar Left 1
41R 1790241R Top handlebar Right 1
42 1790242 Stationary handlebar 1
43 1790243 Screw M5 x10 2
44 1790244 Monitor 1
45 1790245 Bushing 4
46 1790246 Bushing 4
47 1790247 Extension sensor wire 1
48 1790248 Motor 1
49 1790249 Bottom sensor wire 1
50 1790250 Sensor bracket 1
51 1790251 Magnetic assembly 1
52 1790252 Nylon nut M8 2
53 1790253 Washer φ8 x φ17 2
54 1790254 Plastic spacer 2
55 1790255 Allen screw M8 x 55 1
56 1790256 Pulley 1
57 1790257 Belt 1
58 1790258 Flywheel 1
59 1790259 France nut 4
60 1790260 Idler assembly 1
61 1790261 Allen screw M8 x 20 1
62 1790262 Powder bushing 1
63 1790263 Allen screw M8 x 45 1
64 1790264 Nut M8 1

Customer Service 1-888-707-1880
10
NO. PART NO. DESCRIPTION QTY
65 1790265 Self-tapping screw ST5 x 15 9
66 1790266 Lower sensor wire 2 1
67 1790267 Power wire 1
68 1790268 Crank cover 2
69 1790269 Plastic spacer 2
70 1790270 End cap for wire 2
72 1790272 Self-tapping screw ST4 x 15 2
73 1790273 Washer φ4 x φ12 2
74 1790274 Hand pulse sensor 2
75 1790275 Bushing 4
76 1790276 Motor Wire 1
77 1790277 Adapter 1
78 1790278 Audio Wire 1
79 1790279 Allen wrench S13,17 2
80 1790280 Allen key L6 1
81 1790281 Allen key L4 1
82 1790282 Allen key L8 1
Customer Service 1-888-707-1880
11
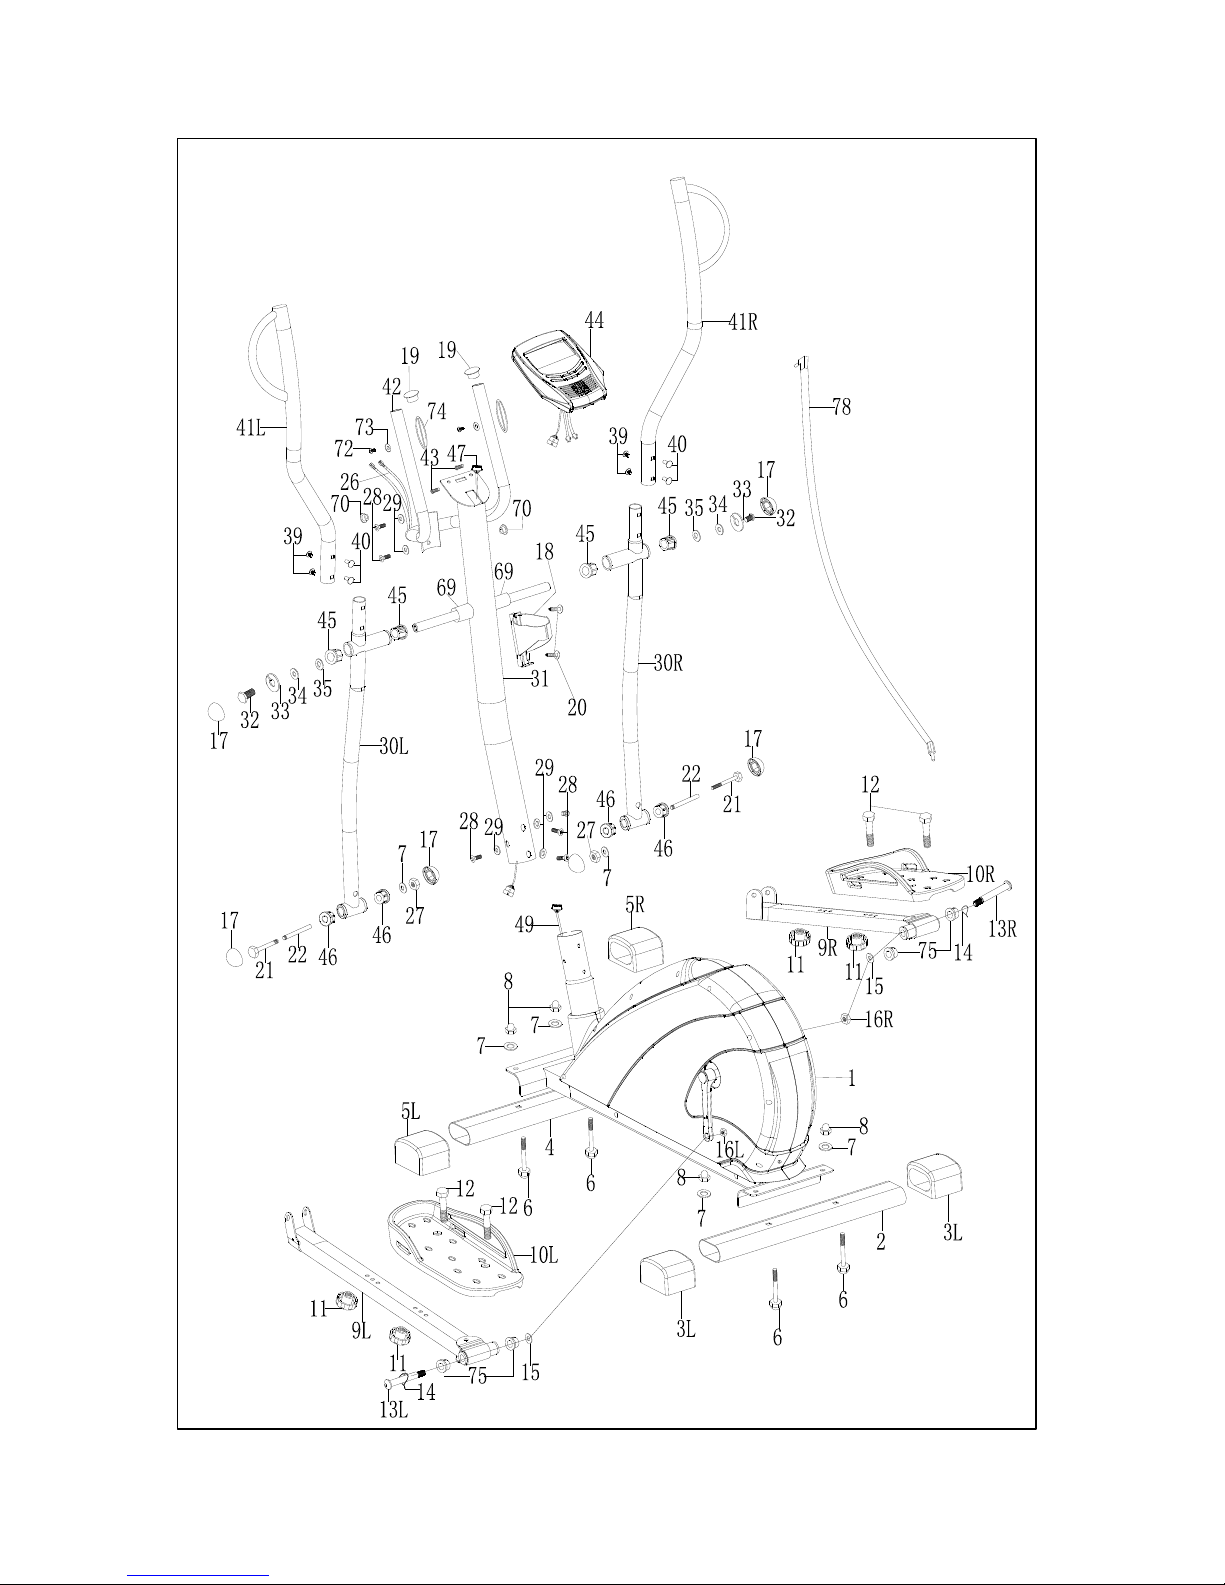
DIAGRAM
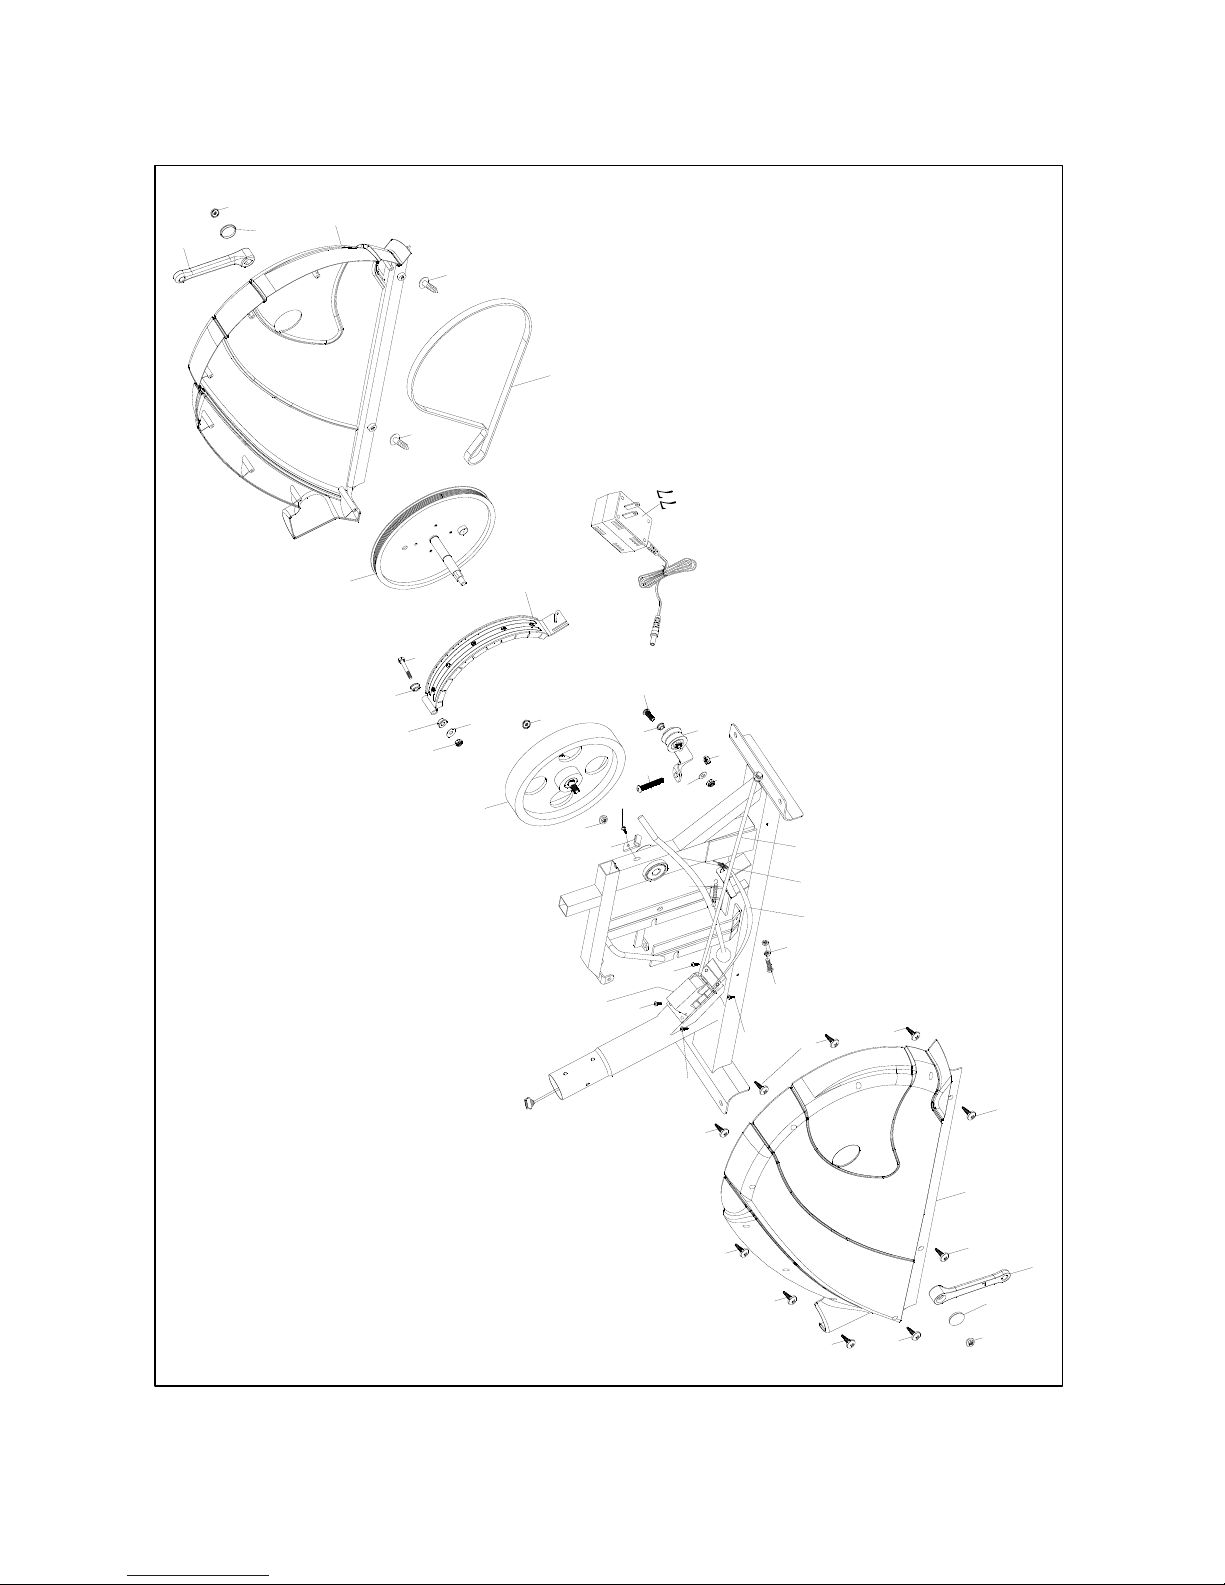
Customer Service 1-888-707-1880
12
76
68
68
67
66
48
65
65
65
65
23R
23L
59
59
65
65
65
65
65
65
65
65
25R
25L
24
24
24
24
38
37
36
50
52
53
64
636261
60
59
59
58
57
56
55
54
54
53
52
51

Customer Service 1-888-707-1880
13
MONITOR INSTRUCTIONS
A. Input Power
Plug in the adaptor to the equipment then the computer will produce a beep sound and turn on the
computer at the Manual mode.
B. Program select and setting value
1. Use the UP or DOWN keys to select program mode and then press ENTER to confirm your exercise mode.
2. At the Manual mode, the computer will use the UP or DOWN keys to set up your exercise TIME,
DISTANCE, CALORIES, PULSE.
3. Press the START/STOP key to start exercise.
4. When you reach the target, the computer will produce beep sounds and then stop.
5. If you set up more than one target and you would like to reach next target, press START/STOP key to keep
on exercise.
C. Wake-Up Function
The monitor will enter SLEEP mode (LCD off) when there is no signal input and no key be pressed after 4
minutes. Press the screen to start the monitor.
D. Your monitor is equipped with a speaker.
Plug the audio cable (included with the monitor) into the back of the monitor and into an MP3 player. You
need to turn the speaker on. The switch is found on the back of the monitor.
Functions and Features:
1. TIME: Displays your elapsed workout time in minutes and seconds. Your computer will
automatically count up from 0:00 to 99:59 in one second intervals. You can also
program your computer to count down from a set value by using the UP and DOWN
keys. If you continue exercising once the time has reached 0:00, the computer will
begin beeping, and reset itself to the original time set, letting you know your workout is
done.
2. DISTANCE: Displays the accumulative distance traveled during each workout up to a maximum of
99.9KM/MILE.
3. RPM: Displays your pedal cadence.
4. WATT: Displays the amount of mechanical power the computer is receiving from your exercise.
5. SPEED: Displays your workout speed value in KM/MILE per hour.
6. CALORIES: Your computer will estimate the cumulative calories burned at any given time during
your workout.
7. PULSE: Your computer displays your pulse rate in beats per minute during your workout.
8. AGE: Your computer is age-programmable from 10 to 99 years. If you do not set an age, this
function will always default to age 35.
9. TARGET HEART RATE (TARGET PULSE): The heart rate you should maintain is called your Target Heart
Rate in beats per minute.
10. PULSE RECOVERY: During the START stage, leave the hands holding on grips then press “PULSE
RECOVERY” key, time starts counting from 00:60 - 00:59 - - to 00:00. As soon as 00:00
is reached, the computer will show your heart rate recovery status with the grade F1.0
to F6.0.
1.0 means OUTSTANDING
1.0<F<2.0 means EXCELLENT
2.0≦F≦2.9 means GOOD
3.0≦F≦3.9 means FAIR
4.0≦F≦5.9 means BELOW AVERAGE
6.0 means POOR
Note: If no pulse signal input then the computer will show “P” on the PULSE window. If the computer shows
“ERR” on the message window, please re-press the PULSE RECOVERY key and please make sure
your hands are on the handpulse grips.
11. TEMPERATURE: Displays the current temperature.

Customer Service 1-888-707-1880
14
Key Functions:
1. START/STOP key: a. Quick Start function: Allows you to start the computer without selecting a program.
Manual workout only. Time automatically begins to count up from zero
b. During the exercise mode, press the key to STOP exercise.
c. During the stop mode, press the key to START exercise.
2. UP key: a. Press the key to increase the resistance during exercise mode.
b. During the setting mode, press the key to increase the value of Time,
Distance,Calories, Age and select Gender and Program.
3. DOWN key: a. Press the key to decrease the resistance during exercise mode.
b. During the setting mode, press the key to decrease the value of Time, Distance,
Calories, Age and select Gender and Program.
4. ENTER key: a. During the setting mode, press the key to accept the current data entry.
b. At the stop mode, by holding this key for over two seconds the user can reset all
values to zero or default value.
c. During setting the Clock, press this key can accept the setting hour and setting
minute.
5. BODY FAT key: Press the key to input your HEIGHT, WEIGHT, GENDER and AGE then to
measure your body fat ratio,
6. PULSE RECOVERY key: Press the key to activate heart rate recovery function.
Program Introduction & Operation:
Manual Program: Manual
P1 is a manual program. User can start exercise by pressing START/STOP key. The default resistance level is
5. Users may exercise in any desirous of resistance level (Adjusting by UP/DOWN keys during the workout)
with a period of time or a number of calories or a certain distance.
Operations: 1. Use UP/DOWN keys to select the MANUAL (P1) program.
2. Press the ENTER key to enter MANUAL program.
3. The TIME will flash and you can press UP or DOWN keys to set your exercise TIME. Press
ENTER key to confirm your desired TIME.
4. The DISTANCE will flash and you can press UP or DOWN keys to set your target DISTANCE.
Press ENTER key to confirm your desired DISTANCE.
5. The CALORIES will flash and you can press UP or DOWN keys to set your exercise
CALORIES. Press ENTER key to confirm your desired CALORIES.
6. The PULSE will flash and then you can press UP or DOWN keys to set your exercise PULSE.
Press ENTER key to confirm your desired Pulse.
7. Press the START/STOP key to begin exercise.
Preset Program: Steps, Hill, Rolling, Valley, Fat Burn, Ramp, Mountain, Intervals, Random, Plateau,
Fartlek, Precipice Program
PROGRAM 2 to PROGRAM 13 is the preset programs. Users can exercise with different level of tension in
different intervals as the profiles show. You can adjust the tension by using the UP/DOWN keys during the
workout for a period of time or a number of calories burned or a certain distance travelled.
Operations: 1. Use UP/DOWN keys to select one of the above programs from P2 to P13.
2. Press the ENTER key to enter your workout program.
3. The TIME will flash and you can press UP or DOWN keys to set your exercise TIME. Press
ENTER key to confirm your desired TIME.
4. The DISTANCE will flash and you can press UP or DOWN keys to set your target DISTANCE.
Press ENTER key to confirm your desired DISTANCE.
5 The CALORIES will flash and you can press UP or DOWN keys to set your exercise CALORIES.
Press ENTER key to confirm your desired CALORIES.
6. The PULSE will flash and then you can press UP or DOWN keys to set your exercise PULSE.
Press ENTER key to confirm your desired Pulse.
7 Press the START/STOP key to begin exercise.
User Setting Program: User 1, User 2, User 3, User 4
Program 14 to 17 is the user setting program. Users are free to create the values in the order of TIME,
DISTANCE, CALORIES and the resistance level in 10 columns. The values and profiles will be stored in the

Customer Service 1-888-707-1880
15
memory after setup. Users may also change the ongoing loading in each column by UP/DOWN keys, and they
will not change the resistance level stored in the memory.
Operations: 1. Use UP/DOWN keys to select the USER program from P14 to P17.
2. Press the ENTER key to enter your workout program.
3. The column 1 will flash, and then use the UP/DOWN keys to create your personal exercise
profile. Press ENTER to confirm your first column of exercise profile. The default level is load
1.
4. The column 2 will flash, and then use the UP/DOWN keys to create your personal exercise
profile. Press ENTER to confirm your second column of exercise profile.
5. Follow the above description 5 and 6 to finish your personal exercise profiles. Press ENTER
to confirm your desired exercise profile.
6. The TIME will flash and you can press UP or DOWN keys to se your exercise TIME. Press
ENTER key to confirm your desired TIME.
7. The DISTANCE will flash and you can press UP or DOWN keys to set your target
DISTANCE. Press ENTER key to confirm your desired DISTANCE.
8. The CALORIES will flash and you can press UP or DOWN keys to set your exercise
CALORIES. Press ENTER key to confirm your desired CALORIES.
9. The PULSE will flash and then you can press UP or DOWN keys to set your exercise
PULSE. Press ENTER key to confirm your desired Pulse.
10. Press the START/STOP key to begin exercise.
Heart Rate Control Program: 55% H.R.C., 65% H.R.C., 75% H.R.C., 85% H.R.C., Target H.R.C.
Program 18 to Program 22 is the Heart Rate Control Programs and Program 22 is the Target Heart Rate
Control program.
Program 18 is the 55% Max H.R.C. - - Target H.R. = (220 – AGE) x 55%
Program 19 is the 65% Max H.R.C. - - Target H.R. = (220 – AGE) x 65%
Program 20 is the 75% Max H.R.C. - - Target H.R. = (220 – AGE) x 75%
Program 21 is the 85% Max H.R.C. - - Target H.R. = (220 – AGE) x 85%
Program 22 is the Target H.R.C. - - Workout by your target heart rate value.
Users can exercise according to your desired Heart Rate program by setting your AGE, TIME, DISTANCE,
CALORIES or TARGET PULSE. In these programs, the computer will adjust the resistance level according to
the heart rate detected. For example, the resistance level may increase every 20 seconds while the heart rate
detected is lower than the TARGET H.R.C. Also the resistance level may decrease every 20 seconds while the
heart rate detected is higher than the TARGET H.R.C.
Operations: 1. Use UP/DOWN keys to select one of the heart rate control program from P18 to P22.
2. Press the ENTER key to enter your workout program
3. The AGE will flash at P18 to P21 programs and you can press UP or DOWN keys to set
your AGE. The default age is 35.
4. At program 22, the TARGET PULSE will flash and you can press UP or DOWN keys to set
your TARGET PULSE between 80 to 180. The default TARGET PULSE is 120.
5. The TIME will flash and you can press UP or DOWN keys to set your exercise TIME. Press
ENTER key to confirm your desired TIME.
6. The DISTANCE will flash and you can press UP or DOWN keys to set your target
DISTANCE. Press ENTER key to confirm your desired DISTANCE.
7. The CALORIES will flash and you can press UP or DOWN keys to set your exercise
CALORIES. Press ENTER key to confirm your desired CALORIES.
8. Press the START/STOP key to begin exercise.
Operation guide:
1. Sleep Mode:
The computer will enter the sleep mode when there is no signal input and no keys be pressed after 4
minutes. You can press any key to wake up the computer.
2. BMI (Body Mass Index): BMI is a measure of body fat based on height and weight that applies to both
adult men and women.
3. BMR (Basal Metabolic Rate): Your Basal Metabolic Rate (BMR) shows the number of calories your body
needs to operate. This doesn’t account for any activity, it’s simply the energy needed to sustain a
heartbeat, breathing and normal body temperature. It measures the body at rest, not sleep, at room
temperature.

Customer Service 1-888-707-1880
16
LCD Workout Graphics
PRESET PROGRAM PROFILES:
PROGRAM 1 PROGRAM 2 PROGRAM 3
MANUAL STEPS HILL
PROGRAM 4 PROGRAM 5 PROGRAM 6
ROLLING VALLEY FAT BURN
PROGRAM 7 PROGRAM 8 PROGRAM 9
RAMP MOUNTAIN INTERVALS
PROGRAM 10 PROGRAM 11 PROGRAM 12
RANDOM PLATEAU FARTLEK
PROGRAM 13
PRECIPICE
USER SETTING PROGRAM
PROGRAM 14
USER 1
PROGRAM 15
USER 2

Customer Service 1-888-707-1880
17
PROGRAM 16
USER 3
PROGRAM 17
USER 4
HEART RATE PROGRAM PROFILES:
PROGRAM 18
55% H.R.C.
PROGRAM 19
65% H.R.C.
PROGRAM 20
75% H.R.C.
PROGRAM 21
85% H.R.C.
PROGRAM 22
TARGET H.R.C.

Customer Service 1-888-707-1880
18
HOW THE ELLIPTICAL WORKS
The elliptical allows your feet to move in a natural elliptical path, minimizing the impact on your knees
and ankles.
The elliptical provides smooth, quiet and variable exercise capabilities with:
Dual Action Handles for total body workout
Stationary handlebar for stability

Customer Service 1-888-707-1880
19
TROUBLE SHOOTING
Problem Cause Correction
Monitor does not display Adaptor not plug in Plug in adaptor
Sending unit not connected
Securely plug sending unit into
extension wire and the back of the
monitor
Sending unit not working
properly Replace sending unit
No speed or distance
displays on the monitor
Monitor not working properly Replace monitor
Tension control cable not
connected
Securely plug tension control cable
into the extension tension control
cable
No tension
Magnetic wheel not working
properly Replace magnetic wheel
Pulse wire not connected not
connected
Securely plug wires into the back of
the monitor
Hand pulse defective Replace hand pulse grip or ear clip
Heart rate not displaying
Monitor not working properly Replace monitor
Crank bearing defective Replace crank bearings
Idler pulley defective Replace idler pulley
Grinding
Mag wheel defective Replace magnetic wheel
Squealing V-belt slipping Adjust v-belt
Table of contents
Other Body Break Elliptical Trainer manuals


