Body Break 16117119 User manual

Elliptical
RETAINFOR
FUTURE REFERENCE
MAURICE PINCOFFS CANADAINC. 6050DONMURIE STREET,NIAGARA FALLS, ONTARIOL2E 6X8
OWNER S
MANUAL
ModelNo.
16117119
ELLIPTICAL
•Assembly
•Operation
•Exercise
•Parts
•Warranty
CAUTION:
You mustreadand
understandthis
owner smanual
beforeoperating
unit.
PDFcreated withpdfFactorytrialversion www.softwarelabs.com

Customer Service1-888-707-1880 1MauricePincoffs Canada Inc. ©2009
Manufacture sOne-YearLimitedWarranty
Your BodyBreak MagneticEllipticaliswarranted foroneyear fromthe dateof purchase
against defectsinmaterialwhen used forthepurposeintended,under normalconditions
and provideditreceivesproper care.Anypart found defectiveor missing will be sent at
nocost whenreturned inaccordancewiththe termsofthiswarranty.
Thiswarrantyisnottransferableandisextendedonlytothe originalowner.
The warrantyshallnotapplytoexerciseunitswhichare(1) used forcommercialor other
incomeproducingpurposes,or (2) subject tomisuse, neglect, accidentor unauthorized
repairand alterations.
Thiswarrantyprovidedhereinislieu ofallotherexpresswarranties,anyimplied
warranties,including anyimplied warrantiesof merchantabilityoffitness forparticular
purpose,are limitedinduration tothe first12monthsfromdateof purchase.Allother
obligationsorliabilities,including liabilityfor consequentialdamagesare herebyexcluded.
REPAIR PARTSANDSERVICE
Allofthe partsfor theellipticalshowninfigurecanbeorderedfromMauricePincoffs
CanadaInc.6050DONMURIE STREET,NIAGARAFALLS, ONTARIOL2E6X8.When
ordering parts,the partswill be sentandbilledatthe current prices. Pricesmaybesubject
tochange without notice.Checkor moneyordermustaccompanyall orders.Standard
hardware itemsare availableat your localhardware store.
Toensure promptandcorrecthandlingofanyerrors,or toanswer anyquestions,please
callour TollFree number:1-888-707-1880,orlocalnumber 1-905-353-8955 or fax1-905-
353-8968or email customerservice@pincoffs.ca.Officehoursarefrom8:30 AMto5:00
PMMondaytoFridayEasternStandard Time.
Alwaysincludethe followinginformationwhen orderingparts
lModelnumber
lNameof eachpart
lPartnumber ofeachpart
TABLEOFCONTENTS
WARRANTY 1
HOWTHEELLIPTICALWORKS 14
SAFETYPRECAUTIONS 2
DIAGRAM 15
PRE-ASSEMBLYCHECK LIST 3
PARTSLIST 16-18
HARDWAREPACKINGLIST 4
TROUBLESHOOTING 19
ASSEMBLYINSTRUCTION 5-9
TRAININGGUIDELINES 20-22
COMPUTERINSTRUCTION 10-13
EXERCISE 23-24
PDFcreated withpdfFactorytrialversion www.softwarelabs.com

Customer Service1-888-707-1880 2MauricePincoffs Canada Inc. ©2009
SAFETYPRECAUTIONS
Thankyou forpurchasing our product.Even thoughwegotogreat effortstoensure the
qualityof eachproduct weproduce,occasionalerrorsand /oromissionsdooccur.Inany
eventshouldyou findthisproducttohaveeither adefectiveor amissingpart please
contact usforareplacement.
Thisproduct hasbeen designed forhomeuseonly. Product liabilityand guarantee
conditionswill not be applicabletoproductsbeing subjected toprofessionaluseor
productsbeingused inagymcenter.
Thisexerciseequipment wasdesigned andbuilt foroptimumsafety.However,certain
precautionsapplywhenever you operateapieceofexerciseequipment.Besure toread
the entire manualbefore assemblyand operation of thismachine.Also, pleasenotethe
following safetyprecautions:
1.Read theOWNERS OPERATINGMANUALandall accompanyingliteratureand
followit carefullybeforeusingyour elliptical.
2.If dizziness,nausea, chestpains,oranyotherabnormalsymptomsare
experienced whileusing thisequipment, STOPthe workout at once.CONSULTA
PHYSICIANIMMEDIATELY.
3.Inspect yourexerciseequipmentpriortoexercising toensure thatallnutsandbolts
arefullytightenedbeforeeachuse.
4.Theellipticalmustberegularlychecked forsignsofwear and damage.Anypart
founddefectivemust be replacedwithanewpartfromthe manufacturer.
5.Fitness equipmentmustalwaysbeinstalledonaflatsurface,It isrecommended to
usean equipmentmattopreventtheunit frommoving whileitisbeingused,which
couldpossiblyscratchor damagethesurfaceof yourfloor.
6.Nochangesmust bemade whichmight compromisethe safetyofthe equipment.
7.It isrecommended tohaveaminimumof2 safeclearancearound the exercise
equipmentwhileinuse.
8.Keep children andpetsawayfromthisequipmentatall timeswhileexercising.
9.Warmup5to10minutesbefore eachworkout and cooldown5to10minutes
afterward.Thisallowsyour heartratetograduallyincreaseand decreaseand
willhelppreventyou fromstrainingmuscles.
10.Never holdyour breathwhileexercising.Breathingshouldremainatanormalrate
inconjunction withthe levelofexercisebeingperformed
11.Alwayswear suitableclothingand footwear whileexercising.Donotwearloose
fitting clothing thatcouldbecomeentangledwiththemoving partsofyourelliptical.
12.Caremustbe takenwhen liftingormoving the equipment,soasnottoinjureyour
back.Alwaysuseproper lifting techniques.
13.User weightshouldnotexceed 275lbs.
WARNING:BEFORE BEGINNINGANY EXERCISE PROGRAMCONSULTYOUR
PHYSICIAN.THIS ISESPECIALLY IMPORTANTFORINDIVIDUALSOVERTHE AGE
OF35ORPERSONSWITHPRE-EXISTINGHEALTHPROBLEMS. READ ALL
INSTRUCTIONS BEFORE USINGANYFITNESS EQUIPMENT.WE ASSUME NO
RESPONSIBILITY FORPEROSNALINJURY ORPROPERTY DAMAGESUSTAINSBY
ORTHROUGHTHE USE OFTHISPRODUCT.
PDFcreated withpdfFactorytrialversion www.softwarelabs.com

Customer Service1-888-707-1880 3MauricePincoffs Canada Inc. ©2009
PRE-ASSEMBLYCHECKLIST
1 2 80 8(L/R)/7
3L/R 410/78
9L/R 11
6/72
15
34L/R
KEY NO
Description Quantity
1 Mainframe 1
80 Front stabilizer1
2 Rearstabilizerrail 1
3 PedalbarR/L 2
4 FootpedaltubeR/L 2
6/72 Ubracketw/pivotshaft R/L 2
7 Lowerhandlebarright 1
8 Lowerhandlebarleft 1
9L/R UpperhandlebarR/L 2
10/78 Uprightpost/Upright postcover 2
11 Stationaryhandlebar 1
15 Monitor 1
34L/R PedalR/ L 2
PDFcreated withpdfFactorytrialversion www.softwarelabs.com

Customer Service1-888-707-1880 4MauricePincoffs Canada Inc. ©2009
HARDWAREPACKINGLIST
NO Description Qty
Specification Drawings
17 Allen headbolt 2M8x25mm
18 Spring washer 18 M8
23 Washer 2 Φ32xΦ8.4x2.0t
24 Allen headbolt 2 M8x20mm
25 Hexhead bolt 4 M8x42mm
26 Curvewasher 8 M8
27 Capnut 8 M8
29 Washer 2 Φ32xΦ19x0.5t
32 Nylonnut 4 M8
33 Allen headbolt 6 M8x15mm
31 Allen headbolt 4 M8x45mm
39 Allenheadbolt 6 M8x12mm
46 Levelknob 2 M8x50mm
74 Flatallenhead bolt 6 M8x20mm
75 Carriagebolt 2 M8x75mm
79 Curvesleeve 2 Φ38xφ19x10mm
93 Allen wrench 1 5mm
94 Allen wrench 1 6mm
95 Universalwrench 1
48 Carriagebolt 2 M8x65mm
PDFcreated withpdfFactorytrialversion www.softwarelabs.com

Customer Service1-888-707-1880 5MauricePincoffs Canada Inc. ©2009
ASSEMBLYINSTRUCTION
Thismanualisdesignedtohelpyou easilyassemble,adjust and usethismachine.Please
readthismanualcarefully.Forthe sakeoffamiliarizing yourself withthe partsidentified in
the instruction,first studythe overviewdrawing.
Setall partsinaclear areaonthe floorandremovethepackingmaterial.Refer tothe
partslistforhelptoidentifythe parts.
It willtaketwopeopletoassembleyourunit.
Step1
1.Attachthelevelling knobs (46) totherearstabilizer rail (2).
2.Attachrear stabilizerrail (2) withlevelling endcaps (47) tothe welded cross bar
bracketof themainframe (1).Secure withtwocurvedwashers (26),twospring
washers (18),twocarriagesbolts (48) and twocap nuts (27).
3.Attachthe front stabilizer (80) withtransportationwheels (76) tothefrontwelded
bracketofthemainframe (1).Securewithtwocarriagebolts (75),twocurvedwashers
(26), twospringwashers (18) andtwocapnuts (27).
NOTE: Makesure youfastenthe boltssecurelytoavoidshakinganddiscomfortwhen
cycling.
75
26
27
2726
48
18
18
80
2
1
46
47
76
76
47
Step2
1.Slidetheuprightpost cover (78) on tothe upright post (10) fromthe bottomend of
upright post.
2.Connect theextensionwire (88) tothe motor w/cable (83).
3.Connect theextensionwire (88) tothe sensor w/wire (85).
4.Connect theextensionwire (88) tothe powerwire (87)
5.Attachtheuprightpost (10) intothe mainframe (1).Secureusing sixallenhead
bolts (74) andsixspringwashers (18).Note:Becarefulnot topinchthewires.
6.Slidetheuprightpost cover (78) down tothe bottomofuprightpost (10).
74
78
10
1
87
88
85 83
74
74
18
18
PDFcreated withpdfFactorytrialversion www.softwarelabs.com

Customer Service1-888-707-1880 6MauricePincoffs Canada Inc. ©2009
Step3
1.AttachtheUbracket (6L) withthe left pedalaxle (72L) tofrontofleft pedaltube (3L).
Secure using oneallenhead bolt (31) and onenylon nut (32).
2.Repeatfor the rightpedaltube.
3L
72L 3R
72R
31
32
6
Step4
1.Attachtheleft pedal (34L) totheleft foot pedaltube (4L). Secureusingthree hexhead
bolts (33).
2.Repeatfor the rightpedaltube (4R).
33
34L
4L
33
34R
4R
Step5
1.Attachthe leftfootpedaltube (4L) tothe leftpedaltube (3L).Secureusing the
connectorbracket (5) and threeallenhead bolts (39).
2. Repeat fortheright footpedaltube (4R).
3R
4R
39 5
3L
4L
39
5
PDFcreated withpdfFactorytrialversion www.softwarelabs.com

Customer Service1-888-707-1880 7MauricePincoffs Canada Inc. ©2009
Step6
1.Attachthe leftpivotshaft (72L) ofthe pedalbar (3L) toleftcrank (67L).Securetightly.
2.Repeat for therightpivotshaft (72R).
NOTE: The pivot shaft (72R) isright thread.Pleasetightenitclockwise. Theleftpivot
shaft (72L) isleft thread.Pleasetighten itcounter-clockwise.
3R
1
72L
72R
71L
3L
Step7
1.Slidetheplasticsleeve (79) andoneflatwasher (29) on totheleft sideofthe axleof
upright
post (10).
2.Attachthelowerlefthandlebar (8L) tothe left side of theaxleofthe uprightpost (10).
Secure using oneflatwasher (23),one spring washer (18) and one allen headbolt (24).
3.Repeatfor the lower right handlebar (8R).
4.Attachtheupperleft handlebar (9L) tothelowerleft handlebar (8L).Secureusing two
hexhead bolts (25), two curvewashers (26),twospring washers (18) andtwocapnuts
(27).
5.Repeatfor the upper righthandlebar (9R).
23 24
18
9L
9R
8R
8L
25 27
26
25 27
18
26
23
24 18
79 29
79
29
1
10
PDFcreated withpdfFactorytrialversion www.softwarelabs.com

Customer Service1-888-707-1880 8MauricePincoffs Canada Inc. ©2009
Step8
1.Attachthelower lefthandlebar (8L) totheleftfootpedaltube (4L).Secureusingone
allenbolt (31) andone nylonnut (32).
2.Repeat forthe lower righthandlebar (8R).
32
31
8R
8L
4L
1
Step9
1. Attachthe stationaryhandlebar (11) withhand pulse (13) tothe welded bracket
oftheupright
post (10).Secureusing two springwashers (18) and twoallenhead bolts (17).
Note: Becarefulnot topinchthewires.
11
18
17
10
13
13
PDFcreated withpdfFactorytrialversion www.softwarelabs.com

Customer Service1-888-707-1880 9MauricePincoffs Canada Inc. ©2009
Step10
1.Connect the extension wire (88) tothebackofthe computer (15)
2.Connect the handpulsewire (90) tothe backof the computer (15).
3.Slidethe computer (15) ontothebracketoftheuprightpost (10).Secure usingfour
m5x15mmscrew (16) found on the back ofthecomputer.
Note: Ensure thatthewiresareawayfromthebracket when sliding on the monitor.
ENSURETO FIRMLYTIGHTENALLNUTSANDBOLTS
YOURUNITISNOWFULLYASSEMBLED
Thecomputercanonlybepoweredbyusing theAC adaptor(82). Insertthe plugof
adaptor (82) intothe jack of theright chaincover
82
1
PDFcreated withpdfFactorytrialversion www.softwarelabs.com

Customer Service1-888-707-1880 10MauricePincoffs Canada Inc. ©2009
ComputerInstructions
START
STOP MODE
SETRESET
FAN
BUTTONS:
▲/UP: Presstoselect programsP1toP12.Presstoincreasethe valuesofthe
setting mode.
Press toincreasetheleveloftheworkload whenrunningaprogram.
▼/DOWN: Press toselectprogramsP1toP12.Presstodecreasethevaluesof the
setting mode.
Press todecreasethe leveloftheworkloadwhen running aprogram.
SET: Press toconfirmtheselected programsP1toP12.Pressthe SET buttonto
select thevaluesof thevarioussettings.
START/STOP: Press tostartthe selectedprogram.Pressthe START/ STOP buttonto
stoptheprogram.
You can press the START/ STOP button againtocontinuetorunthe
currentprogram, oruse “▲ / ▼”buttonstoselectanewprogram.
MODE: Press toselectthe function valuedisplaysof RPM and WATT, or SPEED
and CALORIES.
RESET: Press toreset allof thefunctionvaluestozero.
FAN: Press toturn onoroff, andtochangethe speed ofthefan onthe
COMPUTER(27)insequenceasfollows: LowSpeed HighSpeed
OFF
PDFcreated withpdfFactorytrialversion www.softwarelabs.com

Customer Service1-888-707-1880 11MauricePincoffs Canada Inc. ©2009
LCD DISPLAY INSTRUCTIONS
PROGRAM: Displayprogramsfor selection during setup,fromP1toP12.Displaysthe
selected programduringexercise.
TIME: Displaysthe time.Countsupwardfromonesecondto99:59minutes.
Countsdownfrompresetvalue.
SPEED/RPM: Displaysthecurrentspeed fromzero 99.9milesperhour, or RPMfrom
zeroto999 RPM.
Pressthe MODE buttontoselectthedisplayofSPEEDor RPM.
DISTANCE: Displaysthe distancefromzero to999.9miles.
CALORIE/WATT: Displaysthe calorieconsumptionfromzero to999.9WATT.
Press theMODE button toselect thedisplayofCALorWATT.
NOTE: The caloriesandwattreadoutsare an estimateforan average
user.It shouldbe usedonlyasacomparisonbetween workoutson
thisunit.
AGE/ Whenyou selectthe HeartRateControlPrograms,P11 or P12,you must
inputyour TARGETH.R.: age. Thisvalueaffectsonlythe HeartRate
ControlPrograms.Pressthe SET button until the AGE/TARGETH.R.
displayisflashingand usesthe “▲ / ▼” buttonstoinputyourage.Whenthe
Heart RateControlPrograms,P11orP12,are selected,the targetheartrate
value will
beshownduringexercise.
HEARTRATE:Displaysheart rateinbeatsperminutefrom40to240beatsper minute.
Todisplaythe heartrate,you mustgraspthePulsesensorsonboth
sidesofthe handrail, one ineachhand.The heart symbol “♥” will begin
flashingwhen thecomputer sensesyourhearrate.Yourheartratewillbe
displayedapproximatelyfive(5) secondsafterthehearticonisdisplayed.
If you do not placeyour handscorrectlyand 60secondspasseswithout
aheartratereading,the computerwill turnoffthe heartratecircuit. Ifthis
occurs, pressthe MODE button torestarttheheartratecircuit, placeyour
handsbackonthePulseSensorscorrectly,and theheartratereadout
willappear.
PROGRAMDESCRIPTIONS
Thiscomputer contains12differentprograms.You can presetthe programtimeandthe
computer willdividethe timechoseninto10intervals.If you do not set theprogramstime
inadvance, the computerwill defaulttoa30 minuteworkout time.
MANUALPROGRAM:
P1isamanualprogramallowing the usertofullmanual
controlofthe workload. Usethe “▲” buttontoincrease
load.Usethe “▼” button todecreasetheload.
PDFcreated withpdfFactorytrialversion www.softwarelabs.com
Customer Service1-888-707-1880 12MauricePincoffs Canada Inc. ©2009
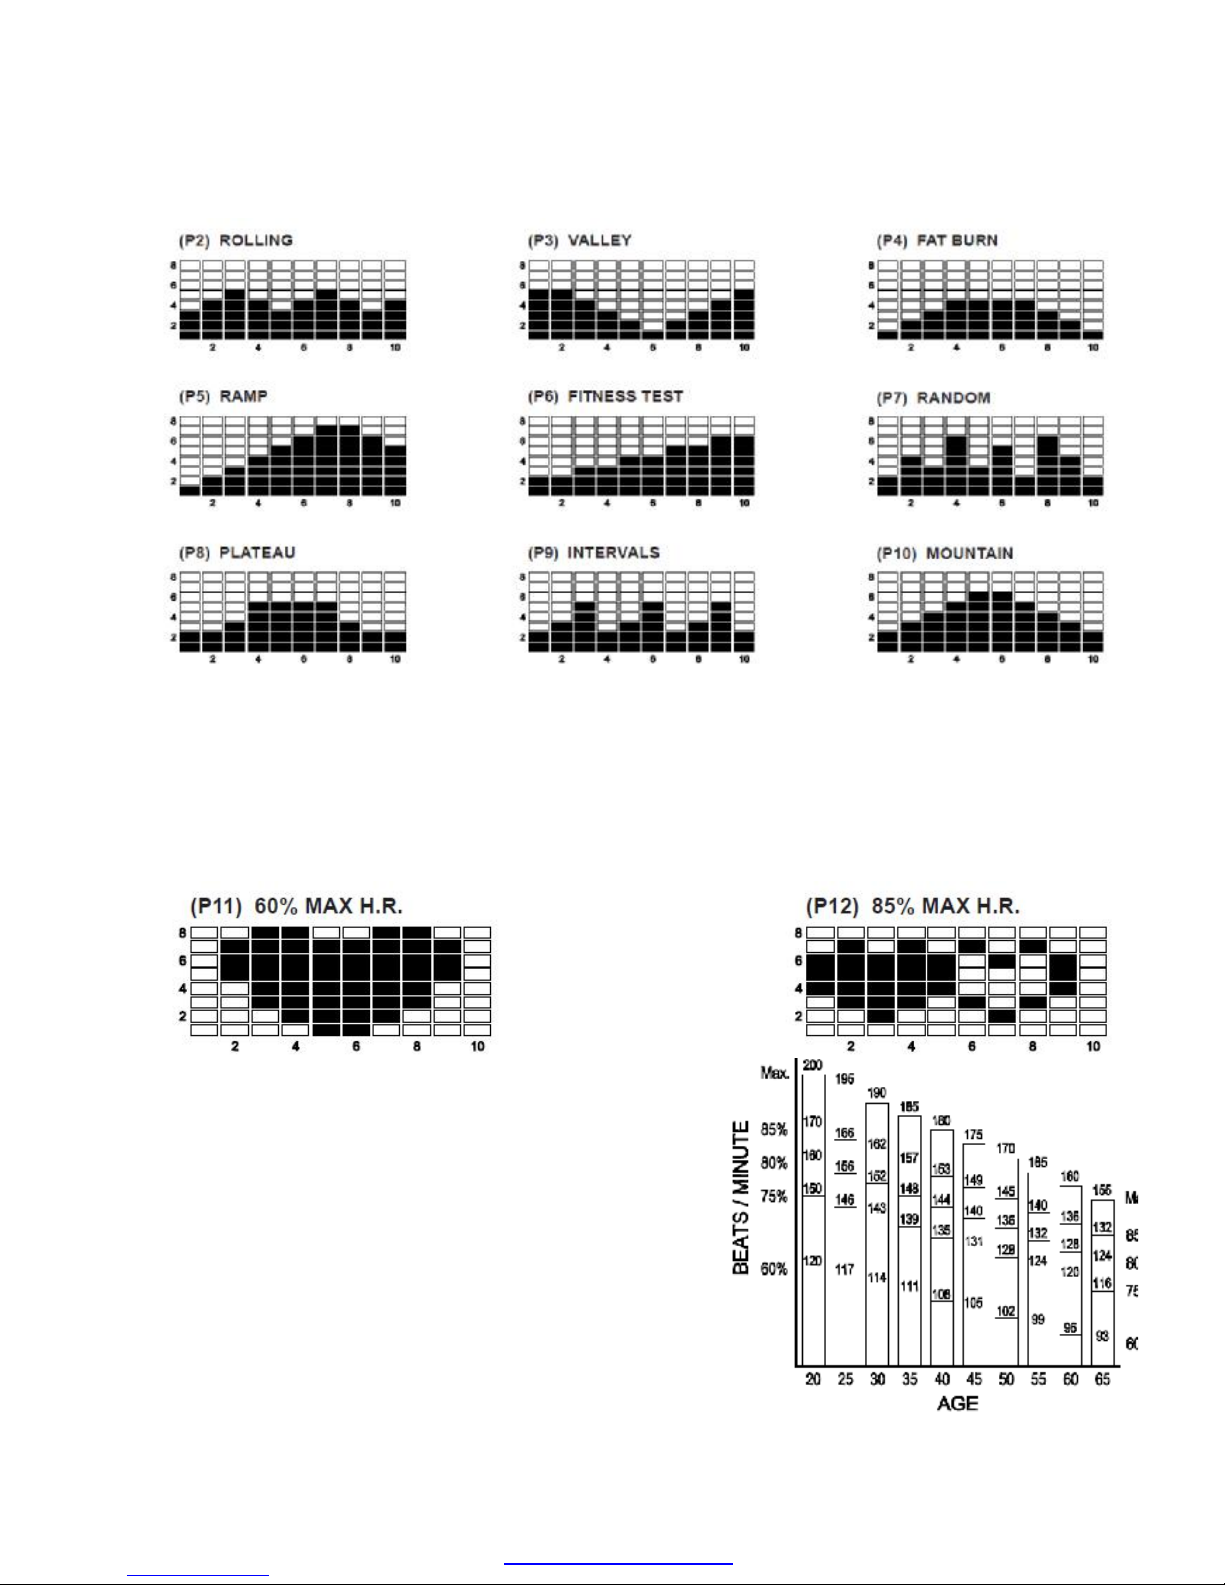
PRESETPROGRAMS: P2toP10are presetautomaticprograms.The profilesare
shownonthefaceof thecomputer.Usethe “▲” buttontoincreasetheloadlevelofthe
program. Usethe “▼” button todecreasetheloadlevelofthe program.
HEARTRATECONTROLPROGRAMS: P11andP12 arepresetautomaticHeart Rate
ControlPrograms.
Youmustinputyour ageand alwaysholdthepulsesensorson the HANDRAIL(6) with
bothhandswhen usingthe HeartRateControlPrograms.P11isprogrammed touse60%
ofyourmaximumheart rateasyourtargetheartratezone workoutgoal, and P12is
programmedtouse85%ofyourmaximumheartrateasyourtargetheartratezone
workoutgoal;therefore,P11willbealessintenseworkout thanP12
Asyou exercise,the programwillmonitor yourpulse
Andadjust theworkload automaticallytokeep you
workingwithinazonethat isplusorminus5beatsper
minuteofyour targetheartrate.Your ageandthe
programyourselected willdetermineyour heartrate
zone.
Forexample, ifyourageis30,yourmaximumhear
rateis190.If you selected P11,your workoutwillkeep
your withinatarget heartratezonethat isplusorminus
5beatsper minuteof60ofyour maximumheart
rate:190 x60%=114soyour heart ratezone is109
to119. Theprogramwill monitoryourpulseand adjust
the workloadautomaticallytokeepyour pulsewithin
the heart ratezone during yourworkout.
PDFcreated withpdfFactorytrialversion www.softwarelabs.com

Customer Service1-888-707-1880 13MauricePincoffs Canada Inc. ©2009
COMPUTEROPERATION
STEP 1:POWERON
Pedaling or pressanybutton.
STEP 2:SELECTPROGRAM
Press the “▲ / ▼” buttonsuntilthedesired programisdisplayed.
STEP 3:SETTHEPROGRAMTIME(AND INPUTAGE FORHEARTRATE
CONTROLPROGRAMS)
Press the SET button,the TIME functionmodewillappearwiththe display
flashing “0:00”.Pressthe SETbuttonagaintopasssetting the program
time.Orusethe “▲ / ▼” buttonstosetthe programtime,from5minutesup
to99 minuteswith1minuteincrements.PresstheSETbutton toconfirmthe
setting.Pressthe START/STOP button tostartthe program.
Whenyou selectthe HeartRateControlPrograms,P11 toP12, you must
inputyourage.PresstheSETbutton until the AGE/TARGETH.R. displayis
flashingand usesthe “▲ / ▼” buttonstoinputyourage.PresstheSET
buttontoconfirmthe setting.Pressthe START/ STOP buttontostartthe
program.
NOTE:1.The programwillnotstartuntilyoupress the START/ STOPbutton
2.If you don tsettheprogramtime, thecomputerwillcountupfromone
second up to99:59Minutes,and usethe default workout time,30
minutes,tocyclerun theprogramprofile.
3.The computerwillcountdownfromthe programtimethatyou set.
Whenthetimercountsdowntozero,thecomputerwillalertyouwith
anaudiblealarmthat your workoutiscomplete.Youcan pressany
buttontostop the audiblealarm.
OPERATIONDESCRIPTIONS
1.Tostop arunning program,pressthe START/ STOP button.Inthismode,you can
pressthe START/ STOP buttonagaintocontinue torun the currentprogram. Or, you
can usethe “▲ / ▼” buttonstoselectanewprogram. The function valuesof
DISTANCE and CALORIE willcontinue toaccumulate.
2.Whenyoucompleteaprogram,pressthe START/ STOP buttontostoptheprogram.
You can usethe “▲ / ▼” buttonstoselect anewprogram.Thefunctionvaluesof
DISTANCE and CALORIE willcontinue toaccumulate.Thiswill allowyou torun
severalprogramsandstillknowthetotal DISTANCE and CALORIE duringthe
workout.
3.If you wanttorestartwithanewprogram,pressthe RESET button toresetallofthe
function valuestozero. Usethe “▲ / ▼” buttonstoselect anewprogram.
4.The computerwillshutoff automaticallyafter4minutesofinactivity, and the function
values, DISTANCE and CALORIE, willbekept.
POWERSOURCE:
The computerusesthe ADAPTER(88) asapowersource.Usethe BODY BREAK
ELLIPTICAL withtheadapter pluggedintoanelectricaloutlet.
PDFcreated withpdfFactorytrialversion www.softwarelabs.com

Customer Service1-888-707-1880 14MauricePincoffs Canada Inc. ©2009
HOWTHEELLIPTICALWORKS
The ellipticalallowsyour feettomoveinanaturalellipticalpath,minimizing theimpacton
your kneesand ankles.
The ellipticalprovidessmooth,quietandvariableexercisecapabilitieswith:
žDualAction Handlesfor totalbodyworkout
žStationaryhandlebar forstability
PDFcreated withpdfFactorytrialversion www.softwarelabs.com

Customer Service1-888-707-1880 15MauricePincoffs Canada Inc. ©2009
DIAGRAM
PDFcreated withpdfFactorytrialversion www.softwarelabs.com

Customer Service1-888-707-1880 16MauricePincoffs Canada Inc. ©2009
PARTSLIST
KEY NO PART NO Description Specification Q'TY
1 1711901 Main frame 1
2 1711902 Rear stabilizer rail 1
3L 1711903L Pedalbarleft 1
3R 1711903R Pedalbarright 1
4L 1711904L Footpedal tube left 1
4R 1711904R Footpedal tube right 1
5 1711905 Pedalconnect bracket 2
6 1711906 U bracket 2
7 1711907 UpperUbracket 2
8L 1711908L Lowerhandlebar left 1
8R 1711908R Lowerhandlebar right 1
9L 1711909L Upperhandlebar left 1
9R 1711909R Upperhandlebar right 1
10 1711910 Upright post 1
11 1711911 Stationaryhandlebar 1
12 1711912 Foamgrip 1
13 1711913 Hand pulse 2
14 1711914 Machine screw M4x15mm 2
15 1711915 Monitor 1
16 1711916 Screw M5x15mm 4
17 1711917 Allenheadbolt M8x25mm 2
18 1711918 Spring washer M8 22
19 1711919 Endcap 2
20 1711920 Foamgrip 2
21 1711921 Axle bushing Φ19 4
22 1711922 Bushing Φ32xΦ19x25mm 4
23 1711923 Flatwasher Φ32xΦ8.4x2.0t 6
24 1711924 Allenheadbolt M8x20mm 6
25 1711925 Hexheadbolt M8x42mm 4
26 1711926 Curvewasher M8 8
27 1711927 Cap nut M8 8
28 1711928 bushing Φ19xΦ13xΦ13x7mm 4
29 1711929 Flatwasher Φ32xΦ19x0.5t 2
30 1711930 Bushing Φ32xΦ28xΦ16x14mm 8
PDFcreated withpdfFactorytrialversion www.softwarelabs.com

Customer Service1-888-707-1880 17MauricePincoffs Canada Inc. ©2009
KEY NO PART NO Description Specification Q'TY
31 1711931 Allenheadbolt M8x45mm 4
32 1711932 Nylonnut M8 4
33 1711933 Allenheadbolt M8x15mm 6
34L 1711934L Pedalleft 1
34R 1711934R Pedalright 1
35 1711935 Machine screw M5x25mm 4
36 1711936 Wavewasher Φ22xΦ16.5x0.5t 2
37 1711937 Machine screw M5x15mm 5
38 1711938 Plug Φ12 2
39 1711939 Allenheadbolt M8x12mm 6
40 1711940 Sleeve Φ25.4xΦ15.9x31mm 2
41 1711941 Allenheadbolt M10x60mm 2
42 1711942 Sleeve Φ14xφ10.5x4mm 4
43 1711943 Wheel 2
44 1711944 Cap nut 2
45 1711945 Rectanglecap J30x60 2
46 1711946 Levelingknob 2
47 1711947 Endcap Φ50.8 2
48 1711948 Carriagebolt M10x65mm 2
49 1711949 Flywheel 1
50 1711950 Nut 3/8"x26Wx4mm 1
51 1711951 Nut 3/8"x26Wx7mm 3
52 1711952 Adjustorbolt 2
53 1711953 Spring Φ17xΦ2.3x75mm 1
54 1711954 Idlerwheel bracket 185x30x5.0mm 1
55 1711955 Flatallenhead bolt M10x20mm 1
56 1711956 Nylonnut M10 2
57 1711957 Flatallenhead bolt M10x40mm 1
58 1711958 Washer Φ32xΦ16.5x0.5mm 1
59 1711959 Sleeve Φ16xΦ10.2x18mm 1
60 1711960 Idlerwheel 1
61 1711961 Belt J6450 1
62 1711962 Axle 1
63 1711963 Bearing 6003Z 2
64 1711964 Adjusting washer Φ22xΦ17x1.0mm 1
65 1711965 Clip Φ17 2
PDFcreated withpdfFactorytrialversion www.softwarelabs.com

Customer Service1-888-707-1880 18MauricePincoffs Canada Inc. ©2009
KEY NO PART NO Description Specification Q'TY
66 1711966 Magnet Φ15 1
67L 1711967L Crank diskleft 1
67R 1711967R Crank diskright 1
68 1711968 Machine screw M5x10mm 4
69 1711969 Washer Φ16xΦ6x1.0mm4
70 1711970 Hexheadbolt M8x20mm 2
71L 1711971L Disccover left Φ400 1
71R 1711971R Disccover right Φ400 1
72L 1711972L Pedalaxle left 11
72R 1711972R Pedalaxle right 1
73 1711973 Crank cover Φ50 2
74 1711974 Flatallenhead bolt M8x20mm 6
75 1711975 Carriagebolt M8x75mm 2
76 1711976 Transportationwheel Φ60 2
77 1711977 Machine screw M4X12mm 2
78 1711978 Upright post cover 1
79 1711979 Plasticsleeve Φ38xΦ19x13mm 2
80 1711980 Frontstabilizer 1
81 1711981 Bearing 6000Z 4
82 1711982 Adaptor 1
83 1711983 Motor w/cable 1
84 1711984 Machine screw M5x15mm 4
85 1711985 Sensor w/wire 1
86 1711986 Wheel sleeve Φ14xφ10.5x18.2mm 2
87 1711987 Powercable 1
88 1711988 Extensionwire 1
89 1711989 Resistancecable 1
90 1711990 Handpulsewire 1
91L 1711991L Chaincoverleft 1
91R 1711991R Chaincoverright1
92 1711992 Wavewasher Φ26xΦ20x0.5mm 2
93 1711993 Allenwrench 5mm 1
94 1711994 Allenwrench 6mm 1
95 1711995 Universalwrench 10.13.15.16 1
PDFcreated withpdfFactorytrialversion www.softwarelabs.com

Customer Service1-888-707-1880 19MauricePincoffs Canada Inc. ©2009
TROUBLESHOOTING
Problem Cause Correction
Monitordoesnotdisplay
Adaptor notpluggedinor batteries
notinstalled Plug adaptorinorinsertbatteries
Nospeed or distance
displaysonthemonitor Sendingunitnotconnected Securelyplug sendingunitinto
extension wire andthe back of
themonitor
Sendingunitnot working properly Replacesendingunit
Monitornot workingproperly Replacemonitor
Notension Gear boxwirenot connected Securelyconnectthe gear box
wiresintotheextensiongearbox
wire
Magneticwheelnot working properly Replacemagneticwheel
Heartratenotdisplaying
Pulsewire notconnectednot
connected Securelyplugwirestogether
Hand pulsedefective Replacehand pulsegrip
Monitornot workingproperly Replacemonitor
GrindingCrankbearing defective Replacecrankbearings
Idler pulleydefective Replaceidlerpulley
Magwheeldefective Replacemagneticwheel
Squealing V-beltslipping Adjustv-belt
PDFcreated withpdfFactorytrialversion www.softwarelabs.com
Table of contents
Other Body Break Elliptical Trainer manuals


