Bodyfriend REX-L User manual
BODYFRIEND
Massage Chair
REX-L
User Manual
Product image or content descriptions may slightly dier due to product improvements without previous notice.

Introduction
Product Features
Thank you for purchasing BODYFRIEND Massage Chair. Before
using our product, please read through the safety precautions
and operation instructions carefully. We kindly ask users to
understand that there may be slight dierences in image and
content descriptions presented throughout this manual due
to product quality improvements. Thank you.
Zero Gravity
Distributing gravitational pressure
by a weightless positioning of the
body, recline angles can further be
adjusted to optimize the massage
experience.
Ergonomic Frame
SL Frame best supports the body
and massages the entire length of
the body from the head down to
the buttocks by conforming to the
contours of the body.
Zero Wall
Zero Wall feature automatically
slides chair forward when the
chair is reclined, saving the
trouble of allocating extra space
behind the chair.
Zero Gravity
Full Body
Massage
Dual Airpump
Ergonomic
Frame
Hand/Arm/
Shoulder Massage
Language
Zero Wall
Audio Guidance
Stereo
Speakers
Auto Massage
Modes
Sole Reexology
Rollers
Zipper
Upholstery
Auto Massage
Indicator
Bluetooth
Connectivity
Heating
WARNING - Do not install massage chair under direct sunlight
or where high temperature uctuations can occur.
IMPORTANT - Product image or content descriptions may slightly dier due to product quality improvements.

Table of Contents
Before Use Instructions Product Features 02
Safety Precautions 04
Important Safety Instructions 05
Components and Descriptions 06
Transporting/Grounding 07
Installation Instructions Installation 08
Controller Information Controller Button Descriptions 12
Controller Function Descriptions 14
Program Descriptions BODYFRIEND Customized Programs 19
Product Specifications Product Specifications 20
Troubleshooting Troubleshooting 21
Customer Support Guidelines 22

Before Use: Safety Precautions
Before using, please carefully read the “Safety Precautions” section for proper
installation and operation.
WARNING - Please do not try to install or repair
massage chairs without the assistance of technicians.
Bodyfriend is not responsible for replacement costs if the product is damaged or
breaks due to self -troubleshooting.
CAUTION - Please Do Not Install Outside the Home.
This product is for non-commercial household use only. Warrant y is subject
to cancellation if the product is used for commercial purposes.
To reduce injury and risk of re:
Prohibited
01 Do not install in bathrooms or areas with
high humidity levels. Could result in
electric shock.
02 Avoid using in areas with dust or areas
prone to rust.
03 Do not operate this device in settings with
temperatures exceeding 104F°.
04 Do not use outdoors.
05 Do not use near heaters or anything
radiating heat.
06 Install and use only when properly
grounded on at surfaces.
07 Use in areas with ample space and
reasonable air circulation.
08 Do not use after disassembling parts.
Can result in product malfunctions.
09 Do not use concurrently with other
electronic or medical devices.
10 Do not use aerosol (spray) products.
11 Do not place heavy objects on top of
this product.
12 Please take precautionary measures to
ensure toddlers, pets, and small beings
do not crawl under the body of the chair,
leg rest, etc. to prevent any injuries or
damage.
13 Do not allow more than one person to
operate the machine at a time.
14 If the power cord or power plug becomes
damaged in any way, disconnect from
the main supply immediately and consult
an authorized service engineer for repair
or replacement.
15 Do not damage, excessively bend,
pull, twist, or knot any device cords.
16 Do not stand on the legrest before, after,
or while the device is sliding forward or
back to its original resting position.

01 Check power supply before using.
02 Do not handle with wet hands.
03 Do not operate when body is wet.
04 Do not use after excessive eating.
05 Take precautionary measures to ensure
parts of the body or objects do not get
caught in any openings of the massage
chair.
06 When using targeted massage functions,
be aware of individual body signals, not to
over-stimulate targeted areas.
07 Individuals who have been hospitalized
for extended periods of time or are
recovering from medical injuries are asked
to use this product with caution.
08 Do not use if experiencing high fever or
show symptoms of high fever.
09 Do not use if suering from skin diseases
or have wounds not yet fully healed.
10 Consult a doctor before using if you
are a patient or suer from any body
malfunctions.
11 This device is not intended for use by
persons with reduced physical, sensory,
or mental capabilities or lack experience
and knowledge unless they are supervised
or have been given instructions concerning
the use of this device. Children should also
be supervised when using this device.
12 Consult a doctor before using if you suer
from any spinal disorders, osteoporosis, or
any other bone disorders.
13 Consult a doctor before using if you have
a pacemaker or any implantable medical
device.
14 Do not use if pregnant or have recently
given birth.
15 Please limit the use of this product for
children.
16 Be cautious not to let massage balls exert
excessive pressure to the spine.
17 Do not use this product on areas of the
body not intended for this device.
18 While the massage balls are initializing,
stay in the correct upright position for
accurate sensor locating.
19 Make sure the massage chair is upright
when mounting and dismounting.
20 Be cautious of hypothermia if unusual
fatigue or sleepiness ensues after receiving
a massage.
21 If you feel any pain or discomfort,
immediately stop the machine or adjust
settings to accommodate to personal
health needs/preferences.
22 Operate this device based on individual
health status.
23 People over 242lbs are not advised to use
this device.
24 Do not stand on the device. Operate the
chair only while being seated.
25 Do not stand on the leg rest.
Important Safety Instructions
Compulsory
This device complies with Part 15 of the FCC Rules. Operation is subject to the following two conditions:
(1) This device may not cause harmful interference, and (2) this device must accept any interference
received, including interference that may cause undesired operation.

Components and Descriptions
01
Head Rest
02
Back Rest
03
Embedded Touch Switch
04
Seat Cushion
05
Controller Storage
06
Leg Massage Unit
07
Side Panel
08
USB Charging Port
09
Arm Massage Unit
10
Shoulder Massage Unit
Exterior
01
Power ON/OFF
02
Auto
03
Back Ascend
04
Back Descend
Embedded Touch
Switch
Interior
01
Back Massage Ball
02
Back/Waist Airbags
03
Calf Airbags
04
Power Source Terminal
05
Controller Socket
06
Feet Rollers
07
Feet Airbags
08
Thigh/Buttocks Airbags
09
Arm Airbags
10
Back Heating Pad
11
Shoulder Airbags
06
01
01 02 03 04
02
09
03
05
10
04
08
07
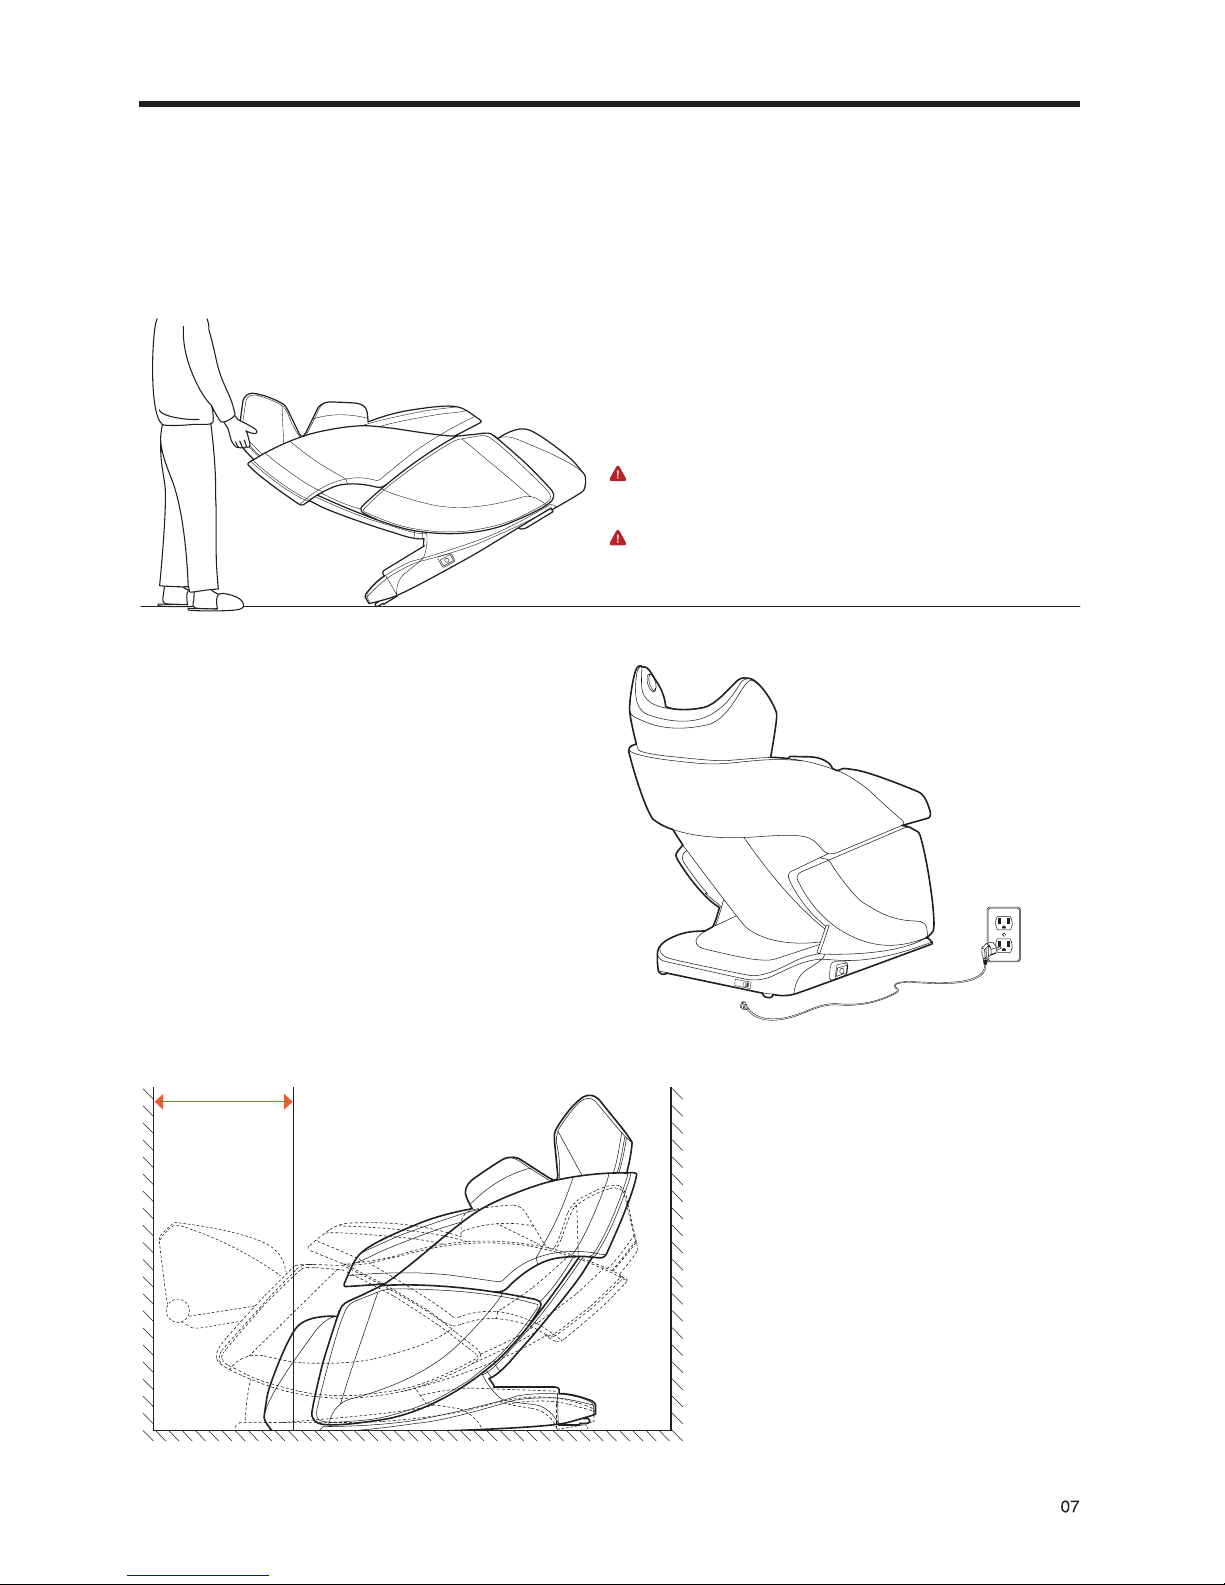
Transporting/Grounding
01
Reserve space for installation
of the massage chair.
02
Remove all miscellaneous objects around
or in direct contact with the machine.
03
Remove and disconnect any cables beneath
or around the chair.
After removing all cables and miscellaneous objects
from the oor, tilt the massage chair backward at an
angle and lift. After arriving at the desired location,
safely place the chair securely on the oor and begin
re-installation of the chair.
WARNING
※ Do not drag and take precautions to not damage the oor.
※ Do not lift the chair by the leg unit.
IMPORTANT
※ To avoid injury or damage to the device, we recommend two or
more people when transporting.
20"(50cm)
STEP 1. Undo Packaging
This product is packaged in three separate boxes.
Please check that you have received all necessary parts.
• Main Box : Back sheet, Head sheet, Seat cushion, Accessories (controller, cables, and manual)
• Arm / Shoulder Unit
• Leg Unit
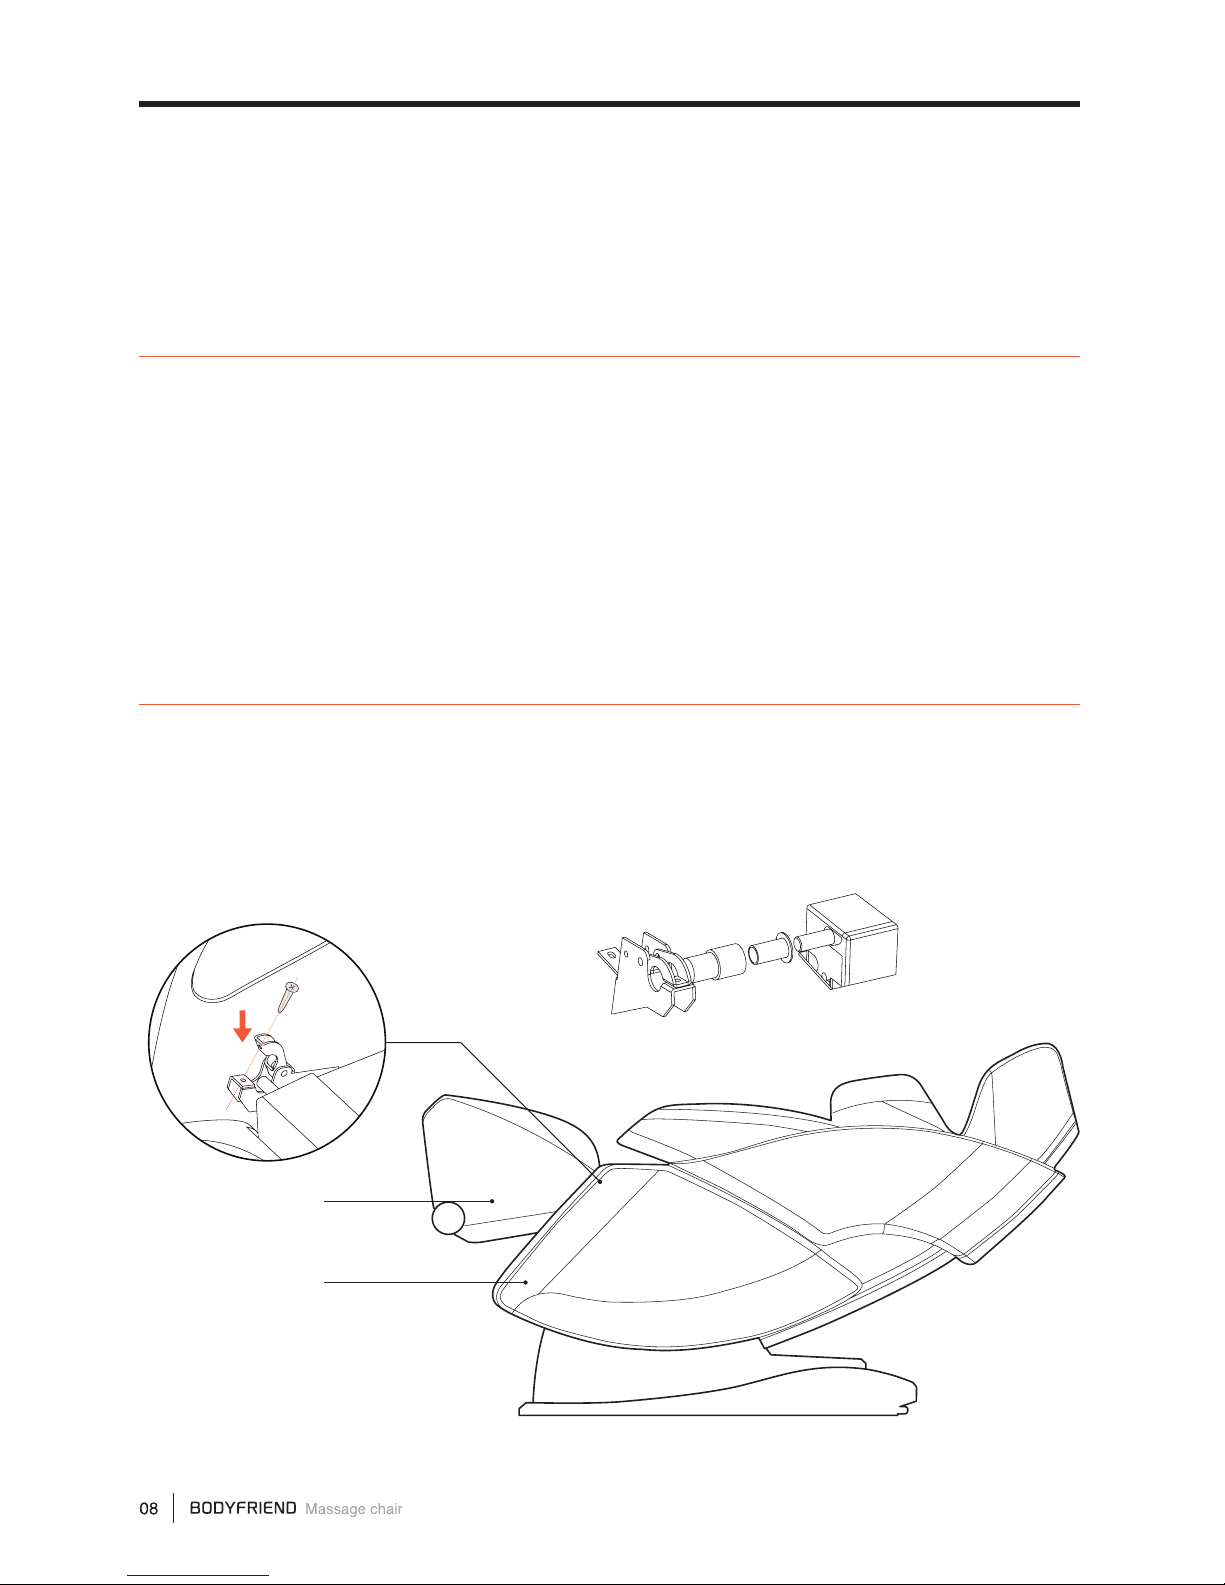
STEP 2. Constructing the Leg Unit
01
With the controller, recline the chair to be parallel with the oor. Then, install the connector and air hose
pieces within the leg unit.
02
Connect the leg unit to the main body frame by aligning the parts as shown in the diagram below.
03
When all parts are aligned and in place, use the controller to lower the leg unit to its original resting
position.
Installation Part 01
Main Body
Main Body
Leg Unit
Leg Unit
Fasten the parts together using nails.

STEP 3. Assemble the Arm Unit / Attach the Back Cover
01
Connect the air hose and connector beneath the interior of the side panel.
02
After aligning the corresponding parts, fasten using nails.
03
Fasten the back cover into place using nails on the back of the
massage chair.
CAUTION
※ Do not lift or apply pressure to the back cover. Accidents or broken parts may
result.
Installation Part 02
Arm Unit
Main Body
Back Cover
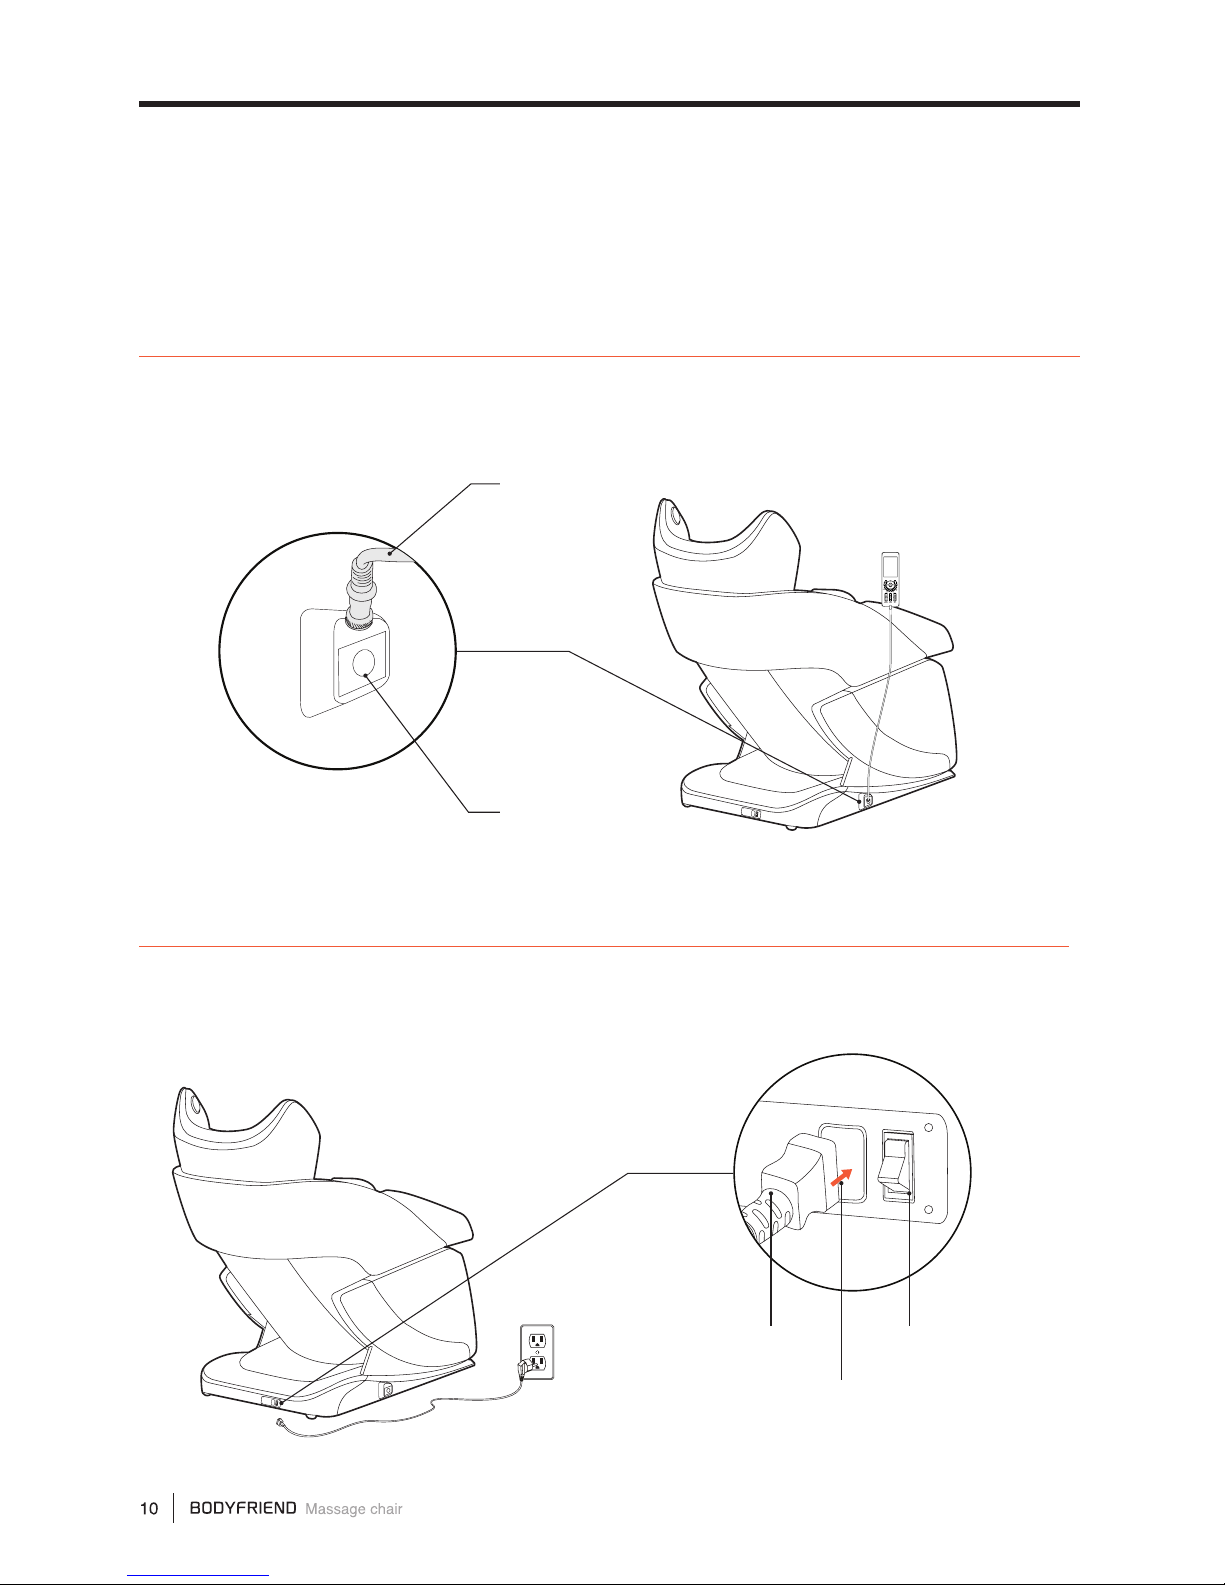
STEP 5. Connecting to Power Supply
Plug the power cable into the socket at the lower end of the massage chair as depicted below. After
plugging in the power cable, turn on the power switch.
STEP 4. Connecting the Controller
Locate the controller socket towards the right arm rest and connect the controller cables with its socket.
Power Socket
Power Cable Power Switch
Controller Cable
Installation Part 03
Controller Socket
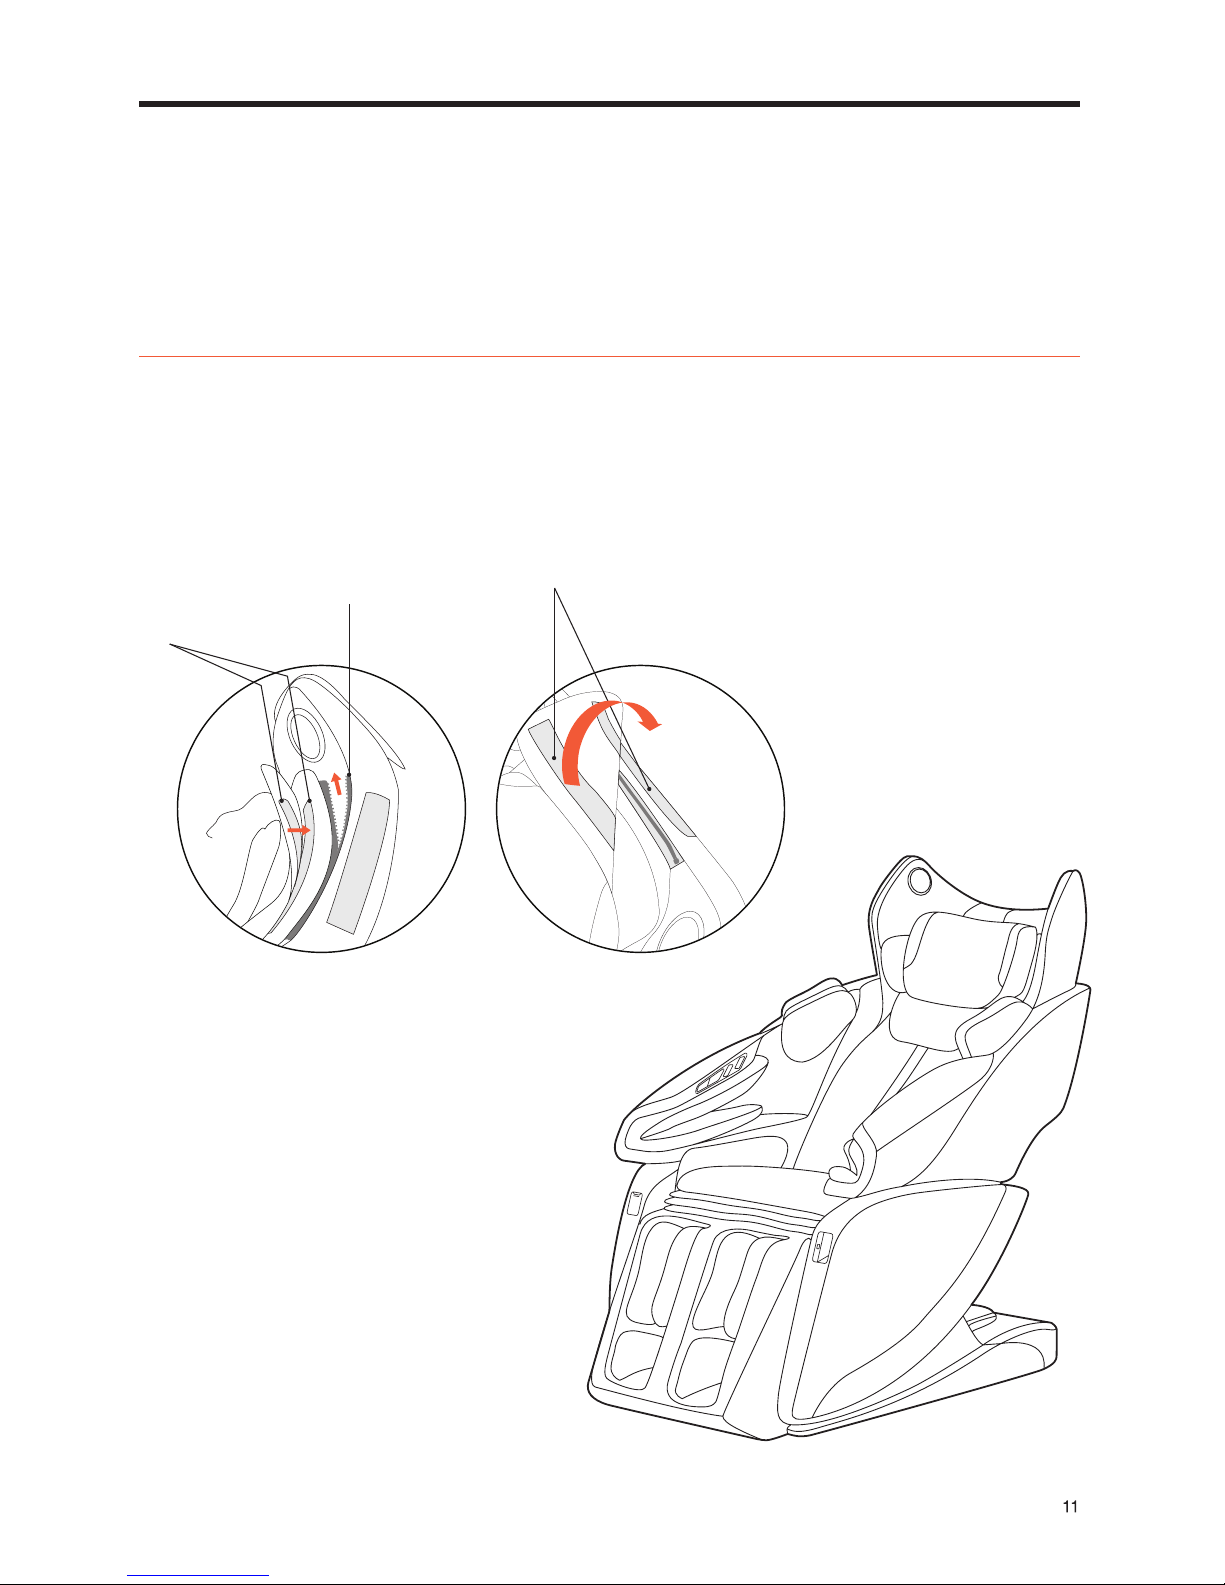
STEP 6. Back / Head Unit Construction
Head cushion and pillow can be installed depending on preference.
The head cushion can be used to soften the intensity of the shoulders and neck massage.
Construct the back unit using the zipper (01) and adherent (02).
Install the head cushion using the adherent (03) (length can be adjusted based on preference).
Installation Part 04
(03) ADHERENT
(02) ADHERENT
(01) ZIPPER

Controller Button Descriptions 01
03
02
01
04
05
06
07
14
15
16
17
18
10
11
12
13
09
08
23
21
22
20
19
01
Zero Gravity Indicator
02
Heating Indicator
03
Auto/Manual Mode Indicator
04
Auto or Manual
Massage Technique Indicator
05
Air Massage Indicator
06
Legrest Adjust Indicator
07
Massage Intensity Indicator
Feet Roller Speed Indicator
Airbag Intensity Indicator
Width Indicator
08
Reclining Indicator
09
Massage Module Movement Tracking
10
Massage Module Spot Indicator
11
Time Elapsed Indicator
12
Volume Control
13
Bluetooth Connectivity Indicator
Controller LCD
Components
14
Power
15
Zero Gravity
16
Airbag
17
Spot Adjust
18
Legrest Adjust
19
Reclining
20
Heating
21
Auto
22
Enter
23
Menu
Controller Button
Components
Slide Safety Mode
This massage chair is equipped with the automatic sliding function. Therefore, if the power button is pressed during
operation, the chair will start to automatically slide back to its original resting position. When the chair is sliding back to its
original state, please make sure children, pets, or other objects do not get caught. If there are any obstacles preventing the
chair from sliding back to its original state, immediately press any button on the controller to stop the auto slide. Please
use with caution.

Controller Button Descriptions 02
Power
This is the power button. If the [Power] button is pressed during a massage, the
screen will ask the user if he/she would like to end the massage. In the case of a
ceased massage mode, massage balls, sliding features, and etc. will all return to
its original resting state.
Menu When the [Menu] button is pressed during operation, the menu screen will
appear or take you back to the previous screen.
Zero
Gravity
The [Zero Gravity] button will transition the body into the zero gravity position
and angle.
Airbags
When the [Airbag] button is pressed during operation, the airbag installation
screen will appear, allowing airbag massage spot, intensity, and etc., to be
adjusted.
Auto During a massage mode, press the [Auto] button to quickly transition the
massage mode to a dierent auto massage mode.
Heating Pressing the [Heating] button during operation will cause the heating screen to
appear and heat temperature and heating location can be adjusted.
Arrow
Keys
The arrow keys allow user to navigate the controller. On the main screen, the [left/
right] buttons control massage intensity levels and the [up/down] buttons control
airbag pressure levels.
Spot
Adjust
The controls displayed on the left adjust the spot of the massage balls on manual
mode. The controls displaced on the left adjust the shoulder spot on automatic
mode.
Legrest
Adjust These buttons allow leg angles to be adjusted.
Reclining Reclining buttons adjust the recline angles for the body.

Controller Function Descriptions 01
Start
Press the [Power] button to turn on the screen and activate the massage chair.
When the child safety lock screen appears, hold down the [Enter] button for three seconds.
Finish
After nishing a massage mode or if there is
a need to quit during a massage, press the
[Power] button.
A screen will appear asking for conrmation to
end the massage.
Press [Enter] to conrm the end of the massage
mode and the machine will shut down with all
parts moving back to its original resting position.
The child safety lock screen is emplaced
as a safety precaution. After activating
the controller, the child safety lock screen
will appear requiring the user to hold
down the [Enter] button for three seconds
to transition to the next screen to start
operating the massage chair. Users can
make necessary changes in the settings
option.
The main screen shows the current
state of the massage, time, and etc.
[Right/Left] arrow keys control
massage intensity levels.
[Up/Down] arrow keys control airbag
pressure levels.
After the auto body scanning is
complete, the [Up/Down] arrow keys
allow shoulder spot adjustment.
The menu screen will appear when the
[Menu] button is pressed. Four options
will appear: Auto Mode, Manual Mode,
Massage Options, and Settings. Detailed
massage setting can be accessed through
Massage Options. Any other setting can be
accessed through Settings.
Child Safety Lock Screen Main Screen Menu Screen
The pinch point prevention screen appears as a
safety measure just before the device is turned o.
Check for any objects that may prevent the chair
from moving back to its original position and then
press [Enter] to completely turn o the device.
Pinch Point Prevention Screen
03
01
02

Controller Function Descriptions 02
Auto Modes
[Menu] > Auto > Use the [Up/Down] arrow keys to pick preferred massage modes > [Enter] > Auto Body
Scanning will use sensors to pinpoint areas of your body > Massage balls will relocate to corresponding
locations > Massage session will begin.
Refresh Massage mode that simultaneously uses kneading and tapping techniques on targeted
shoulder area.
Relax Massage mode concentrated on shoulders, back, and waist through continuous kneading
and tapping.
Hip-Up Massage mode that alternates acupressure and kneading techniques on the buttocks.
Rest Massage mode that provides 30 minutes of concentrated kneading for the entire back.
Athlete Massage mode that combines tapping, kneading, and acupressure techniques targeting
the shoulders while operating dual chopping feet rollers.
Oce Massage mode using tapping and acupressure massaging techniques focusing on the
waist while automatically reclining the body at dierent angles to promote relaxation.
Stretch Massage mode using tapping and kneading techniques while fully reclining the body at
dierent angles to gently stretch the legs and body separately.
Auto Upper Massage mode that provides tapping for the shoulders and back while using acupressure
and various other massaging techniques for the upper body.
Auto Lower Massage mode relieves tension in the lower body area by concentrating on the legs and
operating rollers for the feet.
Lymphatic Massage mode uses pinpointed massage therapy to stimulate the lymphatic system to
drain toxins from the body.
Digestive
Massage mode uses acupressure massage techniques to facilitate digestion, ease
hangovers, and improve circulation throughout the arms and legs to the digestive
organs.
Waist
Focused
Massage mode uses massage balls targeted around the body's core to strengthen the
waist and improve body posture.

Controller Function Descriptions 03
Manual Modes
[Menu] > Manual Mode > Choose preferred area of massage on the body > (Press [Menu] to go back to
previous screen)
[Up/Down] > Choose massage techniques > [Enter] > Massage set-up screen will appear
[Right/Left] to personalize massage options > [Enter] to start massage mode.
※ While in Auto Massage Mode, Manual Mode Options (massage techniques/spot/intensity) cannot be adjusted.
Spot
Adjust
Adjust the area of the back-side that needs to be massaged.
Full Body: This massage incorporates all areas of the body.
Shoulders: Massages area from the neck to shoulders.
Back/Waist: Massages back and waist area.
Buttocks: Massage the buttocks area.
Leg: Massages the legs (detailed massage options cannot be adjusted)
Massage
Techniques
Choose among (kneading/tapping/chopping/combination (kneading and tapping)/
acupressure) massage techniques.
Specic
Settings
Massage intensity, width, and shift speeds are able to be adjusted.
-Shift Speed: Speed in which massage balls move from upper body to lower body can be
adjusted from Level 1 to Level 3.
-Intensity Levels: Dierent intensity level options starting from Level 1 to Level 3.
-Width: Width of the massage modules can be adjusted (narrow/medium/wide)

Controller Function Descriptions 04
Roller Speed
Adjust roller speeds for the feet, change to manual
feet massage mode, and use [Right/Left] arrow keys
to adjust roller speeds.
Heating
There are heating options for the back and waist.
Heating temperature can also be adjusted in
increments of 9°F from 86°F to 140°F. [Right/Left]
arrow keys control dierent heating levels and at
level 0, the heating function is shut o.
Airbags
Airbag massage function (Airbag Spot/Intensity) can
be set up.
[Up/Down] arrow keys adjust the location of
airbags.
[Right/Left] arrow keys adjust airbag levels.
[Menu] > [Massage options] > roller speed, heating, airbag settings can be adjusted.
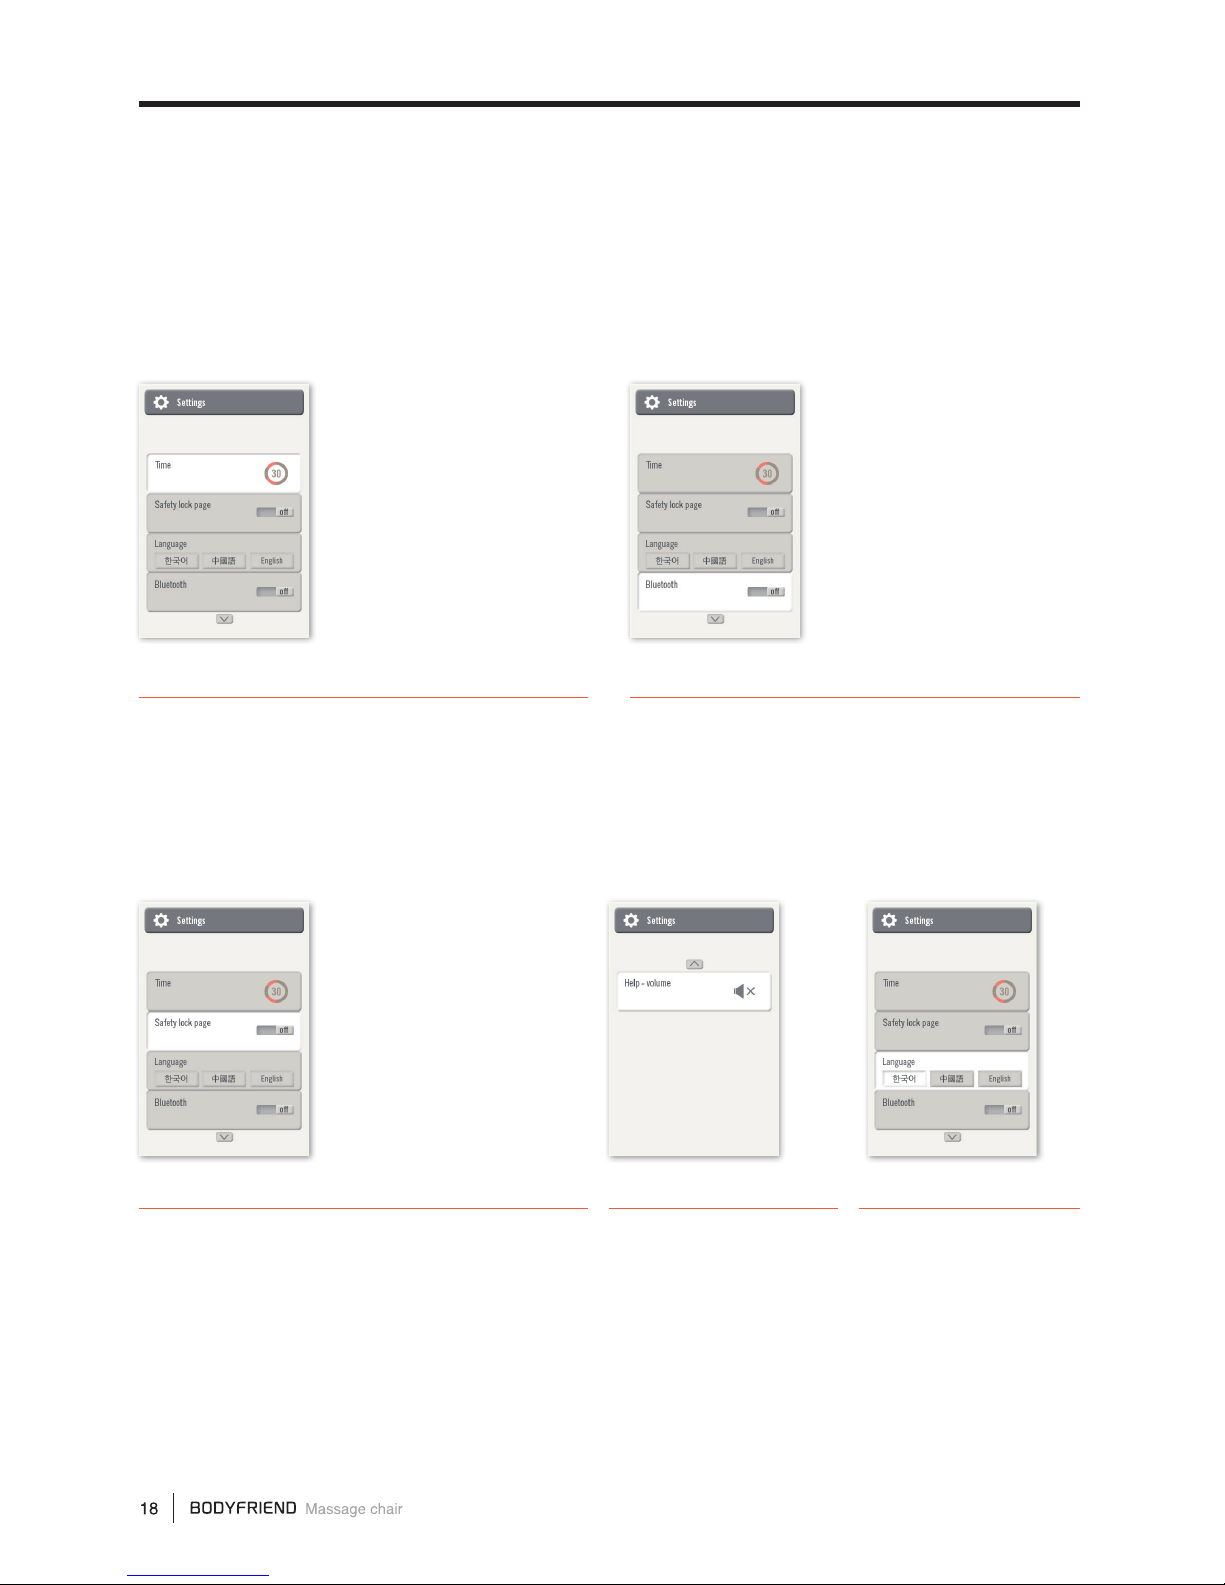
Controller Function Descriptions 05
[Menu] > Settings
Set up massage duration times, child safety lock screen, language, Bluetooth
connectivity, audio guidance volume, and etc.
Child Safety Lock Screen
Child safety lock screen can be emplaced to prevent
young children from operating the massage chair.
If the safety lock screen is set up, it will appear
when the controller is turned on. When this screen
appears, hold down the [Enter] button for three
seconds to proceed to the main screen. Under
settings, [Right/Left] arrow keys switch the safety
lock screen on/o.
Audio Guide Volume
Audio guidance can be
turned on/o and volume
controls can also be
adjusted.
Language
Change language
settings to either Korean,
Chinese, or English. Use
the [Right/Left] arrow
keys to switch between
languages to pick the
preferred language.
Time Elapsed
Set massage duration times for 15/20/25/30
mins. [Right/Left] arrow keys increase or decrease
duration times.
(Sleep mode is pre-set at 30 min. and cannot be adjusted).
Bluetooth Connectivity
Sync personal mobile device with Bluetooth
function to play music through the speakers while
receiving a massage.
Bluetooth Connectivity
01
Use the controller to turn the
Bluetooth function on under the
settings menu.
02
Turn Bluetooth ON on mobile
device.
03
Pair the devices by nding
"BODYFRIEND REX-BT1 "

BODYFRIEND Customized Programs
Stretch
Extend the body while relaxing on a massage chair. BODYFRIEND’s unique Stretch Mode
stretches the body even while sitting down. The entire body is encapsulated with airbags and air
compression massage ensues. Airbags gently tug and pull on the body to create an “extending”
eect. From head to toe, gentle stretching allows the muscles to be loosened and body to be
elongated.
STEP 01
Relieve tensions throughout the body with medium or strong massage levels at
recline angles up to 135°.
STEP 02
Set at recline angle around 150°, medium intensity kneading and acupressure
massages transcend the user to sleep. The back of the neck and head is gently
kneaded to further induce sleep.
STEP 03
Reclined at 170°, gentle kneading and acupressure techniques relax the body and
keep the body physically and mentally stabilized.
BODYFRIEND’s Rest Mode provides healing bodies need (30min.).
Rest Mode is one of BODYFRIEND’s exclusively patented technologies.
Rest
New Massage Modes
BODYFRIEND’s new massage modes have a variety of customers’ needs in mind.
Athlete
Oce
Hip-Up
Muscle soreness or knots from exercise can be relieved through Athlete mode. Alternating
between the shoulder, waist, and buttocks, the entire body is massaged to relax the muscles.
There are dierent reclining options for this mode to rejuvenate the body and mind.
For those who put a lot of pressure on the waist, Office Mode focuses
acupressure and tapping techniques on the waist area. Office Mode relieves built
up tension in the waist caused by sedentary lifestyles.
Relaxing muscle tensions throughout the lower body, the hip-up mode targets the buttocks
and hips. Massaging these areas by kneading, acupressure, air pressure, and a combination of
these techniques, let the body experience the benets of hip-up mode.

Product Specifications
Model BFS-8000US
Reclining Angle 135°- 170°
Lower Body Angle 0°-90°
Kneading Speed 25-35 kneads per minute
Kneading Width 2.4in – 6.7in (6-17cm)
Tapping 320-560 taps per minute
Heating Temperature Max 140°F
Power Supply 110-120V~
Rated current 1.8A
Power Frequency 60Hz
Auto Timer 15min/20min/25min/30min
Airbags Shoulders/Waist/Arms/Hips/Calves/Feet
Rollers Feet Soles
Massage Balls Neck/Shoulder/Back/Buttocks (Spot&Range)
Auto Mode 12 Auto Massage Modes
Weight
(including packaging) 322lbs
Product Weight 276lbs
Cover / Upholstery ABS / Synthetic Leather
Dimensions Reclined 68.9in X 32.7in X 37in (175cmx83cmx94cm)
Dimensions Upright 59.1in X 32.7in X 49.2in (150cmx83cmx125cm)
Product Name Massage chair
Product Specications are subject to change without previous notications due to product improvements.
Table of contents
Other Bodyfriend Massager manuals


