Bodytastic B22.3 User manual
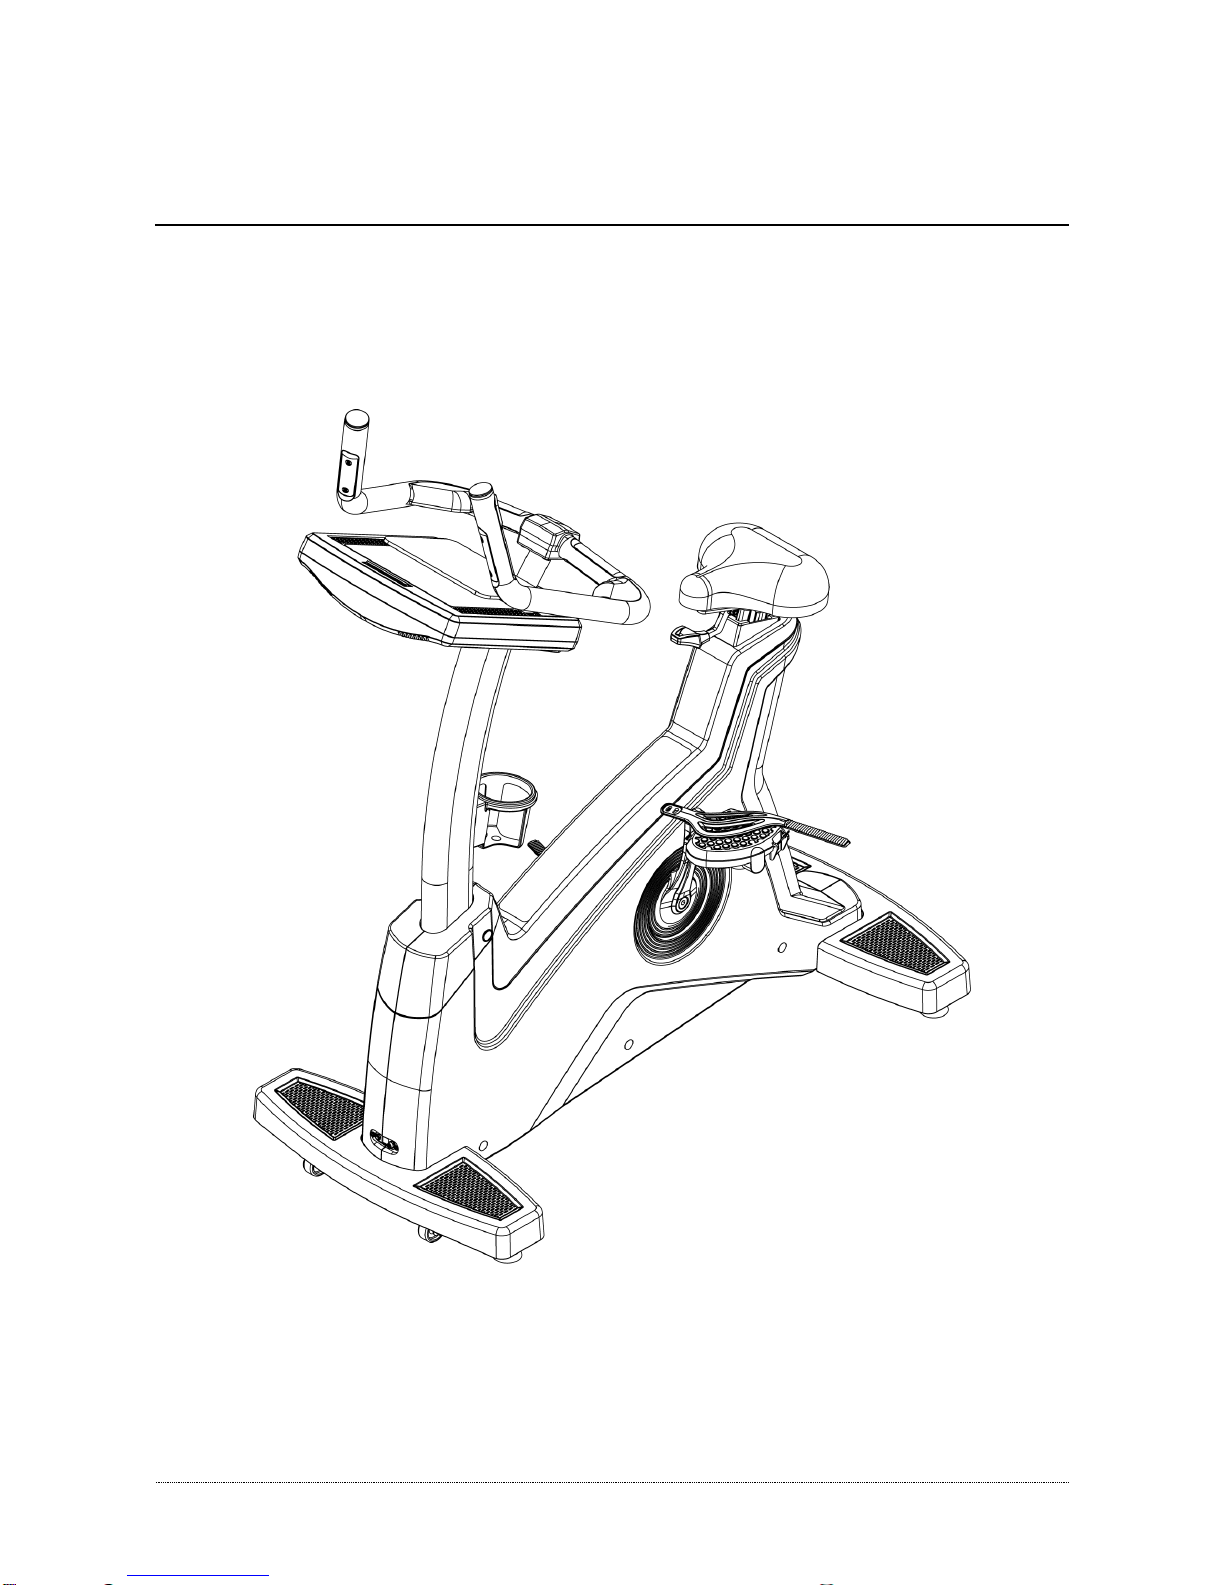
B22.3 BIKE ASSEMBLE INSTRUCTION
INDEX

2015/3/9V1.1+V1.1
1
1. PART LIST....................................................................................................................2
2. SCREW BAG................................................................................................................3
3. ASSEMBLE STEPS......................................................................................................4
4. The operation instruction of electronic meter..............................................................10
4.1. Electronic meter structure................................................................................11
5. Display page introduction ...........................................................................................13
5.1. Simple user interface:....................................................................................13
5.2. Startup page.....................................................................................................13
5.3. Resident area...................................................................................................13
5.4. Standby page...................................................................................................14
5.5. Program control set page.................................................................................15
5.6. Exercise storage device optional page (running and fitness with the exercise
record device).............................................................................................................15
5.7. Pages of the exercise ......................................................................................17
5.8. Exercise Course Page .....................................................................................23
6. Heart Detection Introduction.......................................................................................25
6.1. Heart Rate Sensor System ..............................................................................25
6.2. Regional heart rate exercise............................................................................26
7. Sports and fitness program.........................................................................................26
7.1. Overview of sports and fitness program...........................................................26
7.2. Overview of sports and fitness program...........................................................27
8. Program Set ...............................................................................................................35
8.1. Enter and Exit Engineer Mode.........................................................................35
8.2. Setting Metric or Imperial system Units............................................................35
8.3. Time zone setting.............................................................................................36
8.4. Language.........................................................................................................36
8.5. Setting Metric or Imperial system Units............................................................36
8.6. Machine information.........................................................................................36
8.7. Wi-fi setting......................................................................................................37
8.8. Power setting...................................................................................................37
8.9. Update for the software....................................................................................37
8.10. Value Setting................................................................................................38
8.11. Debug Log....................................................................................................38
8.12. TV Setting.....................................................................................................38
8.13. Others...........................................................................................................39
2015/3/9V1.1+V1.1
2
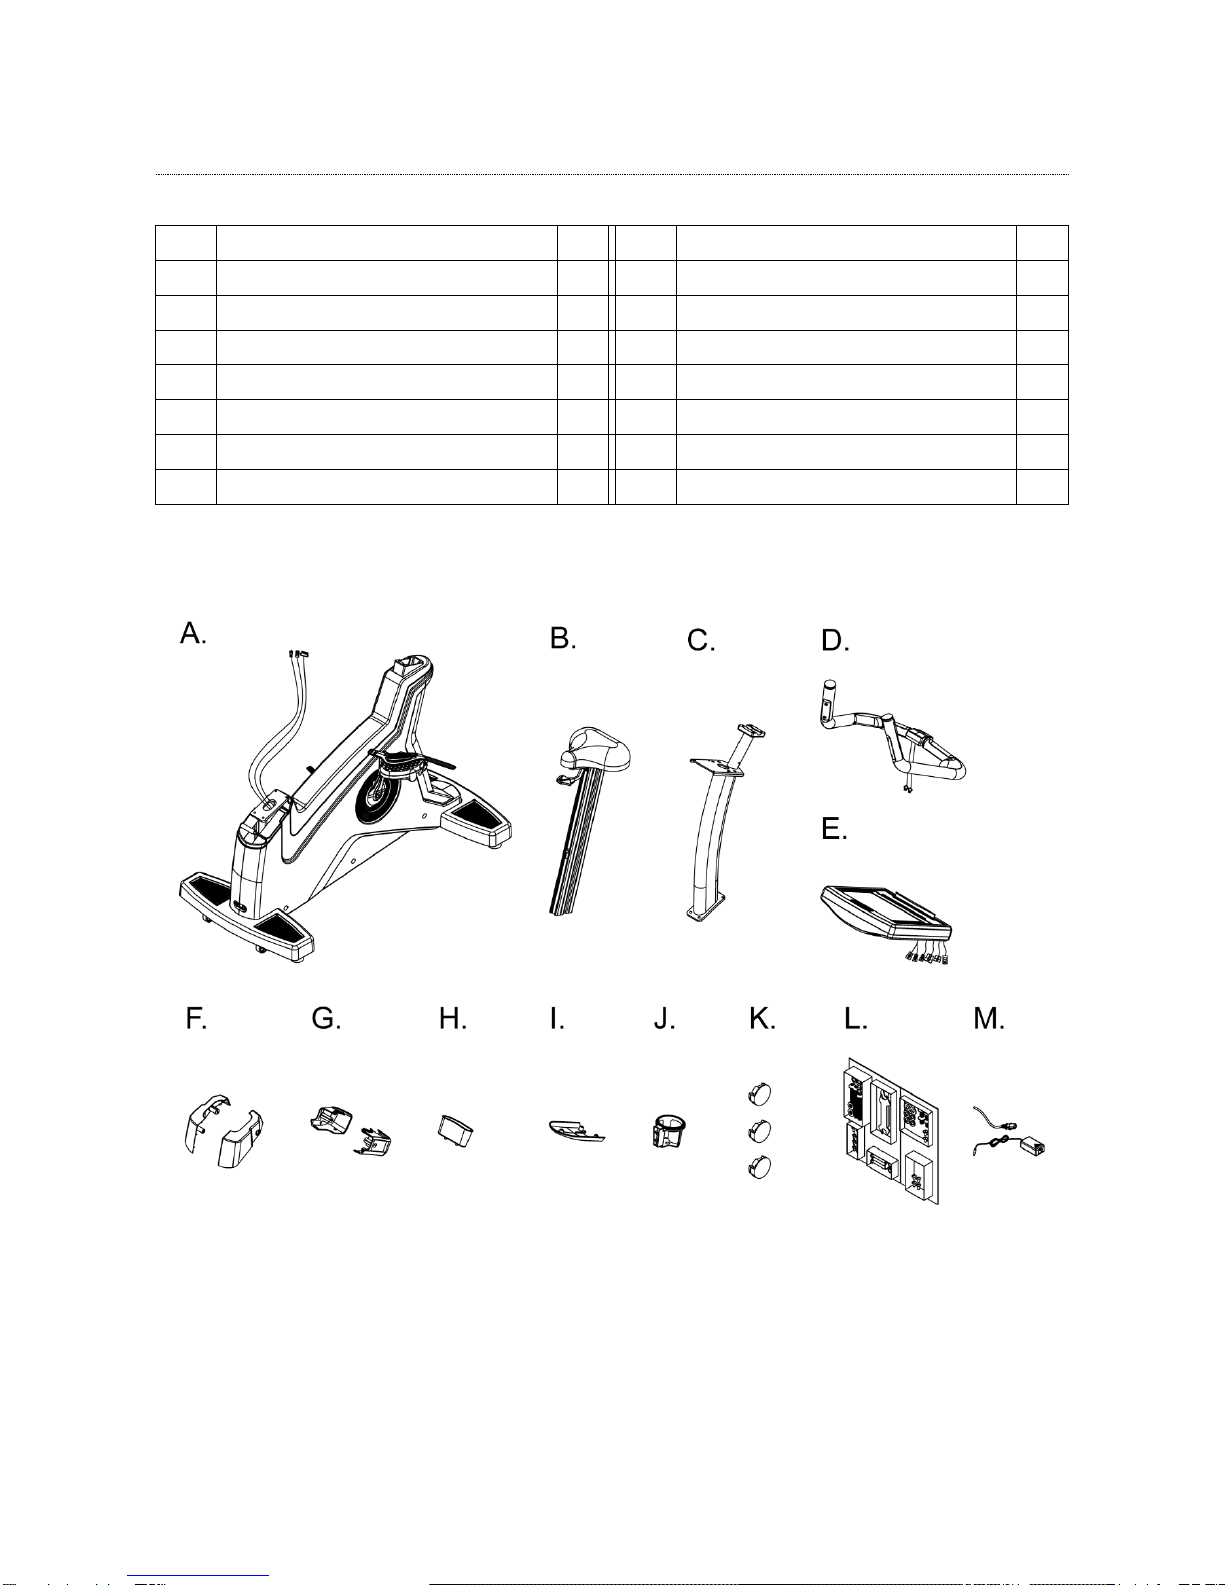
1. PART LIST
ITME
Description
Qty
ITEM
Description
Qty
A
frame
1
H
Stuff holder
1
B
seat
1
I
Lower computer decorative cover
1
C
Control tube
1
J
Flask holder
1
D
Handle bar tube
1
K
Screw head cover
3
E
computer
1
L
Screw bag
1
F
Control tube decorative cover
1
M
Power wire
1
G
Computer decorative cover front
1
2015/3/9V1.1+V1.1
3
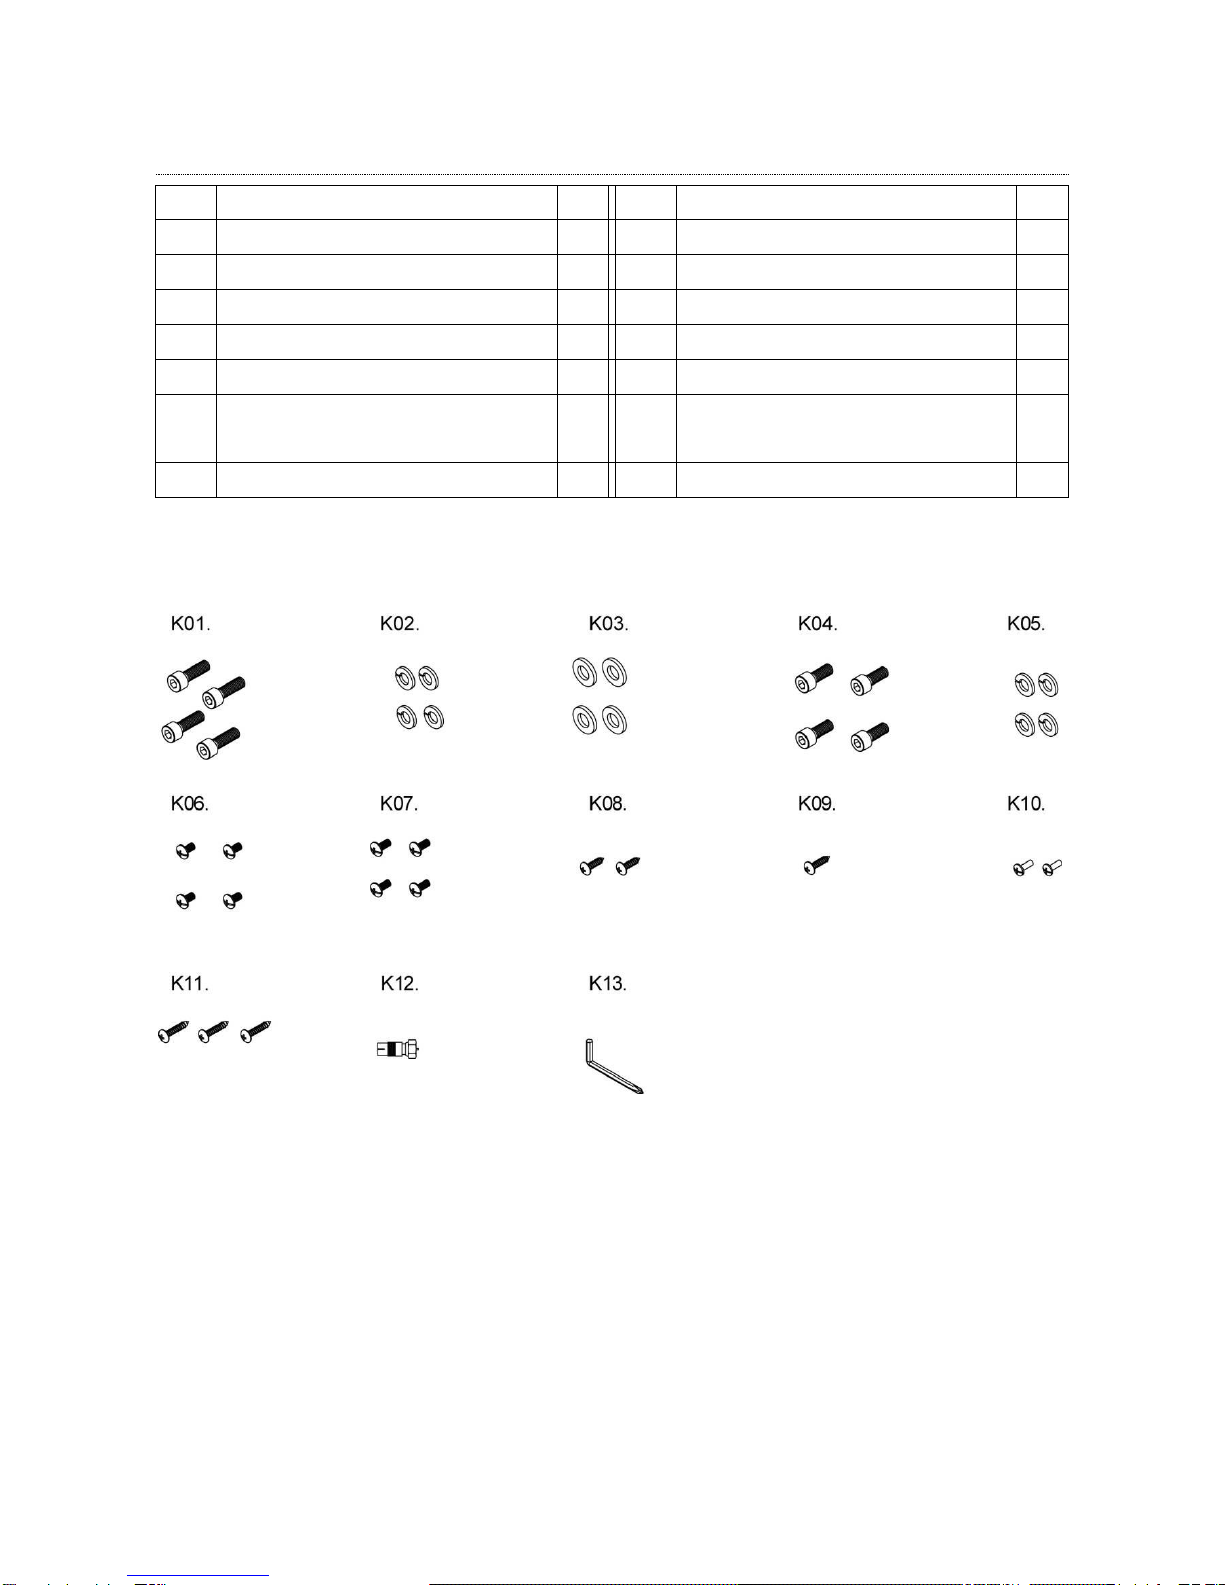
2. SCREW BAG
ITME
Description
Qty
ITEM
Description
Qty
K01
Cks hex screw M8xP1.25x25
4
K08
Truss cross self-tapping screw Φ4x10
2
K02
Spring washer M8
4
K09
Truss cross self-tapping screw Φ4x12
1
K03
Flat washer Φ8xΦ12x1.0t
4
K10
Truss cross screw M4xP0.7x12
2
K04
Cks hex screwM8XP1.25X20
4
K11
Truss cross self-tapping screw Φ4x15
3
K05
Spring washer M8
4
K12
CABLE transferring head
1
K06
Truss cross screw M5xP0.8x10
4
K13
L shaped hex wrench+cross screwdriver
6x40x120mm
1
K07
Truss cross screw M5xP0.8x12
4
2015/3/9V1.1+V1.1
4
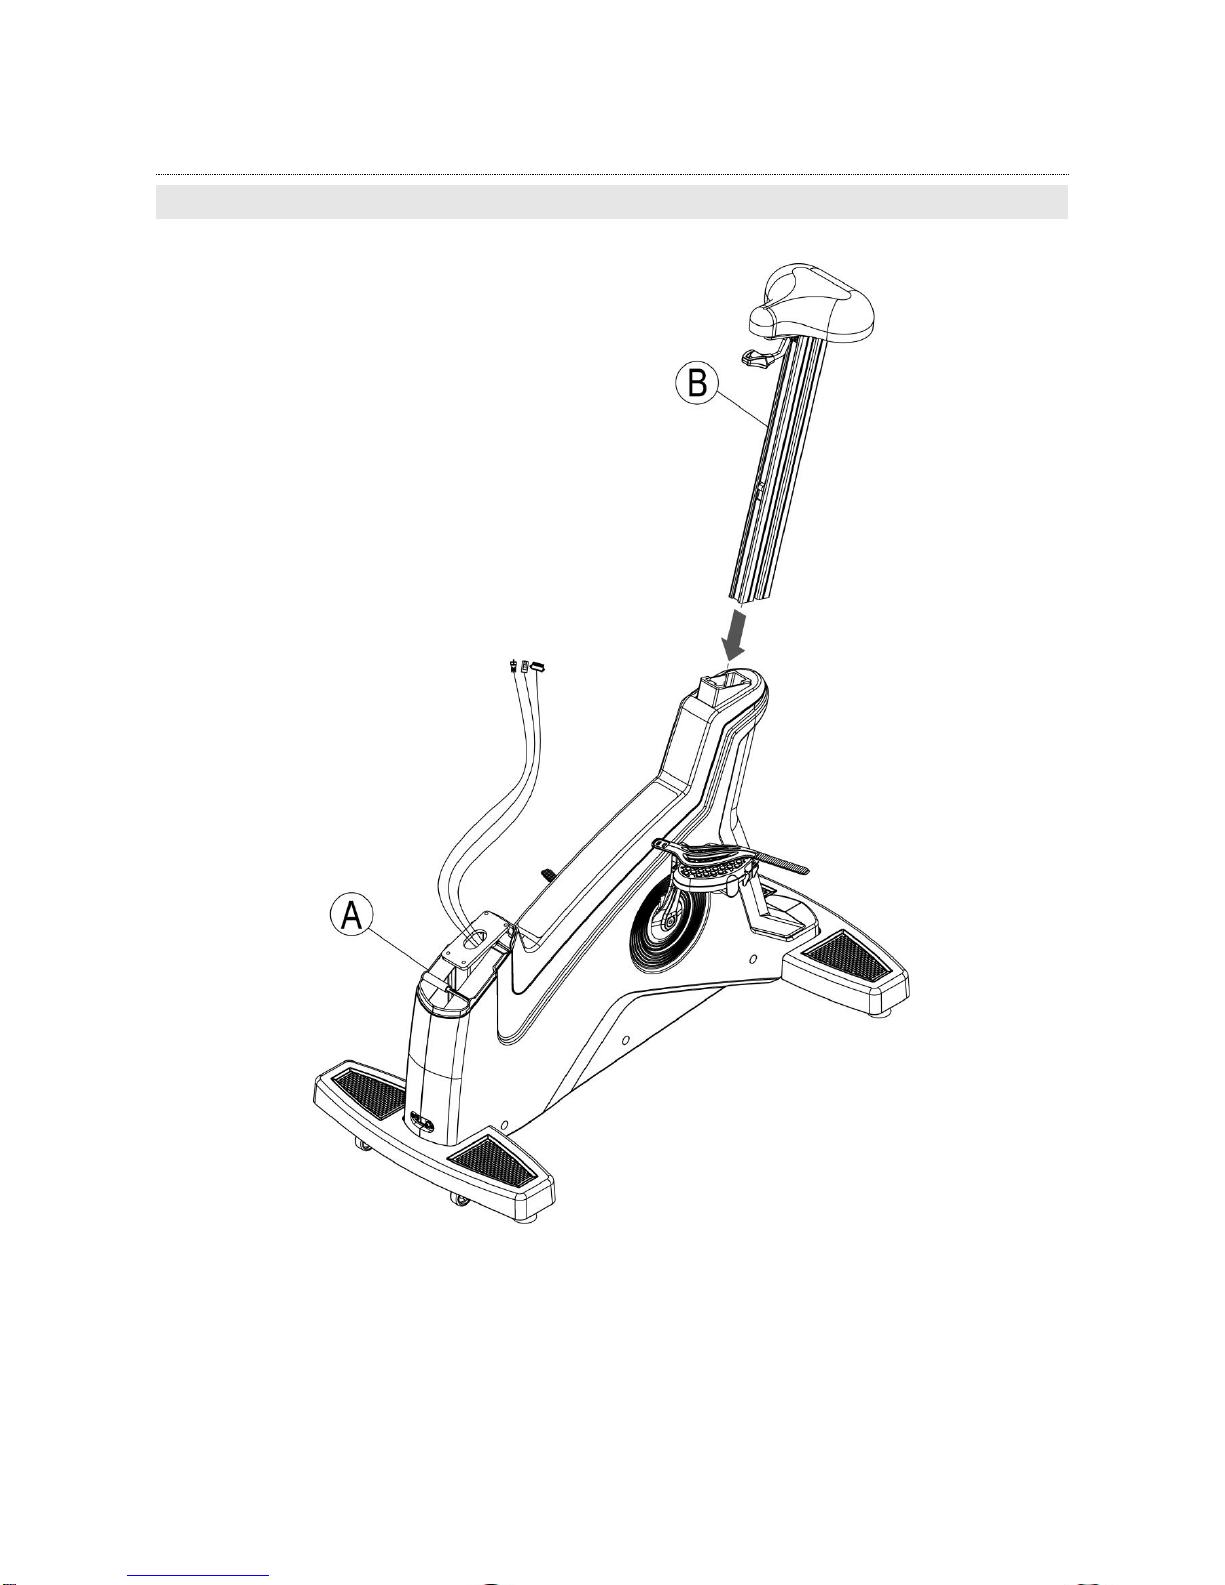
3. ASSEMBLE STEPS
STEP 1 ASSEMBLE FRAME AND SEAT
Insert seat(B) into frame(A) as the arrow showing and fix them.
2015/3/9V1.1+V1.1
5
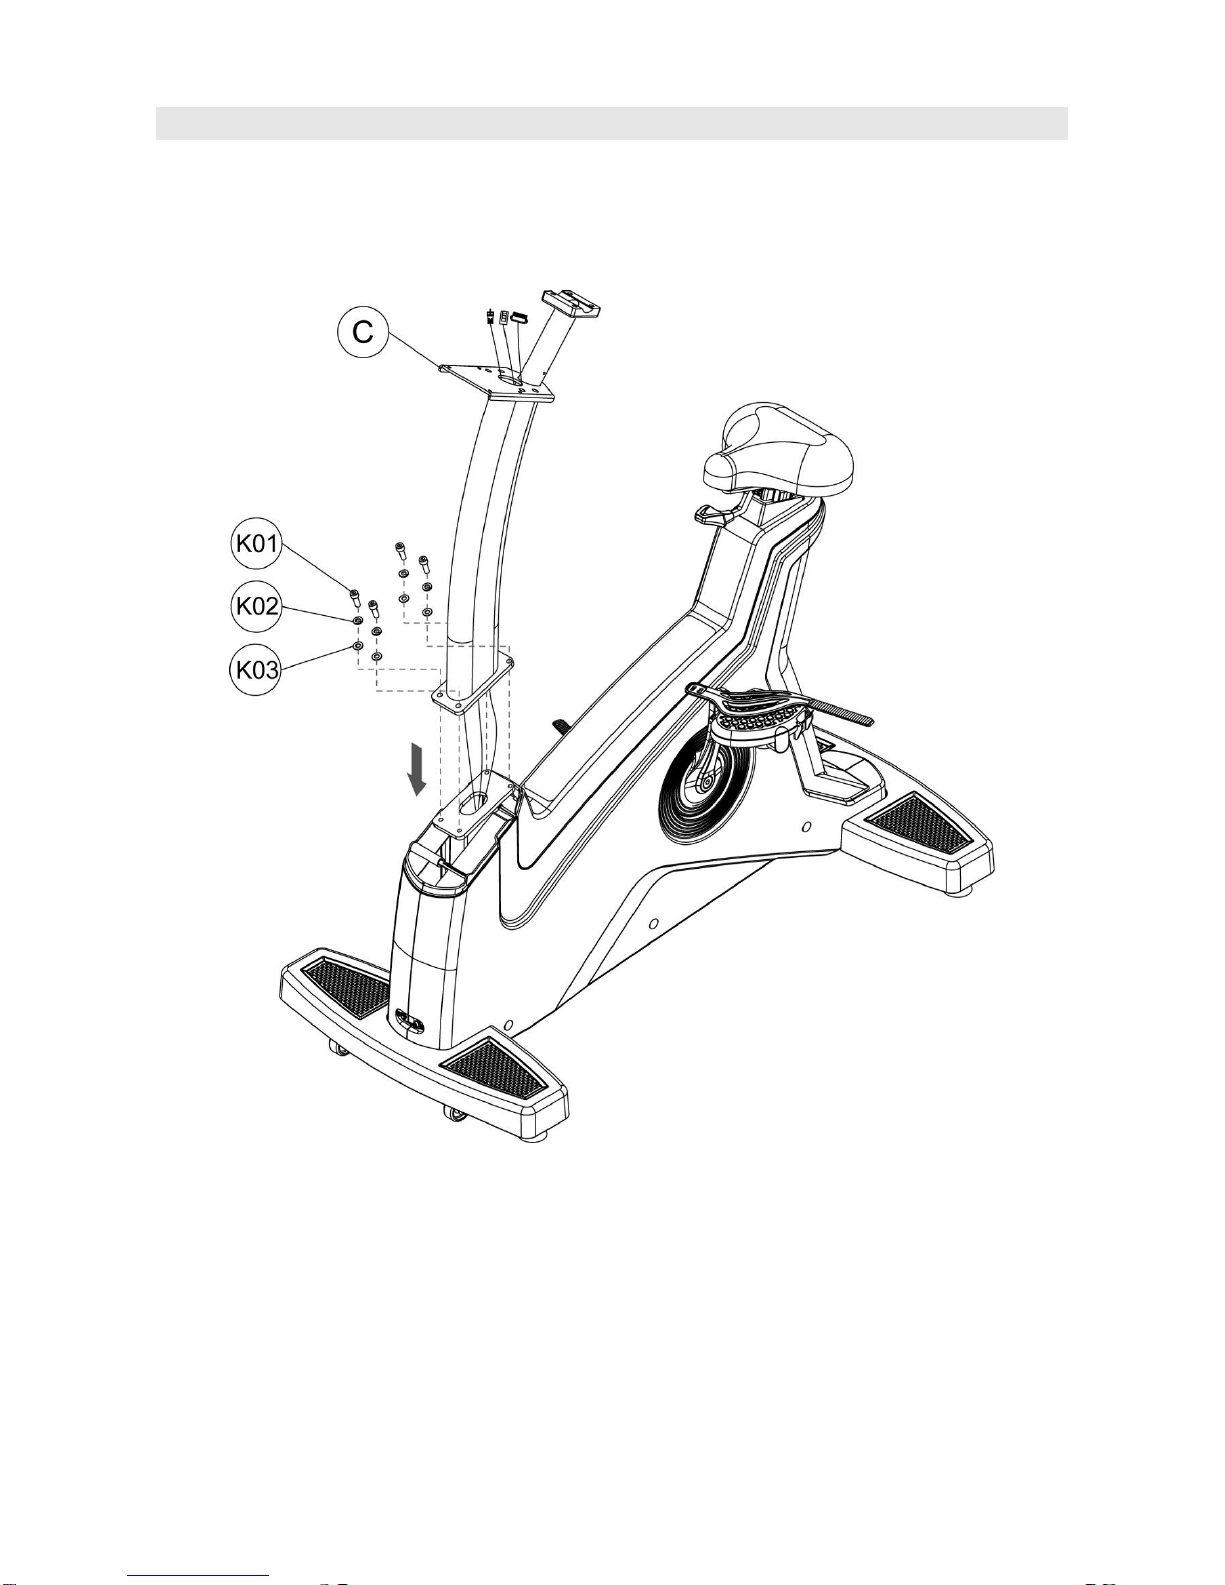
STEP 2 ASSEMBLE FRAME AND CONTROL TUBE
Make the control wire of frame through control tube, then tighten control tube(C) on frame(A)
with hex screw(K01), spring washer(K02) and flat washer(K02) as the figure showing.
2015/3/9V1.1+V1.1
6
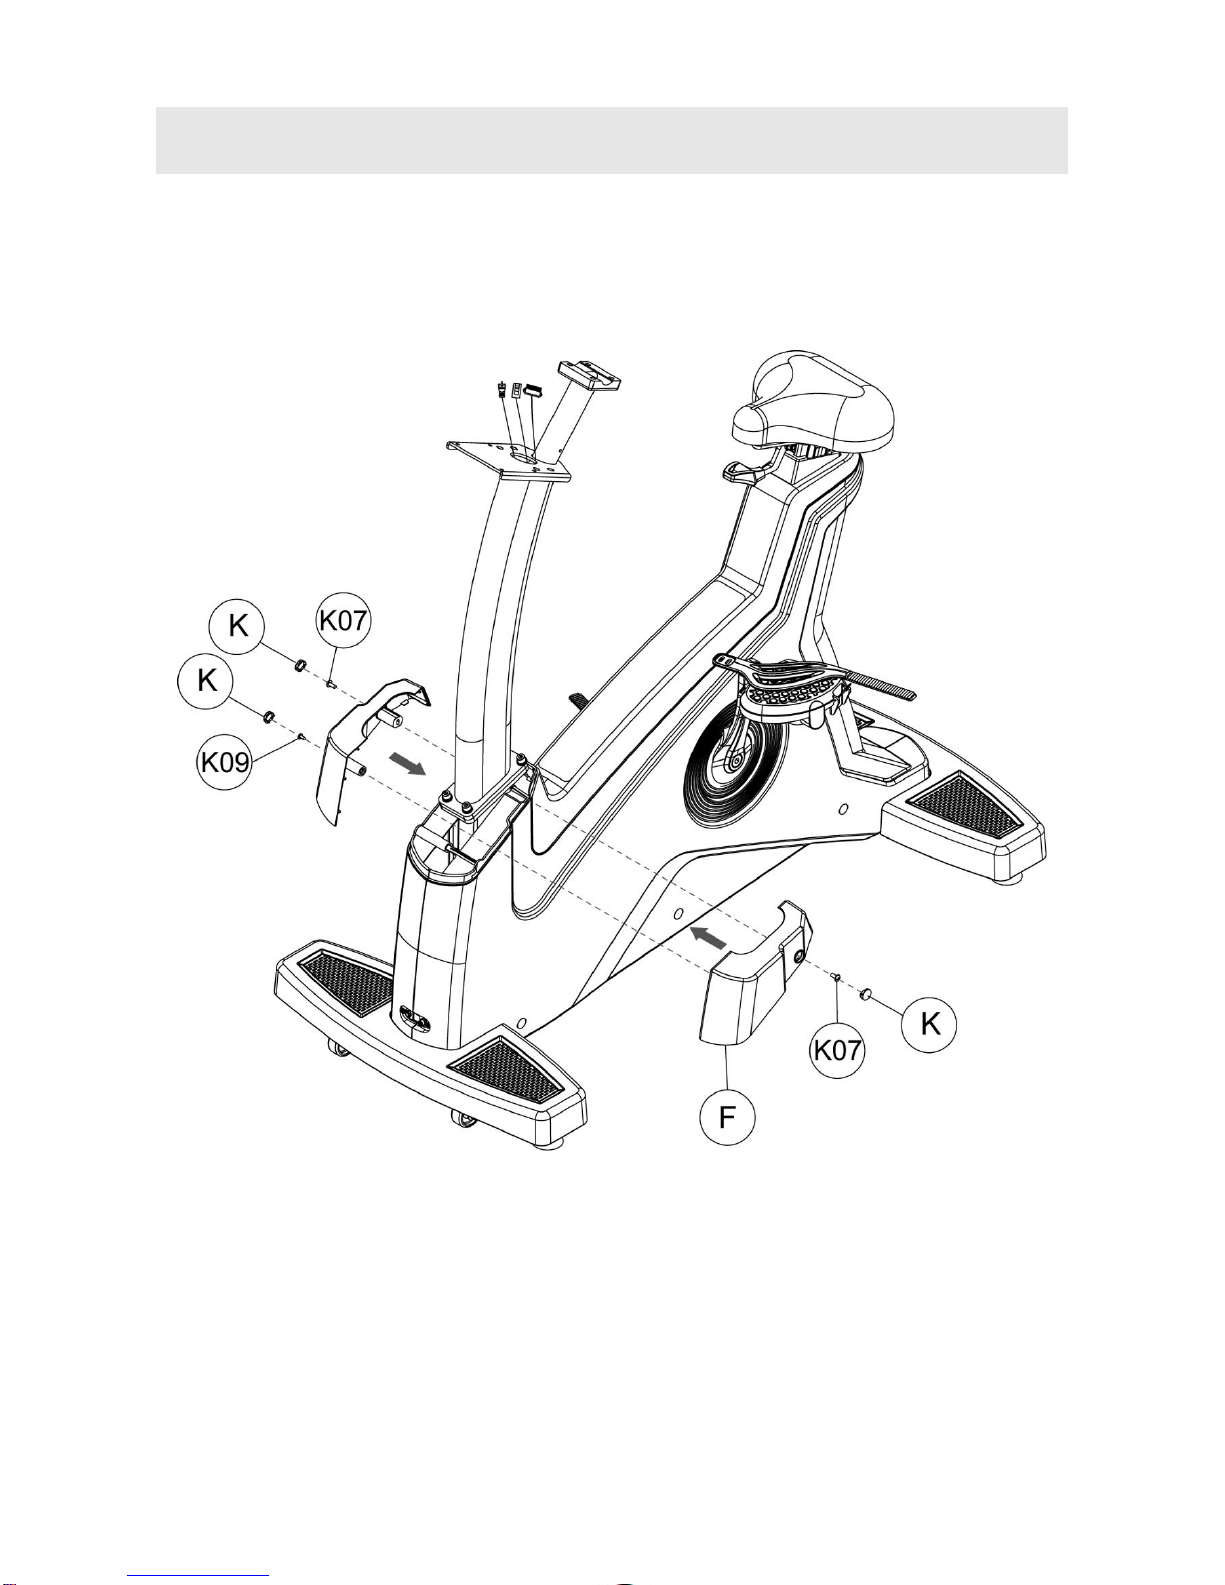
STEP 3 ASSEMBLE CONTROL TUBE AND CONTROL TUBE
DECORATIVE COVER
Tighten control tube decorative cover(F) with truss cross screw(K07) & truss cross
self-tapping screw(K09) as figure showing, then cover the screw head cover(K).
2015/3/9V1.1+V1.1
7
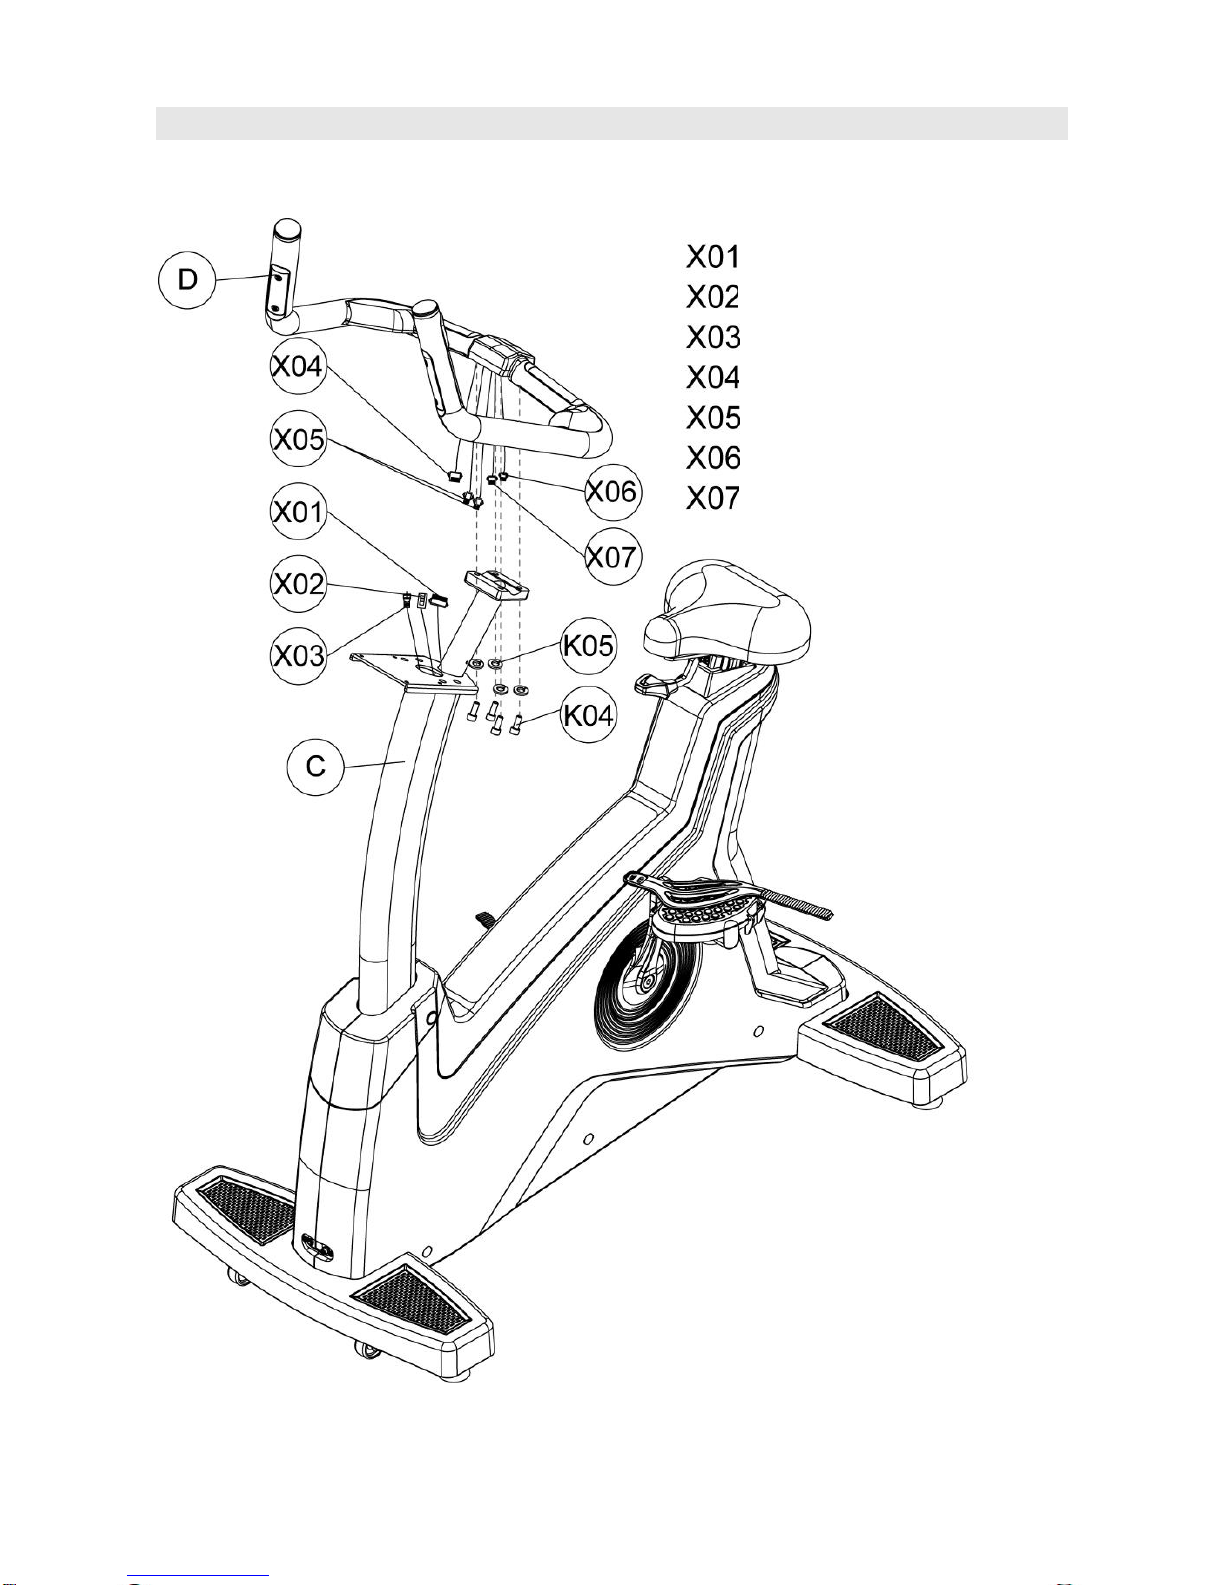
STEP 4 ASSEMBLE CONTROL TUBE AND HANDLE BAR TUBE
Pull out the wires in handle bar tube(D) and make it through control tube(C), then tighten
handle bar tube(D) on control tube(C) with hex screw(K04), spring washer(K05).
: Lower control wire
: Network cable
: TV cable lower
: Lower hand grip pulse wire
: Lower hand grip pulse wire
: Hand grip instant key connecting wire lower
: Hand grip instant key connecting wire lower

2015/3/9V1.1+V1.1
8
STEP 5 ASSEMBLE COMPUTER AND CONTROL TUBE
Connecting wires of computer(E) and the wires outing from control tube(C), then tighten
computer(E) on control tube(C) with truss cross screw(K06).
: Hand grip instant key connecting wire upper
: Hand grip instant key connecting wire upper
: Network connecting cable upper
: TV cable
: Upper control wire
: Hand grip pulse wire upper
: Hand grip pulse wire upper

2015/3/9V1.1+V1.1
9
STEP 6 ASSEMBLE COMPUTER DECORATIVE COVER, FLASK
HOLDER AND COMPUTER CONTROL TUBE
Tighten computer decorative cover front(G) on control tube(C) with truss cross screw(K07),
and fix stuff holder(H) with truss cross self-tapping screw(K08). Then tighten flask holder(J)
on control tube(C) with truss cross screw(K10).At last, fix lower computer decorative
cover(I) on computer(E) with truss cross self-tapping screw(K11).
2015/3/9V1.1+V1.1
10
4. The operation instruction of electronic meter
This machine can provide a simple and easily operated electronic meter. Users can input
personal data by the electronic meter and set each exercise target.
A
B
C
D

2015/3/9V1.1+V1.1
11
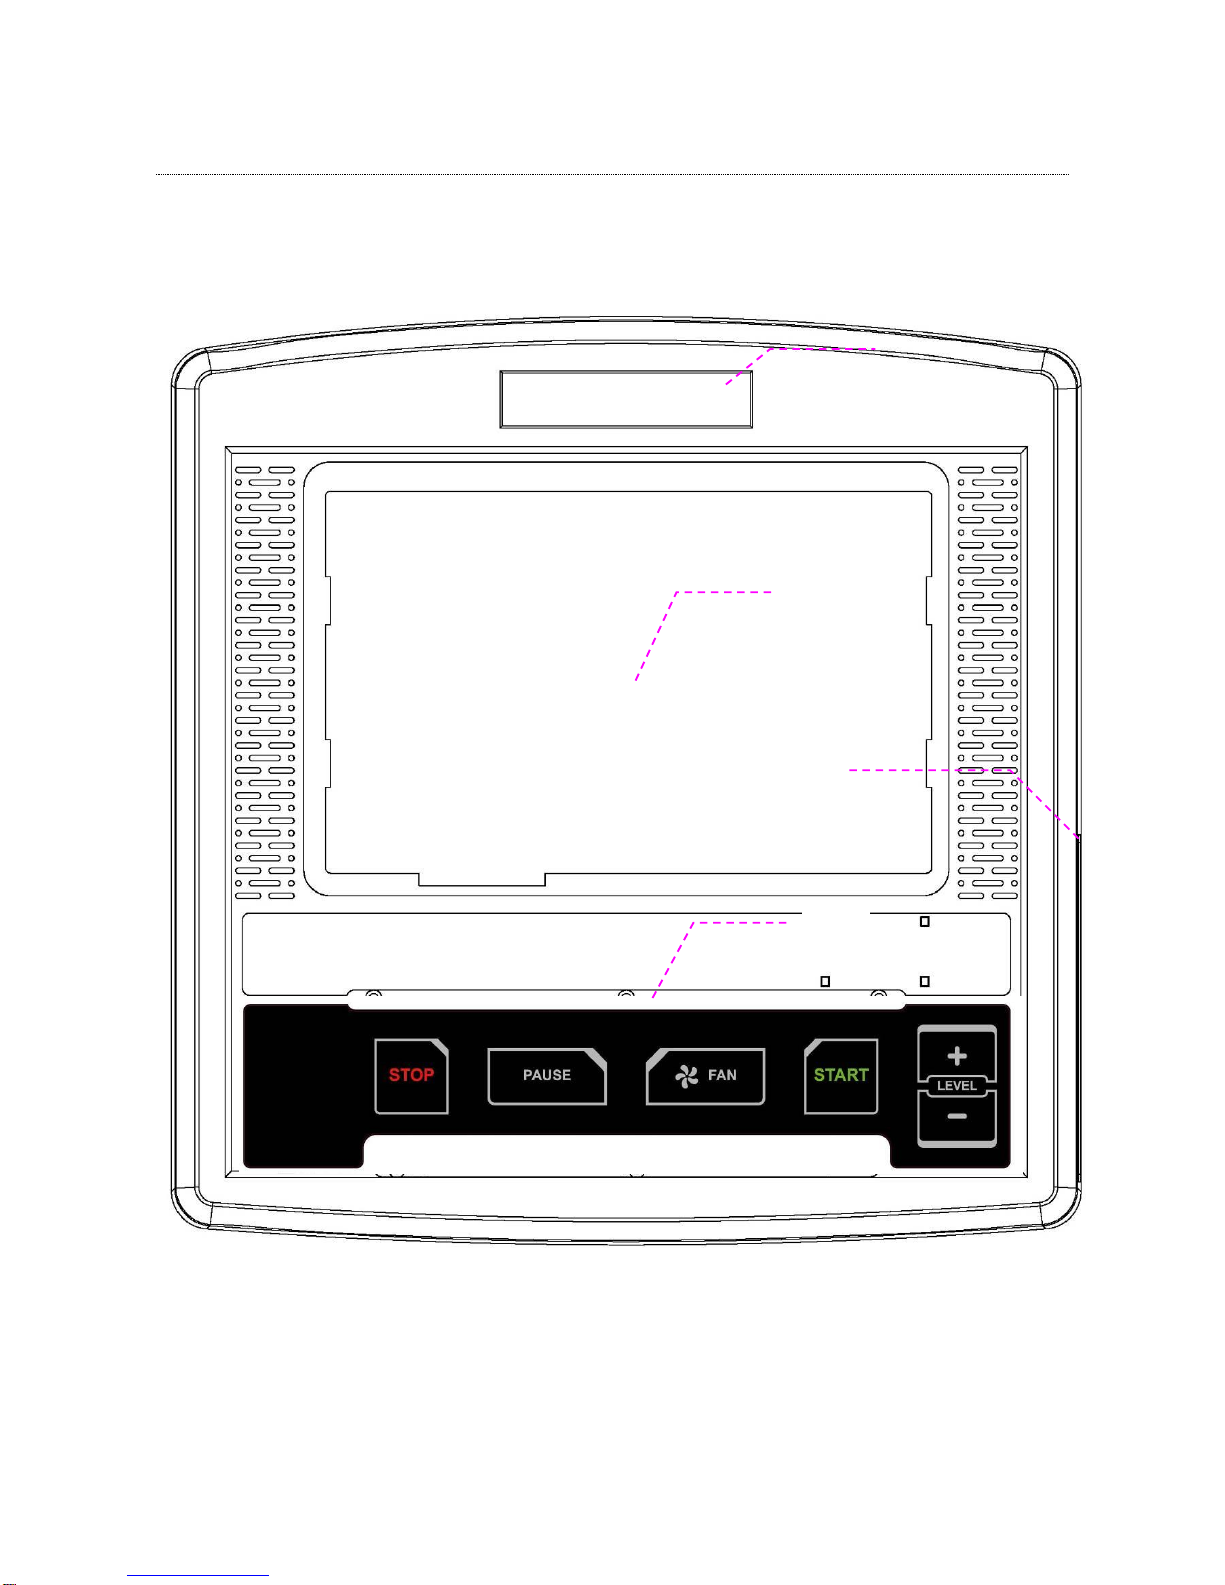
4.1. Electronic meter structure
A1
Information
condition
display
area
Display each condition information before
exercise, during exercise and after exercise.
A2
Touch
operation
area
The screen area has touch function. On the
screen, there are operation keys for each page.
Except for pressing once, part keys support long
time pressing, finger drag and rotating.
A3
Picture
display
area
Display multiplayer picture
B1
Resistance
increase
Press the button to increase the resistance.
Scope value: 1~40 LEVEL
Resistance
decrease
Press the button to decrease the resistance.
Scope value: 1~40 LEVEL
B2
Start
(1)If press the key at any time, the program
setting can be skipped to directly enter the
optional page of exercise storage device with
default value before exercise.
(2) If the electronic meter is in the optional page
of exercise storage device and if press this key, it
can enter exercise page.
(3) If the electronic meter is in pause status and
if press this key, it can cancel pause and return
to exercise status, The speed can return to the
previous value and the lifting can continue the
unfinished target value.
(4) If the electronic meter is in course page for
exercise ending and if press this key, the
electronic meter can return to standby page.
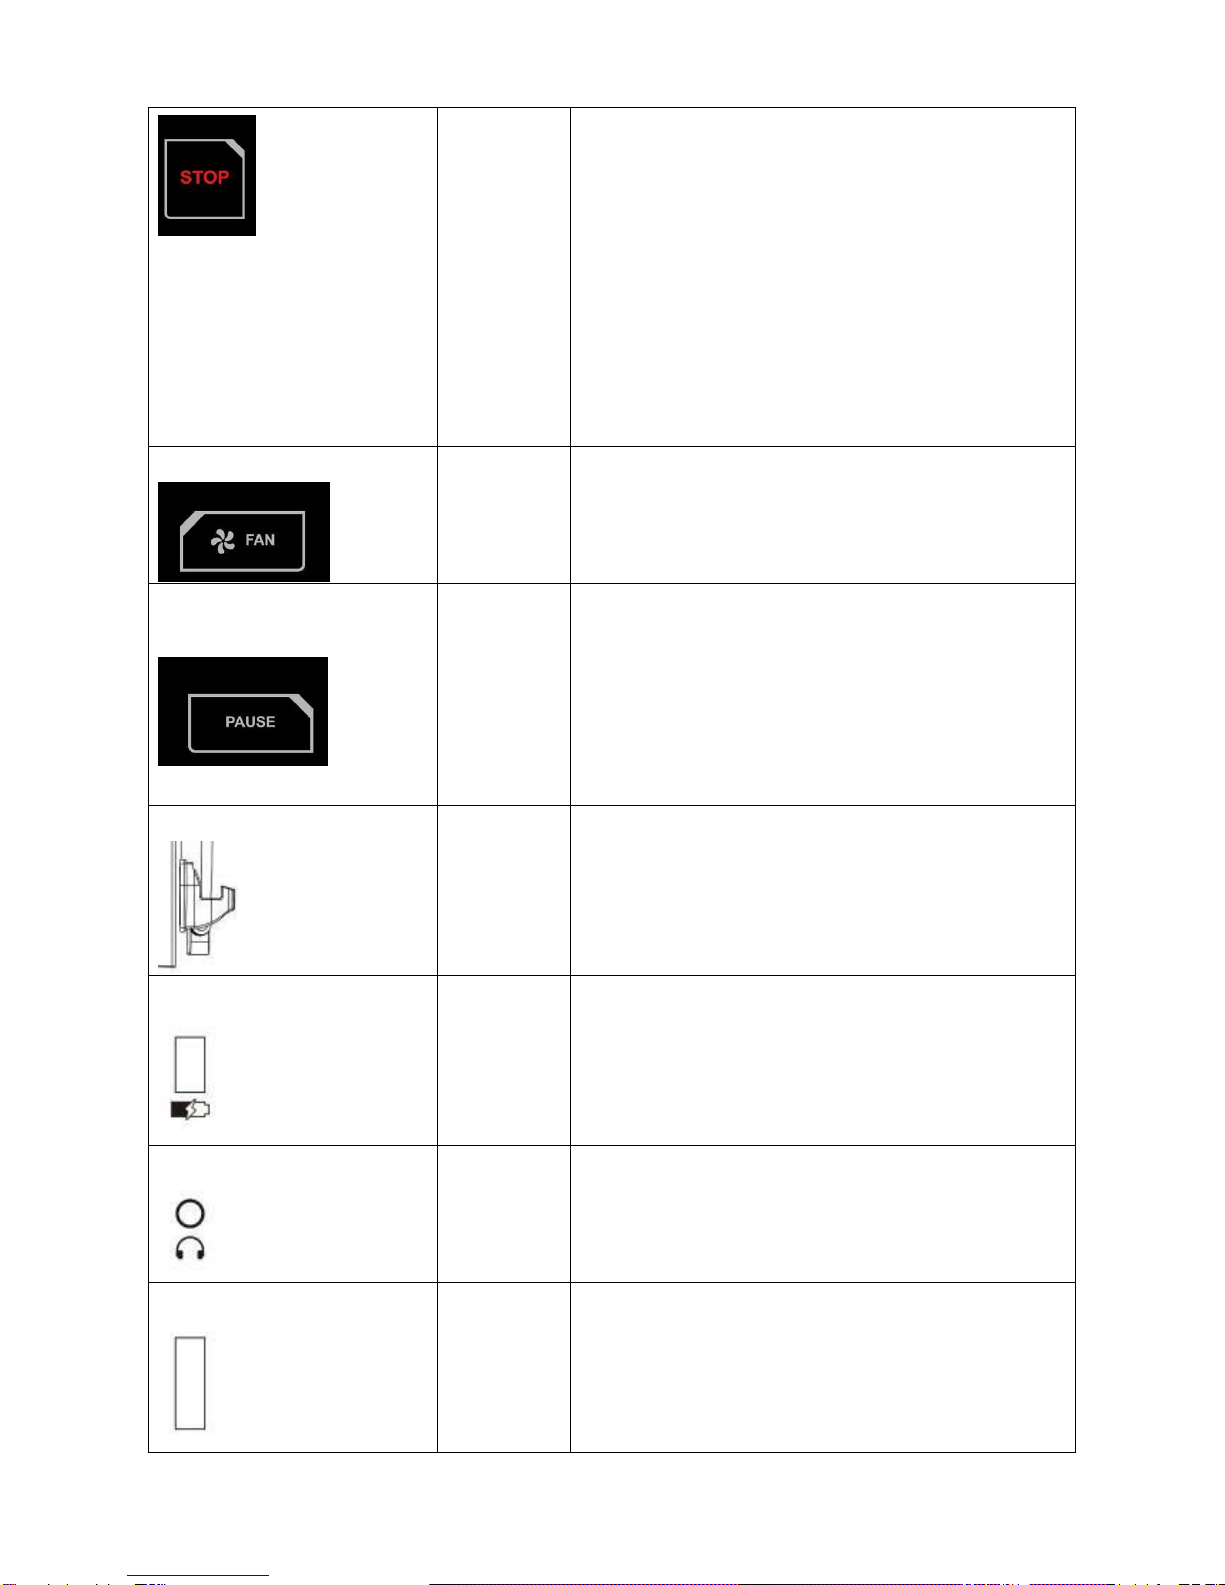
B3
Stop
(1) If the electronic meter is in log in page and if
2015/3/9V1.1+V1.1
12
(1) If the electronic meter is in setting page and if
press this key, the electronic meter can return to
standby page.
(2) If the electronic meter is in optional page of
exercise storage device and if press this key, the
electronic machine can return to standby page.
(3) If the electronic is in exercise status or in
pause status and if press this key, this exercise
can be ended directly and enter exercise course
report.
B4
Fan
Press this button to turn on/off the fan during
exercise. The fan has high/low speed 2 section.
B5
Pause
Press this button to enter into pause state during
exercise.
Under pause state, press this button to return to
exercise mode.
Under warm up or cool down statue, press this
button to skip.
C1
The fixed
hook with
IPod wires
When IPod connection wires are not used, twine
them as U shape and hang them on the hook.
C2
USB
(1) This holes can be used for Andriod device
charging and the output power supply is 5V/1A.
(2) This holes can be used for software updating
and maintenance.
C3
Earphone
This hole can connect 3.5mm voice output
device, such as earphone.
C4
IPod
connecting
wire
This wire can connect iOS device through the
electronic meter and the following functions can
be used:
Charging function,
Reading the sound source and video inside the

2015/3/9V1.1+V1.1
13
device.
Nike+ function.
D
The air
outlet
holes of
fan
The air outlet angle can be adjusted by hand.
5. Display page introduction
5.1. Simple user interface:
The simple and obvious buttons and icons will assist users to operate as the users
wish to finish all settings and the control during exercise.
UI design of the electronic meter comes from our long term experience in fitness
equipment field, the special new technical function and users’ angle. The designed
operation environment is the fittest.
5.2. Startup page
This electronic meter isAndriod system and the loading picture can be displayed during
startup. The total loading time of the system is about 35s.
5.3. Resident area

2015/3/9V1.1+V1.1
14
There is a commonly existed status column at the Top right of the picture to assist users to
make an inspection at any time.
Wi_fi signal intensity
It is used for confirming the online quality of wireless network of the electronic
meter.
The online status of local area network:
It is used for confirming the online quality of local area network of the electronic
meter.
Language switch section
To switch the words on the screen for the users, and after choosing the language,
the system will switch automatically. During the switch, other keys are invalid.
※This language switching is real-time. When the electronic meter is turned on, the
system language can return to the default automatically which can be set under the
engineering mode.
※Resident area only display at the standby page under the non-exercise status.
5.4. Standby page
Choose Quick start or other program control in this page. Go back to this page whenever
the exercise is over.
5.4.1. Date, time and address of the system will be shown in the page center.
5.4.2. Bottom of the page is menu area of program control, total 2 pages. Change to
the next page in the method of left or right sliding. Some program control has
sub-stage. Pop-up sub-menu after pressing program control title.

2015/3/9V1.1+V1.1
15
5.5. Program control set page
5.5.1. Choose any program control in standby page, apart from Quick start, and then
enter into the set page of the program control.
5.5.2. Input the age, weight, gender…of the user in specific program control, to be
substituted into the computational formula of the SPC.
5.5.3. After the set is finished, press start key, then enter into storage device ahead
the exercise, choose the page.
5.6. Exercise storage device optional page (running and fitness with the
exercise record device)
5.6.1. Quick start or any program control can enter the page ahead the exercise.
Press OK Go or START key to enter into exercise. Press Home key or Stop key,
you can cancel it and return to standby page.
5.6.2. The page is set for the purpose that the user can choose whether to keep pace
with the following 3 exercise record devices:
2015/3/9V1.1+V1.1
16
CSAFE:
A set of exercise management system developed by FitLinxx is one of the
specifications widely accepted by fitness industry. The gym shall add FitLinxx
memberships and server appliance shall be installed. Use RJ45 network cable to
achieve the online and data synchronism with electronic meter. Exercise value of
fitness equipment that uses CSAFE function can be accumulated.
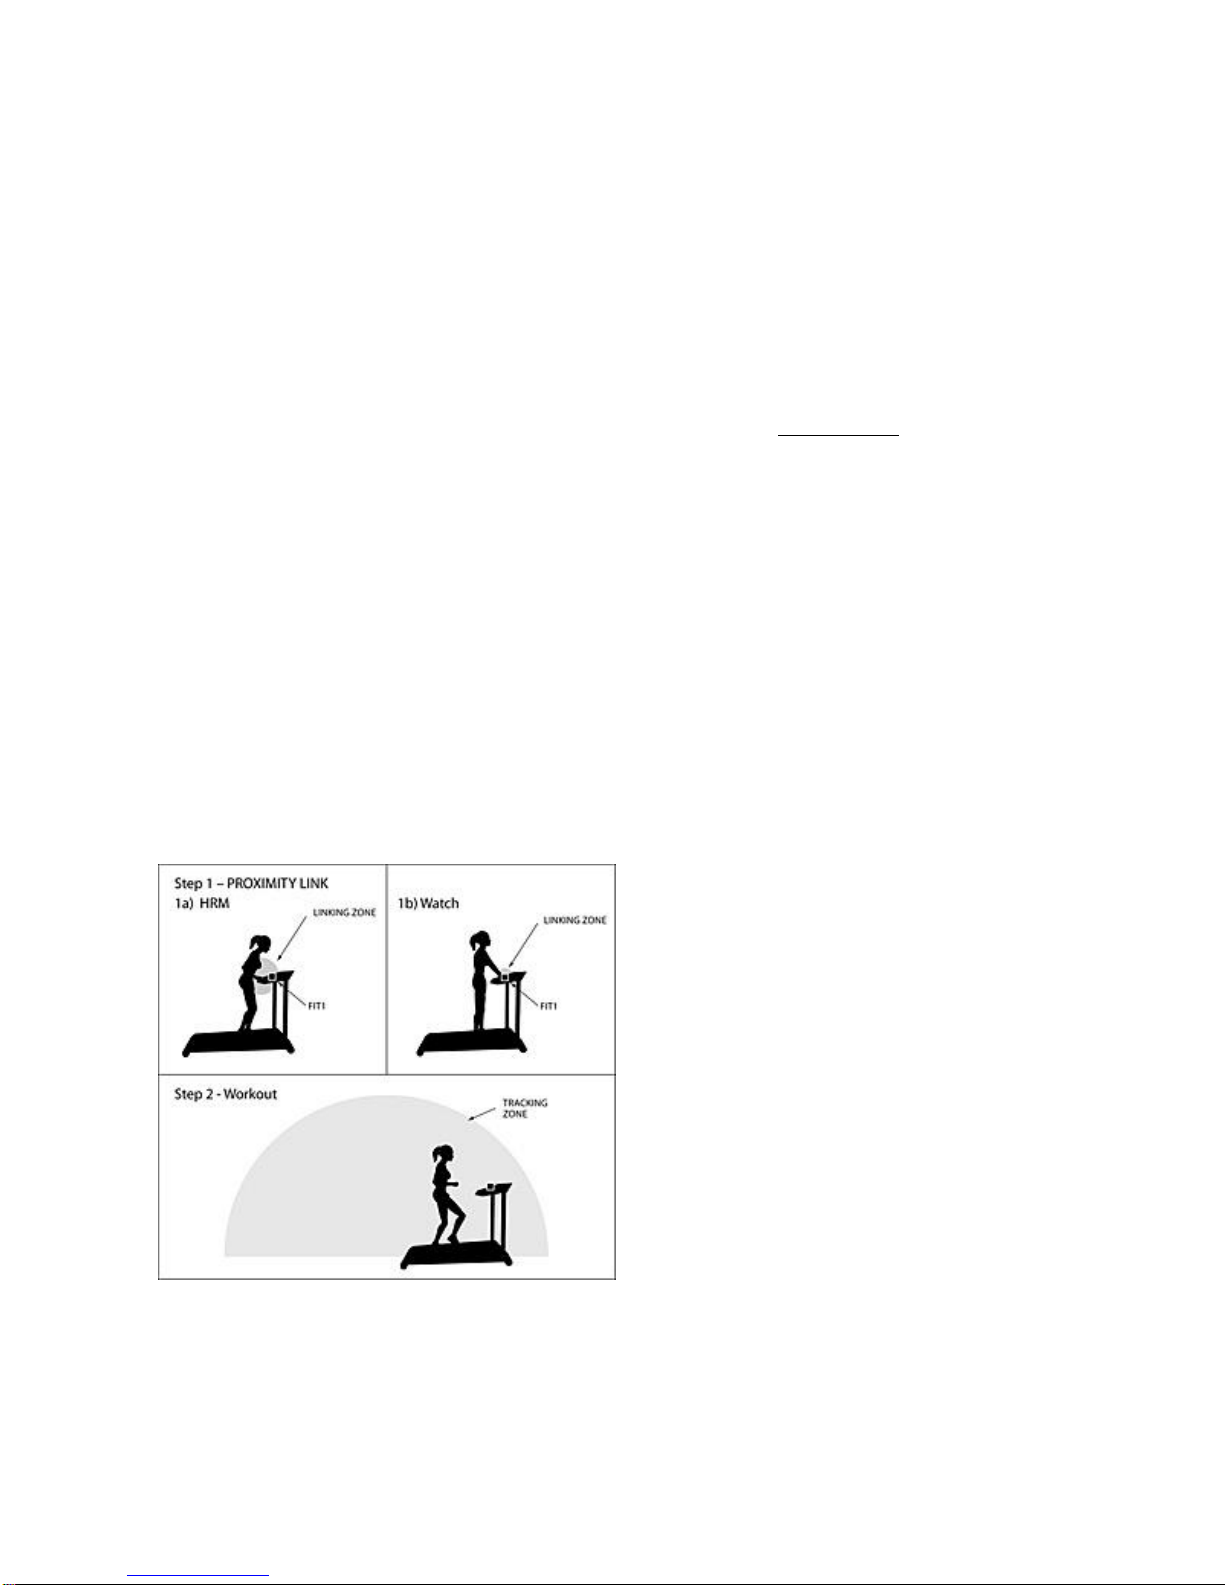
ANT+:
A set of exercise management system developed by Dynastream is wireless
transmission communication technology. The user shall be equipped with the
device that has ANT+ launcher established inside, such as the sport watch of
Garmin, FR60, Forerunner 210/310/610/910XT…or supporting smart phone, such
as HTC Rhyme、Samsung S4、Sony Z1…
Step.1 Approach the receiver inside the electronic meter by wireless induction to
conduct the pairing of devices
Step.2 Choose the pattern of ANT+ in this page, confirm the online and data
synchronism. Value between the watch (outdoor) and electronic meter (indoor)
can be accumulated.
2015/3/9V1.1+V1.1
17
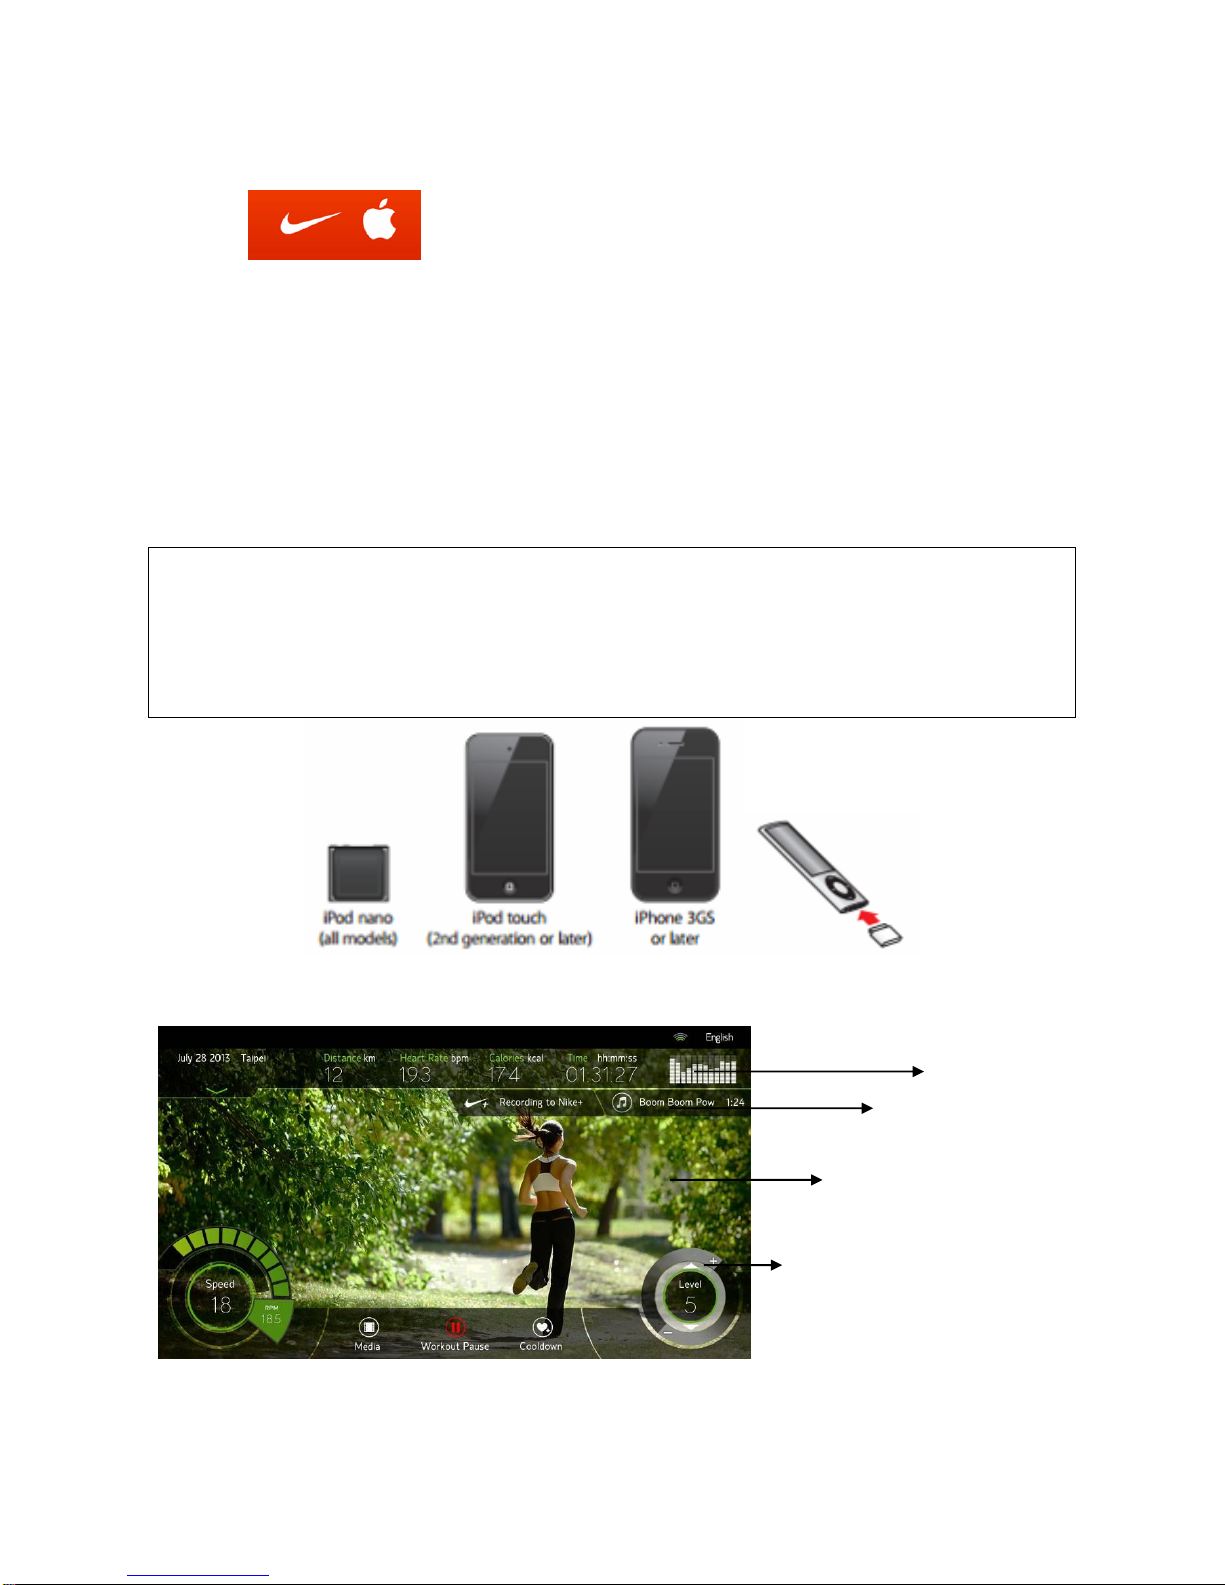
Nike Plus:
For a set of exercise management system developed by Nike, the user shall be
equipped with Apple device that has Nike+iPod receiver established inside, such
as iPod touch 4, Nano 6, and iPhone 4.
Step.1 Connect withApple device by iPod transmission line established inside the
electronic meter.
Step.2 Choose the pattern of Nike+ in this page to confirm the online and data
synchronism. The value can be stored in Apple device in the following exercise.
Why are the Apple device that has Nike+iPod receiver established inside and software
designed?
iPod nano, Software version 1.2 or more advanced version
iPod touch, Software version 5.1.1 or more advanced version
iPhone 3GS~ iPhone 4, Software version iOS 5.1.1 or more advanced version
5.7. Pages of the exercise
A-1
B
C
D

2015/3/9V1.1+V1.1
18
5.7.1. Enter the page of the exercise by the mode of Quick start or program control,
and there are five areas, A/B/C/D/E.
5.7.2. Instruction of display areas
A-1 area:
The information area of motion state can display five common states of motion,
including distance value, heartbeat value, calorie value, time and lifting outline
(shown in the form of column diagram).
A-2 area:
Click any part of A-1 area, the window can be pulled down. Change five status of
A-1 area into other status information arbitrarily, for example, change distance
value and speed value into British system, the heartbeat value will be changed
into maximum oxygen content, calorie into the pace and speed, time into “min”,
lifting outline into speed curve diagram (update frequency: 5s) or heartbeat
record diagram. Click any part of A-2 area, retract to A-1 area.
B area:
It displays that a few exercise record device are running.
C area:
If the multimedia mode is not started, the background is base map; when the
multimedia mode is started, the background is image processing area, including
the interface of display and operation of films.
D area:
Basic operational key, right turntable can adjust the speed, press individually or
press for a few seconds Speed↑/↓key, or if the finger presses the turntable, no
leaving, describing circle according to clockwise or anti-clockwise, you can speed
up or slow down.
E
A-2

2015/3/9V1.1+V1.1
19
E area:
the operating keys as following:
Cool down
Enter into 3-min-cool down program by manual
operation. Every 1 min passes; the speed value will
decrease 50% automatically. Lifting will return to 0
section, when the time is zero, run end.
Skip
Press this button for cancel, when in warm or cool
down program.
Pause
Press this key, enter the pause status.
Home
Press this button in the pause status. The sport
end.
Continue
Press this button in the pause status. Return to
sport again.
Media
Start or close multimedia mode, including
facebook、iPod/iPhone、TV/DTV、Youtube…
Table of contents
Other Bodytastic Exercise Bike manuals


Popular Exercise Bike manuals by other brands


VIRTUFIT
VIRTUFIT CTR 3.0i user manual

Reebok
Reebok RT300 RBEX2976.3 user manual

Weslo
Weslo EasyFit WLIVEX86011.0 user manual
ICON Health & Fitness
ICON Health & Fitness NordicTrack GX 4.0 user manual

PowerPeak
PowerPeak Speed Bike FBS8296P user manual

Horizon Fitness
Horizon Fitness Comfort U Service manual