Fit4Home TONERX TF-BB8001A User manual

1
F4H-EB-BB8001A
Please Keep For Future Reference
IMPORTANT - Please Read Instructions Fully Before Assembly Or Use
These instructions contain important information which will help you get the best
from your equipment and ensure safe and correct assembly, use and maintenance.
If you need help or have damaged or missing parts,
call the Customer Helpline: 0330 124 0718 (Opening hours: Mon-Fri 9:00am-3:00pm)
or Email: customerservices@fit4home.co.uk
TONERX TF-BB8001A
USER MANUAL

2
CONTENTS
Safety Information
Parts List
Exploded Diagram
Assembly Instructions
Step 1
Step 2
Step 3
Step 4
Step 5
Step 6
Step 7
Operating the Computer
Exercise Instructions
Declaration
03,4
05
06
07
07
07
08
08
09
09
09
10
11,12

3
IMPORTANT SAFETY INFORMATION
PLEASE KEEP THIS MANUAL IN A SAFE PLACE FOR REFERENCE
Warning: Now here we suggest that you should consult with your physician or health
professional before starting your workout, especially for the age up to 35 old or once-health
problem people. We take no responsible for any troubles or hurts if you don’t following our
specication. Treadmill will be carefully assembled and covered the motor shield, then connect
to the power.
1. It is important to read this entire manual before assembling and using the equipment. Safe
and ecient use can only be achieved if the equipment is assembled, maintained and used
properly. It is your responsibility to ensure that all users of the equipment are informed of all
warnings and precautions.
2. Before starting any exercise program you should consult your doctor to determine if you
have any physical or health conditions that could create a risk to your health and safety, or
prevent you from using the equipment properly. Your doctor’s advice is essential if you
are taking medication that aects your heart rate, blood pressure or cholesterol level.
3. Be aware of your body’s signals. Incorrect or excessive exercise can damage your health.
Stop exercising if you experience any of the following symptoms: Pain, tightness in your
chest, irregular heartbeat, extreme shortness of breath, feeling light headed, dizzy or
nauseous. If you do experience any of these conditions you should consult your doctor
before continuing with your exercise program.
4. Keep children and pets away from the equipment . The equipment is designed for adult use
only.
5. Use the equipment on a solid, at level surface with a protective cover for your oor or
carpet . For safety, the equipment should have at least 0. 6 meter of free space all around it.

4
IMPORTANT SAFETY INFORMATION
6. Before using the equipment, check the nuts and bolts are securely tightened. Some parts
like pedaIs, etc. It’s easy to be ware away.
7. The safety level of the equipment can only be maintained if it is regularly examined for
damage and/or wear and tear.
8. Always use the equipment as indicated. If you nd any defective components whilst
assembling or checking the equipment, or if you hear any unusual noise coming from the
equipment during use, st op. Do not use the equipment until the problem has been rectied
9. Wear suitable clothing whilst using the equipment. Avoid wearing loose clothing which may
get caught in the equipment or that may restrict or prevent movement. Please run it slowly
in the beginning. Please hold the handlebar tightly and do not let your body leave the seat
when exercise.
10.The equipment has been tested and certied to EN957 under class H.C. Suitable for
domestic, home use only. Maximum user weight 100kg. Breaking is speed independent .
11.The equipment is not suitable for therapeutic use
12.Must be Careful for taken when lifting or moving the equipment so as not to injure your
back. Always use proper lifting techniques and/or use assistance .
5
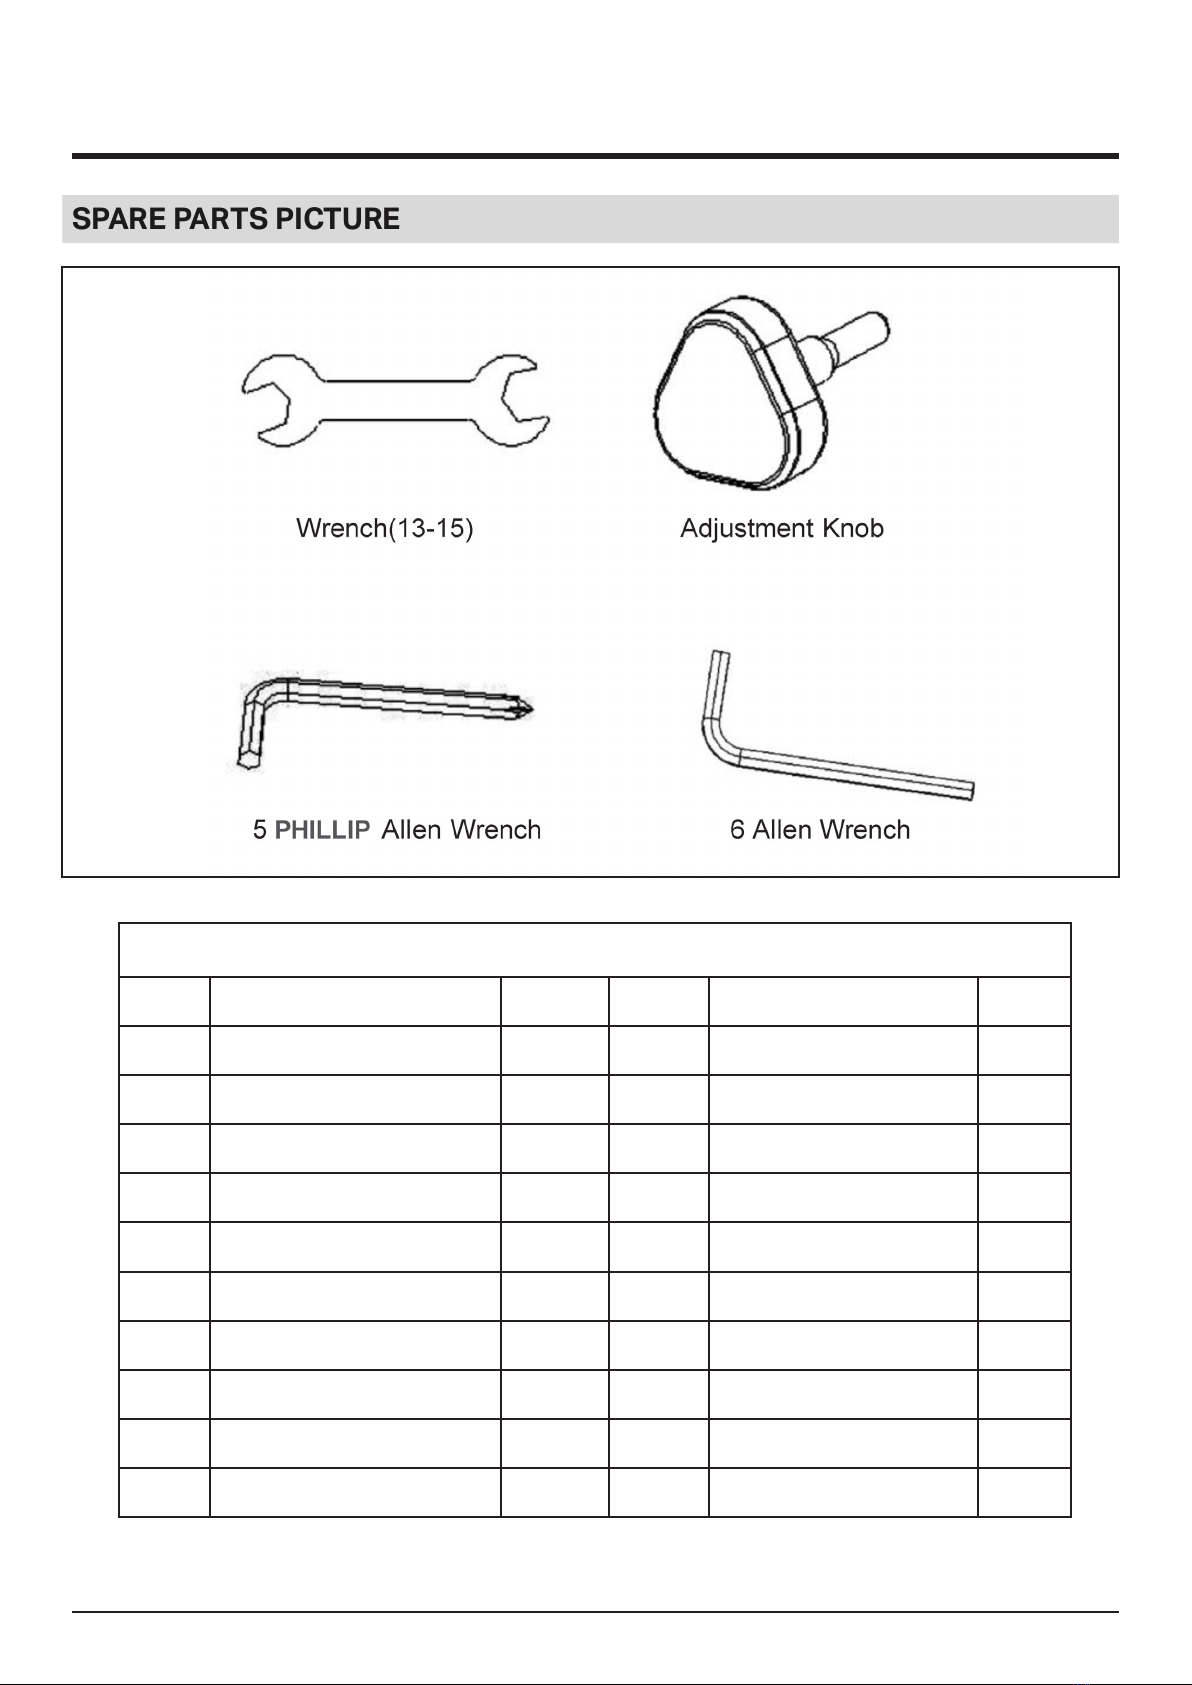
Spare Part list
NO. Description QTY NO. Description QTY
1 Main Frame 1 11 Flat Washer 3
2 Rear Stabilizer 1 12 Seat 1
3 Front Stabilizer 1 13 Pedal(R) 1
4 Carriage Bolt 4 14 Fixing Bolt 4
5 Curved Washer 4 15 Front Post 1
6 Domed Nut 4 16 Monitor Hold 1
7 Pedal(L) 1 17 Monitor 1
8 Adjustment Knob 1 18 Fixing Bolt 2
9 Seat Post 1 19 Spring Washer 2
10 MS Lock Nut 3 20 Handlebar 1
PARTS LIST
SPARE PARTS PICTURE

6
EXPLODED DIAGRAM

7
ASSEMBLY INSTRUCTIONS
STEP 1
1. Attach the Front Stabilizers (pt . 3) to the Main Frame(pt. 1) using 2 sets of MS Domed
Nuts(pt. 6), (Zl8 Curved Wash ers(pt .5) and M8x60mm Carriage Bolts (pt.4).
2. Slide the Rear Stabilizer (pt.2) into the Main Frame (pt. 1), making sure the open side of
the bracket is facing up, as shown, then x with 4pcs (Zl 8 Washer (pt. 5), 2pcs M8x60mm
Carriage Bolts (pt . 4).and 2 sets of MS Domed Nuts (pt. 6).
STEP 2
1. Fix the Seat (pt. 12) to the Seat post by using the three sets of Washers (pt.11) and three
lock Nuts (pt. 10) located under the seat.
8
ASSEMBLY INSTRUCTIONS
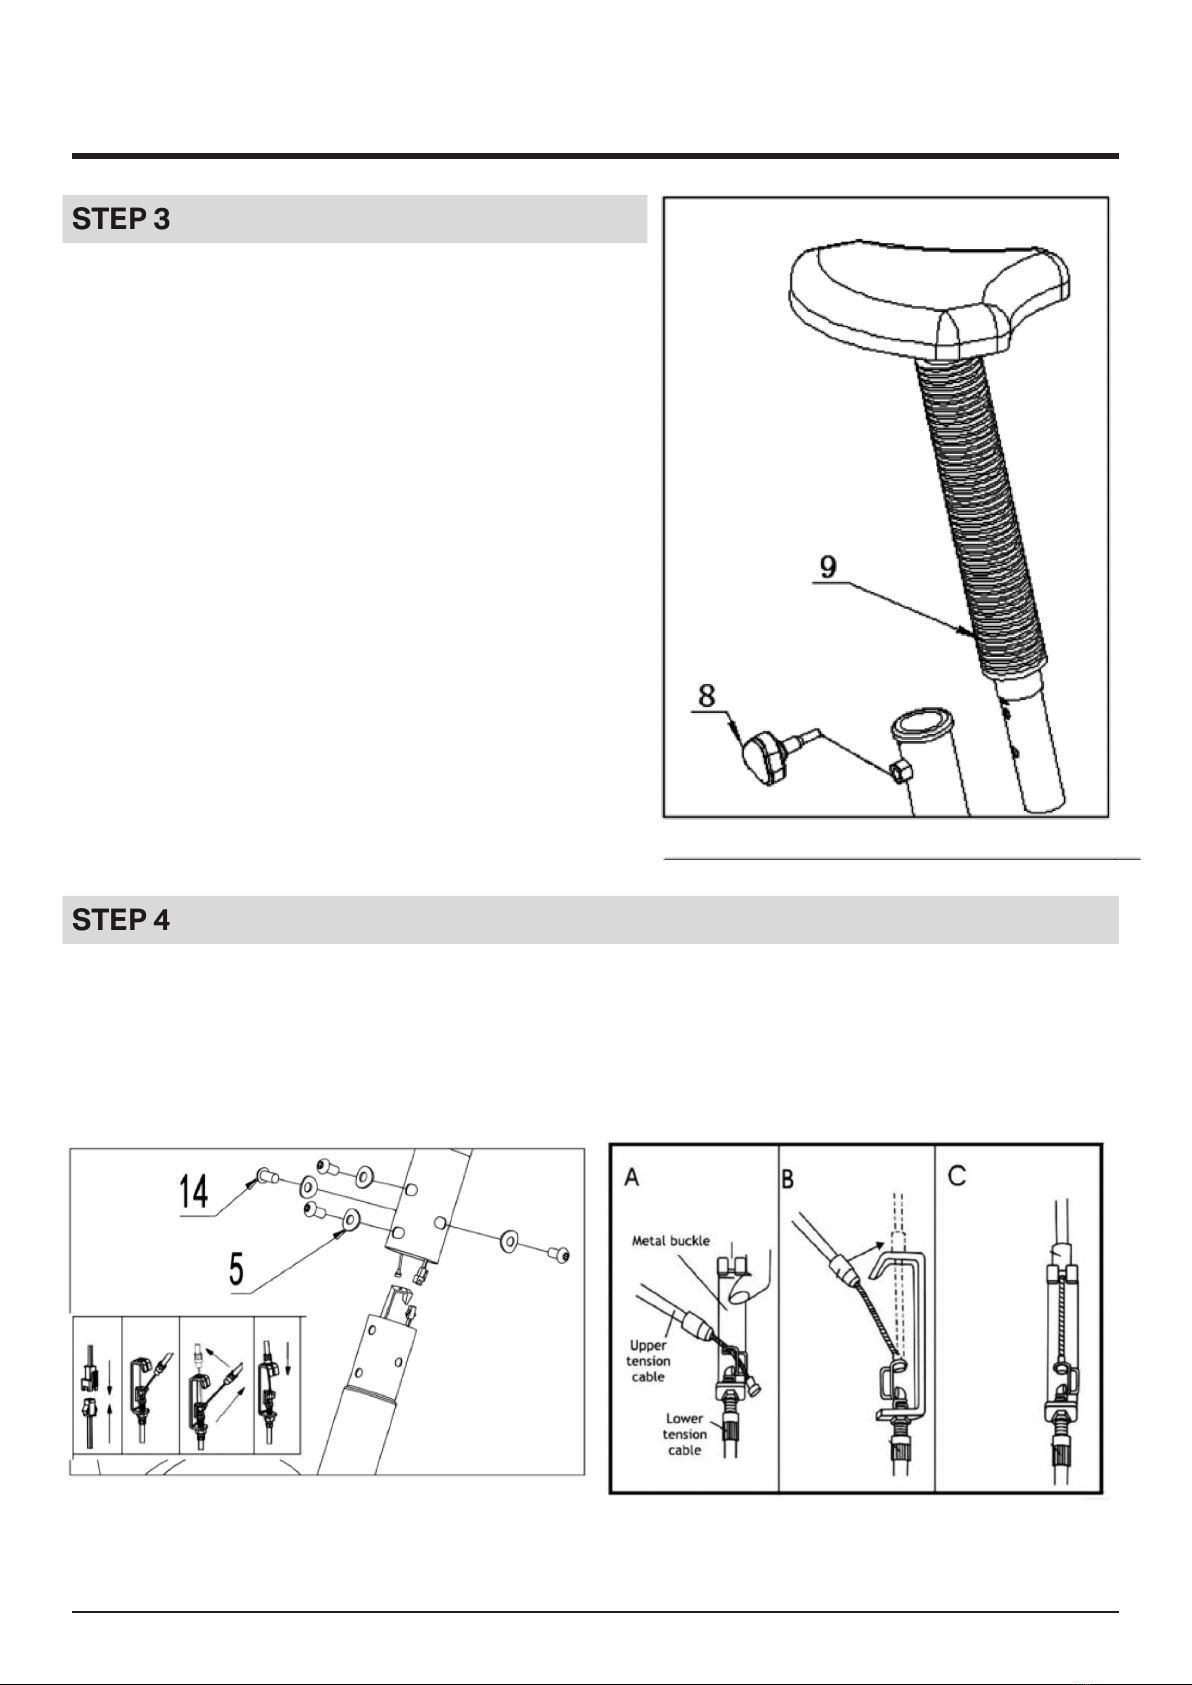
STEP 3
1. Insert the Seat Post (pt. 9) into the Seat Post
housing and line up the holes (The correct
height adjustment can be made when the
bike is fully assembled) Secure the seat in
position with the Adjustment Knob (pt. 8).
STEP 4
1. Take the Front Post (lS)and connect the Upper Monitor Wire with Lower Monitor Wire(See
picture A,B, C) .Then Slide the Front Post into the front post housing, then x with 4 pcs xing
bolts(pt.14) and Curved washer(pt.5). Be careful not to cut the sensor wires

9
ASSEMBLY INSTRUCTIONS
STEP 5
1. Plug the upper Monitor Sensor Wire to the
back of Monitor(pt. 17),and then slide the
Monitor onto the Monitor Holder (pt.16).
Fix Handlebar( pt. 20) on the Front by 2 pcs
M8*30mm xing Bolt( pt. 18) and Spring
Washers( pt .19).
STEP 6
1. Fix the (L) pedal (pt.7) on the main frame
by wrench(13-15) in counter clockwise, Fix
the (R) pedal ( pt.13) on the main frame by
wrench in clockwise
STEP 7
1. The tension can be adjust by turning knob
either to - mark or to+ mark..

10
COMPUTER OPERATION GUIDE
SCAN: Automatic display of the following functions in the order shown: TIME-SPEED-
DISTANCE- CALORIES (repeat)
DST: The distance of each workout will be displayed by pressing MODE key until brand DST
appear.
SPD: Current speed will be shown by pressing MODE key until brand DST appear.
TMR, The time of exercise will be displayed by pressing MODE .Key until brand TMR appear. o
CAL, The calories burned will be displayed by pressing mode key until brand cal appear. o
Manual
TIM E(TMR)··········· · ·········· ··········· ············00:00-99 :59 MIN
SPEED(SPD )· .. •••• • • • • • •• • •••• • • • • • • • • • • • • • • •••• • • • • • • • ·0.0-99.9KM/H DISTANCE (
DST) ••• ••• ••• ••• ••• ••• ••• ••• ••• ••• ••• ···0.00-999.9KM CALORIES (CAL) ·0-9999KCAL
FUNCTION:
1. AUTO ON/OFF
The system turns on when any key is pressed or the exercise begin;
Without any signal for a period of 4 minutes, the display will shut o automatically
2. RESET
The unit can be reset by changing the batteries or pressing the MODE key for 3 second. The
customs can change batter by takeo computer by tool and change batter

11
EXERCISE INSTRUCTIONS
THE WARM UP PHASE
Using your EXERCISE CYCLE will provide you with several benets, it will improve your physical
tness, tone muscle and in conjunction with calorie controlled diet help you lose weight.
This stage helps get the blood owing around the body and the muscles working properly. It will
also reduce the risk of cramp and muscle injury. It is advisable to do a few stretching exercises
as shown below. Each stretch should be held for approximately 30 seconds, do not force or jerk
your muscles into a stretch - if it hurts, STOP.
THE EXERCISE PHASE
This is the stage where you put the eort in. After regular use, the muscles in your legs will
become more exible. Work to your own pace but it is very important to maintain a steady
tempo throughout. The rate of work should be sucient to raise your heart beat into the target
zone shown on the graph below.
This stage should last for a minimum of 12 minutes though most people start at about 15-20minutes
12
THE RELAX PHASE
This stage is to let your Cardio-vascular System and muscles wind down. This is a repeat of the
warm up exercise e.g. reduce your tempo, continue for approximately 5 minutes. The stretching
exercises should now be repeated, again remembering not to force or jerk your muscles into the
stretch . As you get tter you may need to train longer and harder. It is advisable to train at least
three times a week, and if possible space your workouts evenly throughout the week.
FAULT FIND
If you do not receive numbers appearing on your computer, please ensure all connections are
correct.
MUSCLE TONING
To tone muscle while on your EXERCISE CYCLE you will need to have the resistance set quite
high. This will put more strain on your leg muscles and may mean you cannot train for as long
as you would like. If you are also trying to improve your tness you need to alter your training
program. You should train as normal during the warm up and cool down phases, but towards the
end of the exercise phase you should increase resistance making your legs work harder. You will
have to reduce your speed to keep your heart rate in the target zone.
The seat height can be adjusted by removing the adjustment knob and raising or lowering the
seat. There are 7 holes in the seat post allowing for a range of heights. Once the correct height
has been chosen, ret the adjustment knob and tighten. The tension control knob allows you to
alter the the pedals. A high resistance makes it more dicult to pedal; a low resistance
makes it easier. For the best results set the tension while the bike is in use.
EXERCISE INSTRUCTIONS

13
Declaration of Conformity
We, Importer
Fit4home Ltd
Unit A, Perseverance Mills, Olive Lane, Darwen BB3 3DQ United Kingdom
Declare that the Belt Bike
Complies with EN ISO 20957-5: 2016 Stationary training equipment Part
5:Stationary exercise bicycles and upper body crank training equipment,
additional specic safety requirements and test methods.
Authorised Signatory and technical le holder
Signed for and behalf of:
Fit4home Ltd
Unit A
Perseverance Mills
Olive Lane
Darwen
BB3 3DQ
United Kingdom
Tassadaq Hussain

14
Table of contents
Other Fit4Home Exercise Bike manuals

Fit4Home
Fit4Home ES893 User manual

Fit4Home
Fit4Home F4H-EB-ORB2600S User manual

Fit4Home
Fit4Home ORIOLE EB-OW-ORIOLEX User manual

Fit4Home
Fit4Home TF-S760 User manual

Fit4Home
Fit4Home KPR65910 User manual

Fit4Home
Fit4Home KPR65850 User manual

Fit4Home
Fit4Home TF-8938 User manual

Fit4Home
Fit4Home KPR4890W User manual


