Boeco BLC-500 User manual

BLC Series
Serie BLC
Precision Balances
Balanzas de precisión
Operating Instructions/Instrucciones de manejo
98648-012-67

2
English – page 3
Español – página 11

3
Important
You have purchased a quality
precision weighing instrument that
requires handling with care.
Please read these Operating
Instructions carefully before operating
your new BOECO balance.
Disclaimer
Calibrate your balance using a refer-
ence weight of the appropriate toler-
ance (class). A measuring instrument
is only as accurate as the standard that
was used as a reference in calibration.
For assistance in the selection of
reference weights, please contact
the factory.
Warning
Never lift balance by the weighing
pan, as this may cause damage to
internal mechanisms.
Always lift and transport the balance
by its base, including when removing it
from packing materials!
4
Specifications
Model BLC-500 BLC-3000
Capacity 500 g 3000 g
Readability 0.1 g 1 g
Taring Range 0 to 500 g 0 to 3000 g
Repeatability 0.1 g 1 g
Linearity 0.1 g 1 g
Pan Size 5.4” x 5.4” 5.4” x 5.4”
(138 x 138 mm) (138 x 138 mm)
Common Specifications:
Dimensions (LxWxH): 7.5 x 5.5 x 1.7” (190 x 140 x 45 mm)
Net Weight: 0.8 lbs (0.38 kg)
Operating Temperature: 10°C – 30°C (50°F – 86°F)
Electrical Requirements: 9 V battery or AC adapter (sold separately)
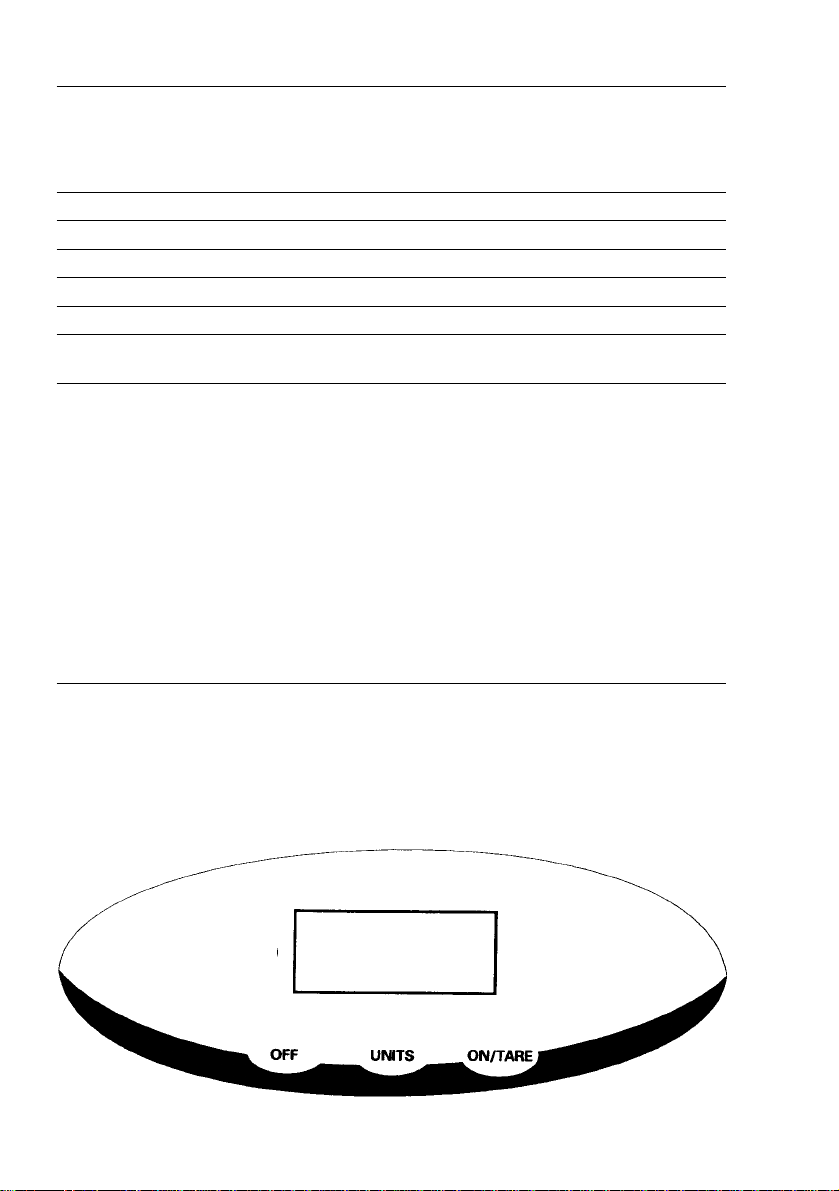
Function Keys
[ON/TARE] Turns the balance on.
Returns the unit to zero (tares).
[UNITS] Toggles between defined units.
[OFF] Turns the balance off.
500g
0.1g
BLC-500

5
Operation
A. Taring (Zeroing)
All models have taring capabilities up
to their total weight capacity (varies
with each model)
1. Place sample container on pan.
2. Press the [ON/TARE] key to zero the
balance.
3. Add your sample; when the balance
is stable the display shows the
weight of the sample and an ° in the
top left corner of the display.
B. Weigh Units
Pressing the [UNITS] key will toggle
between the units selected as Unit 1.
The choices are:
• grams (g) and pounds/ounces
(lb/oz)
• grams only
• grams, troy ounces (ozt) and
pennyweights (dwt)
• grams (g) and ounces (oz)
• grams, Taiwanese kilograms (kg)
and piece count (P)
To select Unit 1
1. Turn the balance off.
2. Hold down the [ON/TARE] key until
all segments are displayed.
3. Continue to hold down the
[ON/TARE] key and press the
[UNITS] key four times. Release the
[ON/TARE] key.
4. Press the [ON/TARE] key twice
so the display reads Unit1
(or UnitP if in counting mode).
5. Press the [UNITS] key to scroll
through the choices of units.
6. Press the [OFF] key when the
desired unit combination appears.
Unit 2 can also be defined. The choices
are grams (g), troy ounces, penny-
weights, ounces (oz), Taiwanese kilo-
grams or pounds/ounces (lb/oz).
Unit 2 is used after being set until the
[UNITS] button is pressed.

6
To select Unit 2
1. Turn the balance off.
2. Hold down the [ON/TARE] key until
all segments are displayed.
3. Continue to hold down the
[ON/TARE] key and press the
[UNITS] key four times.
4. Release the [ON/TARE] key.
5. Press the [ON/TARE] key three times
so the display reads Unit 2.
6. Press the [UNITS] key to scroll
through the choices of units.
7. Press the [OFF] key when the
desired unit appears.
C. Calibration
To calibrate the balance, tare or zero
the balance with no weight on the pan.
1. Turn the balance off.
2. Hold down the [ON/TARE] key until
all segments are displayed.
3. Continue to hold down the
[ON/TARE] key and press the
[UNITS] key three times. Release the
[ON/TARE] key.
4. After a few seconds the display
will show Cand the value of the
required calibration weight.
5. Place the correct weight on
the balance. After several seconds
the maximum capacity will be
displayed, indicating the value has
been accepted.

7
D. Counting or Piece Mode
1. Select grams, Taiwanese kilograms
(kg) and piece count (P) as Unit1.
2. Place the container on the pan and
press [ON/TARE].
3. Press the [UNITS] key repeatedly
until the display reads PC followed
by the reference quantity.
4. To change the reference quantity,
press the [ON/TARE] key repeatedly
until the desired reference quantity
(10, 20 or 50) is displayed.
5. Place the designated number of
pieces on the balance.
6. Press the [ON/TARE] key.
The display will show Pand the
number of pieces.
7. Add or subtract pieces.
8. For the next set of pieces to be
weighed, press the [UNITS] key
repeatedly until grams are displayed
and repeat steps 2 – 7.
Note
If balance is turned off, the reference
weight must be reset.
Note
The individual piece must weigh more
than the resolution of the balance.
E. Auto Zero
With this function, the balance auto-
matically remains at zero even with
slight changes.
1. Turn the balance off.
2. Hold down the [ON/TARE] key until
all segments are displayed.
3. Continue to hold down the
[ON/TARE] key and press the
[UNITS] key four times.
4. Release the [ON/TARE] key.
5. Press the [ON/TARE] key four times
so the display reads tr-xd.
6. Press the [UNITS] key to scroll
through the choices of zero tracking
(1d to 4d).
7. Press the [OFF] key when the
desired setting appears.

8
F. Battery-saving mode.
The balance can be set to turn off auto-
matically after 1 to 9 minutes or to stay
on until the [OFF] key is pressed.
To select auto-off interval:
1. Turn the balance off.
2. Hold down the [ON/TARE] key until
all segments are displayed.
3. Continue to hold down the
[ON/TARE] key and press the
[UNITS] key four times. Release the
[ON/TARE] key.
4. The display will show [OFF] and the
number of minutes set.
5. Press the [UNITS] key to cycle
through the choices of minutes
(1 to 9).
6. Press the [OFF] key when the
desired auto-off time appears.
Note:
Auto-off interval is not applicable
if battery-saving mode is set to
SlepO.
To disable battery-saving mode:
1. Turn the balance off.
2. Hold down the [ON/TARE] key until
all segments are displayed
3. Continue to hold down the
[ON/TARE] key and press the
[UNITS] key four times.
Release the [ON/TARE] key.
4. Press the [ON/TARE] key until the
display shows Slep.
5. Press the [UNITS] key to select 0
for battery-saving mode off or 1to
enable auto-off interval.
6. Press the [OFF] key when the
desired auto-off time appears.

9
Troubleshooting
Display Shows Cause Remedy
EEEE Weight exceeds balance Reduce weight
capacity.
Pan obstructed Check pan placement
- - - - - Underload Check pan placement
Lo Battery low Replace battery
Cleaning Instructions
The exterior surfaces of the product
may be cleaned with a mild water-
based detergent and a lint-free
nonabrasive cloth. Alternatively, iso-
propyl alcohol may be used. Do not
immerse the product in any liquid.
Warning
Never lift balance by the weighing pan
as this may cause damage to internal
mechanisms.
Always lift and transport the balance by
its base.
Note
This unit contains no user serviceable
parts.
All replacement parts should be
obtained from the manufacturer. Please
refer to this manual for the phone
number of your sales and service
representative.

10
CMarking
This equipment complies with the
Directives of the Council of the
European Union:
Directive 89/336/EEC “Electro-
magnetic Compatibility (EMC)”
Applicable European Standards:
Limitation of Emissions:
According to Product Standard
EN 61326-1 Kl.B
(Residential environment)
Defined Immunity to Interference:
According to Product Standard
EN 61326-1
(Industrial environment)
Important Note:
The operator shall be responsible for
any modifications to BOECO equipment
and for any connections of cables or
equipment not supplied by BOECO and
must check and, if necessary, correct
these modifications and connections.
On request, the BOECO will provide
information on the minimum operating
specifications (in accordance with the
Standards listed above for defined
immunity to interference).
Council Directive 73/23/EEC
“Electrical equipment designed for
use within certain voltage limits”
Applicable European Standards:
EN 60950
Safety of information technology
equipment including electrical business
equipment
EN 61010
Safety requirements for electrical
equipment for measurement, control
and laboratory use
Part 1: General Requirements
When you use electrical equipment
in installations and under ambient
conditions requiring higher safety
standards, you must comply with the
provisions as specified in the applica-
ble regulations for installation in your
country.

11
Calibre su balanza con una pesa de
referencia de tolerancia correspondien-
te (clase). Un aparato de medición
jamás podrá ser más preciso que el
estándar, que le sirve como magnitud
de referencia. Apoyo para la selección
de las pesas de referencia lo obtendrá
Ud. del fabricante.
¡Cuidado!
¡Jamás levante la balanza asiéndola
del plato de carga; esto podría
causar daños en el mecanismo inter-
no de la balanza!
¡Levante y transporte la balanza siem-
pre asiéndola desde el zócalo. Esto
también vale al sacarla del material de
embalaje!
Ud. se ha decidido por la compra
de una balanza de precisión de alta
calidad, que requiere un trato muy
cuidadoso.
Lea atentamente todo lo que contiene
estas instrucciones de manejo, antes
de poner en marcha su nueva balanza
BOECO.

12
Especificaciones técnicas
Modelo BLC-500 BLC-3000
Capacidad 500 g 3000 g
Legibilidad 0,1 g 1 g
Rango de tara 0 hasta 500 g 0 hasta 3000 g
Repetibilidad 0,1 g 1 g
Linealidad 0,1 g 1 g
Dimensiones del plato 138 x 138 mm 138 x 138 mm
(5,4” x 5,4”) (5,4” x 5,4”)
Especificaciones técnicas generales:
Dimensiones (LxAxA): 190 x 140 x 45 mm (7,5 x 5,5 x 1,7”)
Peso neto: 0,38 kg (0,.8 lbs)
Temperatura de régimen: 10°C – 30°C (50°F – 86°F)
Requisitos eléctricos: Batería 9 V o bien, adaptador de tensión alterna
(a pedir por separado)
Teclas de función
[ON/TARE] Encender la balanza/puesta a cero (tara) de la balanza
[UNITS] Conmutar entre las unidades de medida
[OFF] Apagar la balanza
500g
0,1g
BLC-500

13
Funcionamiento
A. Tarar (puesta a cero)
Todos los modelos pueden tararse
hasta la capacidad máxima de pesada
(diferente, según el modelo).
1. Coloque el recipiente de muestra en
el plato de carga.
2. Pulse la tecla [ON/TARE] para poner
la balanza a cero.
3. Ponga la muestra en el plato de
carga. Tan pronto como la balanza
se estabiliza, se indica el peso de la
muestra, apareciendo arriba y a la
izquierda de la pantalla.
B. Unidades de medida
Pulsando la tecla [UNITS], el aparato
conmuta entre las unidades de medida
seleccionadas como Unit 1.
Los siguientes ajustes son posibles:
• Gramo (g) y Libra/Onza (lb/oz)
• sólamente Gramo
• Gramo, Onzas Troy (ozt)
y Pennyweight (dwt)
• Gramo (g) y Onza (oz)
• Gramo, Kilogramo taiwanés (kg)
y Contaje (P)
Seleccionar unidad de medida 1
(Unit 1)
1. Apague la balanza.
2. Pulse la tecla [ON/TARE]. Todos los
segmentos aparecen en la pantalla.
3. Mantenga pulsada la tecla
[ON/TARE], y pulse cuatro veces la
tecla [UNITS]. Luego, suelte la tecla
[ON/TARE].
4. Pulsando dos veces la tecla
[ON/TARE] aparecerá en pantalla
Unit1 (o bien UnitP, para
contaje).
5. Pulse ahora la tecla [UNITS], para
recorrer las unidades de medida
disponibles para la selección.
6. Tan pronto aparezca la combinación
de unidades de medida deseada,
pulse la tecla [OFF].
Como unidad de medida 2 (Unit 2)
pueden seleccionarse: Gramo (g),
Onzas Troy, Pennyweight, Onza (oz),
Kilogramo taiwanés, o bien Libra/Onza
(lb/oz). Una vez hecha la selección, la
unidad de medida 2 será utilizada
hasta que se pulse nuevamente la tecla
[UNITS].

14
C. Proceso de calibración
Antes de calibrar, la balanza tiene
que ser puesta a cero, sin contenido
de carga en el plato.
1. Apague la balanza.
2. Pulse la tecla [ON/TARE]. Aparecen
todos los segmentos en la pantalla.
3. Mantenga pulsada la tecla
[ON/TARE], y pulse la tecla [UNITS]
tres veces. Suelte la tecla
[ON/TARE].
4. Después de algunos segundos
aparecen la letra Cy el valor de la
pesa de calibración deseada.
5. Coloque la pesa correcta en la
balanza. Después de algunos
segundos, se indica la capacidad
de pesada máxima. Esto significa
que el valor ha sido aceptado.
Seleccionar unidad de medida 2
(Unit 2)
1. Apague la balanza.
2. Pulse la tecla [ON/TARE]. Aparecen
todos los segmentos en la pantalla.
3. Mantenga pulsada la tecla
[ON/TARE], y pulse la tecla [UNITS]
cuatro veces.
4. Suelte la tecla [ON/TARE].
5. Pulsando tres veces la tecla
[ON/TARE] aparecerá Unit 2 en la
pantalla.
6. Pulse ahora la tecla [UNITS], para
recorrer todas las unidades de
medida posibles de seleccionar.
7. Tan pronto aparezca la unidad
de medida deseada, pulse la
tecla [OFF].

15
D. Contaje
1. Seleccione Gramo, Kilogramo
taiwanés (kg) y Contaje (P) como
unidad de medida 1 (Unit 1).
2. Coloque el recipiente en el plato de
carga y pulse [ON/TARE].
3. Pulse la tecla [UNITS], hasta que
aparezcan PC y la cantidad de
piezas de referencia en la pantalla.
4. Para modificar la cantidad de piezas
de referencia, pulse la tecla
[ON/TARE] hasta que aparezca la
cantidad de piezas de referencia
deseada (0, 20 o 50).
5. Ponga la cantidad indicada de
piezas en la balanza.
6. Pulse la tecla [ON/TARE]. En la
pantalla aparecerán la letra Py la
cantidad de piezas.
7. Agregue más piezas, o bien quite
piezas de la balanza.
8. Antes del siguiente proceso de
contaje, pulse la tecla [UNITS] hasta
que se indique Gramo. Repita ahora
los pasos 2 a 7.
Advertencia:
Si la balanza es apagada, tiene que
reponerse el peso de referencia.
Advertencia:
El peso de una sola pieza a cotejar
tiene que ser mayor que la resolución
(exactitud) de la balanza.
E. Auto-cero
El punto cero de la balanza se
mantiene automáticamente también
con mínimas desviaciones.
1. Apague la balanza.
2. Pulse la tecla [ON/TARE]. Todos los
segmentos aparecen en la pantalla.
3. Mantenga pulsada la tecla
[ON/TARE], y pulse la tecla [UNITS]
cuatro veces.
4. Suelte la tecla [ON/TARE].
5. Pulsando cuatro veces la tecla
[ON/TARE] aparecerá: tr-xd
en la pantalla.
6. Pulse ahora la tecla [UNITS], y
recorra de esta manera los posibles
ajustes para la puesta a cero
(1d hasta 4d).
7. Tan pronto aparezca el ajuste
deseado en la pantalla, pulse la
tecla [OFF].

16
F. Modo ahorro de batería
La balanza puede ajustarse de manera
tal que se desactive automáticamente,
después de 1 hasta 9 minutos, o bien
que permanezca encendida hasta
pulsar la tecla [OFF].
Ajuste del tiempo de desactivación
(Auto-Off):
1. Apague la balanza.
2. Pulse la tecla [ON/TARE]. Aparecen
todos los segmentos en la pantalla.
3. Mantenga pulsada la tecla
[ON/TARE], y pulse cuatro veces la
tecla [UNITS]. A continuación,
suelte la tecla [ON/TARE].
4. En la pantalla aparecen Off y la
cantidad ajustada de minutos.
5. Pulse ahora la tecla [UNITS] y recor-
ra de esta manera todos los tiempos
de desactivación posibles (1 hasta
9 minutos).
6. Tan pronto aparezca Tiempo-Auto-
Off deseado, pulse la tecla [OFF].
Advertencia:
Con modo ahorro de batería ajustado
en SlepO no puede ajustarse ningún
Tiempo-Auto-Off.
Desactivar el modo ahorro
de batería:
1. Apague la balanza.
2. Pulse la tecla [ON/TARE]. Aparecen
todos los segmentos en la pantalla.
3. Mantenga pulsada la tecla
[ON/TARE], y pulse cuatro veces la
tecla [UNITS]. A continuación, suelte
la tecla [ON/TARE].
4. Pulse ahora la tecla [ON/TARE].
En la pantalla aparece Slep.
5. Pulse la tecla [UNITS] y desactive el
modo ahorro de batería con 0, o
bien active Tiempo-Auto-Off con 1.
6. Tan pronto aparezca el Tiempo-Auto-
Off deseado, pulse la tecla [OFF].

17
Utilice para la limpieza del exterior
de la balanza solamente detergentes
suaves solubles en agua y un paño
suave, exento de pelusas, o bien
alcohol isopropil ¡Nunca sumerja la
balanza en líquidos!
¡Cuidado!
¡Jamás levante la balanza asiéndola
del plato de carga; esto podría
causar daños en el mecanismo inter-
no de la balanza!
¡Levante y transporte la balanza
siempre asiéndola desde el zócalo!
Limpieza
Mensaje de error
Lectura Causa Solución
EEEE Capacidad de pesada Descargue balanza
superada. Controle posición correcta
Plato de carga bloqueado. del plato
- - - - - Muy poca carga. Controle posición correcta
del plato
Lo Rendimiento de batería Recambie la batería
Debilitado.
¡Cuidado!
Este aparato no posee ningún tipo de
componente que pudiera ser reparado
o mantenido por el usuario mismo.
Utilice exclusivamente repuestos
originales del fabricante. El número de
teléfono del representante de ventas
y servicio correspondiente lo obtiene
Ud. en este manual.

18
Marca C
El aparato cumple los requisitos
de las Directivas del Consejo de la
Unión Europea:
89/336/CEE “Compatibilidad
electromagnética (CEM)”
Limitación de las fuentes de distor-
sión:según la norma de productos
EN 61326-1 clase B (área residencial)
Inmunidad definida: según la
norma para productos EN 61326-1
(área industrial)
Advertencia:
modificaciones de los aparatos o la
conexión de cables o aparatos no
suministrados por BOECO es de
responsabilidad del usuario y deben
ser controladas correspondientemente
por él mismo y, en caso necesario,
corregirla. BOECO pone a disposición,
según consultas, informaciones sobre
los datos mínimos de calidad del fun-
cionamiento (según las normas sobre
inmunidad aquí mencionadas).
73/23/CEE “Material eléctrico a
utilizarse con determinados límites
de tensión”
Normas Europeas aplicables:
EN 60950
Seguridad de los equipos de tratamien-
to de la información, incluyendo los
equipos eléctricos de oficina
EN 61010
Requisitos de seguridad de equipos
eléctricos de medida, control y uso en
laboratorio
Parte 1: Requisitos generales
Al utilizarse equipo eléctrico en instala-
ciones, bajo condiciones ambientales
que requieren altas medidas de
seguridad, han de observarse las
prescripciones correspondientes para
la instalación.


Boeckel & Co.
Roedingsmarkt 33
20459 Hamburg, Germany
t +49 (0) 40-3256270
f +49 (0) 40-32562741
E-mail: [email protected]
98648-012-67
Publication No.: WBL6007-al04041
W3A000.BOECO BLC
This manual suits for next models
1
Table of contents
Languages:
Other Boeco Scale manuals


