BOIA CLASICA User manual

INSTRUCTIONS MANUAL
BAND SAW BOIA
CLASICA
CORPORACIÓN BOIA DOMENICO C.A.

CORPORACIÓN BOIA DOMENICO C.A.
Index
1.Introduction ...........................................................................................3
1.1. Safety ..............................................................................................3
1.2. Main Components ............................................................................3
1.3. Technical Characteristics .................................................................9
2.Installation y Pre-Operation ....................................................................9
2.1. Installation .......................................................................................9
2.2. Pre-Operation .................................................................................9
3. Operation ...........................................................................................10
3.1. Functioning and Operation Process ...............................................10
3.2. Cleaning .........................................................................................11
4.General Safety Rules ...........................................................................12
4.1. Operation Fundamentals Practices ................................................12
4.2. Cares and Observations before to Turn on the Band Saw ..............12
4.3. Routine Inspection ........................................................................12
4.4. Operation ......................................................................................13
4.5. Post-Operation ..............................................................................13
4.6. Maintenance...................................................................................13
4.7. Warnings .......................................................................................13
5.Problems Analysis and Solutions .........................................................13
5.1. General Problems and Solutions ....................................................13
5.2. Components Adjustment ...............................................................14

CORPORACIÓN BOIA DOMENICO C.A.
1.Introduction
1.1. Safety
2
In order to operate the Band Saw BOIA Clasica, it is necessary that the instructions manual
is read carefully and that the band saw parts are known.
- Do NOT touch the blade even when the saw is switched off.
- Do NOT wear loose clothes with wide sleeves when using the saw.
- KEEP hands away from moving parts.
- NEVER switch on the saw with open doors.
The band saw is highly dangerous if it is used incorrectly. During maintenance and cleaning, the
machine must be disconnected from the power supply.

1.2. Main Components
CORPORACIÓN BOIA DOMENICO C.A.
3
3 - Grooved Guide
(SI304016)
4 - Door Hook
(SI309010)
2 - Front Handle
(SI309117)
1- Full Frontal
(RS309521) 5- Upper Wheel
Support
(RS304510)
6- Upper Wheel
(SI304006)
7- Wheel Cleaner
(SI309103)
1
2
3
4
6
7
5

CORPORACIÓN BOIA DOMENICO C.A.
4
2 - Sliding Plate
(SI309121)
1- Handle
(SI304001)
3- Rail Angle
(SI309501)
4- Rail
(SI309533)
5- Table
(RR309525)
1
2
3
4
5

CORPORACIÓN BOIA DOMENICO C.A.
5
3 - Knob
(SI309117)
4 - Rubber ¾ “
(SI309102)
2 - Arm Shaft
(SI309514)
1- Adjustable
Arm
(RS304120)
1
2
3
4
4

CORPORACIÓN BOIA DOMENICO C.A.
6
2 - Protector with
support
(SI304102)
1- Bearing 6200
12
3
4
3 - Upper Guide
(SI309005)
4 - Blade 5/8 97”
(SI309552)

CORPORACIÓN BOIA DOMENICO C.A.
7
2 - Lower Steel
Guide
(SI309021)
1- Aluminum Guide
(SI309022)
1
2

CORPORACIÓN BOIA DOMENICO C.A.
8
2 - Hinge
1- Blade Cleaner
(SI309118)
4- Lower Wheel
(SI304110)
5- Rail Support
(SI309116)
6- Switch
(RS309109)
3- Lower Wheel
Support
(RS309524)
1
2
3
4
5
6

CORPORACIÓN BOIA DOMENICO C.A.
1.3. Technical Characteristics
The Band Saw is equipped with a single-phase motor.
Table 1: Main Characteristics
2.Installation and Pre-Operation
2.1. Installation
2.2. Pre-Operation
9
Characteristic
VOLTAGE
POWER
FREQUENCY
WIDHT
HEIGHT
DEPHT
NET WEIGHT
GROSS WEIGHT
MAX. CUT WIDTH
MAX. CUT HEIGHT
Unit.
VOLT
HP
HZ
cm.
M.
cm.
kg.
kg.
cm.
cm.
Quantity
220
2
60
80
1.7
1
155
165
29
35
- Immediately after receiving a Band Saw BOIA Clasica, the machine must be inspected before
unpackaging it to see if there are any damages from shipping. After inspection, the machine can
be placed in a safe area in order to be operated.
- The band saw must be installed in a place with a flat surface in order to obtain the best stability
and performance during the operation.
- Before switching on the band saw, it must be connected to a power supply.
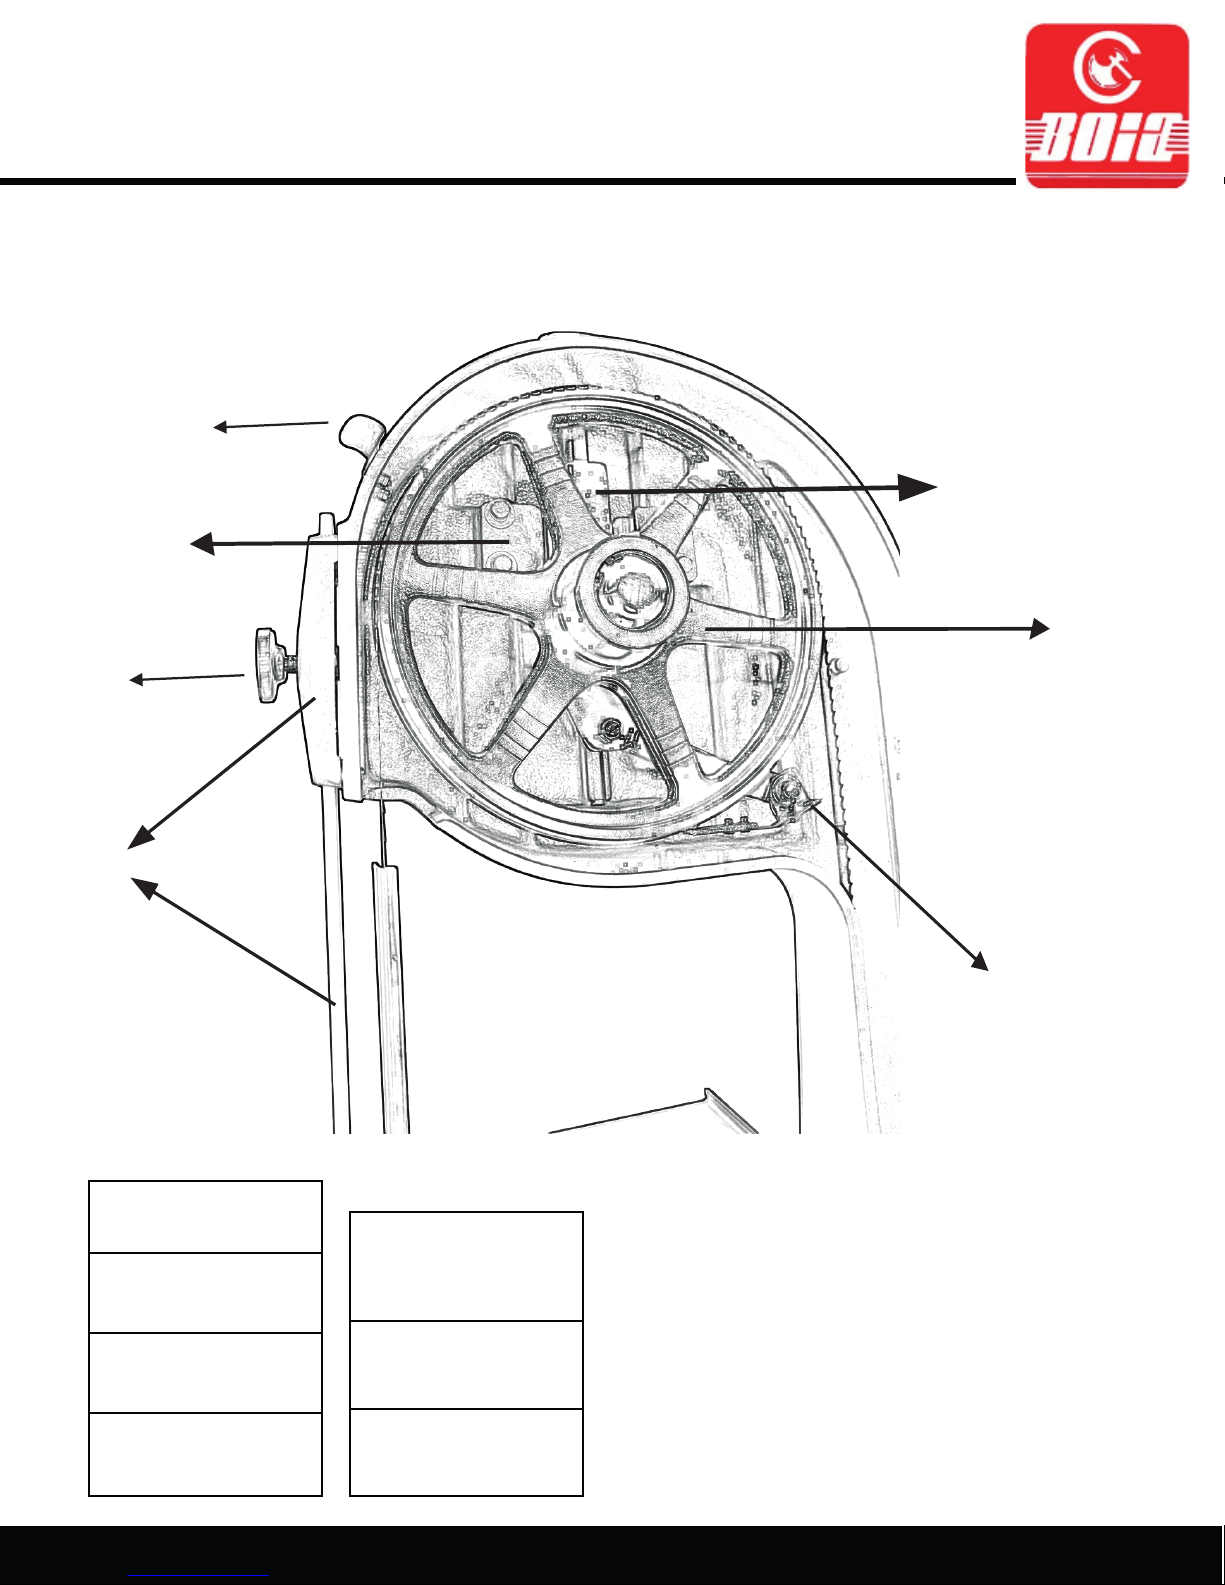
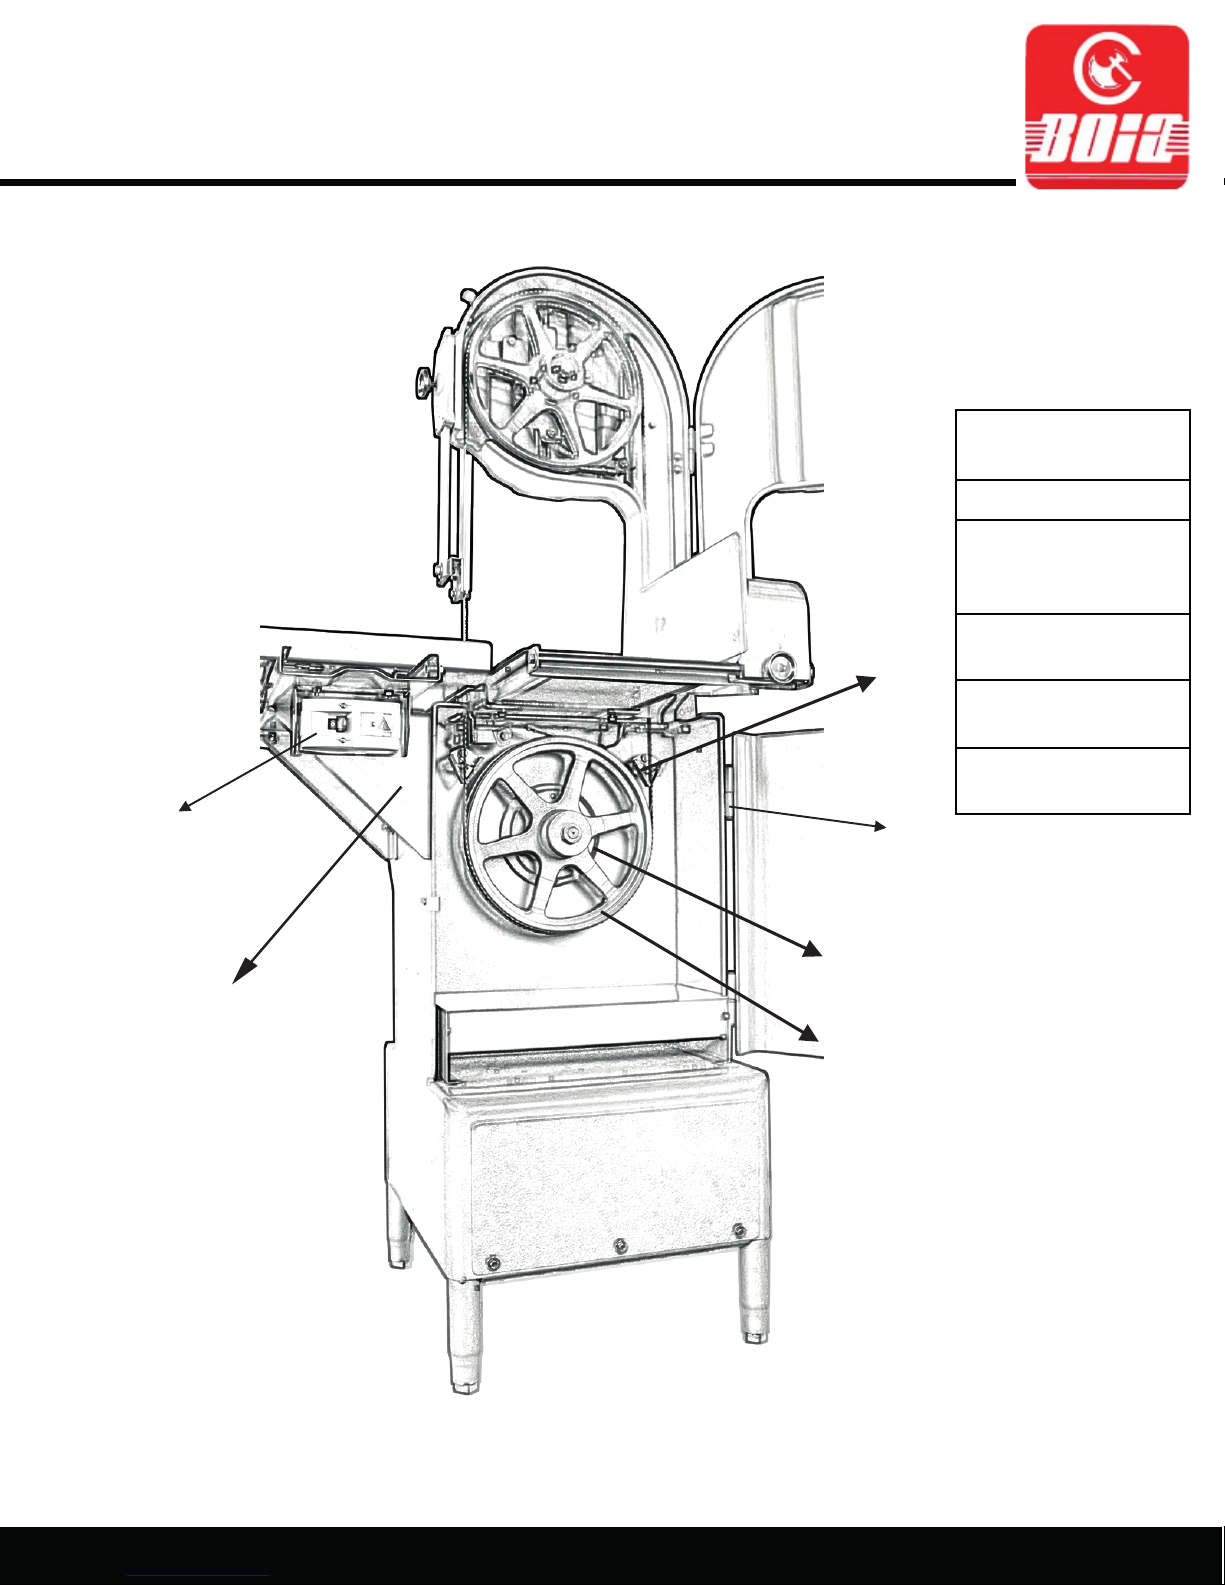
- Blade Installation: Open the upper and lower door of the band saw on the right side and loosen
the handle that tightens the previous blade. Slide the sliding plate all the way to left, loosen the
aluminum guide and lift it up. Next place the blade on the wheels and inside the wheel/blade
cleaners carefully. Finally, tighten the blade by turning the handle clockwise until it can freely
rotate around the wheels.
- Aluminum Guide Installation: Place the new aluminum guide in its position. Rotate manually
the upper wheel downward so the blade can fit inside the guide itself and then tighten it.
- The band saw blade must be calibrated before turning it on. Turn the handle clockwise in order to
tighten the blade.
- Before turning on the band saw make sure it is balanced and stable on its surface. The four band
saw legs allow themselves to be adjusted in order to obtain the best balance of the weight with
respect to the surface.
- Make sure that the motor and the power source have the same voltage, cycle, phase, and current.
For your best convenience contact your electrical technician.

3.Operation
3.1. Functioning and Operation Process
CORPORACIÓN BOIA DOMENICO C.A.
10
We strongly recommend that you spend some time with the machine so you get to know it better.
After reading the instructions manual carefully, the operator will be able to obtain the best results and
performance of the band saw. All the required meat cuts will be obtained effectively by using the band
saw in a proper and safe manner.
Follow the next steps before starting the operation process:
- Doors and components must be closed and tight.
- The band saw must be connected to the power source.
- The operator must stand on the right side of the band saw.
- Always keep your hands away from the blade: remember that the sliding plate slides from right to
left.
- Regulate the adjustable arm in order to define the thickness of the cut that is required. Place the
product side desired to cut next to it.
- Never place your hand in the blade direction in order to push the product that must be cut. Slide
the sliding plate.
- Always turn off the band saw after using it.
- If the band saw stops operating or reduces the velocity, then the guides are probably filled with
pieces of the product that are being cut. First disconnect the band saw from the power source,
loosen the upper and lower guides, remove the blade carefully and clean the guides. Finally,
replace the blade and tighten the guides back.
- Adjustable Arm: When cuts of the same thickness are required, adjust the position of the
adjustable arm based on the thickness required by tightening the handle on its side. If there is no
required thickness for the cut, keep the adjustable arm removed.
- Blade Protector with support, Upper Guide, and Bearing: this set of components is used in
order to maintain the blade in the right position and in order to maintain its rigidity. This system
is able to adjust itself depending on the size of the product required to cut. In order to adjust the
system loosen the front handle and adjust the protector depending on the height required. This set
of components can never be removed because it increases the life of the blade and protects the
operator.

3.2. Cleaning
CORPORACIÓN BOIA DOMENICO C.A.
11
In order to clean the band saw, disconnect it from the power source.
The parts that are in contact with the band saw must be cleaned correctly. In order to remove
the main parts of the band saw read the following steps:
1. Loosen the aluminum guide positioned in between the sliding plate and the table. Loosen the
tension of the blade by turning the handle counterclockwise, and then remove the blade carefully.
Clean the blade every day with warm water.
2. Remove the handle, and then remove the upper wheel. Clean the upper wheel only with a wet
cloth (Do not use warm water).
3. After cleaning the guides and placing the aluminum guide back, place the blade on the wheels,
inside the upper and lower guides, and inside the wheel/blade cleaners carefully. Finally, tighten
the blade by turning the handle clockwise.
1 2 3

4.General Safety Rules
4.1. Operation Fundamentals Practices
4.2. Cares and Observations before to Turn on the Band Saw
4.3. Routine Inspection
CORPORACIÓN BOIA DOMENICO C.A.
12
!
!
DANGER: Do not touch any electrical component of the band saw with wet hands or wet
clothes. It can cause several damages including death.
WARNING: Do not perform any maintenance when the band saw is connected to its power
source. Ensure that the work space is safe to avoid drops and accidents. Maintain the work floor
dry. If the work will be performed in a group, communicate with signs and have a work plan
before to start.
NOTICE: To lubricate parts, use lubricating oils or special greases. Avoid that water, dust,
or any other factors enter into the mechanical components. Do not modify mechanically the
band saw. Read carefully all the emergency stickers and security labels on the band saw. If a
sticker is erased or lost, please order a new one immediately with your dealer.
IMPORTANT: Read carefully the instructions manual. If there are questions please
contact your dealer.
DANGER: Check that cables and electric components are in good conditions before use.
NOTICE: Understand the instructions manual and understand the buttons functions before
using the band saw.
- Check the Band Saw motor.
- Check the tension of the blade.
- Check the wheel/blade cleaners.
- Check the blade guides.
- Check the blade bearings.
- Pay attention to any sound and noise that is not normal.

CORPORACIÓN BOIA DOMENICO C.A.
4.5. Post-Operation
4.6. Maintenance
.
4.7. Warnings
5. Problems Analysis and Solutions
5.1. General Problems and Solutions
13
- Clean the band saw after using it.
- Adjust the machine parts after cleaning the band saw.
- Do not place your fingers in between the belt and lower wheel at any moment.
- Turn off the band saw and disconnect it from the power source.
DANGER: Any Maintenance activity must be performed with the band saw
disconnected from the power source.
- The band saw must be operated by a qualified worker.
- It must be operated in a safe working place.
- Turning on the band saw: It might be possible that the band saw is not connected to the power
source or that there is no electric energy in the work place. Connect the band saw to the power
source or call your dealer if the case is worst.
- Burnt Odor or Smoke: The machine could have a problem with the electric circuit inside or
outside. In this case, contact your dealer.
- Abnormal Noise: This might be caused because of an incorrect welding of the blade and
consequently, it is necessary to change it for a new one. Another reason could be the fact that
blade is slipping off the wheels. In this case, the tension must increase by turning the handle
clockwise and by adjusting the wheels. See section 5.2.
4.4. Operation
- The machine can only be operated by qualified personnel to do this job.
- The operator must know all the safety instruments required for this job.
- Do not use the band saw with loose hair or long and wide sleeves that could create problems.

CORPORACIÓN BOIA DOMENICO C.A.
5.2. Components Adjustment
14
Before adjusting any component, disconnect the band saw from the power source.
- If the blade goes out of the wheel or jumps, follow the next recommendations:
1. Adjust the upper wheel in the following manner:
a. If the blade goes out to the front: loosen the nut and the locknut, rotate the graduation
screw ¼ or half a turn clockwise, later turn the wheel and check if the blade is in the right
position, tighten the nut and the locknut.
b. If the blade jumps: loosen the nut and the locknut, rotate the graduation screw ¼ or half a
turn counterclockwise, later turn the wheel and check if the blade is in the right position,
tighten the nut and the locknut.
- If the blade continues presenting the same failure, follow the next steps:
2. Adjust the lower wheel in the following manner:
a. Loosen the nut on the upper side of the lower wheel support. Loosen the locknut that is
located immediately in behind the lower wheel support, rotate the nut clockwise a ¼ or
half a turn (if the blade goes out to the front), or counterclockwise (if the blade goes out
to the back).
b. Later tighten the nut and locknut of the front. Never loosen the lower nuts of the lower
wheel support to adjust.
- If the problem continues please contact the dealer immediately.
- Difficulty cutting the meat: It is possible that the blade is dirty, the wheels are dirty, the blade is
not centered or the blade is simply consumed. It is necessary to clean the blade and wheel, adjust
the blade or wheel, or change the blade. See section 2.1, 3.2, and 5.2. If the problem is worst
please contact the dealer.
- Constant blade breaking: The wheels and the blade are possibly dirty or filled with the products
pieces. Another possibility is that the wheels are consumed. Clean the wheels and blade or change
the wheels. See section 3.2 and contact the dealer if a new wheel is needed.
Table of contents