Bolymedia BA-101 User manual

http://www.bolymedia.com
User Manual
BA-101/BA-102/BA-201/BA-202

Contents
Appearance..............................................................................1
Getting Started...................................................................... 3
Charging the Battery...................................................3
Inserting or Removing MicroSD Card................ 3
Software Update........................................................... 4
Power On and Off......................................................... 4
Setup.......................................................................................... 5
Camera Mode................................................................. 5
LCD Display Screen..................................................... 5
Setting Items.................................................................. 6
Connections...........................................................................11
Using a Card Reader..................................................11
Using a USB Cable...................................................... 11
Using a HDMI Cable.................................................. 11
WIFI Connecting.................................................................13
Mounting Accessories...................................................... 15
Specifications....................................................................... 17
/ Appearance
1
Appearance

/ Appearance
2
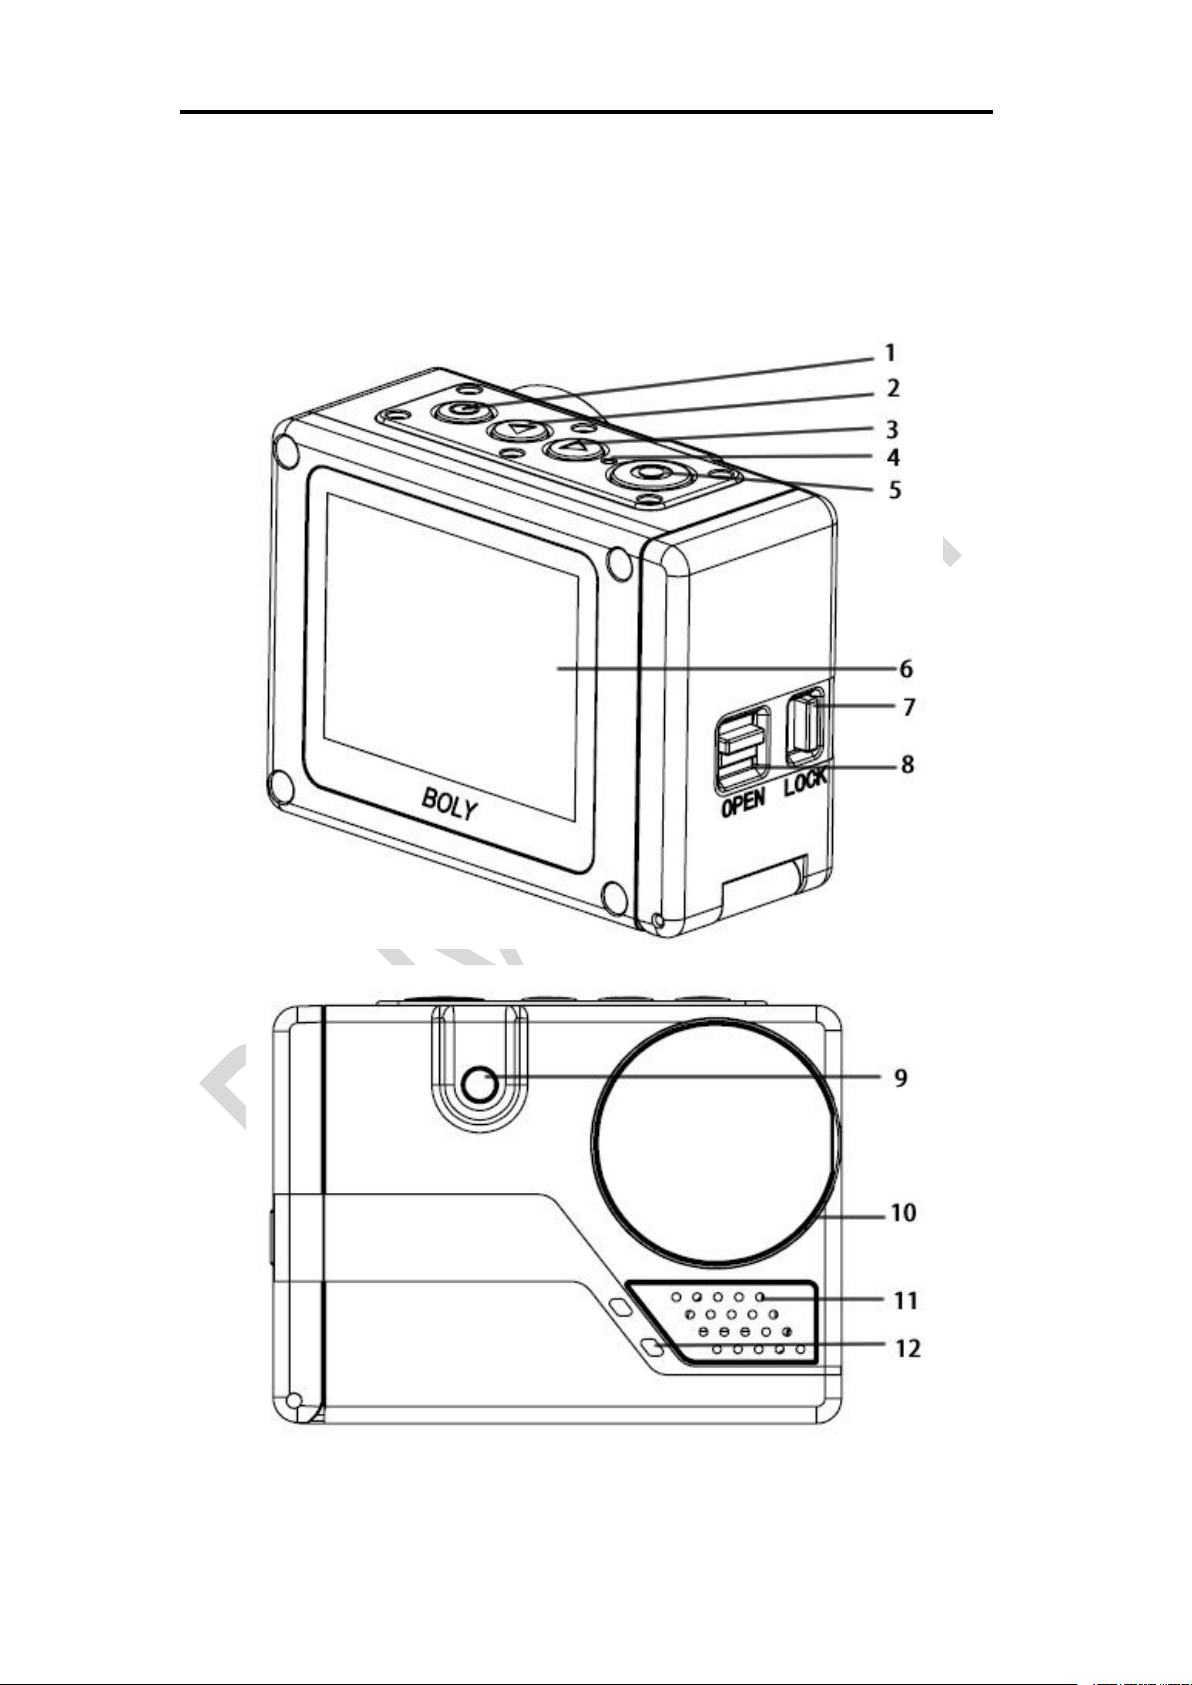
1. Power/Menu 10. Lens
2. Up/Voice switch 11. Speaker
3. Down/WIFI switch/Mode 12. Microphone
4. Charging indicator 13. MicroSD card slot
5. Shutter/OK 14. Micro HDMI port
6. LCD Display 15. Li-on battery
7. Battery cover lock 16. Battery buckle
8. Battery cover switch 17. Mini USB port
9. Flash 18. Rubber gasket
All images and illustrations given in this manual are
for explanation purpose and may differ slightly
from the actual product.
Features: Different from the BA-101/BA-102, BA-201
and BA-202 is known as the auto focus function. You can
choose the video resolution as 4K/2K( only for BA-102
/BA-202 optional).

/GettingStarted
3
Getting Started
Charging the Battery
Unlock and open the battery door, charge the
battery by connecting the camera to a computer or
other USB charging adapter using the included USB
cable. The charging indicator turns on during
charging and turns off when charging is completed.
NOTICE: Only use chargers marked: output 5V 1A.
If you do not know the voltage and current of your
charger, use the included USB cable to charge the
camera from your computer.
The included lithium-ion battery comes partially
charged. No damage occurs to the camera or battery
if used prior to a full charge.
Inserting or Removing MicroSD
Card
Slide the memory card into the card slot according
to the correct icon before powering on the camera.
The camera itself has no storage space , it will not
work well if no microSD card is inserted.
When you want to remove the microSD card, place
your fingernails against the edge of the memory
card and lightly press it further into the slot. It will
springs out far enough to be removed.
NOTE: the camera is compatible with 4GB to 32GB
capacity microSD, microSDHC and microSDXC

/Getting Started
4
memory cards(not included). Boly recommends
using brand name memory cards for maximum
reliability in high-vibration activities. Avoid liquids,
dust and debris comes to the microSD card during
use. Power off the camera before inserting or
removing the card.
Software Update
To get the latest features and best performance
from the camera, make sure you are using the most
current camera software.
The camera supports updating software through the
microSD card. Note frequent updating software may
cause damage to the camera.
Power On and Off
To Power On:
Long press the Power/Menu button[ ], the LCD
display will light with a short “BolyAcam” animation.
The information will be displayed on the screen
when camera is on.
To Power Off:
Long press the Power/Menu button[ ], the LCD
display will dim with a short “BolyAcam” animation.

/ Setup
5
Setup
Camera Mode
The camera supports three modes: Photo Mode,
Video Mode and Playback Mode. In preview status,
short press Down/WIFI switch/Mode button [ ]
repeatedly to change modes after turning on the
camera. There are different item settings for each
mode.
Video Mode: Press the Shutter/OK button[ ] to
capture a video clip according to custom settings,
the same button to stop. Video Mode is the default
mode.
Photo Mode: Press the Shutter/OK button[ ]
to capture still photos according to custom settings.
Playback Mode: Press Down/WIFI
switch/Mode button [ ] repeatedly to enter
playback mode to see a video or photo which has
been taken. The Shutter/OK button[ ] also helps
to playback a video clip, the Up/Voice switch
button[ ] shows you the prior one.
Also in playback mode, press the Power/Menu
button[ ] to delete or protect photo or video clip.
Once a photo or video clip is protected, it cannot be
deleted. An icon of key shows when a picture or
video clip is protected.
LCD Display Screen
There is a 2’’LCD display screen on the camera
which makes it easy to set up and view the
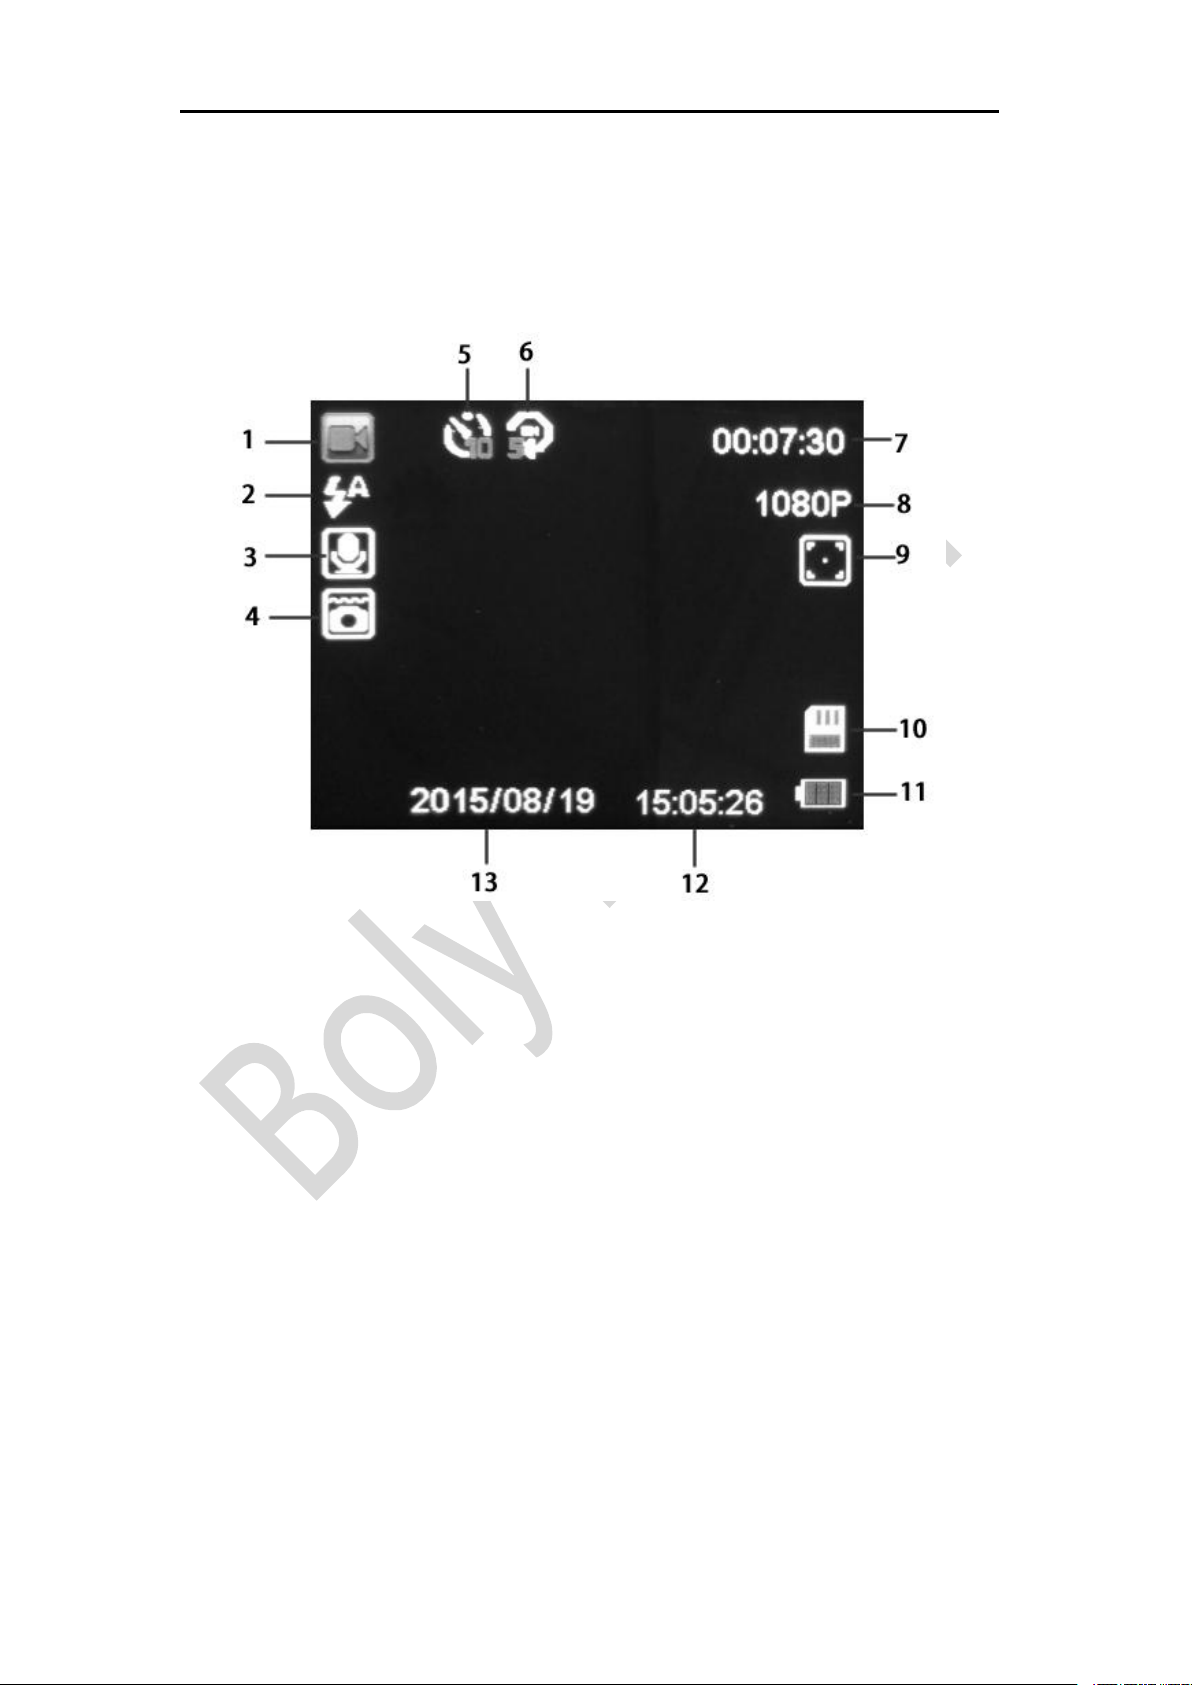
Setup
6
parameters for the various camera modes. Take a
few minutes to familiarize yourself with the displays.
It is helpful to bookmark this section and refer to it
when reading through the rest of the manual.
1. Mode 8. Resolution
2. Flash 9. Focus icon
3. Voice control 10. MicroSD card
4. Underwater 11. Battery icon
5. Capture mode 12. Time
6. Loop/Sequence 13. Date
7. Remaining space
Setting Items
After you are familiar with the basic operations of
the camera, you are now ready for advanced
operations. The options and parameters of the
camera are explained in more detail.
Setting Items contain two kinds of parameters:
/ Setup
7
mode parameters and system parameters.
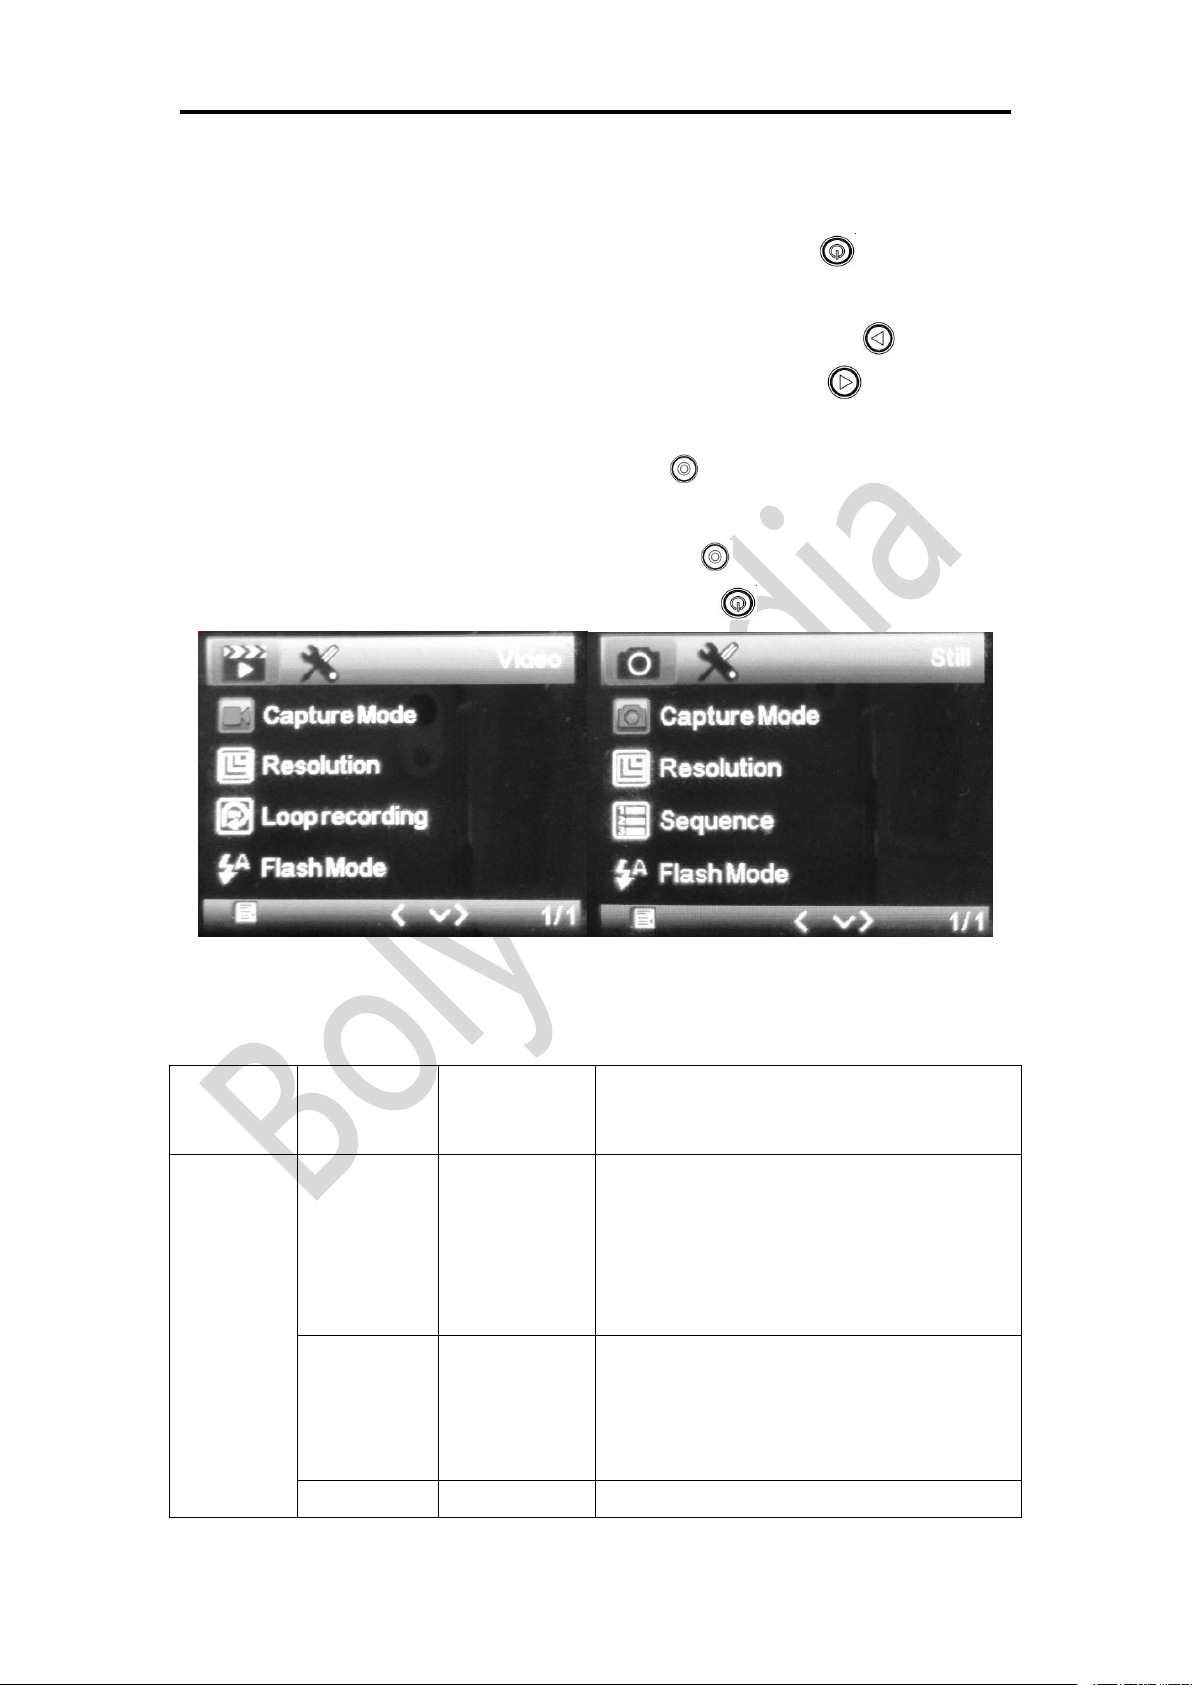
Setting Mode Parameters:
a. Short press Power/Menu button[ ] to enter
settings menu in preview status;
b. Press Up/Voice switch button[ ] or
Down/WIFI switch/Mode button [ ] to select
menu list;
c. Press Shutter/OK button[ ] to expand all of the
available options, select the right option you need,
then the Shutter/OK button[ ] to save;
d. Press Power/Menu button[ ] to exit.
Video Mode Photo Mode
Mode
Menu
Option
s
Description
Video
Mode
Capture
Mode
Single
2S Timer
5S Timer
10S Timer
This parameter defines the delay time
before a video clip begins to record.
The delay begins once you press the
shutter button. The Single option is
for no delay on a video recording.
Resolution
1080FHD
720P
360P
It means video resolution, select the
video resolution you need. Higher
resolution takes up more memory
space.
Off
This parameter defines the length of

Setup
8
Loop
Recording
3 Minutes
5 Minutes
10 Minutes
each video clip during the recording.
Off means there is no interruption
during video recording.
Flash
Mode
Auto
Off
On
There is a White LED on the front of
the camera as fill light. If Flash is set
to on, the LED will brighten when the
camera starts to take video. If Flash is
set to Auto, the LED will brighten
when there isn’t enough natural
lighting for the video.
Photo
Mode
Capture
Mode
Single
2S Timer
5S Timer
10S Timer
This parameter defines the delay time
before a photo is taken. The delay
begins once you press the Shutter
button. The Single option means no
delay time on a photo being taken.
Resolution
30M
20M
14M
8M
It means photo resolution, select the
photo resolution you need. Higher
resolution takes up more memory
space.
Sequence
1 Sequence
3 Sequence
5 Sequence
10 Sequence
It means the shooting number of each
capturing.
Flash
Mode
Auto
Off
On
There is a White LED on the front of
the camera as fill light. If Flash is set
to on, the LED will brighten when the
camera starts to take photo. If Flash is
set to Auto, the LED will brighten
when there isn’t enough natural
lighting for the photo.
System Items
Option
s
Description
WIFI
Off
On
There is a WIFI module built in the
camera which makes it much easier to
transfer files between the camera and

/ Setup
9
smart phone or tablet PC.
Date/Time
Y/M/D
H/M/S
You can change the date and time
when necessary, e.g., after turn on the
camera. The date format can be
changed to Month/Day/Year Day/
Month/Year or Year/Month/Day
Voice Study
Take Photo
Take Movie
Stop Movie
Voice Test
There is an acoustic sensor built in the
camera. Voice control is available on
this camera, but it need to record your
voice as a command at first.
For example, select “Take Photo”,
speak“Take Photo” or other words
when“Please speak” is showing on the
screen, then speak again according to
the screen reminder. There will be a
before “Take Photo” if it succeeds.
You can do a voice test by selecting
“Voice Test”.
Voice Control
Off
On
Turn on or turn off the voice control.
Shortcut key:long press the Up/
Voice switch button [ ] to turn on
or turn off in preview status.
Auto Power Off
Off
3 Minutes
5 Minutes
10 Minutes
This parameter defines the amount of
time the camera will automatically
turn off after being idle. The Off
setting means camera will remain
working until you turn it off or the
battery consumed.
Beep Sound
Off
On
This parameter is for the beep sound
that camera makes when the camera
is in use.

Setup
10
Language
Chinese
English
Choose the language you need
showing in the menu.
Underwater
Off
On
The camera itself is resistant against
water and can be used underwater
without an additional case.Please note
do not use this camera underwater
deeper than 3m. Deeper than 3m can
damage the camera.
Focus Distance
Near
Far
The focus of lens in camera can be
adjusted. It has two options, “Far”
and “near”. Far means the lens’ focus
is farer than 1.5m. Near means the
lens’ focus is nearer than 0.3m.
Frequency
50Hz
60Hz
This camera can be customized to
eliminate the screen flicker frequency.
50Hz is for areas using 50Hz
frequency of AC. 60Hz is for areas
using 60Hz frequency of AC.
Format
Cancel
OK
Format the microSD card. All photos
and videos already on the microSD
card will be deleted. Please make sure
to back up or save these photos before
formatting if needed.
Default Setting
Cancel
OK
Restore all custom settings to default
values.
Version
BA-201
Version
Version information.
Please Note to press Shutter/OK button[ ] to
save the selected options, and Power /Menu
button[ ] to exit.Also do not use voice control
function in a loud noisy environment.

/ Connections
11
Connections
There are three ways to view the photo or video files on
external devices.
Using a Card Reader
1. Open the battery cover;
2. Eject the microSD card from the camera and insert into
a card reader(not included);
3. Connect the card reader to a PC;
4. Open [My Computer] to find the disk of card reader;
5. Double-click the photo or video you want to view.
Using a USB Cable
1. Open the battery cover;
2. Connect the USB port to a PC using the supplied USB
cable;
3. Turn on the camera;
4. Select [Mass Storage] showing on the camera screen;
4. Open [My Computer] to find the disk of card reader;
5. Double-click the photo or video you want to view.
Note there are two options when connected with the USB
cable to a PC: “Mass Storage” and “PC camera”. It can be
used as an external video equipment of PC when “PC
camera” is selected.
Using a HDMI Cable
1. Open the battery cover;
2. Connect HDMI port of the camera to a HDTV with an

/Connections
、
12
HDMI cable(not included);
3. Turn on HDTV and switch to HDMI-mode;
4. Turn on the camera;
5. After connecting correctly, objects will be shown on the
HDTV, you can record and playback photos or videos,
do menu settings on the camera, but the screen will be
replaced by the HDTV.

/WIFI Connecting
13
WIFI Connecting
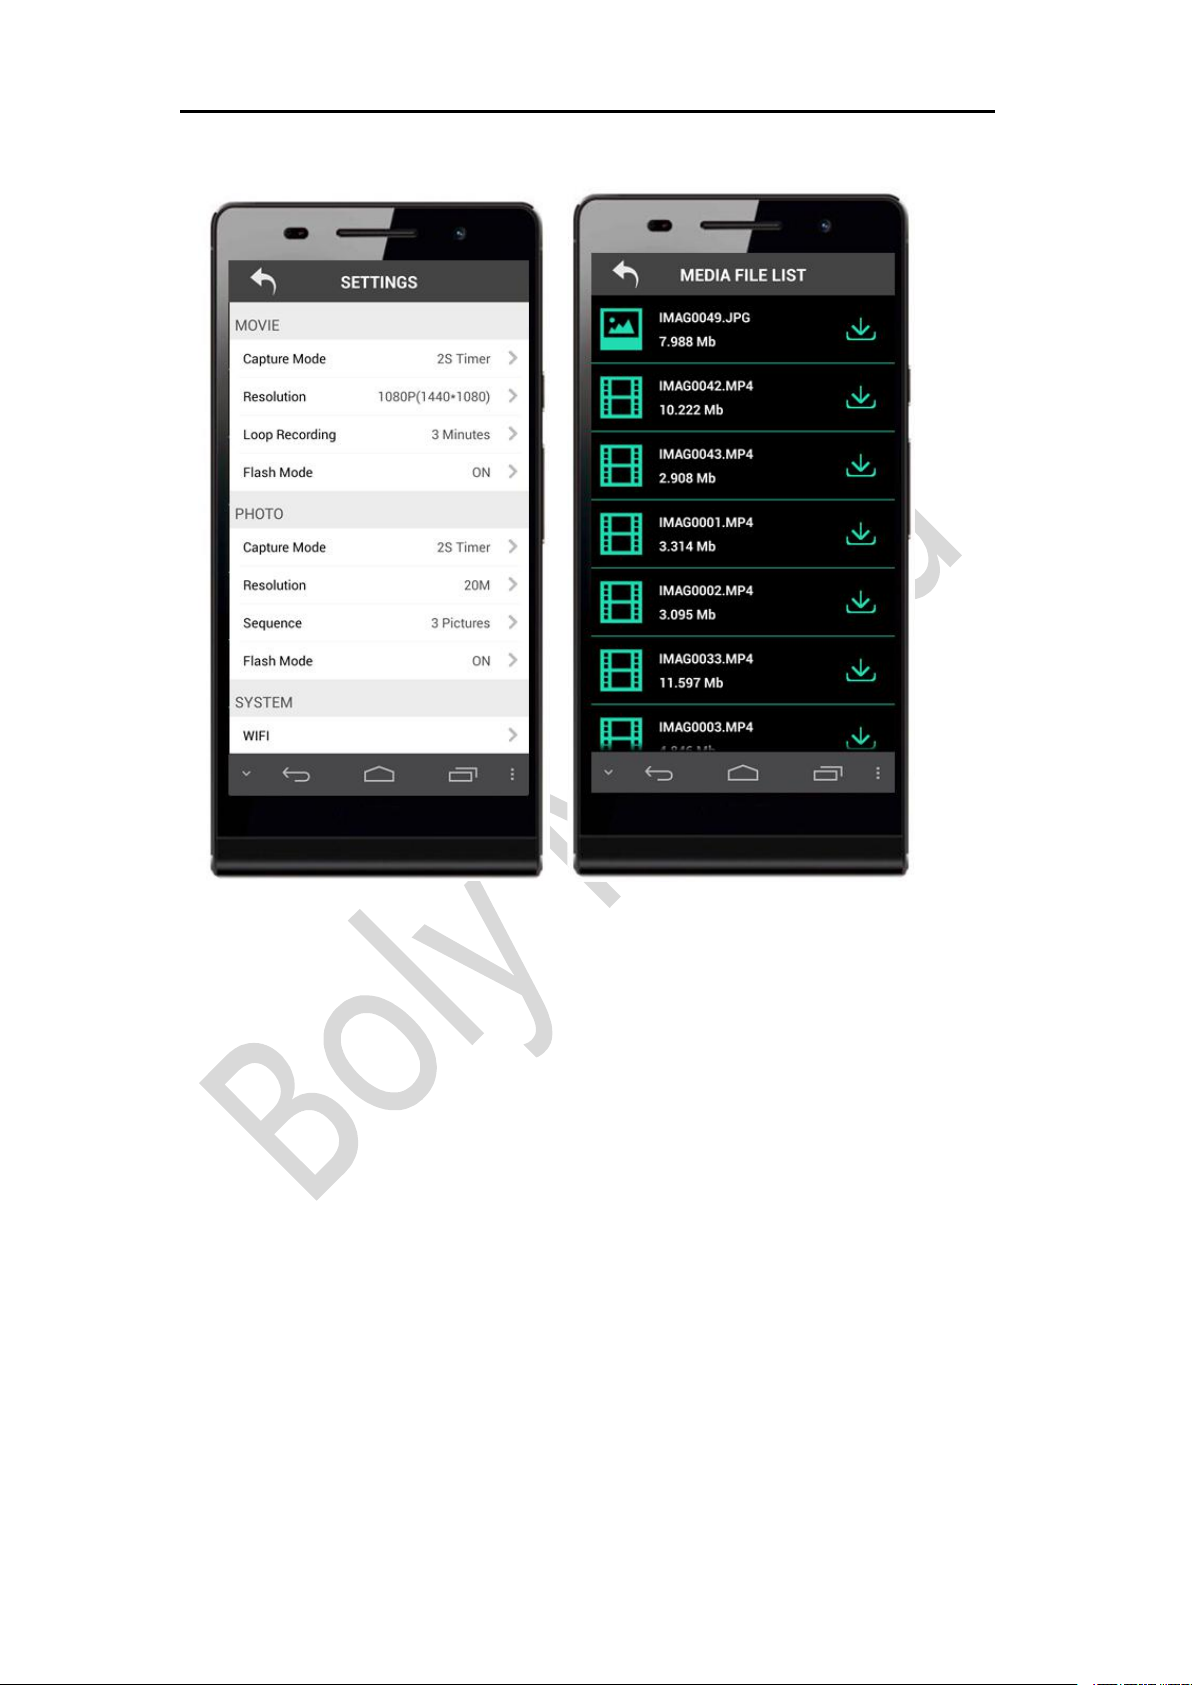
The BolyDV App lets you control your camera remotely
using a smart phone or tablet PC. Features include full
camera control, live preview, playback, item settings and
downloading files.
Shortcut button: Long press Down/WIFI switch/Mode
button [ ] to turn on WIFI control.
1. Download the BolyDV App to
your smart phone or tablet PC
from the Apple store(IOS system)
or Google Play(Android system);
2. Install it on your smart phone or
tablet PC;
3. Turn on the WIFI button on
camera;
4. Search the WIFI signal on your
smart phone or tablet PC, the
default password is 12345678,
then connect;
5. Open the APP, all operations can
be done through the APP once
WIFI is connected successfully to
smart phone or tablet PC.
NOTE: WIFI name and password can be changed through
the APP. It is recommended to do it when you are using a
WIFI connection. Please remember to restart the camera
after changing the WIFI name and password.
/WIFI Connecting
、
14
/Mounting Accessories
15
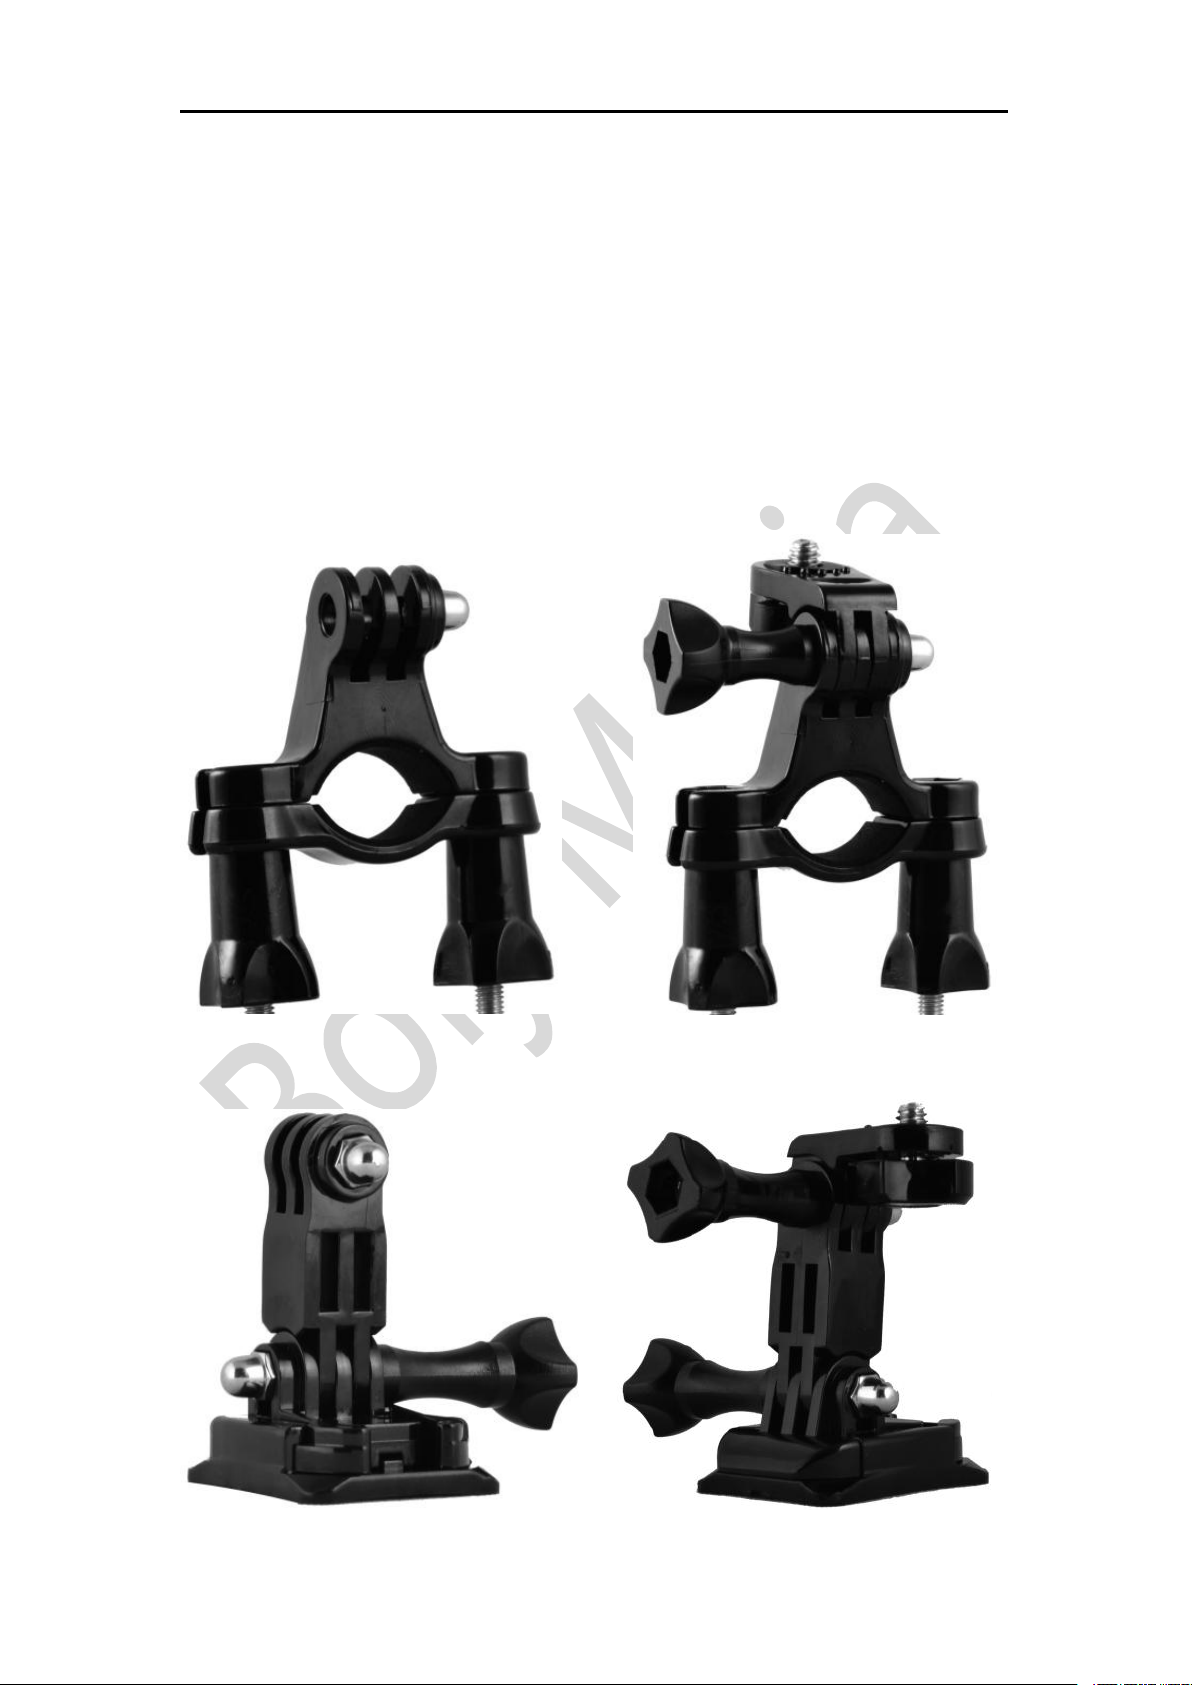
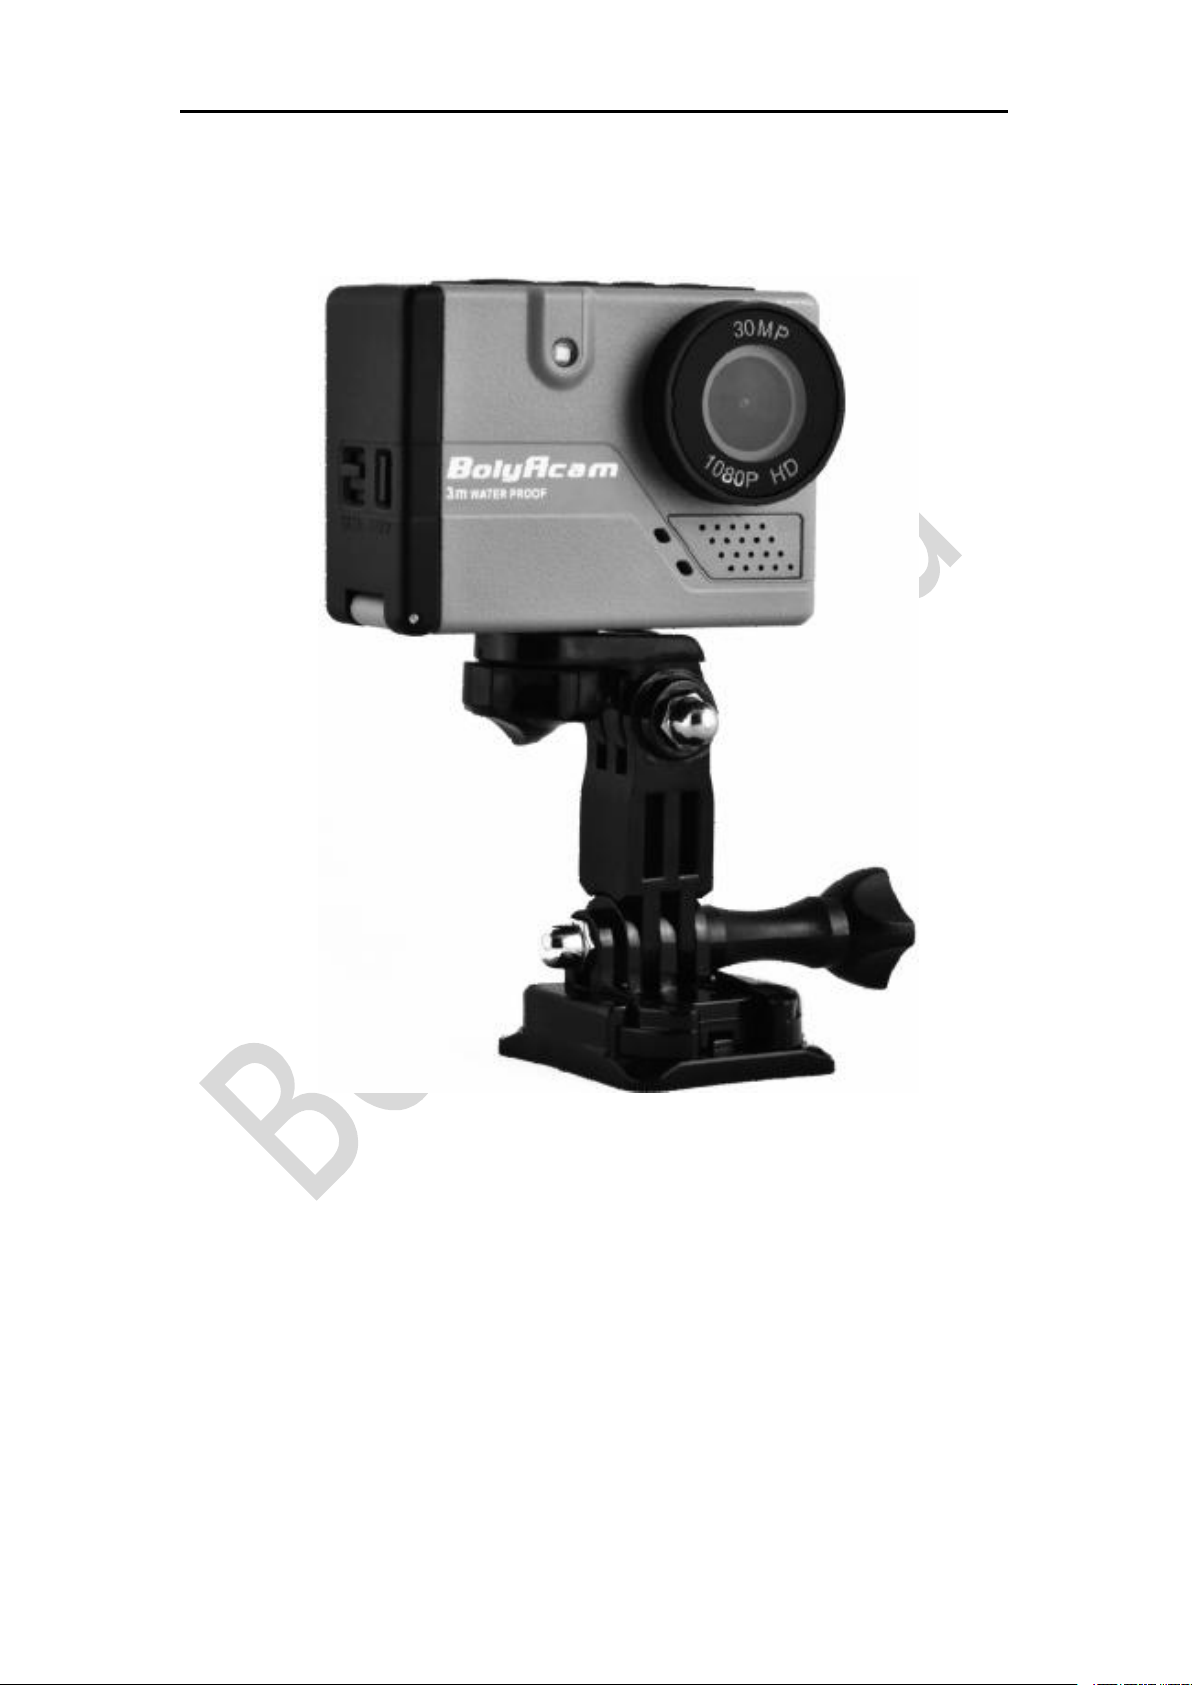
Mounting Accessories
In order to use the camera more convenient in an outdoor
environment, Boly provides two kinds of mounting
brackets: one is for mounting to a bike and the other is for
mounting to a helmet. Install them as following steps.
1), Mounting to a bike
2), Mounting to a helmet
/Mounting Accessories
、
16
There is an adhesive tape included for you to connect the
mounting bracket to a helmet.
WARNING: Please take caution when using the camera as
part of your active lifestyle. Always be aware of your
surroundings to avoid injury to yourself and others. Abide
by all local laws when using this camera and related
mounting accessories.

/Specifications
17
Specifications
Sensor
14MP
Operating modes
Photo mode/Video mode/Playback mode
Display screen
2’’ LCD
Lens
F=2.8
FOV=154°
Storage card
Up to 32GB
Photo resolution
30M 6400x4800
20M 5184x3888
14M 4320x3240
8M 3264x2448
Video resolution
4K/2K( Only for BA-202/ BA-102 optional )
1080FHD 1920x1080
720P 1280x720
360P 640x360
Microphone
Yes
Speaker
Yes
Battery
Li-on battery
3.7V 1000mAh
Waterproof depth
3 Meter
Dimension
68x50x30mm
Weight
109g
Operating Temp.
-10℃- 50℃
Storage Temp.
-20℃- 60℃
Security
authentication
FCC, CE, RoHS

18
The United States and Canada
Boly Media Communications Inc.
Address: 3235 Kifer Rd., Suite260
Santa Clara,Ca95051,USA
Email: us_sales@bolymedia.com
Tel: 001-408-789-7811
Fax:001-844-272-4983
Europe and other areas
Boly Media Communications(Shenzhen)Co.,Ltd.
Address: 2F,Shanshui Building B, Yungu Innovation Industrial Park,No.1183,Liuxian
Blvd,Nanshan District, Shenzhen.Guangdong,China 518055
Email: sales@bolymedia.com
Tel: 0086-755-26805999
Fax: 0086-755-26817782
This manual suits for next models
3
Table of contents
Other Bolymedia Action Camera manuals


