PRIXTON DV660 User manual

MULTI SPORT ACTION CAM
DV660 4K
ES
Funciones
Precauciones
2
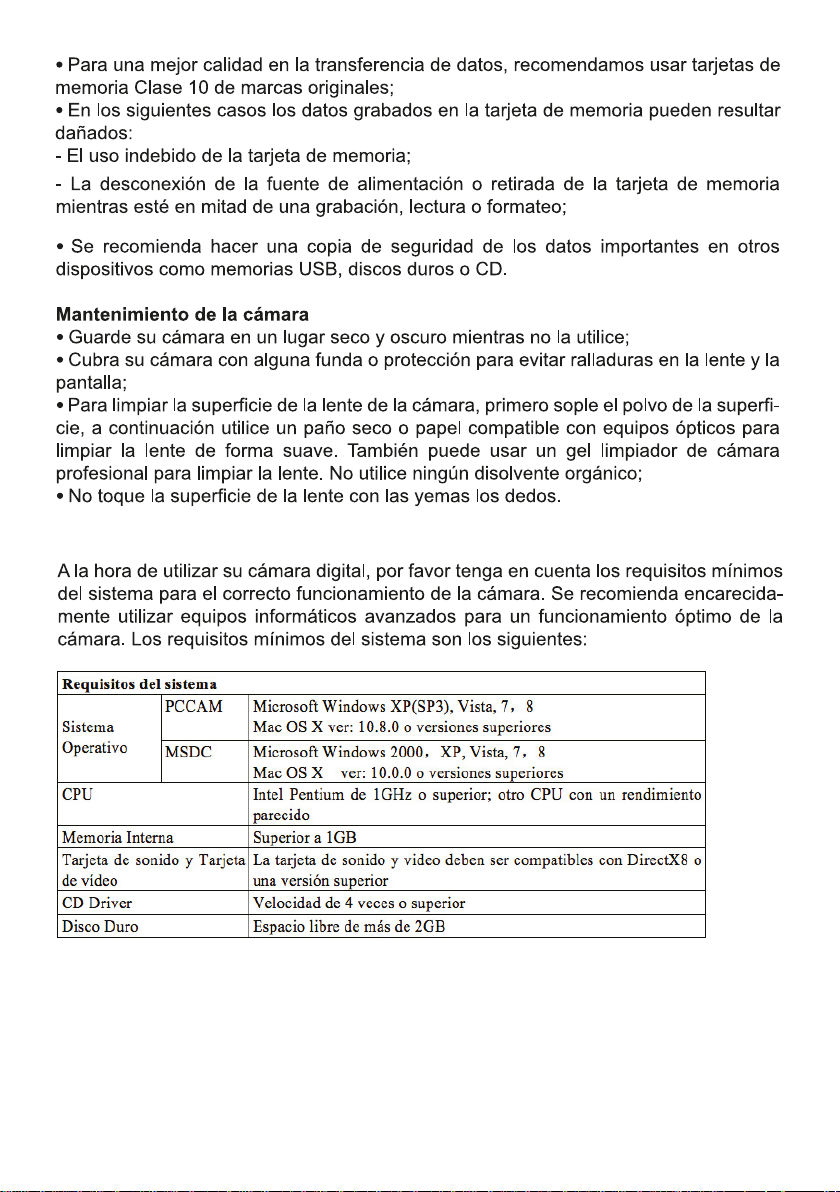
Requisitos del sistema
3
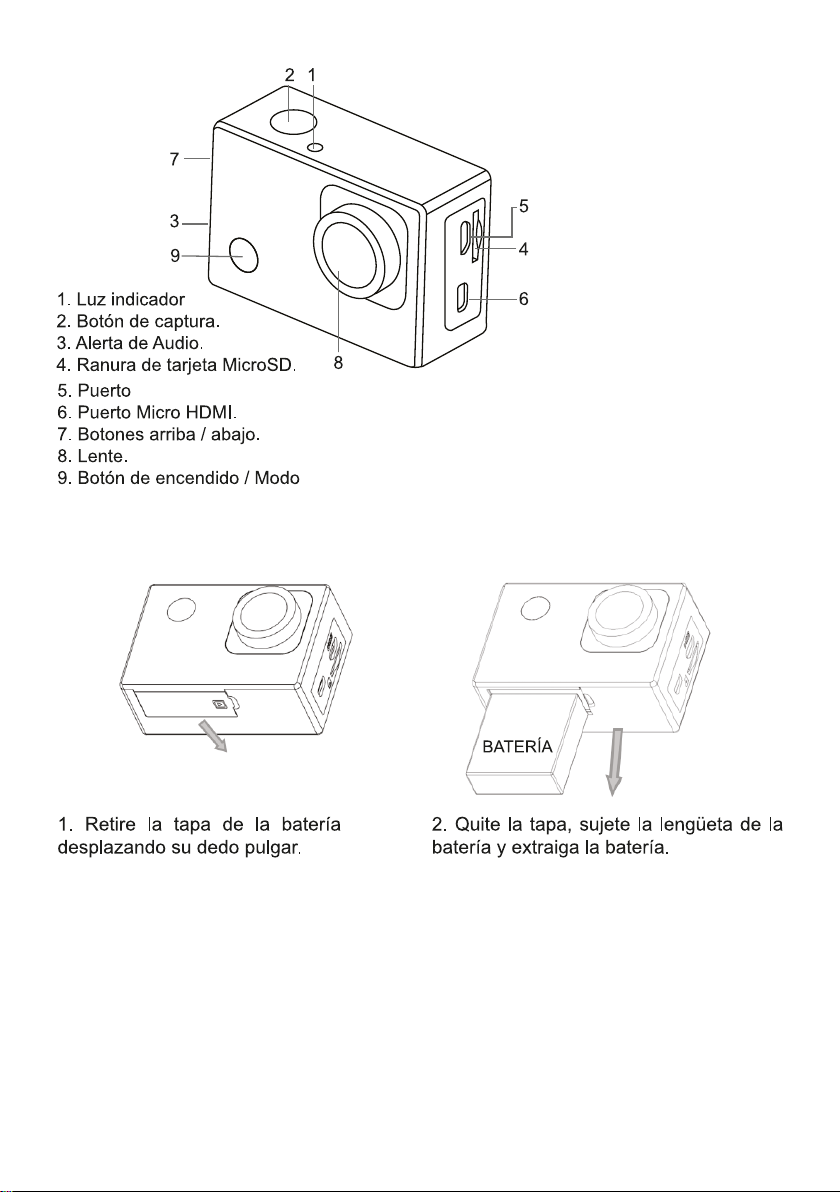
Apariencia
Extracción de la batería de la cámara
Tipo C
4
Primeros pasos
5

6
7

8

9
10

X-Sport Pro App Instrucciones
1. APP de control de la cámara (Compatible con Android e iOS)
1.1. Cómo instalar la APP
a. Para android, por favor busque "X-Sport Pro" en la tienda de Google APP para
descargarlo e instalarlo de acuerdo con la instrucción.
b. Para IOS, por favor busca "X-Sport Pro" descárgalo e instálalo en la App Store de
apple.
c. O escanear el código QR debajo del teléfono para descargar la APP
Iniciar el WIFI (tanto Android como iOS )
1. Inserte la tarjeta de memoria Micro y encienda la cámara. Entra en el menú y activa el
WIFI(X10000_XXXX).
2. Activar WI-FI en el teléfono inteligente o tableta y la búsqueda de Wifi SSID llamado
"66666666", entonces
conéctelo a la cámara, hasta que el sistema muestre "Conectado correctamente".
Nota: la primera vez que se conecte a la cámara, deberá introducir la contraseña
"66666666"
3.Después de conectar el teléfono móvil a la cámara WIFI, abra la APP y haga clic en
"conectar la cámara" para entrar en la interfaz de funcionamiento de la APP. Como se
muestra en la siguiente imagen.
Android IOS
11
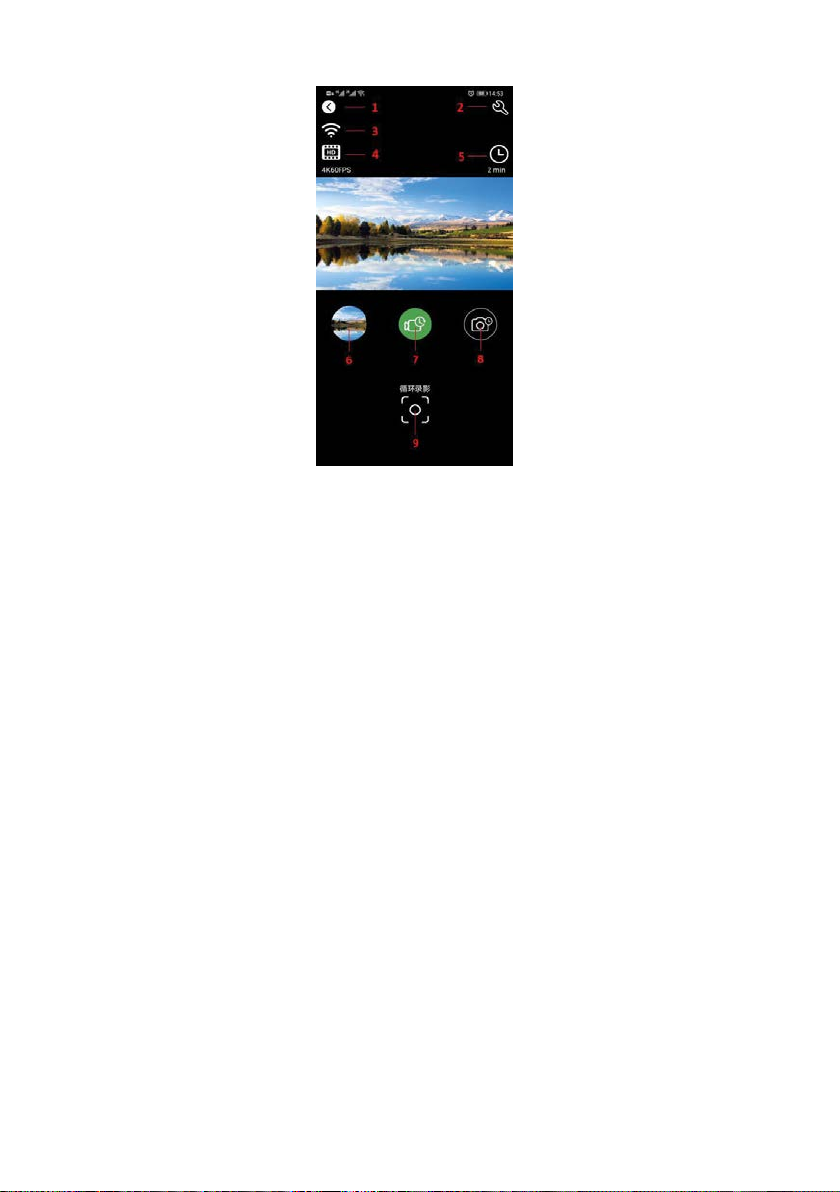
Introducción de la función de interfaz de funcionamiento de APP
1 Salir
2 Ajustes de la cámara
3 Señal WIFI
4 Ajuste de la resolución
5 Parámetros de vídeo y foto
6 Álbum de la cámara
7 Selección del modo de vídeo
8 Selección del modo de cámara
9 Botón del obturador
Compartir fotos de vídeo
Después de descargar las fotos y vídeos del álbum de la cámara, se guardarán automática-
mente en el "Álbum Offline" de la APP. Después de conectar el teléfono a la red, abre la
APP y entra en el "Álbum sin conexión" para ver o compartir las fotos de vídeo que se han
descargado en el local. También puedes ver y compartir las fotos de vídeo descargadas en
el teléfono en el álbum del teléfono → otros álbumes → álbum "4K-Sport Pro".
12
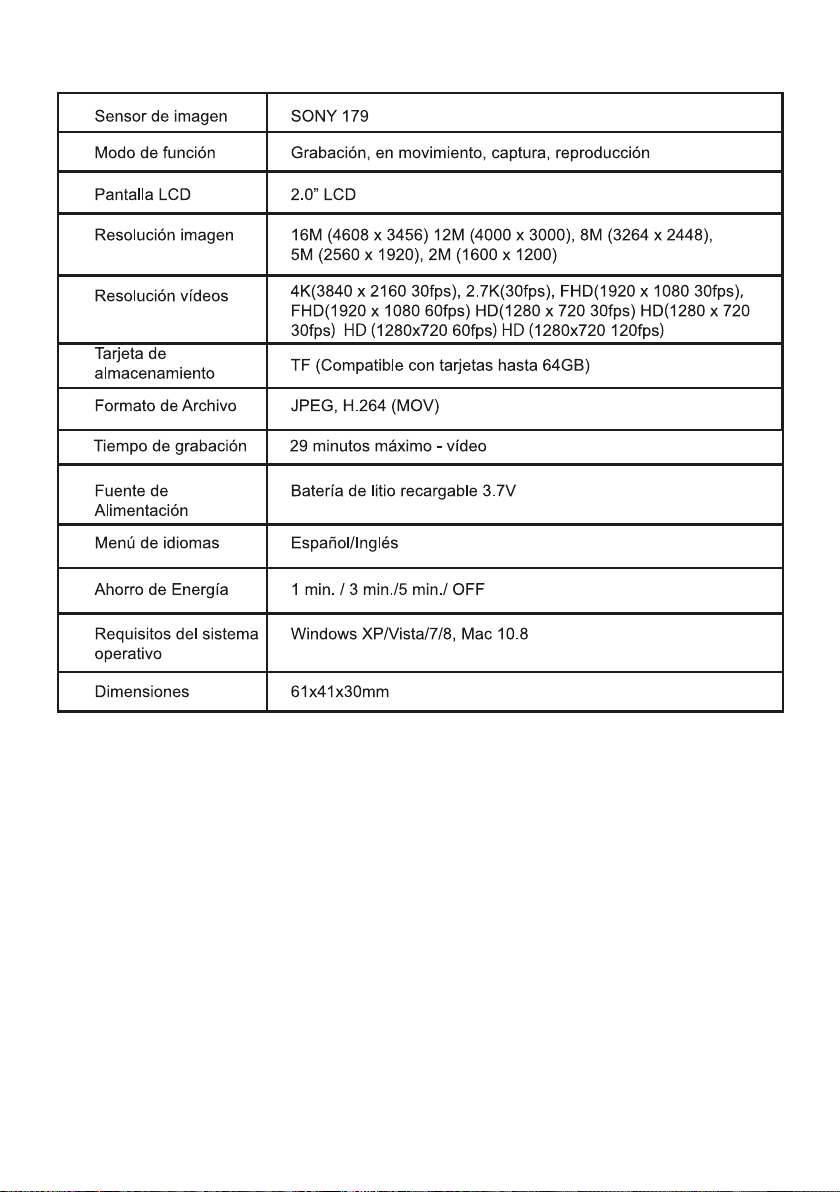
Especificaciones Técnicas
13

Política de garantía
En cumplimiento de lo establecido en el art. 16.7 del Real Decreto-ley 7/2021, de 27 de abril.
Ref. BOE-A-2021-6872, se pone a disposición de los interesados, accediendo a www.prix-
ton.com, cuanta información sea necesaria para ejercer los derechos de desistimiento
atendiendo a los supuestos que recoge dicha ley, dando por cumplidas las exigencias que
esta demanda de la parte vendedora en el contrato de venta.
Las características técnicas y eléctricas que aquí se brindan corresponden a unidades
típicas y podrían cambiarse sin previo aviso con el fin de proveer un mejor equipo.
Declaración ue de conformidad simplificada
Por la presente, La Trastienda Digital SL como propietaria de la marca comercial Prixton,
ubicada en Avenida Cervantes 49, módulo 25, Basauri 48970, Bizkaia, declara que el tipo de
equipo radioeléctrico que a continuación se expone:
Es conforme con la Directiva 2014/53/UE del Parlamento Europeo y del consejo de 16 de
abril de 2014.
El texto completo de la declaración UE de conformidad está disponible en la dirección de
Internet siguiente:
www.prixton.com LA TRASTIENDA DIGITAL
MARCA MODELO DESCRIPCIÓN CATEGORÍA
PRIXTON DV660 4K MULTI SPORT ACTION CAM OCIO
14
EN
Function
Thank you for choosing this camera. Please carefully read the manual before using, and
keep it at a safe place for future reference.
The compilation of the manual refers to the latest information. The manual quotes
captured screen displays and graphics, with the aim to introduce the digital camera
through detailed and direct methods. Due to the differences of technical R&D and
production batch, those captured screen displays and graphics indicated un the manual
may be different from that of actual digital camera.
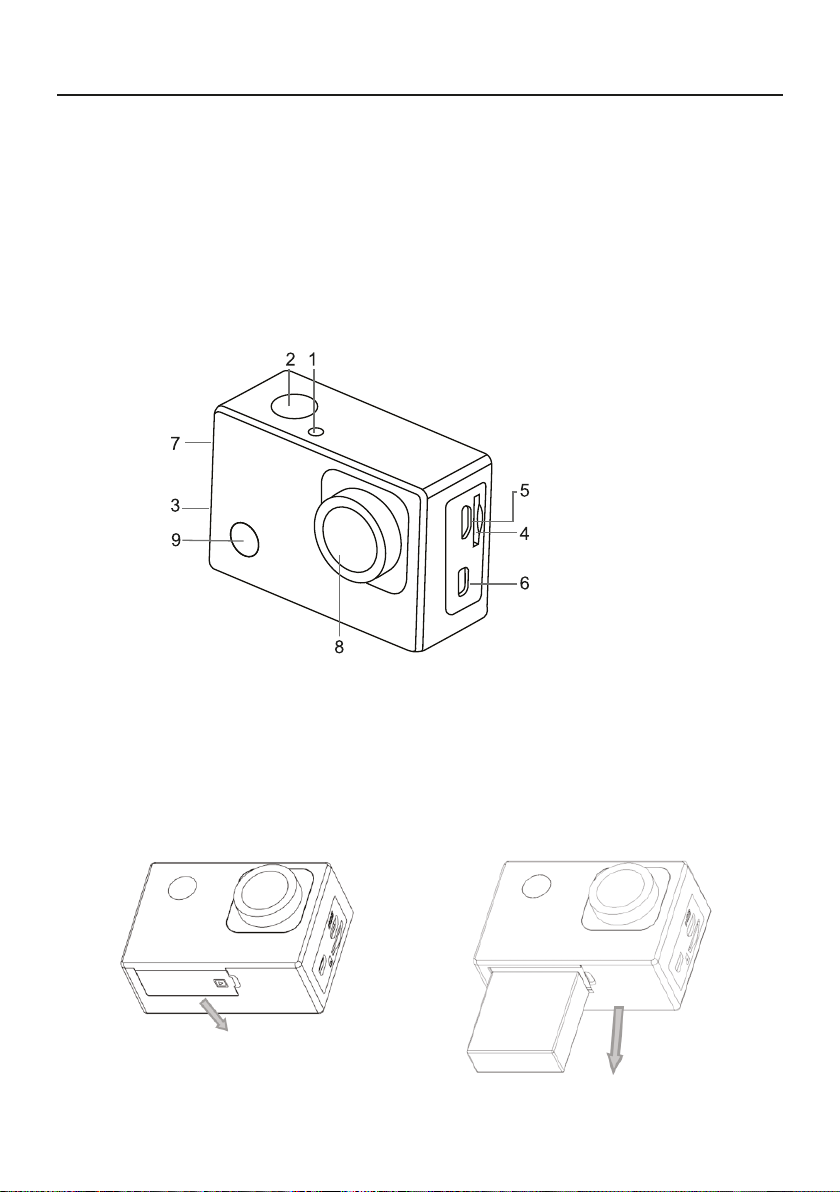
Appearance
1.Ligh indicator
2.Shutter button
3.Sound alert
4.MicroSD card slot
5.Type C port
6.Micro HDMI port
7.Up / down buttons
8.Lens
9.POWER / Mode
Removing the battery from the camera
1.Remove the battery door by
placing your thumb
2.Allow the door to pop out.
Grasp the battery pull-tab and
remove from the camera
BATTERY
15

Start to use
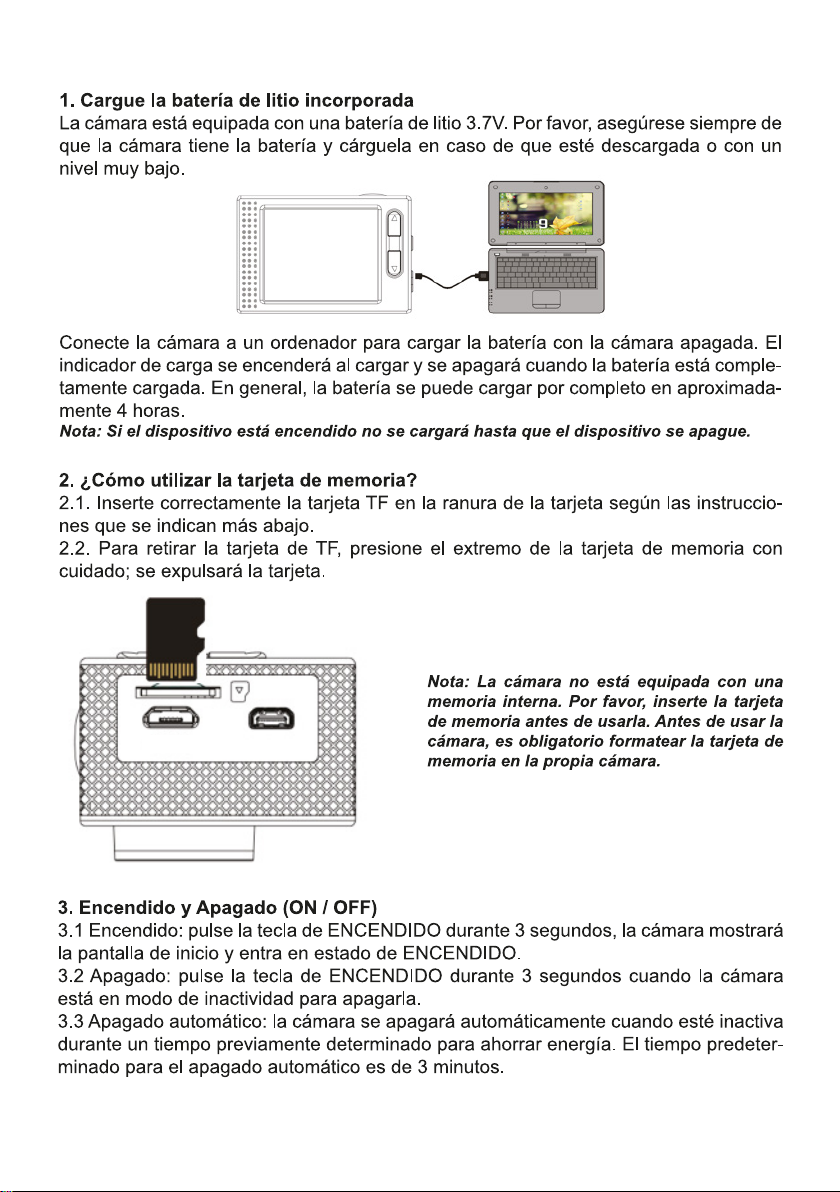
Charge the built-in lithium battery
The camera is equipped with built-in 3.7V lithium battery. Please ensure power available
for the camera and timely charge it in case of low battery.
The
charging indicator will be on when charging, and will be off when the battery is fully
charged. Generally, the battery can be fully charged after about 4 hours.
Note: when the DV is on, it will not charge until the DV turn off.
How to use the memory card
Properly insert the MicroSD card into the card holder as per the instructions indicated
near the card holder.
To remove the MicroSD card, press the end of memory card gently, the card will be
ejected.
Startup and shutdown
Startup: press the POWER key for 3 second, the camera will show startup screen
and enters into POWER ON state;
Shutdown: press the POWER key for 3 second when the camera is under idle mode
to shut down;
Auto shutdown: the camera will be shut down automatically when the camera is
under idle mode for a certain time to save power. The default time for auto shutdown is 3
min.
Shutdown under low power: when the battery is under low power, the LCD will
indicate
the camera will be shutdown automatically.
Function modes switching
The camera has 4 modes: recording mode, photo mode, movement mode and playback
Note: The camera is not equipped with built-in
memory. Please insert memory card before
using. Before using the camera, it is a must to
format the memory card on the camera.
mode. Press the Mode key to switch the modes after starting up.
16

the current video/photo from the SD Card.
Indicators
BUSY indicator: when the camera is working (e.g. recording, photographing, etc.), the
indicator will light;
Charging indicator: when power is off, the lightened indicator means the user is
charging the camera.
Photo/recording/vehicle-mounted/mode
It enters automatically into recording mode.
Press shutter to start recording, and press shutter again to stop recording.
Press mode key to photo mode.
Press mode key to movement mode.
Press shutter to start recording, and press shutter again to stop recording.
Screen display in photo mode Screen display in recording mode
1. Photo Mode. 1. Recording mode.
2. Resolution. 2.Resolution and fps.
3. Photos available. 3.Storage available.
4. Micro SD card 4. Micro SD card.
5. WIFI 5. WIFI.
6. Battery. 6.Battery
7. Date and time. 7. Date and time.
Note: when using the 4k, FHD size or HD video, you must use the MicroSD card at
class 10 or above.
17

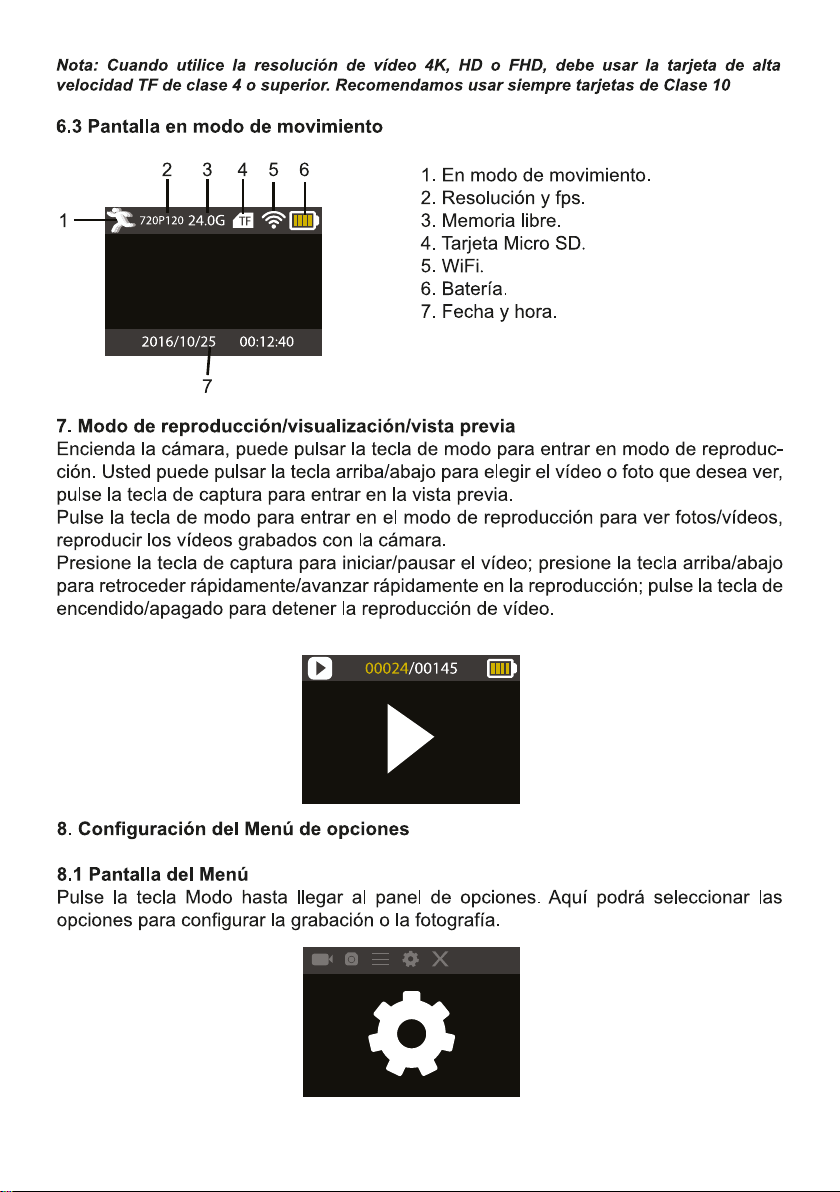
1.movement mode
2.resolution and fps.
3.Storage available.
4.Micro SD card.
5.WIFI.
6.Battery.
7.Date and time.
7.Playback mode
Turn on the camera, you can press the
Screen display in movement mode
mode key to enter playback mode. You can press the up/down key to choose the photo
or video you want to play, then press the shutter key to enter preview.
Press mode key to enter playback mode to browse photo/video, play the video recorded
by this camera.
Play movie: press the shutter key to start/pause play video, press the Up/Down key to
restart quickly/ fast forward playback, press the power key to stop play video.
Menu setting mode
Menu display
Press mode key until enter in options display. Here you can select the different options to
configure your recording or photo.
Recording and photo menu:
18
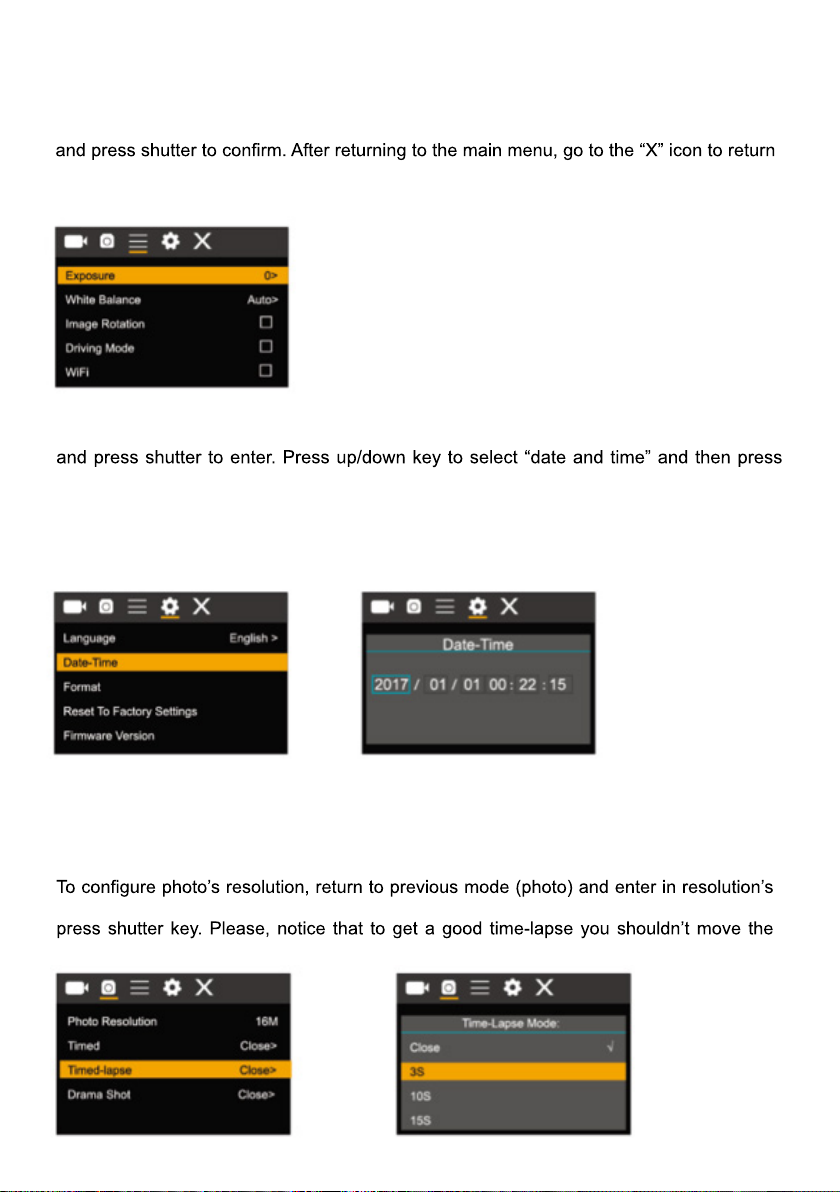
System Configuration menu
After opening the menu by pressing power key, press mode key to switch over to setting
main menu. Press up/down key to select menu, and after that to press shutter key for
confirming to enter the submenu. In the submenu, press up or down key to select menu,
to main menu.
System menu mode:
Setting data and time
Press mode key to open the menu, press mode key again until arrive to the grain icon
shutter to enter.
In setting window, press mode key to select items(date/time) to be adjusted, and then
press up key or down key to make adjustment, press shutter key for conformation at
completion of adjustment or press power key to cancel setting and exit. Finally, press
power key to exit from setting mode
Time-lapse mode settings
To configure the camera into time-lapse mode, enter in setting menu and then select
photo settings. Enter in time-lapse submenu and adjust the shutting time for each photo.
Keep in mind that in PAL-DV mode, to get 1 second in video you will need take 24
photos; and in HD mode 30 photos.
submenu. To start taking pictures, enter in photo mode, put the camera in position and
camera
19
have to rename the photo files to allow your software identify them correctly.
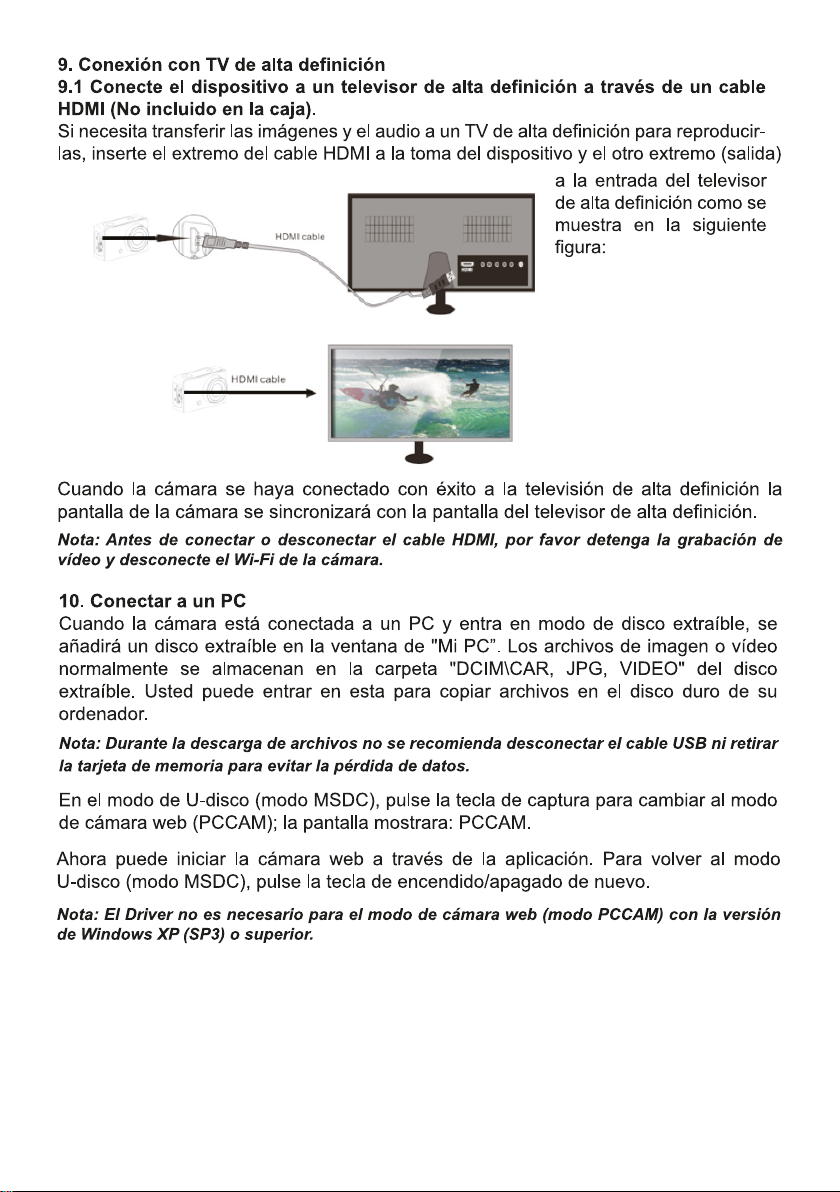
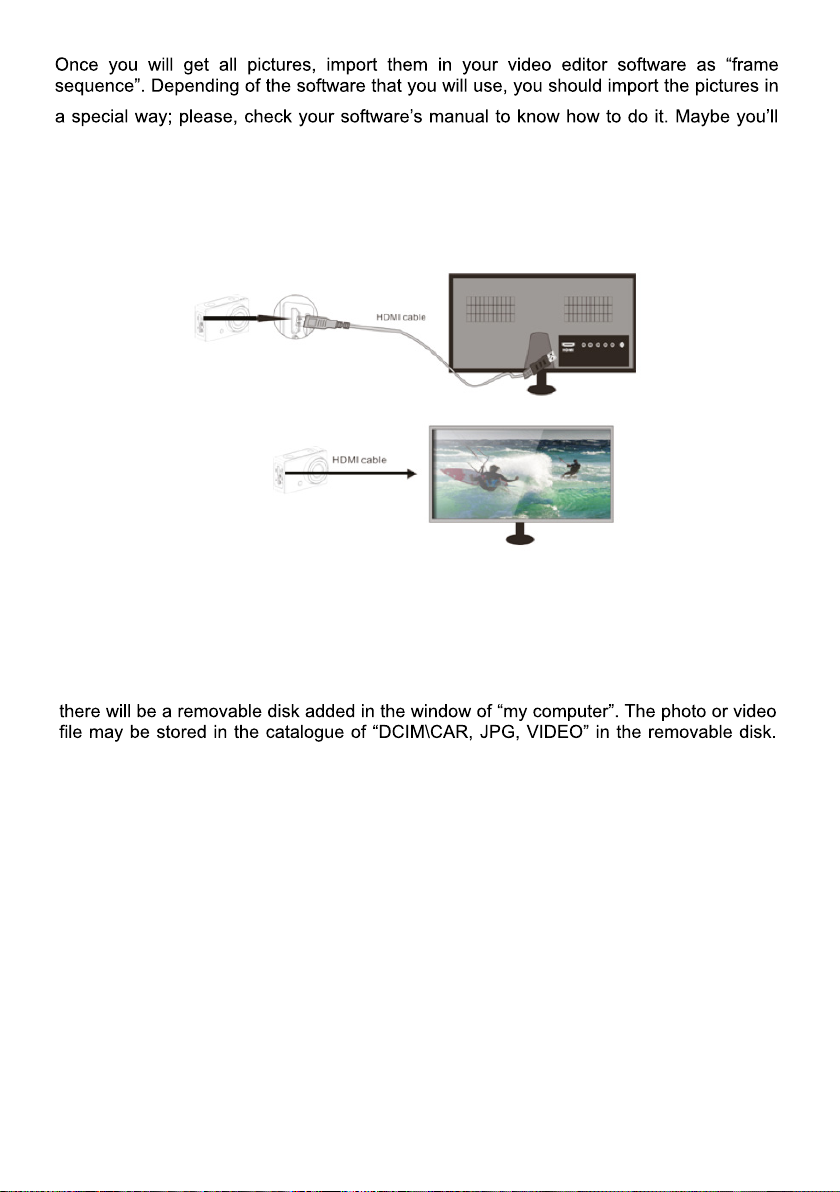
Connecting to HDTV
Connect the DV to HDTV via HDMI cable (optional)
If you need to transfer the image and audio to an HDTV for playback, insert the com end
of the HDMI cable to the DV, and the other end (output) to the HD input of the HDTV, as
shown in the following figure:
When the camera is connected with the HDTV successfully, the camera display is
synchronizing with HDTV display.
Note: before connecting or removing the HDMI cable, please stop video recording
and disconnect WI-FI first.
Connect to PC
When the camera is connected with the computer and entering removable disk mode,
You may enter this catalogue to copy files on to hard disk of your computer.
Note: during file downloading, it is prohibited to disconnect USB connection, and
plugging out the memory card when USB connected is also prohibited to avoid
loss of data.
In U-disk mode (MSDC mode), press the shutter key to switch to web cam mode
(PCCAM) the LCD will display: PCCAM.
Now you can start the web cam through application. To return to U-disk mode (MSDC
mode), press the power key again.
Note: Driver is not required for web cam mode (PCCAM mode) on Windows
XP(SP3) version or above.
20
Table of contents
Other PRIXTON Action Camera manuals


